GE CGP95363M1S2, CGP95362M1S2, CGP95362M1S1, CGP95302M1S2, CGP95302M1S1 Owner’s Manual
...

 TM
TM
Owner's Manual
Built-In Gas Cooktop
Models: CGP9530, CGP9536, CGP7030, and CGP7036
Contents
Safety Information. . . . . . . . . . . . . . . . . . . . . . . . . . . . . . .3
Using The Cooktop
In Case of a Power Failure . . . . . . . . . . . . . . . . . . . . . . .6
Surface Burners . . . . . . . . . . . . . . . . . . . . . . . . . . . . . . . .6
Griddle Accessory . . . . . . . . . . . . . . . . . . . . . . . . . . . . . .8
Care And Cleaning
Cleaning the Glass Cooktop . . . . . . . . . . . . . . . . . . . . . .9
Troubleshooting Tips . . . . . . . . . . . . . . . . . . . . . . . . . . .13
Limited Warranty. . . . . . . . . . . . . . . . . . . . . . . . . . . . . . .14
Accessories . . . . . . . . . . . . . . . . . . . . . . . . . . . . . . . . . . .15
Consumer Support . . . . . . . . . . . . . . . . . . . . . . . . . . . . .16
Write the model and serial numbers here:
Model # _______________________________
Serial # _______________________________
You can find them on a label under the cooktop.
English • Français • Español
49-80840 Rev. 1 03-19 GEA

THANK YOU FOR MAKING CAFÉ A PART OF YOUR HOME.
We take pride in the craftsmanship, innovation and design that goes into every Café product, and we think you will too. Among other things, registration of your appliance ensures that we can deliver important product information and warranty details when you need them.
Register your Café appliance now online. Helpful websites are available in the Consumer Support section of this Owner’s Manual. You may also mail in the pre-printed registration card included in the packing material.


 TM
TM
2 |
49-80840 Rev. 1 |
IMPORTANT SAFETY INFORMATION
READ ALL INSTRUCTIONS BEFORE USING THE APPLIANCE
WARNING Read all safety instructions before using the product. Failure to follow these instructions may result in fire, electrical shock, serious injury or death.
 WARNING If the information in these instructions is not followed exactly, a fire or explosion may result, causing property damage, personal injury or death.
-Do not store or use gasoline or other flammable vapors and liquids in the vicinity of this or any other appliance.
-WHAT TO DO IF YOU SMELL GAS
Ŷ 'R QRW WU\ WR OLJKW DQ\ DSSOLDQFH Ŷ 'R QRW WRXFK DQ\ HOHFWULFDO VZLWFK
Ŷ 'R QRW XVH DQ\ SKRQH LQ \RXU EXLOGLQJ
Ŷ ,PPHGLDWHO\ FDOO \RXU JDV VXSSOLHU IURP D QHLJKERU¶V SKRQH )ROORZ WKH JDV VXSSOLHU¶V LQVWUXFWLRQV
Ŷ ,I \RX FDQQRW UHDFK \RXU JDV VXSSOLHU FDOO WKH ILUH GHSDUWPHQW
-Installation and service must be performed by a qualified installer, service agency or the gas supplier.
 WARNING GENERAL SAFETY INSTRUCTIONS
 WARNING NEVER use this appliance as a space heater to heat or warm the room. Doing so may result in carbon monoxide poisoning and overheating of the oven.
Ŷ 8VH WKLV DSSOLDQFH IRU LWV LQWHQGHG SXUSRVH DV described in this owner’s manual.
Ŷ +DYH \RXU FRRNWRS LQVWDOOHG DQG SURSHUO\ JURXQGHG by a qualified installer in accordance with the provided installation instructions.
Ŷ $Q\ DGMXVWPHQW DQG VHUYLFH VKRXOG EH SHUIRUPHG only by a qualified gas cooktop installer or service technician. Do not attempt to repair or replace any part of your cooktop unless it is specifically recommended in this manual.
Ŷ <RXU FRRNWRS LV VKLSSHG IURP WKH IDFWRU\ VHW IRU XVH with natural gas. It can be converted for use with propane gas. If required, these adjustments must be made by a qualified technician in accordance with the installation instructions and local codes. The agency performing this work assumes responsibility for the conversion.
Ŷ +DYH WKH LQVWDOOHU VKRZ \RX WKH ORFDWLRQ RI WKH cooktop gas shut-off valve and how to turn it off if necessary.
Ŷ 3OXJ \RXU FRRNWRS LQWR D YROW JURXQGHG RXWOHW only. Do not remove the round grounding prong from the plug. If in doubt about the grounding of the home electrical system, it is your responsibility and obligation to have an ungrounded outlet replaced with a properly grounded, three prong outlet in accordance with the National Electrical Code. Do not use an extension cord with this appliance.
Ŷ %HIRUH SHUIRUPLQJ DQ\ VHUYLFH XQSOXJ WKH FRRNWRS or disconnect the power supply at the household distribution panel by removing the fuse or switching off the circuit breaker.
Ŷ %H VXUH DOO SDFNLQJ PDWHULDOV DUH UHPRYHG IURP WKH cooktop before operating to prevent ignition of these materials.
Ŷ $YRLG VFUDWFKLQJ RU LPSDFWLQJ FRRNWRS RU FRQWURO panel. Doing so may lead to glass breakage. Do not cook on a product with broken glass. Shock, fire, or cuts may occur. Contact a qualified technician immediately.
Ŷ 'R QRW UHPRYH WKH EODFN = EUDFNHWV VFUHZHG WR the bottom of the cooktop (on some models).
READ AND SAVE THESE INSTRUCTIONS
INFORMATION SAFETY
49-80840 Rev. 1 |
3 |

SAFETY INFORMATION
IMPORTANT SAFETY INFORMATION
READ ALL INSTRUCTIONS BEFORE USING THE APPLIANCE

 WARNING GENERAL SAFETY INSTRUCTIONS (Cont.)
Ŷ 'R QRW OHDYH FKLOGUHQ DORQH RU XQDWWHQGHG LQ DQ area where an appliance is in use. They should never be allowed to climb, sit or stand on any part of the appliance.
Ŷ |
CAUTION |
Do not store items of interest |
|
to children in cabinets above a cooktop - children |
|
|
climbing on the cooktop to reach items could be |
|
|
seriously injured. |
|
Ŷ 8VH RQO\ GU\ SRW KROGHUV PRLVW RU GDPS SRW holders on hot surfaces may result in burns from steam. Do not let pot holders touch surface burners or burner grate. Do not use a towel or other bulky cloth in place of pot holders.
Ŷ %H FDUHIXO QRW WR WRXFK KRW VXUIDFHV RI WKH FRRNWRS
Ŷ 'R QRW KHDW XQRSHQHG IRRG FRQWDLQHUV 3UHVVXUH could build up and the container could burst, causing an injury.
Ŷ &RRN IRRG WKRURXJKO\ WR KHOS SURWHFW DJDLQVW foodborne illness. Minimum safe food temperature recommendations can be found at IsItDoneYet.gov and fsis.usda.gov 8VH D IRRG WKHUPRPHWHU WR WDNH food temperatures and check several locations.
WARNING KEEP FLAMMABLE MATERIALS AWAY FROM THE COOKTOP
Failure to do so may result in fire or personal injury.
Ŷ 'R QRW VWRUH RU XVH IODPPDEOH PDWHULDOV QHDU the cooktop, including paper, plastic, pot holders,
linens, wall coverings, curtains, drapes and gasoline or other flammable vapors and liquids.
Ŷ 1HYHU ZHDU ORRVH ILWWLQJ RU KDQJLQJ JDUPHQWV ZKLOH using the cooktop. These garments may ignite if they contact hot surfaces causing severe burns.
Ŷ 'R QRW OHW FRRNLQJ JUHDVH RU RWKHU IODPPDEOH materials accumulate in or near the cooktop. Grease on the cooktop may ignite.
 WARNING IN THE EVENT OF A FIRE, TAKE THE FOLLOWING STEPS TO PREVENT INJURY AND FIRE SPREADING
Ŷ 'R QRW XVH ZDWHU RQ JUHDVH ILUHV 1HYHU SLFN XS D IODPLQJ SDQ 7XUQ WKH FRQWUROV RII 6PRWKHU D IODPLQJ SDQ
RQ D VXUIDFH XQLW E\ FRYHULQJ WKH SDQ FRPSOHWHO\ ZLWK D ZHOO ILWWLQJ OLG FRRNLH VKHHW RU IODW WUD\ 8VH D PXOWL purpose dry chemical or foam-type fire extinguisher.
READ AND SAVE THESE INSTRUCTIONS
4 |
49-80840 Rev. 1 |

IMPORTANT SAFETY INFORMATION
READ ALL INSTRUCTIONS BEFORE USING THE APPLIANCE

 WARNING COOKTOP SAFETY INSTRUCTIONS
Ŷ 1HYHU OHDYH WKH VXUIDFH EXUQHUV XQDWWHQGHG DW medium or high heat settings. Foods, especially oily foods, may ignite resulting in fire that could spread to surrounding cabinets.
Ŷ 1HYHU OHDYH RLO XQDWWHQGHG ZKLOH IU\LQJ ,I DOORZHG to heat beyond its smoking point, oil may ignite resulting in fire that may spread to surrounding
FDELQHWV 8VH D GHHS IDW WKHUPRPHWHU ZKHQHYHU possible to monitor oil temperature.
Ŷ 7R DYRLG RLO VSLOORYHU DQG ILUH XVH WKH PLQLPXP amount of oil when using a shallow pan-frying and avoid cooking frozen foods with excessive amounts of ice.
Ŷ 8VH SURSHU SDQ VL]H DQG DYRLG SDQV WKDW DUH unstable or easily tipped. Select cookware that is matched to the size of the burner. Burner flames should be adjusted so that they do not extend beyond the bottom of the pan. Excessive flame may be hazardous.
Ŷ $OZD\V XVH WKH /,7( SRVLWLRQ ZKHQ LJQLWLQJ WKH WRS burners and make sure the burners have ignited.
Ŷ :KHQ XVLQJ JODVV FHUDPLF FRRNZDUH PDNH VXUH LW is suitable for cooktop service; others may break because of sudden change in temperature.
Ŷ 7R PLQLPL]H WKH SRVVLELOLW\ RI EXUQV LJQLWLRQ RI flammable materials and spillage, the handle of a container should be turned toward the center of the cooktop without extending over nearby burners.
Ŷ 'R QRW XVH D ZRN ZLWK D URXQG PHWDO VXSSRUW ULQJ
The ring may trap heat and block air to the burner resulting in a carbon monoxide hazard.
Ŷ 'R QRW DWWHPSW WR OLIW WKH FRRNWRS 'RLQJ VR PD\ damage the gas tubing to the surface burners resulting in a gas leak and risk of fire.
Ŷ :KHQ GLVDEOLQJ JDV ORFNRXW RQ VRPH PRGHOV make sure the surface controls are set to the OFF position. This will prevent unintended gas flow from the burners.
Ŷ 'R QRW XVH DOXPLQXP IRLO WR FRYHU WKH JUDWHV RU line any part of the cooktop. Doing so may result in carbon monoxide poisoning, overheating of the cooktop surfaces, or a potential fire hazard.
STATE OF CALIFORNIA PROPOSITION 65 WARNINGS

 WARNING This product contains one or more chemicals known to the State of California to cause cancer, birth defects or other reproductive harm.
Gas appliances can cause low-level exposure to some of these substances, including benzene, carbon monoxide, formaldehyde and soot, caused primarily by incomplete combustion of natural gas or propane fuels. Exposure to these substances can be minimized by opening a window or using a ventilation fan or hood.
How to Remove Protective Shipping Film and Packaging Tape
Carefully grasp a corner of the protective shipping film with your fingers and slowly peel it from the appliance surface. Do not use any sharp items to remove the film. Remove all of the film before using the appliance for the first time.
To assure no damage is done to the finish of the product, the safest way to remove the adhesive from packaging tape on new appliances is an application of a household liquid dishwashing detergent. Apply with a soft cloth and allow to soak.
NOTE: The adhesive must be removed from all parts. It cannot be removed if it is baked on.
INFORMATION SAFETY
READ AND SAVE THESE INSTRUCTIONS
49-80840 Rev. 1 |
5 |
USING THE COOKTOP: ,Q &DVH RI D 3RZHU )DLOXUH 6XUIDFH %XUQHUV
In Case of a Power Failure
In the event of a power failure, the surface burners may |
WKHQ VORZO\ WXUQ WKH NQRE WR WKH /,7( SRVLWLRQ 2QFH OLW |
EH OLW ZLWK D PDWFK 8VLQJ H[WUHPH FDXWLRQ KROG D OLW |
surface burners will continue to operate normally. |
match near the ports beneath the surface burner cap, |
|
Surface Burners |
|
Lighting a Surface Burner
 WARNING Burners should be operated only when covered by cookware. Burner flames not covered by cookware present a risk of fire or clothing ignition. Never let flames extend beyond the sides of the cookware. Failure to comply may result in serious injury.
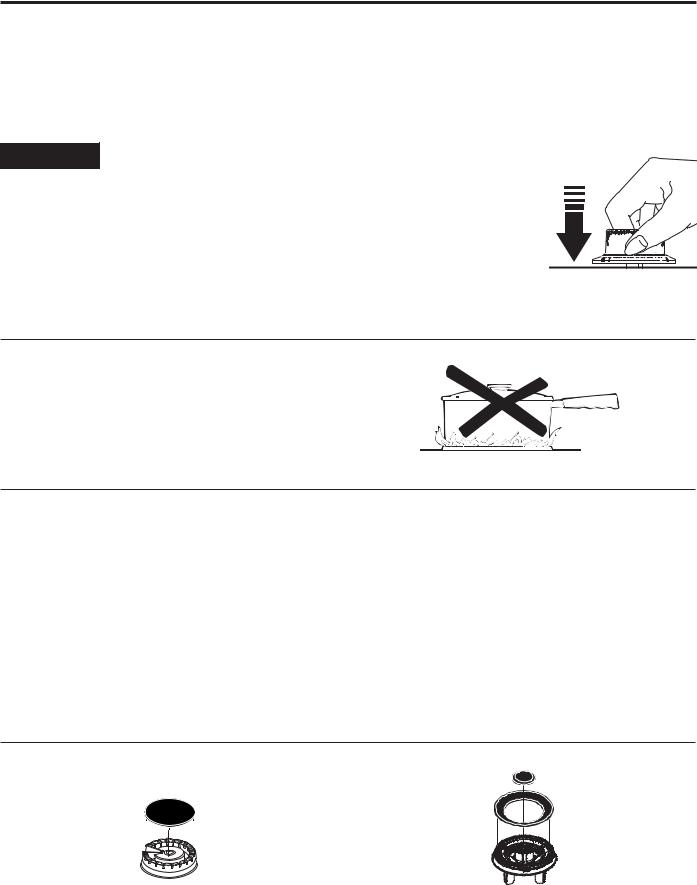
Make sure all burners are in their correct locations and fully assembled before attempting to operate any burner.
Select a burner and find its control knob. Push the knob
LQ DQG WXUQ LW WR WKH /,7( SRVLWLRQ
<RX ZLOO KHDU D FOLFNLQJ QRLVH the sound of the electric spark igniting the burner. When one
EXUQHU LV WXUQHG WR /,7( DOO burners will spark. Sparking will continue as long as the knob
UHPDLQV DW /,7( 2QFH JDV LV ignited, turn the knob to adjust the flame size.
Push the control knob in and
WXUQ LW WR WKH /,7( SRVLWLRQ
Selecting a Flame Size
Watch the flame, not the knob, as you adjust heat. When rapid heating is desired, the flame size should match the size of the cookware you are using. Flames larger than the bottom of the cookware will not heat faster and may be hazardous.
These flames are too large for the pot
Using the Surface Burners
NOTES:
Ŷ 'R QRW RSHUDWH WKH EXUQHU IRU DQ H[WHQGHG SHULRG RI time without cookware on the grate. The finish on the grate may discolor or chip without cookware to absorb the heat.
Ŷ 'R QRW DWWHPSW WR GLVDVVHPEOH DQ\ EXUQHU ZKLOH another burner is on. Damage to the product may occur.
Ŷ %H VXUH WKH EXUQHUV DQG JUDWHV DUH FRRO EHIRUH \RX place your hand, a pot holder or cleaning materials on them.
Your cooktop has sealed gas burners that offer convenience, cleanability and flexibility for a wide range of cooking applications.
The smallest burner is the simmer burner. A simmer
EXUQHU WXUQHG GRZQ WR /2 SURYLGHV SUHFLVH FRRNLQJ performance for foods such as delicate sauces that require low heat for a long cooking time.
The extra-large burner is designed to quickly bring large amounts of liquid to a boil. Some models have a
32:(5 %2,/ VHWWLQJ HVSHFLDOO\ GHVLJQHG IRU XVH ZLWK cookware with a diameter of 11 inches or larger.
Types of Surface Burners
Round Burner (on some models) |
Multi-Ring Burner (on some models) |
8VH WKLV EXUQHU IRU JHQHUDO FRRNLQJ SXUSRVHV |
8VH WKLV EXUQHU IRU ODUJH FRRNZDUH RU IRU VLPPHULQJ DSSOLFDWLRQV |
Size cookware appropriately to the flames. |
|
6 |
49-80840 Rev. 1 |
Surface Burners (Cont.)
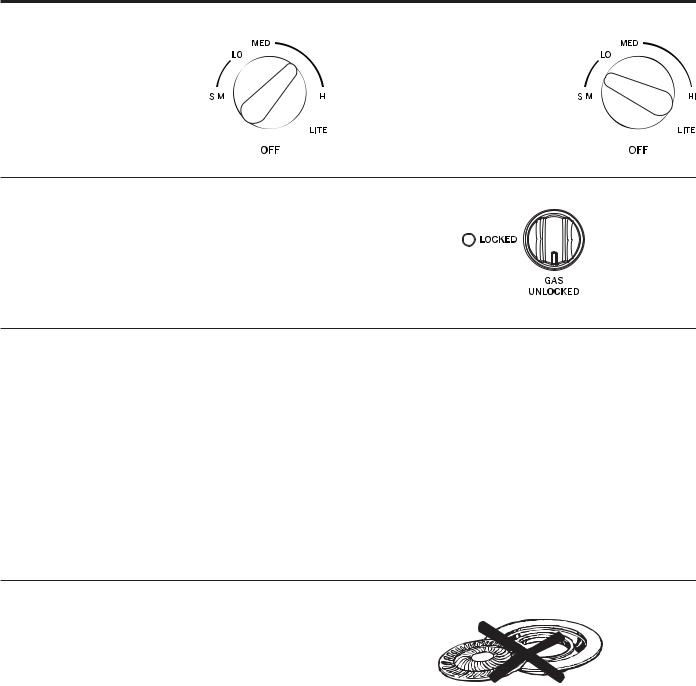
Multi-Ring Burner (some models)
For large cookware, activate |
|
|
|
|
For small cookware or low heating |
|
||
all rings by setting the burner |
|
|
|
|
applications, only activate the inner |
|
||
between Hi and Med. |
|
|
|
|
rings by setting the burner between |
|
||
|
|
|
|
|
/R DQG 6LP |
|
|
|
|
|
|
|
|||||
|
|
|
|
|
|
|
|
|
|
|
|
|
|
|
|
|
|
Control Lock (on some models)
To lock the cooktop and prevent unwanted use, turn the control lock knob clockwise to Locked. An indicator light will illuminate when the cooktop is locked. When locked, gas flow to the burners is prevented. Burners will spark if a knob is turned, but will not ignite.
To unlock, turn the control lock knob to Unlocked.
Cooktop Cookware
Aluminum: Medium-weight cookware is recommended because it heats quickly and evenly. Most foods brown
HYHQO\ LQ DQ DOXPLQXP VNLOOHW 8VH VDXFHSDQV ZLWK WLJKW fitting lids when cooking with minimum amounts of water.
Stainless Steel: This metal alone has poor heating properties and is usually combined with copper, aluminum or other metals for improved heat distribution. Combination metal skillets usually work satisfactorily if they are used with medium heat or as the manufacturer recommends.
Cast-Iron: If heated slowly, most skillets will give satisfactory results.
Enamelware: 8QGHU VRPH FRQGLWLRQV WKH HQDPHO of some cookware may melt. Follow the cookware
manufacturer’s recommendations for cooking methods.
Glass: 7KHUH DUH WZR W\SHV RI JODVV FRRNZDUH WKRVH for oven use only and those for surface burner cooking (saucepans, coffee and teapots). Glass conducts heat very slowly.
Heatproof Glass Ceramic: Can be used for either surface or oven cooking. It conducts heat very slowly and cools very slowly. Check the cookware manufacturer’s directions to be sure it can be used on gas surface burners.
Stove Top Grills
Do not use an after-market stove top grill on your
gas surface burners. A stove top grill will cause incomplete combustion resulting in carbon monoxide levels above allowable standards. This could be hazardous to your health.
Do not use stove top grills
Burners Surface COOKTOP: THE USING
49-80840 Rev. 1 |
7 |
USING THE COOKTOP: Griddle Accessory
Griddle Accessory (available on some models)
 CAUTION Fire Hazard
Ŷ 8VH FDUH ZKHQ FRRNLQJ JUHDV\ IRRGV 6SLOOHG JUHDVH PD\ UHVXOW LQ ILUH
Ŷ 1HYHU SODFH DQ\ LWHPV RQ WKH JULGGOH ZKHQ LW LV QRW LQ XVH +HDW IURP VXUURXQGLQJ EXUQHUV FDQ KHDW the griddle and may result in fire.
Ŷ 3ODFH DQG UHPRYH WKH JULGGOH RQO\ ZKHQ JULGGOH LV FRRO DQG DOO VXUIDFH EXUQHUV DUH WXUQHG 2II
Using Your Cast-Iron Griddle (on some models)
Your griddle provides an extra-large cooking surface for meats, pancakes and other foods usually prepared in a skillet. Before first use, rinse with hot water and dry thoroughly. Prepare the surface with cooking spray or vegetable oil.
Griddle Precautions:
Ŷ 'R QRW SODFH WKH JULGGOH LQ D PLFURZDYH RYHQ Ŷ 'R QRW FOHDQ \RXU JULGGOH LQ WKH GLVKZDVKHU
Ŷ ,I VRPHWKLQJ KDV VSLOOHG XQGHU WKH JULGGOH LW VKRXOG EH cleaned up as soon as possible to prevent “baked on” food soil.
Ŷ 'R QRW DOORZ JUHDVH WR DFFXPXODWH XQGHU WKH JULGGOH as it can be a fire hazard. Clean under the griddle with hot, soapy water as soon as it is cool.
Positioning Your Griddle
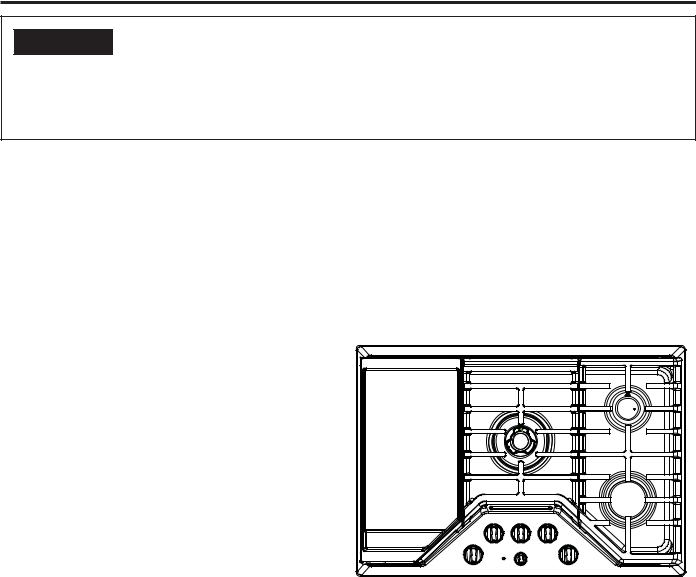
The cast-iron griddle (on some models) can only be used over the left burners of the cooktop. To position the griddle, place the griddle on top of the left grate. Adjust the griddle until it is fully seated and sitting flat on the grate below. Do not turn on the left burners until you are certain the griddle has been positioned correctly.
Preheating Your Griddle
Preheat your griddle by setting both left burners to Hi for 5 minutes before placing food on the griddle. Once the griddle is preheated, turn the knob on each left burner to the griddle zone and use the cook setting outlined in the table below.
Preseasoned Cast-Iron Griddle
Type of Food |
Cook Setting |
Bacon |
Med |
%UHDNIDVW 6DXVDJH /LQNV |
Med |
Eggs |
/R |
Grilled Cheese |
0HG /R |
Hamburgers |
0HG /R |
Pancakes |
0HG /R |
Warming Tortillas |
/R |
Cook settings may need to be reduced if the griddle is used for an extended time.
8 |
49-80840 Rev. 1 |

Cleaning the Cooktop
Cooktop Surface
Do not use oven cleaners, abrasive cleansers, strong liquid cleansers, steel wool, plastic scouring pads, or cleaning powders on the cooktop surface. Clean with a
PLOG VRDS DQG ZDWHU RU D VROXWLRQ RI YLQHJDU DQG water. Rinse with clean water and dry with a soft cloth. When cleaning surfaces, make sure that they are at room temperature and not in direct sunlight.
Spillage of marinades, fruit juices, tomato sauces and basting liquids containing acids may cause discoloration and should be wiped up as soon as hot surfaces cool, then clean and rinse.
Stainless Steel Surfaces (on some models)
Do not use a steel wool pad; it will scratch the surface.
To clean the stainless steel surface, use warm sudsy water or a stainless steel cleaner or polish. Always wipe the surface in the direction of the grain. Follow the cleaner instructions for cleaning the stainless steel surface.
Cleaners with oxalic acid such as Bar Keepers Friend
6RIW &OHDQVHU ZLOO UHPRYH VXUIDFH UXVW WDUQLVK DQG
VPDOO EOHPLVKHV 8VH RQO\ D OLTXLG FOHDQVHU IUHH RI JULW and rub in the direction of the brush lines with a damp, soft sponge.
To inquire about purchasing cleaning products including stainless steel appliance cleaner or polish, see the Accessories and Consumer Support sections at the end of this manual.
Cleaning Knobs
For easier cleaning, the control knobs may be removed by pulling them directly upwards once the knobs are in the OFF position. The knobs can be washed by hand with soap and water or in a dishwasher.
To replace knobs after cleaning, align the hole on the knob backside with the gas valve shaft and push downward until the knob is securely fastened. All knobs are interchangeable except control lockout (on some models).
Pull the knob straight up off the stem.
Cooktop the Cleaning CLEANING: AND CARE
49-80840 Rev. 1 |
9 |
CARE AND CLEANING: Cleaning the Cooktop
Cleaning the Cooktop (Cont.)
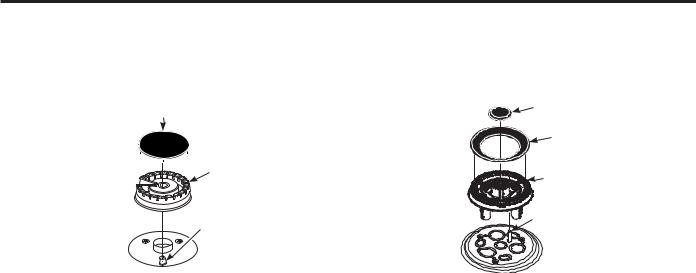
Removal of Surface Burners for Cleaning
Turn all controls OFF. Allow cooktop to cool before removing grates and burner parts. When removing the burner caps and heads, remember their size and location. Replace them in the same location after cleaning.
Round Burner Cap |
Cap |
|
(Removable) |
||
|
||
|
Cap |
|
Round Burner |
Burner |
|
Head |
||
|
||
Electrode |
Electrode |
|
|
Round Burner |
Multi-Ring Burner |
10 |
49-80840 Rev. 1 |
Cleaning the Cooktop (Cont.)
Cleaning the Surface Burners
Cleaning the Burner Caps
Wash burner caps in hot, soapy water and rinse with clean water. You may scour with a plastic scouring pad to remove burned-on food particles. The round burner caps may also be cleaned in your dishwasher.
Cleaning the Burner Heads
Wash the burner heads routinely, especially after bad
VSLOORYHUV ZKLFK FRXOG FORJ WKH EXUQHU RSHQLQJV /LIW burners off when cool. Wash with hot, soapy water. Rinse with clean water. For more stubborn stains, use a brush with plastic bristles.
NOTE: Do not use steel wool or scouring pads to clean the burner parts as these may clog the openings. Never wash burner heads in your dishwasher. Doing so may cause them to discolor.
The ports in the burner heads must be kept clean at all times for an even, unhampered flame.
Clogged or dirty burner ports or electrodes will not allow the burner to operate properly.
Replacing Surface Burners
Before replacing WKH EXUQHU FDSV KHDGV DQG RYDO KHDG cap assembly, shake out excess water and allow them to dry thoroughly.
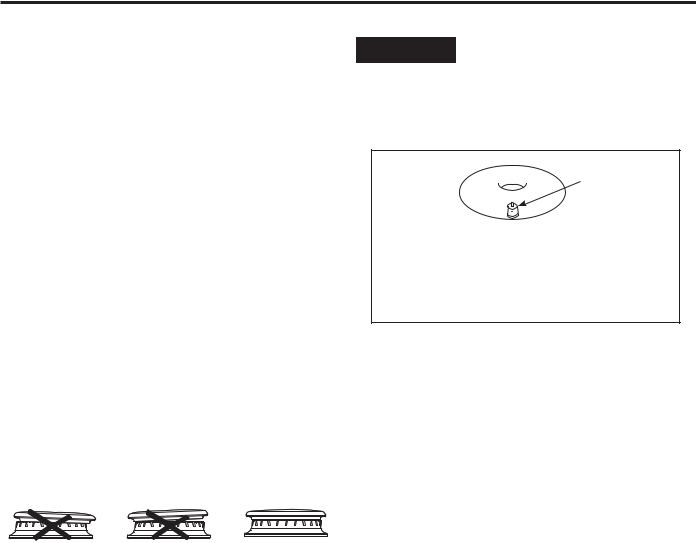
Replace burner heads in the correct locations according to size. Ensure each cap is properly seated on the burner head, as pictured below.

 CAUTION Do not operate the cooktop without all burner parts and grates in place.
Any spill on or around an electrode must be carefully cleaned. Avoid hitting the electrode with anything hard or it could be damaged.


 Electrode
The electrode of the spark igniter is exposed when the burner head is removed. When one
EXUQHU LV WXUQHG WR /,7( DOO WKH EXUQHUV VSDUN
Do not attempt to disassemble or clean around any burner while another burner is on.
Burner cap is |
Burner cap is |
Burner cap is |
NOT properly seated. |
NOT properly seated. |
properly seated. |
Cooktop the Cleaning CLEANING: AND CARE
49-80840 Rev. 1 |
11 |
CARE AND CLEANING: Cleaning the Cooktop
Cleaning the Cooktop (Cont.)
Burner Grates
Manual Cleaning
Grates should be washed in hot, soapy water and rinsed with clean water. To soften burned-on food, place grates in a solution containing ¼-cup of household ammonia for several hours. Afterward, scrub grates with a plastic scouring pad soaked in hot, soapy water. Rinse well and dry.
Oven Cleaning
Some models have grates that can be cleaned in a selfcleaning oven. If grates do NOT have rubber bumpers (pads) attached to the bottom of the grates, they may be cleaned in the oven using the self-clean cycle. See your oven's Owner's Manual for specific instructions. If self-cleaning instructions are not mentioned in Owner's Manual, the grates should not be cleaned in a selfcleaning oven.
Dishwasher Cleaning
The grates may be cleaned in the dishwasher. Remove any burnt-on food particles prior to placing the grates in the dishwasher. Place them on the lowest rack of the dishwasher and run on a "heavy duty" cycle.
Do not operate a burner for an extended period of time without cookware on the grate. The finish on the grate may chip without cookware to absorb the heat.
Although the grates are durable, they will gradually lose their shine, regardless of the best care you can give them. This is due to their continual exposure to high temperatures and abrasion by the cookware.
NOTE: 8VH FDXWLRQ ZKHQ UHPRYLQJ WKH JUDWHV IURP WKH oven after the self-clean cycle has ended. The grates may still be hot.
Once the self-clean cycle is complete, the grates may carefully be removed. You may notice a white residue on the grates. Wipe it off with a damp sponge. If white spots
SHUVLVW ZHW WKH VSRQJH ZLWK D VROXWLRQ RI YLQHJDU and water and wipe the grates again.
When replacing the grates on the cooktop, be sure to locate them correctly. Grates should fit securely into the cooktop.
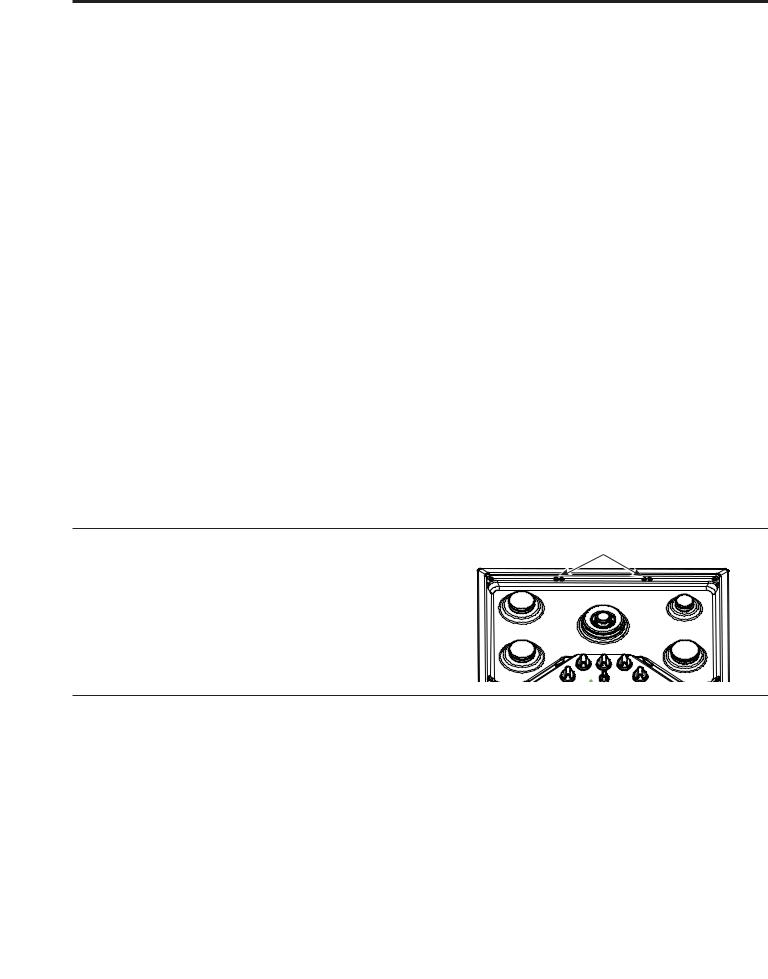
Grate Support Bumpers (on some models) |
Grate Support Bumpers |
If any of the rubber grate support bumpers in the cooktop are missing or damaged, replacement parts can be obtained by visiting cafeappliances.com/part.
To insert the new bumpers, simply place the coneshaped end of the bumper into the hole in the cooktop and push down while gently twisting the bumper.
Griddles (on some models)
Cast-Iron: Clean your cast-iron griddle with a stiff
EUXVK DQG KRW ZDWHU 8VLQJ VRDS LV QRW UHFRPPHQGHG and harsh detergents should never be used as they will remove the seasoning. Rinse with hot water and dry thoroughly. After rinsing, preseason the griddle by applying a light coat of cooking oil to the griddle surface. Wipe off excess oil with a paper towel.
Store in a cool, dry place.
Griddle Precautions:
Ŷ If something has spilled under the griddle, it should be cleaned up as soon as possible to prevent the spill from getting baked onto the cooktop.
Ŷ Do not allow grease to accumulate under the griddle as it can be a fire hazard. Clean under the griddle with hot, soapy water as soon as it is cool.
Ŷ Do not wash your griddle in the dishwasher.
Ŷ 'R QRW FOHDQ WKH JULGGOH LQ WKH VHOI FOHDQLQJ RYHQ
12 |
49-80840 Rev. 1 |

Troubleshooting Tips ... Before you schedule service
Save time and money! Review the charts on the following pages first and you may not need to schedule service.
Problem |
Possible Causes |
What To Do |
|||
Burners have |
The combustion quality of |
Determine the quality of flames visually. Normal burner flames should |
|||
yellow or yellow- |
burner flames needs to be |
look like (A) or (B). |
|||
tipped flames |
determined visually. |
/RQJ EULJKW \HOORZ IODPHV DUH QRW QRUPDO 1RUPDO IODPHV PD\ VKRZ |
|||
|
|
signs of an orange tint when well heated or signs of flickering orange |
|||
|
|
due to particles in the gas or air. |
|||
|
|
|
|
(A) Soft blue flames— |
|
|
|
|
|
||
|
|
|
|
Normal for natural gas |
|
|
|
|
|
(B) Yellow tips on |
|
|
|
|
|
||
|
|
|
|
||
|
|
|
|
outer cones— |
|
|
|
|
|
Normal for propane gas |
|
|
|
|
|
|
|
|
|
|
|
|
|
Control knobs will |
Knob isn’t pushed down. |
To turn from the OFF position, push the knob down and then turn. |
|||
not turn |
|
|
|
|
|
Burners do not light |
Plug on cooktop is not |
Make sure electrical plug is plugged into a live, properly grounded |
|||
|
completely inserted in the |
outlet. |
|||
|
electrical outlet. |
|
|
|
|
|
Gas supply not connected or |
See the Installation Instructions that came with your cooktop. |
|||
|
turned on. |
|
|
|
|
|
A fuse in your home may be |
Replace the fuse or reset the circuit breaker. |
|||
|
blown or the circuit breaker |
|
|
|
|
|
tripped. |
|
|
|
|
|
Burner parts not replaced |
See the Cleaning the Cooktop section. |
|||
|
correctly. |
|
|
|
|
|
The electrodes under the |
See the Cleaning the Cooktop section. |
|||
|
burners are soiled. |
|
|
|
|
|
Cooktop is locked. |
8QORFN WKH FRRNWRS 6HH WKH 8VLQJ WKH &RRNWRS VHFWLRQ |
|||
|
The igniter hole (on some |
See the Cleaning the Cooktop section. |
|||
|
models) is plugged. |
|
|
|
|
Ticking sound of |
Control knob is still in the |
Turn the knob out of the LITE position to the desired setting. |
|||
igniter persists after |
/,7( SRVLWLRQ |
|
|
|
|
Turn the burner off and relight. If ticking is still present, call for service. |
|||||
burner lights |
|
||||
|
|
|
|
||
Top burners do not |
Improper burner assembly. |
Make sure the burner caps are seated correctly. See the Care and |
|||
burn evenly |
|
Cleaning of the range section. |
|||
|
Burner slots on the side of the |
Remove the burners for cleaning. See the Care and Cleaning of the |
|||
|
burner may be clogged. |
range section. |
|||
TIPS TROUBLESHOOTING
49-80840 Rev. 1 |
13 |

LIMITED WARRANTY
Proof of the original purchase |
service under the warranty. |
your receipt here. |
needed to obtain |
Staple |
date is |
|
|
Café Gas Cooktop Limited Warranty
cafeappliances.com
All warranty service is provided by our Factory Service Centers, or an authorized service technician. To schedule service online, visit us at cafeappliances.com/service. Please have your serial number and your model number available when scheduling service.
Servicing your appliance may require the use of the onboard data port for diagnostics. This gives a Café factory service technician the ability to quickly diagnose any issues with your appliance and helps Café improve its products by providing Café with information on your appliance. If you do not want your appliance data to be sent to Café, please advise your technician not to submit the data to Café at the time of service.
For the period of |
Café will replace |
One year |
Any part of the cooktop which fails due to a defect in materials or workmanship. During this |
From the date of the |
limited one-year warranty, Café will provide, free of charge, all labor and in-home service |
original purchase |
to replace the defective part. |
What Café will not cover:
ŶService trips to your home to teach you how to use the product.
Ŷ ,PSURSHU LQVWDOODWLRQ GHOLYHU\ RU PDLQWHQDQFH
Ŷ )DLOXUH RI WKH SURGXFW LI LW LV DEXVHG PLVXVHG modified or used for other than the intended purpose or used commercially.
Ŷ 'DPDJH WR WKH JODVV FRRNWRS FDXVHG E\ XVH RI cleaners other than the recommended cleaning creams and pads.
Ŷ 'DPDJH WR WKH JODVV FRRNWRS FDXVHG E\ KDUGHQHG spills of sugary materials or melted plastic that are not cleaned according to the directions in the Owner’s Manual.
Ŷ 5HSODFHPHQW RI KRXVH IXVHV RU UHVHWWLQJ RI FLUFXLW breakers.
Ŷ 'DPDJH WR WKH SURGXFW FDXVHG E\ DFFLGHQW ILUH floods or acts of God.
Ŷ ,QFLGHQWDO RU FRQVHTXHQWLDO GDPDJH FDXVHG E\ possible defects with this appliance.
Ŷ 'DPDJH FDXVHG DIWHU GHOLYHU\
Ŷ 3URGXFW QRW DFFHVVLEOH WR SURYLGH UHTXLUHG VHUYLFH Ŷ 6HUYLFH WR UHSDLU RU UHSODFH OLJKW EXOEV H[FHSW IRU
/(' ODPSV
ŶDamage to finish, such as surface rust, tarnish, or small blemishes not reported within 48 hours of delivery.
EXCLUSION OF IMPLIED WARRANTIES
<RXU VROH DQG H[FOXVLYH UHPHG\ LV SURGXFW UHSDLU DV SURYLGHG LQ WKLV /LPLWHG :DUUDQW\ $Q\ LPSOLHG ZDUUDQWLHV including the implied warranties of merchantability or fitness for a particular purpose, are limited to one year or the shortest period allowed by law.
This limited warranty is extended to the original purchaser and any succeeding owner for products purchased for home
XVH ZLWKLQ WKH 86$ ,I WKH SURGXFW LV ORFDWHG LQ DQ DUHD ZKHUH VHUYLFH E\ D &DIp$XWKRUL]HG 6HUYLFHU LV QRW DYDLODEOH \RX may be responsible for a trip charge or you may be required to bring the product to an Authorized Café Service location for service. In Alaska, the limited warranty excludes the cost of shipping or service calls to your home.
Some states do not allow the exclusion or limitation of incidental or consequential damages. This limited warranty gives you specific legal rights, and you may also have other rights which vary from state to state. To know what your legal rights are, consult your local or state consumer affairs office or your state’s Attorney General.
Warrantor: GE Appliances, a Haier company
/RXLVYLOOH .<
Warrantor in Canada: MC Commercial
%XUOLQJWRQ 21 / 5 %
Extended Warranties: Purchase a Café extended warranty and learn about special discounts that are available while your warranty is still in effect. You can purchase it online anytime at
cafeappliances.com/extended-warranty
Café Service will still be there after your warranty expires.
14 |
49-80840 Rev. 1 |

Accessories
Looking For Something More?
Café offers a variety of accessories to improve your cooking and maintenance experiences!
Refer to the Consumer Support page for phone numbers and website information.
The following products and more are available:
Cleaning Supplies
CitruShine Stainless Steel Wipes
Stainless Steel Polishing Cloth
Cerama Bryte® Burnt-On Grease Remover
ACCESSORIES
49-80840 Rev. 1 |
15 |
 Loading...