


GE CGS995SEL1SS, CGS990SET9SS, CGS990SET8SS, CGS990SET7SS, CGS990SET6SS Owner’s Manual
...RangeDouble Oven Self-Cleaning Gas
Safety Information . . . . . . . . . . . .3
Using The Cooktop
Surface Burners . . . . . . . . . . . . . . . . . . .8
Griddle. . . . . . . . . . . . . . . . . . . . . . . . . .10
Using The Oven
Oven Controls . . . . . . . . . . . . . . . . . . . .11
Oven Air Vents . . . . . . . . . . . . . . . . . . .12
Special Features . . . . . . . . . . . . . . . . . .12
Oven Racks. . . . . . . . . . . . . . . . . . . . . .14
Cookware . . . . . . . . . . . . . . . . . . . . . . .14
Cooking Modes . . . . . . . . . . . . . . . . . . .15
Upper Oven . . . . . . . . . . . . . . . . . . . . . .16
Aluminum Foil and Oven Liners . . . . . .16
Cooking Guide. . . . . . . . . . . . . . . . . . . .17
Care and Cleaning
Oven . . . . . . . . . . . . . . . . . . . . . . . . . . .18
Cooktop . . . . . . . . . . . . . . . . . . . . . . . . .20
Door. . . . . . . . . . . . . . . . . . . . . . . . . . . .23
Oven Light . . . . . . . . . . . . . . . . . . . . . . .23
Lower Oven Door . . . . . . . . . . . . . . . . .24
Upper Oven Door . . . . . . . . . . . . . . . . .24
Troubleshooting Tips. . . . . . . .25
Warranty . . . . . . . . . . . . . . . . . . . . .30
Accessories. . . . . . . . . . . . . . . . . .31
Consumer Support . . . . . . . . . .32
Write the model and serial numbers here:
Model # ________________
Serial # ________________
You can find them on a label under the manifold above the upper oven door.
Owner’s Manual
Español
Para consultar una version en español de este manual de instrucciones, visite nuestro sitio de internet GEAppliances.com.
49-85234 03-16 GE

THANK YOU FOR MAKING GE APPLIANCES A PART OF YOUR HOME.
Whether you grew up with GE Appliances, or this is your first, we’re happy to have you in the family.
We take pride in the craftsmanship, innovation and design that goes into every GE Appliances product, and we think you will too. Among other things, registration of your appliance ensures that we can deliver important product information and warranty details when you need them.
Register your GE appliance now online. Helpful websites and phone numbers are available in the Consumer Support section of this Owner’s Manual. You may also mail in the pre-printed registration card included in the packing material.
2 |
|
49-85234 |
IMPORTANT SAFETY INFORMATION READ ALL INSTRUCTIONS BEFORE USING
 This is the safety alert symbol. This symbol alerts you to potential hazards that can kill or hurt you and others.
$OO VDIHW\ PHVVDJHV ZLOO IROORZ WKH VDIHW\ DOHUW V\PERO DQG WKH ZRUG ³'$1*(5´ ³:$51,1*´ RU ³&$87,21´ 7KHVH words are defined as:

 DANGER ,QGLFDWHV D KD]DUGRXV VLWXDWLRQ ZKLFK LI QRW DYRLGHG will result in death or serious injury.

 WARNING ,QGLFDWHV D KD]DUGRXV VLWXDWLRQ ZKLFK LI QRW DYRLGHG could result in death or serious injury.
 CAUTION ,QGLFDWHV D KD]DUGRXV VLWXDWLRQ ZKLFK LI QRW DYRLGHG could result in minor or moderate injury.
 WARNING If the information in this manual is not followed exactly, a fire or explosion may result, causing property damage, personal injury or death.
-Do not store or use gasoline or other flammable vapors and liquids in the vicinity of this or any other appliance.
-WHAT TO DO IF YOU SMELL GAS
Ŷ 'R QRW WU\ WR OLJKW DQ\ DSSOLDQFH
Ŷ 'R QRW WRXFK DQ\ HOHFWULFDO VZLWFK GR QRW XVH DQ\ SKRQH LQ \RXU EXLOGLQJ
Ŷ ,PPHGLDWHO\ FDOO \RXU JDV VXSSOLHU IURP D QHLJKERU¶V SKRQH )ROORZ WKH JDV VXSSOLHU¶V LQVWUXFWLRQV Ŷ ,I \RX FDQQRW UHDFK \RXU JDV VXSSOLHU FDOO WKH ILUH GHSDUWPHQW
,QVWDOODWLRQ DQG VHUYLFH PXVW EH SHUIRUPHG E\ D TXDOLILHG LQVWDOOHU VHUYLFH DJHQF\ RU WKH JDV VXSSOLHU
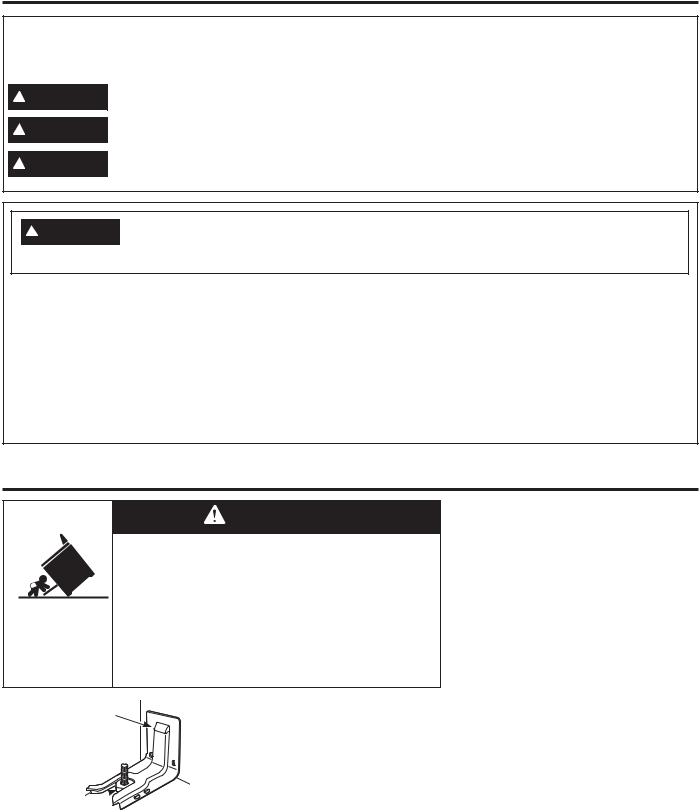
ANTI-TIP DEVICE
To reduce the risk of tipping the range, the range must be secured by a properly installed anti-tip bracket. See installation instructions shipped with the bracket for complete details before attempting to install.
Anti-Tip
Bracket
Leveling Leg 
Freestanding and Slide-In Ranges
For Freestanding and Slide-In Ranges
To check if the bracket is installed and engaged properly, look underneath the range to see that the rear leveling leg is
engaged in the bracket. On some models, the storage drawer or kick panel can
EH UHPRYHG IRU HDV\ LQVSHFWLRQ ,I YLVXDO LQVSHFWLRQ LV QRW SRVVLEOH VOLGH WKH UDQJH forward, confirm the anti-tip bracket is securely attached to the floor or wall, and slide the range back so the rear leveling leg is under the anti-tip bracket.
,I WKH UDQJH LV SXOOHG IURP WKH ZDOO IRU DQ\ UHDVRQ DOZD\V UHSHDW WKLV SURFHGXUH WR verify the range is properly secured by the anti-tip bracket.
Never completely remove the leveling legs or the range will not be secured to the anti-tip device properly.
INFORMATION SAFETY
49-85234 |
SAVE THESE INSTRUCTIONS |
3 |
|
SAFETY INFORMATION
IMPORTANT SAFETY INFORMATION READ ALL INSTRUCTIONS BEFORE USING
STATE OF CALIFORNIA PROPOSITION 65 WARNING
The California Safe Drinking Water and Toxic Enforcement Act requires the Governor of California to publish a list of substances known to the state to cause cancer, birth defects or other reproductive harm, and requires businesses to warn customers of potential exposure to such substances.

 WARNING This product contains one or more chemical known to the State of California to cause cancer, birth defects or other reproductive harm.
Self-clean ovens can cause low-level exposure to some of these substances, including carbon monoxide, during the cleaning cycle. Exposure can be minimized by venting with an open window or using a ventilation fan or hood.

 WARNING GENERAL SAFETY INSTRUCTIONS
 WARNING NEVER use this appliance as a space heater to heat or warm the room. Doing so may result in carbon monoxide poisoning and overheating of the oven.
Ŷ 8VH WKLV DSSOLDQFH IRU LWV LQWHQGHG SXUSRVH DV described in this owner’s manual.
Ŷ +DYH \RXU UDQJH LQVWDOOHG DQG SURSHUO\ JURXQGHG E\ a qualified installer in accordance with the provided installation instructions. Any adjustment and service should be performed only by a qualified gas range installers or service technicians. Do not attempt to repair or replace any part of your range unless it is specifically recommended in this manual.
Ŷ <RXU UDQJH LV VKLSSHG IURP WKH IDFWRU\ VHW IRU XVH ZLWK QDWXUDO JDV ,W FDQ EH FRQYHUWHG IRU XVH ZLWK /3 JDV
,I UHTXLUHG WKHVH DGMXVWPHQWV PXVW EH PDGH E\ D qualified technician in accordance with the installation instructions and local codes. The agency performing this work assumes responsibility for the conversion.
Ŷ +DYH WKH LQVWDOOHU VKRZ \RX WKH ORFDWLRQ RI WKH UDQJH gas shut-off valve and how to turn it off if necessary.
Ŷ 3OXJ \RXU UDQJH LQWR D YROW JURXQGHG RXWOHW only. Do not remove the round grounding prong
IURP WKH SOXJ ,I LQ GRXEW DERXW WKH JURXQGLQJ RI WKH home electrical system, it is your responsibility and obligation to have an ungrounded outlet replaced with a properly grounded, three prong outlet in accordance with the National Electrical Code. Do not use on extension cord with this appliance.
Ŷ %HIRUH SHUIRUPLQJ DQ\ VHUYLFH XQSOXJ WKH UDQJH or disconnect the power supply at the household
distribution panel by removing the fuse or switching off the circuit breaker.
Ŷ %H VXUH DOO SDFNLQJ PDWHULDOV DUH UHPRYHG IURP WKH range before operating to prevent ignition of these materials
Ŷ $YRLG VFUDWFKLQJ RU LPSDFWLQJ JODVV GRRUV FRRNWRSV or control panels. Doing so may lead to glass breakage. Do not cook on a product with broken glass. Shock, fire or cuts may occur.
Ŷ 'R QRW OHDYH FKLOGUHQ DORQH FKLOGUHQ VKRXOG QRW be left alone or unattended in an area where an appliance is in use. They should never be allowed to climb, sit or stand on any part of the appliance.
Ŷ  CAUTION Do not store items of interest to children in cabinets above an oven - children climbing on the oven to reach items could be seriously injured.
Ŷ 'R QRW DOORZ DQ\RQH WR FOLPE VWDQG RU KDQJ RQ WKH oven door, drawer or cooktop. They could damage the range or tip it over causing severe injury or death.
4 |
SAVE THESE INSTRUCTIONS |
49-85234 |

IMPORTANT SAFETY INFORMATION READ ALL INSTRUCTIONS BEFORE USING

 WARNING GENERAL SAFETY INSTRUCTIONS (Cont.)
Ŷ 1HYHU EORFN WKH YHQWV DLU RSHQLQJV RI WKH UDQJH
They provide the air inlets and outlets that are necessary for the range to operate properly with correct combustion. Air openings are located at the rear of the cooktop, at the top and bottom of the oven door, and at the bottom of the range under the warming drawer, lower oven drawer or kick panel.
Ŷ 8VH RQO\ GU\ SRW KROGHUV PRLVW RU GDPS SRW KROGHUV on hot surfaces may result in burns from steam. Do not let pot holders touch surface burners, burner grate, or oven heating element. Do not use a towel or other bulky cloth in place of pot holders.
Ŷ 'R QRW WRXFK WKH KHDWLQJ HOHPHQWV RU WKH LQWHULRU surface of the oven. These surfaces may be hot enough to burn even though they are dark in color. During and after use, do not touch, or let clothing or other flammable materials contact any interior area of
WKH RYHQ DOORZ VXIILFLHQW WLPH IRU FRROLQJ ILUVW 2WKHU
surfaces of the appliance may become hot enough to cause burns. Potentially hot surfaces include the burners, grates, oven vent opening, surfaces near the opening and crevices around the oven door.
Ŷ 'R QRW KHDW XQRSHQHG IRRG FRQWDLQHUV 3UHVVXUH could build up and the container could burst, causing an injury.
Ŷ &RRN PHDW DQG SRXOWU\ WKRURXJKO\ PHDW WR DW OHDVW an internal temperature of 160° F and poultry to at least an internal temperature of 180° F. Cooking to these temperatures usually protects against foodborne illness.
Ŷ 'R QRW XVH DQ\ W\SH RI IRLO RU OLQHU WR FRYHU WKH RYHQ bottom, drip pans or anywhere in the oven, except as described in this manual. Oven liners can trap heat or melt, resulting in damage to the product and risk of shock, smoke or fire.
 WARNING KEEP FLAMMABLE MATERIALS AWAY FROM THE OVEN
Failure to do so may result in fire or personal injury.
Ŷ 'R QRW VWRUH RU XVH IODPPDEOH PDWHULDOV LQ DQ RYHQ RU |
Ŷ 'R QRW OHW FRRNLQJ JUHDVH RU RWKHU IODPPDEOH |
near the cooktop, including paper, plastic, pot holders, |
materials accumulate in or near the range. Grease in |
linens, wall coverings, curtains, drapes and gasoline |
the oven or on the cooktop may ignite. |
or other flammable vapors and liquids. |
Ŷ &OHDQ YHQWLODWLQJ KRRGV IUHTXHQWO\ *UHDVH VKRXOG QRW |
|
|
Ŷ 1HYHU ZHDU ORRVH ILWWLQJ RU KDQJLQJ JDUPHQWV ZKLOH |
be allowed to accumulate on the hood or filter. |
using the appliance. Avoid storing commonly used |
|
items in cabinets above the range and be careful |
|
when reaching over the range. Clothing in close |
|
proximity to burners or hot surfaces may ignite |
|
causing severe burns. |
|
INFORMATION SAFETY
49-85234 |
SAVE THESE INSTRUCTIONS |
5 |
|

SAFETY INFORMATION
IMPORTANT SAFETY INFORMATION READ ALL INSTRUCTIONS BEFORE USING
 WARNING IN THE EVENT OF A FIRE, TAKE THE FOLLOWING STEPS TO PREVENT INJURY AND FIRE SPREADING
Ŷ 'R QRW XVH ZDWHU RQ JUHDVH ILUHV 1HYHU SLFN XS |
Ŷ ,I WKHUH LV D ILUH LQ WKH RYHQ GXULQJ VHOI FOHDQ WXUQ WKH |
a flaming pan. Turn the controls off. Smother a |
oven off and wait for the fire to go out. Do not force |
flaming pan on a surface burner by covering the pan |
WKH GRRU RSHQ ,QWURGXFWLRQ RI IUHVK DLU DW VHOI FOHDQ |
completely with a well-fitting lid, cookie sheet or flat |
temperatures may lead to a burst of flame from the |
WUD\ ,I QHFHVVDU\ XVH D PXOWL SXUSRVH GU\ FKHPLFDO RU |
oven. Failure to follow this instruction may result in |
foam-type fire extinguisher. |
severe burns. |
Ŷ ,I WKHUH LV D ILUH LQ WKH RYHQ GXULQJ EDNLQJ WXUQ WKH |
|
oven off and keep the door closed until the fire goes |
|
RXW ,I QHFHVVDU\ XVH D PXOWL SXUSRVH GU\ FKHPLFDO RU |
|
foam type fire extinguisher. |
|

 WARNING COOKTOP SAFETY INSTRUCTIONS
Ŷ 1HYHU OHDYH WKH VXUIDFH EXUQHUV XQDWWHQGHG DW medium or high heat settings. Foods, especially oily foods, may ignite resulting in fire that could spread to surrounding cabinets.
Ŷ 1HYHU OHDYH RLO XQDWWHQGHG ZKLOH IU\LQJ ,I DOORZHG WR heat beyond its smoking point, oil may ignite resulting in fire that may spread to surrounding cabinets. Use a deep fat thermometer whenever possible to monitor oil temperature.
Ŷ 7R DYRLG RLO VSLOORYHU DQG ILUH XVH D PLQLPXP DPRXQW of oil when shallow pan-frying and avoid cooking frozen foods with excessive amounts of ice.
Ŷ 8VH SURSHU SDQ VL]H DQG DYRLG SDQV WKDW DUH XQVWDEOH or easily tipped. Select cookware that is matched
to the size of the burner. Burner flames should be adjusted so that they do not extend beyond the bottom of the pan. Excessive flame may be hazardous.
Ŷ $OZD\V XVH WKH /,7( SRVLWLRQ ZKHQ LJQLWLQJ WKH WRS burners and make sure the burners have ignited.
Ŷ :KHQ XVLQJ JODVV FHUDPLF FRRNZDUH PDNH VXUH LW
LV VXLWDEOH IRU FRRNWRS VHUYLFH RWKHUV PD\ EUHDN because of sudden change in temperature.
Ŷ 7R PLQLPL]H WKH SRVVLELOLW\ RI EXUQV LJQLWLRQ RI flammable materials and spillage, the handle of a container should be turned toward the center of the range without extending over nearby burners.
Ŷ :KHQ SUHSDULQJ IODPLQJ IRRGV XQGHU D KRRG WXUQ WKH fan on.
Ŷ 'R QRW XVH D ZRN ZLWK D URXQG PHWDO VXSSRUW ULQJ 7KH ring may trap heat and block air to the burner resulting in a carbon monoxide hazard.
Ŷ 'R QRW DWWHPSW WR OLIW WKH FRRNWRS 'RLQJ VR PD\ damage the gas tubing to the surface burners resulting in a gas leak and risk of fire.
Ŷ :KHQ GLVDEOLQJ /RFN &RQWURO RQ VRPH PRGHOV make sure the surface controls are set to the OFF position. This will prevent unintended gas flow from the burners.
Ŷ 'R QRW XVH DOXPLQXP IRLO WR FRYHU WKH JUDWHV RU OLQH any part of the cooktop. Doing so may result in carbon monoxide poisoning, overheating of the cooktop surfaces, or a potential fire hazard.
6 |
SAVE THESE INSTRUCTIONS |
49-85234 |

IMPORTANT SAFETY INFORMATION READ ALL INSTRUCTIONS BEFORE USING

 WARNING OVEN SAFETY INSTRUCTIONS
 WARNING NEVER cover any slots, holes, or passages in the oven bottom or cover an entire rack with materials such as aluminum foil or oven liners. Doing so blocks air flow through the oven and may cause carbon monoxide poisoning. Never place foil or oven liners on the oven bottom. They can trap heat causing risk of smoke or fire.
Ŷ 8VH WKLV DSSOLDQFH IRU LWV LQWHQGHG SXUSRVH DV described in this owner’s manual.
Ŷ 6WDQG DZD\ IURP WKH UDQJH ZKHQ RSHQLQJ WKH RYHQ door. Hot air or steam which escapes can cause
EXUQV WR KDQGV IDFH DQG RU H\HV
Ŷ .HHS WKH RYHQ IUHH IURP JUHDVH EXLOGXS *UHDVH LQ the oven may ignite.
Ŷ 3XOO WKH RYHQ UDFN WR WKH VWRS ORFN SRVLWLRQ ZKHQ loading and unloading food from the oven. This helps prevent burns from touching hot surfaces of the door and oven walls.
Ŷ 'R QRW OHDYH LWHPV VXFK DV SDSHU FRRNLQJ XWHQVLOV RU
IRRG LQ WKH RYHQ ZKHQ QRW LQ XVH ,WHPV VWRUHG LQ DQ oven can ignite.
Ŷ 'R QRW OHDYH LWHPV RQ WKH FRRNWRS QHDU WKH RYHQ YHQW
ZKLFK LV LQ WKH FHQWHU RI WKH EDFNJXDUG ,WHPV PD\ overheat resulting in a risk of fire or burns.
Ŷ :KHQ XVLQJ FRRNLQJ RU URDVWLQJ EDJV LQ WKH RYHQ follow the manufacturer’s directions.
Ŷ 1HYHU EURLO ZLWK GRRU RSHQ 2SHQ GRRU EURLOLQJ LV QRW permitted due to overheating of control knobs.
Ŷ 3ODFH RYHQ UDFNV LQ GHVLUHG ORFDWLRQ ZKLOH RYHQ LV
FRRO ,I UDFN PXVW EH PRYHG ZKLOH RYHQ LV KRW EH careful to avoid touching hot surfaces.

 WARNING SELF-CLEANING OVEN SAFETY INSTRUCTIONS
The self-cleaning feature operates the oven at temperatures high enough to burn away food soils in the oven. Follow these instructions for safe operation.
Ŷ 'R QRW WRXFK RYHQ VXUIDFHV GXULQJ VHOI FOHDQ operation. Keep children away from the oven during self-cleaning. Failure to follow these instructions may cause burns.
Ŷ %HIRUH RSHUDWLQJ WKH VHOI FOHDQ F\FOH UHPRYH SDQV shiny metal oven racks and other utensils from the oven. Only porcelain-coated oven racks may be left in the oven. Do not use self-clean to clean other parts, such as grates.
Ŷ %HIRUH RSHUDWLQJ WKH VHOI FOHDQ F\FOH ZLSH JUHDVH DQG food soils from the oven. Excessive amount of grease may ignite leading to smoke damage to your home.
Ŷ ,I WKH VHOI FOHDQLQJ PRGH PDOIXQFWLRQV WXUQ WKH RYHQ off and disconnect the power supply. Have it serviced by a qualified technician.
Ŷ 'R QRW XVH RYHQ FOHDQHUV 1R FRPPHUFLDO RYHQ cleaner or oven liner protective coating of any kind should be used in or around any part of the oven.
INFORMATION SAFETY
49-85234 |
SAVE THESE INSTRUCTIONS |
7 |
|

USING THE COOKTOP: Surface Burners
Surface Burners
How to Remove Protective Shipping Film and Packaging Tape
Carefully grasp a corner of the protective shipping film with your fingers and slowly peel it from the appliance surface. Do not use any sharp items to remove the film. Remove all of the film before using the appliance for the first time.
To assure no damage is done to the finish of the product, the safest way to remove the adhesive from
packaging tape on new appliances is an application of a household liquid dishwashing detergent. Apply with a soft cloth and allow to soak.
NOTE: 7KH DGKHVLYH PXVW EH UHPRYHG IURP DOO SDUWV ,W cannot be removed if it is baked on.
How to Light a Surface Burner

 WARNING Burners should be operated only when covered by cookware. Burner flames not covered by cookware present a risk of fire or clothing ignition. Never let flames extend beyond the sides of the cookware. Failure to comply may result in serious injury.
Make sure all burners are in their correct locations and fully assembled before attempting to operate any burner.
Select a burner and find its control knob. Push the knob in and turn it to the LITE position.
<RX ZLOO KHDU D FOLFNLQJ QRLVH the sound of the electric spark igniting the burner. When one burner is turned to LITE, all burners will spark. Sparking will continue as long as the knob remains at LITE. Once gas is ignited, turn the knob to adjust the flame size.
Push the control knob in and
WXUQ LW WR WKH /,7( SRVLWLRQ
After Lighting a Burner
Ŷ 'R QRW RSHUDWH WKH EXUQHU IRU DQ H[WHQGHG SHULRG RI time without cookware on the grate. The finish on the grate may discolor or chip without cookware to absorb the heat.
Ŷ 'R QRW DWWHPSW WR GLVDVVHPEOH DQ\ EXUQHU ZKLOH another burner is on. An electric shock may result, which could cause you to knock over hot cookware.
Ŷ %H VXUH WKH EXUQHUV DQG JUDWHV DUH FRRO EHIRUH \RX place your hand, a pot holder or cleaning materials on them.
Use of the Surface Burners
Your gas rangetop has sealed gas burners. They offer convenience, cleanability and flexibility for a wide range of cooking applications.
The smallest burner is the simmer burner. On some models, the center burner of the triple flame burner provides an additional simmer burner. A simmer burner turned down to LO provides precise cooking
performance for foods such as delicate sauces that require low heat for a long cooking time.
The extra-large burner is designed to quickly bring large amounts of liquid to a boil. Some models have a POWER BOIL™ setting especially designed for use with cookware with a diameter of 11 inches or larger.
How to Select Flame Size
Watch the flame, not the knob, as you adjust heat. When rapid heating is desired, the flame size on a burner should match the size of the cookware you are using.
Flames larger than the bottom of the cookware will not
heat faster and may be hazardous.
These flames are too large for the pot
8 |
49-85234 |
Surface Burners (Cont.)
Top-of-Range Cookware
Aluminum: Medium-weight cookware is recommended because it heats quickly and evenly. Most foods brown evenly in an aluminum skillet. Use saucepans with tightfitting lids when cooking with minimum amounts of water.
Stainless Steel: This metal alone has poor heating properties and is usually combined with copper, aluminum or other metals for improved heat distribution. Combination metal skillets usually work satisfactorily if they are used with medium heat as the manufacturer recommends.
Cast-Iron: ,I KHDWHG VORZO\ PRVW VNLOOHWV ZLOO JLYH satisfactory results.
Enamelware: Under some conditions, the enamel of some cookware may melt. Follow cookware
manufacturer’s recommendations for cooking methods.
Glass: 7KHUH DUH WZR W\SHV RI JODVV FRRNZDUH WKRVH for oven use only and those for top-of-range cooking
VDXFHSDQV FRIIHH DQG WHDSRWV *ODVV FRQGXFWV KHDW very slowly.
Heatproof Glass Ceramic: Can be used for either
VXUIDFH RU RYHQ FRRNLQJ ,W FRQGXFWV KHDW YHU\ VORZO\ and cools very slowly. Check cookware manufacturer’s directions to be sure it can be used on gas ranges.
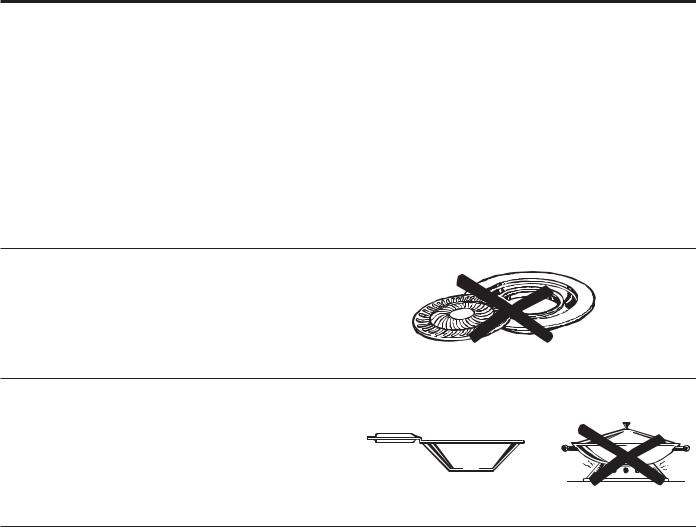
Stove Top Grills
Do not use an after-market stove top grill on your |
|
gas surface burners. A stove top grill will cause |
|
incomplete combustion resulting in carbon monoxide |
|
levels above allowable standards. This could be |
|
hazardous to your health. |
Do not use stove top grills |
Using a Wok
Use only a flat-bottomed wok with a diameter of 14 inches
or less. Make sure the wok bottom sits flat on the grate.
Do not use a wok support ring. Placing the ring over the burner or grate may cause the burner to work improperly,
resulting in carbon monoxide levels above allowable Use a flat-bottomed wok. standards. This could be hazardous to your health.
In Case of a Power Failure
,Q FDVH RI D SRZHU IDLOXUH \RX FDQ OLJKW WKH VXUIDFH burners on your range with a match. Hold a lit match to the burner ports, then slowly turn the control knob to the LITE position. Use extreme caution when lighting burners this way.
Surface burners in use when an electrical power failure occurs will continue to operate normally.
Burners Surface COOKTOP: THE USING
49-85234 |
9 |
USING THE COOKTOP: Griddle
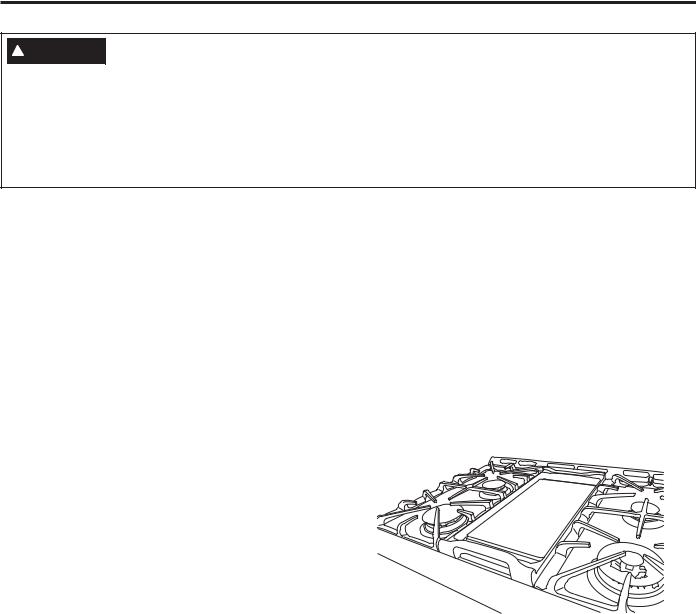
Griddle
Using the Griddle

 WARNING Fire Hazard
ŶThe PREHEAT setting (on some models) is provided to quickly heat your griddle. Turn heat down before placing food on the griddle. Cooking at the PREHEAT setting may result in fire.
ŶUse care when cooking greasy foods. Spilled grease may result in fire.
ŶNever place any items on the griddle when it is not in use. Heat from surrounding burners can heat the griddle and may result in fire.
Ŷ Place and remove the griddle only when griddle is cool and all surface burners are turned OFF.
Your griddle provides an extra-large cooking surface for meats, pancakes and other foods usually prepared in
a skillet. Before first use, rinse with hot water and dry thoroughly. Prepare the surface with cooking spray or vegetable oil.
NOTE: Do not place the griddle in a microwave oven.
NOTE: Do not clean the griddle in the self-cleaning oven. Doing so will remove the seasoned finish. For instructions on how to clean the griddle, see Care and Cleaning section.
Placement of the Nonstick Griddle on the Cooktop
These griddles can only be used over the oval burner in the center of the rangetop. To position the griddle, remove the center grate and replace it with the griddle. Do not turn on the oval burner until you are certain the griddle has been positioned correctly.
Preheating the griddle - Preheat for 5-10 minutes before placing food on griddle and then turn heat down to cook setting.
Nonstick Griddle
Type of Food |
Cook Setting |
Warming Tortillas |
Med-Lo |
Pancakes |
Med-Lo |
Hamburgers |
Med |
Fried Eggs |
Med-Lo |
Breakfast Sausage Links |
Med |
Hot Sandwiches |
Med-Lo |
VXFK DV *ULOOHG &KHHVH |
|
Do not overheat the griddle. Leaving the griddle burner on at
+, IRU DQ H[WHQGHG DPRXQW RI WLPH ZLWKRXW IRRG FDQ GDPDJH WKH nonstick coating.
Avoid using metal utensils with sharp points or rough sharp edges which might damage the griddle surface.
Replace the center grate with the Nonstick Griddle
10 |
49-85234 |
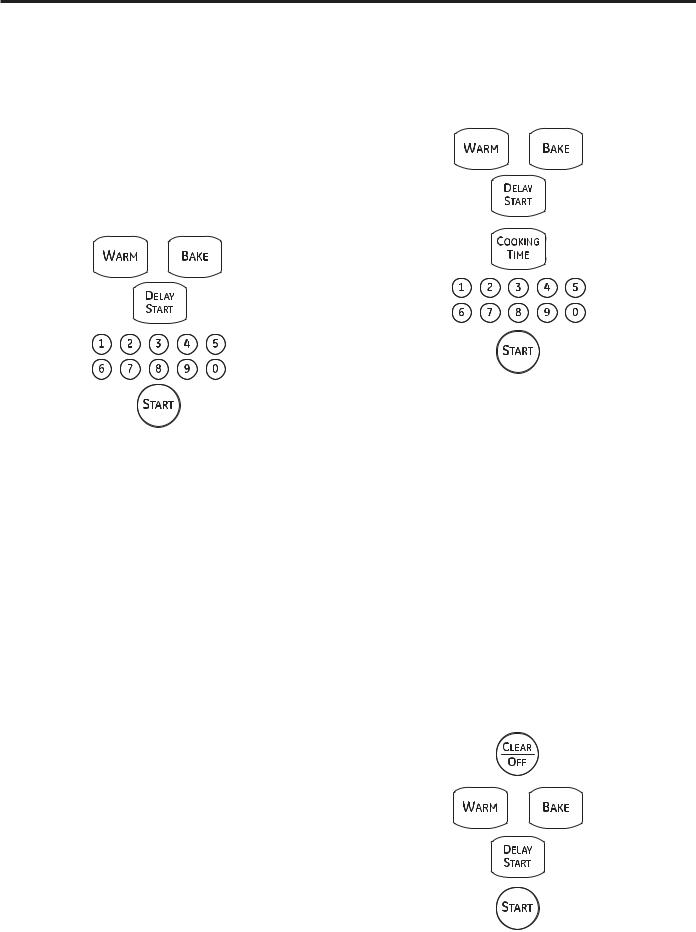
Oven Controls
1 |
8 |
6 |
9 |
3 |
10 |
2 |
5 |
4 |
12 |
11 |
7 |
1. Convection Cooking Modes: Convection cooking modes use increased air circulation
to improve performance. The type of benefit depends on the mode. Your oven has the following convection cooking modes: Bake and Roast. See the Cooking Modes section for more information.
2. Traditional Cooking Modes: Your oven has the following traditional cooking modes: Bake and Warm. See the Cooking Modes section for more information.
3. Clean: Your oven has a Self Clean mode. See the Cleaning the Oven section for important information about using this mode.
4. Start: Must be pressed to start any cooking, cleaning, or timed function.
5. Clear/Off: Cancels ALL oven operations except the clock and timer.
6. Cooking Time: Counts down cooking time and turns off the oven when the cooking time is complete. Press the Cooking Time pad, use the number pads to program a cooking time in hours and minutes, then press Start. This can only be used with Traditional Bake, Convection Bake and Convection Roast.
7. Clock: Sets the oven clock time. Press Clock pad. Use the number pads to program the clock. Press Start to save the time.
8. Kitchen Timer: Works as a countdown timer. Press the Kitchen Timer pad and the number pads to program the time in hours and minutes. Press the Start pad. The oven will continue to operate when the timer countdown is complete. To turn the timer off press the Kitchen Timer pad.
9. Delay Start: Delays when the oven will turn on. Use this to set a time when you want the oven
to start. Press the Delay Time pad and use the number pads to program the time of day for the oven to turn on then press Start. Press the desired cooking mode and temperature then press Start. A cook time may also be programmed if desired. This can only be used with Traditional Bake, Convection Bake, Convection Roast and Self-Clean.
NOTE: When using the delay time feature, foods
WKDW VSRLO HDVLO\ VXFK DV PLON HJJV ILVK VWXIILQJV
SRXOWU\ DQG SRUN VKRXOG QRW EH DOORZHG WR VLW IRU more than 1 hour before or after cooking. Room temperature promotes the growth of harmful bacteria. Be sure that the oven light is off because heat from the bulb will speed harmful bacteria growth.
10. Probe: Monitors internal food temperature and turns the oven off when the food reaches
WKH SURJUDPPHG WHPSHUDWXUH ,QVHUW WKH SUREH program the cooking mode, and program the probe temperature. See the Cooking Modes section for more information. The probe can only be used with Traditional Bake and Convection Roast.
11.Oven Light: Turns the oven light on or off.
12.Gas/Control Lockout: Touch and hold the
Gas/Control Lockout SDG IRU VHFRQGV WR ORFN unlock the surface burners, oven burners and control panel so they cannot be activated.
Controls Oven OVEN: THE USING
49-85234 |
11 |

USING THE OVEN: 2YHQ$LU9HQWV6SHFLDO)HDWXUHV
Oven Air Vents
1HYHU EORFN WKH YHQWV DLU RSHQLQJV RI WKH UDQJH 7KH\ provide the air inlet and outlet that are necessary for the range to keep cool and operate properly with correct combustion.
Air openings are located at the rear of the cooktop, at the top and bottom of the oven door, and at the bottom of the range.
Special Features
There are several different special features on your oven. To change the settings of these special features, press the
Bake and Warm SDGV DW WKH VDPH WLPH DQG KROG IRU WKUHH VHFRQGV 6) ZLOO DSSHDU LQ WKH GLVSOD\ 6HOHFW WKH IHDWXUH \RX want to change. When the change has been made, press the Start key to save the change and return to the time of day.
Adjust the Oven Temperature
This feature allows the oven baking temperature to be adjusted up to 35ºF hotter or down to 35ºF cooler. Use this feature if you believe your oven temperature is too hot or too cold and wish to change it.
Press the Bake pad to enter the temperature adjustment mode. A number between 35 and - 35 will display.
Use the number pads to set the desired temperature adjustment and use the Bake pad to change between negative and positive.
Press the Start pad to save the temperature adjustment.
End of Timer Signals
This is the tone that signals the end of a timer. The tone
FDQ EH FRQWLQXRXV &RQ E((S RU RQH UHSHDWLQJ EHHS
E((S $ FRQWLQXRXV VHWWLQJ ZLOO FRQWLQXH WR VRXQG D tone until a button on the control is pressed. Press the Kitchen Timer pad to view the current setting and then to change the setting.
Fahrenheit or Celsius Temperature Display
The oven control is set to use Fahrenheit temperatures
)
EXW \RX FDQ FKDQJH LW WR XVH &HOVLXV WHPSHUDWXUHV &
Press the Warm and Cook Time pads at the same time to view the current setting, press again to change the setting.
Clock Display
This feature specifies how the time of day will be displayed or if no time of day will be displayed. You can
VHOHFW D VWDQGDUG KRXU FORFN KU KRXU PLOLWDU\
WLPH GLVSOD\ KU RU QR FORFN GLVSOD\HG 2)) 3UHVV the Clock pad to view the current setting, press again to change the setting.
Autorecipe Conversion
7KLV IHDWXUH 21 2)) DXWRPDWLFDOO\ UHGXFHV WKH programmed recipe temperature in Convection Bake mode by 25ºF. The default setting for this feature is off.
Note: This option does not convert baking time, only temperatures. This option does not adjust temperatures
for Convection Roast mode. Press Bake to view the current setting. Press again to change the setting.
Using the Sabbath Feature
(Designed for use on the |
CERTIFIED |
|
Jewish Sabbath and Holidays) |
K |
|
The Sabbath feature can be used |
SABBATH |
|
IRU EDNLQJ LQ WKH ORZHU RYHQ ,W |
MODE |
|
cannot be used for convection, |
|
|
warm, self-cleaning or Delay Start cooking.
NOTE: The oven light comes on automatically when the door is opened and goes off when the door is closed. The bulb may be removed. See the Oven Light Replacement section. On models with a light switch on the control panel, the oven light may be turned on and left on.
How to Set for Regular Baking:
Make sure the clock shows the correct time of day and the oven is off.
1.Press and hold both the Bake and Warm pads, at the same time XQWLO WKH GLVSOD\ VKRZV 6)
2.Tap the Delay Start SDG XQWLO 6$E E$W+ DSSHDUV LQ the display.
3.Touch the Start SDG DQG will appear in the display.
4.Touch the Bake pad. No signal will be given.
12 |
49-85234 |
Special Features (Cont.)
5.Using the number pads, enter the desired temperature between 170° and 550°. No signal or temperature will be given.
6.Touch the Start pad.
7.After a random delay period of approximately 30
VHFRQGV WR PLQXWH ZLOO DSSHDU LQ WKH GLVSOD\
LQGLFDWLQJ WKDW WKH RYHQ LV EDNLQJ ,I GRHVQ¶W appear in the display, start again at Step 4.
To adjust the oven temperature, touch the Bake pad, enter the new temperature using the number pads and touch the Start pad.
NOTE: The Clear/Off and Cooking Time pads are active during the Sabbath feature.
To adjust the oven temperature, touch the Bake pad, enter the new temperature using the number pads and touch the Start pad.
When cooking is finished, the display will change from
WR DQG ZLOO DSSHDU LQGLFDWLQJ WKDW WKH oven has turned OFF but is still set in Sabbath. Remove the cooked food.
+
+
|
:KHQ WKH GLVSOD\ VKRZV WKH |
|
oven is set in Sabbath. When the |
|
GLVSOD\ VKRZV WKH RYHQ LV |
|
EDNLQJ URDVWLQJ |
:KHQ WKH GLVSOD\ VKRZV WKH |
How to Exit the Sabbath Feature: |
oven is set in Sabbath. When the |
GLVSOD\ VKRZV WKH RYHQ LV
EDNLQJ URDVWLQJ
How to Set for Timed Baking–Immediate Start and Automatic Stop:
Make sure the clock shows the correct time of day and the oven is off.
1.Press and hold both the Bake and Warm pads, at the same time XQWLO WKH GLVSOD\ VKRZV 6)
2.Tap the Delay Start SDG XQWLO 6$E E$W+ DSSHDUV LQ the display.
3.Touch the Start SDG DQG ZLOO DSSHDU LQ WKH display.
4.Touch the Cooking Time pad.
5.Touch the number pads to set the desired length of cooking time between 1 minute and 9 hours and 99 minutes. The cooking time that you entered will be displayed.
6.Touch the Start pad.
7.Touch the Bake pad. No signal will be given.
8.Using the number pads, enter the desired temperature. No signal or temperature will be given.
9.Touch the Start pad.
10.After a random delay period of approximately 30
VHFRQGV WR PLQXWH ZLOO DSSHDU LQ WKH GLVSOD\
LQGLFDWLQJ WKDW WKH RYHQ LV EDNLQJ URDVWLQJ ,I doesn’t appear in the display, start again at Step 7.
1. Touch the Clear/Off pad.
,I WKH RYHQ LV FRRNLQJ ZDLW IRU D UDQGRP GHOD\ SHULRG of approximately 30 seconds to 1 minute, until only
LV LQ WKH GLVSOD\
3.Press and hold both the Bake and Warm pads, at
WKH VDPH WLPH XQWLO WKH GLVSOD\ VKRZV 6)
4.Tap the Delay Start SDG XQWLO VKGQ RU QR VKGQ DSSHDUV LQ WKH GLVSOD\ VKGQ LQGLFDWHV WKDW WKH RYHQ ZLOO DXWRPDWLFDOO\ WXUQ RII DIWHU KRXUV QR
VKGQ LQGLFDWHV WKDW WKH RYHQ ZLOO QRW DXWRPDWLFDOO\ turn off.
5.Touch the Start pad.
NOTE: ,I D SRZHU RXWDJH RFFXUUHG ZKLOH WKH RYHQ ZDV in Sabbath, the oven will automatically turn off and stay off even when the power returns. The oven control must be reset.
+
Features Special OVEN: THE USING
49-85234 |
13 |

USING THE OVEN:2YHQ5DFNV&RRNZDUH
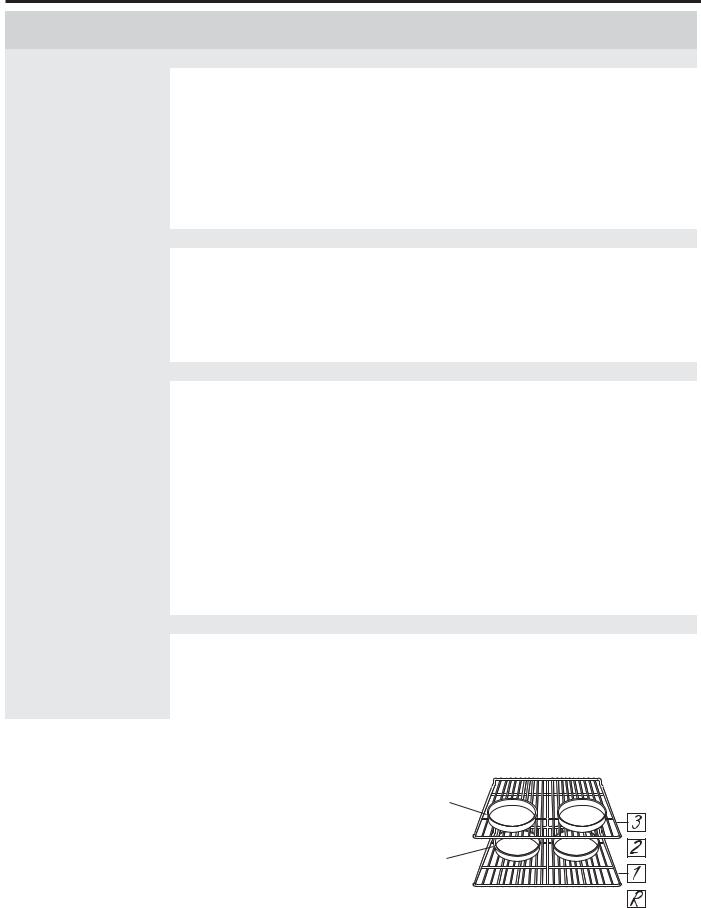
Oven Racks
Your oven has two rack positions in the upper oven
$ % DQG IRXU UDFN SRVLWLRQV LQ WKH ORZHU RYHQ 5
5HFRPPHQGHG UDFN SRVLWLRQV IRU YDULRXV W\SHV of foods are provided in the Cooking Guide. Adjusting rack position is one way to impact cooking results. For example, if you would prefer darker tops on cakes, muffins, or cookies, try moving food one rack position
KLJKHU ,I \RX ILQG IRRGV DUH WRR EURZQ RQ WRS WU\ PRYLQJ them down next time.
When baking with multiple pans and on multiple racks, ensure there is sufficient space between pans to allow air to flow.
Flat Racks
When placing and removing cookware, pull the rack out
WR WKH EXPS VWRS SRVLWLRQ RQ WKH UDFN VXSSRUW
To remove a rack, pull it toward you, tilt the front end up and pull it out.
7R UHSODFH SODFH WKH FXUYHG HQG RI WKH UDFN VWRS ORFNV onto the oven supports, tilt up the front of the rack and push the rack in.
Racks may become difficult to slide, especially after a self-clean. Put some vegetable oil on a soft cloth or paper towel and rub onto the left and right edges.
Upper Oven
Lower Oven
Cookware
Cookware Guidelines
The material, finish, and size of cookware affect baking performance.
Dark, coated and dull pans absorb heat more readily than light, shiny pans. Pans that absorb heat more readily can result in a browner, crisper, and thicker crust.
,I XVLQJ GDUN DQG FRDWHG FRRNZDUH FKHFN IRRG HDUOLHU
WKDQ PLQLPXP FRRN WLPH ,I XQGHVLUDEOH UHVXOWV DUH obtained with this type of cookware consider reducing oven temperature by 25° F next time.
Shiny pans can produce more evenly cooked baked goods such as cakes and cookies.
Glass and ceramic pans heat slowly but retain heat well. These types of pans work well for dishes such as pies and custards.
Air insulated pans heat slowly and can reduce bottom browning.
Keep cookware clean to promote even heating.
14 |
49-85234 |

Cooking Modes
Your new oven has a variety of cooking modes to help you get the best results. These modes are described below. Refer to the Cooking Guide section for recommendations for specific foods. Remember, your new oven may perform differently than the oven it is replacing.
Bake
The bake mode is for baking and roasting. This mode uses heat primarily from the lower burner but also from the upper burner to cook food. When preparing baked goods such as cakes, cookies, and pastries always preheat the oven first. Follow recipe recommendations
IRU IRRG SODFHPHQW ,I QR JXLGHOLQHV DUH SURYLGHG FHQWHU food in the oven. To use this mode press the Bake pad, enter a temperature, and then press Start.
Warm
Warm mode is designed to keep hot foods hot for up to 3 hours. To use this mode, press the Warm pad then press Start. Cover foods that need to remain moist and do not cover foods that should be crisp. Preheating is not required. Do not use warm to heat cold food other
WKDQ FULVSLQJ FUDFNHUV FKLSV RU GU\ FHUHDO ,W LV DOVR recommended that food not be kept warm for more than 2 hours.
Broiling Modes
Broil is only available in the upper oven. Always broil with the door closed. Monitor food closely while broiling. Use caution when broiling on upper rack positions as placing food closer to the broil burner increases smoking, spattering, and the possibility of fats igniting. Broiling on rack position 5 is not recommended.
Try broiling foods that you would normally grill. Adjust rack positions to adjust the intensity of the heat to the food. Place foods closer to the broil burner when a seared surface and rare interior is desired. Thicker foods and foods that need to be cooked through should be broiled on a rack position farther from the burner.
Convection Bake
The Convection Bake mode is intended for baking on a single rack. This mode may use heat from the upper and lower burners, along with air movement from the convection fan to enhance cooking evenness. Your oven is equipped with Auto Recipe Conversion, so it is not necessary to convert the temperature when using this mode. To use this mode press the Bake pad under
Convection, enter a temperature, and then press Start. Always preheat when using this mode.
Convection Roast
The Convection Roast mode is intended for roasting whole cuts of meat on a single rack. This mode may use heat from the upper and lower bake burner along with air movement to improve browning and reduce cooking
WLPH ,W LV QRW QHFHVVDU\ WR FRQYHUW WHPSHUDWXUH &KHFN food earlier than the recipe suggested time when using
WKLV PRGH RU XVH WKH SUREH RQ VRPH PRGHOV 7R XVH this mode press the Roast pad under Convection, enter a temperature, and then press Start ,W LV QRW QHFHVVDU\ to preheat when using this mode.
Probe
,QWHUQDO IRRG WHPSHUDWXUH LV IUHTXHQWO\ XVHG DV DQ indicator of doneness, especially for roasts and poultry. The Probe mode monitors the internal food temperature and turns the oven off when the internal food temperature reaches the programmed temperature.
Minimum temperatures for food safety can be found at
ZZZ ,V,W'RQH<HW JRY 7KH WHPSHUDWXUH SUREH FDQ RQO\ be used with Traditional Bake, Convection Bake, and Convection Roast modes.
To use the probe with preheating:
1.Press the desired cook mode (Traditional Bake, Convection Bake, or Convection Roast) pad and enter the desired cooking temperature.
,QVHUW WKH SUREH LQWR WKH IRRG VHH 3URSHU 3UREH 3ODFHPHQW *XLGHOLQHV LQ WKLV VHFWLRQ
3.Once the oven is preheated, place the food in the oven and connect the probe to the probe outlet, making sure it is fully inserted. Use caution, the oven walls and probe outlet are hot.
4.Program the probe temperature by pressing the Probe pad and entering the desired food
temperature. The maximum internal food temperature that you can set is 200º F.
0RGHV&RRNLQJ&RRNZDUH OVEN: THE USING
49-85234 |
15 |
USING THE OVEN: 8SSHU2YHQ$OXPLQXP)RLODQG2YHQ/LQHUV
Upper Oven
To Use the Upper Oven
1.Push in and turn the upper oven knob to any desired setting.
2.Allow the upper oven to preheat.
Ŷ 7KH XSSHU RYHQ VLJQDO OLJKW LV ORFDWHG RQ WKH XSSHU left side of the knob and glows when the knob is
LQ WKH 21 SRVLWLRQ ,W UHPDLQV 21 XQWLO WKH NQRE LV moved to the OFF position.
Ŷ 7KH ³+HDWLQJ´ VLJQDO OLJKW LV ORFDWHG RQ WKH XSSHU right side of the knob and glows when the heating elements are active. Preheat is complete after the “Heating” signal has turned off for the first time with each use. A tone will NOT sound when the oven is finished preheating.
NOTES:
Ŷ 7KH ORZHU RYHQ FDQQRW EH XVHG GXULQJ D VHOI FOHDQ cycle of the upper oven.
Ŷ 'R QRW SXW IRRG IRLO RU FRRNZDUH GLUHFWO\ RQ WKH bottom of the upper oven.
Ŷ ,I IRRGV UHTXLUH D FRYHU use only foil or lids able to withstand baking temperatures. Do not use plastic.
Ŷ )RU EHVW EDNLQJ UHVXOWV
XVH UDFN SRVLWLRQ % ,I \RXU dish is too tall, place on rack position A.
Ŷ )RU EHVW UHVXOWV EDNH cakes in lower oven.
Push in and turn the upper oven knob to any desired setting.
How to Set the Upper Oven for Broiling
1. Place the meat or fish on a broiler grid in a broiler pan.
2.Follow suggested rack positions in the Broiling Guide.
3.The oven door must be closed during broiling.
4.Push in and turn the upper oven knob to broil setting.
Serve the food immediately, and leave the pan outside
the oven to cool during the meal for easiest cleaning.
Close the door. Always broil with the door closed.
Aluminum Foil and Oven Liners

 CAUTION Do not use any type of foil or oven liner to cover the oven bottom. These items can block airflow or melt, resulting in damage to the product and risk of carbon monoxide poisoning, smoke or fire. Damage from improper use of these items is not covered by the product warranty.
Foil may be used to catch spills by placing a sheet on a lower rack, several inches below the food. Do not use more
IRLO WKDQ QHFHVVDU\ DQG QHYHU HQWLUHO\ FRYHU DQ RYHQ UDFN ZLWK DOXPLQXP IRLO .HHS IRLO DW OHDVW ´ IURP RYHQ ZDOOV to prevent poor heat circulation.
16 |
49-85234 |
Cooking Guide
|
RECOMMENDED |
OVEN |
RECOMMENDED |
|
|
FOOD TYPE |
MODE(S) |
(Upper/Lower) |
RACK POSITION(S) |
ADDITIONAL SUGGESTIONS |
|
Baked Goods |
|
|
|
|
|
Layer cakes, sheet cakes, |
|
|
|
|
|
bundt cakes, muffins, quick |
Bake |
Lower |
2 |
Use shiny cookware. |
|
breads, biscuits, scones on |
Upper |
B |
|||
|
|
||||
a Single Rack |
|
|
|
|
|
Layer cakes* on Multiple |
Convection Multi-Bake |
Lower |
1 and 3 |
Ensure adequate airflow |
|
Racks |
Bake |
VHH LOOXVWUDWLRQ EHORZ |
|||
|
|
||||
&KLIIRQ FDNHV DQJHO IRRG |
Bake |
Lower |
1 |
Use shiny cookware. |
|
Cookies, biscuits, scones on |
Bake |
Lower |
2 |
Use shiny cookware. |
|
a Single Rack |
Upper |
B |
|||
|
|
||||
Cookies, biscuits, scones on |
Convection Multi-Bake |
Lower |
1 and 3 |
Ensure adequate airflow. |
|
Multiple Racks |
Bake |
||||
|
|
|
|||
Beef & Pork |
|
|
|
|
|
|
|
|
|
8VH D EURLO SDQ PRYH IRRG GRZQ IRU |
|
Hamburgers |
Broil Hi |
Upper |
B |
PRUH GRQHQHVV OHVV VHDULQJ :DWFK |
|
|
|
|
|
food closely when broiling. |
|
|
|
|
|
8VH D EURLO SDQ PRYH IRRG GRZQ IRU |
|
Steaks & Chops |
Broil Hi |
Upper |
B |
PRUH GRQHQHVV OHVV VHDULQJ :DWFK |
|
|
|
|
|
food closely when broiling. |
|
Roasts |
Convection Roast |
Lower |
R or 1 |
Leave uncovered, use a low sided |
|
Bake |
pan such as a broil pan. |
||||
|
|
|
|||
Poultry |
|
|
|
|
|
Whole chicken |
Convection Roast |
Lower |
R or 1 |
Leave uncovered, use a low sided |
|
Bake |
pan such as a broil pan. |
||||
|
|
|
|||
Bone-in chicken breasts, |
Broil Lo |
Upper |
A |
,I EUHDGHG RU FRDWHG LQ VDXFH DYRLG |
|
Broil Hi modes. Broil skin side down |
|||||
legs, thighs |
Bake |
Lower |
2 |
||
first. Watch food closely when broiling. |
|||||
|
|
|
|
||
Boneless chicken breasts |
Broil Lo |
Upper |
A |
Watch food closely when broiling. |
|
Bake |
Lower |
2 |
|||
|
|
||||
|
Convection Roast |
|
|
Leave uncovered, use a low sided |
|
Whole turkey |
Lower |
R or 1 |
pan such as a broil pan. Watch food |
||
Bake |
|||||
|
|
|
closely when broiling. |
||
|
|
|
|
||
|
|
|
|
|
|
Turkey Breast |
Bake |
Lower |
2 |
Leave uncovered, use a low sided |
|
pan such as a broil pan. |
|||||
|
|
|
|
||
Fish |
Broil Lo |
Upper |
A |
Watch food closely when broiling. |
|
Bake |
Lower |
2 |
|||
|
|
||||
Casseroles |
Bake |
Lower |
2 |
|
|
Upper |
B |
|
|||
|
|
|
|||
Frozen Convenience Foods |
|
|
|
|
|
Pizza, french fries, tator tots, |
|
Lower |
2 |
Use shiny cookware. |
|
chicken nuggets, appetizers |
Bake |
||||
Upper |
B |
||||
on a Single Rack |
|
|
|||
|
|
|
|
||
Pizza, french fries, tator tots, |
Convection Multi-Bake |
Lower |
1 and 3 |
Use shiny cookware. |
|
chicken nuggets, appetizers |
Bake |
||||
on Multiple Racks |
|
|
|
||
|
|
|
|
*When baking four cake layers at a time, stagger the pans as shown so that one pan is not directly above another.
Cook food thoroughly to help protect against food borne illness. Minimum safe food temperature recommendations for food safety can be found at www.IsItDoneYet.gov. Make sure to use a food thermometer to take food temperatures.
Front |
Placement |
Rear |
Placement |
Guide Cooking OVEN: THE USING
49-85234 |
17 |

CARE AND CLEANING: Oven
Oven
Be sure electrical power is off and all surfaces are cool before cleaning any part of the range.
Control Panel and Knobs
Wipe the control panel after each use of the oven with a damp cloth. For cleaning, use mild soap and water or
D VROXWLRQ RI YLQHJDU DQG ZDWHU 5LQVH ZLWK FOHDQ water. Polish dry with a soft cloth.
Do not use abrasive cleansers, strong liquid cleansers, plastic scouring pads or oven cleaners on the control
SDQHO WKH\ ZLOO GDPDJH WKH ILQLVK
Do not try to bend knobs by pulling them up or down or by hanging a towel or other such loads. This can damage the gas valve shaft.
The control knobs may be removed for easier cleaning.
With knobs in the OFF position pull them straight off the stems.
The knobs can be washed by hand with soap and water or in a dishwasher.
Not all knobs are interchangeable. To determine the correct location of a particular knob, examine the back of the knob. A knob with a label or two stem holes should be replaced on the front panel first by matching the shape of the knob holes to the shape of the control panel stems. The remainder of the knobs having no labels and only one stem hole can then be replaced on the front panel anywhere there is a single stem.
|
Stem |
Label |
|
|
|
|
|
Stem holes |
Surface burner knob |
Knobs with two stem holes have |
|
|
special locations |
|
Oven Exterior and Cooktop Surface
Do not use oven cleaners, abrasive cleansers, strong liquid cleansers, steel wool, plastic scouring pads, or cleaning powders on the interior or exterior of the oven.
&OHDQ ZLWK D PLOG VRDS DQG ZDWHU RU D VROXWLRQ RI vinegar and water. Rinse with clean water and dry with a soft cloth. When cleaning surfaces, make sure that they are at room temperature and not in direct sunlight.
,I D VWDLQ RQ WKH GRRU YHQW WULP LV SHUVLVWHQW XVH D PLOG abrasive cleaner and a sponge-scrubber for best results.
Spillage of marinades, fruit juices, tomato sauces and basting liquids containing acids may cause discoloration and should be wiped up immediately. Let hot surfaces cool, then clean and rinse.
Stainless Steel Surfaces (on some models)
'R QRW XVH D VWHHO ZRRO SDG LW ZLOO VFUDWFK WKH VXUIDFH
To clean the stainless steel surface, use warm sudsy water or a stainless steel cleaner or polish. Always wipe the surface in the direction of the grain. Follow the cleaner instructions for cleaning the stainless steel surface.
Cleaners with oxalic acid such as Bar Keepers Friend Soft Cleanser™ will remove surface rust, tarnish and small blemishes. Use only a liquid cleanser free of grit and rub in the direction of the brush lines with a damp, soft sponge.
To inquire about purchasing cleaning products including stainless steel appliance cleaner or polish,
UHDG WKH $VVLVWDQFH $FFHVVRULHV VHFWLRQV DW WKH beginning of this manual.
Oven Interior
The interior of your new oven can be cleaned manually or by using the Steam Clean or Self Clean modes.
Spillage of marinades, fruit juices, tomato sauces and basting liquids containing acids may cause discoloration and should be wiped up as soon as hot surfaces cool, then clean and rinse.
Manual Cleaning
Do not use oven cleaners, abrasive cleaners, strong liquid cleansers, steel wool, scouring pads, or cleaning powders on the interior of the oven. Clean with a mild
VRDS DQG ZDWHU RU VROXWLRQ RI YLQHJDU DQG ZDWHU
Rinse with clean water and dry with a soft cloth. When cleaning surfaces, make sure that they are at room temperature and not in direct sunlight.
18 |
49-85234 |

Oven (Cont.)
Oven Interior
Self Clean Mode
5HDG 6HOI &OHDQLQJ 2YHQ 6DIHW\ ,QVWUXFWLRQV DW WKH beginning of this manual before using Self Clean Mode. Self clean uses very high temperatures to clean the oven interior. The oven door will lock when using this feature. Before operating the self-clean cycle, pre-wash inner door and inside window before self-cleaning. Wipe inner black door before self clean. Remove all items from the oven
RWKHU WKDQ HQDPHOHG GDUN FRORU UDFNV 6KLQ\ RU VLOYHU racks, the meat probe, and any cookware or other items should all be removed from the oven before initiating a self-clean cycle. The surface burners must be turned off prior to the self-clean start time. Cooktop burners will not start during self clean cycle. Both ovens can not be selfcleaned at the same time. Close the door.
Cleaning Lower Oven
Press the Clean pad once and a default self-clean time is displayed. Press the Start pad or use the number pads to enter any clean time between 3 and 5 hours and press Start. For heavily soiled ovens 5 hours is recommended. The oven will turn off automatically when the self-clean cycle is complete. The door will stay locked until the oven has cooled down. After the oven has cooled down wipe any ash out of the oven.
Cleaning Upper Oven
The oven door must be closed and all controls set correctly for the cycle to work. Rotate upper oven knob to self-clean position. Touch the Start pad. Doors will lock automatically. The display will show the clean time remaining. If the upper door is not locked and remaining clean time is not displayed, within 1 minute of initiating the cycle rotate the knob to the Off position and open both doors for 10 minutes. Repeat step 1. ,W ZLOO QRW EH SRVVLEOH WR RSHQ WKH oven door until the temperature drops below the lock temperature and the LOCKED DOOR light goes off. The oven shuts off automatically when the clean cycle is complete. When the LOCKED DOOR light is off, the door will unlock automatically. Rotate knob to the off position. The words LOCK DOOR will flash and the oven control will signal if you set the clean cycle and forget to close the oven door. To stop a clean cycle,
touch the Clear/Off pad then turn the oven control knob to the OFF position. After some period of time, the LOCKED DOOR light will go off. This will indicate that the oven has cooled below the locking temperature and gas is able to flow to the cooktop. The doors will unlock automatically. After you complete the first oven clean cycle, you can start the second oven clean cycle.
IMPORTANT: The health of some birds is extremely sensitive to the fumes given off during the self-cleaning cycle of any range. Move birds to another wellventilated room.
Oven Racks
All oven racks may be cleaned by hand with an abrasive cleaner or steel wool. Black porcelain-coated oven racks may remain in the oven during the self-cleaning cycle
ZLWKRXW EHLQJ GDPDJHG ,I QLFNHO SODWHG RYHQ UDFNV remain in the oven during the self-cleaning cycle, they
ZLOO ORVH WKHLU OXVWHU DQG EHFRPH KDUG WR VOLGH ,W ZLOO EH necessary to grease all oven rack side edges with a light coating of vegetable oil after cleaning them by hand or in the oven. This will help maintain the ease of sliding the racks in and out of the oven.
Probe
The temperature probe may be cleaned with soap and water or a soap-filled scouring pad. Cool the temperature probe before cleaning. Scour stubborn spots with a soap-filled scouring pad, rinse and dry.
To order additional temperature probes read the Assistance and Accessories sections at the beginning of this manual.
ŶDo not immerse the temperature probe in water.
ŶDo not store the temperature probe in the oven.
ŶDo not leave the temperature probe inside the oven during a self or steam clean cycle.
Oven CLEANING: AND CARE
49-85234 |
19 |
CARE AND CLEANING: Cooktop
Cooktop
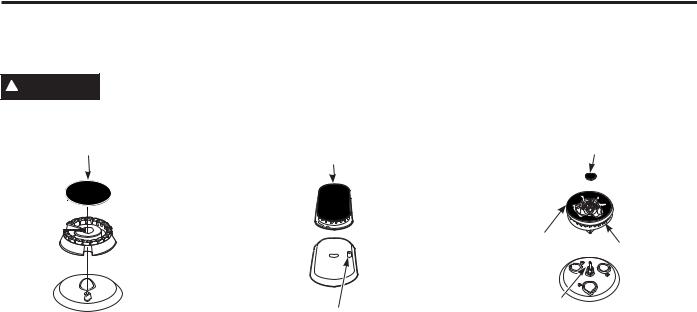
Removal of Surface Burners for Cleaning
Turn all controls OFF. Allow cooktop to cool before removing grates and burner parts. When removing the burner caps and heads, remember their size and location. Replace them in the same location after cleaning.

 CAUTION Do not attempt to remove bridge burner, oval burner or tri-ring burner caps from burner heads.
Round Burner Cap |
Oval Burner Head |
Inner Burner Cap |
5HPRYDEOH |
and Cap Assembly |
5HPRYDEOH |
|
1RQ 5HPRYDEOH |
|
Outer Burner Cap |
|
1RQ 5HPRYDEOH |
Burner |
|
Head |
Round Burner
The burner caps and burner heads can be lifted off the cooktop.
Electrode
1RQ 5HPRYDEOH
Oval Burner (on some models)
Cap is permanently attached to the burner head.
Electrode
1RQ 5HPRYDEOH
Tri-Ring Burner (on some models)
The small tri-ring burner cap can be lifted off for cleaning. The outer cap is permanently attached to the burner head assembly. Lift the burner head assembly off the cooktop as one piece.
20 |
49-85234 |
 Loading...