


 TM
TM
Owner's Manual & Installation Instructions
Side by Side Refrigerators
Models: CSB42, CSB48
Contents
Safety Information. . . . . . . . . . . . . . . . . . . . . . . . . . . . . . .3
Using the Refrigerator
Controls . . . . . . . . . . . . . . . . . . . . . . . . . . . . . . . . . . . . . .5
Dispenser. . . . . . . . . . . . . . . . . . . . . . . . . . . . . . . . . . . . .7
Automatic Icemaker . . . . . . . . . . . . . . . . . . . . . . . . . . . . .8
Water Filter. . . . . . . . . . . . . . . . . . . . . . . . . . . . . . . . . . . .9
Climate Controlled Drawer. . . . . . . . . . . . . . . . . . . . . . .10
Storage Drawers . . . . . . . . . . . . . . . . . . . . . . . . . . . . . .11
Shelves and Bins . . . . . . . . . . . . . . . . . . . . . . . . . . . . . .12
Baskets . . . . . . . . . . . . . . . . . . . . . . . . . . . . . . . . . . . . .13
WiFi . . . . . . . . . . . . . . . . . . . . . . . . . . . . . . . . . . . . . . . .13
Care And Cleaning . . . . . . . . . . . . . . . . . . . . . . . . . . . . .14
Installation Instructions . . . . . . . . . . . . . . . . . . . . . . . . .26
Preparing to Install the Refrigerator. . . . . . . . . . . . . . . .16
Installing the Refrigerator. . . . . . . . . . . . . . . . . . . . . . . .19
Troubleshooting
Normal Operating Conditions. . . . . . . . . . . . . . . . . . . . .25
Troubleshooting Tips . . . . . . . . . . . . . . . . . . . . . . . . . . .26
Limited Warranty. . . . . . . . . . . . . . . . . . . . . . . . . . . . . . .29
Consumer Support
MWF Performance Data Sheet . . . . . . . . . . . . . . . . . . .30
MWF Water Filter Cartridge Limited Warranty. . . . . . . .31
Consumer Support. . . . . . . . . . . . . . . . . . . . . . . . . . . . .32
Write the model and serial numbers here:
Model # _______________________________
Serial # _______________________________
Find these numbers on a label on the left side, near the middle of the refrigerator compartment.
ENGLISH/FRANÇAIS/ESPAÑOL
49-1000081 Rev. 2 07-19 GEA

THANK YOU FOR MAKING CAFÉ A PART OF YOUR HOME.
We take pride in the craftsmanship, innovation and design that goes into every Café product, and we think you will too. Among other things, registration of your appliance ensures that we can deliver important product information and warranty details when you need them.
Register your Café appliance now online. Helpful websites are available in the Consumer Support section of this Owner’s Manual. You may also mail in the pre-printed registration card included in the packing material.


 TM
TM
2 |
49-1000081 Rev. 2 |

IMPORTANT SAFETY INFORMATION
READ ALL INSTRUCTIONS BEFORE USING THE APPLIANCE
 WARNING To reduce the risk of fire, explosion, electric shock, or injury when using your refrigerator, follow these basic safety precautions:
Ŷ 7KLV UHIULJHUDWRU PXVW EH SURSHUO\ LQVWDOOHG |
Ŷ 7R DYRLG VHULRXV LQMXU\ RU GHDWK FKLOGUHQ VKRXOG QRW |
|
and located in accordance with the Installation |
stand on, or play in or with the appliance. |
|
Instructions before it is used. |
Ŷ &KLOGUHQ DQG SHUVRQV ZLWK UHGXFHG SK\VLFDO VHQVRU\ |
|
Ŷ 8QSOXJ WKH UHIULJHUDWRU EHIRUH PDNLQJ UHSDLUV RU |
or mental capabilities or lack of experience and |
|
cleaning. |
knowledge can use this appliance only if they are |
|
NOTE: Power to the refrigerator cannot be |
supervised or have been given instructions on safe |
|
disconnected by any setting on the control panel. |
XVH DQG XQGHUVWDQG WKH KD]DUGV LQYROYHG |
|
NOTE: Repairs must be performed by a qualified |
Ŷ 7KLV DSSOLDQFH LV LQWHQGHG WR EH XVHG LQ KRXVHKROG |
|
Service Professional. |
||
and similar applications such as: staff kitchen areas |
||
|
Ŷ 5HSODFH DOO SDUWV DQG SDQHOV EHIRUH RSHUDWLQJ Ŷ 'R QRW XVH DQ H[WHQVLRQ FRUG
Ŷ 'R QRW VWRUH RU XVH JDVROLQH RU RWKHU IODPPDEOH vapors and liquids in the vicinity of this or any other appliance.
Ŷ 'R QRW VWRUH H[SORVLYH VXEVWDQFHV VXFK DV DHURVRO cans with a flammable propellant in this appliance.
Ŷ 7R SUHYHQW VXIIRFDWLRQ DQG HQWUDSPHQW KD]DUGV
WR FKLOGUHQ UHPRYH WKH IUHVK IRRG DQG IUHH]HU doors from any refrigerator before disposing of it or discontinuing its use.
LQ VKRSV RIILFHV DQG RWKHU ZRUNLQJ HQYLURQPHQWV IDUP KRXVHV E\ FOLHQWV LQ KRWHOV PRWHOV EHG
EUHDNIDVW DQG RWKHU UHVLGHQWLDO HQYLURQPHQWV catering and similar non-retail applications.
Ŷ 'R QRW DSSO\ KDUVK FOHDQHUV WR WKH UHIULJHUDWRU
Certain cleaners will damage plastic which may cause parts such as the door or door handles to detach unexpectedly. See the Care and Cleaning section for detailed instructions.

 CAUTION To reduce the risk of injury when using your refrigerator, follow these basic safety precautions.
Ŷ 'R QRW FOHDQ JODVV VKHOYHV RU FRYHUV ZLWK ZDUP water when they are cold. Glass shelves and covers may break if exposed to sudden temperature changes or impact, such as bumping or dropping. Tempered glass is designed to shatter into many small pieces if it breaks.
Ŷ .HHS ILQJHUV RXW RI WKH ³SLQFK SRLQW´ DUHDV clearances between the doors and between the doors and cabinet are necessarily small. Be careful closing doors when children are in the area.
Ŷ 'R QRW WRXFK WKH FROG VXUIDFHV LQ WKH IUHH]HU compartment when hands are damp or wet, skin may stick to these extremely cold surfaces.
Ŷ 'R QRW UHIUHH]H IUR]HQ IRRGV ZKLFK KDYH WKDZHG completely.
Ŷ ,Q UHIULJHUDWRUV ZLWK DXWRPDWLF LFH PDNHUV DYRLG contact with the moving parts of the ejector mechanism, or with the heating element that releases the cubes. Do not place fingers or hands on the automatic ice making mechanism while the
IUHH]HU LV SOXJJHG LQ
INSTALLATION

 WARNING
 EXPLOSION HAZARD
.HHS IODPPDEOH PDWHULDOV DQG YDSRUV VXFK DV JDVROLQH DZD\ IURP UHIULJHUDWRU )DLOXUH WR GR VR FDQ UHVXOW LQ ILUH explosion, or death.

 WARNING

 Tip Over Hazard.
These appliances are top heavy, especially with any doors open, and must be secured to prevent tipping forward which could result in death or serious injury. Read and follow the entire installation instructions for securing the appliance with the anti-tip system.
INFORMATION SAFETY
READ AND SAVE THESE INSTRUCTIONS
49-1000081 Rev. 2 |
3 |

SAFETY INFORMATION
IMPORTANT SAFETY INFORMATION
READ ALL INSTRUCTIONS BEFORE USING THE APPLIANCE
CONNECTING ELECTRICITY

 WARNING
 ELECTRICAL SHOCK HAZARD
Plug into a grounded 3-prong outlet
Do not remove the ground prong
Do not use an adapter
Failure to follow these instructions can result in death, fire, or electrical shock.
Do not, under any circumstances, cut or remove the third (ground) prong from the power cord. For personal safety, this appliance must be properly grounded.
The power cord of this appliance is equipped with a 3-prong (grounding) plug which mates with a standard
SURQJ JURXQGLQJ ZDOO RXWOHW WR PLQLPL]H WKH SRVVLELOLW\ RI HOHFWULF VKRFN KD]DUG IURP WKLV DSSOLDQFH
Have the wall outlet and circuit checked by a qualified electrician to make sure the outlet is properly grounded.
Where a standard 2-prong wall outlet is encountered, it is your personal responsibility and obligation to have it replaced with a properly grounded 3-prong wall outlet. Do not use an adapter.
The refrigerator should always be plugged into its own individual electrical outlet which has a voltage rating that matches the rating plate.
$ 9ROW $& +] RU DPS IXVHG JURXQGHG electrical supply is required. This provides the best performance and also prevents overloading house
ZLULQJ FLUFXLWV ZKLFK FRXOG FDXVH D ILUH KD]DUG IURP overheated wires.
Never unplug your refrigerator by pulling on the power cord. Always grip plug firmly and pull straight out from the outlet.
Immediately discontinue use of a damaged supply cord. If the supply cord is damaged, it must be replaced by a qualified service professional with an
DXWKRUL]HG VHUYLFH SDUW IURP WKH PDQXIDFWXUHU
When moving the refrigerator away from the wall, be careful not to roll over or damage the power cord.
PROPER DISPOSAL OF YOUR OLD REFRIGERATOR

 WARNING SUFFOCATION AND ENTRAPMENT HAZARD
Failure to follow these disposal instructions can result in death or serious injury
IMPORTANT: Child entrapment and suffocation |
Before You Throw Away Your Old Appliance |
|
are not problems of the past. Junked or abandoned |
Ŷ 7DNH RII WKH IUHVK IRRG DQG IUHH]HU GRRUV |
|
refrigerators are still dangerous even if they will sit |
Ŷ Leave the shelves in place so that children may not |
|
IRU ³MXVW D IHZ GD\V ´ ,I \RX DUH JHWWLQJ ULG RI \RXU ROG |
||
easily climb inside. |
||
refrigerator, please follow the instructions below to help |
||
|
||
prevent accidents. |
|
Refrigerant and Foam Disposal:
Dispose of appliance in accordance with Federal and Local Regulations. Contact your local authorities for the environmentally safe disposal of your appliance.
READ AND SAVE THESE INSTRUCTIONS
4 |
49-1000081 Rev. 2 |

Controls
Dispense Models
Non-dispense Models
NOTE: The refrigerator is shipped with protective film covering the temperature controls. If this film was not removed during installation, remove it now.
The temperature controls are preset in the factory at 37°F (3°C) for the refrigerator compartment and 0°F (-18°C) for
WKH IUHH]HU FRPSDUWPHQW $OORZ KRXUV IRU WKH WHPSHUDWXUH WR VWDELOL]H WR WKH SUHVHW UHFRPPHQGHG VHWWLQJV
The temperature controls can display both the SET temperature as well as the actual temperature in the refrigerator
DQG IUHH]HU 7KH DFWXDO WHPSHUDWXUH PD\ YDU\ VOLJKWO\ IURP WKH SET temperature based on usage and operating environment.
Changing the Temperature for Non-dispense Models
To change the temperature, press and release the |
To turn OFF cooling system, press and hold either (+) |
(+) or (-) pad to the desired temperature set point for |
pad until both displays show OFF. |
IUHVK IRRG DQG IUHH]HU VHSDUDWHO\ $OORZ KRXUV IRU WKH |
|
refrigerator to reach the temperature you have set. |
|
Changing the Temperature for Dispense Models
To change the temperature, press and release the |
To turn OFF cooling system, press and hold Fridge |
Freezer or Fridge pad. The display will show the set |
and Ice Maker simultaneously for 3 seconds. When the |
temperature. To change the temperature, press either the |
cooling system is OFF the display should read OFF. |
Freezer or Fridge pad until the desired temperature is |
|
displayed. |
|
Controls REFRIGERATOR: THE USING
49-1000081 Rev. 2 |
5 |

USING THE REFRIGERATOR: Controls
Controls
Not all features available on all models.
Freezer temp control $GMXVW IUHH]HU FRPSDUWPHQW WHPSHUDWXUH
Fresh food temp control
Adjust fresh food compartment temperature.
TurboFreeze™ setting
$FWLYDWH 7XUER)UHH]H WR TXLFNO\ UHVWRUH IUHH]HU temperatures after frequent door openings.
TurboCool™ setting
Activate TurboCool to quickly restore fresh food temperature after frequent door openings.
Lock controls
Press and hold 3 seconds to lock out ice and water dispenser and all feature and temperature buttons.
LED dispenser light
LED lighting that can be turned on/off to light your dispenser.
Door Alarm
6RXQGV WR DOHUW ZKHQ WKH IUHH]HU RU IUHVK IRRG GRRUV have been open for more than 2 minutes. Press and hold Door Alarm pad and it will toggle the sound between low, high and off.
Ice maker setting
Turn your ice makers on/off.
Cooling system On/Off
Press and hold Fridge & Ice Maker simultaneously for 3 seconds to turn the cooling system on or off.
Metric/English units
Press and hold Ice Maker & door alarm simultaneously for 3 seconds to switch between Metric & English units.
 Reset water filter
Press and hold the RESET FILTER Button for nondispense models or press and hold the WATER button for dispense models to reset the filter indicator.
6 |
49-1000081 Rev. 2 |
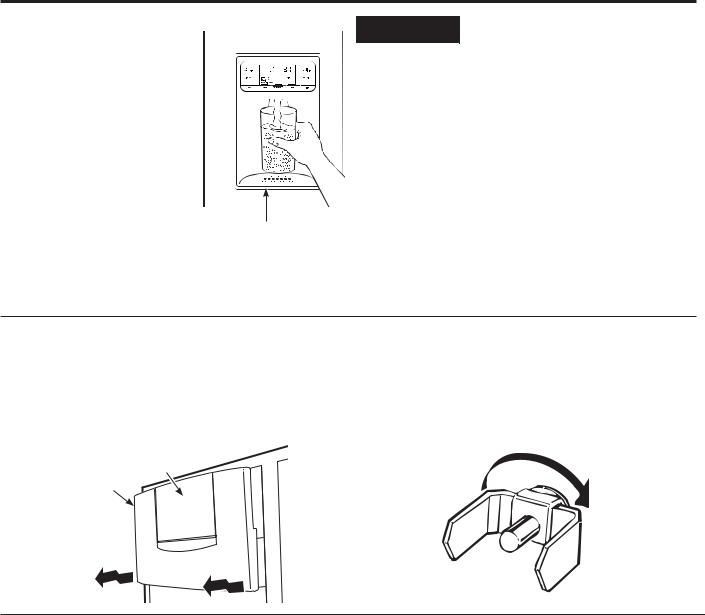
Ice and Water Dispenser (On some models.)
To dispense water or ice: select
Water, Crushed, or Cubed. Press the glass gently against the
top of the dispenser cradle.
The drip tray is not self-draining. To reduce water spotting, the shelf and its grille should be cleaned regularly.
If no water is dispensed when the refrigerator is first installed, there may be air in the water line system. Press the dispenser
cradle for at least two minutes to remove trapped air from
the water line and to fill the water system. To flush out impurities in the water line, throw away the first gallon (3.8 liters) of water.
 CAUTION Never put fingers or any other objects into the ice crusher discharge opening.
Locking the Dispenser:
Touch Lock for 3 seconds to lock the dispenser and control pad. To unlock, touch Lock again for 3 seconds.
Light:
This feature turns the light on and off. The light also comes on when the dispenser cradle is pressed. If this light burns out, contact factory service.
Ice Storage Drawer on Dispenser Models
To remove:
Lift up the access door to reach the icemaker. Set the icemaker power switch to the OFF position. With the access door closed, support the storage bin at the bottom while slightly lifting. Pull bin straight out.
Access Door
Ice Storage Bin
To replace:
Slide the bin back until the tab on the bin locks into the slot on the shelf. If the bin does not go all the way back, remove it and rotate the drive mechanism 1/4 turn. Then push the bin back again.
Rotate
Drive
Mechanism
Important Facts About Your Dispenser
Ŷ 'R QRW DGG LFH IURP WUD\V RU EDJV WR WKH VWRUDJH ELQ ,W may not crush or dispense well.
Ŷ $YRLG RYHUILOOLQJ JODVV ZLWK LFH DQG XVH RI QDUURZ JODVVHV
Backed-up ice can jam the chute or cause the door in the
FKXWH WR IUHH]H VKXW ,I LFH LV EORFNLQJ WKH FKXWH SRNH LW through with a wooden spoon.
Ŷ %HYHUDJHV DQG IRRGV VKRXOG QRW EH TXLFN FKLOOHG LQ WKH ice storage bin. Cans, bottles or food packages in the storage bin may cause the icemaker or auger to jam.
Ŷ 7R NHHS GLVSHQVHG LFH IURP PLVVLQJ WKH JODVV SXW WKH glass close to, but not touching, the dispenser opening.
Ŷ 6RPH FUXVKHG LFH PD\ EH GLVSHQVHG HYHQ WKRXJK \RX selected Cubed. This happens occasionally when a few cubes have been left in the crusher.
Ŷ $IWHU FUXVKHG LFH LV GLVSHQVHG VRPH ZDWHU PD\ GULS IURP the chute.
Ŷ 6RPHWLPHV D VPDOO PRXQG RI VQRZ ZLOO IRUP RQ WKH GRRU in the ice chute. This condition is normal and usually occurs when you have dispensed crushed ice repeatedly. The snow will eventually evaporate.
Ŷ 7KH ILUVW JODVV RI ZDWHU GLVSHQVHG PD\ EH ZDUPHU WKDQ the following ones. This is normal.
Ŷ 'LVSHQVHG ZDWHU LV QRW LFH FROG )RU FROGHU ZDWHU VLPSO\ add crushed ice or cubes before dispensing water.
Ŷ 7R HOLPLQDWH GULSV RQ WKH GULS WUD\ WLOW WKH JODVV LQ slightly when dispensing water.
Dispenser Water and Ice REFRIGERATOR: THE USING
49-1000081 Rev. 2 |
7 |

USING THE REFRIGERATOR: Automatic Icemaker
Automatic Icemaker
A newly-installed refrigerator may take 12–24 hours to begin making ice.
Automatic Icemaker
Icemaker
Power |
Feeler Arm |
|
Switch |
||
|
When the refrigerator has been connected to the water supply, set the power switch on the icemaker to ON.
For dispense models, the icemaker can be turned on and off using the power switch on the icemaker or by using the Ice Maker button on the control panel. If you use the control panel to turn the icemaker off you will have to use the control panel to turn it back on. The same is true for the power switch on the icemaker.
The icemaker will produce seven cubes per cycle— approximately 15 cycles in a 24-hour period, depending
RQ IUHH]HU FRPSDUWPHQW WHPSHUDWXUH URRP WHPSHUDWXUH number of door openings and other use conditions.
If the refrigerator is operated before the water connection is made to the icemaker, set the power switch on the icemaker to OFF.

 CAUTION Avoid contact with the moving parts of the ejector mechanism, or with the heating element (located on the bottom of the ice maker) that releases the cubes. Do not place fingers or hands on the automatic ice making mechanism while the refrigerator is plugged in.
Important Facts About Your Icemaker
Ŷ <RX PD\ KHDU D EX]]LQJ VRXQG HDFK WLPH WKH LFHPDNHU fills with water.
Ŷ 7KURZ DZD\ WKH ILUVW IHZ EDWFKHV RI LFH WR DOORZ WKH ZDWHU line to clear.
Ŷ %H VXUH QRWKLQJ LQWHUIHUHV ZLWK WKH VZHHS RI WKH IHHOHU arm.
Ŷ :KHQ WKH ELQ ILOOV WR WKH OHYHO RI WKH IHHOHU DUP WKH icemaker will stop producing ice. It is normal for several cubes to be joined together.
Ŷ ,I LFH LV QRW XVHG IUHTXHQWO\ ROG LFH FXEHV ZLOO EHFRPH cloudy, taste stale and shrink.
NOTE: In homes with lower-than-average water pressure, you may hear the icemaker cycle multiple times when making one batch of ice. Icemaker works best between 40 and 120 psi (275-827 kPa).
8 |
49-1000081 Rev. 2 |
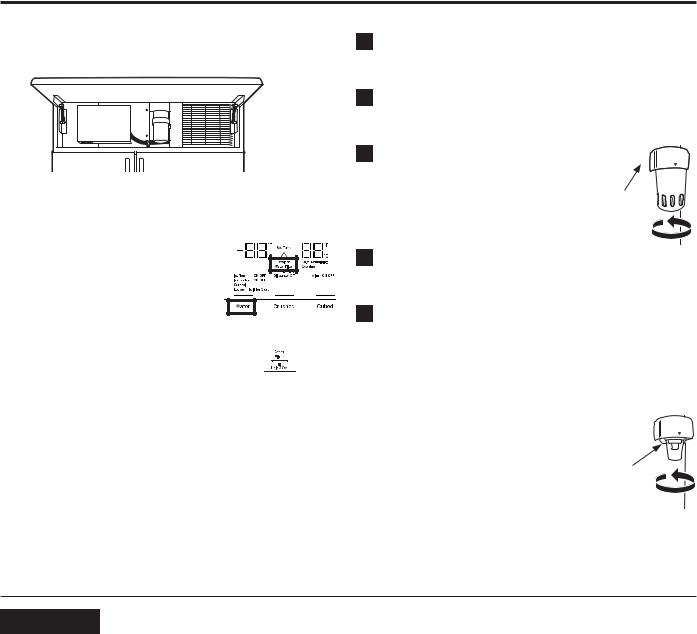
Water Filter Cartridge (On some models.)
Water filter cartridge |
|
Installing the filter cartridge |
|
The water filter cartridge is located behind the upper |
1 Fill the replacement cartridge with water from the |
||
cover at the top of the refrigerator. |
|
tap to allow for better flow from the dispenser |
|
|
|
immediately after installation. |
|
|
|
2 Line up the arrow on the cartridge and the cartridge |
|
|
|
holder. Place the top of the new cartridge up inside |
|
|
|
the holder. Do not push it up into the holder. |
|
|
|
3 Slowly turn it to the right until the |
|
|
|
filter cartridge stops. DO NOT |
|
When to replace the filter on models with a |
OVERTIGHTEN. As you turn the |
Cartridge |
|
cartridge it will automatically raise |
|||
replacement indicator light |
|
itself into position. The cartridge |
Holder |
There is a replacement indicator |
Dispense Models |
|
|
will move about a 1/2 turn. |
|
||
light for the water filter cartridge on |
|
|
|
|
4 Run water from the dispenser for |
|
|
the dispenser. This light will turn |
|
|
|
orange to tell you that you need to |
|
1-1/2 gallons (5.7 liters) (about three minutes) to |
|
replace the filter soon. |
|
clear the system and prevent sputtering. |
|
The filter cartridge should be |
|
5 Press and hold the RESET FILTER Button for non- |
|
replaced when the replacement |
Non-Dispense Models |
dispense models or press and hold the WATER |
|
indicator light turns red or if the |
button for dispense models to reset the filter |
||
|
indicator. |
|
|
flow of water to the dispenser or |
|
|
|
|
|
|
|
icemaker decreases. |
|
NOTE: A newly installed water filter cartridge may cause |
|
Removing the filter cartridge |
|
water to spurt from the dispenser. |
|
|
|
|
|
If you are replacing the cartridge, first remove the old |
Filter bypass plug |
|
|
one by slowly turning it to the left. Do not pull down on |
|
||
the cartridge. A small amount of water may drip down. |
You must use the filter bypass plug |
|
|
|
|
when a replacement filter cartridge is |
Filter |
NOTE: To reduce the risk associated with property |
not available. The dispenser and the |
Bypass |
|
damage due to water leakage, read and follow |
icemaker will not operate without the filter Plug |
||
instructions before installation and use of this system. |
or filter bypass plug. |
|
|
,QVWDOODWLRQ DQG XVH 0867 FRPSO\ ZLWK DOO VWDWH DQG ORFDO plumbing codes.

 WARNING To reduce the risk associated with choking, do not allow children under 3 years of age to have access to small parts during the installation of this product. The disposable filter cartridge should be replaced every 6 months at the rated capacity, or sooner if a noticeable reduction in flow rate occurs.
For the maximum benefit of your filtration system, GE Appliances, a Haier company, recommends the use of
*( $SSOLDQFHV EUDQGHG ILOWHUV RQO\ 8VLQJ *( $SSOLDQFHV EUDQGHG ILOWHUV LQ &DIp UHIULJHUDWRUV SURYLGHV RSWLPDO performance and reliability. Our filters meet rigorous industry NSF standards for safety and quality that are important for products that are filtering your water. There is no assurance that brands other than GE Appliances filters meet our standards for quality, performance and reliability.
If you have questions, or to order additional filter cartridges, visit gewaterfilters.com. In Canada, visit cafeappliances.ca/service or consult the yellow pages for the nearest Camco Service Center.
Cartridge Filter Water REFRIGERATOR: THE USING
49-1000081 Rev. 2 |
9 |
USING THE REFRIGERATOR: Climate Control Drawer
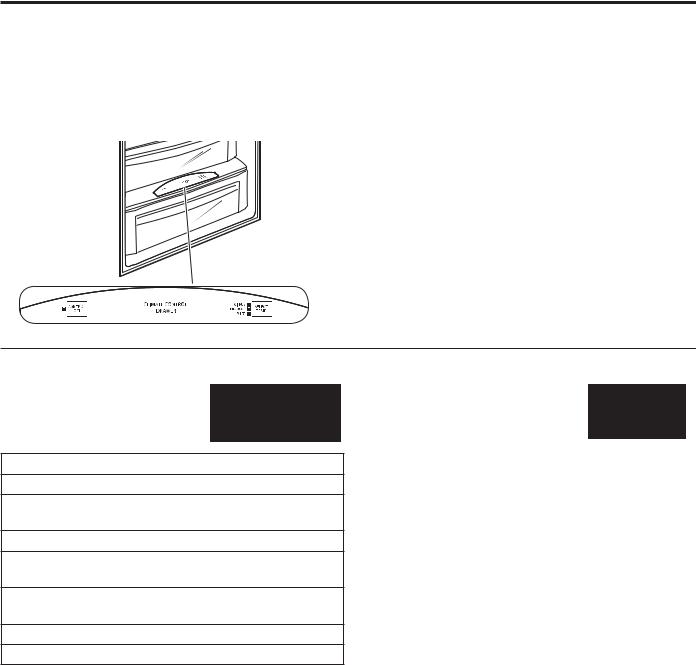
Climate Control Drawer
The Climate Control feature is a system of dampers, a fan, a temperature thermistor, and a heater. The Climate Control drawer can be used to store items at their optimum temperatures.
The drawer is tightly sealed to prevent the drawer’s temperature from causing temperature fluctuations in the rest of the refrigerator.
SELECT TEMP—8VH WKLV IHDWXUH WR VWRUH LWHPV DW their optimum temperatures. See Climate Control Chart below.
CONTROL LOCK—8VH WKLV IHDWXUH WR ORFN WKH temperature controls.
NOTE: When the controls on the Climate Control drawer are turned off, the drawer will maintain temperatures at 42-48°F (5.6-8.9°C).
Climate Control Chart
NOTE: Results may vary depending on packaging, starting
temperature and other food traits.
Citrus Setting (39–47°F) (3.9-8.3°C)
Oranges, Lemons, Limes, Pineapple, Cantaloupe
Beans, Cucumbers, Tomatoes, Peppers, Eggplant,
Squash
Produce Setting (31–38°F) (-0.6 - 3.3°C)
6WUDZEHUULHV 5DVSEHUULHV .LZLIUXLW 3HDUV &KHUULHV
Blackberries, Grapes, Plums, Nectarines, Apples
Asparagus, Broccoli, Corn, Mushrooms, Spinach,
&DXOLIORZHU .DOH *UHHQ 2QLRQV %HHWV 2QLRQV
Meat Setting (27–37°F) (-2.8 - 2.8°C)
Raw Meat, Fish and Poultry
Control Lock
Press and hold this pad for 3 seconds to lock the settings for the Climate Control drawer. To unlock, press and hold for another 3 seconds.
10 |
49-1000081 Rev. 2 |
 Loading...