


GE CYE22USHKSS, CYE22USHJSS, CYE22USHISS, CYE22USHGSS, CYE22USHFSS Owner’s Manual
...Bottom Freezer |
REFRIGERATORS |
SAFETY INFORMATION . . . . . 3
OPERATING INSTRUCTIONS
Features . . . . . . . . . . . . . . . . . . . . . . . . . . 6 Controls . . . . . . . . . . . . . . . . . . . . . . . . . . 8 Dispenser . . . . . . . . . . . . . . . . . . . . . . . . . 11 Water Filter . . . . . . . . . . . . . . . . . . . . . . 12 Hot Water . . . . . . . . . . . . . . . . . . . . . . . 13 Single Serve Keurig K-Cup Brewer . . 14 Appliance Communication . . . . . . . . . 15 Fresh Food Storage Options . . . . . . . 16 Climate Zone & Temperature Controlled Drawer . . . . . . . . . . . . . . . . 18 Freezer . . . . . . . . . . . . . . . . . . . . . . . . . . 20 Automatic Ice maker . . . . . . . . . . . . . . 21
CARE AND CLEANING . . . . . 22
Replacing the Lights . . . . . . . . . . . . . . 23
INSTALLATION INSTRUCTIONS
Preparing to Install the
Refrigerator. . . . . . . . . . . . . . . . . . . . . . 24 Installing the Refrigerator. . . . . . . . . . 26 Installing the Anti-Tip Bracket . . . . . . 32 Installing the Water Line. . . . . . . . . . . 37
TROUBLESHOOTING TIPS. . 41
Normal Operating Conditions . . . . . .40 Truth or Myth . . . . . . . . . . . . . . . . . . . . 43
WARRANTY. . . . . . . . . . . . . . . . . . 45
CONSUMER SUPPORT
RPWFE Water Filter Cartridge
Limited Warranty. . . . . . . . . . . . . . . . 46
Performance Data Sheet . . . . . . . . . . . 47
Consumer Support . . . . . . . . . . . . . . . . 48
*Select Models Only
Write the model and serial numbers here:
Model #_________________
Serial # _________________
Find these numbers on a label on the left side, near the middle of the refrigerator compartment.
OWNER’S MANUAL &
INSTALLATION
INSTRUCTIONS
GE Café™ models Models that start with CFE are Standard Depth Models (SD) Models that start with CYE and CWE are Counter Depth Models
(CD)
ENGLISH/FRANÇAIS/
ESPAÑOL
GE is a trademark of the General Electric Company. Manufactured under trademark license.
239D3389P011 Pub No. 49-60741-4 12-16 GEA

THANK YOU FOR MAKING GE APPLIANCES A PART OF YOUR HOME.
Whether you grew up with GE Appliances, or this is your first, we’re happy to have you in the family.
We take pride in the craftsmanship, innovation and design that goes into every GE Appliances product, and we think you will too. Among other things, registration of your appliance ensures that we can deliver important product information and warranty details when you need them.
Register your GE appliance now online. Helpful websites and phone numbers are available in the Consumer Support section of this Owner’s Manual. You may also mail in the pre-printed registration card included in the packing material.
2 |
|
49-60741-4 |
IMPORTANT SAFETY INFORMATION
READ ALL INSTRUCTIONS BEFORE USING THE APPLIANCE
WARNING To reduce the risk of fire, explosion, electric shock, or injury when using your refrigerator follow these basic safety precautions:
Ŷ 7KLV UHIULJHUDWRU PXVW EH SURSHUO\ LQVWDOOHG DQG ORFDWHG LQ DFFRUGDQFH ZLWK WKH ,QVWDOODWLRQ ,QVWUXFWLRQV EHIRUH LW LV XVHG
Ŷ 8QSOXJ WKH UHIULJHUDWRU EHIRUH PDNLQJ UHSDLUV replacing a light bulb, or cleaning.
Note: Power to the refrigerator cannot be disconnected by any setting on the control panel. Note: Repairs must be performed by a qualified service professional.
Ŷ 5HSODFH DOO SDUWV DQG SDQHOV EHIRUH RSHUDWLQJ
Ŷ 'R QRW VWRUH RU XVH JDVROLQH RU RWKHU IODPPDEOH vapors and liquids in the vicinity of this or any other appliance.
Ŷ %HFDXVH RI SRWHQWLDO VDIHW\ KD]DUGV XQGHU FHUWDLQ conditions, we strongly recommend against the use of an extension cord. However, if you must use an extension cord, it is absolutely necessary that it be a
8/ OLVWHG LQ WKH 8QLWHG 6WDWHV RU D &6$ FHUWLILHG LQ
&DQDGD ZLUH JURXQGLQJ W\SH DSSOLDQFH H[WHQVLRQ cord having a grounding type plug and outlet and that the electrical rating of the cord be 15 amperes
PLQLPXP DQG YROWV
Ŷ 7R SUHYHQW VXIIRFDWLRQ DQG HQWUDSPHQW KD]DUGV
WR FKLOGUHQ UHPRYH WKH IUHVK IRRG DQG IUHH]HU doors from any refrigerator before disposing of it or discontinuing its use.
Ŷ 'R QRW DOORZ FKLOGUHQ WR FOLPE VWDQG RU KDQJ RQ WKH door handles or the shelves in the refrigerator. They could seriously injure themselves.
STATE OF CALIFORNIA PROPOSITION 65 WARNINGS:
 WARNING This product contains one or more chemicals known to the State of California to cause cancer and birth defects or other reproductive harm.
|
To reduce the risk of injury when using your refrigerator, follow these basic safety |
CAUTION |
|
|
precautions. |
Ŷ 'R QRW FOHDQ JODVV VKHOYHV RU FRYHUV ZLWK ZDUP water when they are cold. Glass shelves and covers may break if exposed to sudden temperature changes or impact, such as bumping or dropping. Tempered glass is designed to shatter into many small pieces if it breaks.
Ŷ .HHS ILQJHUV RXW RI WKH ³SLQFK SRLQW´ DUHDV clearances between the doors and between the doors and cabinet are necessarily small. Be careful closing doors when children are in the area.
Ŷ 'R QRW UHIUHH]H IUR]HQ IRRGV ZKLFK KDYH WKDZHG completely.
Ŷ ,Q UHIULJHUDWRUV ZLWK DXWRPDWLF LFHPDNHUV DYRLG contact with the moving parts of the ejector mechanism, or with the heating element that
UHOHDVHV WKH FXEHV 'R QRW SODFH ILQJHUV RU KDQGV on the automatic ice making mechanism while the refrigerator is plugged in.
INSTALLATION

 WARNING
 EXPLOSION HAZARD
.HHS IODPPDEOH PDWHULDOV DQG YDSRUV VXFK DV JDVROLQH DZD\ IURP UHIULJHUDWRU )DLOXUH WR GR VR FDQ UHVXOW LQ ILUH explosion, or death.

 WARNING

 TIP OVER HAZARD.
%XLOW LQ VW\OH PRGHOV PRGHO 3<( &<( *<( 3:( &:( DQG =:( DUH WRS KHDY\ HVSHFLDOO\ ZLWK DQ\ GRRUV open. These models must be secured with the anti-tip floor bracket to prevent tipping forward, which could result in death or serious injury. Read and follow the entire installation instructions for installing the anti-tip floor bracket packed with your refrigerator.
READ AND SAVE THESE INSTRUCTIONS
INFORMATION SAFETY
49-60741-4 |
3 |
SAFETY INFORMATION
IMPORTANT SAFETY INFORMATION
READ ALL INSTRUCTIONS BEFORE USING THE APPLIANCE
CONNECTING ELECTRICITY

 WARNING
 ELECTRICAL SHOCK HAZARD
Plug into a grounded 3-prong outlet
'R QRW UHPRYH WKH JURXQG SURQJ 'R QRW XVH DQ DGDSWHU
)DLOXUH WR IROORZ WKHVH LQVWUXFWLRQV FDQ UHVXOW LQ GHDWK ILUH RU HOHFWULFDO VKRFN
Do not, under any circumstances, cut or remove the third (ground) prong from the power cord. For personal safety, this appliance must be properly grounded.
The power cord of this appliance is equipped with a
SURQJ JURXQGLQJ SOXJ ZKLFK PDWHV ZLWK D VWDQGDUGSURQJ JURXQGLQJ ZDOO RXWOHW WR PLQLPL]H WKH SRVVLELOLW\ RI HOHFWULF VKRFN KD]DUG IURP WKLV DSSOLDQFH
Have the wall outlet and circuit checked by a qualified electrician to make sure the outlet is properly grounded.
Where a standard 2-prong wall outlet is encountered, it is your personal responsibility and obligation to have it replaced with a properly grounded 3-prong wall outlet.
'R QRW XVH DQ DGDSWHU
The refrigerator should always be plugged into its own individual electrical outlet which has a voltage rating that matches the rating plate.
$ 9ROW $& +] RU DPS IXVHG JURXQGHG electrical supply is required. This provides the best performance and also prevents overloading house
ZLULQJ FLUFXLWV ZKLFK FRXOG FDXVH D ILUH KD]DUG IURP overheated wires.
Never unplug your refrigerator by pulling on the power cord. Always grip plug firmly and pull straight out from the outlet.
Repair or replace immediately all power cords that
KDYH EHFRPH IUD\HG RU RWKHUZLVH GDPDJHG 'R QRW use a cord that shows cracks or abrasion damage along its length or at either end.
When moving the refrigerator away from the wall, be careful not to roll over or damage the power cord.
PROPER DISPOSAL OF YOUR OLD APPLIANCE

 WARNING SUFFOCATION AND CHILD ENTRAPMENT HAZARD
5HPRYH IUHVK IRRG DQG IUHH]HU GRRUV IURP WKH UHIULJHUDWRU SULRU WR GLVSRVDO )DLOXUH WR GR VR FDQ UHVXOW LQ FKLOG entrapment which can lead to death or brain damage.
IMPORTANT: Child entrapment and suffocation are not problems of the past. Junked or abandoned refrigerators are still dangerous even if they will sit
IRU ³MXVW D IHZ GD\V ´ ,I \RX DUH JHWWLQJ ULG RI \RXU ROG appliance, please follow the instructions below to help prevent accidents.
Before You Throw Away Your Old Refrigerator:
Ŷ 7DNH RII WKH IUHVK IRRG DQG IUHH]HU GRRUV
Ŷ /HDYH WKH VKHOYHV LQ SODFH VR WKDW FKLOGUHQ PD\ QRW easily climb inside.
Refrigerants
All refrigeration products contain refrigerants, which under federal law must be removed prior to product
GLVSRVDO ,I \RX DUH JHWWLQJ ULG RI DQ ROG UHIULJHUDWLRQ product, check with the company handling the disposal about what to do.
READ AND SAVE THESE INSTRUCTIONS
4 |
49-60741-4 |

IMPORTANT SAFETY INFORMATION
READ ALL INSTRUCTIONS BEFORE USING THE APPLIANCE
HOT WATER DISPENSER

 WARNING
 Scalding Hazard.
7KH KRW ZDWHU GLVSHQVHU LV FDSDEOH RI KHDWLQJ ZDWHU WR D WHPSHUDWXUH RI DSSUR[LPDWHO\ ) & :DWHU
WHPSHUDWXUHV DERYH ) & FDQ FDXVH VHYHUH EXUQV RU GHDWK IURP VFDOGLQJ &KLOGUHQ WKH GLVDEOHG DQG the elderly are at highest risk of being scalded.
Use this appliance only for its intended purpose as described in this Owner’s Manual. To reduce the risk of severe burns, scald injuries, or death when using your hot water dispenser, the instructions below must be followed:
Ŷ 'R QRW SHUPLW FKLOGUHQ WR XVH WKH KRW ZDWHU dispenser.
ŶThe hot water dispensing knob requires both twist and push motions in order to reduce the risk of hot water being dispensed unintentionally or by small
FKLOGUHQ 'R QRW WDPSHU ZLWK RU PRGLI\ WKH KRW ZDWHU dispensing knob.
ŶThe water coming from the dispenser is very hot.
8VH H[WUHPH FDXWLRQ ZKHQ GLVSHQVLQJ DQG GULQNLQJ water. Allow water to cool to a drinkable temperature before drinking.
Ŷ :KHQ GLVSHQVLQJ ZDWHU EHORZ Û) DOZD\V WHVW WKH temperature of the water before drinking.
ŶWhen dispensing hot water, the container can
EHFRPH YHU\ KRW 8VH D WHPSHUDWXUH LQVXODWLQJ
FRQWDLQHU VXFK DV FHUDPLF RU IRDP 8VLQJ FRQWDLQHU materials such as paper or plastic may result in
D EXUQ ZKLOH KROGLQJ WKH FXS 'R QRW XVH JODVV containers, as thermal shock can cause the container to break and may result in scalding or lacerations.
ŶAlways follow the formula manufacturer’s instructions for preparation of baby formula.
Ŷ 'R QRW XVH ZLWK ZDWHU WKDW LV PLFURELRORJLFDOO\ XQVDIH or of unknown quality.
ŶYour container should be close to the dispensing
SRLQW WR PLQLPL]H WKH VSODVKLQJ RI KRW ZDWHU
ŶA newly installed water filter cartridge will cause water to spurt from the dispenser. Run 2 gallons
RI ZDWHU WKURXJK WKH FROG ZDWHU GLVSHQVHU DERXW
PLQXWHV WR UHPRYH DLU IURP WKH V\VWHP 8QWLO WKLV DLU is removed from the system through the cold water
GLVSHQVHU '2 127 XVH WKH KRW ZDWHU GLVSHQVHU DV it may result in spurting of hot water and lead to hot water scalding.
ŶThe first time the hot water feature is used, confirm
LI \RX OLYH DERYH IHHW KLJK DOWLWXGH 7KLV OLPLWV the temperature of the hot water system to avoid boiling. To access the high altitude selection, go to the settings menu.
ŶThe hot water dispenser is designed to only dispense
ZDWHU 'R QRW DWWHPSW WR KHDW RU GLVSHQVH DQ\WKLQJ
RWKHU WKDQ ZDWHU 'R QRW DWWHPSW WR GLVDVVHPEOH RU clean the tank.
Ŷ 7KH KRW ZDWHU GLVSHQVLQJ WDQN LV D QRQ SUHVVXUL]HG tank, with a vent on the tank and a dispenser tube
RXWOHW 'R QRW PRGLI\ WKH V\VWHP FORVH RU EORFN WKH dispense tube, or connect any other type of device
WR WKH WDQN RU GLVSHQVH WXEH 'RLQJ VR PD\ OHDG WR rupture of the tank and hot water scalding.
INFORMATION SAFETY
READ AND SAVE THESE INSTRUCTIONS
49-60741-4 |
5 |

REFRIGERATOR:)HDWXUHV |
Features |
|
|
|
|
USING THE |
|
|
|
Space-saving ice maker* |
QuickSpace™ shelf* |
,FH PDNHU DQG ELQ DUH ORFDWHG RQ WKH GRRU FUHDWLQJ more usable storage space.
 Showcase LED lighting
/(' OLJKWLQJ LV SRVLWLRQHG WKURXJKRXW WKH LQWHULRU WR VSRWOLJKW DUHDV LQ WKH UHIULJHUDWRU /('V DUH ORFDWHG
XQGHU WKH IUHVK IRRG GRRU WR OLJKW WKH IUHH]HU ZKHQ opened.
Drop-down tray*
Allows for extra door storage when you need it and tucks away when you don’t.
Full-width temperature controlled drawer
Adjustable temperature control bin that can accommodate larger items.
 Dairy bin
Separate compartment for your items.
 Ice bin/Ice maker*
,FH PDNHU ZLWK LFH VWRUDJH ELQV
)XQFWLRQV DV D QRUPDO IXOO VL]HG VKHOI ZKHQ QHHGHG and easily slides back to store tall items below.
Spillproof shelves
'HVLJQHG WR FDSWXUH \RXU VSLOOV IRU HDVLHU FOHDQ XS
Anti-slip Mat
/LQHU WKDW FDSWXUHV VSLOOV NHHSV FRQWDLQHUV IURP shifting when the door is opened and is easily removable for cleaning.
 Removable door bin
Can be removed for those with a wall limiting the door opening.
 Climate zone bin
Separate bins for produce storage.
 Water filter
)LOWHUV ZDWHU DQG LFH
* Select models only.
6 |
49-60741-4 |
Features
Door ice bin*
1.Open left fresh food door.
2.Pull down latch to release bin door.
8VLQJ KDQGKROG OLIW LFH EXFNHW up and out to clear locators in bottom of bin.
4.To replace the ice bucket, set it on the guide brackets and push until the ice bucket seats properly.
,I EXFNHW FDQQRW EH UHSODFHG
URWDWH WKH ,FH %XFNHW )RUN turn clockwise.
Drop down dairy bin*
1. Open right fresh food door.
'HSUHVV ERWK EXWWRQV RQ ORZHU sides and bin will drop down.
3. Reverse to reinstall.
Ice/water filter
Remove filter/bypass plug
Push the indent on the cover and
RSHQ ILOWHU GRRU 3XOO RXW RQ ILOWHU bypass plug and pull straight back to remove.
Installing the filter cartridge
Push the indent at the bottom of
WKH FRYHU DQG RSHQ /LIW GRRU DQG
DOLJQ WDEV RQ ILOWHU WR ILOWHU KROGHU and push filter into place.


 /DWFK
/DWFK 


,FH EXFNHW
Push in and pull open
Swing
1
Push \ Pull
2
*Select Models Only
'URS WUD\WUD\ RSHQ
)HDWXUHV REFRIGERATOR: THE USING
49-60741-4 |
7 |
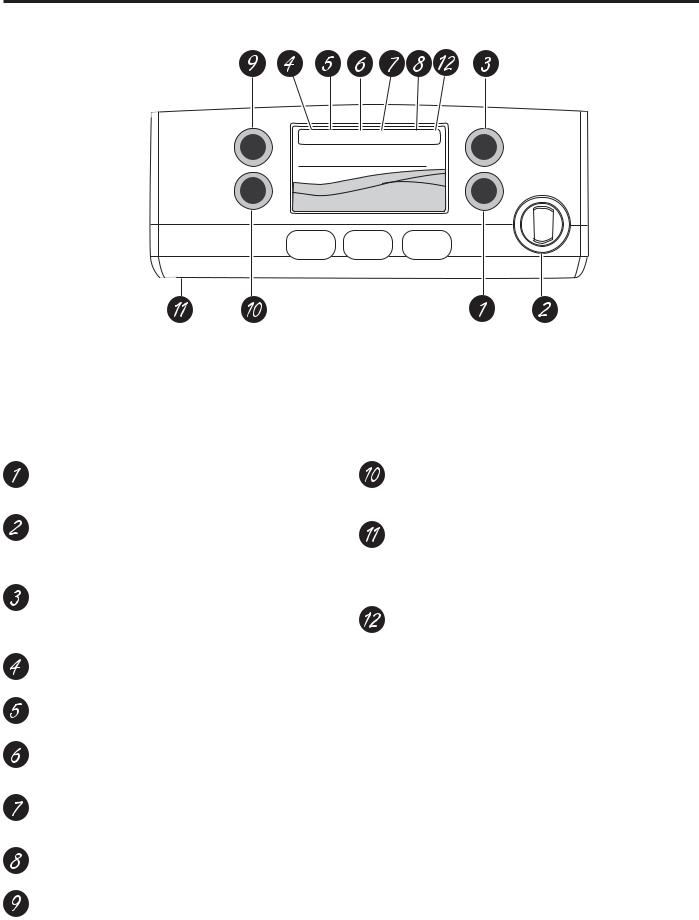
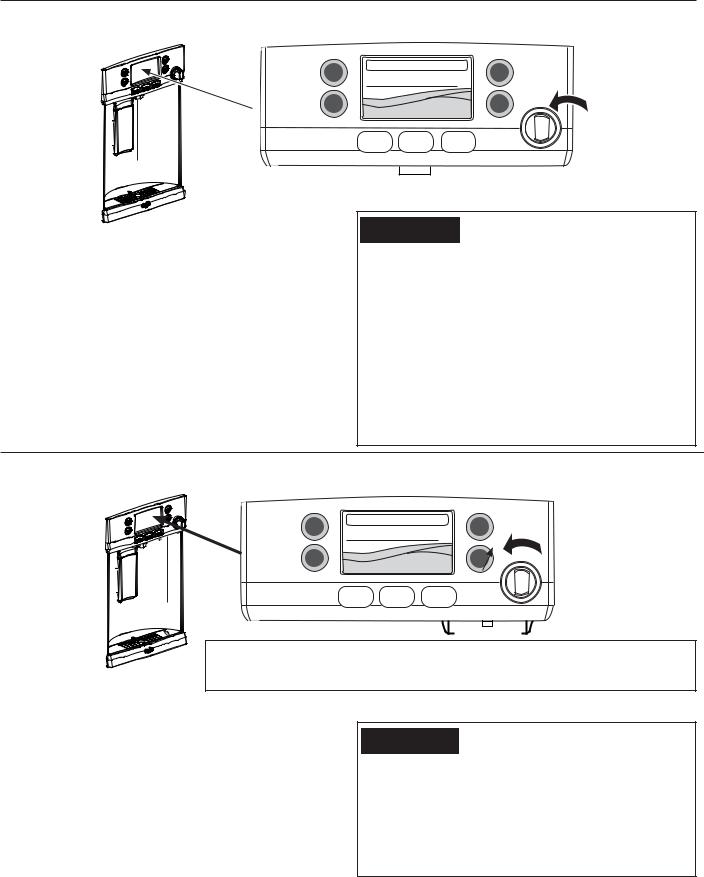
USING THE REFRIGERATOR: Controls
Controls
CYE/CFE Control Style |
|
CWE Control Style |
|
Lock |
Temperature Express Modes |
Settings |
|
|
Precise |
|
|
Controls |
Water |
Fill |
|
|
|
Refrigerator |
|
|
|
Hot |
|
Light |
|
Hold 3 Sec for °F/°C |
|
|
|
Water |
|
Recommended: 37 °F
Water Crushed Cubed
Changing the Temperature for Control Style CYE/CFE
To Change the Refrigerator Temperature: Access By: Temperature Button Temperature 

Activate By: %HORZ WKH ZRUG ³5HIULJHUDWRU´ XVH WKH DUURZV to select the desired temperature. Press DONE when finished to return to HOME screen.
To Change the Freezer Temperature:
Access By: Temperature Button Temperature 

Activate By: %HORZ WKH ZRUG ³)UHH]HU´ XVH WKH DUURZV WR select the desired temperature. Press DONE when finished to return to HOME screen.
7R WXUQ 2)) FRROLQJ V\VWHP DFFHVV SETTINGS from the
HOME screen. Page over and tap COOLING SYSTEM ON. Press DONE to return to HOME screen.
To turn ON cooling system, access SETTINGS from the
HOME VFUHHQ 3DJH RYHU DQG WDS &22/,1* 6<67(0 2)) 3UHVV DONE to return to HOME screen.
Turning the cooling system off stops the cooling to refrigerator, but it does not shut off the electrical power.
NOTE: )RU RSWLPDO WHPSHUDWXUH SHUIRUPDQFH ZH recommend to avoid placing food or other items directly at the air flow vents or the fresh food air tower, thus blocking the air flow.
Actual Set


 F
F

 Energy Smart
Recommended: 0°F
Freezer
Energy Smart Override
Hold 3 Seconds
 Door Alarm
Ice Maker
Lock Controls
Hold 3 Seconds
Reset Filter
Hold 3 Seconds
Changing Temp. for Control Style CWE
7HPSHUDWXUH 'LVSOD\ LV ORFDWHG RQ LQVLGH RI OHIW KDQG refrigerator door. To change the temperature, press and release the REFRIGERATOR or FREEZER pad.
The ACTUAL TEMP light will come on and the display will show the actual temperature. To change the temperature, tap either the
REFRIGERATOR or FREEZER pad until the desired temperature is displayed.
To turn OFF cooling system, press and hold the REFRIGERATOR and FREEZER pads simultaneously for 3 seconds. When the cooling system is OFF the display should read OFF.
To turn ON cooling system, press either
REFRIGERATOR or FREEZER pad. The display will show the preset temperature settings of 37°F for refrigerator and 0°F IRU IUHH]HU 7XUQLQJ WKH FRROLQJ
system off stops the cooling to refrigerator, but it does not shut off the electrical power.
8 |
49-60741-4 |
Controls
Control Style A, External Controls &)( &<( 0RGHOV
Lock |
Temperature |
Express Modes |
Settings |
|
|
Precise |
|
Controls |
Water |
|
Fill |
|
|
|
|
Light |
|
|
Hot |
|
|
|
Water |
|
Water |
Crushed |
Cubed |
NOTE: 7KH UHIULJHUDWRU LV VKLSSHG ZLWK SURWHFWLYH ILOP FRYHULQJ WKH WHPSHUDWXUH FRQWUROV ,I WKLV ILOP ZDV QRW removed during installation, remove it now.
7KH WHPSHUDWXUH FRQWUROV DUH SUHVHW LQ WKH IDFWRU\ DW ) IRU WKH UHIULJHUDWRU FRPSDUWPHQW DQG ) IRU WKH IUHH]HU FRPSDUWPHQW $OORZ KRXUV IRU WKH WHPSHUDWXUH WR VWDELOL]H WR WKH SUHVHW UHFRPPHQGHG VHWWLQJV
The temperature controls can display both the SET temperature as well as the actual temperature in the refrigerator
DQG IUHH]HU 7KH DFWXDO WHPSHUDWXUH PD\ YDU\ VOLJKWO\ IURP WKH 6(7 WHPSHUDWXUH EDVHG RQ XVDJH DQG RSHUDWLQJ environment.
Hot Water
'LVSHQVHV XS WR RXQFHV RI ILOWHUHG KRW ZDWHU IURP XVHU VHOHFWHG UDQJHV RI ) WR )
Hot Water Knob
,OOXPLQDWHV WR LQGLFDWH KRW ZDWHU LV UHDG\ 'LVSHQVHV with two motions: a counter-clockwise twist and then push to dispense.
Precise Fill
Precisely dispenses filtered water in accurate measurements in ounces, cups, quarts, or liters using paddle.
Refrigerator temp control $GMXVW IUHH]HU FRPSDUWPHQW WHPSHUDWXUH
Fresh food temp control
Adjust fresh food compartment temperature.
TurboFreeze™ setting
$FWLYDWH 7XUER)UHH]H WR TXLFNO\ UHVWRUH IUHH]HU WHPperatures after frequent door openings.
TurboCool™ setting
Activate TurboCool to quickly restore fresh food temperature after frequent door openings.
Humidity setting
Humidity setting can be normal or high.
Lock controls
Press and hold 3 seconds to lock out ice and water dispenser and all feature and temperature buttons.
LED dispenser light
/(' OLJKWLQJ WKDW FDQ EH WXUQHG RQ RII WR OLJKW \RXU dispenser.
Photo Upload
,QVHUW 86% PHPRU\ VWLFN WR XSORDG SHUVRQDO SKRWRV
WR WKH UHIULJHUDWRU /&' VFUHHQ /&' ZLOO SURYLGH RQ screen prompts to load and view slideshow. Make
VXUH WKH SKRWRV DUH LQ WKH URRW GLUHFWRU\ LQ \RXU 86%
Additional Settings
•Connected Home ready
•Slideshow
•Reset filter
•,FH PDNHU RQ RII
•'RRU DODUP
•Sound control
•&RROLQJ V\VWHP 2Q 2II
•0HWULF (QJOLVK XQLWV
•Altitude
Additional Modes
•Sabbath Mode
Press and hold lock & light simultaneously for 3
VHFRQGV WR HQWHU H[LW 6DEEDWK PRGH $FWLYDWH 6DEbath Mode to turn off interior lights, temperature control and advanced features. Compressor will run on a timed defrost when in Sabbath mode.
Controls REFRIGERATOR: THE USING
49-60741-4 |
9 |
USING THE REFRIGERATOR: Controls
Controls
Controls Style B, Internal Controls CWE Models
Refrigerator
Hold 3 Sec for °F/°C
Recommended: 37 °F
Actual Set


 F
F

 Energy Smart
Recommended: 0°F
Freezer
Energy Smart Override
Hold 3 Seconds
 Door Alarm
Ice Maker
Lock Controls
Hold 3 Seconds
Reset Filter
Hold 3 Seconds
Door Alarm |
Freezer temp control |
|
6RXQGV WR DOHUW ZKHQ WKH IUHH]HU RU IUHVK IRRG GRRUV |
$GMXVW IUHH]HU FRPSDUWPHQW WHPSHUDWXUH |
|
have been left open. |
Refrigerator temp control |
|
Reset Filter |
||
Adjust fresh food compartment temperature |
||
Hold for 3 seconds after replacing filter. |
Ice maker setting |
|
Lock Controls |
||
7XUQ \RXU LFH PDNHUV RQ RII |
||
Press and hold 3 seconds to lock out ice and water |
Sabbath Mode |
|
dispenser and all feature and temperature buttons. |
||
|
3UHVV DQG KROG 'RRU $ODUP DQG ,FH 0DNHU VLPXOWDQHRXVO\ IRU |
|
|
VHFRQGV WR HQWHU H[LW 6DEEDWK 0RGH |
|
49-60741-4 |
Dispenser &)( &<( 0RGHOV 2QO\
Water & Ice Dispenser
6HH $ERXW WKH FRQWUROV with temperature settings
& About the control
IHDWXUHV
'LVSHQVHU WUD\

 WARNING LACERATION HAZARD
ŶNever put fingers or any other object into ice crusher
GLVFKDUJH RSHQLQJ 'RLQJ VR FDQ UHVXOW LQ FRQWDFWLQJ the ice crushing blades and lead to serious injury or amputation
Ŷ8VH D VWXUG\ JODVV ZKHQ GLVSHQVLQJ LFH $ GHOLFDWH glass may break and result in personal injury.
,I QR ZDWHU LV GLVSHQVHG ZKHQ WKH UHIULJHUDWRU LV ILUVW installed, there may be air in the water line system. Press the dispenser paddle for at least five minutes to remove trapped air from the water line and to fill the water system. To flush out impurities in the water line, throw away the first six full glasses of water.
To remove Dispenser Tray
Ŷ3XOO 'LVSHQVHU 7UD\ RXW XQWLO LW VWRSV
Ŷ/RFDWH WDE LQ WKH FHQWHU RQ WKH ERWWRP DQG SXVK XS
Ŷ3XOO 'LVSHQVHU 7UD\ DVVHPEO\ RXW
Ŷ/LIW PHWDO 'LVSHQVHU 7UD\ RXW DW FHQWHU QRWFK WR FOHDQ
To reinstall Dispenser Tray
Ŷ3ODFH WKH 'LVSHQVHU 7UD\ FRYHU RQ WRS RI FDWFK WUD\ and position under the two plastic retainers on either side.
Ŷ&HQWHU 'LVSHQVHU WUD\ DQG DOLJQ ZLWK FHQWHU JXLGHV
ŶPush in until is firmly in place.
Important Facts About Your Dispenser
Ŷ'R QRW DGG LFH IURP WUD\V RU EDJV WR WKH GRRU LFH PDNHU EXFNHW ,W PD\ QRW FUXVK RU GLVSHQVH
ŶAvoid overfilling glass with ice and use of narrow glasses. Backed-up ice can jam the chute or cause the
GRRU LQ WKH FKXWH WR IUHH]H VKXW ,I LFH LV EORFNLQJ WKH chute remove the ice bucket, poke it through with a wooden spoon.
ŶBeverages and foods should not be quick-chilled in the door ice maker bin. Cans, bottles or food packages in the storage drawer may cause the ice maker or auger to jam.
ŶTo keep dispensed ice from missing the glass, put the glass close to, but not touching, the dispenser opening.
ŶSome crushed ice may be dispensed even though you selected CUBED ICE. This happens occasionally when a few cubes accidentally get directed to the crusher.
ŶAfter crushed ice is dispensed, some water may drip from the chute.
ŶSometimes a small mound of snow will form on the door in the ice chute. This condition is normal and usually occurs when you have dispensed crushed ice repeatedly. The snow will eventually evaporate.
To Use the Internal Water Dispenser &:( 0RGHOV 2QO\
The water dispenser is located on the left wall inside the refrigerator compartment.
To dispense water:
1.Hold the glass against the recess.
2.Push the water dispenser button.
3.Hold the glass underneath the dispenser for 2–3 seconds after releasing the dispenser button. Water may continue to dispense after the button is released.
,I QR ZDWHU LV GLVSHQVHG ZKHQ WKH UHIULJHUDWRU LV ILUVW installed, there may be air in the water line system. Press the dispenser button for at least 5 minutes to remove trapped air from the water line and to fill the water sys-
WHP 'XULQJ WKLV SURFHVV WKH GLVSHQVHU QRLVH PD\ EH loud as the air is purged from the water line system. To flush out impurities in the water line, throw away the first 6 glassfuls of water.
NOTE: To avoid water deposits, the dispenser should be cleaned periodically by wiping with a clean cloth or sponge.
2QO\0RGHOV&<( &)( 'LVSHQVHU REFRIGERATOR: THE USING
49-60741-4 |
11 |
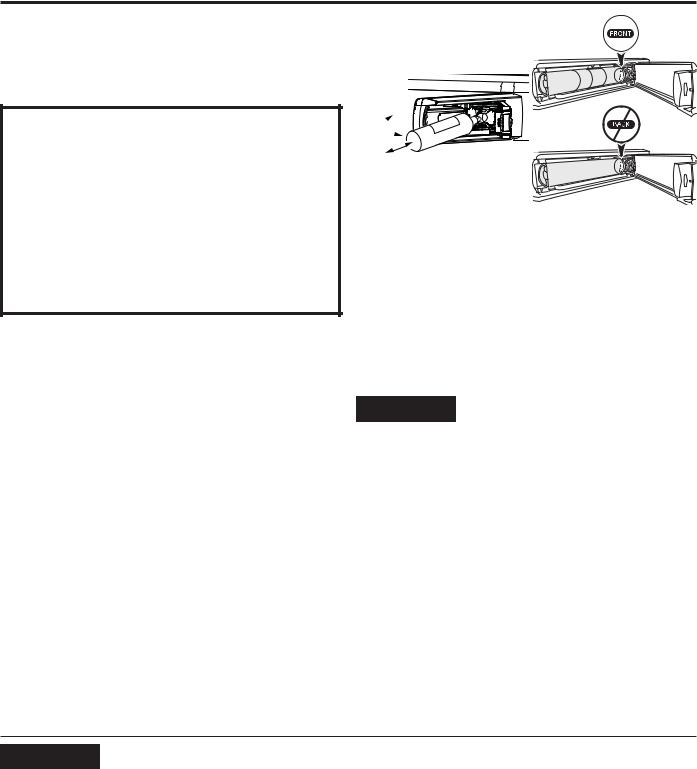
USING THE REFRIGERATOR::DWHU)LOWHU&DUWULGJH53:)(
12
Water Filter Cartridge - RPWFE
Water Filter Cartridge
The water filter cartridge is located in the fresh food interior on the left side wall, near the top.
7KLV SURGXFW XVHV UDGLR IUHTXHQF\ LGHQWLILFDWLRQ 5),' WR GHWHFW OHDNV DQG PRQLWRU ILOWHU VWDWXV 7KH 5),' WHFKQRORJ\ LV FHUWLILHG E\ WKH )&&
FCCID: ZKJ-EBX1532P001 ICID:
10229A-EBX1532P001
“This device complies with part 15 of the FCC Rules. Operation is subject to the following two conditions: (1) This device may not cause harmful interference, and
(2) this device must accept any interference received, including interference that may cause undesired operation.”
“This device complies with Industry Canada licenceexempt RSS standard(s). Operation is subject to the following two conditions: (1) this device may not cause interference, and (2) this device must accept any interference, including interference that may cause undesired operation of the device.”
When to replace the filter cartridge
The filter cartridge should be replaced every six months
RU HDUOLHU LI JDOORQV RI ZDWHU KDV EHHQ GLVSHQVHG or the flow of water to the dispenser or icemaker decreases.
Touch Screen Models: A filter status message will appear on the screen when the water filter needs to be replaced. The filter status will automatically update when the filter is replaced.
Non-touch Screen Models: A filter indicator light will illuminate on the screen when the water filter needs to be replaced.
Removing the filter cartridge
To replace the filter, first remove the old cartridge by opening the filter door and pulling on the bottom of the cartridge to allow it to swing outward. When the cartridge can no longer swing, gently pull to unseat it from the
FDUWULGJH KROGHU '2 127 7:,67 &$575,'*( $ VPDOO amount of water may drip out.
Installing the Filter Cartridge
1.Align top of filter cartridge with cartridge holder with WKH ZRUG ³FRONT” facing outward then push the cartridge toward the rear of the unit until it is fully
VHDWHG '2 127 7:,67 7+( ),/7(5 &$575,'*(
2.While continuing to ensure cartridge is fully seated in the holder, gently swing the filter inward until it is in
Swing
Push \ Pull
SRVLWLRQ ,I ILOWHU ZLOO QRW VZLQJ HDVLO\ FKHFN WR HQVXUH filter is properly aligned and fully seated within the cartridge holder. Close the filter door.
3.Run two gallons of water through the cold water
GLVSHQVHU DERXW PLQXWHV WR UHPRYH DLU IURP WKH system. A newly installed filter cartridge will cause water to spurt from the dispenser. 8VH D ODUJH SLWFKHU RU VSRUWV ERWWOH WR FDWFK WKH ZDWHU VSUD\ '2
127 XVH KDQGV IUHH DXWR ILOO VRPH PRGHOV XQWLO DOO air is removed from the system.
5HVHW )LOWHU 6WDWXV PHVVDJH QRQ WRXFK VFUHHQ PRGHOV

 WARNING
 SCALDING HAZARD.*
8VH RI WKH KRW ZDWHU GLVSHQVHU SULRU WR SXUJLQJ DLU IURP the system may result in spurting of hot water and lead
WR KRW ZDWHU VFDOGLQJ )ROORZ WKH LQVWUXFWLRQV DERYH WR purge all air from the system through the cold water dispenser prior to using the hot water dispenser.
1RWH ,W LV QRUPDO IRU ZDWHU WR DSSHDU GLVFRORUHG GXULQJ the initial system flush. Water color will return to normal after first few minutes of dispensing.
Filter Bypass Plug
To reduce the risk of property damage due to water leakage, you MUST use the filter bypass plug when a replacement filter cartridge is not available. Some
models do not come equipped with the filter bypass plug.
7R REWDLQ D IUHH E\SDVV SOXJ FDOO *(&$5(6 ,Q
&DQDGD FDOO 7KH GLVSHQVHU DQG LFHPDNHU will not operate without either the filter or bypass plug installed. The bypass plug is installed in the same way
as a filter cartridge.
*Select Models Only
 WARNING To reduce the risk associated with choking, do not allow children under 3 years of age to have access to small parts during the installation of this product. The disposable filter cartridge should be replaced every 6 months at the rated capacity, or sooner if a noticeable reduction in flow rate occurs.
)RU WKH PD[LPXP EHQHILW RI \RXU ILOWUDWLRQ V\VWHP *( $SSOLDQFHV UHFRPPHQGV WKH XVH RI *( $SSOLDQFHV EUDQGHG ILOWHUV RQO\ 8VLQJ *( $SSOLDQFHV EUDQGHG ILOWHUV LQ *( $SSOLDQFHV DQG +RWSRLQW® refrigerators provides optimal
SHUIRUPDQFH DQG UHOLDELOLW\ *( $SSOLDQFHV ILOWHUV PHHW ULJRURXV LQGXVWU\ 16) VWDQGDUGV IRU VDIHW\ DQG TXDOLW\ WKDW are important for products that are filtering your water. GE Appliances has not qualified non-GE Appliances-branded filters for use in GE Appliances and Hotpoint refrigerators and there is no assurance that non-GE Appliancesbranded filters meet GE Appliances standards for quality, performance and reliability.
If you have questions, or to order additional filter cartridges, visit our website at www.gewaterfilters.com or call GE Appliances Parts and Accessories, 877.959.8688.
Customers in Canada should consult the yellow pages for the nearest Camco Service Center.
49-60741-4
Hot Water
For GE Cafe™, Hot Water Only Models
Lock |
Temperature |
Express Modes |
Settings |
|
|
Precise |
|
Controls |
Water |
|
Fill |
|
|
|
|
Light |
|
|
Hot |
|
|
|
Water |
Water Crushed Cubed
Important Facts about HOT WATER
To Use Hot Water Dispenser
Ŷ Press HOT WATER button.
Ŷ 6HOHFW GHVLUHG ZDWHU WHPSHUDWXUH RQ WKH /&' VFUHHQRU &XVWRP
Ŷ :KHQ KRW ZDWHU LV UHDG\ LQGLFDWHG RQ WKH VFUHHQ DQG
E\ D EHHSLQJ VRXQG KROG FRQWDLQHU ZLWK OHIW KDQG centered in the recess under the spout.
ŶTo dispense water, rotate the hot water knob counterclockwise and then push it in. The knob must be held in during dispense.

 WARNING
 SCALDING HAZARD.
ŶThe water coming from the dispenser is very hot and can cause scalds or burns. Read all warnings on page 2 prior to use.
ŶAlways use a container that is suitable for hot liquids
FHUDPLF IRDP HWF
ŶThe maximum single hot water dispense amount
LV R] $GGLWLRQDO KRW ZDWHU FDQ EH GLVSHQVHG E\
UHVWDUWLQJ WKH KRW ZDWHU IHDWXUH WKURXJK WKH /&' screen.
ŶHOT WATER works best with household water
SUHVVXUH RI WR SVL
ŶHOT WATER will time out if unused and may require a short reheat time.
For GE Cafe™ with K-Cup Brewing System
Lock |
Temperature |
Express Modes |
Settings |
|
|
Precise |
|
Controls |
Water |
|
Fill |
|
|
|
|
Light |
|
|
Hot |
|
|
|
Water |
Water Crushed Cubed
2Q *( &DIp UHIULJHUDWRUV HTXLSSHG ZLWK WKH . &XS EUHZLQJ V\VWHP $// +27 :$7(5 is dispensed from stainless steel dispense tube located under the right side of the control panel. The hot water is not dispensed from the center of the recess area.
To Use Hot Water Dispenser
Ŷ Press HOT WATER button.
Ŷ 6HOHFW GHVLUHG ZDWHU WHPSHUDWXUH RQ WKH /&' VFUHHQRU &XVWRP
Ŷ ,I VHOHFWLQJ ³.HXULJ . &XS 3RG´ WKH KRW ZDWHU V\VWHP
ZLOO FKDQJH LQWR . &XS PRGH 6HH SDJH IRU . &XS mode instructions.
Ŷ :KHQ KRW ZD WHU LV UHDG\ LQGLFDWHG RQ WKH VFUHHQ
DQG E\ D EHHSLQJ VRXQG KROG FRQWDLQHU ZLWK OHIW KDQG centered in the recess under the spout.
ŶTo dispense water, rotate the hot water knob counterclockwise and then push it in. The knob must be held in during dispense.
Important Facts about HOT WATER

 WARNING
  Scalding Hazard
Ŷ6HH +RW :DWHU :DUQLQJ 6FDOGLQJ +D]DUG DERYH
Ŷ'R QR SHUPLW FKLOGUHQ WR XVH WKH EUHZHU
ŶAlways use a container that is suitable for hot liquids
FHUDPLF IRDP HWF
Ŷ'R QRW EUHZ LQWR D PXJ PDGH RI JODVV 'RLQJ VR may cause the glass to crack or break.
Water Hot REFRIGERATOR: THE USING
49-60741-4 |
13 |
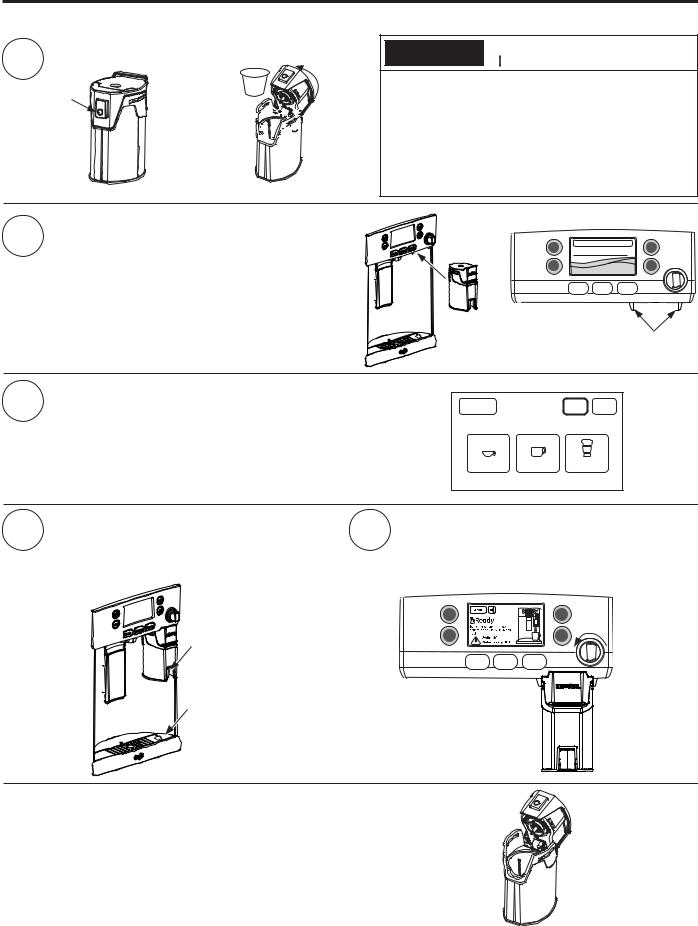
USING THE REFRIGERATOR:6LQJOH6HUYH.HXULJ.%UHZHU&XS
Single Serve Keurig K-Cup Brewer
How to use the single serve dispenser
1 |
Load Keurig K-Cup into brewer. |
|
|
'URS . &XS |
|
Push to |
into brewer and |
|
|
open |
press down |
|
|
firmly. |


 Close brewer.


 /LG ZLOO FOLFN


 when secure.

 CAUTION
 Cut/Puncture Hazard.
•There are two sharp needles located inside the
. &XS EUHZHU 7R DYRLG ULVN RI LQMXU\ GR QRW SXW
\RXU ILQJHUV LQVLGH WKH EUHZHU 8VH FDXWLRQ ZKHQ cleaning.
•.HHS WKH . &XS EUHZHU RXW RI WKH UHDFK RI FKLOGUHQ
DV WKH\ PD\ EH LQMXUHG LQ XVLQJ WKH . &XS EUHZHU incorrectly.
Two ways to brew:
2 3UHVV +RW :DWHU 6HOHFW . &XS 3RG |
|
|
|
|
Lock |
Temperature |
Express Modes |
Settings |
|
|
|
|
|
|
|
Precise |
|||
|
|
|
|
Controls |
Water |
|
Fill |
||
|
OR |
|
|
|
|
Light |
|
|
Hot |
|
|
|
|
|
|
|
|
|
Water |
|
2. Slide the brewer into the rails. |
|
|
|
|
|
Water |
Crushed |
Cubed |
|
|
|
|
|
|
|
|
|
Rails for the |
|
|
|
|
|
|
|
|
|
brewer |
|
Pick your size. |
|
|
|
|
|
|
|
|
3 127,&( ,I XVLQJ D SRZGHUHG EHYHUDJH VHOHFW WKH &RFRD VHWWLQJ |
Cancel |
|
Coffee |
Coffee |
Cocoa |
|
|||
|
|
Serving Size |
|
|
|
||||
|
|
|
|
6oz |
|
8oz |
10oz |
|
|
4 |
Place your mug under the brewer (on the |
5 |
Rotate the hot water knob counterclockwise |
||||||
tray mug icon and under the red brew spout). |
and push in to brew and dispense. |
|
|||||||
|
127,&( 0DNH VXUH WKH PXJ EHLQJ XVHG LV ODUJH |
|
127,&( 3UHVV DQ\ EXWWRQ RU GLVSHQVHU SDGGOH RU RSHQ |
||||||
|
HQRXJK IRU WKH VL]H VHOHFWHG |
|
either the left or right door to cancel dispense. |
||||||
|
|
|
|
Lock |
6oz Brew |
Precise |
|
|
|
|
Red brew |
|
|
Controls |
|
Fill |
|
|
|
|
|
|
|
|
|
|
|
|
|
|
spout |
|
|
|
|
Water |
|
|
|
|
|
|
|
Light |
|
Hot |
|
|
|
|
for mug |
|
|
|
|
|
|
|
|
|
alignment |
|
|
Water |
Crushed |
Cubed |
|
|
|
|
Mug icon for |
|
|
|
|
|
|
|
|
|
placement |
|
|
|
|
|
|
|
|
Cleaning the brewer
Ŷ 7KH . &XS EUHZHU LV dishwasher safe. To clean it, open the lid and place the
. &XS EUHZHU LQ WKH WRS UDFN RI \RXU GLVKZDVKHU DQG UXQ LQ D QRUPDO ZDVK cycle.
Ŷ 7R PD[LPL]H SHUIRUPDQFH RI \RXU EUHZHU LW LV UHFRPPHQGHG WR ULQVH LW thoroughly after washing to remove all soap residue.
Ŷ Periodic cleaning of dispenser recess area is recommended as staining may
RFFXU ZLWK XVDJH RI WKH . &XS EUHZHU
14 |
49-60741-4 |
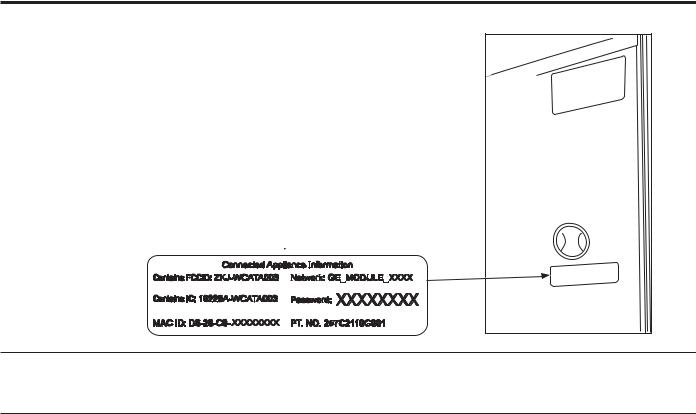
Appliance Communication (for customers in the United States and its territories)
GE WiFi Connect
GE WiFi Connect Enabled*
,I \RXU UHIULJHUDWRU KDV D &RQQHFWHG $SSOLDQFH LQIRUPDWLRQ ODEHO located on the inside as shown, your refrigerator can be connected
WR \RXU :L)L QHWZRUN DOORZLQJ LW WR FRPPXQLFDWH ZLWK \RXU VPDUW SKRQH IRU UHPRWH PRQLWRULQJ FRQWURO DQG QRWLILFDWLRQV 'HSHQGLQJ
RQ WKH UHIULJHUDWRU PRGHO \RX KDYH \RX HLWKHU KDYH D :L)L communication card built into the product, or a port for an external
:L)L &RQQHFW3OXV 0RGXOH VROG VHSDUDWHO\ 3OHDVH YLVLW www. GEAppliances.com/connect to learn more about connected appliance features, and to learn what connected appliance apps will work with your Smart Phone.
:L)L &RQQHFWLYLW\ )RU DVVLVWDQFH ZLWK WKH DSSOLDQFH RU WKH ConnectPlus QHWZRUN FRQQHFWLYLW\ IRU PRGHOV WKDW DUH :L)L HQDEOHG RU :L)L RSWLRQDO SOHDVH FDOO 1-800-220-6899.
REGULATORY INFORMATION
FCC/IC Compliance Statement:
7KLV GHYLFH FRPSOLHV ZLWK 3DUW RI WKH )&& 5XOHV 2SHUDWLRQ LV VXEMHFW WR WKH IROORZLQJ WZR FRQGLWLRQV
1.This device may not cause harmful interference, and
2.This device must accept any interference received, including interference that may cause undesired operation.
This equipment has been tested and found to comply with the limits for a Class B digital device, pursuant
WR 3DUW RI WKH )&& 5XOHV 7KHVH OLPLWV DUH GHVLJQHG WR SURYLGH UHDVRQDEOH SURWHFWLRQ DJDLQVW KDUPIXO interference in a residential installation. This equipment generates uses and can radiate radio frequency energy and, if not installed and used in accordance with the instructions, may cause harmful interference to radio communications. However, there is no guarantee that interference will not occur in a particular
LQVWDOODWLRQ ,I WKLV HTXLSPHQW GRHV FDXVH KDUPIXO LQWHUIHUHQFH WR UDGLR RU WHOHYLVLRQ UHFHSWLRQ ZKLFK can be determined by turning the equipment off and on, the user is encouraged to try to correct the interference by one or more of the following measures:
• Reorient or relocate the receiving antenna.
,QFUHDVH WKH VHSDUDWLRQ EHWZHHQ WKH HTXLSPHQW DQG UHFHLYHU
• Connect the equipment into an outlet on a circuit different from that to which the receiver is connected.
&RQVXOW WKH GHDOHU RU DQ H[SHULHQFHG UDGLR WHOHYLVLRQ WHFKQLFLDQ IRU KHOS
Labelling: Changes or modifications to this unit not expressly approved by the manufacturer could void the user’s authority to operate the equipment.
Communication Appliance REFRIGERATOR: THE USING
*Select Models Only
49-60741-4 |
15 |
 Loading...