


GE CVW73613M1DS, CVW73612M1SS, CVW73014M1WM, CVW73013M1DS, CVW73012M1SS Owner’s Manual
...Owner's Manual
Wall Chimney Vent Hoods
Models: CVW7301 - 30" Glass
CVW7361 - 36" Glass
Contents
Safety Information. . . . . . . . . . . . . . . . . . . . . . . . . . . . . . |
.3 |
Troubleshooting Tips . . . . . . . . . . . . . . . . . . . . . . . . . . |
. .8 |
Using the Hood |
|
Limited Warranty. . . . . . . . . . . . . . . . . . . . . . . . . . . . . . |
.10 |
Controls . . . . . . . . . . . . . . . . . . . . . . . . . . . . . . . . . . . . . |
.5 |
Accessories . . . . . . . . . . . . . . . . . . . . . . . . . . . . . . . . . . |
.11 |
Filter . . . . . . . . . . . . . . . . . . . . . . . . . . . . . . . . . . . . . . . . |
.6 |
Consumer Support |
12 |
Care And Cleaning |
|
||
|
|
|
|
Surfaces. . . . . . . . . . . . . . . . . . . . . . . . . . . . . . . . . . . . . . |
7 |
|
|
Lights . . . . . . . . . . . . . . . . . . . . . . . . . . . . . . . . . . . . . . . . |
7 |
|
|
Write the model and serial numbers here:
Model # _______________________________
Serial # _______________________________
You can find them on a label on the inside of the hood.
Español
Para consultar una version en español de este manual de instrucciones, visite nuestro sitio de internet cafeappliances.com.
49-2000062 05-18 GEA

THANK YOU FOR MAKING CAFÉ A PART OF YOUR HOME.
We take pride in the craftsmanship, innovation and design that goes into every CAFÉ product, and we think you will too. Among other things, registration of your appliance ensures that we can deliver important product information and warranty details when you need them.
Register your CAFÉ appliance now online. Helpful websites are available in the Consumer Support section of this Owner’s Manual. You may also mail in the pre-printed registration card included in the packing material.
2 |
49-2000062 |

IMPORTANT SAFETY INFORMATION READ ALL INSTRUCTIONS BEFORE USING
 WARNING TO REDUCE THE RISK OF FIRE, ELECTRIC SHOCK OR INJURY TO PERSONS, OBSERVE THE FOLLOWING:
A.Use this unit only in the manner intended by the manufacturer. If you have questions, contact the manufacturer.
B.Before servicing or cleaning unit, switch power off at service panel and lock the service disconnecting means to prevent power from being switched
on accidentally. When the service disconnecting means cannot be locked, securely fasten a prominent warning device, such as a tag, to the service panel.
C.Do not use this unit with any solid-state speed control device.
D.This unit must be grounded.
 CAUTION FOR GENERAL VENTILATING USE ONLY. DO NOT USE TO EXHAUST HAZARDOUS OR EXPLOSIVE MATERIALS AND VAPORS.
 WARNING TO REDUCE THE RISK OF INJURY TO PERSONS IN THE EVENT OF A RANGE TOP GREASE FIRE, OBSERVE THE FOLLOWING*:
A.SMOTHER FLAMES with a close-fitting lid, cookie sheet or metal tray, then turn off the burner. BE CAREFUL TO PREVENT BURNS. If the flames do not go out immediately, EVACUATE AND CALL THE FIRE DEPARTMENT.
B.NEVER PICK UP A FLAMING PAN—You may be burned.
C.DO NOT USE WATER, including wet dishcloths or towels—a violent steam explosion will result.
D.Use an extinguisher ONLY if:
1.You know you have a Class ABC extinguisher, and you already know how to operate it.
2.The fire is small and contained in the area where it started.
3.The fire department is being called.
4.You can fight the fire with your back to an exit.
*Based on “Kitchen Fire Safety” published by NFPA.
 CAUTION TO REDUCE RISK OF FIRE AND
TO PROPERLY EXHAUST AIR, BE SURE TO DUCT
AIR OUTSIDE. DO NOT VENT EXHAUST AIR INTO
SPACES WITHIN WALLS OR CEILINGS OR INTO
ATTICS, CRAWL SPACES OR GARAGES.
READ AND SAVE THESE INSTRUCTIONS
INFORMATION SAFETY
49-2000062 |
3 |
SAFETY INFORMATION
IMPORTANT SAFETY INFORMATION READ ALL INSTRUCTIONS BEFORE USING
 WARNING TO REDUCE THE RISK OF A RANGE TOP GREASE FIRE:
A.Never leave surface units unattended at high settings. Boilovers cause smoking and greasy spillovers that may ignite. Heat oils slowly on medium settings.
B.Always turn hood ON when cooking at high heat or when flambéing food (i.e. Crepes Suzette, Cherries Jubilee, Peppercorn Beef Flambé).
C.Clean ventilating fans frequently. Grease should not be allowed to accumulate on fan or filter.
D.Use proper pan size. Always use cookware appropriate for the size of the surface element.
 WARNING TO REDUCE THE RISK OF FIRE, ELECTRIC SHOCK OR INJURY TO PERSONS, OBSERVE THE FOLLOWING:
A.Installation work and electrical wiring must be done by qualified person(s) in accordance with all applicable codes and standards, including fire-rated construction.
B.Sufficient air is needed for proper combustion and exhausting of gases through the flue (chimney) of fuel burning equipment to prevent back drafting.
Follow the heating equipment manufacturer’s guidelines and safety standards such as those published by the National Fire Protection Association (NFPA), the American Society for Heating, Refrigeration and Air Conditioning Engineers (ASHRAE) and the local code authorities.
C.When cutting or drilling into wall or ceiling, do not damage electrical wiring and other hidden utilities.
D.Ducted fans must always be vented to the outdoors.
E.When applicable, install any makeup (replacement) air system in accordance with local building code requirements. Visit cafeappliances.com for available makeup air solutions.
F.Turn off breaker to adjacent rooms while working.
 WARNING TO REDUCE THE RISK OF FIRE, USE ONLY METAL DUCTWORK.
Ŷ 'R QRW DWWHPSW WR UHSDLU RU UHSODFH DQ\ SDUW RI \RXU hood unless it is specifically recommended in this manual. All other servicing should be referred to a qualified technician.
How to Remove Protective Shipping Film and Packaging Tape
Carefully grasp a corner of the protective shipping film with your fingers and slowly peel it from the appliance surface. Do not use any sharp items to remove the film. Remove all of the film before using the appliance for the first time.
To assure no damage is done to the finish of the product, the safest way to remove the adhesive from packaging tape on new appliances is an application of a household liquid dishwashing detergent. Apply with a soft cloth and allow to soak. NOTE: If surface is still not clean, see page 8 for more cleaning options.
NOTE: The adhesive must be removed from all parts.
READ AND SAVE THESE INSTRUCTIONS
4 |
49-2000062 |
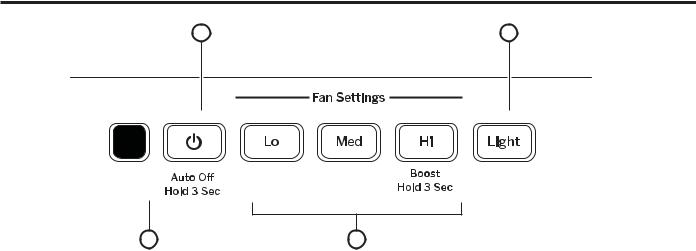
Controls
3 |
2 |
1 |
4 |
1. Rangehood Control Panel: The control panel is located on the front of the canopy. The position and function of each control button are noted below.
2. Light Button: On/Night/Off switch for the halogen lights. Press the LIGHT button to turn the lights on, again to set the lights to night setting, and again to turn off.
3. Fan Off Button: Off switch for the fan. The fan can be operated by pressing any of the fan setting buttons. Hold for 2 seconds to activate auto off after
15 minutes.
4.Fan Settings Buttons: Speed control for
fan. Press the switch Lo for LOW speed, Med for MEDIUM speed and Hi for HIGH speed. Hold down the Hi button for 2 seconds to activate the BOOST SPEED that will run for 10 minutes.
Controls HOOD: THE USING
49-2000062 |
5 |

CARE AND CLEANING: Filters
Filters
Be sure the circuit breaker is off and all surfaces are cool before cleaning or servicing any part of the vent hood.
Metal Grease Filter
The metal filter traps grease released by foods from cooking.
The filters must ALWAYS be in place when the hood is in use. The grease filters are dishwasher-safe and should be cleaned every 6 months, or as needed.
To remove: |
Filter Lock |
Pull downward on the filter lock to release the filter. |
|
To replace: |
|
Fit the tabs at the bottom of the filter behind the ledge of |
|
the filter opening. Lift up the front side of the filter, push |
|
downward on the filter lock, and push gently until the filter |
|
is in place. Release the filter lock to secure the filter in |
|
place. |
|
To clean, swish the filter in hot soapy water and rinse |
|
in clean water or wash it in the dishwasher. Do not use |
|
abrasive cleansers. |
|
NOTE: Some discoloration may occur in the dishwasher. |
|
For Recirculation Installation Only Charcoal Filter (Not Included)
If the model is not vented to the outside, the air needs to be recirculated through a disposable charcoal filter that helps remove smoke and odors.
NOTE: DO NOT rinse, or put charcoal filter in an automatic dishwasher.
The charcoal filter cannot be cleaned. It must be replaced. It is recommended that the charcoal filter be replaced every 6-12 months or if it is noticeably dirty or discolored.
Order Charcoal Filter JXCF71
To inquire about purchasing replacement charcoal filters or to find the location of a dealer nearest you, visit cafeappliances.com/parts.
To install:
1. Insert the bottom tabs of the charcoal filter into the two slots at the back of the unit. Pivot filter upward into place while depressing the locking tabs.
2. Replace the metal filter—see Metal grease filter section.
To remove:
1. Remove the metal filter—see Metal grease filter section.
2.Press on the two tabs on the charcoal filter to disengage the lock and pivot to remove.
6 |
49-2000062 |

Surfaces
Stainless Steel Surfaces (on some models)
Do not use a steel wool pad; it will scratch the surface.
To clean the stainless steel surface, use warm sudsy water or a stainless steel cleaner or polish. Always wipe the surface in the direction of the brush line. Follow the cleaner instructions for cleaning the stainless steel surface. Cleaners with oxalic acid such as Bar Keepers Friend Soft Cleanser™ will remove surface rust, tarnish, and small blemishes. Use only a liquid cleanser
free of grit and rub in the direction of the brush lines with a damp soft sponge.
To inquire about purchasing stainless steel appliance cleaner or polish, or to find the location of a dealer nearest you, visit cafeappliances.com/parts.
Painted Surfaces (on some models)
Do not use a steel wool pads or other abrasive cleaners; they will scratch the surface.
Clean grease-laden surfaces of the hood frequently. To clean the hood surface, use a hot, damp cloth with a mild detergent suitable for painted surfaces. About one tablespoon of ammonia may be added to the water. Use a clean, hot, damp cloth to remove soap. Dry with a dry, clean cloth.
NOTE: When cleaning, take care not to come in contact with filters and other surfaces.

 CAUTION When cleaning the hood surfaces, be certain that you do not touch the light with moist hands or cloth. A warm or hot light may break if touched with a moist surface. Always let the light cool completely before cleaning around it.
Lights
 CAUTION Allow lights to cool before touching. To change the lights:
1.Before attempting to replace the lights, make sure that the light switch is turned off.
2.Wear gloves. Do not touch the light with your bare fingers. Skin oils can cause early light failure. Wear clean gloves or use a paper towel to handle the light.
3.Using a flathead screwdriver, unclip the metal trim ring from the lighting support.
4.Remove the light by pulling towards the front of the hood. Replace it with a new G4 20W Clear Halogen Capsule light by inserting the two stakes into the holes and pushing towards the back of the hood to secure the light.
5.Reinsert the metal trim ring by lining up the two side holes on the lighting support with the two tabs on the trim ring, and push upward.
Lights / Surfaces CLEANING: AND CARE
49-2000062 |
7 |

TROUBLESHOOTING TIPS
Troubleshooting tips ... Before you schedule service
Save time and money! Review the charts on the following pages first and you may not need to schedule service.
Problem |
Possible Cause |
What To Do |
|
Fan/Light does not |
A house fuse may be blown or a circuit |
Replace fuse or reset circuit breaker. |
|
operate when either |
breaker tripped. |
|
|
button is pressed |
|
|
|
Fan does not operate |
The blower connector is loose or not |
Disconnect power to the unit. Remove the filters and |
|
when fan Lo, Med, |
plugged into its mating connector. |
look up at the blower. If the blower connector plug is |
|
Hight buttons are |
|
loose or you see the connector dangling, the installer |
|
pressed |
|
failed to plug it in securely. See the mini manual for the |
|
|
|
plug location and how to plug in the connector. |
|
Loud or abnormal |
Wrong duct size used in installation. |
This hood requires 6” ducting to perform optimally. Using |
|
airflow noise |
|
smaller duct pipe will cause reduced venting. Minimize |
|
|
|
the duct run length and number of transitions and |
|
|
|
elbows. CAFÉ service technicians cannot correct this |
|
|
|
issue if installed improperly. |
|
Fan fails to circulate |
Obstructions in duct work. |
Make sure nothing is blocking the vent. Make sure your |
|
air or moves air slower |
|
wall or roof cap has a blade or door. |
|
than normal and/or |
|
|
|
Damper blade on wall or roof cap may not |
Make sure damper swings freely. Damper blades may |
||
fan is making loud or |
|||
be open. |
flip over and will not fully open when this happens. |
||
abnormal airflow noise |
|||
|
|
Adjust to original position. |
|
|
Metal grease filter and charcoal filter (if |
Clean the metal grease filter and replace charcoal filter |
|
|
present) may be dirty. |
(if present). See Care and Cleaning of the Vent Hood. |
|
|
Insufficient makeup (replacement) air |
Sufficient makeup (replacement) air is required for |
|
|
|
exhausting appliances to operate to rating. Check with |
|
|
|
local building codes, which may require or strongly |
|
|
|
advise the use of makeup air. Visit cafeappliances.com |
|
|
|
for available makeup air solutions. |
|
The hood controls are |
Control logic confused. |
Disconnect power to the hood by resetting the circuit |
|
not operating correctly |
|
breaker. Wait 30 seconds to allow controls to reset. |
|
Early light failure |
Replacing lights with bare hands. |
Replace lights while wearing gloves to keep skin oils |
|
|
|
off lights. |
|
|
Light wattage is too high. |
Replace with correct wattage. |
8 |
49-2000062 |
 Loading...