


NOTEBOOK
REFERENCEGUIDE
®


Contents
Chapter 1: About This Reference. . . . . . . . . . . . 1
About this guide . . . . . . . . . . . . . . . . . . . . . . . . . . . . . . . . . . . 2
Accessing your online User Guide . . . . . . . . . . . . . . . . . . . . . 2
Gateway contact information . . . . . . . . . . . . . . . . . . . . . . . . . 3
Gateway model and serial number . . . . . . . . . . . . . . . . . 3
Microsoft Certificate of Authenticity . . . . . . . . . . . . . . . . . . . 3
For more information . . . . . . . . . . . . . . . . . . . . . . . . . . . . . . . 4
Chapter 2: Checking Out Your Notebook . . . . . 5
Front . . . . . . . . . . . . . . . . . . . . . . . . . . . . . . . . . . . . . . . . . . . . . 6
Left . . . . . . . . . . . . . . . . . . . . . . . . . . . . . . . . . . . . . . . . . . . . . . 7
Right . . . . . . . . . . . . . . . . . . . . . . . . . . . . . . . . . . . . . . . . . . . . . 8
Back . . . . . . . . . . . . . . . . . . . . . . . . . . . . . . . . . . . . . . . . . . . . . 9
Bottom . . . . . . . . . . . . . . . . . . . . . . . . . . . . . . . . . . . . . . . . . . 10
Keyboard area . . . . . . . . . . . . . . . . . . . . . . . . . . . . . . . . . . . . 11
Chapter 3: Setting Up and Getting Started . . 13
Working safely and comfortably . . . . . . . . . . . . . . . . . . . . . 14
Reducing eye strain . . . . . . . . . . . . . . . . . . . . . . . . . . . . 14
Setting up your computer desk and chair . . . . . . . . . . . 15
Sitting at your notebook . . . . . . . . . . . . . . . . . . . . . . . . . 15
Avoiding discomfort and injury from repetitive strain . 15
Connecting the AC adapter . . . . . . . . . . . . . . . . . . . . . . . . . . 16
Protecting from power source problems . . . . . . . . . . . 18
Connecting the dial-up modem . . . . . . . . . . . . . . . . . . . . . . 19
Connecting to a broadband modem or network . . . . . . . . 20
Starting your notebook . . . . . . . . . . . . . . . . . . . . . . . . . . . . . 20
Waking up your notebook . . . . . . . . . . . . . . . . . . . . . . . 22
Turning off your notebook . . . . . . . . . . . . . . . . . . . . . . . . . . 22
Restarting (rebooting) your notebook . . . . . . . . . . . . . . . . . 23
Using the status indicators . . . . . . . . . . . . . . . . . . . . . . . . . . 24
Using the keyboard . . . . . . . . . . . . . . . . . . . . . . . . . . . . . . . . 25
Key types . . . . . . . . . . . . . . . . . . . . . . . . . . . . . . . . . . . . . 25
System key combinations . . . . . . . . . . . . . . . . . . . . . . . . 26
i

Contents
Using the optional fingerprint reader . . . . . . . . . . . . . . . . . 29
Running the TouchStrip Tutorial . . . . . . . . . . . . . . . . . . 30
Enrolling your fingerprints . . . . . . . . . . . . . . . . . . . . . . . 30
Using the Fingerprint Control Center . . . . . . . . . . . . . . . 33
Using the fingerprint reader features . . . . . . . . . . . . . . 34
Using the smart card reader . . . . . . . . . . . . . . . . . . . . . . . . 34
Using a privacy filter . . . . . . . . . . . . . . . . . . . . . . . . . . . . . . . 34
Using the EZ Pad touchpad . . . . . . . . . . . . . . . . . . . . . . . . . . 35
Adjusting the brightness . . . . . . . . . . . . . . . . . . . . . . . . . . . . 37
Adjusting the volume . . . . . . . . . . . . . . . . . . . . . . . . . . . . . . 38
Turning your wireless radio on or off . . . . . . . . . . . . . . . . . 39
IEEE 802.11 wireless network radio . . . . . . . . . . . . . . . . 40
Bluetooth radio . . . . . . . . . . . . . . . . . . . . . . . . . . . . . . . . 40
Chapter 4: Using Drives and Accessories . . . . . 43
Changing modules . . . . . . . . . . . . . . . . . . . . . . . . . . . . . . . . . 44
Using the CD or DVD drive . . . . . . . . . . . . . . . . . . . . . . . . . . 47
Identifying drive types . . . . . . . . . . . . . . . . . . . . . . . . . . 47
Using a CD or DVD . . . . . . . . . . . . . . . . . . . . . . . . . . . . . 48
Using the memory card reader . . . . . . . . . . . . . . . . . . . . . . 48
Memory card types . . . . . . . . . . . . . . . . . . . . . . . . . . . . . 49
Inserting a memory card . . . . . . . . . . . . . . . . . . . . . . . . 49
Using a memory card . . . . . . . . . . . . . . . . . . . . . . . . . . . 49
Removing a memory card . . . . . . . . . . . . . . . . . . . . . . . 50
Adding and removing a PC Card . . . . . . . . . . . . . . . . . . . . . 50
Using a port replicator . . . . . . . . . . . . . . . . . . . . . . . . . . . . . 51
Installing a printer or other peripheral device . . . . . . . . . . 52
Connecting a USB device . . . . . . . . . . . . . . . . . . . . . . . . 52
Connecting an IEEE 1394 device . . . . . . . . . . . . . . . . . . . 53
Viewing the display on a projector or monitor . . . . . . . . . . 54
Adjusting the display properties . . . . . . . . . . . . . . . . . . 55
Using the projector or monitor for a presentation . . . . 56
Viewing the display on a television . . . . . . . . . . . . . . . . . . . 57
Ordering accessories . . . . . . . . . . . . . . . . . . . . . . . . . . . . . . . 58
Chapter 5: Managing Power. . . . . . . . . . . . . . . 61
Monitoring the battery charge . . . . . . . . . . . . . . . . . . . . . . . 62
ii

www.gateway.com
Recharging the battery(ies) . . . . . . . . . . . . . . . . . . . . . . . . . 62
Changing batteries . . . . . . . . . . . . . . . . . . . . . . . . . . . . . . . . 63
Replacing the main battery . . . . . . . . . . . . . . . . . . . . . . 63
Installing a secondary battery . . . . . . . . . . . . . . . . . . . . 64
Recalibrating the battery(ies) . . . . . . . . . . . . . . . . . . . . . . . . 65
Extending battery life . . . . . . . . . . . . . . . . . . . . . . . . . . . . . . 66
Maximizing battery performance . . . . . . . . . . . . . . . . . . 66
Conserving battery power . . . . . . . . . . . . . . . . . . . . . . . 66
Using alternate power sources . . . . . . . . . . . . . . . . . . . 67
Changing power modes . . . . . . . . . . . . . . . . . . . . . . . . . 67
Changing notebook power settings . . . . . . . . . . . . . . . . . . . 69
Changing the power plan . . . . . . . . . . . . . . . . . . . . . . . . 69
Changing advanced settings . . . . . . . . . . . . . . . . . . . . . 71
Chapter 6: Traveling with Your Notebook . . . 73
Packing your notebook . . . . . . . . . . . . . . . . . . . . . . . . . . . . . 74
Traveling by air . . . . . . . . . . . . . . . . . . . . . . . . . . . . . . . . . . . 74
Dial-up modem . . . . . . . . . . . . . . . . . . . . . . . . . . . . . . . . . . . 74
Radio frequency wireless connections . . . . . . . . . . . . . . . . . 75
Files . . . . . . . . . . . . . . . . . . . . . . . . . . . . . . . . . . . . . . . . . . . . 75
Security . . . . . . . . . . . . . . . . . . . . . . . . . . . . . . . . . . . . . . . . . 76
Power . . . . . . . . . . . . . . . . . . . . . . . . . . . . . . . . . . . . . . . . . . . 77
Additional tips . . . . . . . . . . . . . . . . . . . . . . . . . . . . . . . . . . . . 77
Chapter 7: Maintaining Your Notebook . . . . . 79
Caring for your notebook . . . . . . . . . . . . . . . . . . . . . . . . . . . 80
Cleaning your notebook . . . . . . . . . . . . . . . . . . . . . . . . . . . . 81
Cleaning the exterior . . . . . . . . . . . . . . . . . . . . . . . . . . . 81
Cleaning the keyboard . . . . . . . . . . . . . . . . . . . . . . . . . . 81
Cleaning the notebook screen . . . . . . . . . . . . . . . . . . . . 82
Maintaining the battery(ies) . . . . . . . . . . . . . . . . . . . . . . . . . 82
Storing batteries . . . . . . . . . . . . . . . . . . . . . . . . . . . . . . . 83
Cleaning CDs or DVDs . . . . . . . . . . . . . . . . . . . . . . . . . . . . . . 83
Recovering your system . . . . . . . . . . . . . . . . . . . . . . . . . . . . 84
Recovering pre-installed software and drivers . . . . . . . 85
Using Microsoft System Restore . . . . . . . . . . . . . . . . . . 91
Recovering your system to its factory condition . . . . . 93
Recovering your system using the Windows DVD . . . . 95
iii

Contents
Chapter 8: Upgrading Your Notebook . . . . . . . 97
Preventing static electricity discharge . . . . . . . . . . . . . . . . . 98
Adding or replacing memory modules . . . . . . . . . . . . . . . . 99
Replacing the hard drive kit . . . . . . . . . . . . . . . . . . . . . . . . 103
Chapter 9: Troubleshooting . . . . . . . . . . . . . . 109
Safety guidelines . . . . . . . . . . . . . . . . . . . . . . . . . . . . . . . . . 110
First steps . . . . . . . . . . . . . . . . . . . . . . . . . . . . . . . . . . . . . . 110
Troubleshooting . . . . . . . . . . . . . . . . . . . . . . . . . . . . . . . . . 111
Audio . . . . . . . . . . . . . . . . . . . . . . . . . . . . . . . . . . . . . . . 111
Battery . . . . . . . . . . . . . . . . . . . . . . . . . . . . . . . . . . . . . . 111
CD drives . . . . . . . . . . . . . . . . . . . . . . . . . . . . . . . . . . . . 111
Diskette drive (modular or external) . . . . . . . . . . . . . . 112
Display . . . . . . . . . . . . . . . . . . . . . . . . . . . . . . . . . . . . . . 113
DVD drives . . . . . . . . . . . . . . . . . . . . . . . . . . . . . . . . . . . 114
Ethernet . . . . . . . . . . . . . . . . . . . . . . . . . . . . . . . . . . . . . 116
File management . . . . . . . . . . . . . . . . . . . . . . . . . . . . . . 116
Fingerprint reader . . . . . . . . . . . . . . . . . . . . . . . . . . . . . 116
Hard drive . . . . . . . . . . . . . . . . . . . . . . . . . . . . . . . . . . . 117
Internet . . . . . . . . . . . . . . . . . . . . . . . . . . . . . . . . . . . . . 118
Keyboard . . . . . . . . . . . . . . . . . . . . . . . . . . . . . . . . . . . . 119
Media Center . . . . . . . . . . . . . . . . . . . . . . . . . . . . . . . . . 120
Memory . . . . . . . . . . . . . . . . . . . . . . . . . . . . . . . . . . . . . 122
Memory card reader . . . . . . . . . . . . . . . . . . . . . . . . . . . 123
Modem (cable or DSL) . . . . . . . . . . . . . . . . . . . . . . . . . . 123
Modem (dial-up) . . . . . . . . . . . . . . . . . . . . . . . . . . . . . . 123
Mouse . . . . . . . . . . . . . . . . . . . . . . . . . . . . . . . . . . . . . . 127
Networks (wired) . . . . . . . . . . . . . . . . . . . . . . . . . . . . . . 127
Networks (wireless) . . . . . . . . . . . . . . . . . . . . . . . . . . . . 129
Passwords . . . . . . . . . . . . . . . . . . . . . . . . . . . . . . . . . . . 131
PC Cards . . . . . . . . . . . . . . . . . . . . . . . . . . . . . . . . . . . . . 132
Power . . . . . . . . . . . . . . . . . . . . . . . . . . . . . . . . . . . . . . . 132
Printer . . . . . . . . . . . . . . . . . . . . . . . . . . . . . . . . . . . . . . 133
Sound . . . . . . . . . . . . . . . . . . . . . . . . . . . . . . . . . . . . . . . 134
Status indicators . . . . . . . . . . . . . . . . . . . . . . . . . . . . . . 135
Touchpad . . . . . . . . . . . . . . . . . . . . . . . . . . . . . . . . . . . . 135
Video . . . . . . . . . . . . . . . . . . . . . . . . . . . . . . . . . . . . . . . 135
iv

www.gateway.com
Telephone support . . . . . . . . . . . . . . . . . . . . . . . . . . . . . . . 136
Before calling Gateway Customer Care . . . . . . . . . . . . 136
Appendix A: Legal Information . . . . . . . . . . . . 139
Index . . . . . . . . . . . . . . . . . . . . . . . . . . . . . . . . 149
v

Contents
vi

CHAPTER1
About This Reference
• About this guide
• Accessing your online User Guide
• Gateway contact information
• Microsoft Certificate of Authenticity
• For more information
1

CHAPTER 1: About This Reference
About this guide
This guide includes information and maintenance instructions
that are specific to your model of Gateway notebook. For all
other notebook information, see your online User Guide.
Accessing your online User Guide
In addition to this guide, your online User Guide has been
included on your hard drive. Your User Guide is an in-depth,
easy-to-read manual that includes information on the
following topics:
• Help and technical support
• Using and customizing Windows and other software
• Using the Internet
• Protecting your files
• Playing and recording media
• Networking
To access your online User Guide:
• Click (Start), All Programs, then click Gateway
Documentation.
2
www.gateway.com
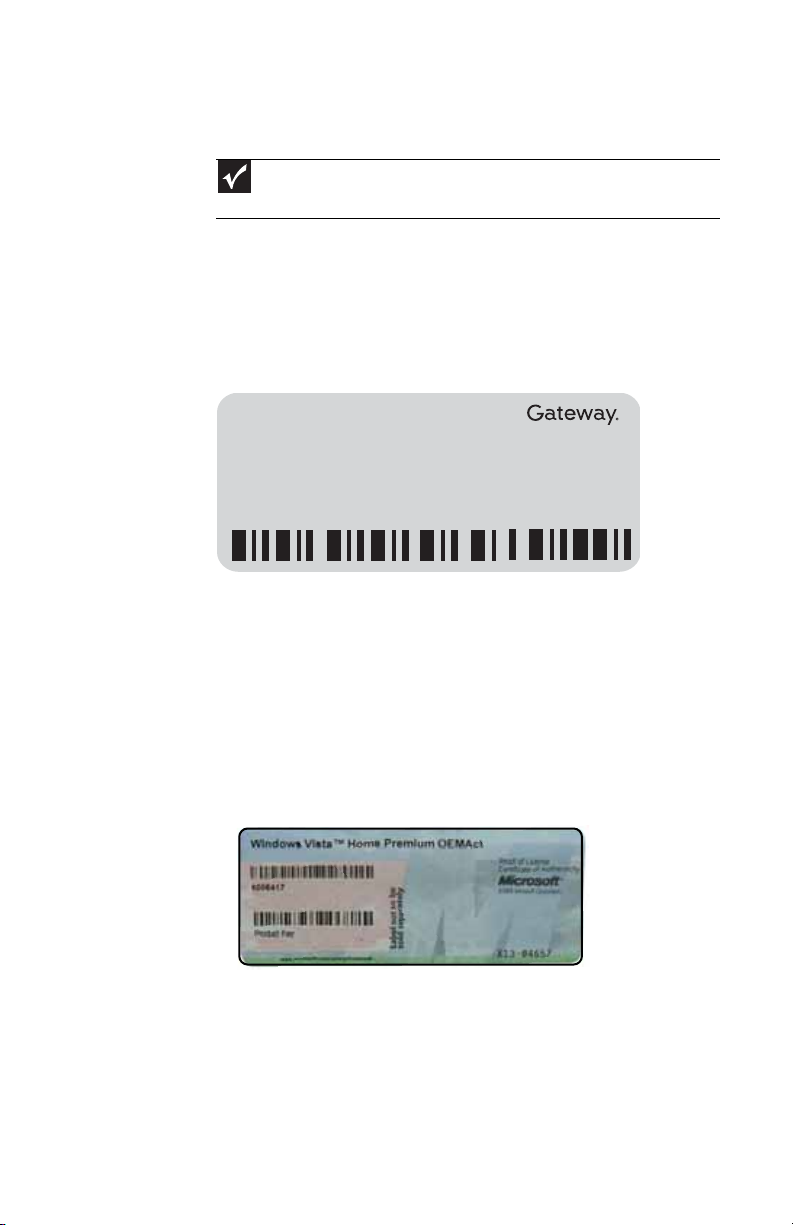
Gateway contact information
Important
The labels shown in this sect ion are for informational purposes only. Label
information varies by model, features ordered, and location.
Gateway model and serial number
The label on the bottom of your notebook contains
information that identifies your notebook model and its
features. Gateway Customer Care will need this information
if you call for assistance.
Online Support:
Tech Support Phone:
Hours:
Model:
S/No:
Microsoft Certificate of Authenticity
The Microsoft Certificate of Authenticity label found on the
bottom of your notebook includes the product key code for
your operating system.
3

CHAPTER 1: About This Reference
For more information
For more information about your notebook, visit Gateway’s
Support page at www.gateway.com
shown on your notebook’s label. The Support page also has
links to additional Gateway documentation and detailed
specifications.
or the Web address
4

CHAPTER2
Checking Out Your Notebook
• Front
• Left
• Right
• Back
• Bottom
• Keyboard area
5

Front
CHAPTER 2: Checking Out Your Notebook
Microphone jack
Speaker
Headphone jack
Speaker
LCD panel release latch
Power indicator
Battery charge indicator
Wireless network switch
Component Icon Description
LCD panel release
latch
Microphone jack Plug a microphone into this jack. The built-in
Speakers Provide audio output when headphones or
Power indicator
Battery charge
indicator
Slide to open the LCD panel.
microphone (see “Keyboard area” on page 11)
is turned off while an external microphone is
connected.
amplified speakers are not plugged in.
■
LED on - Notebook is on.
■
LED blinking - Notebook is in Sleep or Hybrid
Sleep mode.
■
LED off - Notebook is off.
■
LED blue - Battery is fully charged.
■
LED purple - Battery is charging.
■
LED blinking red - Battery charge is very low.
■
LED solid red - Battery is malfunctioning.
Important: This LED only lights up when your
notebook is connected to AC power or the
battery charge is very low.
Wireless network
switch
6
Turn the optional IEEE 802.11 wireless network
radio and optional Bluetooth radio on or off. For
more information, see “Wireless Ethernet
Networking” in your online User Guide.
Warning: Radio frequency wireless
communication can interfere with equipment
on commercial aircraft. Current aviation
regulations require wireless devices to be
turned off while traveling in an airplane.
IEEE 802.11 and Bluetooth communication
devices are examples of devices that provide
wireless communication.
www.gateway.com
Component Icon Description
Headphone jack Plug amplified speakers or headphones into this
jack. The built-in speakers are turned off when
speakers or headphones are plugged into this
jack.
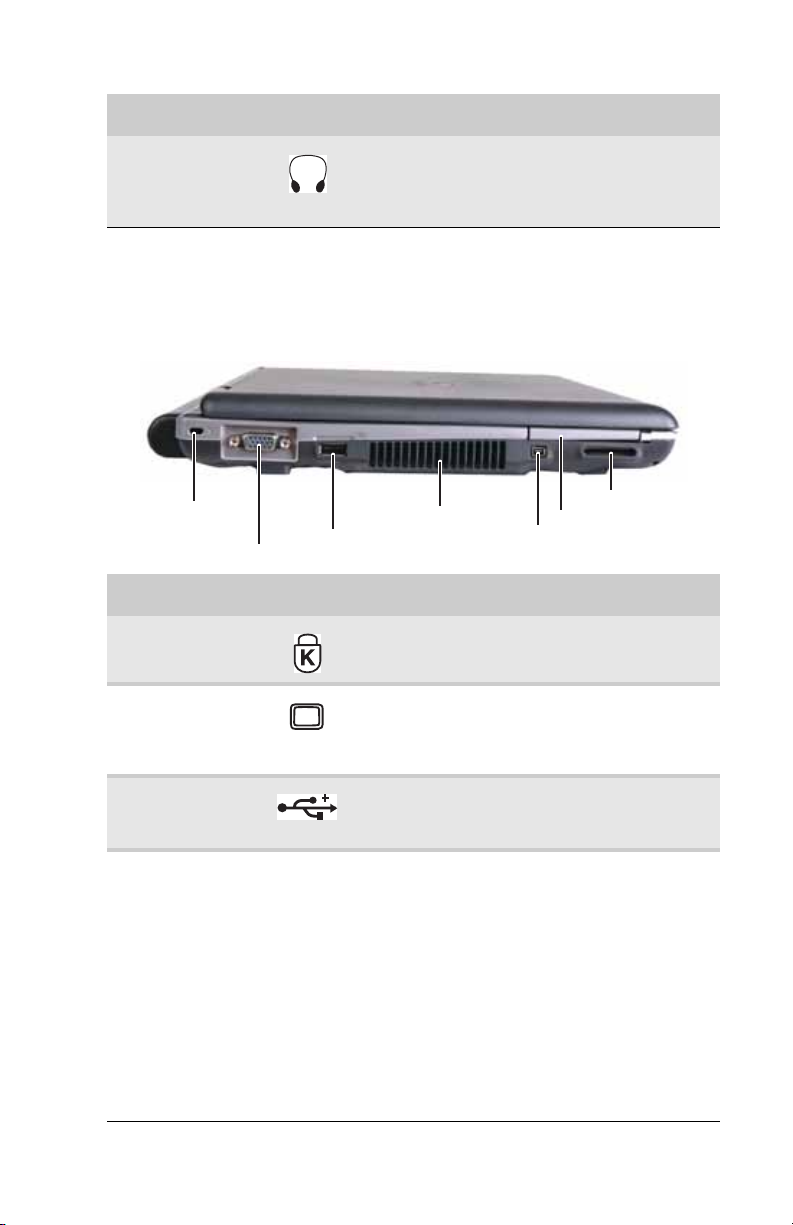
Left
Kensington lock slot
Monitor port
USB port
Ventilation fan
IEEE 1394 port
Component Icon Description
Kensington™
lock slot
Monitor port Plug an analog VGA monitor or projector into
Secure your notebook to an object by
connecting a Kensington cable lock to this slot.
this port. For more information, see “Viewing
the display on a projector or monitor” on
page 54.
PC Card
slot
Memory card
reader
USB port Plug a USB device (such as a diskette drive, flash
drive, printer, scanner, camera, keyboard, or
mouse) into this port.
Ventilation fan Helps cool internal components.
Warning: Do not work with the notebook
resting on your lap. If the air vents are blocked,
the notebook may become hot enough to harm
your skin.
Caution: Do not block or insert objects into
these slots. If these slots are blocked, your
notebook may overheat resulting in unexpected
shutdown or permanent damage to the
notebook.
Caution: Provide adequate space around your
notebook so air vents are not obstructed. Do
not use the notebook on a bed, sofa, rug, or
other similar surface.
7
CHAPTER 2: Checking Out Your Notebook
Component Icon Description
IEEE 1394 port Plug an IEEE 1394 (also known as Firewire® or
PC Card slot Insert one Type II PC Card into this slot. For
Memory card
reader
i.Link®) device (such as a digital camcorder or
MP3 player) into this 4-pin IEEE 1394 port.
more information, see “Adding and removing a
PC Card” on page 50.
Insert a memory card from a digital camera,
MP3 player, PDA, or cellular telephone into the
memory card reader. For more information, see
“Using the memory card reader” on page 48.
The memory card reader supports Memory
Stick®, Memory Stick Pro®, Mini Secure
Digital®, MultiMediaCard™,
RS-MultiMediaCard™, Secure Digital™, and
xD-Picture Card™cards.
Important: RS-Multimedia Card and Mini
Secure Digital cards require the use of an
adapter that is available with the media.
Right
USB port
Smart card reader
Modular bay
USB ports
Modem jack
Ethernet jack
Component Icon Description
USB ports Plug USB devices (such as a diskette drive, flash
Smart card reader Insert a smart card in this slot for enhanced
drive, printer, scanner, camera, keyboard, or
mouse) into these ports.
security. For more information, see “Using the
smart card reader” on page 34.
8
www.gateway.com
Component Icon Description
Modular bay Insert a module such as a CD drive, DVD drive,
Modem jack Plug a dial-up modem cable into this jack. For
Ethernet jack Plug an Ethernet network cable into this jack.
combination DVD/CD-RW drive, multi-format
DVD±RW drive, diskette drive, a second hard
drive, a secondary battery, or a weightsaver
into this bay. For more information, see
“Changing modules” on page 44.
To determine the type of drive in the modular
bay, examine the drive tray’s plastic cover and
compare the logo to those listed in “Identifying
drive types” on page 47.
Important: To order a module other than the
one that came with your notebook, contact
Gateway.
more information, see “Connecting the dial-up
modem” on page 19.
Plug the other end of the cable into a cable
modem, DSL modem, or an Ethernet network
jack. For more information, see “Connecting to
a broadband modem or network” on page 20.
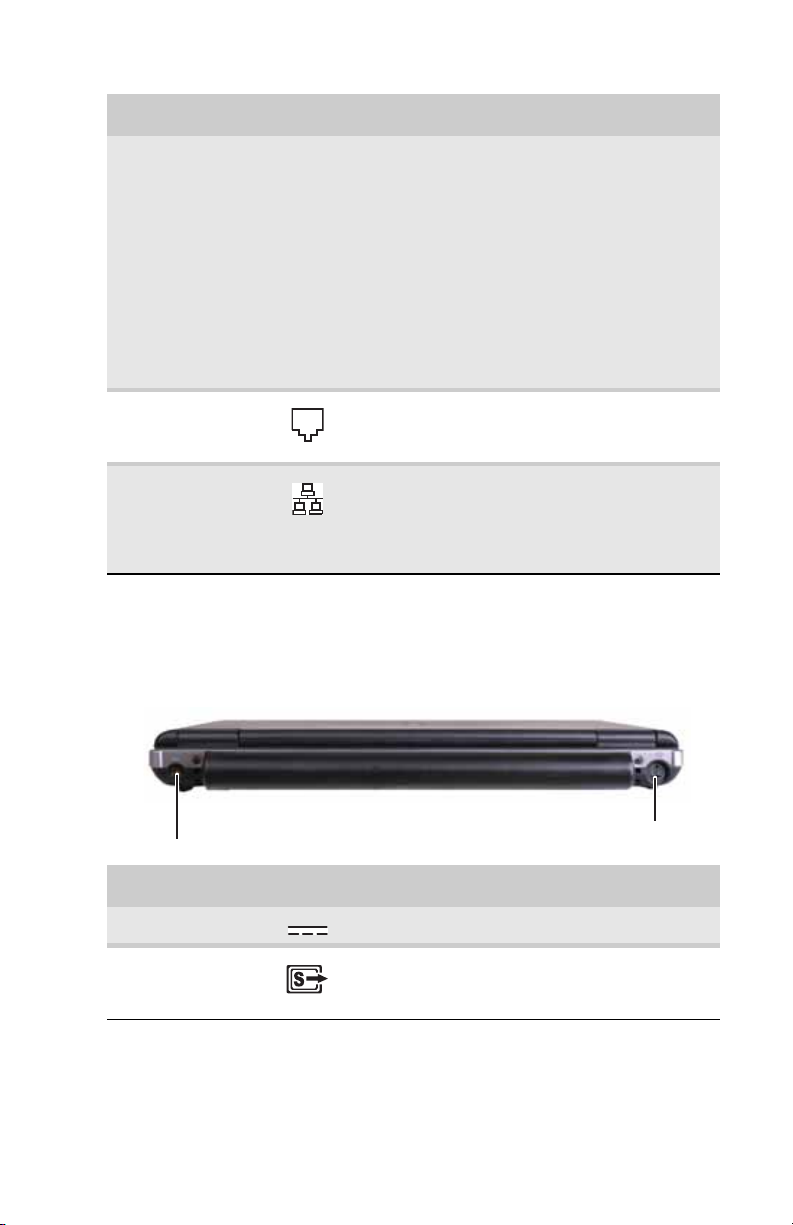
Back
Power connector
S-Video out jack
Component Icon Description
Power connector Plug the AC adapter cable into this connector.
S-Video out jack Plug an S-Video device, such as a television, into
this jack. For more information, see “Viewing
the display on a television” on page 57.
9
CHAPTER 2: Checking Out Your Notebook
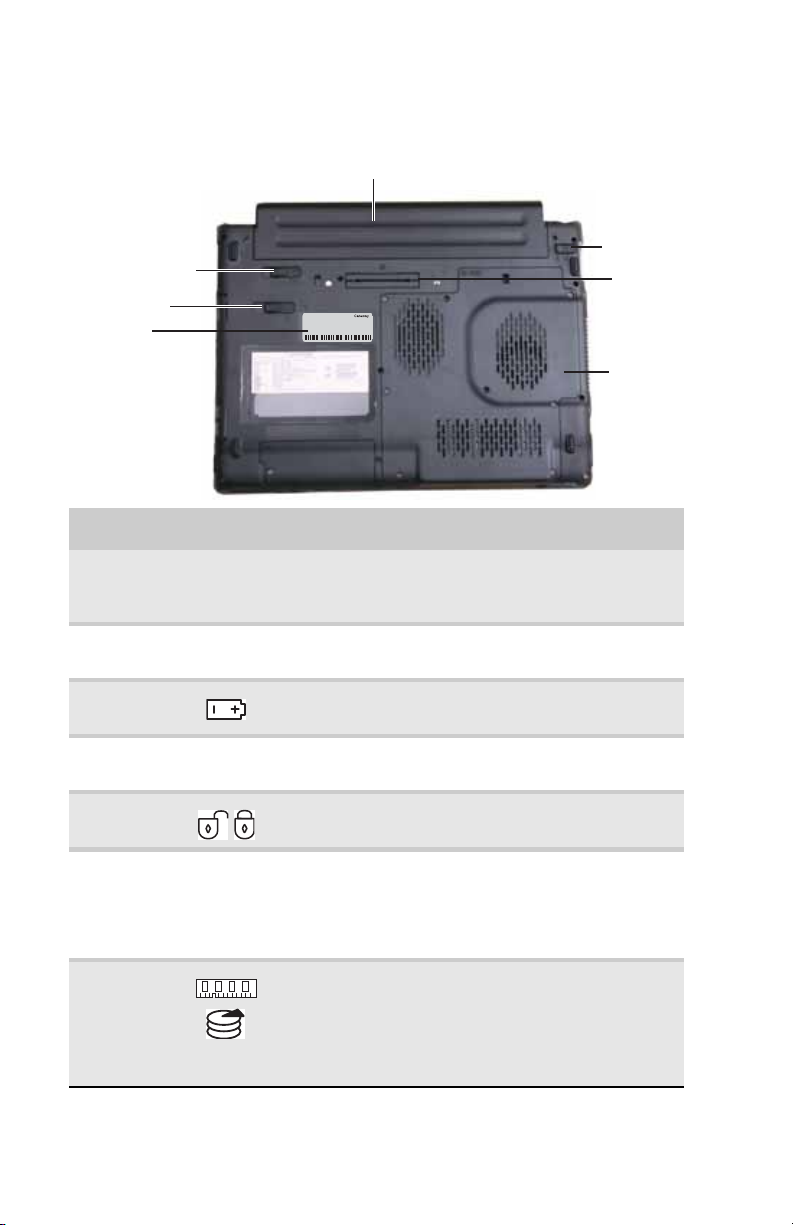
Bottom
Battery latch
Modular bay latch
Customer
care label
Component Icon Description
Online Support:
Tech Support Phone:
Hours:
Model:
S/No:
Main battery
Battery lock
Docking port
Memory
bay/Hard
drive bay
Customer
Care label
Includes the Customer Care contact information. For
more information, see “Gateway contact information”
on page 3.
Modular bay
latch
Slide to release the module. For more information, see
“Changing modules” on page 44.
Battery latch Slide to release the main battery. For more
information, see “Changing batteries” on page 63.
Main battery Provides power when the notebook is not plugged
into AC power.
Battery lock Slide to unlock the main battery. For more
information, see “Changing batteries” on page 63.
Docking port Connect the optional port replicator to this port.
Warning: Power is passed through this port. This
docking connection is certified to UL 1950 for use only
with port replicators designed for your Gateway
notebook.
Memory
bay/Hard
drive bay
■
Install a memory module into this bay. For more
information, see “Adding or replacing memory
modules” on page 99.
■
The hard drive is located in this bay. For more
information, see “Replacing the hard drive kit” on
page 103.
10
www.gateway.com
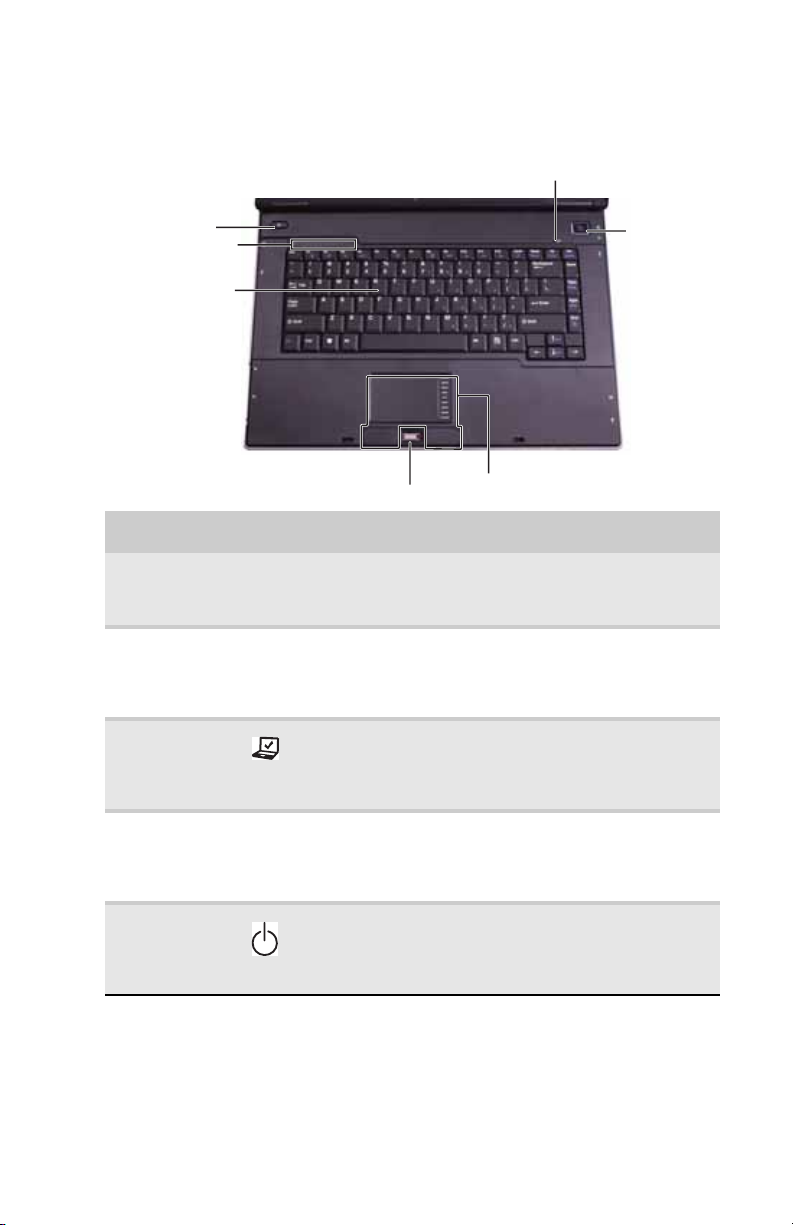
Keyboard area
Mobility center
button
Status indicators
Keyboard
Microphone
Power button
Optional fingerprint reader
Tou chpa d
Component Icon Description
Keyboard Provides all the features of a full-sized, computer
Status
indicators
Mobility
center button
Microphone Record audio through this microphone. The built-in
Power button Press to turn the power on or off. You can also
keyboard. For more information, see “Using the
keyboard” on page 25.
Inform you when a drive is in use or when a button
has been pressed that affects how the keyboard is
used. For more information, see “Using the status
indicators” on page 24.
Opens the Windows Mobility Center. For more
information about the Windows Mobility Center, see
“Using the Windows Mobility Center” in your online
User Guide.
microphone is turned off while an external
microphone is connected. For the location of your
microphone jack, see “Front” on page 6.
configure the power button for Sleep/Resume mode.
For more information on configuring the power button
mode, see “Changing advanced settings” on page 71.
11

CHAPTER 2: Checking Out Your Notebook
Component Icon Description
Touchpad Provides all the functionality of a mouse. For more
Fingerprint
reader
(optional)
information, see “Using the EZ Pad touchpad” on
page 35.
Provides enhanced security. For more information, see
“Using the optional fingerprint reader” on page 29.
12

CHAPTER3
Setting Up and Getting Started
• Working safely and comfortably
• Connecting the AC adapter
• Connecting the dial-up modem
• Connecting to a broadband modem or
network
• Starting your notebook
• Turning off your notebook
• Restarting (rebooting) your notebook
• Using the status indicators
• Using the keyboard
• Using the optional fingerprint reader
• Using the smart card reader
• Using the EZ Pad touchpad
• Adjusting the brightness
• Adjusting the volume
• Turning your wireless radio on or off
13

CHAPTER 3: Setting Up and Getting Started
Working safely and comfortably
Before using your notebook, follow these general guidelines
for setting up a safe and comfortable work area and avoiding
discomfort and strain:
• Keep hands and arms parallel to the floor.
• Adjust the screen so it is perpendicular to your line of
sight.
• Place your feet flat on the floor or on a footrest.
• Although notebooks are sometimes called “laptops,” do
not use your notebook while it rests on your
unprotected lap. Notebook operating temperatures can
become quite high, increasing the risk of burns to your
legs. Instead, use a laptop desk to protect your legs.
• Do not use the notebook on any soft, conforming
surface, such as your lap, a blanket, carpet, or a sofa.
Soft surfaces can block your notebook’s ventilation
openings, leading to overheating, permanent damage
to your notebook, and fire danger. Instead, place your
notebook on a rigid, hard surface, and make sure that
you keep the ventilation openings on the sides clear.
War ning
Do not use your notebook on a soft surface, such as your lap,
a blanket, carpet, or a sofa. You must keep your notebook’s ventilation
openings clear of obstructions, or your notebook may overheat,
increasing the risk of fire and personal injury.
Reducing eye strain
Sunlight or bright indoor lighting should not reflect on the
screen or shine directly into your eyes.
• Position the computer desk and screen so you can avoid
glare on your screen and light shining directly into your
eyes. Reduce glare by installing shades or curtains on
windows, and by installing a glare screen filter.
• Use soft, indirect lighting in your work area. Do not use
your notebook in a dark room.
• Avoid focusing your eyes on your screen for long
periods of time. Every 10 or 15 minutes, look around
the room, and try to focus on distant objects.
• Where feasible, keep your head vertical while looking
at the screen. If you use an external keyboard, raise the
notebook so the top of its screen is no higher than eye
level.
14

www.gateway.com
Setting up your computer desk and chair
When you are setting up your computer desk and chair, make
sure that the desk is the appropriate height and the chair helps
you maintain good posture.
• Select a flat surface for your computer desk.
• Adjust the height of the computer desk so your hands
and arms are positioned parallel to the floor when you
use the keyboard and touchpad. If the desk is not
adjustable or is too tall, consider using an adjustable
chair to control your arm’s height above the keyboard.
• Use an adjustable chair that is comfortable, distributes
your weight evenly, and keeps your body relaxed.
• Position your chair so the keyboard is at or slightly
below the level of your elbow. This position lets your
shoulders relax while you type.
• Adjust the chair height, adjust the forward tilt of the
seat, or use a footrest to distribute your weight evenly
on the chair and relieve pressure on the back of your
thighs.
• Adjust the back of the chair so it supports the lower
curve of your spine. You can use a pillow or cushion to
provide extra back support.
Sitting at your notebook
• Avoid bending, arching, or angling your wrists. Make
sure that they are in a relaxed position when you type.
• Do not slouch forward or lean far back. Sit with your
back straight so your knees, hips, and elbows form right
angles when you work.
• Take breaks to stand and stretch your legs.
• Avoid twisting your torso or neck.
Avoiding discomfort and injury from repetitive strain
• Vary your activities to avoid excessive repetition.
• Take breaks to change your position, stretch your
muscles, and relieve your eyes.
• Find ways to break up the work day, and schedule a
variety of tasks.
15

CHAPTER 3: Setting Up and Getting Started
Connecting the AC adapter
You can run your notebook using an AC adapter or your
notebook’s main and optional secondary batteries. The
battery(ies) were shipped to you partially charged. You should
use the AC adapter right away to fully charge the battery(ies).
Allow three hours for the battery(ies) to fully charge.
War ning
Do not attempt to disassemble the AC adapter. The AC adapter has no
user-replaceable or user-serviceable parts inside. The AC adapter has dang erous
voltages that can cause serious injury or death. Contact Gateway about
returning defective AC adapters.
Caution
Make sure that you use the AC adapter that came with your notebook
or one of the same type purchased from Gateway. Replace the power cord if
it becomes damaged. The replacement cord must be of the same type and
voltage rating as the original cord or your notebook may be damaged.
Important
If the main and optional secondary batteries are not fully charged before
you use your notebook on battery power for the first time, the battery life may
be much shorter than you expect. If the battery life seems short even after being
charged for three hours, the battery(ies) may need to be recalibrated. For
information on recalibrating the battery(ies), see “Recalibrating the battery(ies)”
on page 65.
16
To connect the AC adapter:
1 Connect the power cord to the AC adapter.

www.gateway.com
2 Connect the AC adapter to your notebook’s power
connector.
3 Plug the power cord into a wall outlet. The battery
charge indicator turns on (see “Front” on page 6 for the
location of the battery charge indicator). If the battery
charge indicator does not turn on, complete the
following steps until it turns on:
a Unplug the adapter from your notebook, then plug
it back in.
b Press FN+F1 to toggle the status lights on and off.
c Make sure the power cord is firmly attached to the
AC adapter.
d Plug the power cord into a different wall outlet.
4 When you finish using your notebook for the first time,
turn off your notebook and leave your notebook
connected to AC power until the battery charge
indicator turns blue.
Important
If the battery charge indicator does not turn blue after three
hours, contact Gateway Customer Care at the location shown on the
Customer Care label. For more information, see “Gateway contact
information” on page 3.
17

CHAPTER 3: Setting Up and Getting Started
Protecting from power source problems
During a power surge, the voltage level of electricity coming
into your notebook can increase to levels far above normal
levels and cause data loss or system damage. Protect your
notebook and peripheral devices by connecting them to a
surge protector, which absorbs voltage surges and prevents
them from reaching your notebook.
War ning
High voltages can enter your notebook through both the power cord and
the modem connection. To protect your notebook and avoid electrical shock,
use a surge protector. If you have a telephone modem, use a surge protector
that has a modem jack. If you have a cable modem, use a surge protector that
has an antenna/cable TV jack. During an electrical storm, unplug both the surge
protector and the modem.
18
www.gateway.com
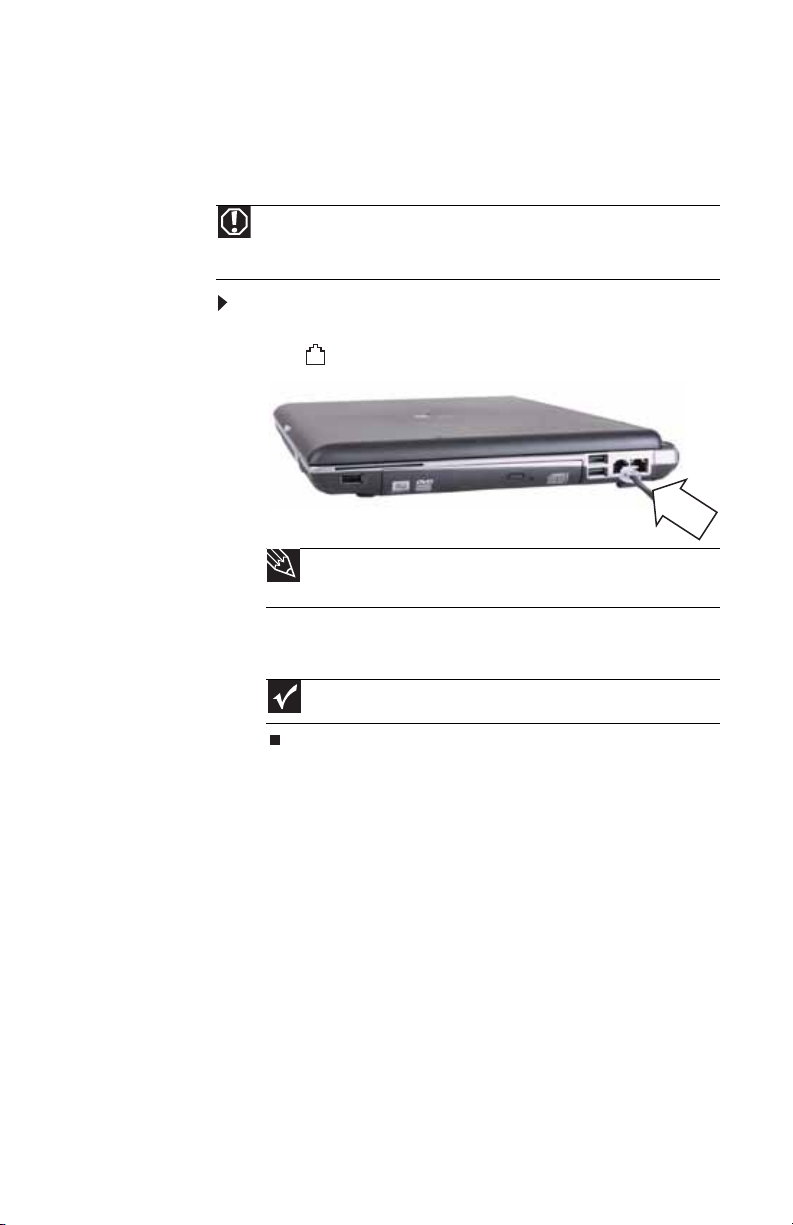
Connecting the dial-up modem
Your notebook has a built-in 56K modem that you can use to
connect to a standard telephone line.
War ning
To reduce the risk of fire, use only No. 26 AWG or larger (for example,
No. 24 AWG) UL-listed or CSA-certified telecommunication line cord for your
dialup modem connection.
To connect the modem:
1 Insert one end of the modem cable into the modem
jack on your notebook.
Tip
For the location of the modem jack on an optional port replicator,
see the port replicator user guide.
2 Insert the other end of the modem cable into a
telephone wall jack.
Important
The modem will not work with digital or PBX telephone lines.
19
CHAPTER 3: Setting Up and Getting Started
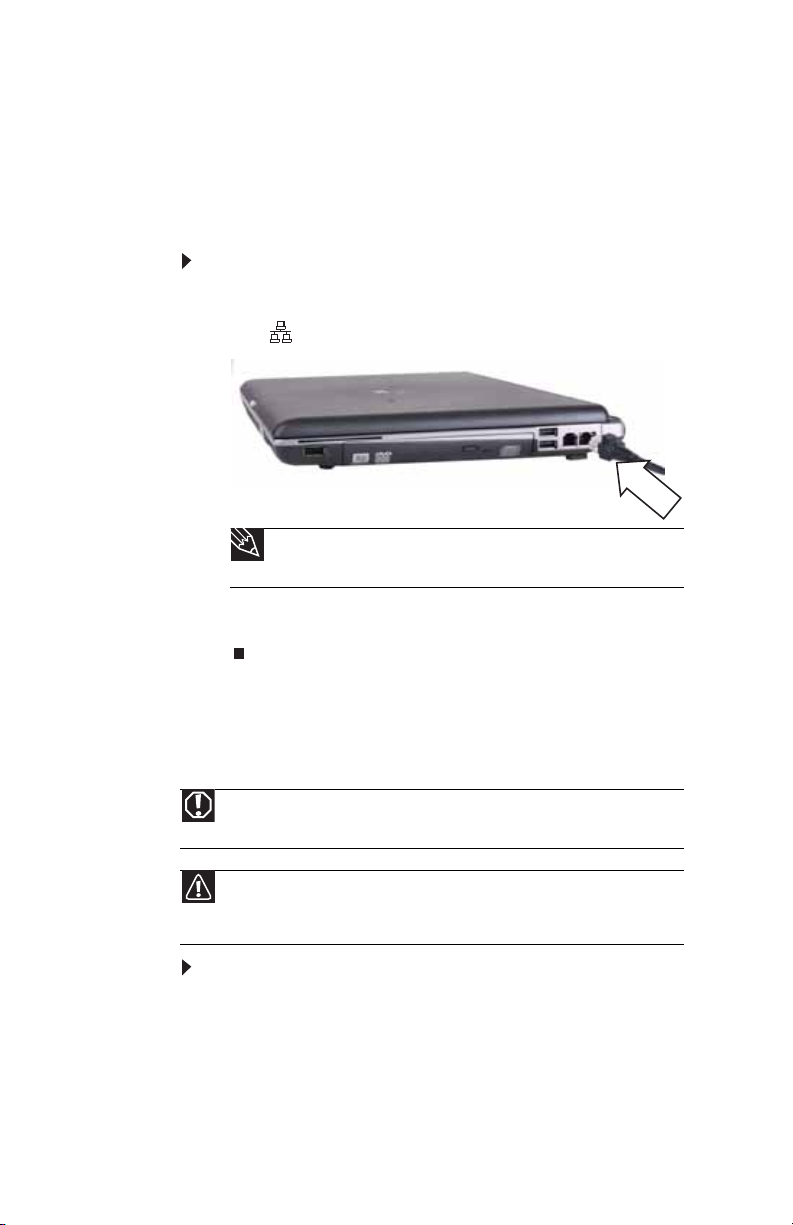
Connecting to a broadband modem or network
Your notebook has a network jack that you can use to connect
to a cable or DSL modem or to a wired Ethernet network.
To connect to a cable or DSL modem or to a wired
Ethernet network:
1 Insert one end of the network cable into the network
jack on your notebook.
Tip
For the location of the network jack on an optional port replicator,
see the port replicator user guide.
2 Insert the other end of the network cable into a cable
modem, DSL modem, or Ethernet network jack.
Starting your notebook
War ning
Do not work with the notebook resting on your lap. If the air vents are
blocked, the notebook may become hot enough to harm your skin.
Caution
Provide adequate space around your notebook so air vents are not
obstructed. Do not use the notebook on a bed, sofa, rug, or other similar
surface.
To start your notebook:
1 Slide the latch on the front of your notebook, then lift
the LCD panel.
20
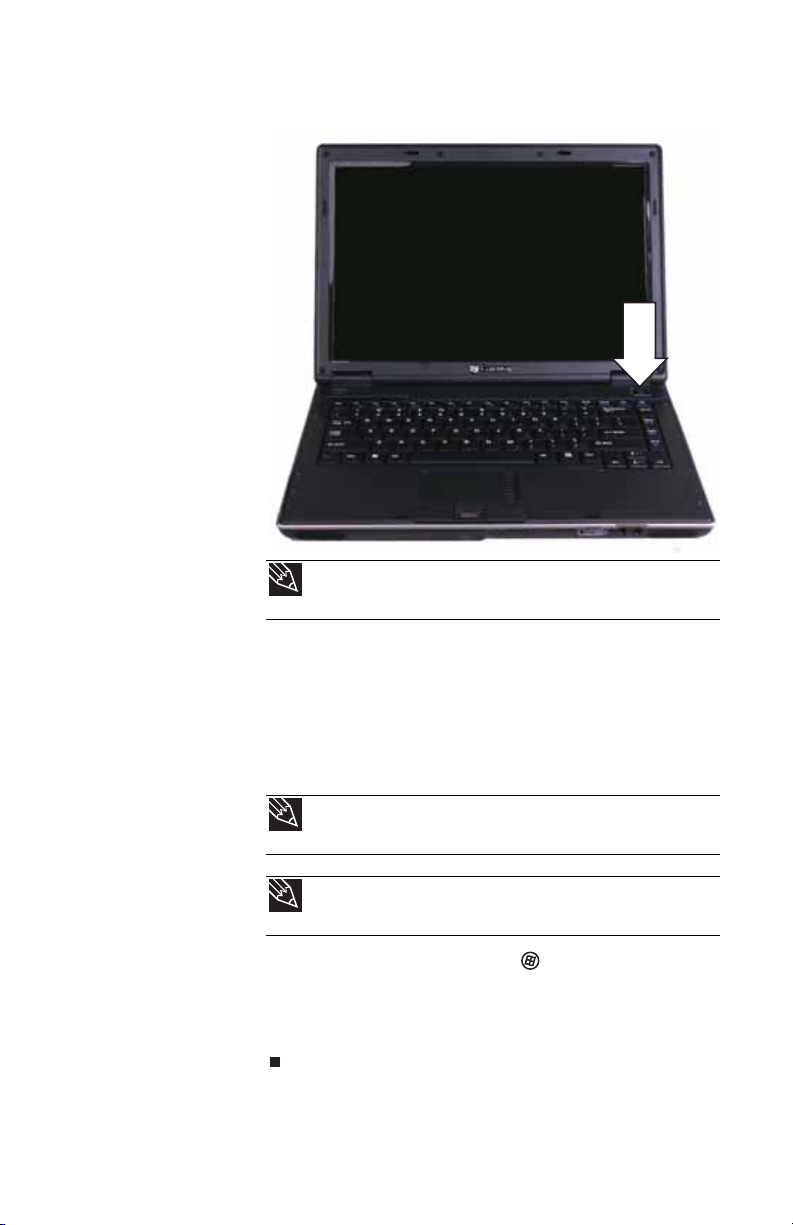
www.gateway.com
2 Press the power button located above the keyboard.
Tip
For more information about changing the power button mode,
see “Changing advanced settings” on page 71.
3 If you are starting your notebook for the first time,
follow the on-screen instructions to select the language
and time zone and to create your first user account.
4 Attach and turn on any peripheral devices, such as
printers, scanners, speakers, and an optional port
replicator.
Tip
For more information about connecting peripheral devices, see
“Installing a printer or other peripheral device” on page 52.
Tip
See the documentation that came with each device for its setup
instructions.
5 To open the main menu, click (Start). From that
menu, you can run programs and search for files. For
more information on using Windows, see “Using
Windows” and “Customizing Windows” in your online
User Guide.
21
CHAPTER 3: Setting Up and Getting Started
Waking up your notebook
When you have not used your notebook for several minutes
or if you close the LCD panel without turning off your
notebook, it may enter a power-saving mode called Sleep.
While in Sleep mode, the power indicator flashes. If your
notebook is in Sleep mode, press the power button to “wake”
it up.
Tip
For more information about Sleep mode, see “Changing power modes”
on page 67.
Turning off your notebook
Putting your notebook into Sleep mode is the easiest way to
power down your notebook. Although it does not turn your
notebook completely off, it turns off or slows down most
system operations to save power. Sleep mode saves your
desktop layout so the next time you restore power, the
programs are laid out just as you left them. Waking your
notebook from a Sleep state is much faster than turning on
your notebook after it has been turned completely off.
Hibernate mode is an alternative to Sleep mode. In Hibernate
mode, your notebook is turned completely off. When you
wake your notebook from Hibernate mode, however, the
programs that were running when your notebook entered
Hibernate mode are running just as you left them.
To put your notebook to sleep:
• Click (Start), then click (power). The
notebook saves your session and partially shuts down
to save power.
-OR-
Press F
N+F3.
22
Tip
You can change the Sleep mode from the standard Sleep mode (default)
to Hybrid Sleep. For more information about Sleep mode, see “Changing power
modes” on page 67.
To put your notebook into hibernation:
• Click (Start), click the arrow next to the lock icon,
then click Hibernate. The notebook saves your session
and shuts down to save power.

www.gateway.com
To turn off your notebook:
• Click (Start), click the arrow next to the lock icon,
then click Shut Down. The notebook turns off.
Important
If for some reason you cannot use the Shut Down option in
Windows to turn off your notebook, press and hold the power button
for about five seconds, then release it.
Restarting (rebooting) your notebook
If your notebook does not respond to keyboard, touchpad, or
mouse input, you may have to close programs that are not
responding. If closing unresponsive programs does not
restore your notebook to normal operation, you may have to
restart (reboot) your notebook.
To close unresponsive programs on your notebook:
1 Press CTRL+ALT+DEL.
2 Click Start Task Manager. The Windows Task Manager
dialog box opens.
3 Click the program that is not responding.
4 Click End Task.
5 Click X in the top-right corner of the Windows Task
Manager dialog box.
To restart your notebook:
• Click (Start), click the arrow next to the lock icon,
then click Restart. The notebook turns off, then turns
on again.
Important
If your notebook does not turn off immediately, complete the
following steps until the notebook turns off:
1. Press and hold the power button for about five seconds, then release
it.
2. Unplug the power cord and remove the main and optional secondary
batteries for more than 10 seconds.
23

CHAPTER 3: Setting Up and Getting Started
A
1
Using the status indicators
Important
If none of the indicators are on, you may need to press FN+F1 to toggle
the status indicators on.
Status indicators inform you when a drive is being used or
when a button has been pressed that affects how the
keyboard is used. The status indicators are located to the right
of the keyboard.
Num lock
Caps lock
Wireless network
Indicator Icon Description
Module
Hard drive
24
Wireless
network
Caps lock
Num lock
Module
Hard drive
■
LED on - Optional wireless IEEE 802.11
radio is turned on.
■
LED off - Optional wireless IEEE 802.11
radio is turned off.
■
LED on - Caps lock is turned on.
■
LED off - Caps lock is turned off.
■
LED on - Numeric keypad is turned on.
■
LED off - Numeric keypad is turned off.
■
LED blue - Module is in use.
■
LED solid purple - Module is ready to
swap.
■
LED flashing purple - Module is not
installed in the notebook.
■
LED blinking - Hard drive is being
accessed.
■
LED off - Hard drive is not being
accessed.

www.gateway.com
Using the keyboard
Your notebook features a full-size keyboard that functions the
same as a desktop computer keyboard. Many of the keys have
been assigned alternate functions, including shortcut keys for
Windows, function keys for specific system operations, and
the Num Lock keys for the numeric keypad.
Function keys/
System keys
FN
key
Windows key
Tip
You can attach an external keyboard to the notebook or optional port
replicator using a USB port. You do not need to shut down the notebook to
connect a USB keyboard.
Numeric keypad
Application key
Arrow keys
Navigation
keys
Key types
The keyboard has several different types of keys. Some keys
perform specific actions when pressed alone and other
actions when pressed in combination with another key.
Key type Icon Description
Function keys Press these keys labeled F1 to F12
System keys Press these colored keys in
to perform actions in programs.
For example, pressing F1 may
open help.
Each program uses different
function keys for different
purposes. See the program
documentation to find out more
about the function key actions.
combination with the F
perform specific actions. For more
information, see “System key
combinations” on page 26.
N key to
25

CHAPTER 3: Setting Up and Getting Started
1
Key type Icon Description
Navigation keys Press these keys to move the
N key Press the FN key in combination
F
Windows key Press this key to open the
Numeric keypad Use these keys to type numbers
Application key Press this key for quick access to
Arrow keys Press these keys to move the
cursor to the beginning of a line, to
the end of a line, up the page,
down the page, to the beginning
of a document, or to the end of a
document.
with a colored system key to
perform a specific action.
Windows Start menu. This key can
also be used in combination with
other keys to open utilities like
F (Search utility), R (Run utility),
and E (Computer window).
when the numeric keypad is
turned on. Press F
the numeric keypad.
shortcut menus and help
assistants in Windows.
cursor up, down, right, or left.
N+ to turn on
System key combinations
When you press the FN key and a system key at the same time,
your notebook performs the action identified by the text or
icon on the key.
Press and hold
FN
, then press
To...
this system key...
Toggle the status indicators on or off. For
more information, see “Using the status
indicators” on page 24.
26

www.gateway.com
Press and hold
FN
, then press
this system key...
To...
Turn the optional IEEE 802.11 wireless
network radio on or off. For more
information, see “Wireless Ethernet
Networking” in your online User Guide.
Warning: Radio frequency wireless
communication can interfere with
equipment on commercial aircraft. Current
aviation regulations require wireless
devices to be turned off while traveling in
an airplane. IEEE 802.11 communication
devices are examples of devices that
provide wireless communication.
Important: The wireless network switch
must be in the ON position for this button
to work. For more information, see “Front”
on page 6.
Enter Sleep mode or Hybrid Sleep mode.
Press the power button to leave Sleep
mode. For more information, see “Changing
notebook power settings” on page 69.
Toggle the notebook display in the
following order:
■
The LCD
■
An external monitor or projector (a
monitor or projector must be plugged
into the monitor port on your notebook
or optional port replicator or the DVI port
on the optional port replicator)
■
Both displays at the same time
For more information, see “Viewing the
display on a projector or monitor” on
page 54.
Turn the optional Bluetooth radio on or off.
6
Warning: Radio frequency wireless
communication can interfere with
equipment on commercial aircraft. Current
aviation regulations require wireless
devices to be turned off while traveling in
an airplane. Bluetooth communication
devices are examples of devices that
provide wireless communication.
Important: The wireless network switch
must be in the ON position for this button
to work. For more information, see “Front”
on page 6.
27

CHAPTER 3: Setting Up and Getting Started
Press and hold
FN
, then press
this system key...
F8
+
-
To...
Increase the LCD panel brightness above
the normal brightest setting. Use this
feature in bright lighting situations, such as
outside in bright sunlight.
Press a second time to decrease the
brightness below the normal lowest
brightness setting. Use this feature in dim
lighting situations.
Press a third time to return the display to
the normal brightness setting.
Important: Using this feature will affect
battery performance.
Play or pause the CD or DVD.
Stop playing the CD or DVD.
Skip back one CD track or DVD chapter.
28
Skip ahead one CD track or DVD chapter.
Increase the brightness of the display.
Decrease the brightness of the display.
Increase volume. For more information, see
“Adjusting the volume” on page 38.

www.gateway.com
Press and hold
FN
, then press
this system key...
To...
Decrease volume. For more information,
see “Adjusting the volume” on page 38.
Mute the sound. Press the key combination
again to restore the sound. For more
information, see “Adjusting the volume” on
page 38.
Using the optional fingerprint reader
Your notebook may include a fingerprint reader that provides
enhanced security and convenience. The fingerprint reader is
located between the left and right touchpad buttons.
Features include:
• Secure logon to Windows and fast user switching
between user accounts
• Password bank feature which records and replays
passwords used in Windows and Web-based
applications.
• A safe or folder for storing encrypted files that only a
user with a matching fingerprint can access
• Boot level security that requires a fingerprint
authentication before the system will boot to Windows
• Scrolling so you can use the fingerprint reader in place
of the touchpad.
29

CHAPTER 3: Setting Up and Getting Started
Running the TouchStrip Tutorial
Before using the fingerprint reader the first time, you should
run the TouchStrip Tutorial which teaches you the correct
method to use the fingerprint reader.
To run the TouchStrip Tutorial:
1 Click (Start), All Programs, Protector Suite QL, then
click Fingerprint Tutorial.
2 Click Next to proceed through the tutorial.
Enrolling your fingerprints
Before you can use the features of the fingerprint reader, you
must enroll your fingerprints so your notebook can identify
you.
To enroll your fingerprints:
1 Click (Start), All Programs, Protector Suite QL, then
click User Enrollment. The Welcome screen opens.
2 Click Next. The Finish screen opens.
3 Select one of the following options, then click Next.
• Enrollment to the biometric device—Select this
option to save your fingerprint to memory in the
fingerprint reader. Use this option to prevent
unauthorized use of your notebook even if the hard
drive has been removed.
• Enrollment to the hard disk—Select this option to
save your fingerprint to the hard drive. If you plan
to enroll more than 21 fingerprints, you must select
this option.
30

www.gateway.com
The User Enrollment wizard opens.
4 If you want to run the TouchStrip Tutorial, leave the Run
interactive tutorial check box selected, then click
Next. The TouchStrip Tutorial runs. For more
information, see “Running the TouchStrip Tutorial” on
page 30. After you have completed the tutorial, the
Enrollment screen appears.
-OR-
If you do not want to run the Touc hS tr ip Tutorial, click
to uncheck the Run interactive tutorial check box,
then click Next. The Enrollment screen appears.
31

CHAPTER 3: Setting Up and Getting Started
5 Click the button above the finger you are enrolling. A
new box appears with three empty circles in it.
6 Swipe your finger. A sample will be created and is
indicated by a fingerprint icon in one of the circles.
7 Repeat Step 6 two more times, then click Next. The
Advanced Security screen appears.
32

www.gateway.com
8 Type a password in the Backup password box, type the
same password in the Retype password box, then click
Next.
9 Click Finish.
Using the Fingerprint Control Center
The Fingerprint Control Center lets the administrator of the
notebook control how the fingerprint reader is used. You can:
• Add new fingerprints to the database
• Edit or delete fingerprints from the database
• Modify how fingerprints are used for logging onto the
notebook.
• Modify how the fingerprint reader is used for scrolling.
To use the Fingerprint Control Center:
1 Click (Start), All Programs, Protector Suite QL, then
click Control Center. The Fingerprint Control Center
opens.
2 If you are logged into the notebook with administrator
privileges, click Elevate administrative privileges for
user so you can make changes to the settings.
3 Click the yellow arrow in front of an option, then click
the option or setting you want to change.
33

CHAPTER 3: Setting Up and Getting Started
Using the fingerprint reader features
For more information about the fingerprint reader and how
to use its features, click (Start),
Suite QL, then click Help.
All Programs, Protector
Using the smart card reader
Your notebook includes a smart card reader that provides
enhanced logon security. A smart card is a plastic card similar
to an ATM card. A computer user inserts the card into the
smart card reader, then enters a personal identification
number (PIN) to log onto the notebook or the network. Smart
cards are typically used by large corporations for security.
To insert a smart card:
• Insert the smart card into the smart card slot with the
magnetic stripe up and to the front of the notebook.
Using a privacy filter
Your notebook’s LCD screen has been specially made to hold
privacy filters. A privacy filter helps block the screen view
from anyone viewing the notebook screen from a side view.
For more information about getting a privacy filter, see
“Ordering accessories” on page 58. To attach a privacy filter
to your notebook, see the installation instructions that come
with the privacy filter.
34
www.gateway.com
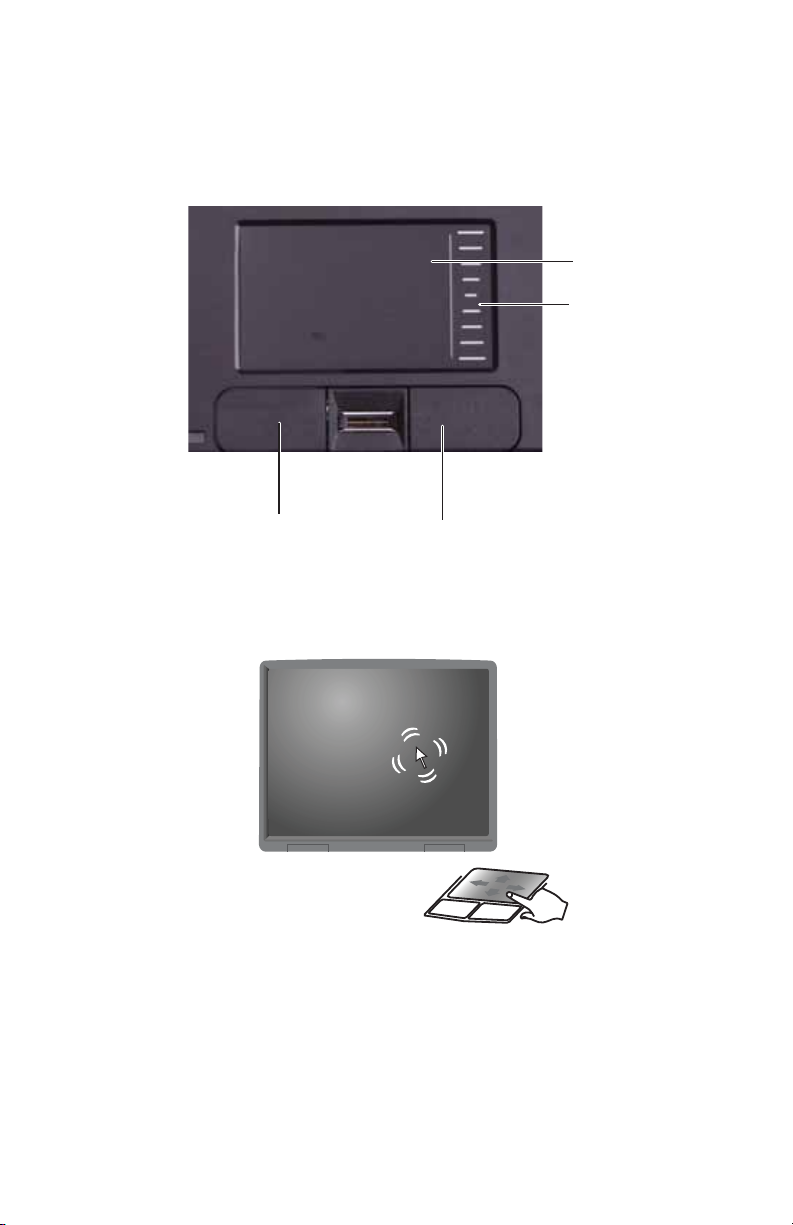
Using the EZ Pad touchpad
The EZ Pad™ consists of a touchpad, two buttons, and a scroll
zone.
Tou chpad
Scroll
zone
Left button
When you move your finger on the touchpad, the pointer
(arrow) on the screen moves in the same direction. You can
use the scroll zone to scroll through documents. Use of the
scroll zone may vary from program to program.
Right button
35

CHAPTER 3: Setting Up and Getting Started
You can use the EZ Pad left and right buttons below the
touchpad to select objects.
Tip
You can attach a mouse to the notebook or optional port replicator using
a USB port. You do not need to shut down the notebook to connect a USB
mouse.
Tip
For instructions on how to adjust the double-click speed, pointer speed,
right-hand or left-hand configuration, and other touchpad settings, see
“Changing the m ouse, touchpad, or pointing device settings” in your online User
Guide.
Tip
You may have received your notebook with the EZ Pad touchpad set to
only accept clicking by using the touchpad buttons. You can change this feature
to allow tapping on the touchpad to simulate clicking the left button. For more
information, see “Changing the mouse, touchpad, or pointing device settings”
in your online User Guide.
To... Do this...
Move the
pointer on
the screen.
Select an
object on the
screen.
Start a
program or
open a file or
folder.
Move your finger
around on the
touchpad. If you
run out of space
and need to move
the pointer
farther, lift your
finger, move it to
the middle of the
touchpad, then
continue moving
your finger.
Position the
pointer over the
object. Quickly
press and release
the left button
once. This action
is called clicking.
Position the
pointer over the
object. Press the
left button twice
in rapid
succession. This
action is called
double-clicking.
36

To... Do this...
www.gateway.com
Access a
shortcut
menu or find
more
information
about an
object on the
screen.
Move an
object on the
screen.
Adjusting the brightness
Position the
pointer over the
object. Quickly
press and release
the right button
once. This action
is called
right-clicking.
Position the
pointer over the
object. Press the
left button and
hold it down,
then use the
touchpad to
move (drag) the
object to the
appropriate part
of the screen.
Release the
button to drop
the object where
you want it.
To adjust screen brightness:
• Use the increase brightness and decrease brightness
keys on the keyboard. For more information, see
“System key combinations” on page 26.
-OR-
Press the Mobility Center button . The Windows
Mobility Center window opens. Slide the Brightness
control to the desired screen brightness.
Tip
For more information about the Windows Mobility Center, see
“Using the Windows Mobility Center” in your online User Guide.
37

CHAPTER 3: Setting Up and Getting Started
Adjusting the volume
You can use the volume control to adjust the overall volume
of your notebook.
To adjust the overall volume level using hardware
controls:
• If you are using external speakers, turn the knob on the
front of the speakers.
-OR-
Use the mute and volume control buttons on the
keyboard. For more information, see “System key
combinations” on page 26.
-OR-
Press the Mobility Center button . The Windows
Mobility Center window opens. Slide the Volume
control to the desired volume level.
Tip
For more information about the Windows Mobility Center, see
“Using the Windows Mobility Center” in your online User Guide.
To adjust the volume from Windows:
1 Click (Volume) on the taskbar. The volume control
slider opens.
38
2 Click and drag the slider up to increase volume and
down to decrease volume.
3 To mute the volume, click (Mute). To restore volume,
click it again.

www.gateway.com
4 To adjust device volume levels, click Mixer. The Volume
Mixer dialog box opens, where you can click and drag
sliders for individual devices.
Tip
Adjust the Windows Sounds slider to change system sounds
volume independently of general volume (such as the volume used for
music and game sounds).
5 Click X in the top-right corner of the window to close it.
Turning your wireless radio on or off
Your Gateway notebook may have a factory-installed wireless
radio.
War ning
Radio frequency wireless communication can interfere with equipment
on commercial aircraft. Current aviation regulations require wireless devices to
be turned off while traveling in an airplane. IEEE 802.11 communication devices
are examples of devices that provide wireless communication.
War ning
In environments where the risk of interference to other devices or
services is harmful or perceived as harmful, the option to use a wireless device
may be restricted or eliminated. Airports, hospitals, and oxygen or flammable
gas laden atmospheres are limited examples where use of wireless devices may
be restricted or eliminated. When in environments where you are uncertain of
the sanction to use wireless devices, ask the applicable authority for
authorization prior to using or turning on the wireless device.
39

CHAPTER 3: Setting Up and Getting Started
IEEE 802.11 wireless network radio
Your notebook may have an IEEE 802.11 radio for
communicating with other computers on a wireless Ethernet
network.
To turn the wireless IEEE 802.11 radio on:
1 Slide the wireless network switch to the ON position.
For more information, see “Front” on page 6.
2 Press FN + F2. The wireless status indicator turns on.For
the location of the wireless status indicator, see “Using
the status indicators” on page 24.
-OR-
Press the Mobility Center button . The Windows
Mobility Center window opens. Click Turn wireless on.
To turn the wireless IEEE 802.11 radio off:
• Press FN + F2. The wireless status indicator turns off.For
the location of the wireless status indicator, see “Using
the status indicators” on page 24.
-OR-
Press the Mobility Center button . The Windows
Mobility Center window opens. Click Turn wireless off.
-OR-
Slide the wireless network switch to the OFF position
to turn both IEEE 802.11 and Bluetooth off. For more
information, see “Front” on page 6.
Tip
For more information about using your notebook on a wireless network,
see “Wireless Ethernet Networking” in your online User Guide
Bluetooth radio
Your notebook may have a Bluetooth radio for communicating
with another Bluetooth device, such as a printer, scanner,
camera, MP3 player, headphone, keyboard, or mouse.
To turn the Bluetooth radio on:
1 Slide the wireless network switch to the ON position.
For more information, see “Front” on page 6.
2 Press FN + F6.
40

www.gateway.com
To turn the Bluetooth radio off:
• Press FN + F6.
-OR-
Slide the wireless network switch to the OFF position
to turn both IEEE 802.11 and Bluetooth off. For more
information, see “Front” on page 6.
Tip
For more information about using your notebook on a Bluetooth Personal
Area Network, see “Bluetooth Networking” in your online User Guide
Help
For more information about Bluetooth, click Start, then click Help and
Support. Type the keyword Bluetooth in the Search Help box, then press
E
NTER.
41

CHAPTER 3: Setting Up and Getting Started
42

CHAPTER4
Using Drives and Accessories
• Changing modules
• Using the CD or DVD drive
• Using the memory card reader
• Adding and removing a PC Card
• Using a port replicator
• Installing a printer or other peripheral device
• Viewing the display on a projector or
monitor
• Viewing the display on a television
• Ordering accessories
43

CHAPTER 4: Using Drives and Accessories
Changing modules
Your notebook’s modular bay supports different bay modules,
such as a CD drive, DVD drive, combination DVD/CD-RW drive,
DVD±RW drive, a second hard drive, a diskette drive, a
secondary battery, or a weightsaver.
Security screw (optional)
Modular bay latch
Modular bay
To change bay modules:
1 If you are removing a drive, make sure that there is no
disc in it.
2 Make sure that the notebook is not in Sleep or Hibernate
mode.
44
Caution
Turn off your notebook if you are removing the optional
secondary battery and the notebook does not have a charged main
battery and is not directly connected to AC power.
3 Close the LCD panel.
4 Disconnect your notebook from the optional port
replicator.
5 Turn your notebook over so the bottom is facing up.

www.gateway.com
6 Remove the optional security screw if your notebook
has one.
Security screw (optional)
7 Slide the bay module release latch. The module moves
out slightly.
45

CHAPTER 4: Using Drives and Accessories
8 Slide the bay module out.
46
9 Firmly push the new bay module straight into the bay
until the latch clicks into place.
10 Reinstall the optional security screw if your notebook
has one.
11 Connect the optional port replicator.

www.gateway.com
Using the CD or DVD drive
You can use your notebook to enjoy a wide variety of
multimedia features.
Identifying drive types
Your Gateway notebook may contain one of the following
drive types. Look on the front of the drive for one or more
of the following logos:
If your drive has this
logo...
ROM/R/RW
This is your drive
type...
CD drive
DVD drive
Combination
DVD/CD-RW drive
Multi-format
double layer
±
RW drive
DVD
Use your drive for...
Installing programs, playing
audio CDs, and accessing
data. You cannot use this
drive to create CDs or DVDs or
play DVDs.
Installing programs, playing
audio CDs, playing DVDs, and
accessing data. You cannot
use this drive to create CDs or
DVDs.
Installing programs, playing
audio CDs, playing DVDs,
accessing data, and recording
music and data to recordable
CDs. You cannot use this drive
to create DVDs.
Installing programs, playing
audio CDs, playing DVDs,
accessing data, recording
music and data to CD-R or
CD-RW discs, and recording
video and data to DVD-R,
DVD+R, DVD-RW, DVD+RW, or
double layer DVD+R or DVD-R
discs.
Note: To use the double layer
capability of the double layer
recordable DVD drive, the
blank DVDs you purchase
must state Double Layer, Dual
Layer, or DL. Using other types
of blank media will result in
less capacity.
47

CHAPTER 4: Using Drives and Accessories
Using a CD or DVD
[
Important
DVD discs and drives contain regional codes that help control DVD title
exports and help reduce illegal disc distribution. To be able to play a DVD, the
disc’s regional code and your DVD drive’s regional code must match.
The regional code on your DVD drive is determined by your notebook’s delivery
address. The regional code for the United States and Canada is 1. The regional
code for Mexico is 4. Your DVD drive’s regional code must match the regional
code of the disc. The regional code for the disc is on the disc, disc
documentation, or packaging.
Important
When you place a single-sided disc in the tray, make sure that the label
side is facing up. If the disc has two playable sides, place the disc so the name
of the side you want to play is facing up.
Manual eject hole
Eject button
To insert a CD or DVD:
1 Press the eject button on the CD or DVD drive. After the
tray opens slightly, pull the disc tray completely open.
2 Place the disc in the tray with the label facing up, then
press down carefully on the disc until it snaps into place.
3 Push the tray in until it is closed.
Tip
For information about cleaning a CD or DVD, see “Cleaning CDs or DVDs”
on page 83.
Using the memory card reader
You can use memory cards to transfer pictures from a digital
camera to your notebook. You can also use the memory card
reader to transfer data between your notebook and a device
that uses memory cards, such as a PDA, MP3 player, or cellular
telephone.
48

www.gateway.com
Memory card types
The memory card reader supports Memory Stick®, Memory
Stick Pro®, MultiMediaCard™, Secure Digital™, Mini Secure
Digital™, RS-MultiMediaCard™, and xD-Picture Card™.
Important
RS-Multimedia Card and Mini Secure Digital cards require the use of an
adapter that is available with the media.
Inserting a memory card
To insert a memory card:
• Insert the memory card into the memory card slot with
the label facing up and the arrow on the label pointing
towards the notebook.
Using a memory card
To access a file on a memory card:
1 Click (Start), then click Computer.
2 Double-click the drive letter (for example, the E: drive),
then double-click the file name.
49

CHAPTER 4: Using Drives and Accessories
Removing a memory card
Important
Do not use the remove hardware icon in the taskbar to remove
the memory card. If you use the remove hardware icon, your notebook may
not recognize your memory card reader until you
To remove a memory card:
restart your notebook.
1 Push the memory card into the notebook. The memory
card pops out slightly.
2 Pull the memory card out of the notebook.
Adding and removing a PC Card
Your notebook has a PC Card slot (also known as a PCMCIA
card slot). This slot accepts one Type II card. You do not need
to restart your notebook when changing most cards because
your notebook supports hot-swapping. Hot-swapping means
that you can insert a PC Card while your notebook is running.
If your PC Card does not work after hot-swapping, see the
PC Card manufacturer’s documentation for further
information.
To insert a PC Card:
• Push the card firmly into the PC Card slot, label-side up,
until the outer edge of the card is flush with the side
of your notebook.
50

www.gateway.com
To remove a PC Card:
1 Turn off your notebook, then go to Step 5.
-OR-
Double-click the remove hardware icon in the
taskbar. The Safely Remove Hardware dialog box
opens.
Important
If the remove hardware icon does not appear on the taskbar, click
the show hidden icons button.
2 Click the PC Card name, then click Stop. The Stop a
Hardware device dialog box opens.
3 Click the PC Card name, then click OK. The Safe to
Remove Hardware dialog box opens.
4 Click OK.
5 Release the eject button by pressing the PC Card eject
button once.
6 Eject the PC Card by pressing the eject button again.
Using a port replicator
Although you can attach devices directly to your notebook, a
port replicator lets you make all of those connections at one
time. When you travel with your notebook, you merely
disconnect from the port replicator instead of unplugging all
the devices.
A port replicator also provides additional ports and other
expansion features not included with your notebook. For
more information about using a port replicator, see the port
replicator user guide.
51

CHAPTER 4: Using Drives and Accessories
Installing a printer or other peripheral device
Your notebook or optional port replicator has one or more of
the following ports: IEEE 1394 (also known as Firewire
®
i.Link
), Universal Serial Bus (USB), S-Video (analog video), DVI
(digital video), and S/PDIF (digital audio). You use these ports
to connect peripheral devices such as printers, scanners, and
digital cameras to your notebook.
Important
Before you install a printer, scanner, or other peripheral device, see the
device documentation and installation instructions.
IEEE 1394 and USB ports support plug-and-play and hot
swapping, which means that your notebook will usually
recognize such a device whenever you plug it into the
appropriate port. When you use an IEEE 1394 or USB device
for the first time, your notebook will prompt you to install any
software the device needs. After doing this, you can
disconnect and reconnect the device at any time.
Help
For more information about installing peripheral devices, click Start,
then click Help and Support. Type the keyword installin g dev ice s in the
Search Help box, then press E
Connecting a USB device
Your notebook has USB ports for connecting devices such as
a diskette drive, flash drive, printer, scanner, camera,
keyboard, or mouse.
NTER.
®
or
52
Important
USB devices may have special installation instructions. See your USB
device’s installation guide.
Important
For more information about using the USB port on your device, see your
device’s documentation.

www.gateway.com
To connect your USB device to your notebook:
1 Connect one end of the USB cable to your device.
2 Connect the other end of the cable to a USB
port on your notebook.
Tip
For the location of the USB ports on your notebook, see “Left”
on page 7 and “Right” on page 8. For the location of the USB ports on
an optional port replicator, see the port replicator user guide.
Connecting an IEEE 1394 device
Your notebook has a 4-pin IEEE 1394 port (also known as a
Firewire® or i.Link® port) for connecting devices such as a
video camera.
Important
For more information about using the IEEE 1394 port on your device,
see your device’s documentation.
To connect your IEEE 1394 device to your notebook:
1 Connect one end of the IEEE 1394 cable to your
IEEE 1394 device.
2 Connect the other end of the cable to the IEEE 1394
port on your notebook.
Tip
For the location of the IEEE 1394 port on an optional port
replicator, see the port replicator user guide.
Tip
For more information about editing video, see “Creating a video
DVD” in your online User Guide.
53

CHAPTER 4: Using Drives and Accessories
Viewing the display on a projector or monitor
You can use your notebook for giving presentations by
connecting an external monitor or projector to your monitor
(VGA) port. In addition, if you have the optional port replicator,
you can connect a monitor or projector using a DVI port. Your
notebook supports simultaneous LCD and external display.
Simultaneous display lets you control the presentation from
your notebook at the same time as you face your audience.
To use a projector or external monitor:
1 Turn off your notebook.
2 Plug the projector or monitor cable into the monitor
port on your notebook or optional port replicator.
54
Tip
For the location of the monitor port on an optional port replicator,
see the port replicator user guide.
3 Turn on your notebook.
4 Plug the projector’s or monitor’s power cord into an
AC power source and turn it on.
Windows recognizes the new hardware and the New
Display Detected dialog box opens.
5 Select the options for the projector or external monitor,
then click OK.
6 Press FN+F4 to switch between viewing the display on
the LCD panel, viewing the display on the projector or
monitor, and viewing the display on both the LCD panel
and the projector or monitor.
Important
If an external monitor or projector is connected and you close
the LCD panel, your notebook may turn off the LCD panel, but will not
enter Sleep mode.

www.gateway.com
Adjusting the display properties
If the image on the projector or monitor does not appear
correctly, or if you want to use the display as an extension
of your notebook desktop, you should adjust the display
properties on the projector or external monitor.
To adjust the display properties on a projector or external
monitor:
1 Press the Mobility Center button . The Windows
Mobility Center window opens.
Tip
For more information about the Windows Mobility Center, see
“Using the Windows Mobility Center” in your online User Guide.
2 Click (Change display settings). The Display
Settings dialog box opens.
3 Click monitor 2.
4 Adjust properties such as Resolution or Colors if
necessary.
5 To use the external monitor or projector as a “mirror”
(duplicate) of the notebook display (both displays have
the same content), click to deselect the check box for
Extend my Windows desktop onto this monitor.
55

CHAPTER 4: Using Drives and Accessories
6 To use the external monitor or projector as an extension
of your desktop (increasing the size of your Windows
desktop), click to select the check box for Extend my
Windows desktop onto this monitor. You can click
and drag the “2” monitor icon to position it the same
way the physical monitor is arranged on your desk.
7 Click OK.
Using the projector or monitor for a presentation
You can configure your notebook so the settings are correct
each time you give a presentation.
To use a projector or external monitor for a
presentation:
1 Press the Mobility Center button . The Windows
Mobility Center window opens.
Tip
For more information about the Windows Mobility Center, see
“Using the Windows Mobility Center” in your online User Guide.
2 Click (Change presentation settings). The
Presentation Settings dialog box opens.
56

www.gateway.com
3 Adjust properties such as Turn off screen saver and
Set the volume to if necessary.
4 Click OK.
5 Click Turn on to turn on the presentation settings. When
you are finished giving the presentation, click Turn off
to return to your standard notebook settings.
Viewing the display on a television
The S-Video out jack on your notebook lets you view your
notebook display on a television screen using a standard
S-Video cable.
Important
To turn on external video by default, connect the television (or other
external video device) before starting your notebook.
Important
Audio is not transmitted through an S-Video out jack. Use the built-in
speaker s or a set o f headpho nes or exte rnal powe red spe ake rs, or c onnect yo ur
notebook to a stereo system using the headphone jack to hear sound while
playing a DVD. DVD playback to a VCR will be scrambled by copyright protection
software.
Tip
Many newer televisions have a VGA or DVI port. For the best picture
quality possible, use the VGA or DVI port instead of the S-Video jack. For more
information, see “Viewing the display on a projector or monitor” on page 54.
57

CHAPTER 4: Using Drives and Accessories
To view your notebook display on a television:
1 With your notebook off, connect one end of a standard
S-Video cable to the S-Video out jack on your
notebook.
Tip
For the location of the S-Video out jack on an optional port
replicator, see the port replicator user guide.
2 Connect the other end of the cable to the Video in jack
on your television or VCR.
3 Turn on the television or VCR.
4 Start your notebook.
Tip
If you are traveling internationally, you may need to change the
video standard. For example, many televisions in Asia use PAL instead
of NTSC.
Tip
DVI video output is only available by using the optional port
replicator.
Ordering accessories
To order accessories, visit www.gateway.com. Accessories
may not be available in all localities.
Automobile/airplane power adapters
With an automobile/airplane power adapter, you can save
battery power by plugging your notebook into an automobile
cigarette lighter or an airplane in-flight power receptacle.
58

www.gateway.com
Batteries
If you run your notebook on battery power for extended
periods, you may want to buy an additional main battery or
a secondary battery so you can swap batteries when
necessary. See “Changing batteries” on page 63 for more
information about using an additional battery.
Bay modules
Your notebook’s modular bay supports different bay modules,
such as a CD drive, DVD drive, combination DVD/CD-RW drive,
DVD±RW drive, a second hard drive, a diskette drive, a
secondary battery, or a weightsaver. A weightsaver is a device
designed to reduce the weight of your notebook. See
“Changing modules” on page 44 for more information.
Carrying cases
Gateway has large-capacity carrying cases if you need
additional space for accessories or supplies.
Hard drives
If you want to increase your internal storage space, try
replacing your existing hard drive with a larger drive. See
“Replacing the hard drive kit” on page 103 for more
information.
Memory
Large programs, such as multimedia games or graphics
programs, use a lot of memory. If your programs are running
more slowly than you think they should, try adding more
memory. See “Adding or replacing memory modules” on
page 99 for more information.
Port replicators
Although you can attach devices directly to your notebook, a
port replicator lets you make all of those connections at one
time. When you travel with your notebook, you merely
disconnect from the port replicator instead of unplugging all
the devices.
A port replicator also provides additional ports and other
expansion features not included with your notebook. See the
user guide for the port replicator for more information about
using a port replicator with your notebook.
Printers
You can attach almost any type of printer to your notebook.
The most common types are inkjet and laser printers, which
print in color or black and white.
59

CHAPTER 4: Using Drives and Accessories
Inkjet printers and cartridges are relatively inexpensive, but
they are slower than laser printers. Using an inkjet color
printer, you can print pictures, banners, and greeting cards,
as well as documents.
Laser printers and cartridges are more expensive, but they
print much faster than inkjet printers. Laser printers are better
than inkjet printers when you are printing large documents.
Privacy filter
A privacy filter helps block the screen view from anyone
viewing the notebook screen from a side view. Your
notebook’s LCD screen has been specially made to hold
privacy filters.
USB flash drive
Use a USB flash drive for storing files or transferring files to
another computer.
60

CHAPTER5
Managing Power
• Monitoring the battery charge
• Recharging the battery(ies)
• Recalibrating the battery(ies)
• Extending battery life
• Changing notebook power settings
61

CHAPTER 5: Managing Power
Monitoring the battery charge
Your new Gateway notebook is designed to provide an
exceptional balance of performance and portability. Your
notebook uses the latest chipset and mobile processor
technologies to manage the processor speed and power
consumption for a greater battery life experience. This design
provides you with maximum performance when plugged into
AC power balanced with optimized battery life when on
battery power.
Closely monitor the battery charge. When the battery charge
gets low, change the main or optional secondary battery or
connect to AC power immediately to prevent losing any
unsaved work. To monitor the battery charge:
• Move the mouse pointer over the power cord icon
or battery icon in the taskbar. A message appears
showing the remaining battery time and the current
power plan.
• Wait for a Low Battery warning message to appear.
• Look at the battery charge status indicator.
If your battery charge indicator displays what looks like
an inaccurate charge, you may need to recalibrate the
battery(ies).
Tip
For more information about the battery charge status indicator,
see “Front” on page 6.
Tip
For more information about recalibrating the battery(ies), see
“Recalibrating the battery(ies)” on page 65.
Recharging the battery(ies)
The battery(ies) recharge while they are installed and your
notebook is connected to AC power. While the battery(ies)
recharge, the battery charge indicator turns on.
62

www.gateway.com
Changing batteries
Replacing the main battery
War ning
Danger of explosion if battery is incorrectly replaced.
Replace only with a battery specifically manufactured for your Gateway
notebook. Discard used batteries according to local hazardous material
regulations.
The batteries used in this device may present a fire or chemical burn hazard if
mishandled. Do not disassemble, heat above 212°F (100°C), or incinerate.
Dispose of used batteries promptly. Keep away from children.
Caution
If your notebook is connected to AC power, or if it has a charged
secondary battery installed, you can change the main battery while the
notebook is turned on. If your notebook has only a main battery and it is not
plugged into an AC outlet, you must turn the notebook off while changing the
battery.
To replace the main battery:
1 Disconnect your notebook from the optional port
replicator.
2 If your notebook is on and is connected to AC power
or has a charged secondary battery installed, go to
Step 3.
-OR-
If your notebook is on, is not plugged into an AC outlet,
and does not have a charged secondary battery
installed, save your work and turn off the notebook.
3 Turn your notebook over so the bottom is facing up.
4 Slide the battery lock to the unlocked position, then
slide the battery release latch.
63

CHAPTER 5: Managing Power
5 Slide the battery out of the notebook.
6 Slide a recharged battery into the notebook until it
snaps into place.
7 Slide the battery lock to the locked position.
8 Turn your notebook over.
9 Open the LCD panel.
Installing a secondary battery
War ning
Danger of explosion if battery is incorrectly replaced.
Replace only with a battery specifically manufactured for your Gateway
notebook. Discard used batteries according to local hazardous material
regulations.
The batteries used in this device may present a fire or chemical burn hazard if
mishandled. Do not disassemble, heat above 212°F (100°C), or incinerate.
Dispose of used batteries promptly. Keep away from children.
64
Your notebook’s modular bay accepts a secondary battery.
The secondary battery charges when the notebook is
connected to AC power.
To install a secondary battery:
• Swap the secondary battery for a bay module by
following the instructions in “Changing modules” on
page 44.

www.gateway.com
Recalibrating the battery(ies)
Important
Do not interrupt the battery recalibration process. If recalibration is
interrupted, you must start the process over again.
If your notebook unexpectedly goes into Sleep mode while
you are using it but the battery charge is not low, you may
need to recalibrate your battery(ies). You should also
recalibrate the battery(ies) periodically to maintain the
accuracy of the battery gauges.
To recalibrate the battery(ies):
1 Connect the AC adapter, then turn on your notebook.
2 As soon as it starts and you see a startup screen, press
F2. The BIOS Setup utility opens.
3 Open the Advanced menu.
4 Highlight Battery Auto Learning, then select Enabled
by pressing the spacebar.
5 Open the Exit menu, highlight Exit Saving Changes,
then press E
6 Select Yes, then press ENTER.
The battery recalibration process begins and a screen
opens showing you the progress. The entire process
takes several hours.
When the recalibration has finished, the message “Press
[Esc] key to exit” appears.
7 Press ESC. The battery charge indicator now displays an
accurate battery charge.
NTER.
Important
If, after completing this procedure, the battery charge indicator still does
not show an accurate charge, contact Gateway Customer Care at the location
shown on the Customer Care label. For more information, see “Gateway contact
information” on page 3.
65

CHAPTER 5: Managing Power
Extending battery life
Maximizing battery performance
To get maximum performance from your notebook
battery(ies), we recommend that you initially condition (fully
charge and discharge) your new battery(ies) a few times
during the first several weeks of use, to let them reach their
maximum rated capacity.
Over the long term, use the battery(ies) at least once a month,
even if they were kept in a cool, dry place for storage, but
avoid frequent full discharges because this puts additional
strain on the battery(ies). Several partial discharges with
frequent recharges are better for a lithium-ion battery than
one complete discharge, and recharging a partially charged
lithium-ion battery does not cause harm because there is no
memory.
Conserving battery power
To conserve power while using the battery(ies) to power your
notebook:
• Turn off wireless networking and Bluetooth.
• Dim the display as low as is comfortable.
• Disconnect all external devices, like IEEE 1394 and USB
devices.
• Remove PC Cards when you do not need them. Many
PC Cards use a small amount of power while inserted,
even if they are not being used.
• Select the Power saver power plan to get maximum
power savings.
66
Tip
For more information about using power plans, see “Changing
notebook power settings” on page 69.
• Close the LCD panel to turn off the display while you
are not using your notebook. The display stays off until
you open the panel again.
• Use Hibernate mode for maximum power savings while
your notebook is not in use.
• Use the notebook touchpad instead of an external
mouse.
• Decrease or mute speaker volume.
• Turn off all scheduled tasks.

www.gateway.com
• Turn off auto-save features in Microsoft Office and
other applications.
• Copy programs from CDs or DVDs to the hard drive so
you do not use battery power by running optical drives.
• Use the CD or DVD drive only when necessary. This drive
uses a large amount of power.
• Recharge the battery(ies) often, take an extra battery,
and fully recharge the batteries before traveling. For
more information, see “Recharging the battery(ies)” on
page 62.
Tip
For more information about traveling with your notebook, see
“Traveling with Your Notebook” on page 73.
Using alternate power sources
To extend battery life, use alternate power sources whenever
possible.
• If traveling internationally, take electrical adapters. Save
the battery(ies) for times when you cannot use a power
adapter. If you plan on taking your AC power adapter,
also take a single-plug surge protector.
• If you will have access to an EmPower™ in-flight power
receptacle, an automobile power outlet, or an
automobile cigarette lighter, use an airplane/
automobile power adapter or power inverter. Save the
battery(ies) for times when you cannot use a power
adapter.
• To find AC power outlets in airports, look for them next
to support pillars, in large areas such as boarding gates,
and under banks of telephones.
Changing power modes
You can use the following power modes to lengthen the life
of your notebook’s battery(ies):
• Sleep - while your notebook is in Sleep mode, it switches
to a low power state where devices, such as the display
and drives, turn off.
67

CHAPTER 5: Managing Power
• Hibernate - (also called save to disk) writes all current
memory (RAM) information to the hard drive, then turns
your notebook completely off. The next time you turn
on your notebook, it reads the memory information
from the hard drive and opens the programs and
documents that were open when you activated
Hibernate mode.
• Hybrid Sleep - while your notebook is in Hybrid Sleep
mode, it switches to a low power state where devices,
such as the display and drives, turn off similar to Sleep
mode. The notebook also writes all current memory
(RAM) information to the hard drive similar to Hibernate
mode. If your notebook experiences a power outage
while in Hybrid Sleep mode, the notebook reads the
memory information from the hard drive and opens the
programs and documents that were open when you
activated Hybrid Sleep mode. If the notebook does not
experience a power outage while in Hybrid Sleep mode,
it restarts using the information in current memory,
thus reducing startup time. You must turn on Hybrid
Sleep mode to use it. For more information, see
“Changing advanced settings” on page 71.
Using power saving modes
68
Always save your work before using Sleep mode. In Sleep
mode, your notebook reduces or turns off the power to most
devices except memory. However, the information in memory
is not saved to the hard drive. If power is interrupted, the
information is lost.
When in Hibernate mode, your notebook saves all memory
information to the hard drive, then turns the power
completely off.
If your notebook
is...
On Enter Sleep or
On Enter Hibernate
In Sleep, Hybrid
Sleep, or Hibernate
mode
...and you want
to...
Hybrid Sleep
mode
mode
Exit Sleep,
Hybrid Sleep, or
Hibernate mode
...then
Press FN+F3.
Click (Start), click
the arrow next to the
lock icon, then click
Hibernate.
Press the power
button.

www.gateway.com
Changing notebook power settings
You can change the function of your notebook’s power
button, Sleep system key, and power-saving timers by
changing power settings on your notebook.
You can customize power settings from the Windows Mobility
Center by selecting power plans and adjusting advanced
power settings.
Changing the power plan
Power plans (groups of power settings) let you change power
saving options such as when the display or hard drive is
automatically turned off. You can select one of the defined
power plans or create a custom power plan.
Three power plans are pre-defined for you:
• Balanced - This is the default power plan which
balances performance and battery life.
• Power saver - This power plan sacrifices performance
in order to extend battery life. Use this plan if you will
be away from AC power outlets for an extended period
of time. Your programs may run slower than you are
accustomed to under the other two power plans.
• High performance - This power plan sacrifices battery
life in order to gain performance. Use this plan if you
need additional computing power for your program.
Your battery may not last as long as you are
accustomed to under the other two power plans.
69

CHAPTER 5: Managing Power
To change the power plan:
1 Press the Mobility Center button . The Windows
Mobility Center window opens.
2 Click (Change power settings). The Select a power
plan window opens.
3 Select the power plan you want to use.
- OR -
Click Change plan settings, modify the power plan you
selected, then click Save changes.
70
Help
For more information about changing the power plan, click
Start, then click Help and Support. Type the keyword power plan
in the Search Help box, then press E
NTER.
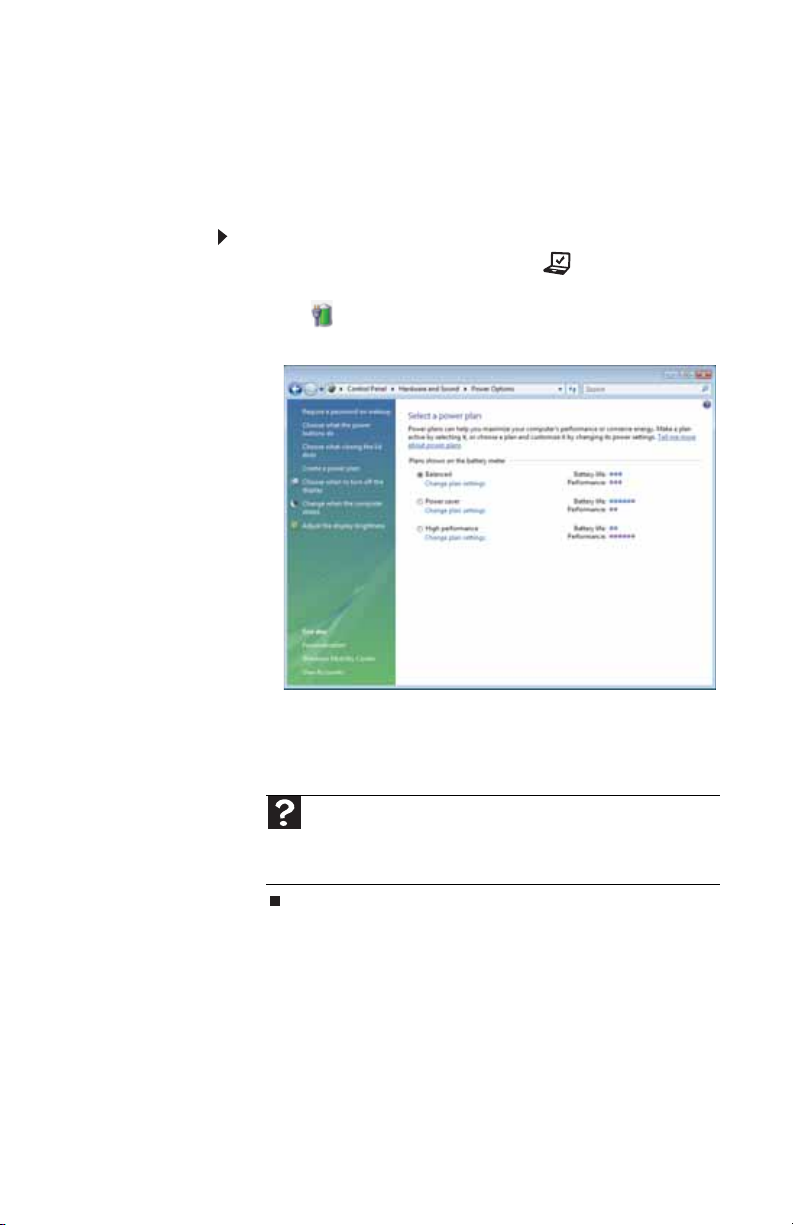
www.gateway.com
Changing advanced settings
Advanced power settings let you assign different power
saving modes to the power button and Sleep system key. You
can also select which power saving mode is activated when
you close the LCD panel.
To change advanced power management settings:
1 Press the Mobility Center button . The Windows
Mobility Center window opens.
2 Click (Change power settings). The Select a power
plan window opens.
3 Click a setting on the left side of the screen that you
want to change. The top three settings are not tied to
a power plan. The bottom three settings modify the
currently selected power plan.
Help
For more information about changing the power
management settings, click Start, then click Help and Support. Type
the keyword power manageme nt in the Search Help box, then
press E
NTER.
71

CHAPTER 5: Managing Power
To turn on Hybrid Sleep mode:
1 On the Select a power plan window, click Change plan
settings for the plan you are using. The Change settings
for the plan window opens.
2 Click Change advanced power settings. The Power
Options dialog box opens.
3 Click the + in front of Sleep, then click the + in front of
Allow hybrid sleep.
4 Change the values to On for On battery and Plugged
in.
Help
For more information about hybrid sleep, click Start, then click
Help and Support. Type the keyword hybrid in the Search Help
box, then press E
NTER.
72

CHAPTER6
Traveling with Your Notebook
• Packing your notebook
• Traveling by air
• Dial-up modem
• Radio frequency wireless connections
• Files
• Security
• Power
• Additional tips
73

CHAPTER 6: Traveling with Your Notebook
Packing your notebook
• Remove all peripheral devices and cables. Remember to
pack those you will need while traveling.
• Pack your notebook securely into a briefcase or
hand-carried luggage, and keep it separate from
toiletries, liquids, and food. Do not pack it in checked
luggage.
• Keep your notebook stable during travel. Secure it to
prevent it from sliding around in overhead bins and car
trunks.
Traveling by air
• Do not check your notebook as luggage.
• Charge the battery in case airport security asks you to
start your notebook.
• Have your notebook hand-inspected or sent through
the X-ray scanner, but never carry it through the metal
detector.
• Turn off you notebook for takeoff and landing.
• Turn off all wireless devices while in the aircraft.
Dial-up modem
• Take a telephone cord to connect the modem to
telephone jacks. If you are traveling internationally, take
telephone jack adapters or an acoustic handset coupler.
• Take a telephone line protector.
• Take a telephone line tester to check for unsafe lines,
especially if you are traveling internationally.
• Take remote access information with you so you can
connect to your ISP while outside of your usual calling
area. A list of country dialing codes may be especially
useful if you are traveling internationally.
74

www.gateway.com
Radio frequency wireless connections
Important
If your notebook came equipped with an internal embedded wireless
device, see “Legal Information” on page 139 for general wireless regulatory
guidelines.
• Every country has different restrictions on the use of
wireless devices. If your notebook is equipped with a
wireless device, check with the local radio approval
authorities prior to your trip for any restrictions on the
use of a wireless device in the destination country.
• Wireless communication can interfere with equipment
on commercial aircraft. Current aviation regulations
require wireless devices to be turned off while traveling
in an airplane. IEEE 802.11 and Bluetooth
communication devices are examples of devices which
use wireless to communicate.
Tip
For more information about turning your wireless device on or
off, see “Turning your wireless radio on or off” on page 39.
Files
• Copy your working files from your desktop computer
to your notebook before you travel.
• If you need to access your desktop computer files from
your notebook while traveling, set up your desktop
computer for remote access. Contact your network
administrator for more information about remote
access.
• Take extra recordable media for transferring files
between computers and backing up files.
75

Security
• Get a locking cable for your notebook so you can attach
• Always keep your notebook with you while waiting in
• Write down your notebook model number and serial
• Whoever sits next to you or behind you can see your
• Use a startup password to restrict access to your
CHAPTER 6: Traveling with Your Notebook
a cable lock and leave your notebook in your hotel room
while you are away.
airports, train stations, or bus terminals. Be ready to
claim your notebook as soon as it passes through the
X-ray machine in security checkpoints.
number (located on the bottom of your notebook) in
case of theft or loss, and keep the information in a safe
place. Also, tape your business card or an address label
to your notebook and accessories.
notebook display. Avoid working with confidential files
until you can be sure of privacy.
notebook. The startup password is set using the BIOS
utility.
Caution
Use a password that you can remember, but that is difficult for
someone else to guess. The password feature is very secure, with no
easy way to recover a forgotten password. If you forget your password,
you must return your notebook to Gateway for service.
76
To create a startup password:
1 Restart your notebook. As soon as you see a startup
screen, press F2. The BIOS Setup utility opens.
2 Open the Security menu, highlight Set Supervisor
Password, then press E
instructions. You must set the supervisor password
in order to set the user (startup) password.
Important
You must enter the Supervisor Password each time you use
the BIOS Setup utility.
NTER and follow the
3 Highlight Set User Password, then press ENTER and
follow the instructions. This is the password you
need to enter at startup.
Important
You must enter the User Password each time you turn on
your notebook if it was turned off or put in hibernate mode. You
do not need to enter the User Password if your notebook was put
in Sleep mode.

Power
www.gateway.com
4 Highlight Password on boot, then press ENTER.
5 Highlight Enabled, then press ENTER.
6 Open the Exit menu, highlight Exit Saving
Changes, then press E
NTER.
7 When you start your computer, you are prompted
to enter the user password you set in Step 3.
• Review the information in “Protecting your notebook”
in your online User Guide.
• Take your AC power adapter to recharge the battery. If
you are traveling internationally, take power plug
adapters.
• Take a portable surge protector to protect your
notebook from power surges.
• To get the best performance from your notebook, avoid
using the battery whenever possible, monitor the
battery charge, and use the most efficient power
management settings. For information on conserving
battery power, using alternate power sources, and
monitoring the battery charge, see “Managing Power”
on page 61.
Additional tips
• If you plan to use several USB peripheral devices, take
a portable USB hub to provide additional USB ports.
• Take a network cable if you need to connect to a
network. Some hotels provide Internet connectivity
only through their networks.
• If your notebook has been exposed to cold
temperatures, let it warm to room temperature before
turning it on.
• Carry proof of ownership or a merchandise passport
when traveling internationally.
77

CHAPTER 6: Traveling with Your Notebook
• Consult your insurance company and credit card
company to learn about emergency travel assistance if
your notebook is lost or damaged.
• Take your recovery discs in case you need to install an
additional driver or software.
Tip
You can create a Drivers and Applications Recovery disc using
the Gateway Recovery Center.
78

CHAPTER7
Maintaining Your Notebook
• Caring for your notebook
• Cleaning your notebook
• Maintaining the battery(ies)
• Cleaning CDs or DVDs
• Recovering your system
79

CHAPTER 7: Maintaining Your Notebook
Caring for your notebook
To extend the life of your notebook:
• Be careful not to bump or drop your notebook, and do
not put any objects on top of it. The case, although
strong, is not made to support extra weight.
• When transporting your notebook, we recommend that
you put it in a carrying case.
• Keep your notebook away from magnetic fields.
Magnetic fields can erase data on hard drives.
• Never turn off your notebook when the drive indicator
is on because data on the hard drive could be lost or
corrupted.
• Avoid subjecting your notebook to extreme
temperature changes. The case (and LCD panel) can
become brittle and easy to break in cold temperatures
and can melt or warp in high temperatures. Damage
due to either extreme is not covered by your warranty.
As a general rule, your notebook is safest at
temperatures that are comfortable for you.
• Keep all liquids away from your notebook. When spilled
onto notebook components, almost any liquid can result
in expensive repairs that are not covered under a
standard warranty.
• Avoid dusty or dirty work environments. Dust and dirt
can clog the internal mechanisms and can lead to
permanent damage to the notebook.
• Do not block the ventilation fan slots. If these slots are
blocked, your notebook may overheat resulting in
unexpected shutdown or permanent damage to the
notebook.
• When storing your notebook for an extended period of
time, unplug AC power and remove the battery(ies)
after discharging them partway.
80

www.gateway.com
Cleaning your notebook
Keeping your notebook clean and the vents free from dust
helps keep your notebook performing at its best. You may
want to gather these items and put together a notebook
cleaning kit:
• A soft, lint-free cloth
• An aerosol can of air that has a narrow, straw-like
extension
• Cotton swabs
• A DVD drive cleaning kit
Cleaning the exterior
War ning
When you shut down your notebook, the power turns off, but some
electrical current still flows through your notebook. To avoid possible injury from
electrical shock, unplug the power cord, modem cable, and network cable from
the wall outlets and remove the main and optional secondary battery.
Always turn off your notebook and other peripherals before
cleaning any components. Also, remove the main and optional
secondary battery before cleaning any components.
Use a damp, lint-free cloth to clean your notebook and other
parts of your system. Do not use household abrasive or
solvent cleaners because they can damage the finish on
components.
Your notebook is cooled by air circulated through the vents
on the case, so keep the vents free of dust. With your
notebook turned off and unplugged, brush the dust away
from the vents with a damp cloth. Be careful not to drip any
water into the vents. Do not attempt to clean dust from the
inside of your notebook with the exception of the memory
bay.
Tip
You may want to occasionally open the memory bay door and remove
dust and lint using an aerosol can of air.
Cleaning the keyboard
You should clean the keyboard occasionally by using an
aerosol can of air with a narrow, straw-like extension to
remove dust and lint trapped under the keys.
81

CHAPTER 7: Maintaining Your Notebook
If you spill liquid on the keyboard, turn off your notebook and
turn the notebook upside down. Let the liquid drain, then let
the keyboard dry before trying to use it again. If the keyboard
does not work after it dries, you may need to replace it. A
replacement keyboard may not be covered by your warranty.
Cleaning the notebook screen
Caution
A notebook LCD screen is made of specially coated glass and can be
scratched or damaged by abrasive or ammonia-based glass cleaners.
Use a soft cloth and water to clean the LCD screen. Squirt a
little water on the cloth (never directly on the screen), and
wipe the screen with the cloth.
Maintaining the battery(ies)
The life span of a notebook battery is about 1.5 to 3 years,
under normal conditions. As the battery begins to die, you will
have to recharge the battery more frequently because it
cannot hold a full charge.
Do not expose the battery to high heat or freezing
temperatures. Hot batteries discharge very quickly, and cold
ones cannot create as much power. Short battery life is more
likely to be caused by heat than by charge/discharge patterns.
Keep your lithium-ion battery cool. Avoid a hot car, for
example.
Charge often, but do not try to fully discharge the battery
frequently. This only adds strain. Several partial discharges
(regular use), with frequent recharges, are better for
lithium-ion than one total discharge. Recharging a partially
charged lithium-ion battery does not cause any harm because
it has no “memory.”
Batteries with fuel gauges (notebooks) should be calibrated by
applying a deliberate full discharge once every 30 charges.
Running the battery down in the equipment does this. If
ignored, the fuel gauge becomes increasingly less accurate
and in some cases will cut off the device prematurely.
Using the right charger is important. By now you probably
know that each kind of battery has its own technology, its own
rate of charge, and so on. Charging lithium batteries correctly
is one way to extend their life and to avoid damage.
82

Storing batteries
Do not charge up the battery, then store it away. A stored
battery should be used every three to four weeks. Let the
battery fully discharge, then recharge to 40% if you plan to
store it again. If you store a battery for longer than three to
four weeks, the battery could fully discharge because the
battery circuitry itself consumes power.
If you have a spare lithium-ion battery, use one exclusively
and keep the other cool by placing it in the refrigerator. Make
sure that it is wrapped protectively and that nothing will be
dropped on it. Do not freeze the battery.
Do not use old batteries. Avoid purchasing spare lithium-ion
batteries and storing them for later use. Do not buy old stock,
even if it is sold at clearance prices. While it makes sense to
have 2 or 3 extra batteries, so that you always have a fresh
one charged up and ready to go, if you buy batteries and store
them for years, they may not work when you decide to use
them.
Consider removing the battery from your notebook when
running on fixed power. However, remember that when you
have removed the battery from your notebook while using it
with an electrical outlet, the automatic battery charger no
longer keeps the battery charged.
Caution
When the battery is in the notebook and the notebook is running on AC
power, the battery constantly charges, even though it has a full charge. This
reduces the life of the battery. If the battery is fully charged and you want to
run on AC power, remove the battery.
www.gateway.com
Cleaning CDs or DVDs
Wipe from the center to the edge, not around in a circle, using
a product made especially for the purpose.
83

CHAPTER 7: Maintaining Your Notebook
Recovering your system
You can solve most notebook problems by following the
information in “Troubleshooting” on page 109 or in the
technical support pages at www.gateway.com. Problem
solving may also involve re-installing some or all of the
notebook’s software (also called recovering or restoring your
system). Gateway provides everything you need to recover
your system under most conditions.
Caution
To prepare your notebook for additional system recovery options, you
should create a set of software and driver recovery discs as soon as possible.
For instructions, see “Preparing for software and device driver recovery” on
page 85.
• If only one or two items of software or hardware have
stopped working correctly, the problem may be solved
by re-installing the software or the hardware drivers.
To recover software and drivers that were pre-installed
at the factory, see “Recovering pre-installed software
and drivers” on page 85. For instructions on reinstalling
software and drivers that were not pre-installed, see
that product’s documentation or support Web site.
• If re-installing software or drivers does not help, then
the problem may be solved by returning your system
to a previous state when everything was working
correctly. For instructions, see “Using Microsoft System
Restore” on page 91.
• If nothing else has solved the problem and you want
to return your system to factory condition, see
“Recovering your system to its factory condition” on
page 93.
If you upgrade or exchange your hard drive or if your hard
drive is completely erased or corrupted, your only option for
system recovery may be to reinstall Windows from the
Windows DVD, then recover your pre-installed software and
device drivers using recovery discs that you created. (Your
notebook must have a DVD-compatible drive to use these
options.)
• To re-install Windows using the Windows DVD, see
“Recovering your system using the Windows DVD” on
page 95.
• To re-install your pre-installed software and device
drivers using recovery discs, see “Recovering
pre-installed software and drivers using recovery discs”
on page 89.
84

www.gateway.com
Recovering pre-installed software and drivers
You can perform a partial recovery by recovering the software
and device drivers that were pre-installed at the factory. If you
need to recover software that did not come pre-installed on
your system, you need to follow that software’s installation
instructions.
You can recover pre-installed software and drivers from a set
of recovery discs (you must create the discs) or by using
Gateway Recovery Center.
Preparing for software and device driver recovery
You can usually recover your pre-installed software and
drivers from your hard drive. However, if you ever re-install
Windows from the Windows DVD or install a new hard drive,
you need to recover your pre-installed software and drivers
using a set of software and driver recovery discs. Because
these discs do not come with your notebook, you should
create your own set.
Caution
Although you may not be expecting to need recovery discs, we
recommend that you prepare for any eventuality and create a set of recovery
discs while you have the opportunity.
Important
Your notebook may have shipped with a Drivers and Applications
Recovery disc. If this is the case, you may want to create an additional set of
discs in case the originals are lost or damaged.
You should create a set of discs for recovering your
pre-installed software and device drivers, in case you need to
use them later for a complete system recovery. (Your
notebook must have a recordable disc drive to perform this
procedure.)
85
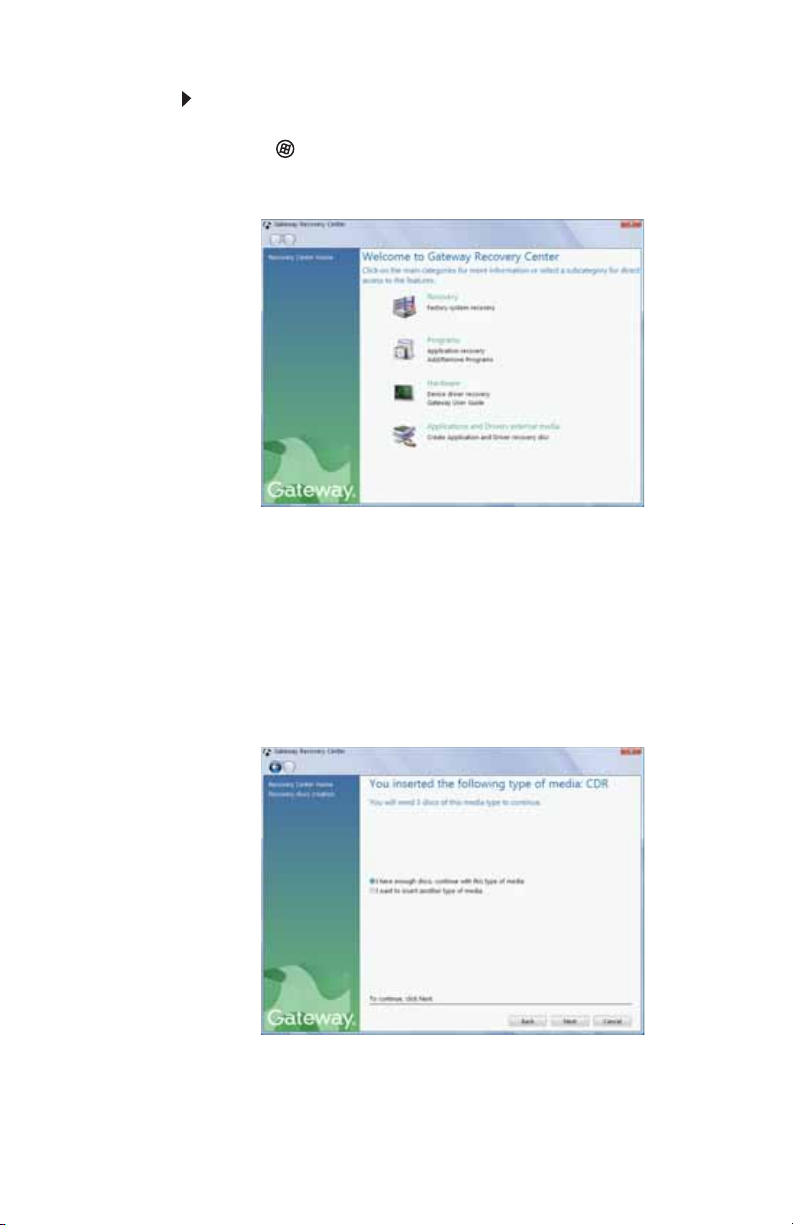
CHAPTER 7: Maintaining Your Notebook
To create discs for recovering pre-installed software
and drivers:
1 Click (Start), All Programs, Gateway Recovery
Center, then click Gateway Recovery Center. The
Gateway Recovery Center opens.
2 Click Applications and drivers external media, then
click Next. The What would you like to do? dialog box
opens.
3 Click Create system recovery discs, then click Next.
4 Insert a blank, recordable disc into the recordable disc
drive, then click Next. If an AutoPlay dialog box opens,
click the x in the upper-right corner to close it.
A dialog box opens that tells you the number of blank
discs you need to create a full set of recovery discs.
86
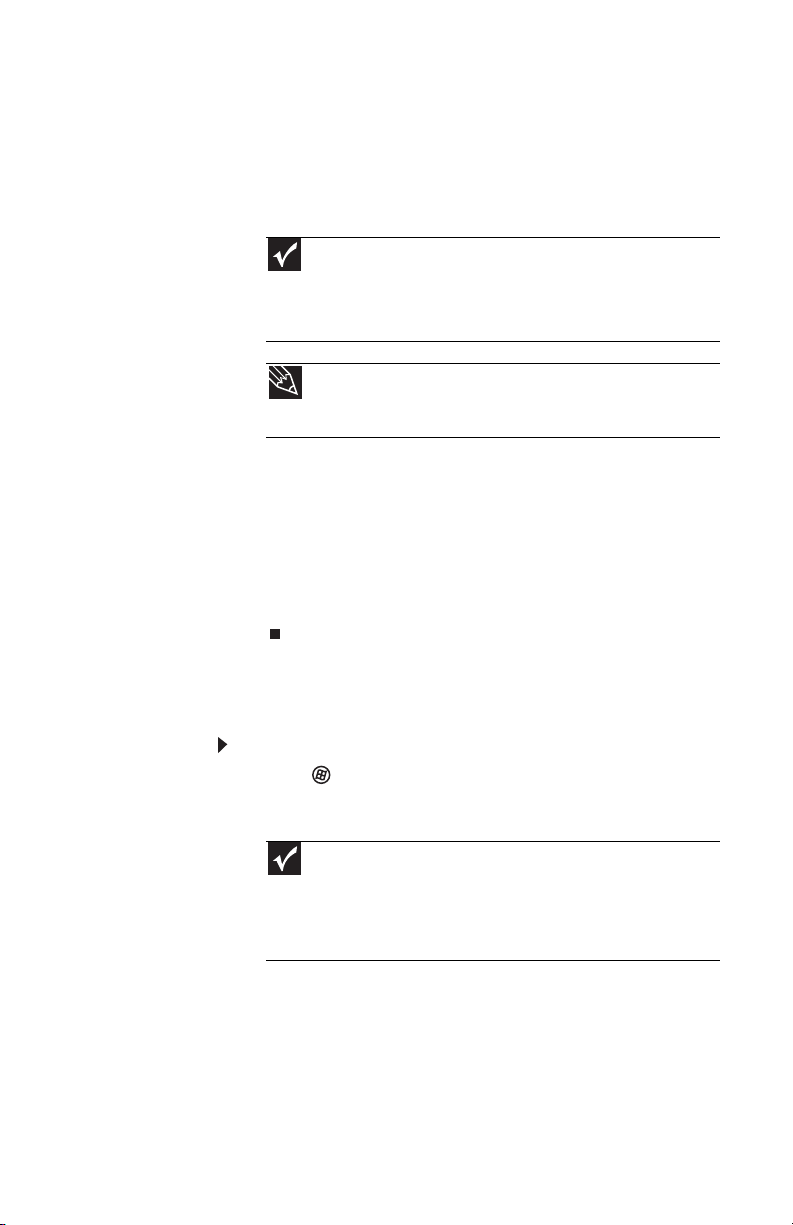
www.gateway.com
5 If you have enough blank discs of the specified type,
click I have enough discs, then click Next. If you do
not have enough discs, choose a different disc type, or
click Cancel.
The disc recording begins. Label the discs as they are
completed.
Important
Use a permanent marker to label each disc “Software and Driver
Recovery,” along with a short description of which notebook the discs
are for. If you are recording multiple discs, as you remove each disc
from the drive, use the marker to label each disc 1 of x, 2 of x, 3ofx,
and so on.
Tip
After a recovery disc is created, your notebook names the disc
Recovery13 for disc 1 of a 3-disc set, Recovery23 for disc 2, and
so on.
6 If multiple discs are required, insert the additional blank
disks when prompted.
7 When the process is finished, the Congratulations!
window opens.
8 Click Finish.
9 Remove your final disc, then label all of the discs and
store them in a safe place.
Recovering pre-installed software and drivers using Gateway Recovery Center
To recover specific drivers and software:
1 Click (Start), All Programs, Gateway Recovery
Center, then click Gateway Recovery Center. The
Gateway Recovery Center opens.
Important
If you have recently reinstalled Windows or installed a new hard
drive, and your Start menu does not contain Gateway Recovery Center
as an option, you must recover your software and drivers using
software and driver recovery discs you have created. For instructions,
see “R ecovering pre-insta lled software and drive rs using recovery di scs”
on page 89.
87

CHAPTER 7: Maintaining Your Notebook
2 To recover software that was pre-installed, click
Programs, then click Application recovery.
- OR -
To recover device drivers that were pre-installed, click
Hardware, then click Device driver recovery.
88
3 Click the software or driver you want to recover, then
click Next.

www.gateway.com
Recovering pre-installed software and drivers using recovery discs
If you created a multiple-disc set of recovery discs, each disc
contains a unique set of software and drivers. If a recovery
disc does not offer the software or driver you need to recover,
try another disc.
To recover software and drivers using recovery discs:
1 Insert a software and driver recovery disc into the CD
or DVD drive. If an AutoPlay dialog box appears,
click Run Grc_Vista.exe. If an AutoPlay dialog box does
not appear and Gateway Recovery Center does not
start, open Computer and run the file Grc_Vista.exe
on the disc.
The Gateway Recovery Center starts.
89

CHAPTER 7: Maintaining Your Notebook
2 To recover pre-installed software, click Application
recovery, then click the software you want to recover.
- OR -
To recover pre-installed device drivers, click Device
driver recovery, then click the type of driver you want
to recover.
90
3 Click Next.
4 If the software or driver is not shown on the list, and
you have a multiple-disc set of recovery discs, close
Gateway Recovery Center and try another disc.

www.gateway.com
Using Microsoft System Restore
Microsoft System Restore periodically takes “snapshots” of
your system settings and saves them as restore points. In
most cases of hard-to-resolve software problems, you can
return to one of these restore points to get your system
running again.
Windows automatically creates an additional restore point
each day, and also each time you install software or device
drivers. You can also create a restore point manually. For
instructions, see “Manually creating a restore point” on
page 92.
Help
For more information about using Microsoft System Restore, click Start,
then click Help and Support. Type windows system restore in the Search
Help box, then press E
To restore using Microsoft System Restore:
1 Click (Start), Control Panel, System and
Maintenance, then click Backup and Restore Center.
The Backup and Restore Center opens.
NTER.
91

CHAPTER 7: Maintaining Your Notebook
2 On the left side of the window, click Repair Windows
using System Restore, then click Next. The Choose a
restore point dialog box opens.
3 Click the restore point you want, click Next, then click
Finish. A confirmation message box appears.
4 Click Yes. Your system is restored using the restore
point you specified. This process may take several
minutes, and may restart your notebook.
92
Manually creating a restore point
To manually create a restore point:
1 Click (Start), Control Panel, System and
Maintenance, then click Backup and Restore Center.
The Backup and Restore Center opens.
 Loading...