

Page 1
TM
BASIC DOCTRINE OF THE LIBERTY SECURITY FORCE
Get the s trategy
guide from Sybex !
0103 Par t No. X09-48136
CONTROL KEYS
This document outlines the primary default keyboard and mouse
controls in
Freelancer
:
Flight Controls
Mouse Flight Left-click and
drag (toggle
with SPACEBAR)
Accelerate W or mouse
wheel forward
Decelerate S or mouse
wheel backward
Afterburner TAB
Strafe Left A
Strafe Right D
Brake Reverse X
Engine Kill Z
Cruise Engine Toggle SHIFT+W
HUD/Windows
Pause Game F1
Minimize HUD BACKSPACE
Trade Request U
(Multiplayer)
Group Invite I
(Multiplayer)
Turret Cam H
Rear Cam V
1st/3rd Person CTRL+V
View Toggle
Combat/Targeting
Select Object Left-click
Target Closest Enemy R
Next Target T
Fire Active Weapons Right-click
Fire Missiles Q
Drop Mine E
Deploy Countermeasure C
Tractor Beam B
Deploy Nanobots G
Shield Battery F
Maneuvers
Dock F3
Go To F2
Join Formation F4
Free Flight ESC
Page 2
PAGE 1
Table of Contents
Ship HUD...............................................................................2
Installing
Freelancer
.................................................... 4
Main Menu........................................................................... 4
In-Game Menus................................................................... 5
Basic Doctrine of the Liberty Security Force......6
Section 1: An Introduction to LSF Protocol........ 7
Declaration of Intent .................................................... 8
Base HUD ........................................................................... 8
Base Protocol.................................................................. 9
Buying and Selling ......................................................... 10
Mission Protocol ............................................................ 12
Section 2: Basics of Flight ........................................13
Free-Flight Mode ............................................................ 14
Maneuver Mode................................................................ 15
Way Points and Best Paths .......................................... 16
Section 3: Jump Gates and Trade Lanes...............18
Key Commands..................................................................20
Section 4: Basics of Combat .................................... 22
Offensive Strategies .................................................... 23
Firing .................................................................................24
Color Coding .................................................................. 25
Targeting Arrows and Brackets
............................... 26
Defensive Strategies
.................................................... 30
Section 5: The Neural Net ....................................... 32
Neural Net Log .............................................................. 32
Nav Map/Mission Log
..................................................... 32
Inventory ......................................................................... 34
Player Status
................................................................. 35
Current Information ..................................................... 35
Conclusion....................................................................... 35
The Freelancer Guild (Multiplayer) 36
Chatting 36
Grouping 36
Trading 37
Connecting to a Server 38
Starting Your Own Server 39
For More Information 39
Safety Warning
About Photosensitive Seizure
A very small percentage of people may experience a seizure when exposed to certain
visual images, including ashing lights or patterns that may appear in video games. Even
people who have no history of seizures or epilepsy may have an undiagnosed condition
that can cause these “photosensitive epileptic seizures” while watching video games.
These seizures may have variety of symptoms, including lightheadedness, altered vision,
eye or face twitching, jerking or shaking of arms or legs, disorientation, confusion, or momentary loss of awareness. Seizures may also cause loss of consciousness or convulsions
that can lead to injury from falling down or striking nearby objects.
Immediately stop playing and consult a doctor if you experience any of these symptoms.
Parents should watch for or ask their children about the above symptoms—children and
teenagers are more likely than adults to experience these seizures.
The risk of photosensitive epileptic seizures may be reduced by taking the following
precautions:
• Play in a well-lit room.
• Do not play when you are drowsy or fatigued.
If you or any of your relatives have a history of seizures or epilepsy, consult a doctor
before playing.
Information in this document, including URL and other Internet Web site references, is subject to change
without notice. Unless otherwise noted, the example companies, organizations, products, domain names,
e-mail addresses, logos, people, places and events depicted herein are ctitious, and no association with
any real company, organization, product, domain name, e-mail address, logo, person, place or event is
intended or should be inferred. Complying with all applicable copyright laws is the responsibility of the
user. Without limiting the rights under copyright, no part of this document may be reproduced, stored in
or introduced into a retrieval system, or transmitted in any form or by any means (electronic, mechanical, photocopying, recording, or otherwise), or for any purpose, without the express written permission
of Microsoft Corporation.
Microsoft may have patents, patent applications, trademarks, copyrights, or other intellectual property
rights covering subject matter in this document. Except as expressly provided in any written license
agreement from Microsoft, the furnishing of this document does not give you any license to these
patents, trademarks, copyrights, or other intellectual property.
© & p 2002 Microsoft Corporation. All rights reserved. Microsoft, Digital Anvil, the Digital Anvil logo,
Freelancer
, the Microsoft logo, the Microsoft Game Studios logo, Windows, and Windows NT are either
registered trademarks or trademarks of Microsoft Corporation in the United States and/or other
countries/regions.
Developed by Digital Anvil for Microsoft Corporation.
The names of actual companies and products mentioned herein may be the trademarks of their respective owners.
Page 3
PAGE 2
PAGE 3
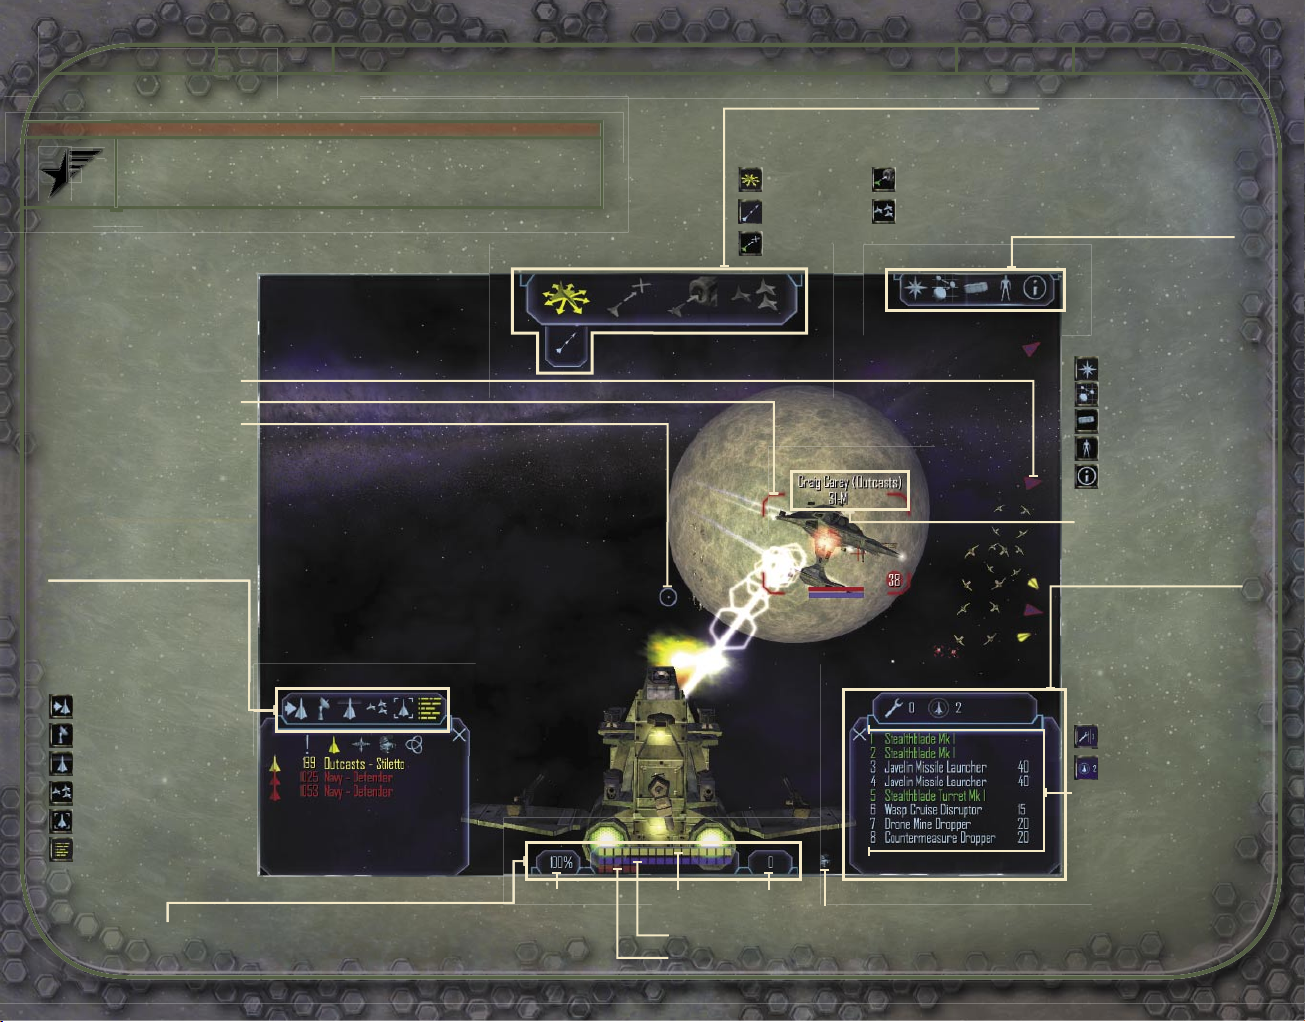
Ship
Targeting Reticle
TARGET STATUS MENU
(SEE SECTION 4)
Allows pilot to monitor
and analyze all nearby
objects
Closest Enemy
NEURAL NET MENU
(SEE SECTION 5)
Links pilot to all LSF
information
databases
Neural Net Log
MANEUVER MENU (SEE SECTION 2)
Allows pilot a variety of ight options
Free Flight
Brackets
Arrows
SHIP STATUS DISPLAY (SEE SECTION 4)
Allows pilot to monitor basic ship systems
Thruster
Reserves
Level
Available
Power
Player Shield Status
Player Ship Hull Health
Ship
Speed
Collect Loot
WEAPONS CONTROL
MENU
(SEE SECTION 4)
Allows pilot to choose
weapons and deploy
repair equipment
Use Nanobots
Use Shield Battery
Pilot Weapons List
Hail
Cargo Scanner/Tractor Beam
Formation Members
Switch to Target
Switch to Contact List
Nav Map/Mission Log
Inventory
Player Status
Current Information
Cruise
Go To
Dock
Formation
HUD
This is the basic HUD you will see when in ight.
Brackets, arrows, and the targeting
reticle help pilot track and analyze
objects. See Section 4 for more
information.
Information about pilot and ship.
See Section 4 for more
information.
Page 4

PAGE 4
PAGE 5
Installing
Freelancer
Insert the
Freelancer
CD into your CD-ROM drive, and then follow
the onscreen prompts.
If
Freelancer
Setup does not automatically run, do the following:
1. On the Start Menu, click Run.
2. Type D:\setup.exe (where D represents your CD-ROM drive).
3. On the Setup screen, click Install, and then follow the
onscreen prompts.
Main Menu
The Main Menu has the following options:
NEW GAME Begin a new game.
LOAD GAME Load a previously saved game.
MULTIPLAYER Begin a game in Multiplayer Mode.
OPTIONS Modify visuals, audio, and keyboard controls;
view credits.
EXIT Exit game and return to the desktop.
In-Game Menus
In-game menus (during ight, on base, or in Multiplayer Mode)
offer slightly different options, including Save Game.
To manually save a game
1. Press F1.
2. Click Save Game.
3. Type a game title or description, and then press ENTER.
Periodically during gameplay, your status and location are
automatically saved.
NOTE: You cannot manua ll y sav e a gam e when
in sp ace o r Multi player Mode.
Page 5
SECTION 1
BY ORDER OF THE SECRETARY OF THE LIBERTY SECURITY FORCE
Basic Doctrine
of the
Liberty Security
Force
WARNING: T hi s doc ument c ontains clas si ed
techn ical da ta, t he expo rt of w hich vi olate s
the L ibert y Secur ity Pri vacy Ac t (Ti tl e 12,
LADSF Sec. 2 132, et seq. ). Viol ators a re
subje ct to p rosec ution.
Trent,
Leaving Bretonia to make your fortune in
space, are you? All I can say is keep your
head on; there’s a lot of grotty butchers
out there who started just like you—honest
folk, looking for their place among the stars.
And I don’t simply mean the criminal
element, either; the rebels and the
governments are almost as corrupt as
the thugs out there.
Study this Liberty combat manual. I got
it from a Junker at the Jersey Debris Field
off Manhattan. It’s a few years old and
the LSF isn’t exactly forthcoming about
certain information, but I’ve lled in the
blanks where I could. You’ll undoubtedly
nd the thing quite illuminating, and it
might just save you from becoming
another interstellar vapor trail.
Staying put in Leeds,
Richard W. Tobias
1 An Introduction
to LSF Protocol
Welcome and congratulations! You have already proven
exemplary in skill and intelligence, traits we hope to embellish
with the most current and time-tested ight and combat
procedures. Yet the characteristic valued above all else in the
Liberty Security Force (LSF) cannot be learned, it is innate, and
it is the single attribute that distinguishes good soldiers from
great ones: the subordination of personal welfare to the higher
law of justice, to something greater than us all. To the Liberty
Security Force.
Page 6
PAGE 8
PAGE 9
SECTION 1 SECTION 1
Declaration of Intent
The purpose of this manual is to familiarize prospective pilots
with LSF protocol, tactics, and technology. While the LSF
recognizes that the written word is no substitute for experience in
the eld, we place requirements upon individual pilots far greater
than those found in other organizations. For that reason, a solid
understanding of LSF methodology is critical to a pilot’s success,
long before he or she enters a combat scenario. The rst section
of this manual explains how an LSF of cer is expected to behave
while on a base.
NOTICE: No n- compl iance w ith LSF proc ed ure a s
outli ned i n this documen t may r esult i n fed eral
prose cutio n.
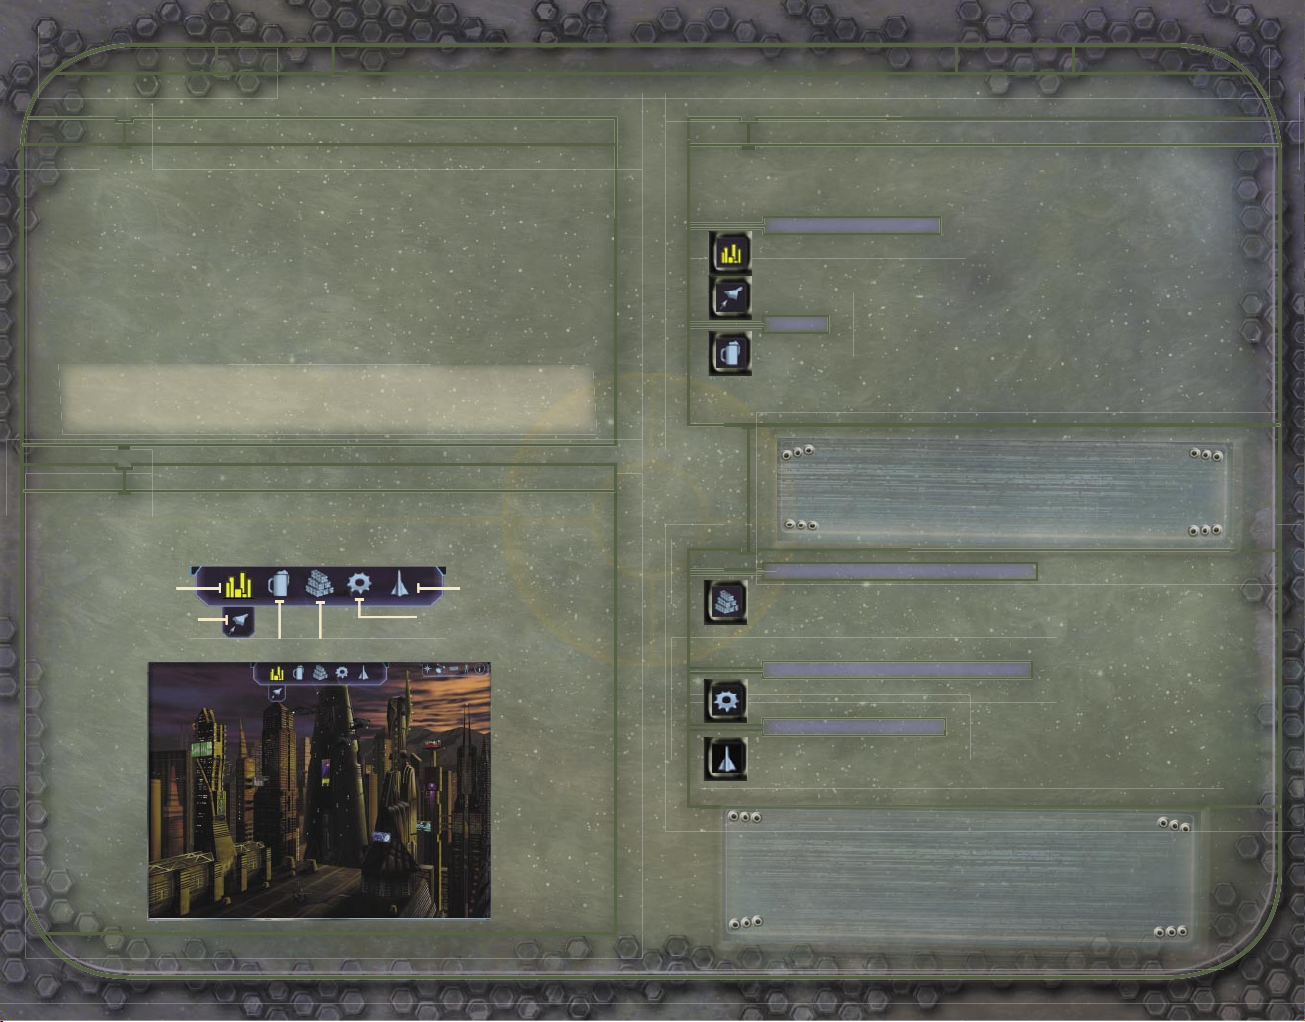
Base HUD
This is how the HUD appears when you are on a base, space
station, or other stationary object.
Base Protocol
When you travel to one of the many bases in the Sirius Sector,
you will encounter the following environments:
LAUNCH PAD Allows you to return to the Launch
Pad. From there, click the Launch to Space icon to launch
to space. The actual Launch Pad icon may be different
from the one pictured here, depending on your location.
BAR Allows you to network with people from all over
the colonies, many of whom offer vital information, useful
rumors, and lucrative job offers. Bars generally feature
Job Boards and News Monitors for further opportunities
and information.
Trent: For the right price, some
pubgoers can clear your reputation
with a rival faction.
COMMODITY TRADER Allows you to buy
or sell Food, Fuel, Oxygen, Medicine, and other items.
Be aware that commodity traders occasionally traf c
in illegal goods.
EQUIPMENT DEALER Allows you to buy
or sell weapons and equipment, and repair your ship.
SHIP DEALER Allows you to trade your ship.
The standard LSF ghting vessel is the Liberty Light
Fighter, available on Manhattan, Los Angeles, Denver,
and Houston.
Trent: Of the 40 or so ship types
available in Sirius, choose one that
suits your needs. Freighters are great
for merchant work, but you can’t beat
a heavy ghter in a skirmish.
Launch Pad
Launch to Space
Bar
Commodity Trader
Equipment Dealer
Ship Dealer
Page 7
PAGE 10
PAGE 11
SECTION 1 SECTION 1
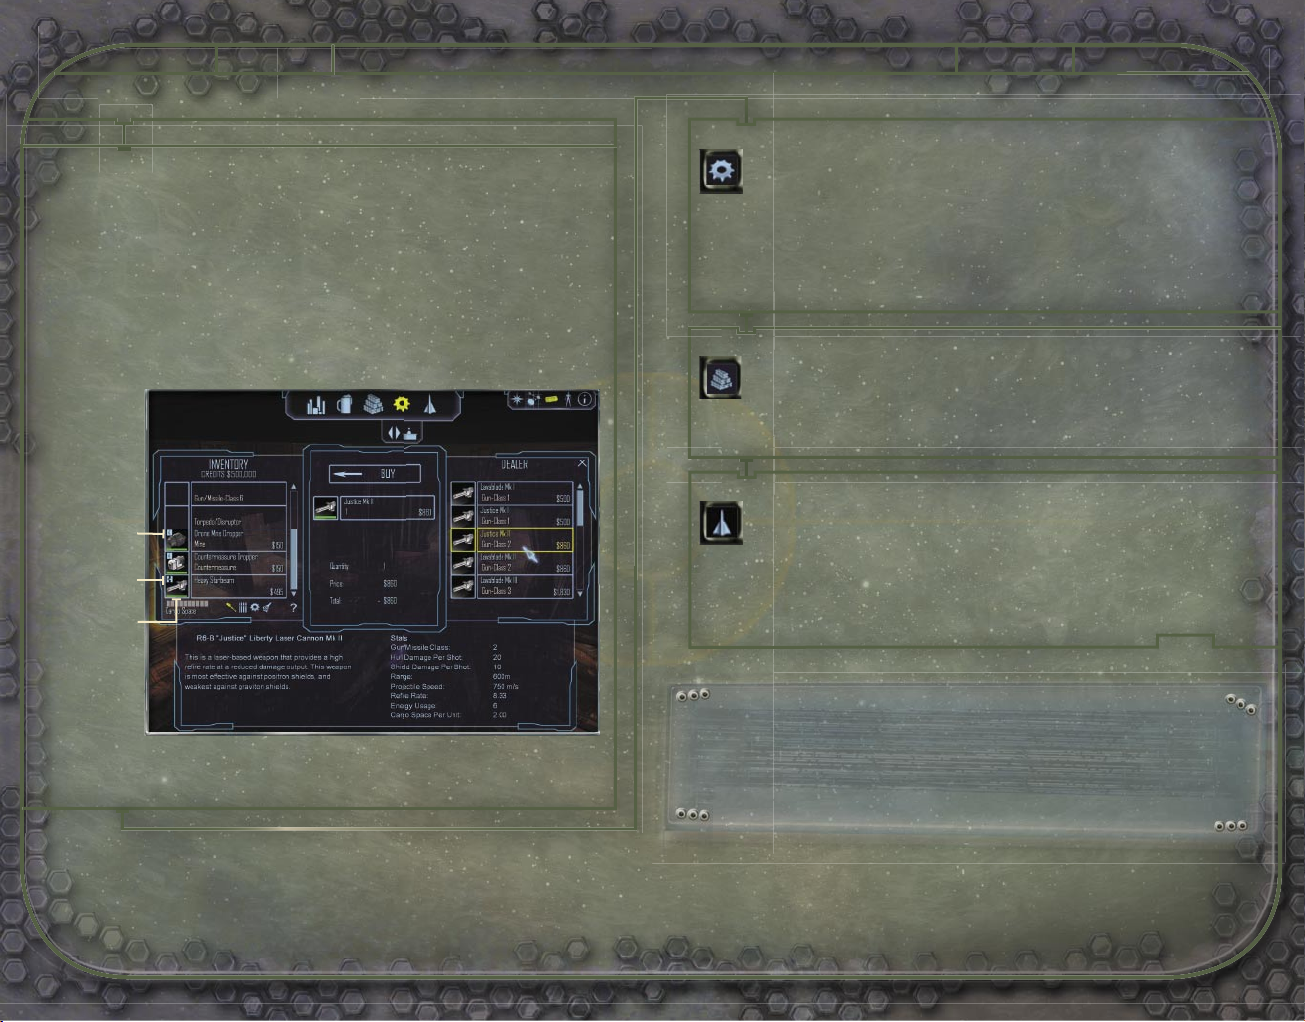
Buying and Selling
LSF protocol for buying or selling weapons, equipment,
commodities, and ships is as follows: Go to the appropriate
vendor (commodity, equipment, or ship), then select the dealer
(or dealer icon) to open a trade window. In the left Inventory
panel, your inventory is itemized. The dealer’s inventory is
itemized in the right Dealer panel. The middle panel displays item
prices and quantities selected from either list. The bottom panel
displays information on any item. Select an item on the dealer
side; if you have the funds, cargo space, and skill level necessary,
you may buy it. To sell, select an item from your Inventory panel.
Equipment Dealers
If you have purchased an item that must be mounted
externally on your ship, a mount button will appear on the
item display in your Inventory panel (see above). If the button
appears locked, the item is properly mounted; otherwise it has
been stored in your cargo hold. All available hardpoints are listed
rst in your Inventory panel, and unmounted weapons are listed
at the bottom.
Commodity Traders
When purchasing commodities, you are given the option
to determine quantity by using a slider bar in the center
panel. Your money and cargo space determine the maximum
quantity purchasable.
Ship Dealers
When you trade in your old ship, your cargo usually
transfers automatically. In rare circumstances where it
does not, untransferred items will appear in the Dealer panel, and
are sold when you nalize the transaction. If you wish to keep an
item that was not transferred, you must make space in your
cargo hold by removing something else.
> > >
A few purchasing differences between vendors should be
pointed out.
Mounted
item
Unmounted
item
Item health
level
Trent: Believe it or not, dealers aren’t in it for
the love. Check the color box next to any commodity
you buy or sell to compare the dealer’s prices with
the galactic average. Yellow’s average, green’s good,
and red is robbery. If you’re selling stuff, colored
circles show how you’re faring.
Page 8

PAGE 12
PAGE 13
SECTION 1 SECTION 2
< < <
Alternative Acquisition
Purchasing is not the only way to procure goods; the LSF
understands that it is often necessary to tractor in weapons
or commodities. Firing on asteroids in mineable zones may
expose raw materials. Press B to tractor in all available items
in your vicinity. The following icons will also accomplish this.
COLLECT LOOT Tractors in all available
area loot.
TRACTOR BEAM Tractors in a speci c item.
(Select the item onscreen or in your Target Status list,
and then click the icon.)
2 Basics of
Flight
This section provides the best operational and strategic
information available to Liberty-af liated combat pilots. Strict
adherence to operating procedures and practices will result in
a long and rewarding career with the Liberty Security Force.
Maneuver Mode
The ship’s onboard computer performs speci c maneuvers.
Free Flight
Maneuvers
(Autopilot)
Trent: Once you’ve demolished an enemy
craft, check the area for salvageable loot.
You may need to jettison something
from your inventory to make room.
Mission Protocol
LSF pilots can gain missions via patrons in the bar or posted
offers on the Job Boards there. You are free to decline any
mission offer; you can always return later and accept it. But
once accepted, a mission should be completed—your reputation
will be adversely affected otherwise. (See “Player Status” in
Section 5 for more information.)
Once you have accepted and launched into space, a mission
brie ng window will appear. The left panel displays your
immediate objective. The middle panel offers a variety of Nav
Maps with information on the surrounding areas. The right panel
lists mission objectives, a dif culty assessment, and reward
information. Review these carefully, and then click Continue
.
(In some cases you may also click Abort Mission, but be
mindful of the consequences to your reputation.)
First off, all known space vessels, whether of Bretonian,
Libertarian, Kusari, or Rheinland origin, utilize two basic
operational systems:
Free-Flight Mode
The pilot controls all ship movement and functions.
Page 9

PAGE 14
PAGE 15
SECTION 2 SECTION 2
Free-Flight Mode
STEERING
There are two ways to steer via mouse. The rst is to click and
drag, which allows you to easily interact with your various HUD
functions. The second method steers your ship in the direction
your mouse moves (without requiring the click and drag). Find
the technique that best suits your personal ying style, or toggle
between them both by pressing the SPACEBAR.
Trent: I stick with the click-and-drag
style unless I’m in a serious brawl where
holding down the left mouse button can
sully up my shooting hand.
THROTTLE CONTROL
Ship speed is adjusted in a number of ways:
THROTTLE Press W to increase and S to decrease
throttle, or rotate the mouse wheel accordingly.
CRUISE ENGINES Click the Cruise icon below the
Maneuver icons or press SHIFT+W to dramatically increase
speed. Be mindful that you cannot re weapons while cruise
engines are engaged.
AFTERBURNER Press TAB to engage the ship’s
afterburners and drastically increase your speed. Note that
afterburners have limited burn time before recharge is necessary.
ADVANCED THROTTLE CONTROL
Stra ng left or right (press A or D, respectively) moves your
ship laterally to help avoid incoming obstacles. Cutting engine
power (press Z) allows your ship to utilize its forward momentum
to travel in a direction other than the one you are facing.
Engaging the reverse thrust (press X) res your rear engines,
moving you backward.
If your ship’s not responding to Free
Flight commands, you haven’t properly
released her from Maneuver Mode.
Try clicking the Free Flight icon or
press SHIFT+ESC.
Maneuver Mode
Maneuvers are autopilot functions designed for speci c tasks,
such as docking with a Trade Lane or Jump Gate, joining a vessel
or group of vessels in formation, and so on. Click the onscreen
target (or select it in the Contact List on your Target Status
Menu), and then click the appropriate icon on the Maneuver
Menu. Click the Free Flight icon (or press ESC
) to cancel any
active maneuver.
> > >
Trent: Maneuver functions are
situational, so if you’re trying to use
the Formation move on a planet,
you’ve had too much grog.
Page 10

PAGE 16
PAGE 17
SECTION 2 SECTION 2
< < <
Click the following Maneuver icons to initiate the listed actions:
GO TO Embarks your ship on course for a selected
destination, autopiloting around objects.
DOCK Lands your ship on planets, bases, space
stations, and so on. Activates Trade Lanes and Jump
Gates for high-speed travel.
FORMATION Links your ship to another craft
or group of crafts, matching speed and destination.
To activate any of these maneuvers, click the object you wish
to perform the maneuver upon (either onscreen or from within
your Target Status Menu), and then click the appropriate
Maneuver icon.
Way Points and Best Paths
Mission-critical way points are automatically set for you; they
appear onscreen as purple diamonds. Fly there manually, or click
the way point (or choose it from your Target Status Menu), and
then click Go To.
When not on a mission, you may set your own way points and
best paths. These options allow your ship to automatically chart
routes for destinations within your system that may involve
multiple Trade Lane jumps.
SET WAY POINTS Creates a selectable target
that will appear as a purple diamond onscreen.
To set a way point
1. From within any map on your Neural Net’s Nav Map Menu,
click a desired destination.
A group of small icons appears.
2. Click the Set Way Point icon.
A purple, diamond-shaped guide appears on the map and
on your HUD.
3. Click the diamond to select it as your target, and then click
Go To
.
SET BEST PATH Allows your ship to plot the
quickest possible path to any chosen object.
To set a best path, follow the same procedure as previously
outlined for setting way points, but click the Set Best Path icon
from within the Nav Map instead of the Set Way Point icon. Then
follow the remaining steps. Your path will appear onscreen as
a series of way points, and within the maps of your Nav Map/
Mission Log as a series of purple lines marked with numbered
way points.
NOTE: You ma y era se set paths a nd wa y point s by
retur ning to the Nav Map and cl ickin g the C lear
Best Path or Clea r Way P oint ic ons. Se e Sec tion 5
for m ore i nf ormat ion on the Nav Map.
Page 11

PAGE 18
PAGE 19
SECTION 3 SECTION 3
3 Jump Gates and
Trade Lanes
With proper clearance, LSF pilots may traverse large distances
quickly using Trade Lanes (for intrasystem travel) and Jump
Gates (for intersystem travel).
Trade Lane Use the Dock maneuver with
a Trade Lane to travel quickly between planets,
stations, and other objects within a system. Click
the Free Flight icon to manually exit a Trade Lane
at any point.
Jump Gate Use the Dock maneuver with a
Jump Gate to travel distances greater than Trade
Lanes can accommodate. Jump Gates are the only
means that allow travel between star systems.
Trent: There’s yet another way to get
around quickly: Jump Holes. The LSF won’t
discuss ‘em because Jump Holes occur
naturally all over the place—it might cut
into Liberty’s mighty Jump Gate industry.
Manhattan
Pittsburgh
Debris
Field
Trade
Lanes
Kusari
Five known solar systems
Liberty
Four known solar systems
Bretonia
Six known solar systems
Rheinland
Five known solar systems
Page 12

PAGE 20
PAGE 21
Key Commands
Legend
Blue Text = SHIFT+(key)
Red Text
= CTRL+(key)
Neural Net
Equipment
Multiplayer Mode
Movement
Unused and Generic Keys
Esc F1
F2
F3 F4 F5 F6
`
2 3 4 5 6 71
Tab Q
W
E R T Y
A
S D F G H
Caps Lock
Shift
Z X C V B
N
Ctrl Alt
F7 F8 F9
F10
F11 F12
8 9 0 - = Backspace
U I O P [ ]
J K L ;
‘
Enter
\
M
, .
/ Shift
Alt Ctrl
Pause Menu
Go To Dock
Join
Formation
Story Star
Nav Map
Inventory
Reputation Information
Select
Hardpoint 1
Fire
Hardpoint 1
Select
Hardpoint 2
Fire
Hardpoint 2
Select
Hardpoint 3
Fire
Hardpoint 3
Select
Hardpoint 4
Fire
Hardpoint 4
Select
Hardpoint 5
Fire
Hardpoint 5
Select
Hardpoint 6
Fire
Hardpoint 6
Select
Hardpoint 7
Fire
Hardpoint 7
Select
Hardpoint 8
Fire
Hardpoint 8
Select
Hardpoint 9
Fire
Hardpoint 9
Select
Hardpoint 10
Fire
Hardpoint 10
Minimize HUD
Afterburners
Fire
Torpedo
Fire Missile
Cruise
Accelerate
Fire Cruise
Disruptor
Drop Mine
Prev Enemy
Next Enemy
Closest Enemy
Prev Target
Clear Target
Next Target
Chat Window
Trade
Request
Group
Window
Group Invite
Scan Cargo Hail
Strafe Left
Decelerate
Strafe Right Shield Battery
Nanobot
Turret View
Chat
Engine Kill
Brake
Reverse
Countermeasure
1st/3rd
Person
Rear View
Tractor
Target
Tractor All
Loot
Mission
Objective
Toggle Mouse Flight On/Off
Page 13

PAGE 22
PAGE 23
SECTION 4 SECTION 4
4 Basics of
Combat
Once you have acquired a solid knowledge of vessel operating
procedure, you must apply it to an equally vital phase of LSF
pilot training: weapons and tactics. The program has two basic
combat components: offensive and defensive strategies.
Offensive Strategies
Energy-based weapons, missiles, and torpedoes are among a
pilot’s offensive weapon choices. Out t your craft with the best
weaponry you can afford, but always check the specs before
committing to any purchase. As we shall see, certain situations
call for certain types of weapons.
Energy-Based Weapons
Energy-based weaponry is the mainstay of any LSF pilot’s arsenal.
Unlike missiles and mines, these weapons utilize your craft’s
power plant to regenerate. Right-click to re them, but be mindful
of the variation between types. For instance, plasma weapons
have a low re re rate but high damage potential, while the
opposite is true for lasers. These weapons also vary in energy
consumption and range of effectiveness.
Missiles and Torpedoes
MISSILES Pilots should purchase missiles from an
equipment dealer as soon as possible. Missiles must be
used sparingly, but along with torpedoes, they are among
the most lethal components of your arsenal. Homing
missiles are better suited for faster-moving targets, but
have less destructive capability than standard missiles
overall. Press Q to launch.
TORPEDOES Torpedoes are capable of creating
immense amounts of damage, but their slow speed
makes them somewhat vulnerable to enemy re. They
are best used on stationary objects. Select a torpedo
from your Weapons List, and then right-click to re or
simply press SHIFT+Q.
Page 14

PAGE 24
PAGE 25
SECTION 4 SECTION 4
Cruise Disruptors
As an actual weapon, cruise disruptors do minimal damage.
They are instead designed to disrupt the cruise engines
of an enemy vessel, thus rendering it much more vulnerable to
attack. Select a cruise disruptor from your Weapons List, and then
right-click to re or press SHIFT
+E.
Mines
A well-deployed mine can throw a pursuant off course
and discourage further trailing. Mines vary in homing
capability, but be cautious when releasing them. Mines simply
hone in on the nearest target and do not distinguish between
friend and foe. Press E to release.
Firing
When your targeting reticle moves over a targetable object, the
reticle color changes to red (or green if friendly). The cursor will
begin spinning when ring time is optimal. The HUD also projects
a red targeting crosshair that calculates the object’s speed and
vector; simply move the reticle to the crosshair and re.
Color Coding
Your ship automatically identi es potential targets with colored
brackets (onscreen targets) and arrows (offscreen targets), and
colored text in the Contact List. This allows you to distinguish
enemies, friendlies, and neutrals at a glance.
Green = friendly
White = neutral
Red = hostile
Yellow = communicating ship or station (in the
Contact List, communication is represented by a
“talking head” icon)
Pink = players within your group (Multiplayer Mode)
Purple = players outside your group (Multiplayer Mode)
Page 15

PAGE 26
PAGE 27
SECTION 4 SECTION 4
Targeting Arrows
and Brackets
Color-coded arrows and brackets provide different types of
information about potential targets.
ARROWS: Your HUD codes all hostile offscreen objects in
the area with small red arrows. A selected target that is offscreen
is distinguished with a larger arrow.
BRACKETS: Onscreen targets such as ships and mission-
critical objects appear in brackets, which provide information
such as pilot name, rank, and ability, as well as ship status
and distance.
NOTE: If a n objec t is mi ssion -critic al, its
targe t bra ck et an d accom panying targ et ing a rrow
will be no ti ceabl y diffe rent fr om a st andar d
brack et an d arrow . If th e objec t is a missi oncriti cal f ri endly , you m ust def end i t. If i t is
an en emy, yo u mus t destr oy it.
Targeting reticle
Color indicates
target reputation
Brackets help pilots
follow a targeted object;
bracket color indicates
an object’s reputation
Pilot name
Group af liation
Target distance
Target hull strength
Target shield strength
Vessel rank
Page 16

PAGE 28
PAGE 29
SECTION 4 SECTION 4
Using the Target Status Menu
This menu identi es all objects (selected or not), calculating their
distances, indicating their attitude toward the pilot, and providing
weapons information. Enemy objects within range will appear in
your Contact List by name. Click the following icons to initiate the
listed actions:
< < <
Switch to Contact List
This list provides detailed analyses of all nearby objects
and displays a variety of icons for data gathering on nearly
everything in your vicinity. Click the following icons to initiate the
listed actions:
IMPORTANT Displays only the most vital
information, such as currently selected objects, mission
way points, or enemy ships in the area.
SHIPS Displays all vessels within a several-
thousand-kilometer range.
SOLARS Displays dockable locations, such as
space stations, outposts, and planets.
LOOT Displays all lootable goods in a large area.
ALL Displays all nearby objects, such as planets,
crafts, and shipyards. Click any icon for basic information,
and then click the Target Information icon for a more
detailed analysis.
Always keep your enemies in front of you. If
they get behind you, switch your camera view
to the back (press V) and pop off a few mines at
‘em. If you’ve got a turret installed, watch ‘em
taking ak from a different angle by switching
the camera to turrets (press H).
CLOSEST ENEMY Automatically selects
closest enemy.
HAIL Contacts any selected communicable entity
in the area for identi cation.
CARGO SCANNER Scans cargo of selected
vessel or object.
FORMATION MEMBERS Displays all ships
in formation.
TRACTOR BEAM Allows acquisition of single
selected objects found outside your ship.
Switch to Target
This menu provides detailed information about the
selected target. In your Contact List, double-click any
object to view a schematic and other information.
> > >
Closest Enemy
Hail
Cargo Scanner
Formation Members
Tractor Beam
Switch to Target
Page 17

PAGE 30
PAGE 31
SECTION 4 SECTION 4
Defensive Strategies
It is critical that you monitor your ship’s physical condition
closely. A damaged hull, for instance, can quickly lead to disaster
if left unrepaired. Keep an eye on your Ship Status Display to
check available power, shield status, and hull health.
< < <
SHIELD BATTERIES Unless destroyed,
your shield will regenerate. If you are taking consistent
re with shield levels low, your hull can be damaged.
In this situation, use a shield battery to recharge
instantaneously. To do this, press
F or click the Use
Shield Battery icon on your Weapons Control Menu.
NANOBOTS Unlike shields, your hull cannot self-
regenerate. To repair hull damage, deploy nanobots—
small, arti cial organisms capable of basic ship repairs
during ight. To do this, press G.
NOTE: The number of av ai lable shield
batte ries an d nan obots i s displ ayed ne xt to
each icon. T he am ount yo u can c arry va ries
with the t yp e of ship yo u are ying .
Trent: If your ship is messed up when
you return to a base, a wrench icon will
appear in your Maneuver Menu. Click it
to go directly to an equipment dealer
and get some repairs done.
Another defensive option is the deployment of countermeasures.
These small, electronically embedded devices were designed
to deceive enemy weapons guidance systems into tracking
the wrong object. As such, they are particularly useful against
missiles and torpedoes. To release a countermeasure, select it
on your Weapons Control Menu, or press C.
Available Power
Shield Status
Hull Health
Weapons Control Menu
The Weapons Control Menu lists all your ship’s weaponry. Click
a weapon in the list to toggle it on or off, or use the designated
key command. This menu also offers two extremely important
defensive options: shield batteries and nanobots.
Start Nanobots
Use Shield Batteries
Pilot Weapons List
> > >
Page 18

PAGE 32
PAGE 33
SECTION 5 SECTION 5
5 The Neural
Net
The Neural Net is your direct link to LSF databases, which provide
instant information on any given situation, from maps of enemy
zones to immediate mission objectives. It is composed of ve
sections: Neural Net Log, Nav Map/Mission Log, Inventory, Player
Status, and Current Information.
NOTE: If y ou are looki ng at t he Poli tical a nd
Patro l Pat h maps, procur e furth er in fo rmati on
about your i mmedi ate are a by cl ickin g the N eutral
Zones , Fri en dly Z ones, a nd Host ile Z on es ic ons.
The Nav Map also displays the following clickable options:
UNIVERSE MAP Displays all known star
systems in the Sirius Sector, providing options to zoom
in on speci c regions for more information.
TOGGLE LABELS Displays names of nearby
Jump Gates, planets, shipyards, space stations, and
so on.
PILOT LOCATION Returns you to a map of
your immediate system if you are looking at a different
system via the Universe Map.
PHYSICAL MAP Displays a basic map of the
immediate system.
POLITICAL MAP Allows pilot to scan an area’s
potential danger zones.
PATROL PATH MAP Displays all known NPC
patrol paths, both friendly and hostile, for aggressive
purposes or stealth.
MINEABLE ZONES MAP Shows areas
in your vicinity that might contain useful debris.
BASE LIST Displays all discovered bases in
the universe.
> > >
Neural Net Log
Nav Map/Mission Log
Inventory Player Status
Current Information
Neural Net Log
Displays current mission information, upcoming mission
information, and your personal log, which is updated as
your career progresses.
Nav Map/Mission Log
Click the Nav Map/Mission Log icon to open a window that
shows your ship’s location within a given system (your
location is the blinking ship icon in the middle panel). You may
zoom in further by clicking the area on the map you wish to know
more about, and from there click the appropriate icon to set way
points or best paths, or to target objects or procure more
information about a selected object.
Universe
Map
Toggle
Labels
Pilot Location
Political
Map
Patrol Path
Map
Physical
Map
Mineable Zones Map
Friendly Zones
Hostile Zones
Neutral Zones
Legend
Base List
Page 19

PAGE 34
PAGE 35
SECTION 5 SECTION 5
< < <
Each map allows you to set best paths, set way points, erase
either, target speci c objects, procure information about a target,
or view a map of a system by targeting a Jump Gate or Jump Hole.
Click the speci c region of interest in a given map, and then click
the appropriate icon.
Player Status
Your reputation with the LSF is of critical importance.
Obviously if you fail a mission or destroy a friendly, your
status is affected. Check the Current Level to review your
ranking, which is based on progress through your career and
threat potential. (In Multiplayer Mode, your level is based upon
net worth, including ship, weapons, and credits. Current Worth
calculates this, while Next Level Retirement tells you what you
need to increase your level.)
These are just a few examples of the types of information
available on the Player Status Menu.
Current Information
Displays an array of information about your immediate
vicinity, whether in space or on base.
Conclusion
This concludes the Basic Doctrine of the LSF. Once again,
congratulations and welcome to the Liberty Security Force.Your
tireless dedication keeps all the peoples of Liberty, as well as
her allies, prosperous and free. Thank you and good luck, pilot.
Zoom In/Out Information
Set Best Path Target Object
Trent: Many systems will not appear in
your maps until you’ve own through them,
or purchased information about them from a
contact on a base.
NOTE: The L egend o ption o n the Nav Ma p/Missi on
Log e xplai ns obje ct colo r codes and on scree n icons .
Jump to System
Inventory
This menu allows you to review your ship’s entire loadout,
including the following:
WEAPONS Displays all weapons and their specs.
AMMUNITION Displays all available ammunition
and their specs.
EXTERNAL EQUIPMENT Displays all
available externals, such as shields and turrets.
INTERNAL EQUIPMENT Displays all
available internal equipment, such as shield batteries
and nanobots.
COMMODITIES Displays all ship commodities,
including salvaged equipment.
Page 20

PAGE 36
PAGE 37
Trent: If you ever tire of your loner ways out
there, read through this. It’ll get you in with
some much-needed company.
The Freelancer Guild
(Multiplayer)
Multiplayer Mode has no story missions. You and your fellow members of the
Freelancer Guild simply explore the universe and take assignments at will from
NPCs or the Job Board. Two icons exclusive to Multiplayer Mode will appear in
your Neural Net: Chat Control and Attention Required.
Chatting
Chat Control allows you to dialog with other players during gameplay.
To open a chat window, press ENTER, type your message, and then
press ENTER again.
There are three chat channels: System messages everyone, Group messages
everyone in your group, and Private messages speci c individuals.
To select one of these channels, click the Chat Control icon in your Neural Net,
and then select either the desired channel or the appropriate player name.
Grouping
Working with others allows you to take on more dangerous and complicated assignments—with higher pay rates as well. (Of course, you must divide the bounty among
your colleagues.) Join an existing group by accepting a member’s invitation. Start your
own group by accepting a mission, and then inviting others along.
To accept (or decline) a group’s invitation
• Click the Attention Required icon in your Neural Net, and then click the
appropriate button.
To invite a player to your group
1. Target the player you wish to invite.
2. Click the Group icon in the target window.
Abandoning a group while on a mission is akin to failing or aborting that mission,
and your reputation is duly affected. If you later rejoin the group and nish the
mission, you will receive bounty and your reputation will improve. If you are disconnected from your server while on a mission, it is akin to abandoning the mission.
Important: In Multiplayer Mode, your group has as many lives as it
has members. The group remains alive until the total number of lives
is expended.
Trading
You may trade anything in your cargo hold (credits, unmounted equipment, and all
commodities) with any player in the game. To initiate a trade with another player,
target the player with whom you wish to trade, and then click the Trade icon in
your target window. If someone is attempting to initiate a trade with you, click
the Attention Required icon. If both parties have agreed to trade, a transaction
window will appear.
Page 21

PAGE 38
PAGE 39
To offer an item for trade
1. Select the item from your inventory in the left panel.
2. Determine the quantity (if applicable) in the middle panel, and then click the
check mark button.
To agree to a trade, click the Accept Trade button. When both parties have agreed
upon a trade, items will be automatically exchanged. To cancel a trade at any time,
close the transaction window.
Note: If a player does not have sufcient cargo space to make the
trade, you will be notied.
Connecting to a Server
In order to play Multiplayer Mode, you must have an Internet or local-area network
(LAN) connection with access to a server. To access Multiplayer Mode, click
Multiplayer on the Main Menu. This opens a table that automatically presents a
list of servers your system can access via LAN or Internet.
To connect to a
1. On the Main Menu, click Multiplayer.
2. In the list of servers that appears, select one, and then click Connect.
3. If you have been to this server before, skip to the next step. Otherwise,
4. Select a character from the list (if you are new to this server, you will
Any server you have connected to in the past will be listed on the Multiplayer
Menu with a “Yes” in the Visited column. You may lter out these or any other
servers by clicking Set Filters, and then selecting the appropriate check box.
Freelancer
server
you will need to create a new character. Click New Character, enter
a character name, and then click Create.
only have one entry), and then click Load Character.
Creating a Character
Each time you connect to the server, you will be given the choice to create a new
character or play one you created previously. Your character name must be unique
on that server (you will be notied if it is not), and it will only appear on the server
in which it was created.
Starting Your Own Server
Starting your own
Freelancer
server allows you to protect access to the server
with a password and control whether players can damage each other.
To start a server
1. Connect to your LAN or the Internet.
2. In the
Freelancer
install directory on your hard drive, double-click
FLSERVER.EXE. You may make your server public by selecting Make Server
Internet Available. (If you want to protect access, you may enter a
password here.) You may also keep players from destroying one another
by clearing the Allow Players to Kill Other Players check box.
3. Type a name for your server, and then click OK.
Note: Each time you make changes to your server, those changes
become the default settings.
For More Information
For more details and troubleshooting information, see the readme.rtf le on your
Freelancer
CD-ROM.
Note: Clicking Refresh will clear the server list and retrieve a
new one from the main
Freelancer
server. All LAN servers appear
automatically as they are found.
Page 22

PAGE 40
PAGE 41
Credits
Technical Support Options
For all of our support offerings in the U.S., visit http://microsoft.com/
support/. In Canada, visit http://microsoft.ca/support/.
To get started, try the following:
• For articles targeted at speci c issues, visit the Microsoft
Knowledge Base at http://microsoft.com/support/.
• To work with a Microsoft Support Professional over the
Internet, submit your issue at
http://support.microsoft.com/directory/onlinesr.asp
.
• For your product’s general support policy, visit
http://support.microsoft.com/directory/
productsupportoption.asp.
PHONE SUPPORT: For support in the U.S., call
(425) 637-9308. In Canada, call (905) 568-3503 (toll charges may
apply). These numbers are for technical issues only—do not use
them to request game hints, codes, or cheats.
TTY USERS: Microsoft text telephone (TTY/TDD) services are
available at (425) 635-4948 in Washington State, (800) 892-5234 in
the U.S., and (905) 568-9641 in Canada.
WORLDWIDE: Support outside the U.S. and Canada may
vary. For regional contact details, visit http://support.microsoft.com/
international.aspx. If there is no Microsoft subsidiary of ce in your
country or region, please contact the establishment from which you
obtained your Microsoft product.
CONDITIONS: Microsoft’s support services are subject to
then-current prices, terms, and conditions, which are subject to
change without notice.
Producer:
Phil Wattenbarger
Lead Designer:
Jorg Neumann
Lead Programmer:
Paul Isaac
Lead Programmer:
Ed Maurer
Lead Programmer:
Tony Bratton
Art Director:
Bruce Lemons
Audio Director:
Martin Galway
In-Game Cine Director:
Harry Jarvis
Test Lead:
Evan Brandt
ENGINE PROGRAMMING
Aaron Otstott
Gary Scott Smith
Mark Kness
Scott Stevens
Simon Travis
Brad Thrift
•
GAME PROGRAMMING
Andrew Sega
Brandon Rowlett
Joel Willard
Taylor Brown
Peter Carter
•
MP PROGRAMMING
Stephen Nichols
ART
Bob Frye
Johari Templin
John P. Funk
Steve Pietzsch
Wade Mulhern
Steven Stahlberg
Eric Lalumiere
Michael Pearce
Frank Bonniwell
DESIGN
Adam Foshko
Brian Hackert
David Chang
Dustin Cryer
Jacob Crow
Will Dougherty
Eric Willmar •
John Sripan •
Scott Shelton •
Todd D. Degani •
Chris Todd •
Jesse Benitez-Steiner •
IN-GAME CINEMATICS
Adam N. Joseph
Bobby Moldavan
•
John Alderson •
Kathy Bateman •
Milena Grozeva •
Patrick Sanchez •
Paul Hiaumet •
Ray Cobo •
Rey Barrera •
Rick Hartman •
Séamus Rail •
AUDIO
Bill Munyon •
Clark Crawford •
Eric Friend •
Jeff Shoemaker •
Kyle Scribner •
Mark Packard •
Mat Mitchell •
INTRO CINEMATIC
Chris Olivia
Dean McCall
John Sommer
Mark Goldsworthy
Pauline Saab
Rhett Bennatt
Scott Peterson
Sarma Vanguri
Curtis Neal
Marc Baird
FREELANCER
ORIGINAL
CONCEPT
Chris Roberts
Phil Wattenbarger
FREELANCER
STORY
SCRIPT
Adam Foshko
Jorg Neumann
STUDIO MANAGER
Alan Hartman
ASSISTANT PM –
TRANSLATIONS
Ray Cobo •
CORE LIBRARY
DEVELOPMENT
Paul Bleisch, Yuichi Ito,
Mike Stembera
•, Tim Perry
TEST TEAM
Jamie Gibbs
Bruce Rogers
•
Lee Boubel •
Mike Weber •
Mark Richards •
Nigel Gandy •
Richard North •
Liz Becker •
Jay Dunn •
Steve Hernandez •
MARKETING
Product Manager:
Rick Mehler
Chris Di Cesare
Darren Trencher
PRODUCT PLANNING
Jon Kimmich
USER EXPERIENCE
Brent Metcalfe
John Pecorelli
•
Kevin Wright •
PRINT DESIGN
Jeannie Voirin
Chris Burns
•
LOCALIZATION LEAD
Lief Thompson
USER TEST LEAD
Marcos Nunes-Ueno
Freelancer
Team
External Production
CONCEPT ART
Adam Medhurst, Harald
Belker, Carlos Ezquerra,
Craig Mullins, James Doh,
John Blood, Digital
Firepower
ROOM PRODUCTION
ART
Luminosity Entertainment
/ Boston Animation
MOTION CAPTURE
The Jim Henson Company,
Locomotion Studios
MUSIC
James Hannigan,
Andrew Sega
Visual Music Tom Seufert, Cato, Kelly,
Grinsfelder and Kitajima
DIALOGUE
PRODUCTION
Soundelux DMG,
Screen Music Studios
SOUND AND
POSTPRODUCTION
Soundelux DMG,
Scorpio Sound
VOCAL DIRECTORS
Julie Morgavi, Peter
Marquardt
•, Carole
Ruggier
PRINCIPAL CAST
Ian Ziering, John RhysDavies, Michael T. Weiss,
George Takei, Jennifer
Hale, Xander Berkeley
Special
Thanks
Chris Roberts
Thanks
Andy O’Brien, Andre
Garcia, Andrew Franklin,
Art Dibianca, Arvee Garde,
Ben Hanson, Jake
Rodgers, Jason Yenawine,
Jared Carr, Jim Magill, John
Thomas, Johnny Guentzel,
Kent Raffray, Lorin
Jameson, Matthew
Hurrell, Rich Lawrence,
Sam Yeates, Thor
Alexander, T.J. O’Leary
• ArtSource • Murder of Crows • VMC Consulting Corporation • Volt Services Group
 Loading...