

2
WARNING:
READ BEFORE PLAYING
A very small percentage of individuals may experience epileptic seizures when
exposed to certain light patterns or flashing lights. Exposure to certain patterns
or backgrounds on a computer screen, or while playing video games, may
induce an epileptic seizure in these individuals. Certain conditions may induce
previously undetected epileptic symptoms even in persons who have no history
of prior seizures or epilepsy.
If you, or anyone in your family, have an epileptic condition, consult your physician prior to playing. If you experience any of the following symptoms while playing a video or computer game -- dizziness, altered vision, eye or muscle twitches, loss of awareness, disorientation, any involuntary movement, or convulsions IMMEDIATELY discontinue use and consult your physician before resuming play.
3
TABLE OF CONTENTS
1 Getting started . . . . . . . . . . . . . . . . . . . . . . . . . 4
1.1 Minimum specifications. . . . . . . . . . . . . . . . . . 4
1.2 Installation . . . . . . . . . . . . . . . . . . . . . . . . . . . . 4
2 Main menu . . . . . . . . . . . . . . . . . . . . . . . . . . . . . . . 4
2.1 Profile . . . . . . . . . . . . . . . . . . . . . . . . . . . . . . . . . 5
2.2 Campaign . . . . . . . . . . . . . . . . . . . . . . . . . . . . . . 5
2.3 Options . . . . . . . . . . . . . . . . . . . . . . . . . . . . . . . 6
3 Playing the game . . . . . . . . . . . . . . . . . . . . . . . . 7
3.1 Character Control . . . . . . . . . . . . . . . . . . . . . 7
3.2 Combat . . . . . . . . . . . . . . . . . . . . . . . . . . . . . . . . 8
3.3 HUD . . . . . . . . . . . . . . . . . . . . . . . . . . . . . . . . . . . . 9
3.4 Cross-com . . . . . . . . . . . . . . . . . . . . . . . . . . . . 10
3.5 Tactical map . . . . . . . . . . . . . . . . . . . . . . . . . . . 11
4 Progress in the campaign . . . . . . . . . . . . . . 12
4.1 Prepping your squad . . . . . . . . . . . . . . . . . . 12
4.2 Objectives . . . . . . . . . . . . . . . . . . . . . . . . . . . 13
4.3 Finishing the mission . . . . . . . . . . . . . . . . . . 13
5 Multiplayer . . . . . . . . . . . . . . . . . . . . . . . . . . . . . 13
5.1 Joining a game . . . . . . . . . . . . . . . . . . . . . . . . . 13
5.2 Creating a game . . . . . . . . . . . . . . . . . . . . . . 14
5.3 Playing on Gamespy . . . . . . . . . . . . . . . . . . . 14
5.4 Domination mode . . . . . . . . . . . . . . . . . . . . . . 15
5.5 Co-operative mode . . . . . . . . . . . . . . . . . . . . 15
Technical support . . . . . . . . . . . . . . . . . . . . . . . 18
Warranty . . . . . . . . . . . . . . . . . . . . . . . . . . . . . . . . 19
WIN UBISOFT GAMES!
Register on the competition site now: http://registrationcontest.ubi.com.
Competition free of charge; no purchase necessary.
- Closing date for registrations: 10/27/2005 to 10/29/2006.
- Full regulations available free of charge by writing to UBISOFT EMEA,
Grand jeu/concours E-Registration – 28, rue Armand Carrel, 93108
Montreuil-sous-Bois Cedex, France; or available at the following address:
http://registrationcontest.ubi.com.
- Awards: 10 video games to be won every week. 520 games in all, with a
total retail value of 31,200 euros (10 games to be won every week for a
year) and unit retail value of 60 euros (inc.VAT) (art L 121-37 Ccons.).
GRAW_PC_Manual_UK 11/04/06 9:44 Page 2
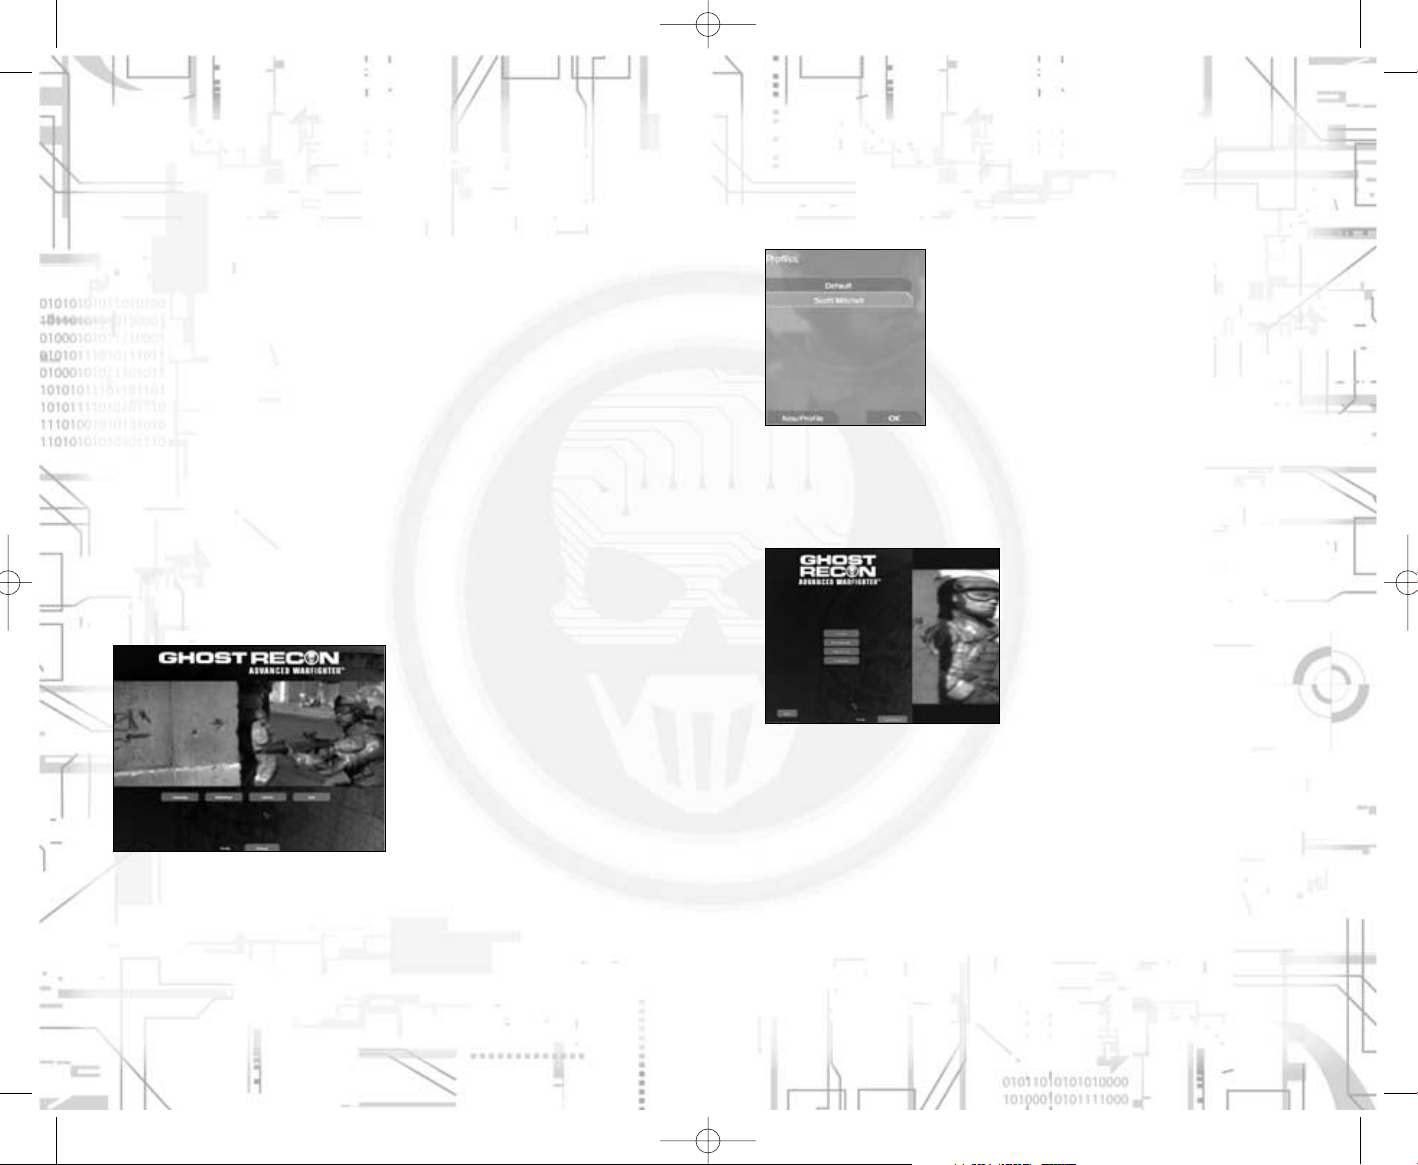
2.1 Profile
A profile is a folder that stores your achievements and preferences for the
game. You can have several profiles to play in different ways. For instance, you
can have a profile with specific control settings adapted to multiplayer games,
and another profile more adapted to the single-player campaign.
Click the profile button on any menu page to access
the profile screen, and change the current profile or
create a new one.
2.2 Campaign
The single-player campaign is played as a series of missions taking place in and
around Mexico City. You need to successfully complete a mission in order to
play the next one. The campaign screen gives you the following options:
Continue: quickly re-launch the campaign at your latest state of achievement.
New Campaign: restart a new campaign from the beginning
Play mission: replay one of the missions you have already won from the begin-
ning
Load Game: load a saved game at one of the mission checkpoints. The game
is automatically saved at specific locations.
54
1 GETTING STARTED
1.1 Minimum specifications
To play the game, your computer should meet the following criteria:
Computer: Pentium IV of 2Ghz or the equivalent (2.8Ghz recommended)
Memory: 1024 MB of RAM
Operating System: Windows 2000/XP
DirectX: DirectX9.0c
Video Card: Shader 2.0 card with 128 MB of VRAM (256MB recommended)
Sound card: DirectX9 compatible sound card
Internet: Broadband / LAN connection
1.2 Installation
Insert the game disk (CD1 or DVD) in your CD-ROM or DVD-ROM drive, the
autorun menu should appear. Click the “Install” button of the autorun button
and follow the instructions for installation.
Once the installation is complete, click the “Play” button in the autorun menu to
launch the game, or double-click the game shortcut.
2 MAIN MENU
Once the game has finished loading, the game menu appears to offer you the
following options:
Campaign: access the campaign page, to create a new single-player campaign
or continue a previous campaign.
Multiplayer: access game's multiplayer features.
Options: allows you to configure game, video, audio, and control settings.
Quit: leaves the game and returns to windows.
Profile: you will find this button on all menu pages, it allows you to change your
current profile.
GRAW_PC_Manual_UK 11/04/06 9:44 Page 4
3 PLAYING THE GAME
This section describes the general controls and features you will use to play the
single- and multiplayer games.
3.1 Character Control
3.1.1 Movement
Move your character forward and backward with the default keys W and S,
sidestep using the default controls A and D.
Your basic motion is cautious and adapted to paying attention to threats, but
you can also dash by holding the run key (Shift + default Z). If you run for too
long, you will eventually run out of stamina and be out of breath (this is represented by the curve shown in your player status). To regain stamina, you only
need to stand still, but it takes much longer to stabilise your weapon.
3.1.2 Stance
The game often involves taking cover behind various elements in your surroundings. Use “Stance down” (Default C) and “Stance up” (Default V) to switch from
a standing to a crouching to a prone position. You can also use the “Go to
prone” action directly (Default Ctrl) if you want to go down immediately.
3.1.3 Peeking
When hidden behind a building corner, you can have a peek left and right
(Default Q and E) and shoot from that position. Your team-mates and enemies
will also use this kind of manoeuvre.
3.1.4 Tactical moves
These moves allow you to jump behind cover more quickly while running.
Pressing the “Stance down” key while running will make you perform a backslide.
Pressing the "default Left Ctrl" key while running will make you perform a dive.
3.1.5 Insertion into the battle zone
Each mission starts with an insertion phase performed with an APC (light
armour vehicle) or Black Hawk (transport helicopter).
When the insertion is performed by a Black Hawk, you become operational as
soon as the Black Hawk arrives over the landing zone. You can open the doors
of the Black Hawk with the Use action (Default X) and clear the ground of enemies or ask your team-mates to move to the floor. Once you are ready to get
down, use the fast rope Use action (Default X) to descend to the ground.
76
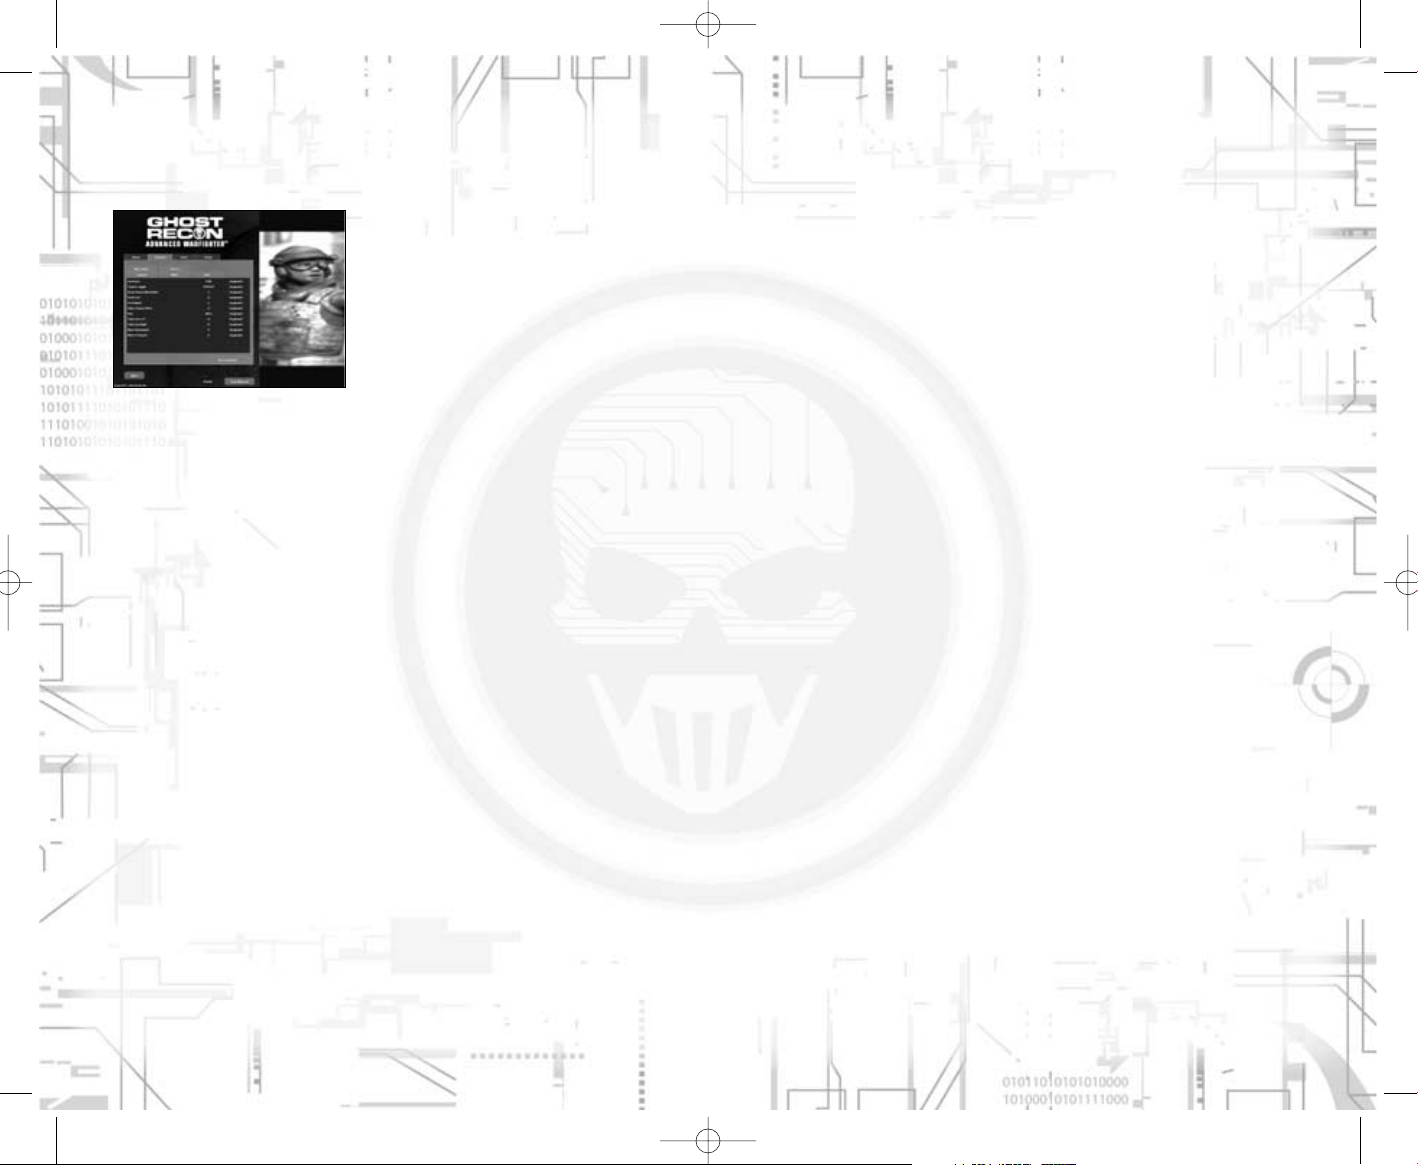
2.3 Options
The Options screen is split into four categories, which you can access by clicking the tabs at the top of the screen.
2.3.1 Game
This sub-panel changes the game-play experience and offers preferences for
interfaces and controls.
You can change the game’s difficulty level from here.
2.3.2 Controls
This sub-panel is used to reassign some of the controls in the game. You can
choose from five new sub-options:
Moving: reconfigure the controls you use to move your character
Combat: switch weapons
Tactics: team and support controls are changed here
Multi: these controls are specific to multiplayer games
Misc
.
:other settings
2.3.3 Video
The first time the game is launched, the program will determine what configuration is best adapted to your system. You can, however, change this by selecting a general graphic quality (make sure your computer is able to support highquality settings).
For advanced users, you can click the “Advanced” button and customise your
video settings in more detail.
2.3.4 Audio
The audio option sub-panel lets you select the global volume for the game, as
well as selecting hardware/software acceleration, depending on the type of
hardware installed.
For advanced users, you can click Advanced Settings to make more in-depth
changes to the game’s volume.
GRAW_PC_Manual_UK 11/04/06 9:44 Page 6
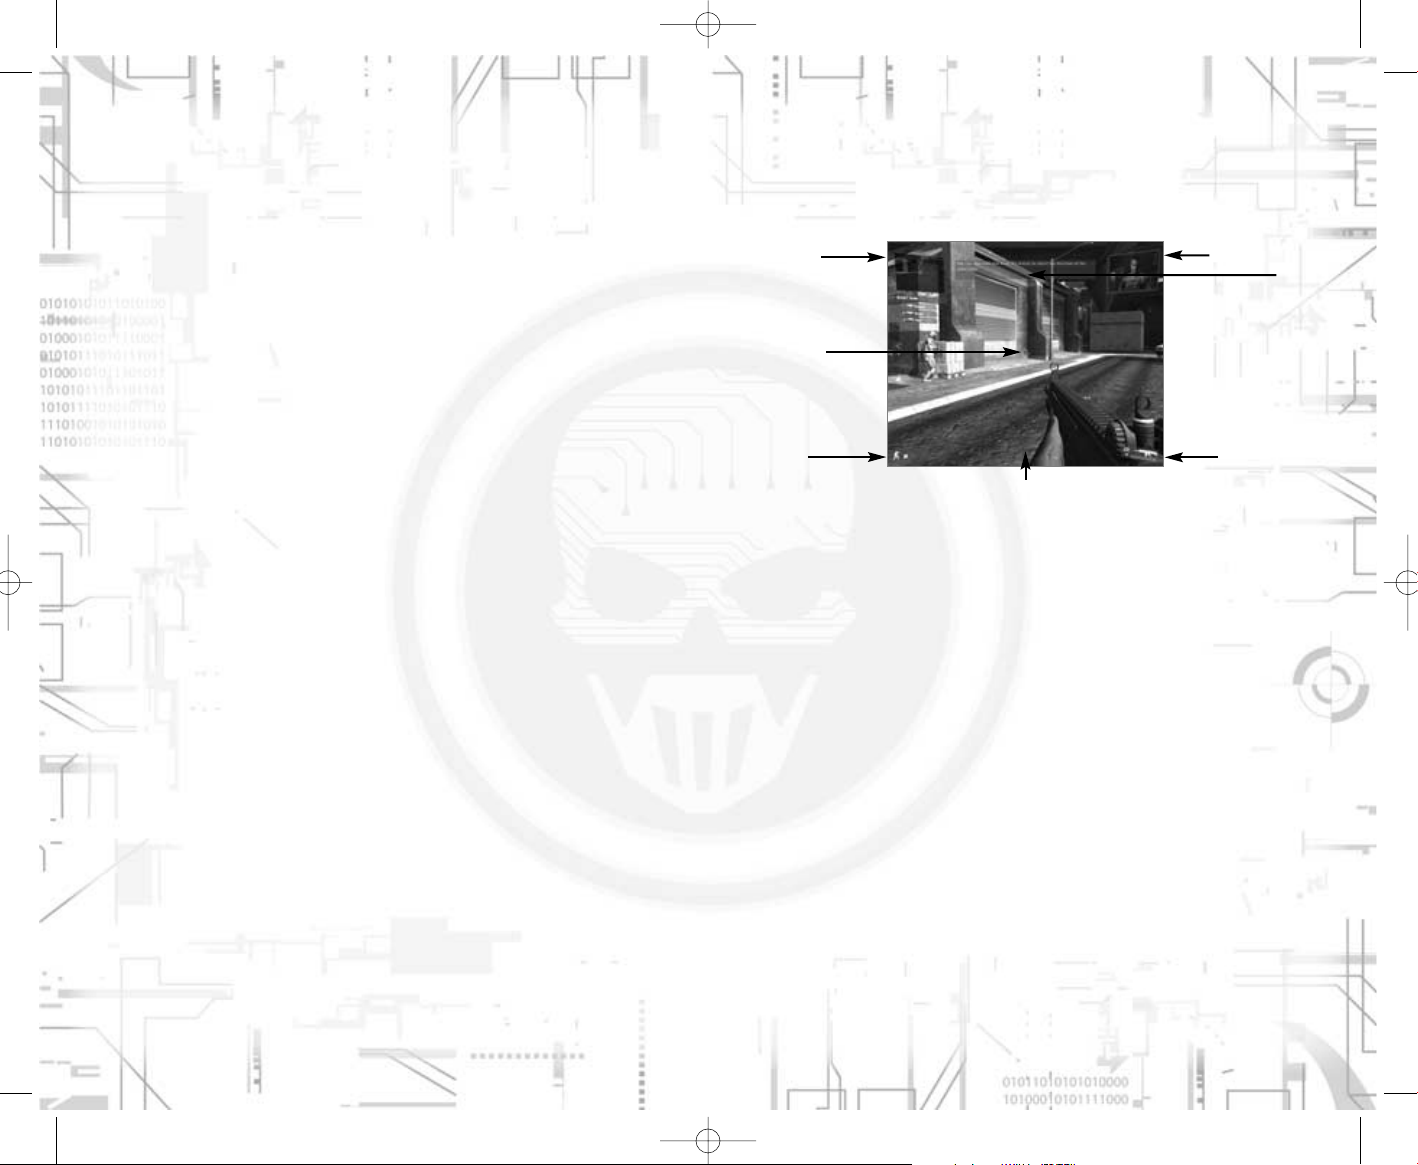
3.3 HUD
HUD stands for Heads Up Display, and is your next gen display. It is very helpful
throughout the game and enhances the realism of the combat field.
3.3.1 Narcom
This window displays video feed from your chain of command, and presents
events happening throughout the entire battle zone. It is through this interface that your objectives are explained.
3.3.2 Log
This panel is used in conjunction with the narcom to pinpoint contextual information and recap your objectives.
3.3.3 Status
This panel shows your current status: possible injuries, current stance, and
stress level.
3.3.4 Field of fire indicator
This interface works both as a compass and as a threat indicator. The red sectors displayed on the disk display the general direction of enemy gunfire.
3.3.5 Weapon status
This window shows the weapon you are currently equipped with, its current
rate of fire, as well as the number of bullets remaining in the magazine and the
number of magazines left.
3.3.6 Cross-hair
This small interface helps you aim at enemies and determine the current dispersion level of your weapon (scattering of bullets around the expected aiming
point).
98
3.2 Combat
3.2.1 Aiming & Shooting
Your best friend in the game is your weapon. Move the mouse around to aim
at targets, and use the Fire action (Default Left mouse button) to fire your
weapon.
Most weapons allow you a zoom or scope view, which you activate/deactivate
with the Mini-zoom action (Default Right mouse button).
3.2.2 Weapon selection
Your outfit contains several weapons: a primary weapon, a secondary sidearm,
and a backpack for heavy equipment. Use the Weapon list action (Default F) to
open the weapon selection menu and select another weapon by rotating the
mouse wheel.
Modifications for some weapons, such as the grenade launcher, will appear as
a specific slot in the list.
3.2.3 Dispersion
Dispersion determines the amount of precision with which you shoot. The four
dots around your cross-hair show your current accuracy. Running, moving your
mouse abruptly, or getting out of breath worsen the dispersion, while standing
still or moving slowly will reduce it.
3.2.4 Ammunition control: fire mode & reloading
Your arsenal is limited and you will have to keep an eye on your ammunition.
Use the Firemode action (Default X) to change your rate of fire and have better
control of your weapon.
Use the Reload action (Default R) to drop the current magazine and load a new
one.
Cross-com
Window
Cross-hair
Player
Status
FFI
Weapon Status
Log
Narcom Window
GRAW_PC_Manual_UK 11/04/06 9:44 Page 8
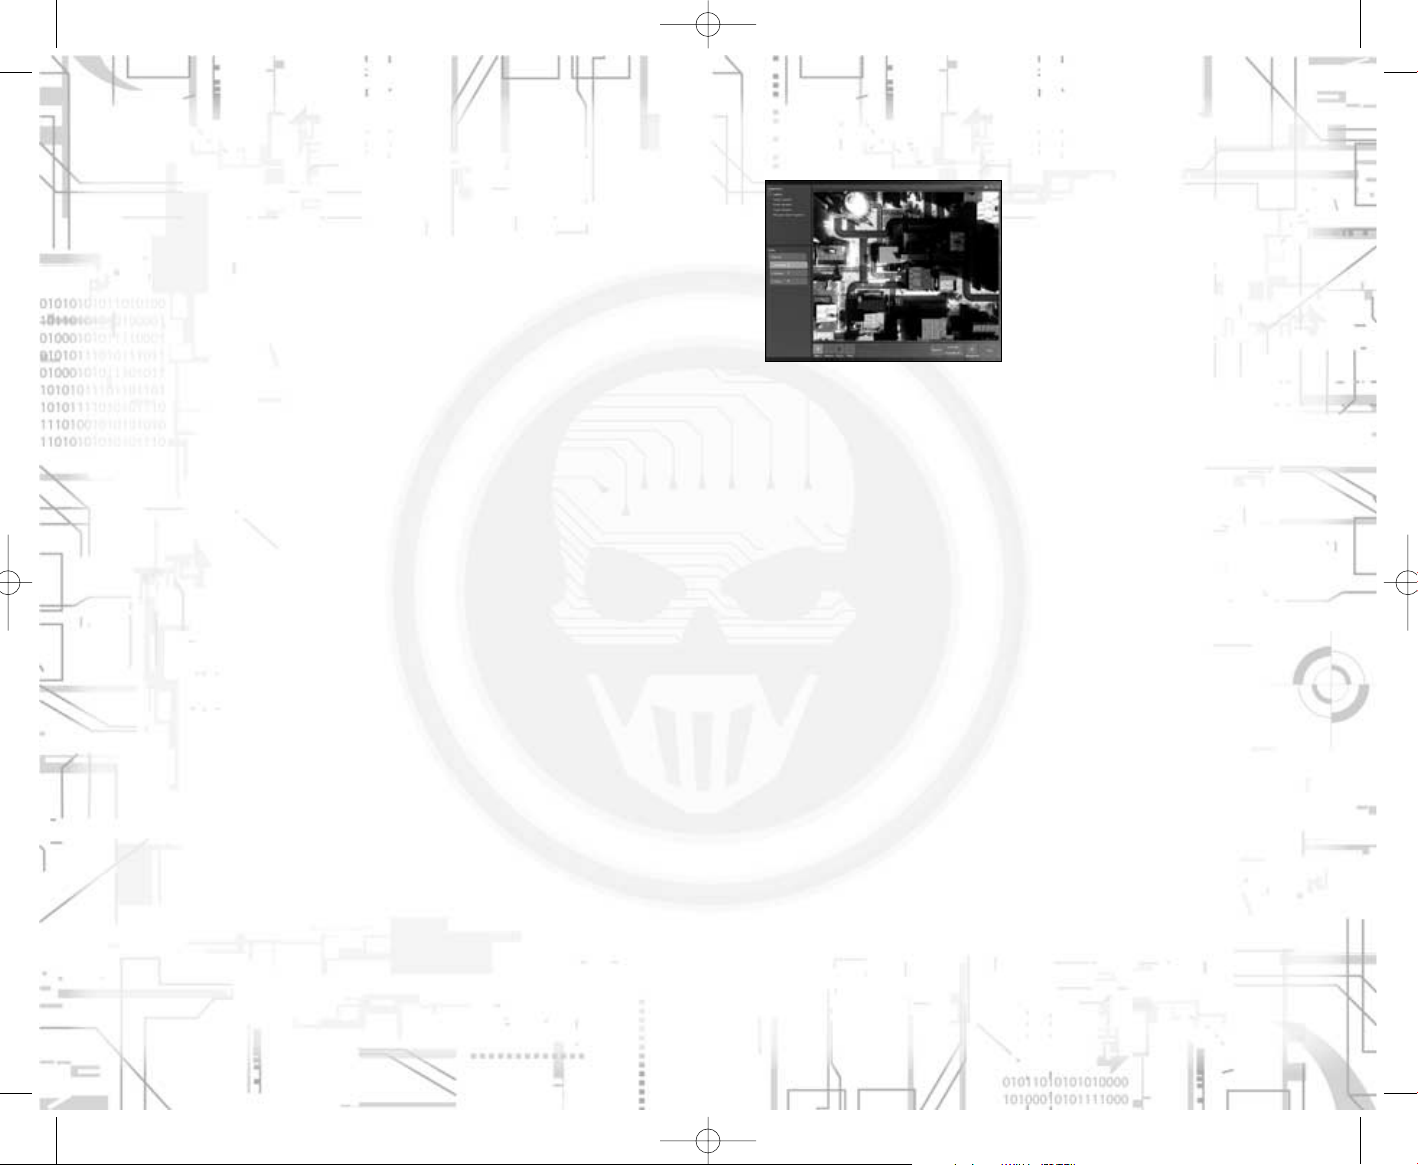
3.5 Tactical map
Use the Tactical map action (Default Tab) to open up this interface. The tactical
map can be used in conjunction with your cross-com and shows the battle area
from above. While the cross-com is designed to issue quick orders within your
visual range, the tactical map is more useful because it enables you to plan
moves beyond your line of vision and ahead of time.
The tactical map also displays your current objectives in the upper left-hand
corner of the screen.
3.5.1 Orders
Left-click on the list to select a unit, then left-click one of the commands at the
bottom of the screen (move, attack, cover) and left-click again on the map.
The order appears as an icon and is planned, but not actually executed by the
unit. When you are ready, execute an order by clicking on the “Execute” button.
Clicking Stop will abort the current order.
3.5.2 Advanced controls
Another distinct advantage of the tactical map is that it allows you to chain
together several orders by left-clicking several times. You can cancel the last
chain ordered by right-clicking or by clicking the Remove button. Once you
press “Execute”, the unit carries out the orders one at a time.
It is possible to have several moves scheduled at the same time. For instance,
you may give individual orders to several members of your Ghost team and
then launch them all simultaneously, using the Execute All button.
The cover order works slightly differently in the tactical map: if you press and
hold the left mouse button while issuing the order within the tactical map, you
can move the mouse to specify the exact direction for the cover.
3.5.3 Waypoint
If you have difficulties finding your bearings in the 3D world, click the waypoint
button, then click the spot on the 3D map where you wish to place the waypoint. It will then appear in your HUD, indicating the direction in which you
should move.
1110
3.4 Cross-com
This last interface of your HUD is probably the most important, since it gives
you control over and feedback from your team. It is split into 3 parts.
3.4.1 Support list
The support list shows your current team and status, as well as any additional
support, both near and far, that you will meet in the game: drones, tanks, air
strikes, apaches, etc.
Simply roll the mouse wheel to scroll up and down through the list, select one
and give it orders (see below).
3.4.2 Video feedback
When your ghosts and your drone are selected, a video feed window appears
and allows you to see from their perspective. The video feed is VR rendered,
and will tell you if your team-mate or drone is moving or if he has encountered
enemies.
You can maximise the cross-com feedback by pressing the Fullscreen action
(Default G), and then pressing it again to return to your own view.
3.4.3 Order system: Cross-com menu
Once you have selected a unit and are ready to assign orders to it, use the
Cross-com menu action (Default Middle mouse button). A menu appears with
the following actions. Use the same control to confirm the order you have
selected.
Move: confirm the order to move the unit to the location you are pointing to.
Attack: roughly aim towards a selected target and ask the unit to take out the
target. The unit continues to attack until the target is destroyed or another
order is given.
Cover: ask a unit to survey an area or protect it with covering fire. The unit
remains locked until another order is given.
Stop: stop the current order and return to default mode
Cancel: close the menu without assigning an order
Various units have different capabilities, so some of the actions above may not
appear. For instance, a drone won’t have the Attack option and you can’t tell a
Black Hawk exactly where to move.
3.4.4 Group / individual team-mate order
Your ghost team is your closest support in the game. Therefore, you have
more control over it. By selecting the team in the unit list, you can issue an
order to the team as a whole, allowing rapid actions.
If you select the team-mates individually, you will be able to give more detailed
orders, place them on the battlefield and devise cunning tactics to counter your
enemy.
GRAW_PC_Manual_UK 11/04/06 9:44 Page 10
4.2 Objectives
Your mission objectives are displayed in the tactical map, showing achieved
and in-progress tasks. You can click an objective to have a more detailed
explanation.
4.3 Finishing the mission
4.3.1 Victory or defeat
Victory is achieved by successfully completing the objectives assigned to you.
You face defeat if you die or if one of your objectives is not reached (by failing
to protect a critical VIP, for instance).
4.3.2 Debrief & Next mission
Once your mission is completed, a screen appears showing your achievements
and stats. Click to continue on to the next mission.
5 MULTIPLAYER
The multiplayer menu features 2 main modes which can be played either on
LAN or on the Internet through Gamespy. Click the “Multiplayer” button in the
main menu to access multiplayer features.
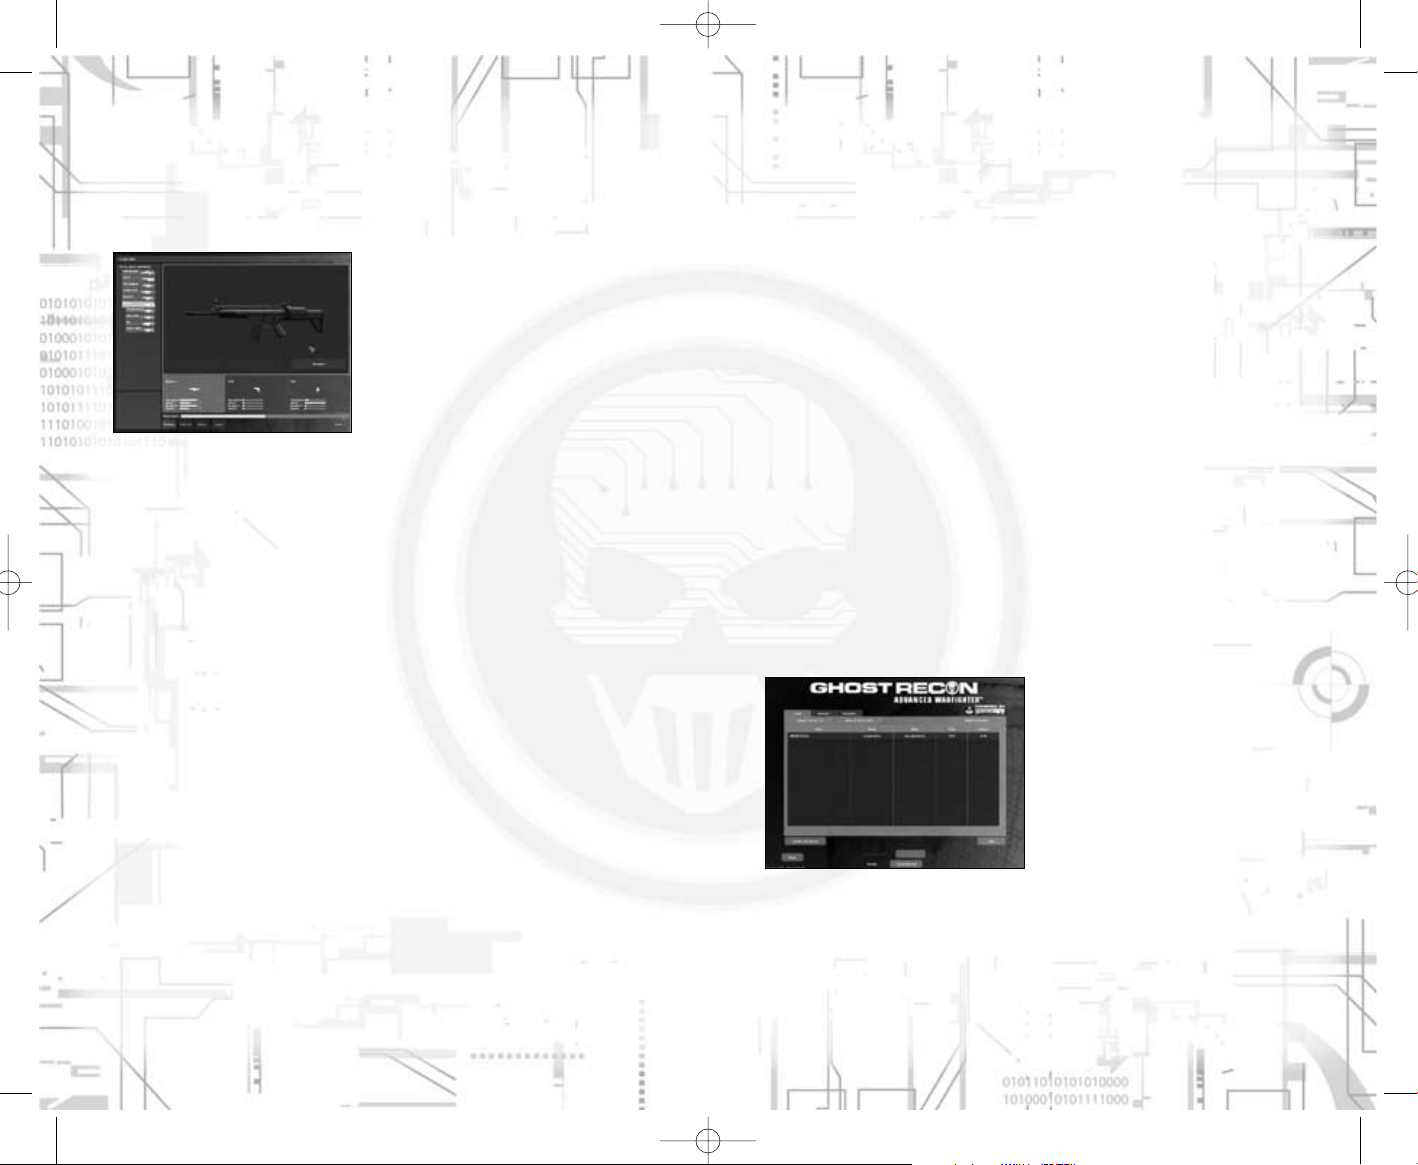
5.1 Joining a game
The first screen you see is the server browsing interface, which lists servers
on the local area network. Pick a server and click the “Join” button to enter it.
1312
4 PROGRESS
IN THE CAMPAIGN
4.1 Prepping your squad
Starting at the beginning of the second
mission, you can select equipment for
your team-mates and yourself.
4.1.1 Weapons
The weapon list shows you all weapons with which you can equip yourself and
displays your general stats in the lower left-hand corner. Select a weapon and
click the “Equip” button to carry it. The weapon appears in the 3D view on the
right.
Underneath the 3D view of the weapon, three tabs give you a recap of your
total payload: primary weapon, secondary weapon, and backpack. Click on one
of the tabs to select the weapon for the secondary and backpack categories.
4.1.2 Mods
Click a weapon to open a list of possible modifications you can make to that
particular weapon. In the lower left-hand corner, the impact of that modification
is displayed. Click the mod and “Equip” to select the modification and have it
appear in the 3D view.
You can also click an already equipped mod in the weapon list and click the
“Remove” button to un-equip it.
4.1.3 Overload
Overload determines whether or not you can equip yourself with a new weapon.
You cannot continue to equip yourself once you have reached the maximum
amount on the weight gauge. You must, therefore, make choices.
Even before this gauge shows the maximum weight, you will begin feeling the
effects of a heavy burden, with a faster loss of stamina while running.
4.1.4 Team-mates
You can select your team-mates’ equipment by clicking on their names at the
bottom of the screen.
GRAW_PC_Manual_UK 11/04/06 9:44 Page 12
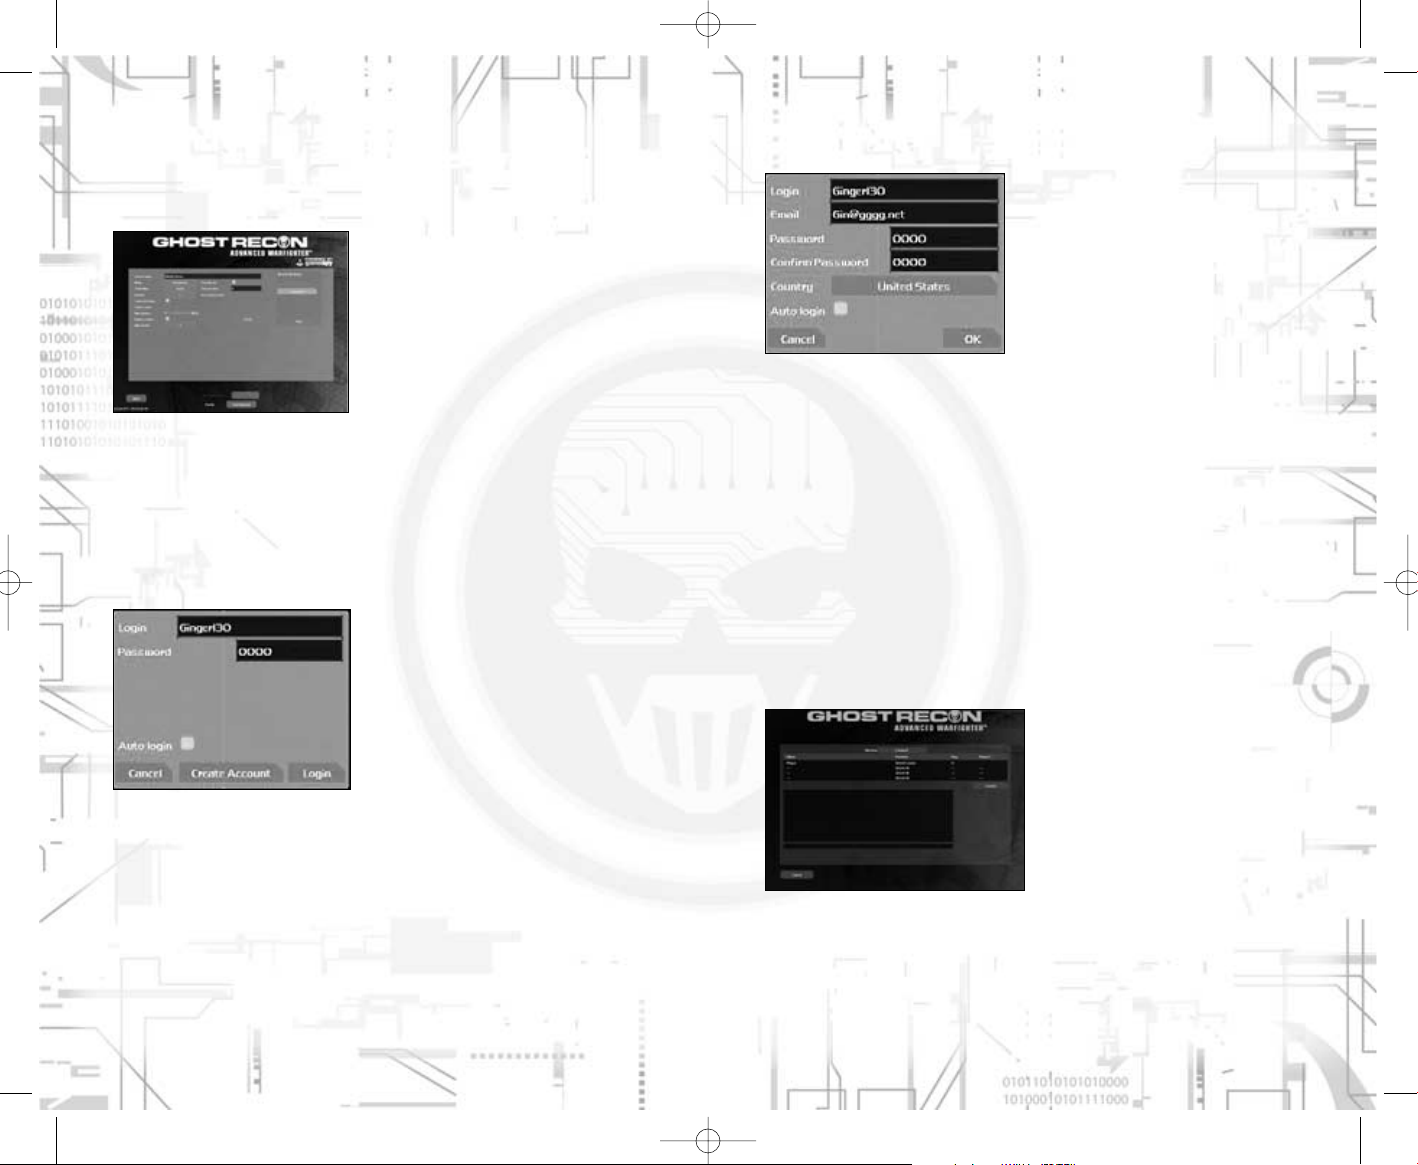
5.3.1 Creating Login
If this is your first time creating a
Gamespy account for this game, click
the “Create Account” button in the login
panel, and fill in the necessary information to create the account, then click
again on “Create Account”.
5.4 Domination mode
Domination is a “join-in anytime” multiplayer mode which challenges two teams
to dominate zones on a battlefield.
Each team starts on one side of the map in the first zone it controls. Zones
are connected by supply lines, and are captured by occupying the zone for a
period of time. When both teams are present within a zone, the ownership of
the zone is challenged and ends with capture as soon as one of the teams
becomes larger than the other team.
When a player is located in a zone which touches his home zone, (perhaps
with an ally occupying the zones in between), he is in the supply chain, and can
afford to select new equipment.
Victory is achieved by the team which controls the most zones when the timer
runs out, or when a team controls all the zones except the enemy home zone.
5.5 Co-operative mode
When a co-operative mode game is
created, players join in a specific
lobby to meet and chat while the
main player selects a mission to play.
Co-operative mode is played on singleplayer campaign mission maps, the
host player acting as the team leader
with the full power of the HUD and
Cross-com, while the other players
act as team-mates with standard
interfaces.
1514
5.2 Creating a game
You may want to create a server and a game, by clicking the “Create Server”
button. On the server configuration screen, select the game mode and define
the settings you want to use.
You may want to save your favourite settings for later use, using the interface
on the top right-hand corner.
Once all your favourite settings are determined, click the “Create” button.
5.3 Playing on Gamespy
To play over the Internet with Gamespy, click the “Internet” tab of the server
browsing page. If you did not select auto login on a previously created account,
a login window asks you to enter your Gamespy account.
You can also change the current gamespy account at any time by clicking on
your “Online account’ at the bottom of the screen (next to your profile).
GRAW_PC_Manual_UK 11/04/06 9:44 Page 14
GRAW_PC_Manual_UK 11/04/06 9:44 Page 16

WARRANTY
Ubisoft guarantees to the original purchaser of this computer software product
that the compact disc (CD)/cartridge supplied with this product shall not show
any default during a normal use period of ninety (90) days from the invoiced
date of purchase. In the first instance please return the faulty product to the
point of purchase together with your valid receipt. If for any reason this is not
possible, (and it is within 90 days of the purchase date), then the faulty compact discs/cartridges should be returned to Ubisoft at the below address,
along with a dated receipt, location of purchase, a statement describing the
fault, and all original packaging.
Address for returns:
Customer Support, Ubisoft, Chantrey Court, Minorca Road, Weybridge, Surrey,
KT13 3DU
Where a CD key is required to access on-line game play, this cannot be reproduced or replaced. It is the responsibility of the original purchaser to keep this
CD key secure. Lost, stolen or damaged CD keys cannot be replaced.
1918
TECHNICAL SUPPORT
NEW: To serve you better, Ubisoft is now providing full ONLINE support, to
solve your gaming problems quickly and efficiently.
Simply go to http://www.ubi.com/uk and visit the Ubisoft Frequently Asked
Questions first!
By visiting our FAQ database, you can find exactly the same answers that are
available to you by calling or sending web-mail to our support representatives.
This service is free and available 24/7!
If for any reason you do not find the answer to your question, you can click on
the Ask a question link in the FAQ to send us a web-mail, ensuring that we get
all the important information on your system and your problem so we can
answer correctly the first time.
Make sure to include all information on your system, your problem, and the
game you are playing.
If you do not have internet access, Our support representatives can assist
you from 9:00 am until 7:00pm, Monday – Friday (excluding Bank Holidays)
on Telephone: 0905-482-0109 Calls cost 30p per minute. Please be at your
system when calling Ubisoft for support.
Australian technical support
Technical Support Info Hotline
1902 262 102
(calls are charged at $2.48 per minute including GST. Higher from public and
mobile phones).
HINTS & TIPS
Looking for cheats to go up to the next level? Call us for Hints and Tips
Telephone Number: 0906 643 0200, available hours 9.00 am until 7.00 pm
Monday – Friday (excluding Bank Holidays) to speak to one of our representatives.
Calls cost £1.50 per minute, please ask permission from the person who pays
the phone bill before making the call.
© 2005 Ubisoft Entertainment. All Rights Reserved. Ghost Recon, Ghost
Recon Advanced Warfighter, the Soldier Icon, Ubisoft, Ubi.com and the Ubisoft
logo are trademarks of Ubisoft Entertainment in the US and/or other countries. PC version developed by Grin.
USES BINK VIDEO. COPYRIGHT
© 1997-2006 BY RAD GAME TOOLS, INC.
THIS PRODUCT CONTAINS SOFTWARE TECHNOLOGY LICENSED
FROM GAMESPY INDUSTRIES, INC. © 1999-2005 GAMESPY
INDUSTRIES, INC. ALL RIGHTS RESERVED.
GRAW_PC_Manual_UK 11/04/06 9:44 Page 18
 Loading...