


 Loading...
P3AM-8802-09ENZ0
FUJITSU Storage
ETERNUS LT260 Tape Library
User's Guide -Panel Operation-

This page is intentionally left blank.

Preface
Fujitsu would like to thank you for purchasing our FUJITSU Storage ETERNUS LT260 Tape Library (hereinafter referred to as LT260).
The LT260 is designed to be connected to servers (such as PRIMEQUEST, PRIMERGY, or Fujitsu M12/M10). This manual explains how to perform operation management and settings for the LT260 from the operator panel or the remote panel.
This manual is intended for use of LT260 in regions other than Japan. Please carefully review the information outlined in this manual.
Ninth Edition
December 2019
LTO, Linear Tape-Open, and Ultrium are registered trademarks of Hewlett Packard Enterprise, L.P., IBM Corporation, and Quantum Corporation.
All SPARC trademarks are used under license and are trademarks or registered trademarks of SPARC International, Inc. in the United States and other countries.
Microsoft, Windows, and Internet Explorer are either registered trademarks or trademarks of Microsoft Corporation in the United States and/or other countries.
The company names, product names and service names mentioned in this document are registered trademarks or trademarks of their respective companies.
Microsoft product screen shot(s) reprinted with permission from Microsoft Corporation.
3
FUJITSU Storage ETERNUS LT260 Tape Library User’s Guide -Panel Operation-
Copyright 2019 FUJITSU LIMITED |
P3AM-8802-09ENZ0 |
About this Manual
Organization
This manual is composed of the following two chapters:
●Chapter 1 Overview
This chapter provides an overview of the operator panel and the remote panel.
●Chapter 2 Operating the Library
This chapter provides information about various operations that can be performed with the operator panel and the remote panel.
Warning Notations
Warning signs are shown throughout this manual in order to prevent injury to the user and/or material damage. These signs are composed of a symbol and a message describing the recommended level of caution. The following explains the symbols, their levels of caution, and their meanings as used in this manual.

 WARNING

 CAUTION
This symbol indicates the possibility of serious or fatal injury if the LT260 is not used properly.
This symbol indicates the possibility of minor or moderate personal injury, as well as damage to the LT260 and/or to other users and their property, if the LT260 is not used properly.
This symbol indicates IMPORTANT information for the user to note when using the LT260.
The following symbols are used to indicate the type of warnings or cautions being described.
Electric Shock
The triangle emphasizes the urgency of the WARNING and CAUTION contents. Inside the triangle and above it are details concerning the symbol (e.g. Electrical Shock).
No Disassembly
The barred "Do Not..." circle warns against certain actions. The action which must be avoided is both illustrated inside the barred circle and written above it (e.g. No Disassembly).
4
FUJITSU Storage ETERNUS LT260 Tape Library User’s Guide -Panel Operation-
Copyright 2019 FUJITSU LIMITED |
P3AM-8802-09ENZ0 |
About this Manual
Unplug
The black "Must Do..." disk indicates actions that must be taken. The required action is both illustrated inside the black disk and written above it
(e.g. Unplug).
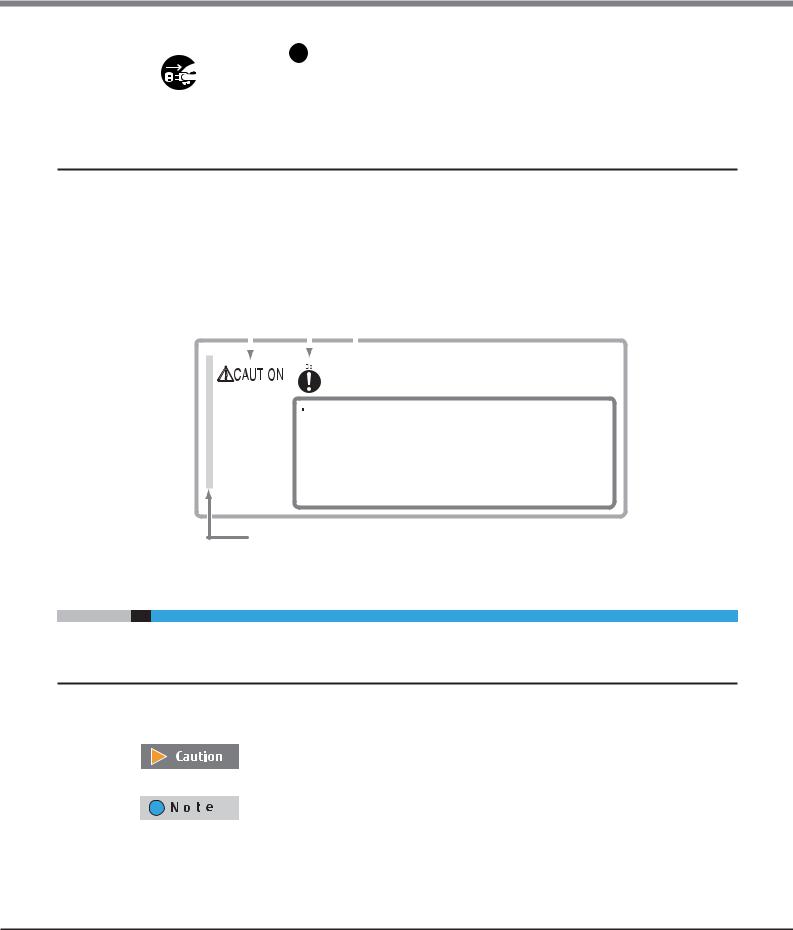
How Warnings are Presented in this Manual
A message is written beside the symbol indicating the caution level. This message is marked with a vertical ribbon in the left margin, to distinguish this warning from ordinary descriptions.
An example is shown here.
Example Warning |
|
|
|
|
|
|
Warning Level Indicator |
|||
|
|
|
|
|
||||||
|
|
|
|
|
|
Warning Type Indicator |
||||
|
|
|
|
|
||||||
|
|
|
|
|
|
|
|
|
|
Warning Details |
|
|
|
|
|
|
|
|
|
|
|
|
|
|
|
|
|
|
|
|
|
|
|
|
|
|
|
|
|
|
|
|
|
|
|
|
|
|
|
|
|
|
|
|
|
|
|
|
|
|
|
|
|
|
|
|
|
|
|
|
|
|
|
|
|
|
|
|
|
|
|
|
|
|
|
|
|
|
|
|
|
|
|
|
|
|
|
|
To avoid damaging the LT260, pay attention to the following points when cleaning the LT260:
-Make sure to disconnect the power when cleaning.
-Be careful that no liquid seeps into the LT260 when using cleaners, etc.
-Do not use alcohol or other solvents to clean the LT260.
Warning Layout Ribbon
Additional Information
Symbols Used in This Manual
The following symbols are used throughout this manual:
This symbol alerts operators to particularly important information. Be sure to read this information.
Functions and know how which can be useful when setting up or operating the LT260.
5
FUJITSU Storage ETERNUS LT260 Tape Library User’s Guide -Panel Operation-
Copyright 2019 FUJITSU LIMITED |
P3AM-8802-09ENZ0 |

About this Manual
Abbreviations Used in This Manual
•“LT260” refers to the FUJITSU Storage ETERNUS LT260 Tape Library.
•Trademark symbols such as ™ and ® are omitted in this manual.
6
FUJITSU Storage ETERNUS LT260 Tape Library User’s Guide -Panel Operation-
Copyright 2019 FUJITSU LIMITED |
P3AM-8802-09ENZ0 |

Table of Contents
Chapter 1 |
Overview |
12 |
|
|
|
|
|
1.1 |
Overview of Panel Operations ........................................................................................... |
12 |
|
1.1.1 |
Overview of the Operator Panel ..................................................................................................................... |
12 |
|
1.1.2 |
Overview of the Remote Panel ....................................................................................................................... |
14 |
|
1.2 |
Operation Window ............................................................................................................ |
15 |
|
1.2.1 |
Window Layout .............................................................................................................................................. |
15 |
|
1.3 |
Menu Layout ..................................................................................................................... |
16 |
|
1.3.1 |
Menu Layout of the Operator Panel ............................................................................................................... |
16 |
|
1.3.2 |
Menu Layout of the Remote Panel ................................................................................................................ |
17 |
|
Chapter 2 |
Operating the Library |
18 |
|
|
|
|
|
2.1 |
Using the Operator Panel .................................................................................................. |
19 |
|
2.2 |
Using the Remote Panel ................................................................................................... |
20 |
|
2.3 |
Logging into the Library ................................................................................................... |
21 |
|
2.4 |
Using the Library Home Screen ......................................................................................... |
23 |
|
2.4.1 |
Top Banner Elements .................................................................................................................................... |
24 |
|
2.4.2 |
Left Pane Elements ........................................................................................................................................ |
24 |
|
2.4.3 |
Center Panel Elements .................................................................................................................................. |
26 |
|
2.5 |
Configuring the Library ..................................................................................................... |
27 |
|
2.5.1 |
Using the Initial Configuration Wizard ........................................................................................................... |
27 |
|
2.5.2 |
Saving, Restoring and Resetting the Library Configuration ............................................................................ |
31 |
|
2.5.3 |
Configuring the Date and Time Format .......................................................................................................... |
34 |
|
2.5.4 |
Configuring Media Barcode Compatibility Checking ...................................................................................... |
38 |
|
2.5.5 |
Configuring Allow Unlabeled Media Setting .................................................................................................. |
39 |
|
2.5.6 |
Configuring License Key Handing .................................................................................................................. |
40 |
|
2.5.7 |
Configuring the RMI Timeout Setting (for Firmware Versions 7.80 and Earlier) ............................................. |
41 |
|
2.5.8 |
Configuring the Library Network Settings ...................................................................................................... |
42 |
|
2.5.9 |
Configuring the SNMP .................................................................................................................................... |
43 |
|
2.5.10 |
Configuring the SMTP .................................................................................................................................... |
47 |
|
2.5.11 |
Configuring Tape Drives ................................................................................................................................. |
49 |
|
2.5.12 |
Enabling or Disabling Mailslots ..................................................................................................................... |
51 |
|
2.5.13 |
Configuring Library Partitions ........................................................................................................................ |
52 |
|
2.5.14 |
Configuring Key Management Function ......................................................................................................... |
57 |
|
2.5.15 |
Configuring User Account Settings (for Firmware Versions 7.80 and Earlier) ................................................. |
58 |
|
2.5.16 |
Configuring User Account Settings (for Firmware Versions 7.90 and Later) ................................................... |
60 |
|
7
FUJITSU Storage ETERNUS LT260 Tape Library User’s Guide -Panel Operation-
Copyright 2019 FUJITSU LIMITED |
P3AM-8802-09ENZ0 |

Table of Contents
2.5.17 |
Configuring Password Requirements (for Firmware Versions 7.90 and Later) |
................................................ 66 |
2.5.18 |
Configuring the Access Management Setting to the Remote Panel ............................................................... |
68 |
2.6 |
Maintaining the Library .................................................................................................... |
82 |
2.6.1 |
Library Tests .................................................................................................................................................. |
82 |
2.6.2 |
Viewing Log Files ........................................................................................................................................... |
90 |
2.6.3 |
Managing System Firmware .......................................................................................................................... |
92 |
2.6.4 |
Managing Drive Firmware ............................................................................................................................. |
93 |
2.6.5 |
Downloading Drive Logs ................................................................................................................................ |
94 |
2.6.6 |
Downloading Log and Trace Files .................................................................................................................. |
96 |
2.6.7 |
Rebooting the Library .................................................................................................................................... |
96 |
2.6.8 |
Tape Drive Reboot ......................................................................................................................................... |
97 |
2.6.9 |
Controlling the UID LED ................................................................................................................................. |
98 |
2.6.10 |
Moving the Robotic to the Base Module ........................................................................................................ |
98 |
2.7 |
Operating the Library ........................................................................................................ |
99 |
2.7.1 |
Moving Media ................................................................................................................................................ |
99 |
2.7.2 |
Opening the Mailslot ................................................................................................................................... |
100 |
2.7.3 |
Opening a Magazine ................................................................................................................................... |
102 |
2.7.4 |
Cleaning a Tape Drive .................................................................................................................................. |
103 |
2.7.5 |
Rescanning the Cartridge Inventory ............................................................................................................. |
104 |
2.7.6 |
Forcing a Tape Drive to Eject a Cartridge ...................................................................................................... |
105 |
2.8 |
Viewing Status Information ............................................................................................ |
106 |
2.8.1 |
Viewing Library and Module Status ............................................................................................................. |
106 |
2.8.2 |
Using Inventory Lists ................................................................................................................................... |
109 |
2.8.3 |
Using Inventory Graphical View ................................................................................................................... |
111 |
2.8.4 |
Partition Map Graphical View ...................................................................................................................... |
113 |
2.8.5 |
Using Partition Map Configuration Status .................................................................................................... |
116 |
2.8.6 |
Viewing Tape Drive Status ........................................................................................................................... |
118 |
2.8.7 |
Viewing Network Status ............................................................................................................................... |
119 |
2.8.8 |
Viewing Security Status ................................................................................................................................ |
121 |
8
FUJITSU Storage ETERNUS LT260 Tape Library User’s Guide -Panel Operation-
Copyright 2019 FUJITSU LIMITED |
P3AM-8802-09ENZ0 |

List of Figures
Figure 1.1 |
Initialization window................................................................................................................................... |
13 |
Figure 1.2 |
Login window.............................................................................................................................................. |
13 |
Figure 1.3 |
Remote panel starting window ................................................................................................................... |
14 |
Figure 1.4 |
Home screen configuration ......................................................................................................................... |
15 |
Figure 1.5 |
Menu layout of the operator panel.............................................................................................................. |
16 |
Figure 1.6 |
Menu layout of the remote panel................................................................................................................ |
17 |
Figure 2.1 |
Login ........................................................................................................................................................... |
21 |
Figure 2.2 |
Home screen ............................................................................................................................................... |
23 |
Figure 2.3 |
Save/Restore configuration.......................................................................................................................... |
31 |
Figure 2.4 |
Time zone.................................................................................................................................................... |
34 |
Figure 2.5 |
Date/Time format ........................................................................................................................................ |
35 |
Figure 2.6 |
Set date/time............................................................................................................................................... |
36 |
Figure 2.7 |
SNTP ............................................................................................................................................................ |
37 |
Figure 2.8 |
Media barcode compatibility check ............................................................................................................. |
38 |
Figure 2.9 |
Allow unlabeled media................................................................................................................................ |
39 |
Figure 2.10 |
License key handing.................................................................................................................................... |
40 |
Figure 2.11 |
RMI timeout ................................................................................................................................................ |
41 |
Figure 2.12 |
Network setting........................................................................................................................................... |
42 |
Figure 2.13 |
SNMP........................................................................................................................................................... |
43 |
Figure 2.14 |
SNMPv3 ....................................................................................................................................................... |
46 |
Figure 2.15 |
SMTP ........................................................................................................................................................... |
47 |
Figure 2.16 |
Tape drive settings ...................................................................................................................................... |
49 |
Figure 2.17 |
Enabling or disabling mailslots ................................................................................................................... |
51 |
Figure 2.18 |
Setting re-lock time..................................................................................................................................... |
52 |
Figure 2.19 |
User accounts settings................................................................................................................................. |
58 |
Figure 2.20 |
User account settings .................................................................................................................................. |
60 |
Figure 2.21 |
Adding an Account ...................................................................................................................................... |
62 |
Figure 2.22 |
Changing the Account Password.................................................................................................................. |
63 |
Figure 2.23 |
Changing the User Account Role.................................................................................................................. |
64 |
Figure 2.24 |
Deleting an account .................................................................................................................................... |
65 |
Figure 2.25 |
Password setting requirements ................................................................................................................... |
67 |
Figure 2.26 |
Access management setting to the remote panel (for firmware versions 7.80 and earlier) ........................ |
68 |
Figure 2.27 |
Access management setting to the remote panel (for firmware versions 7.90 and later) ........................... |
69 |
Figure 2.28 |
Enabling the SSL setting.............................................................................................................................. |
70 |
Figure 2.29 |
Certificate settings....................................................................................................................................... |
71 |
Figure 2.30 |
Self signed certificate creation screen ......................................................................................................... |
72 |
Figure 2.31 |
Information screen ...................................................................................................................................... |
73 |
Figure 2.32 |
Certificate Signing Request screen 1............................................................................................................ |
74 |
Figure 2.33 |
Certificate Signing Request screen 2............................................................................................................ |
75 |
Figure 2.34 |
Signed Certificate screen ............................................................................................................................. |
76 |
Figure 2.35 |
Finish screen ............................................................................................................................................... |
77 |
Figure 2.36 |
Backing up the self-signed certificate.......................................................................................................... |
78 |
Figure 2.37 |
Restoring the self signed certificate ............................................................................................................ |
78 |
Figure 2.38 |
Setting the session timeout......................................................................................................................... |
79 |
Figure 2.39 |
Setting login session locking function ......................................................................................................... |
79 |
Figure 2.40 |
Disabled login session locking function....................................................................................................... |
80 |
Figure 2.41 |
Enabled login session locking function ....................................................................................................... |
80 |
Figure 2.42 |
Remote panel restriction setting ................................................................................................................. |
81 |
9
FUJITSU Storage ETERNUS LT260 Tape Library User’s Guide -Panel Operation-
Copyright 2019 FUJITSU LIMITED |
P3AM-8802-09ENZ0 |

List of Figures
Figure 2.43 |
System test......................................................................................................... |
......................................... 82 |
Figure 2.44 |
Slot to slot test ............................................................................................................................................ |
83 |
Figure 2.45 Element to element test.............................................................................................................................. |
84 |
|
Figure 2.46 |
Position test ................................................................................................................................................ |
86 |
Figure 2.47 |
Wellness test ............................................................................................................................................... |
88 |
Figure 2.48 |
Robotic test ................................................................................................................................................. |
89 |
Figure 2.49 |
OCP test....................................................................................................................................................... |
89 |
Figure 2.50 |
View logs ..................................................................................................................................................... |
90 |
Figure 2.51 Detailed view example for logs ................................................................................................................... |
91 |
|
Figure 2.52 Upgrades system firmware .......................................................................................................................... |
92 |
|
Figure 2.53 Upgrades drive firmware ............................................................................................................................. |
93 |
|
Figure 2.54 Download drive logs.................................................................................................................................... |
94 |
|
Figure 2.55 Download logs and traces ........................................................................................................................... |
96 |
|
Figure 2.56 Rebooting the library .................................................................................................................................. |
96 |
|
Figure 2.57 Tape drive reboot ........................................................................................................................................ |
97 |
|
Figure 2.58 UID LED control ........................................................................................................................................... |
98 |
|
Figure 2.59 Move robotic to base module ...................................................................................................................... |
98 |
|
Figure 2.60 |
Move media ................................................................................................................................................ |
99 |
Figure 2.61 |
Open mailslot............................................................................................................................................ |
101 |
Figure 2.62 |
Open magazine ......................................................................................................................................... |
102 |
Figure 2.63 |
Clean drive ................................................................................................................................................ |
103 |
Figure 2.64 |
Rescan inventory ....................................................................................................................................... |
104 |
Figure 2.65 Force drive media eject ............................................................................................................................. |
105 |
|
Figure 2.66 |
Library status............................................................................................................................................. |
106 |
Figure 2.67 |
Inventory list ............................................................................................................................................. |
109 |
Figure 2.68 Inventory graphical view ........................................................................................................................... |
111 |
|
Figure 2.69 Inventory graphical view (display status) .................................................................................................. |
112 |
|
Figure 2.70 Inventory graphical view (display error status).......................................................................................... |
113 |
|
Figure 2.71 Partition map graphical view..................................................................................................................... |
113 |
|
Figure 2.72 Partition map graphical view (display partition information) ................................................................... |
114 |
|
Figure 2.73 Partition map graphical view (tape drive information display) ................................................................. |
115 |
|
Figure 2.74 Using partition map configuration status .................................................................................................. |
116 |
|
Figure 2.75 Tape drive status ....................................................................................................................................... |
118 |
|
Figure 2.76 |
Network status .......................................................................................................................................... |
119 |
Figure 2.77 Viewing security status.............................................................................................................................. |
121 |
|
10
FUJITSU Storage ETERNUS LT260 Tape Library User’s Guide -Panel Operation-
Copyright 2019 FUJITSU LIMITED |
P3AM-8802-09ENZ0 |
List of Tables
Table 2.1 |
Status icons ................................................................................................................................................. |
18 |
Table 2.2 |
Front panel LED indicators .......................................................................................................................... |
19 |
Table 2.3 |
Management software ................................................................................................................................ |
43 |
11
FUJITSU Storage ETERNUS LT260 Tape Library User’s Guide -Panel Operation-
Copyright 2019 FUJITSU LIMITED |
P3AM-8802-09ENZ0 |

Chapter 1
Overview
This chapter provides an overview of the operator panel and the remote panel.
1.1Overview of Panel Operations
The library provides two main interfaces:
•Operator panel
With the operator panel, you can monitor, configure, and control the library from the front panel. All operating menus are displayed on the center pane.
•Remote panel
With the remote panel, you can monitor, configure, and control the library from a web browser. The remote panel hosts a dedicated, protected Internet site that displays a graphical representation of the library. Except of top menus, operating menu tree are displayed on the right pane.
Although the operator panel is similar to the remote panel in design and functionality, some of the executable operations are different.
1.1.1Overview of the Operator Panel
The operator panel is positioned on the center of the front panel. It is possible to perform operations such as referencing/setting the library and drive status and opening the magazine or mailslot from the operator panel. By selecting the buttons on the operator panel, operations such as window transition, function selection, and setup value input can be performed.
The windows on the operator panel before login can be roughly divided into the initialization window and login window.
12
FUJITSU Storage ETERNUS LT260 Tape Library User’s Guide -Panel Operation-
Copyright 2019 FUJITSU LIMITED |
P3AM-8802-09ENZ0 |

Chapter 1 Overview
1.1 Overview of Panel Operations
■ Initialization window
Initialization is started when the library is turned on. In the initialization window, the progress status of the library initializing are displayed.
Figure 1.1 Initialization window
■ Login window
When initialization operation ends, the login window is displayed on the operator panel. If the screen saver is on, please tap the screen.
Figure 1.2 Login window
13
FUJITSU Storage ETERNUS LT260 Tape Library User’s Guide -Panel Operation-
Copyright 2019 FUJITSU LIMITED |
P3AM-8802-09ENZ0 |
Chapter 1 Overview
1.1 Overview of Panel Operations
1.1.2Overview of the Remote Panel
The remote panel can be used to perform operations such as referencing/setting the library and drive status and performing drive cleaning on a Web browser via the LAN.
•The recommended environment for the remote panel is as follows:
-Web browser
Microsoft Internet Explorer, Mozilla Firefox, Google Chrome, Safari
•Cookies and Java Script are used for the remote panel. Cookies and Java Script need to be enabled in your browser.
Before using the remote panel, network settings need to be performed on the operator panel to enable the IP address, the subnet mask, and the gateway so that the remote panel can be used. Specify the following URL
on a Web browser after performing the settings:
http:// <IP address specified for the LT260>/
or
https:// <IP address specified for the LT260>/
Use the https URL to connect to the remote panel for the LT260 when SSL is enabled. For details related to enabling SSL, refer to "2.5.18 Configuring the Access Management Setting to the Remote Panel" (page 68).
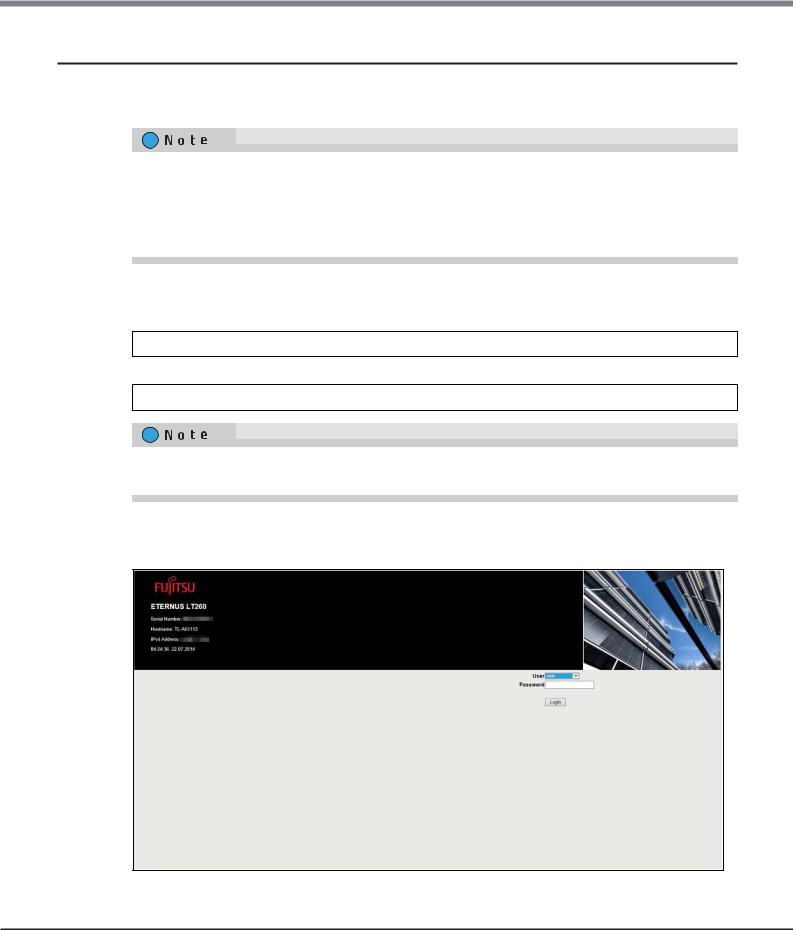
The following window is displayed when the LT260 is connected.
Figure 1.3 Remote panel starting window
14
FUJITSU Storage ETERNUS LT260 Tape Library User’s Guide -Panel Operation-
Copyright 2019 FUJITSU LIMITED |
P3AM-8802-09ENZ0 |
Chapter 1 Overview
1.2 Operation Window
1.2Operation Window
1.2.1Window Layout
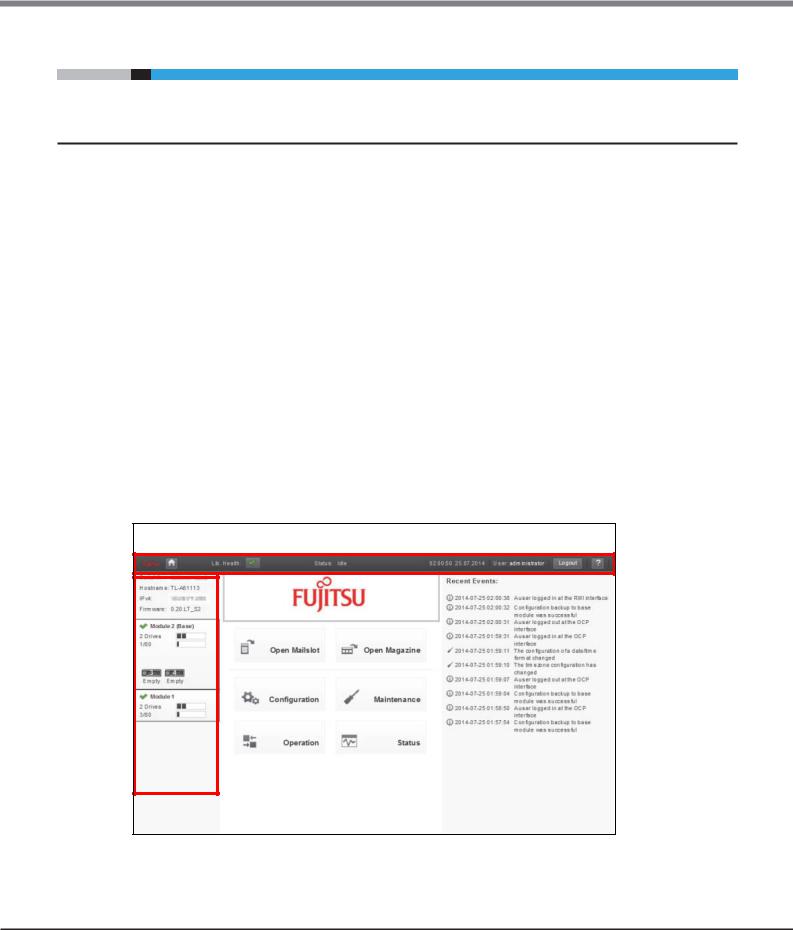
The home screen window is displayed after login. See "2.4 Using the Library Home Screen" (page 23) for details.
The library home screen is organized into the following regions:
●Top banner
Contains the home button and displays the overall status and information about the library and user.
●Left pane
Displays the library identity and module status.
●Center pane
Provides access to operate and configure the library and to view additional status information.
●Right pane (remote panel only) Displays a log of recent events.
Figure 1.4 Home screen configuration
Top banner
|
|
|
|
|
|
|
|
|
|
|
|
|
|
|
|
|
|
|
|
|
|
|
|
|
|
|
|
|
|
|
|
Left pane |
Center pane |
|
|
Right pane |
|||
15
FUJITSU Storage ETERNUS LT260 Tape Library User’s Guide -Panel Operation-
Copyright 2019 FUJITSU LIMITED |
P3AM-8802-09ENZ0 |
Chapter 1 Overview
1.3 Menu Layout
1.3Menu Layout
This section describes the menu layout of the operator panel and the remote panel.
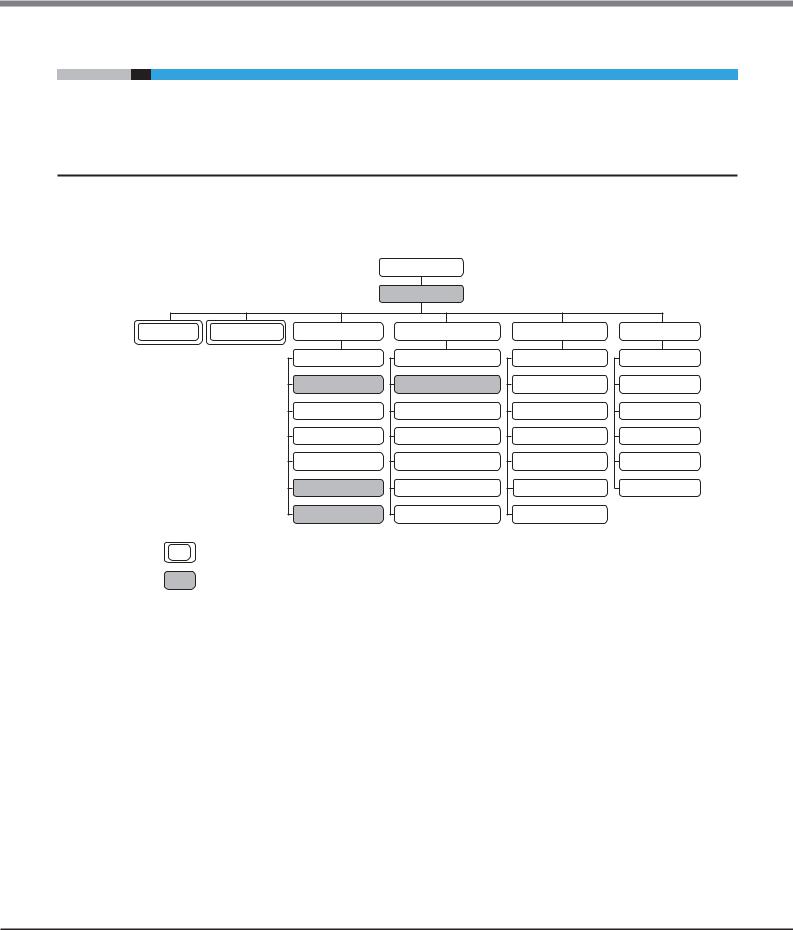
1.3.1Menu Layout of the Operator Panel
The menu layout of the operator panel is as follows.
Figure 1.5 Menu layout of the operator panel
|
|
|
Login |
|
|
|
|
|
Home |
|
|
Open Mailslot |
Open Magazine |
Configuration |
Maintenance |
Operation |
Status |
|
|
Configuration Wizard |
Library Test |
Move Media |
Library Status |
|
|
System |
View Log |
Open Mailslot |
Cartridge Inventory |
|
|
Network |
Software Upgrades |
Open Magazine |
Partition Map |
|
|
Drives |
Download Logs |
Clean Drive |
Drive Status |
|
|
Mailslot |
System Reboot |
Rescan |
Network Status |
|
|
Local User Accounts |
UID LED Control |
Force Drive Media Eject |
Security |
|
|
Web Management |
Move Robotic to Base Module |
Unlock Multiple Magazine |
|
Although the Open Mailslot menu and the Open Magazine menu are in both the Home menu and the Operation menu, they are the same functions.
Menus that have been added or changed for firmware versions 7.90 and later.
16
FUJITSU Storage ETERNUS LT260 Tape Library User’s Guide -Panel Operation-
Copyright 2019 FUJITSU LIMITED |
P3AM-8802-09ENZ0 |
Chapter 1 Overview
1.3 Menu Layout
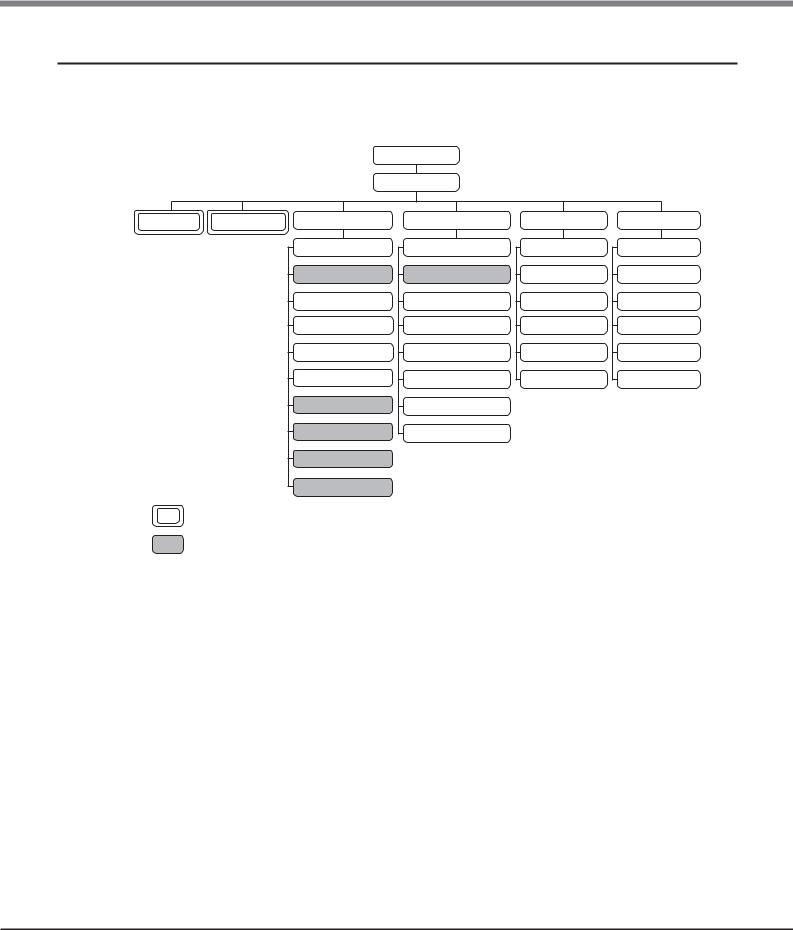
1.3.2Menu Layout of the Remote Panel
The menu layout of the remote panel is as follows.
Figure 1.6 Menu layout of the remote panel
Login
Home
Open Mailslot |
Open Magazine |
Configuration |
Maintenance |
Operation |
Status |
|
|
Initial Configuration Wizard |
Library Test |
Move Media |
Library Status |
|
|
System |
Logs and Traces |
Open Mailslot |
Cartridge Inventory |
|
|
Network |
Software Upgrades |
Open Magazine |
Partition Map |
|
|
Network Management |
Download Drive Logs |
Clean Drive |
Drive Status |
|
|
Drives |
System Reboot |
Rescan Inventory |
Network Status |
|
|
Mailslot |
Drive Reboot |
Force Drive Media Eject |
Security |
|
|
Partition |
UID LED Control |
|
|
|
|
Encryption |
Move Robotic to Base Module |
|
|
|
|
User Accounts |
|
|
|
|
|
Web Management |
|
|
|
Although the Open Mailslot menu and the Open Magazine menu are in both the Home menu and the Operation menu, they are the same functions.
Menus that have been added or changed for firmware versions 7.90 and later.
17
FUJITSU Storage ETERNUS LT260 Tape Library User’s Guide -Panel Operation-
Copyright 2019 FUJITSU LIMITED |
P3AM-8802-09ENZ0 |

Chapter 2
Operating the Library
The library provides two main interfaces:
•Operator panel
With the operator panel, you can monitor, configure, and control the library from the front panel. All operating menus are displayed on the center pane.
•Remote panel
With the remote panel, you can monitor, configure, and control the library from a web browser. The remote panel hosts a dedicated, protected Internet site that displays a graphical representation of the library. Except of top menus, operating menu tree are displayed on the right pane.
Although the operator panel is similar to the remote panel in design and functionality, some of the executable operations are different.
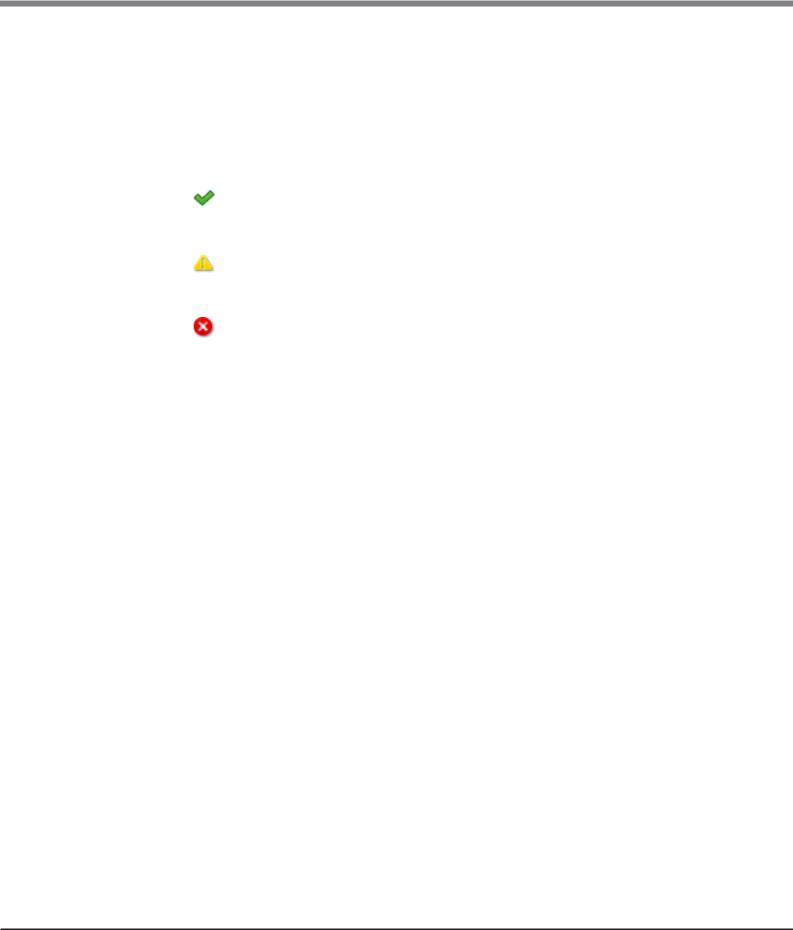
Table 2.1 shows the status icons that appear on the panels and the meaning of the icons.
Table 2.1 |
Status icons |
|
|
|
|
LED |
|
Function |
|
|
The green Status OK icon indicates that the library is fully operational and that no user interaction is |
|
|
required. |
|
|
|
|
|
The yellow exclamation point Status Warning icon indicates that user attention is necessary, but |
|
|
that the device can still perform most operations. |
|
|
|
|
|
The red X Status Error icon indicates that user intervention is required and that the device is not |
|
|
capable of performing some operations. |
|
|
|
18
FUJITSU Storage ETERNUS LT260 Tape Library User’s Guide -Panel Operation-
Copyright 2019 FUJITSU LIMITED |
P3AM-8802-09ENZ0 |

Chapter 2 Operating the Library
2.1 Using the Operator Panel
2.1Using the Operator Panel
The front panel has a power button, an LCD touch screen, and five LEDs. With the operator panel you can monitor, configure, and operate most library functions from the front panel. To navigate the operator panel, tap on the LCD touch screen.
Table 2.2 Front panel LED indicators
LED |
|
Function |
|
|
Blue when activated. The unit identification (UID) LEDs are controlled by the user through the operator |
|
|
Module ID |
panel and remote panel Maintenance > UID LED Control screen. The UIDs on the operator panel and back |
|
|
panel UID are activated and deactivated together. The UIDs are helpful for locating the library in a data |
|
||
|
|
||
|
center. |
|
|
|
|
|
|
Ready |
Green, steady when power is on, blinking with tape Ready drive or library robotic activity. |
|
|
|
|
|
|
Clean |
Amber when a tape drive cleaning operation is recommended. |
|
|
|
|
|
|
Attention |
Amber if the library has detected a condition for which user attention is necessary, but that the library can |
|
|
still perform most operations. |
|
||
|
|
||
|
|
|
|
Error |
Amber if an unrecoverable tape drive or library error occurs. A corresponding error message is displayed |
|
|
on the LCD screen. User intervention is required; the library is not capable of performing some operations. |
|
||
|
|
||
|
|
|
|
|
|
|
|
|
|
|
|
The operator panel screen may be initialized if time elapses without logging in or during the logout process. As a feature, the operator panel turns white for a few seconds during the initialization of the screen and then login screen appears.
19
FUJITSU Storage ETERNUS LT260 Tape Library User’s Guide -Panel Operation-
Copyright 2019 FUJITSU LIMITED |
P3AM-8802-09ENZ0 |
Chapter 2 Operating the Library
2.2 Using the Remote Panel
2.2Using the Remote Panel
With the remote panel, you can monitor, configure, and operate most library functions from a web browser.
When possible, it is recommended that the remote panel be used as the primary library interface because compared to the operations of the operator panel, the web interface provides access to additional features, such as online help, and is easier to use. However, the remote panel is not required to use the product, except to configure advanced features, such as SNMP, IPv6, encryption, and partitions.
Before using the remote panel, you must configure the library network settings and set the administrator password with the operator panel. This can be done with the Initial Configuration Wizard. See "2.5.1 Using the Initial Configuration Wizard" (page 27).
To start the remote panel, open the latest version of a supported web browser and enter the IP address of the library in the browser’s address bar. Supported browsers include Internet Explorer (version 10 or later is recommended), Firefox, Chrome and Safari.
Check the online help in the remote panel for additional information. The help pages are updated with firmware updates and often contain up-to-date technical details that might not be contained in this document.
To access remote panel help, click the  icon on the right side of the remote panel top banner.
20
FUJITSU Storage ETERNUS LT260 Tape Library User’s Guide -Panel Operation-
Copyright 2019 FUJITSU LIMITED |
P3AM-8802-09ENZ0 |
Chapter 2 Operating the Library
2.3 Logging into the Library
2.3Logging into the Library
Figure 2.1 Login
Procedure
1Operator panel: If the operator panel screen saver is on, tap the screen.
Remote panel: Open a supported web browser and enter the IP address of the library in the browser’s address bar.
2Select the User.
3If required, enter the Password.
4Click Login.
End of procedure
The user levels are:
•user
The initial password is "std00001". The user account provides access to status information, but not configuration, maintenance or operation functions. The administrator account can be used to set the user account password, and allow or forbid the use of some of the operation functions by the user account. Based on the firmware version, refer to "2.5.15 Configuring User Account Settings (for Firmware Versions 7.80 and Earlier)" (page 58), or "2.5.16 Configuring User Account Settings (for Firmware Versions 7.90 and Later)" (page 60) for details.
•administrator
The administrator password is required to login as the administrator user. The same administrator password is used for the remote panel and operator panel. The initial administrator password is "adm00001". The administrator user has access to all functionality except for the log configuration and Service features.
21
FUJITSU Storage ETERNUS LT260 Tape Library User’s Guide -Panel Operation-
Copyright 2019 FUJITSU LIMITED |
P3AM-8802-09ENZ0 |
Chapter 2 Operating the Library
2.3 Logging into the Library
From a security perspective, changing the default password immediately after starting the library is recommended.
When logging in for the first time, change the password using the Initial Configuration Wizard or change the password with the user account settings.
Refer to "2.5.1 Using the Initial Configuration Wizard" (page 27), "2.5.15 Configuring User Account Settings (for Firmware Versions 7.80 and Earlier)" (page 58), or "2.5.16 Configuring User Account Settings (for Firmware Versions 7.90 and Later)" (page 60) for details.
•service
Access to this user is by Service personnel only. The service password is set at the factory. The same service password is used for the remote panel and operator panel. Both the administrator and service passwords are required for a service person to enter the service area.
•security
In addition to the functions that are available when logged in as the administrative user, the key management function can be set. After the Key Management Function Option is purchased, the setting for the key management function is available.
The initial password is "security". However, this password can only be used to log in from the operator panel.
After the initial password is changed on the operator panel, the password can then also be used to log in from the remote panel.
Basically, only one user can log in to the library regardless of whether the user logs in from the remote panel or operator panel.
If a user is currently logged in, a warning message appears. Select whether to continue the login process.
•Select Leave to stop the login process.
•Select Login to continue the login process and forcibly log the currently logged in user out.
As an exception, only the "user" user account can log in to the library regardless of whether other users are logged in.
Note that if no operation is performed for a certain period of time, the user is forcibly logged out.
22
FUJITSU Storage ETERNUS LT260 Tape Library User’s Guide -Panel Operation-
Copyright 2019 FUJITSU LIMITED |
P3AM-8802-09ENZ0 |
Chapter 2 Operating the Library
2.4 Using the Library Home Screen
2.4Using the Library Home Screen
The library home screen is organized into the following regions:
•Top banner
Contains the home button and displays the overall status and information about the library and user.
•Left pane
Displays the library identity and module status.
•Center pane
Provides access to operate and configure the library and to view additional status information.
•Right pane (remote panel only) Displays a log of recent events.
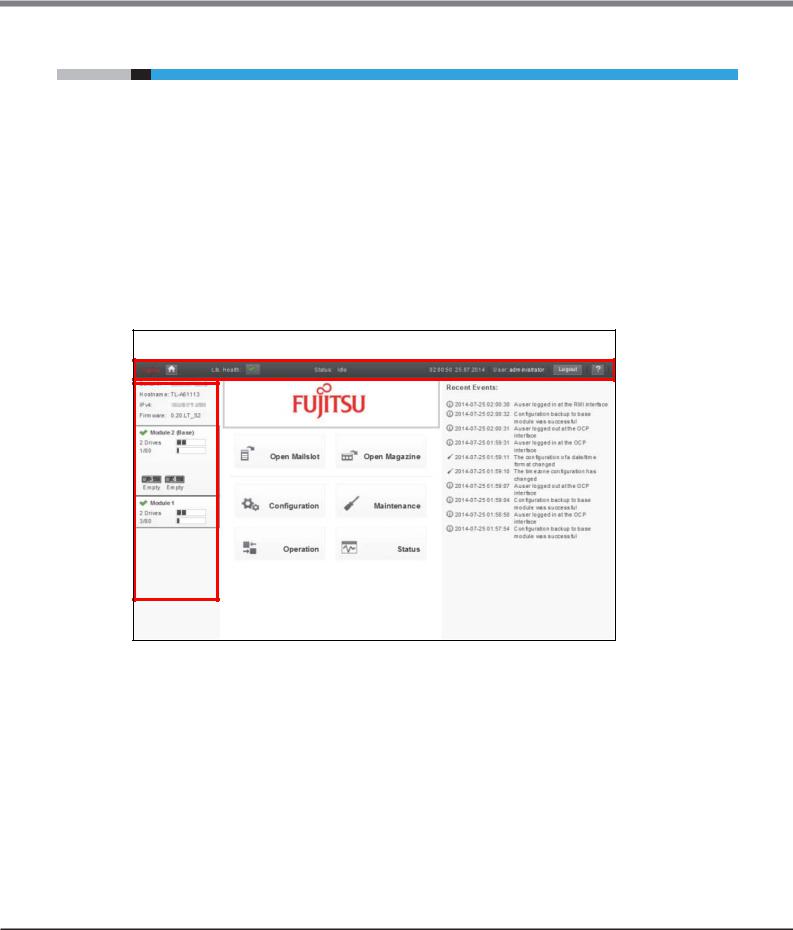
Figure 2.2 Home screen
Top banner
|
|
|
|
|
|
|
|
|
|
|
|
|
|
|
|
|
|
|
|
|
|
|
|
|
|
|
|
|
|
|
|
Left pane |
Center pane |
|
|
Right pane |
|||
23
FUJITSU Storage ETERNUS LT260 Tape Library User’s Guide -Panel Operation-
Copyright 2019 FUJITSU LIMITED |
P3AM-8802-09ENZ0 |

Chapter 2 Operating the Library
2.4 Using the Library Home Screen
2.4.1Top Banner Elements
•  (Home Icon)
Returns to the library home screen.
•Library Health
An icon indicating the overall health status of the library
-
The green check mark Status OK icon indicates that all library components are fully operational and that no user intervention is required.
-
The yellow triangle exclamation point Status Warning icon indicates that user attention is necessary, but that the library can still perform most operations. Click the icon to display the event ticket log.
-
The red circle X Status Error icon indicates that user intervention is required and the library is not capable of performing some operations. Click the icon to display the event ticket log.
•Status
The status of the library robotic
-Idle
The library robotic is ready to perform an action.
-Moving
The library robotic is moving a cartridge.
-Scanning
The library robotic is performing an inventory of cartridges.
-Offline
The robotic assembly is being used by the library or is disabled.
•Library Time & Date
Helpful when analyzing event logs and support tickets, and might be needed when contacting support.
•User
The user account for this session
•Logout
Logs out of this session.
• 
Accesses online help.
2.4.2Left Pane Elements
•Library Status
Overall library confirmation and status
-Serial #
The base module serial number
-Hostname
The library hostname
24
FUJITSU Storage ETERNUS LT260 Tape Library User’s Guide -Panel Operation-
Copyright 2019 FUJITSU LIMITED |
P3AM-8802-09ENZ0 |
Chapter 2 Operating the Library
2.4Using the Library Home Screen
-Network Configuration
The IP version (IPv4 or IPv6) and IP address
-Firmware
The library firmware version
•Module Status Overviews
A summary of each module’s configuration and health. Click or tap the module status area to select the module.
-Module Health Icon
•
The green check mark Status OK icon indicates that the module and each of its components are fully operational and that no user intervention is required.
•
The yellow triangle explanation point Status Warning icon indicates that user attention is necessary, but that the library can still perform most operations.
•
The red circle X Status Error icon indicates that user intervention is required and the module is not capable of performing some operations.
-Module Number
Modules are numbered based on their location in the physical library. The bottom module is Module 1. The base module is annotated with (Base).
-Tape Drive Status
The number of tape drives installed in the module and the health of each tape drive. Click or tap on the tape drive to display the tape drive configuration and status information in the center pane.
•A black square indicates that the tape drive is fully operational and that no user intervention is required.
•A yellow square indicates that user attention is necessary, but that the tape drive can still perform most operations.
•A red square indicates that user intervention is required or the tape drive is not capable of performing some operations.
-Magazine Slot Usage
The number of cartridge slots available and the number in use.
-Tape Drive Operation Status
The current tape drive activity for each tape drive in the module. The tape drive operation status is only displayed for the selected module.
•Write
The tape drive is performing a write operation.
•Read
The tape drive is performing a read operation.
•Idle
A cartridge is in the tape drive but the tape drive is not performing an operation.
•Empty
The tape drive is empty.
•Encrypt
The tape drive is writing encrypted data.
25
FUJITSU Storage ETERNUS LT260 Tape Library User’s Guide -Panel Operation-
Copyright 2019 FUJITSU LIMITED |
P3AM-8802-09ENZ0 |

Chapter 2 Operating the Library
2.4 Using the Library Home Screen
2.4.3Center Panel Elements
•Open Mailslot (Non-user account)
Click or tap to unlock the mailslot on the selected module. Mailslots must be enabled before the slots can be used as mailslots. See "2.5.12 Enabling or Disabling Mailslots" (page 51).
•Open Magazine (Non-user account)
Click or tap to unlock a magazine in the selected module. Only one magazine in the library can be open at a time. See "2.7.3 Opening a Magazine" (page 102).
•Configuration (Non-user account)
Click or tap to configure the library. See "2.5 Configuring the Library" (page 27).
•Maintenance (Non-user account)
Click or tap to access maintenance functions. See "2.6 Maintaining the Library" (page 82).
•Operation (Non-user account)
Click or tap to access operation functions. See "2.7 Operating the Library" (page 99).
•Status
Click or tap to access status information. See "2.8 Viewing Status Information" (page 106).
26
FUJITSU Storage ETERNUS LT260 Tape Library User’s Guide -Panel Operation-
Copyright 2019 FUJITSU LIMITED |
P3AM-8802-09ENZ0 |
Chapter 2 Operating the Library
2.5 Configuring the Library
2.5Configuring the Library
Click or tap [Configuration] in the home screen to access the library configuration function. From the list displayed in the center pane in the operator panel or the right pane in the remote panel, select the item to configure. Refer to "1.3 Menu Layout" (page 16) for the items.
For items with a sub-menu, click or tap the item to expand the sub-menu.
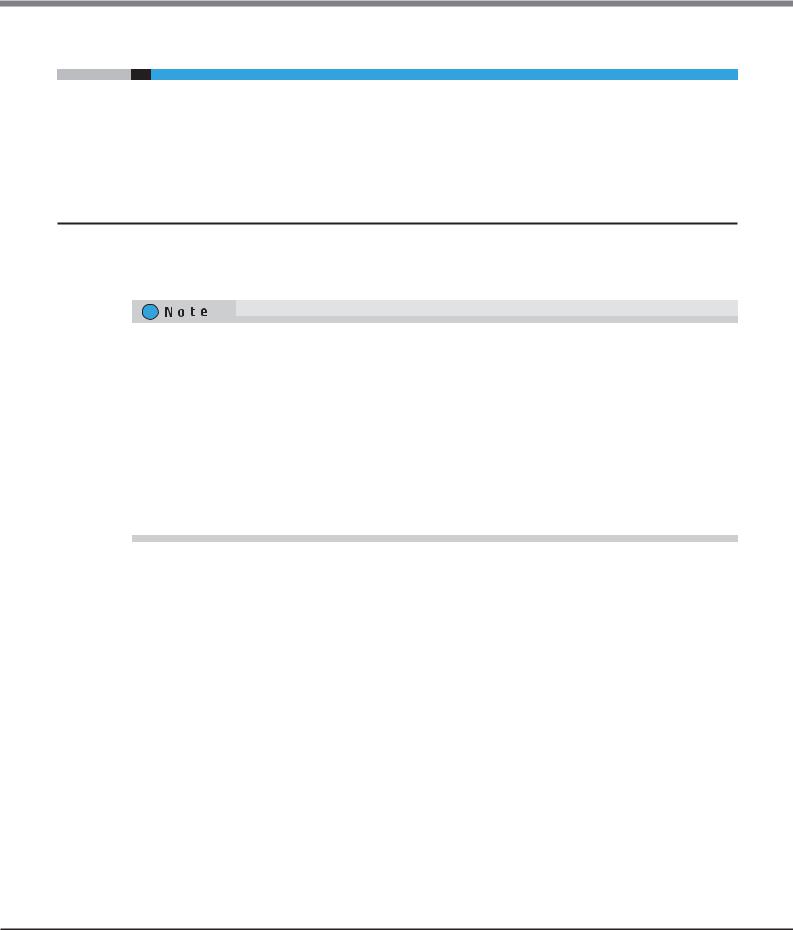
2.5.1Using the Initial Configuration Wizard
The wizard guides you through setting the administrator password, configuring the time zone, date and time, and library network settings. When logging in to the remote panel for the first time, performing a configura-
tion using this function is recommended.
The items that can be configure by this function can also be configured individually. To configure an item individually, refer to the following as required.
•Administrator password
"2.5.15 Configuring User Account Settings (for Firmware Versions 7.80 and Earlier)" (page 58) or "2.5.16 Configuring User Account Settings (for Firmware Versions 7.90 and Later)" (page 60)
•Timezone
"2.5.3.1 Setting the Time Zone" (page 34)
•Date and time
"2.5.3.2 Setting the Date and Time Format" (page 35)
•Library network settings
"2.5.8 Configuring the Library Network Settings" (page 42)
27
FUJITSU Storage ETERNUS LT260 Tape Library User’s Guide -Panel Operation-
Copyright 2019 FUJITSU LIMITED |
P3AM-8802-09ENZ0 |
Chapter 2 Operating the Library
2.5 Configuring the Library
To configure the library, perform the following procedure.
Procedure
1In the [Configuration > System] screen, click "Initial Configuration Wizard" in the right pane to start the wizard.
2Click [Next].
To skip the configuration, click [Next] without entering any information. To go back to the previous item, click [Back]. To cancel the configuration, click [Cancel].
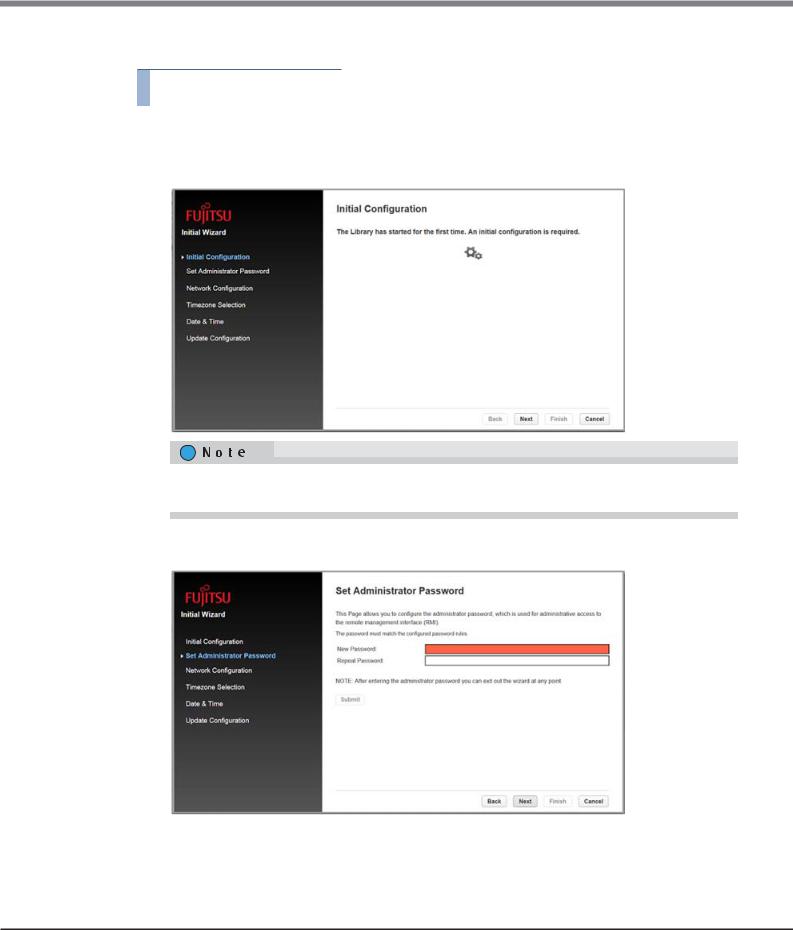
3Set the administrator password.
Enter the password twice and click [Submit]. When the setting is completed, click [Next].
28
FUJITSU Storage ETERNUS LT260 Tape Library User’s Guide -Panel Operation-
Copyright 2019 FUJITSU LIMITED |
P3AM-8802-09ENZ0 |

Chapter 2 Operating the Library
2.5 Configuring the Library
4Configure the network settings.
Enter a value for the required items and then click [Next].
Enter values according to the selected [Protocol].
When directly entering an Internet address, select Static for [Method] and enter a value in each item. When automatically obtaining an Internet address from a DHCP server, select DHCP (for IPv4) or Stateless (for IPv6).
5Configure the timezone
Select a timezone location from [Timezone Lists]. For location names that start with ">", a sub-menu is displayed in the right pane when selected and a more detailed location can be selected. After selecting a timezone, click [Next].
For example, select [Asia > Tokyo] to set the timezone to Japan Standard Time.
29
FUJITSU Storage ETERNUS LT260 Tape Library User’s Guide -Panel Operation-
Copyright 2019 FUJITSU LIMITED |
P3AM-8802-09ENZ0 |
Chapter 2 Operating the Library
2.5 Configuring the Library
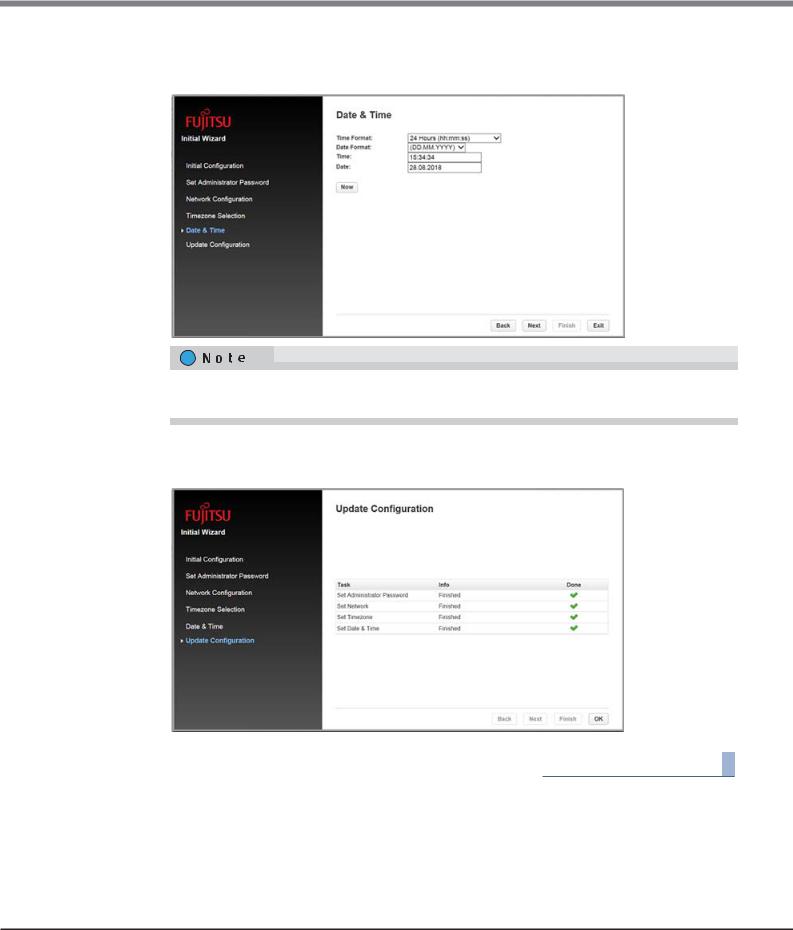
6Configure the date and time.
Select a time format for [Time Format] and a date format for [Date Format], enter the date and time, and then click [Next].
By pressing the [Now] button, the date and time are synchronized with the PC and automatically entered.
7Click [Finish].
8Confirm the result of the configuration and click [OK] to complete the configuration.
End of procedure
30
FUJITSU Storage ETERNUS LT260 Tape Library User’s Guide -Panel Operation-
Copyright 2019 FUJITSU LIMITED |
P3AM-8802-09ENZ0 |
Loading...