


 Loading...
User’s Guide
Guided’utilisation
Learn how to use your Fujitsu STYLISTIC® M532 Android Tablet
Découvrez comment utiliser votre tablette Android Fujitsu STYLISTIC® M532

User’s
Guide
Learn how to use your Fujitsu STYLISTIC® M532 Android Tablet

Copyright and Trademark Information
Fujitsu America, Inc.has made every effort to ensure the accuracy and completeness of this document. Because ongoing development efforts are made to continually improve the capabilities of our products, however, the data contained herein represents Fujitsu design objectives and is provided for comparative purposes; actual results may vary based on a variety of factors. This product data does not constitute a warranty. Specifications are subject to change without knowledge.
Fujitsu and the Fujitsu logo are registered trademarks of Fujitsu Limited; STYLISTIC is a registered trademark of Fujitsu America, Incorporated.
Google, the Google Logo, Android, the Android Logo, Android Market, the Android Market Logo, Google Play, the Google Play Logo, Gmail, the Gmail Logo, Google Mail, the Google Mail Logo, Google Latitude, YouTube, the YouTube Logo and Picasa are registered trademarks of Google Incorporated.
Adobe Reader is a trademark of Adobe Systems Incorporated.
NVIDIA and Tegra are trademarks and/or registered trademarks in the United States and other countries. Absolute and Computrace are registered trademarks of Absolute Software Corporation.
Norton is a trademark of Symantec Corporation in the United States and other countries. Bluetooth and the Bluetooth logo are registered trademarks of Bluetooth SIG, Inc.
All rights reserved, including intellectual property rights. Subject to technical alterations. Delivery subject to availability. No warranty is offered or liability accepted in regard of the completeness, correctness, or current applicability of any data or illustrations. Brand names may be protected trademarks of the respective manufacturer and/or protected by copyright. Use of these by third parties for their own purposes may constitute an infringement of the holders’ rights.
Copyright 2012 Fujitsu America, Incorporated. All rights reserved. No part of this publication may be copied, reproduced, or translated, without the prior written consent of Fujitsu America, Incorporated. No part of this publication may be stored or transmitted in any electronic form without the prior consent of Fujitsu America, Incorporated. B6FJ-9251-01ENZ0-00

DECLARATION OF CONFORMITY according to FCC Part 15
Responsible Party Name: |
Fujitsu America, Inc. |
Address: |
1250 E. Arques Avenue |
|
Sunnyvale, CA 94085 |
Telephone: |
(408) 746-6000 |
Declares that product: |
Base Model Configuration: STYLISTIC M532 Android Tablet |
|
Complies with Part 15 of the FCC Rules. |
This device complies with Part 15 of the FCC rules. Operations are subject to the following two conditions:
(1) This device may not cause harmful interference, (2) This device must accept any interference received, including interference that may cause undesired operation.
IMPORTANT SAFETY INSTRUCTIONS
This unit requires an AC adapter to operate. Use only UL Listed I.T.E. Class II Adapters with an output rating of 19 VDC, with a current of 1.58 A (30 W).
AC adapter output polarity: |
+ |
When using your tablet, basic safety precautions should always be followed to reduce the risk of fire, electric shock and injury to persons, including the following:
CAUTION: HOT SURFACE: THE BOTTOM OF THIS COMPUTER CAN BECOME HOT WHEN USED FOR LONG PERIODS OF TIME. WHEN USING THIS DEVICE, TAKE CAUTION TO LIMIT LONG TERM OR CONTINUOUS USE WHILE RESTING IT ON EXPOSED SKIN, SUCH AS THE LAP.
•Do not use this product near water for example, near a bathtub, washbowl, kitchen sink or laundry tub, in a wet basement or near a swimming pool.
•Use only the power cord and batteries indicated in this manual. Do not dispose of batteries in a fire. They may explode. Check with local codes for possible special disposal instructions.

SAVE THESE INSTRUCTIONS
For Authorized Repair Technicians Only
DANGER OF EXPLOSION IF LITHIUM (CLOCK) BATTERY IS INCORRECTLY REPLACED. REPLACE ONLY WITH THE SAME OR EQUIVALENT TYPE RECOMMENDED BY THE MANUFACTURER. DISPOSE OF USED BATTERIES ACCORDING TO THE MANUFACTURER’S INSTRUCTION.
FOR CONTINUED PROTECTION AGAINST RISK OF FIRE, REPLACE ONLY WITH THE SAME TYPE AND RATING FUSE.

Contents
About This Guide . . . . . . . . . . . . . . . . . . . . . . . . . . . . . . . . . . . . . . . . . . . . . .8
Conventions Used in the Guide . . . . . . . . . . . . . . . . . . . . . . . . . . . . . . . . 8
Fujitsu Contact Information . . . . . . . . . . . . . . . . . . . . . . . . . . . . . . . . . . . 9
Chapter 1 Getting to Know Your Android Tablet
Overview. . . . . . . . . . . . . . . . . . . . . . . . . . . . . . . . . . . . . . . . . . . . . . . . . . . . .10
Locating the Connectors and Controls. . . . . . . . . . . . . . . . . . . . . . . . . . . . .11
Front Features. . . . . . . . . . . . . . . . . . . . . . . . . . . . . . . . . . . . . . . . . . . . . . 11 Back Features . . . . . . . . . . . . . . . . . . . . . . . . . . . . . . . . . . . . . . . . . . . . . . 13
Chapter 2 Getting Started with Your Android Tablet
First-time setup of your tablet. . . . . . . . . . . . . . . . . . . . . . . . . . . . . . . . . . .15
Unpacking and checking the device . . . . . . . . . . . . . . . . . . . . . . . . . . . . 16 Selecting a suitable location . . . . . . . . . . . . . . . . . . . . . . . . . . . . . . . . . . 16 Power Sources . . . . . . . . . . . . . . . . . . . . . . . . . . . . . . . . . . . . . . . . . . . . . . 16 Turning on the system the first time . . . . . . . . . . . . . . . . . . . . . . . . . . . . 17
5
Chapter 3 Working with Your Android Tablet
Tablet Features . . . . . . . . . . . . . . . . . . . . . . . . . . . . . . . . . . . . . . . . . . . . . . 18
Battery charging indicator . . . . . . . . . . . . . . . . . . . . . . . . . . . . . . . . . . . . 18 Turning the Tablet On and Off . . . . . . . . . . . . . . . . . . . . . . . . . . . . . . . . . 19 Touchscreen . . . . . . . . . . . . . . . . . . . . . . . . . . . . . . . . . . . . . . . . . . . . . . . 19 Background lighting . . . . . . . . . . . . . . . . . . . . . . . . . . . . . . . . . . . . . . . . . 19 Selecting display orientation . . . . . . . . . . . . . . . . . . . . . . . . . . . . . . . . . . 19 Android Tablet buttons . . . . . . . . . . . . . . . . . . . . . . . . . . . . . . . . . . . . . . . 20 Web Cams . . . . . . . . . . . . . . . . . . . . . . . . . . . . . . . . . . . . . . . . . . . . . . . . . 21 Rechargeable battery . . . . . . . . . . . . . . . . . . . . . . . . . . . . . . . . . . . . . . . . 21
User-Installable Devices . . . . . . . . . . . . . . . . . . . . . . . . . . . . . . . . . . . . . . . 23
Memory cards . . . . . . . . . . . . . . . . . . . . . . . . . . . . . . . . . . . . . . . . . . . . . . 23
Switching the wireless components on and off . . . . . . . . . . . . . . . . . . . . 24
WLAN and Bluetooth . . . . . . . . . . . . . . . . . . . . . . . . . . . . . . . . . . . . . . . . 24 GPS. . . . . . . . . . . . . . . . . . . . . . . . . . . . . . . . . . . . . . . . . . . . . . . . . . . . . . . 24
Using the optional cradle . . . . . . . . . . . . . . . . . . . . . . . . . . . . . . . . . . . . . . 25
Setting up the Cradle . . . . . . . . . . . . . . . . . . . . . . . . . . . . . . . . . . . . . . . . 25
Chapter 4 Working with Android
Getting Started with Android . . . . . . . . . . . . . . . . . . . . . . . . . . . . . . . . . . . 29
Initial setup of your device with Android . . . . . . . . . . . . . . . . . . . . . . . . . 29 Home Page . . . . . . . . . . . . . . . . . . . . . . . . . . . . . . . . . . . . . . . . . . . . . . . . 30 Navigating on the home page . . . . . . . . . . . . . . . . . . . . . . . . . . . . . . . . . 31 Customizing the home page . . . . . . . . . . . . . . . . . . . . . . . . . . . . . . . . . . 32 Operation . . . . . . . . . . . . . . . . . . . . . . . . . . . . . . . . . . . . . . . . . . . . . . . . . 33 Settings . . . . . . . . . . . . . . . . . . . . . . . . . . . . . . . . . . . . . . . . . . . . . . . . . . . 39 System updates. . . . . . . . . . . . . . . . . . . . . . . . . . . . . . . . . . . . . . . . . . . . . 47 Apps. . . . . . . . . . . . . . . . . . . . . . . . . . . . . . . . . . . . . . . . . . . . . . . . . . . . . . 49
6 -
Chapter 5 Connecting External Devices
Peripheral Device Connections . . . . . . . . . . . . . . . . . . . . . . . . . . . . . . . . . . 52
Connecting USB devices . . . . . . . . . . . . . . . . . . . . . . . . . . . . . . . . . . . . . . 52 HDMI port . . . . . . . . . . . . . . . . . . . . . . . . . . . . . . . . . . . . . . . . . . . . . . . . . 53 Headphone/Microphone port . . . . . . . . . . . . . . . . . . . . . . . . . . . . . . . . . . 54
Chapter 6 Troubleshooting Your Android Tablet
Troubleshooting. . . . . . . . . . . . . . . . . . . . . . . . . . . . . . . . . . . . . . . . . . . . . . 55
Identifying the Problem . . . . . . . . . . . . . . . . . . . . . . . . . . . . . . . . . . . . . . 55
Using the Reset Button. . . . . . . . . . . . . . . . . . . . . . . . . . . . . . . . . . . . . . . 56
Specific Problems . . . . . . . . . . . . . . . . . . . . . . . . . . . . . . . . . . . . . . . . . . . 57
Chapter 7 System Specifications
Specifications . . . . . . . . . . . . . . . . . . . . . . . . . . . . . . . . . . . . . . . . . . . . . . . . 59
Android Tablet. . . . . . . . . . . . . . . . . . . . . . . . . . . . . . . . . . . . . . . . . . . . . . 59
Rechargeable Battery . . . . . . . . . . . . . . . . . . . . . . . . . . . . . . . . . . . . . . . . 61
AC Adapter. . . . . . . . . . . . . . . . . . . . . . . . . . . . . . . . . . . . . . . . . . . . . . . . . 61
Optional Cradle . . . . . . . . . . . . . . . . . . . . . . . . . . . . . . . . . . . . . . . . . . . . . 62
Chapter 8 Regulatory Information
For Android Tablets without radio device . . . . . . . . . . . . . . . . . . . . . . . . . . . . . 63 For Android Tablets with radio device . . . . . . . . . . . . . . . . . . . . . . . . . . . . . . . . 64
7 -

Preface
About This Guide
The STYLISTIC→ M532 Android Tablet offers innovative technology and an ergonomic design, making it a reliable and convenient companion. The responsive touch screen design and on-screen keyboard allow you to interact with it easily and enjoyably. The STYLISTIC M532 was pre-installed with the Android™ operating system along with many useful applications.
The STYLISTIC M532 Android Tablet is a completely self-contained unit with a 10.1” TFT WXGA high-brightness LED, front and rear web cameras, and an NVIDIA® Tegra® processor.
This manual explains how to operate your Android Tablet hardware and built-in system software.
Conventions Used in the Guide
Pages with additional information about a specific topic are cross-referenced within the text.
On screen buttons or menu items appear in bold. Example: Click OK to restart your Android Tablet.
THE INFORMATION ICON HIGHLIGHTS INFORMATION THAT WILL ENHANCE YOUR UNDERSTANDING OF THE SUBJECT MATERIAL.
THE CAUTION ICON HIGHLIGHTS INFORMATION THAT IS IMPORTANT TO THE SAFE OPERATION OF YOUR COMPUTER, OR TO THE INTEGRITY OF YOUR FILES. PLEASE READ ALL CAUTION INFORMATION CAREFULLY.
8

THE WARNING ICON HIGHLIGHTS INFORMATION THAT CAN BE HAZARDOUS TO EITHER YOU, YOUR TABLET, OR YOUR FILES. PLEASE READ ALL WARNING INFORMATION CAREFULLY.
Fujitsu Contact Information
Service and Support
You can contact Fujitsu Service and Support in the following ways:
•Toll free: 1-800-8Fujitsu (1-800-838-5487)
•Website: http://solutions.us.fujitsu.com/www/content/support/contact/index.php
Before you place the call, you should have the following information ready so that the customer support representative can provide you with the fastest possible solution:
•Product name
•Product configuration and serial numbers
•Purchase date
•Conditions under which the problem occurred
•Any error messages that have occurred
•Type of device connected, if any
Fujitsu Shopping Online
You can go directly to the online by going to the website at: www.shopfujitsu.com.
Limited Warranty
Your STYLISTIC M532 Android Tablet is backed by a Fujitsu International Limited Warranty. Check the service kit that came with your tablet for the Limited Warranty period and terms and conditions.
9 - About This Guide
Chapter 1
Getting to Know Your Android Tablet
Overview
The STYLISTIC→ M532 Android Tablet is a highly-efficient computer that has been designed to support the Android™ 4.0 operating system.
This chapter presents the individual hardware components of your device. It gives you an overview of the tablet’s indicators and connections. Please familiarize yourself with these components before you start to work with the device.
Figure 1. STYLISTIC M532 Android Tablet
10

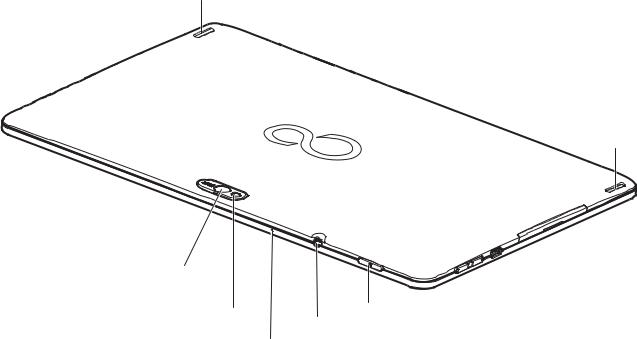
Locating the Connectors and Controls
Features and controls that you use to operate your Android Tablet are outlined below and illustrated in Figures 2 and 3. Details on using these features and controls are provided later in this manual.
Front Web Camera
Display
Battery Charging Indicator
Connector for Docking Cradle |
Ambient Light Sensor |
|
|
and AC Adapter |
Volume Buttons |
|
|
|
Micro-USB Port |
|
Reset Button (under cover) |
|
Micro SD Card Slot (under cover) |
Figure 2. STYLISTIC M532 Android Tablet Features (Bottom, Right View)
Front Features Front Web Camera
The front-facing VGA web camera allows you to take pictures of yourself to send over the internet.
Display
The 10.1” Wide XGA display offers wide vertical and horizontal viewing angles.
11 - Locating the Connectors and Controls
Battery Charging Indicator
The battery charging indicator displays the current power condition of the internal battery. (See “Battery charging indicator” on page 18).
Ambient Light Sensor
The ambient light sensor automatically recognizes lighting conditions and adjusts the display to provide optimum battery life.
Volume Buttons
The volume buttons allow you to adjust the system volume. (See “Android Tablet buttons” on page 20).
Micro-USB Port
The Micro USB port allows you to connect a USB device by using a Micro USB adapter (See “Connecting USB devices” on page 52).
Reset Button
The Reset Button allows you to do a hard reset of your system in the event the device no longer reacts to input or the ON/OFF switch. (See “Using the Reset Button” on page 56)
Micro SD Card Slot
The Micro SD card allows you to save data on removable Micro SD memory cards. (See “Memory cards” on page 23)
Docking Cradle and AC Adapter Connector
Allows you to connect the optional STYLISTIC Docking Cradle (see “Using the optional cradle” on page 25) or an AC Adapter (see“Power Sources” on page 16).
12 - Locating the Connectors and Controls
Stereo Speaker
Stereo Speaker
Rear Web Camera |
|
|
Photoflash |
On/Off Switch |
|
Headphone/Microphone Port |
||
|
Microphone
Figure 3. STYLISTIC M532 Android Tablet Features (Back View)
Back Features
Stereo Speakers
The built-in dual speakers allow for stereo sound.
On/Off Switch
The On/Off Switch allows you to power your system on and off (see “Turning on the system the first time” on page 17).
13 - Locating the Connectors and Controls
Headphone/Microphone Port
The headphone/microphone port allows you to set up connect headphones, a microphone or external loudspeakers to your Android Tablet. (See “Headphone/Microphone port” on page 54)
Microphone
The internal microphone allows you to record audio files.
Photoflash
The Photoflash acts as a flash device when you are using the rear-facing web camera.
Rear Web Camera
The rear web camera allows you to take pictures of objects in front of you for sharing over the internet.
14 - Locating the Connectors and Controls

Chapter 2
Getting Started with Your Android Tablet
First-time setup of your tablet
• |
THE NECESSARY HARDWARE DRIVERS AND THE SUPPLIED SOFTWARE FOR THE DEVICE ARE ALREADY PRE-INSTALLED. |
• |
BEFORE YOU SWITCH ON THE DEVICE FOR THE FIRST TIME, CONNECT IT TO THE POWER USING THE AC ADAPTER. THE AC ADAPTER MUST BE |
|
CONNECTED DURING THE ENTIRE INSTALLATION PROCESS. |
• A SYSTEM TEST IS PERFORMED WHEN YOUR DEVICE IS FIRST SWITCHED ON. VARIOUS MESSAGES CAN APPEAR. THE DISPLAY MAY REMAIN DARK FOR A SHORT TIME OR MAY FLICKER.
•PLEASE FOLLOW THE INSTRUCTIONS ON THE SCREEN.
•NEVER SWITCH OFF YOUR DEVICE DURING THE FIRST-TIME SETUP PROCESS.
The battery is permanently installed in the system and must be charged if you want to use your device under battery operation.
When used on the move, the built-in battery provides the device with the necessary power. You can increase the operating time by using the available energy-saving functions.
Please refer to “Connecting External Devices” on page 52 for instructions on how to connect external devices (e.g., mouse, flash storage) to your device.
15

Unpacking and checking the device
SHOULD YOU DISCOVER ANY MISSING ITEMS OR DAMAGE THAT OCCURRED DURING TRANSPORTATION, CONTACT YOUR SUPPORT REPRESENTATIVE:
TOLL FREE: 1-800-8FUJITSU (1-800-838-5487)
WEB SITE: HTTP://SOLUTIONS.US.FUJITSU.COM/WWW/CONTENT/SUPPORT/CONTACT/INDEX.PHP
1 Unpack all the individual parts from the packing box.
2Check your device and peripherals for any visible damage which may have occurred during transportation.
3Save the packaging in the event you need it to transport your system in the future.
Selecting a suitable location
There are several factors to consider when choosing a location for your system. Please observe the following precautions when doing so.
• |
NEVER PLACE THE DEVICE OR THE AC ADAPTER ON A HEAT-SENSITIVE SURFACE. THE SURFACE COULD BE DAMAGED AS A RESULT. |
• |
THE UNDERSIDE OF THE DEVICE HEATS UP DURING NORMAL OPERATION. PROLONGED CONTACT WITH THE SKIN MAY BECOME UNPLEASANTLY |
|
HOT. |
•
•
Power Sources
KEEP OTHER OBJECTS AT LEAST 100 MM AWAY FROM THE DEVICE AND ITS AC ADAPTER TO ENSURE ADEQUATE VENTILATION.
DO NOT EXPOSE THE DEVICE TO EXTREME ENVIRONMENTAL CONDITIONS. PROTECT THE DEVICE AGAINST DUST, HUMIDITY AND HEAT.
Your Fujitsu STYLISTIC Android Tablet has three possible power sources: an internal Lithium Polymer battery, an AC adapter or an optional docking cradle.
16 - First-time setup of your tablet
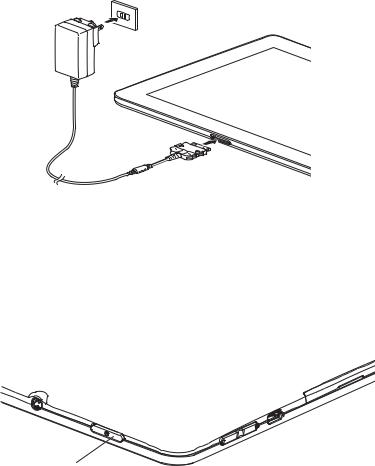
Connecting the AC Adapter
The AC adapter provides power for operating your Android Tablet and charges the battery.
1 Plug the AC Adapter cable into the AC Adapter connector on the bottom edge of your tablet. (Figure 4)
2 Plug the AC adapter into an AC electrical outlet.
Figure 4. Connecting the AC Adapter
Turning on the system the first time
When you switch on the device for the first time, the supplied software is installed and configured. Because this procedure must NOT be interrupted, you should set aside enough time for it to be fully completed and connect the device to power using the AC adapter.
During the installation process, DO NOT restart the device unless you are requested to do so. To make it easier to use your device for the first time, the operating system is pre-installed.
1Press the On/Off switch (1) for 2 seconds to switch the Android Tablet on.
2During installation, follow the instructions on screen.
On/Off Switch
Figure 5. Powering on the system
17 - First-time setup of your tablet

Chapter 3
Working with Your Android Tablet
This chapter describes the basics for operating your Android Tablet. Even if you are already familiar with operating a computer, you should read this chapter to ensure you are familiar with all of the features.
Tablet Features
Battery charging indicator
When the AC adapter is connected, the battery charging indicator provides information on the state of the power supply.
Battery LED |
Description |
|
Condition |
||
|
||
Red, lit |
The battery is being charged |
|
White, lit |
The battery is 100% charged |
Battery Charging Indicator
Figure 6. Battery Charging Indicator
18

Turning the Tablet On and Off
To turn the tablet on: Press the On/Off switch (Figure 7) for two seconds. The tablet may vibrate slightly while it is starting up.
To turn the tablet off: Press the On/Off switch until a
message appears asking if you want to turn off the tablet. Confirm that you do. The tablet may vibrate slightly while it is shutting down.
On/Off Switch
Figure 7. Powering the system on and off
Touchscreen
High-quality TFT displays are installed in Fujitsu Android Tablets. TFT monitors are manufactured for a specific resolution. An optimal, clear picture can only be ensured with the correct resolution intended for the relevant TFT monitor. A monitor resolution that differs from the specification can result in an unclear picture.
The screen resolution of your Android Tablet’s touchscreen is optimally set at the factory.
Background lighting
TFT monitors are operated with background lighting. The luminosity of the background lighting can decrease while the tablet is in use; however, you can set the brightness of your monitor individually.
Selecting display orientation
You can choose to use either portrait (vertical) or landscape (horizontal) orientation for the display.
The alignment of the screen adapts automatically to the alignment in which you are using the tablet. If you hold the tablet in portrait orientation, the image will be shown in portrait format. If you hold the tablet in landscape orientation, the image will be shown in landscape format.
If you want to disable automatic matching of the alignment, proceed as follows:
19 - Tablet Features
1 From All apps, select the Settings option and select Display.
2Uncheck Auto-rotate screen. When the checkmark on the setting disappears, automatic alignment matching is disabled.
3To re-enable matching of the alignment, tap again on the setting Auto-rotate screen. When the checkmark on the setting appears, automatic alignment matching is enabled.
Android Tablet buttons
Your tablet has three tablet buttons: On/Off, Volume Up and Down, and Reset.
|
On/Off Switch |
|
Volume Button - Up |
|
Volume Button - Down |
|
Reset Button |
|
Figure 8. Tablet Buttons |
Button |
Description |
On/Off Switch |
Switch the tablet on and off |
Volume Button - Up |
Increase the volume |
Volume Button - Down |
Decrease the volume. |
Reset Button |
If the device no longer reacts to input and does not respond to the ON/OFF switch, use the |
|
Reset button to restart the device (See “Using the Reset Button” on page 56.). |
20 - Tablet Features
Web Cams
Your device has two web cams: one on the front side of the device and one on the rear.
Depending on the software used, you can use your web cam to take pictures, record video clips or take part in web chats.
•The picture quality depends on the lighting conditions and the software being used.
•You can only operate the webcam with a particular application (e.g., an Internet telephony program or a video conferencing program which supports a webcam).
•When using the webcam, the tablet support must not wobble.
•The webcam automatically adjusts itself to the current light level. For this reason the touchscreen may flicker while the light level is b e i n g adjusted.
Rechargeable battery
For mobile use, the built-in battery provides the tablet with the necessary power. You can increase the life of the battery by caring for the battery properly. The average battery life is around 500 charge/discharge cycles. In the event you should need to have your battery replaced, please contact your Fujitsu Support Representative.
You can also extend the battery life by taking advantage of the available energy saving functions.
Charging, caring for and maintaining the battery
The Android Tablet battery can only be charged when the ambient temperature is between 5°C and 35°C.
You can charge the battery by connecting the tablet to the AC adapter (see “Power Sources” on page 16).
If the battery is running low you will hear a warning alarm. If you do not connect the AC adapter within five minutes of the warning alarm described above, your tablet will switch off automatically.
Monitoring the battery charging level
In the system bar / status display there is a battery symbol shown for monitoring the battery capacity. The battery symbol shows you the remaining battery charge.
21 - Tablet Features
Using the power-management features
The Android Tablet uses less power when the power management features are enabled. Thatallowsyou to work longer when using the battery before having to recharge it.
When you use the power-management features, power efficiency is increased and environmental pollution reduced. By choosing the best power options, you can make significant savings while helping to protect the environment.
We recommend the following settings: Hibernate the Tablet after 5 minutes without activity.
To change your power settings, select Settings > Display and set the desired value for Hibernate.
When the Android Tablet is in power saving mode, you must remember the following:
• During power saving mode, open files are held in the main memory or in a swap file.
•Never switch off the tablet while it is in a power saving mode. If the built-in battery is nearly discharged, close the open files and do not go into power saving mode.
If you do not intend to use your tablet for a long period of time:
•Exit the power saving mode if necessary via touching the screen or by switching on the tablet.
•Close all opened programs and completely shut down the tablet.
22 - Tablet Features
User-Installable Devices
Memory cards
Your Android Tablet is equipped with an integrated memory card reader. Be sure to observe the manufacturer’s instructions when handling memory cards.
Supported format
The memory card reader supports the following format:
• MicroSD Card™
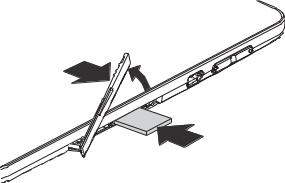
Inserting a memory card
To insert a MicroSD card:
1 |
Open the slot cover (Figure 9, #1). |
|
2 |
Position the card so that the card label is facing upwards. |
|
3 |
Gently push the memory card into the slot (Figure 9, #2) until |
1 |
|
you feel it click into place. Do not use too much force, otherwise |
|
|
the sensitive contact surfaces could be damaged. |
|
4 |
Replace the slot cover. |
2 |
Figure 9. Inserting a MicroSD Card
23 - User-Installable Devices

Removing a memory card
It is very important that the correct procedure be used for removing the memory card. Failure to do so could result in data loss.
To remove a MicroSD card, you must log the memory card out of the system before you can remove it. Proceed as follows:
1Select Settings > Memory. In Memory, all the memory components are displayed.
2Select Remove SD card.
3Confirm the message with OK. The memory card is logged out.
4Press the memory card slightly inwards so that the catch disengages.
5Pull the memory card out of the slot (Figure 10, #1).
6Replace the slot cover (Figure 10, #2)10
2


 1
1
Figure 10. Removing a MicroSD Card
Switching the wireless components on and off
WLAN and Bluetooth
1Select Settings.
2Set the switch for WLAN or Bluetooth to ON.
3Click on WLAN and select your preferred network.
4Click on Bluetooth and select the Bluetooth device with which you would like to connect your tablet.
GPS
Your device is equipped with an integrated GPS module. With the aid of suitable software, you can therefore use your device as a navigation system.
24 - Switching the wireless components on and off
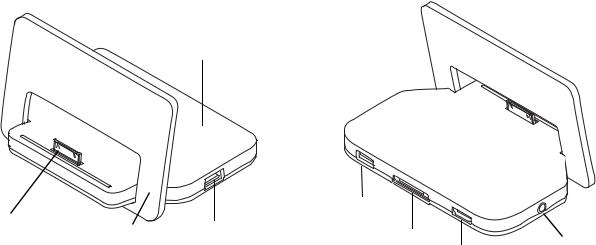
Using the optional cradle
The optional cradle is a device with which you can quickly connect your Android Tablet to your peripheral devices such as a display screen, keyboard, mouse, headphones, etc.
You only need to dock the tablet in order to work with your peripheral devices.
Cradle Base
Docking |
|
|
USB Port |
|
Cradle Easel |
USB Port |
|
|
|
Connector |
DC In |
Line Out |
||
|
|
|
HDMI Port |
|
|
|
|
|
|
|
Figure 11. Cradle - Front |
|
Figure 12. Cradle - Rear |
|
|
|
Figure 13. Docking Cradle Components |
|
|
Setting up the Cradle
Select a suitable location for the cradle before setting it up. Observe the following conditions when doing so:
•Place the cradle on a flat, stable, non-slippery surface.
•Never place the cradle and the AC adapter on a heat-sensitive surface.
•Do not expose the cradle to extreme environmental conditions.
•Protect the cradle from dust, humidity and heat.
25 - Using the optional cradle

Assembling the Cradle
The cradle consists of two pieces: The cradle base and the cradle easel.
To assemble the cradle, simply slide the narrow end of the base into the slot in the easel until the notches in the bottom of the base are aligned above the alignment point. Rest the base on the easel.
Cradle Base
Alignment |
Cradle Easel |
Alignment
Figure 14. Assembling the Cradle
Connecting the Tablet to the Cradle
• IF YOU CONNECT THE TABLET TO THE CRADLE DURING OPERATION, PROBLEMS CAN OCCUR. WE RECOMMEND THAT YOU SWITCH OFF THE TABLET BEFOREHAND.
• IF THE TABLET IS CONNECTED TO THE CRADLE, YOU MUST CONNECT THE AC ADAPTER TO THE CRADLE IN ORDER TO CHARGE OR POWER THE TABLET.
1 Switch off the tablet.
26 - Using the optional cradle

2If connected, remove the AC adapter cable from the DC In connector on the rear of the cradle base (Figure 16).
3Position the tablet so that the docking connector on the bottom of the unit is aligned with the docking connector on the cradle base (Figure 15).
4 |
Push the tablet onto the cradle in the direction of the arrow until it engages with the plug. |
5 |
Plug the AC adapter into the DC In connector on the rear of the cradle. |
6 |
Plug the AC adapter cable into an AC socket. |
AC Adapter
Docking |
|
Connector |
DC In |
|
|
Figure 15. Connecting the tablet to the cradle |
Figure 16. Powering the tablet with the cradle |
27 - Using the optional cradle
Disconnecting the Tablet from the Cradle
If you connect the tablet to the cradle during operation, problems can occur. We recommend that the tablet be switched off or that the appropriate undocking function provided by the operating system is executed.
1Switch off the tablet.
2Lift the tablet from the cradle while supporting the underneath of the cradle.
28 - Using the optional cradle

Chapter 4
Working with Android
Getting Started with Android
Your Android Tablet is pre-installed with the Android 4.0 operating system and many useful apps. Android 4.0 has been specially optimized for the operation of Android Tablets using the finger, so that you will quickly become familiar with it, without any long training periods.
Initial setup of your device with Android
When you switch on your device for the first time the welcome page is displayed. Follow the onscreen instructions. You can choose your language on the welcome screen. If you wish to set another language, select it from the menu by tapping on it and then confirm with Start.
You will be asked for your Google account information during the installation process. If you have not already set this up, you can do so now.
YOU CAN SKIP SETTING UP THE GOOGLE ACCOUNT AND PUT YOUR ANDROID TABLET INTO OPERATION WITHOUT A GOOGLE ACCOUNT.
HOWEVER, SOME APPLICATIONS REQUIRE THAT A GOOGLE ACCOUNT IS SET UP, FOR INSTANCE GMAIL / GOOGLE MAIL. YOU CAN SET UP THE GOOGLE ACCOUNT AT A LATER TIME (“PERSONAL SETTINGS” ON PAGE 42). WHEN YOU SET UP A GOOGLE ACCOUNT, ALL EMAILS, CONTACTS, CALENDAR EVENTS AND OTHER DATA WHICH ARE LINKED TO THIS ACCOUNT WILL AUTOMATICALLY BE SYNCHRONISED WITH YOUR TABLET.
When the installation process is complete, the home page will be displayed.
29
Loading...