


S11
Table of contents
 Loading...
PowerLite
®
S11/X12/X15 User's Guide


Contents
Introduction to Your Projector ................................................................................................................... 9
Setting Up the Projector ........................................................................................................................... 24
Projector Features................................................................................................................................ 9
Product Box Contents.................................................................................................................... 10
Additional Components ................................................................................................................ 11
Optional Equipment and Replacement Parts................................................................................. 12
Warranty and Registration Information .......................................................................................... 13
Notations Used in the Documentation ................................................................................................ 13
Where to Go for Additional Information .............................................................................................. 13
Projector Part Locations ..................................................................................................................... 14
Projector Parts - Front/Top ............................................................................................................ 14
Projector Parts - Rear .................................................................................................................... 15
Projector Parts - Base.................................................................................................................... 19
Projector Parts - Control Panel ...................................................................................................... 19
Projector Parts - Remote Control................................................................................................... 22
Projector Placement........................................................................................................................... 24
Projector Setup and Installation Options ....................................................................................... 24
Projection Distance........................................................................................................................ 26
Projector Connections........................................................................................................................ 27
Connecting to Computer Sources.................................................................................................. 28
Connecting to a Computer for USB Video and Audio................................................................ 28
Connecting to a Computer for VGA Video................................................................................. 29
Connecting to a Computer for HDMI Video and Audio.............................................................. 30
Connecting to a Computer for USB Mouse Control................................................................... 31
Connecting to a Computer for Sound........................................................................................ 32
Connecting to Video Sources ........................................................................................................ 33
Connecting to an HDMI Video Source ...................................................................................... 33
Connecting to a Component-to-VGA Video Source .................................................................. 34
Connecting to a Composite Video Source ................................................................................ 35
Connecting to an S-Video Video Source................................................................................... 36
3

Connecting to a Video Source for Sound .................................................................................. 37
Connecting to an External Computer Monitor................................................................................ 38
Connecting to External Speakers .................................................................................................. 38
Connecting to External USB Devices ............................................................................................ 39
USB Device Projection.............................................................................................................. 40
Connecting a USB Device or Camera to the Projector.............................................................. 40
Selecting the Connected USB Source ...................................................................................... 41
Disconnecting a USB Device or Camera From the Projector .................................................... 41
Connecting to a Document Camera .............................................................................................. 42
Installing Batteries in the Remote Control .......................................................................................... 42
Opening the Lens Cover .................................................................................................................... 44
Using Basic Projector Features ............................................................................................................... 45
Turning On the Projector .................................................................................................................... 45
Turning Off the Projector .................................................................................................................... 47
Selecting the Language for the Projector Menus................................................................................ 49
Adjusting the Image Height ................................................................................................................ 49
Image Shape...................................................................................................................................... 51
Correcting Image Shape with the Keystone Buttons...................................................................... 51
Correcting Image Shape with the Horizontal Keystone Slider ....................................................... 53
Correcting Image Shape with Quick Corner .................................................................................. 53
Resizing the Image............................................................................................................................. 55
Focusing the Image Using the Focus Ring......................................................................................... 56
Remote Control Operation ................................................................................................................. 56
Using the Remote Control as a Wireless Mouse ........................................................................... 57
Using the Remote Control as a Presentation Pointer .................................................................... 58
Selecting an Image Source ................................................................................................................ 59
Projection Modes ............................................................................................................................... 61
Changing the Projection Mode Using the Remote Control ............................................................ 61
Changing the Projection Mode Using the Menus........................................................................... 62
Image Aspect Ratio ............................................................................................................................ 62
Changing the Image Aspect Ratio ................................................................................................. 63
Available Image Aspect Ratios ...................................................................................................... 63
Color Mode......................................................................................................................................... 64
4

Changing the Color Mode.............................................................................................................. 64
Available Color Modes................................................................................................................... 65
Turning On Auto Iris....................................................................................................................... 66
Controlling the Volume with the Volume Buttons................................................................................ 66
Projecting a Slide Show ..................................................................................................................... 67
Supported Slideshow File Types ................................................................................................... 67
Starting a Slide Show .................................................................................................................... 68
Slideshow Display Options ....................................................................................................... 70
Adjusting Projector Features ................................................................................................................... 72
Shutting Off the Picture and Sound Temporarily ................................................................................ 72
Stopping Video Action Temporarily .................................................................................................... 73
Zooming Into and Out of Images ........................................................................................................ 73
Projector Security Features................................................................................................................ 74
Password Security Types .............................................................................................................. 74
Setting a Password ................................................................................................................... 74
Selecting Password Security Types.......................................................................................... 76
Entering a Password to Use the Projector................................................................................. 76
Saving a User's Logo Image to Display..................................................................................... 78
Locking the Projector's Buttons ..................................................................................................... 79
Unlocking the Projector's Buttons ............................................................................................. 80
Installing a Security Cable ............................................................................................................. 80
Adjusting the Menu Settings .................................................................................................................... 82
Using the Projector's Menus............................................................................................................... 82
Image Quality Settings - Image Menu ................................................................................................ 83
Input Signal Settings - Signal Menu.................................................................................................... 85
Projector Feature Settings - Settings Menu........................................................................................ 87
Projector Setup Settings - Extended Menu......................................................................................... 90
Projector Information Display - Info Menu .......................................................................................... 92
Projector Reset Options - Reset Menu............................................................................................... 93
Maintaining and Transporting the Projector ........................................................................................... 95
Projector Maintenance ....................................................................................................................... 95
Cleaning the Lens.......................................................................................................................... 95
Cleaning the Projector Case.......................................................................................................... 96
5

Air Filter and Vent Maintenance .................................................................................................... 96
Cleaning the Air Filter and Vents............................................................................................... 97
Replacing the Air Filter.............................................................................................................. 97
Projector Lamp Maintenance......................................................................................................... 99
Replacing the Lamp ................................................................................................................ 100
Resetting the Lamp Timer....................................................................................................... 105
Replacing the Remote Control Batteries ..................................................................................... 106
Transporting the Projector................................................................................................................ 108
Solving Problems .................................................................................................................................... 109
Projection Problem Tips ................................................................................................................... 109
Projector Light Status ....................................................................................................................... 109
Using the Projector Help Displays .................................................................................................... 112
Solving Image or Sound Problems ................................................................................................... 112
Solutions When No Image Appears............................................................................................. 113
Solutions When Image is Incorrect Using the USB Display Function .......................................... 113
Solutions When "No Signal" Message Appears........................................................................... 114
Displaying From a PC Laptop ................................................................................................. 114
Displaying From a Mac Laptop ............................................................................................... 115
Solutions When "Not Supported" Message Appears ................................................................... 115
Solutions When Only a Partial Image Appears............................................................................ 115
Solutions When the Image is Not Rectangular ............................................................................ 116
Solutions When the Image Contains Noise or Static ................................................................... 116
Solutions When the Image is Fuzzy or Blurry .............................................................................. 117
Solutions When the Image Brightness or Colors are Incorrect .................................................... 118
Solutions When There is No Sound or Low Volume .................................................................... 119
Solving Projector or Remote Control Operation Problems ............................................................... 119
Solutions to Projector Power or Shut-Off Problems ..................................................................... 119
Solutions to Problems with the Remote Control........................................................................... 120
Solutions to Password Problems ................................................................................................. 121
Where to Get Help............................................................................................................................ 121
Technical Specifications ........................................................................................................................ 123
General Projector Specifications ...................................................................................................... 123
Projector Lamp Specifications.......................................................................................................... 125
6

Remote Control Specifications ......................................................................................................... 126
Projector Dimension Specifications.................................................................................................. 126
Projector Electrical Specifications .................................................................................................... 126
Projector Environmental Specifications............................................................................................ 127
Projector Safety and Approvals Specifications................................................................................. 127
Supported Video Display Formats.................................................................................................... 128
USB Display System Requirements................................................................................................. 130
Notices ..................................................................................................................................................... 132
Recycling.......................................................................................................................................... 132
Important Safety Information ............................................................................................................ 132
Important Safety Instructions............................................................................................................ 133
Restriction of Use ........................................................................................................................ 135
FCC Compliance Statement............................................................................................................. 136
Trademarks...................................................................................................................................... 136
Software Copyright........................................................................................................................... 137
Copyright Notice............................................................................................................................... 178
Copyright Attribution.................................................................................................................... 179
7


Introduction to Your Projector
Refer to these sections to learn more about your projector and this manual.
Projector Features
Notations Used in the Documentation
Where to Go for Additional Information
Projector Part Locations
Projector Features
The PowerLite S11, X12, and X15 projectors include these special features:
Bright, high-resolution projection system
• PowerLite S11: Up to 2600 lumens of brightness (white light output and color light output)
PowerLite X12: Up to 2800 lumens of brightness (white light output and color light output)
PowerLite X15: Up to 3000 lumens of brightness (white light output and color light output)
• PowerLite S11: Native resolution of 800 × 600 pixels (SVGA)
PowerLite X12/X15: Native resolution of 1024 × 768 pixels (XGA)
Flexible connectivity
• Plug-and-play 3-in-1 USB projection, audio, and mouse control for instant setup
• PC Free photo slide shows via connected USB memory devices (PowerLite S11/X12)
• HDMI port for computer or video device connection (PowerLite X12/X15)
• Port for connecting an external monitor (PowerLite S11) and external speakers (PowerLite S11/X15)
Easy-to-use setup and operation features
• Low total cost of ownership with longer lamp life
• Innovative horizontal keystone correction slider for flexible projector placement (PowerLite X12/X15)
• 1.2x optical zoom ratio for improved zooming capability (PowerLite X12/X15)
• Built-in closed captioning decoder
• Epson's Instant Off and Direct Power On features for quick setup and shut down
Note: The PowerLite X12 projector is shown in most illustrations in this manual, unless noted otherwise.
9
Product Box Contents
Additional Components
Optional Equipment and Replacement Parts
Warranty and Registration Information
Parent topic: Introduction to Your Projector
Related concepts
Projector Part Locations
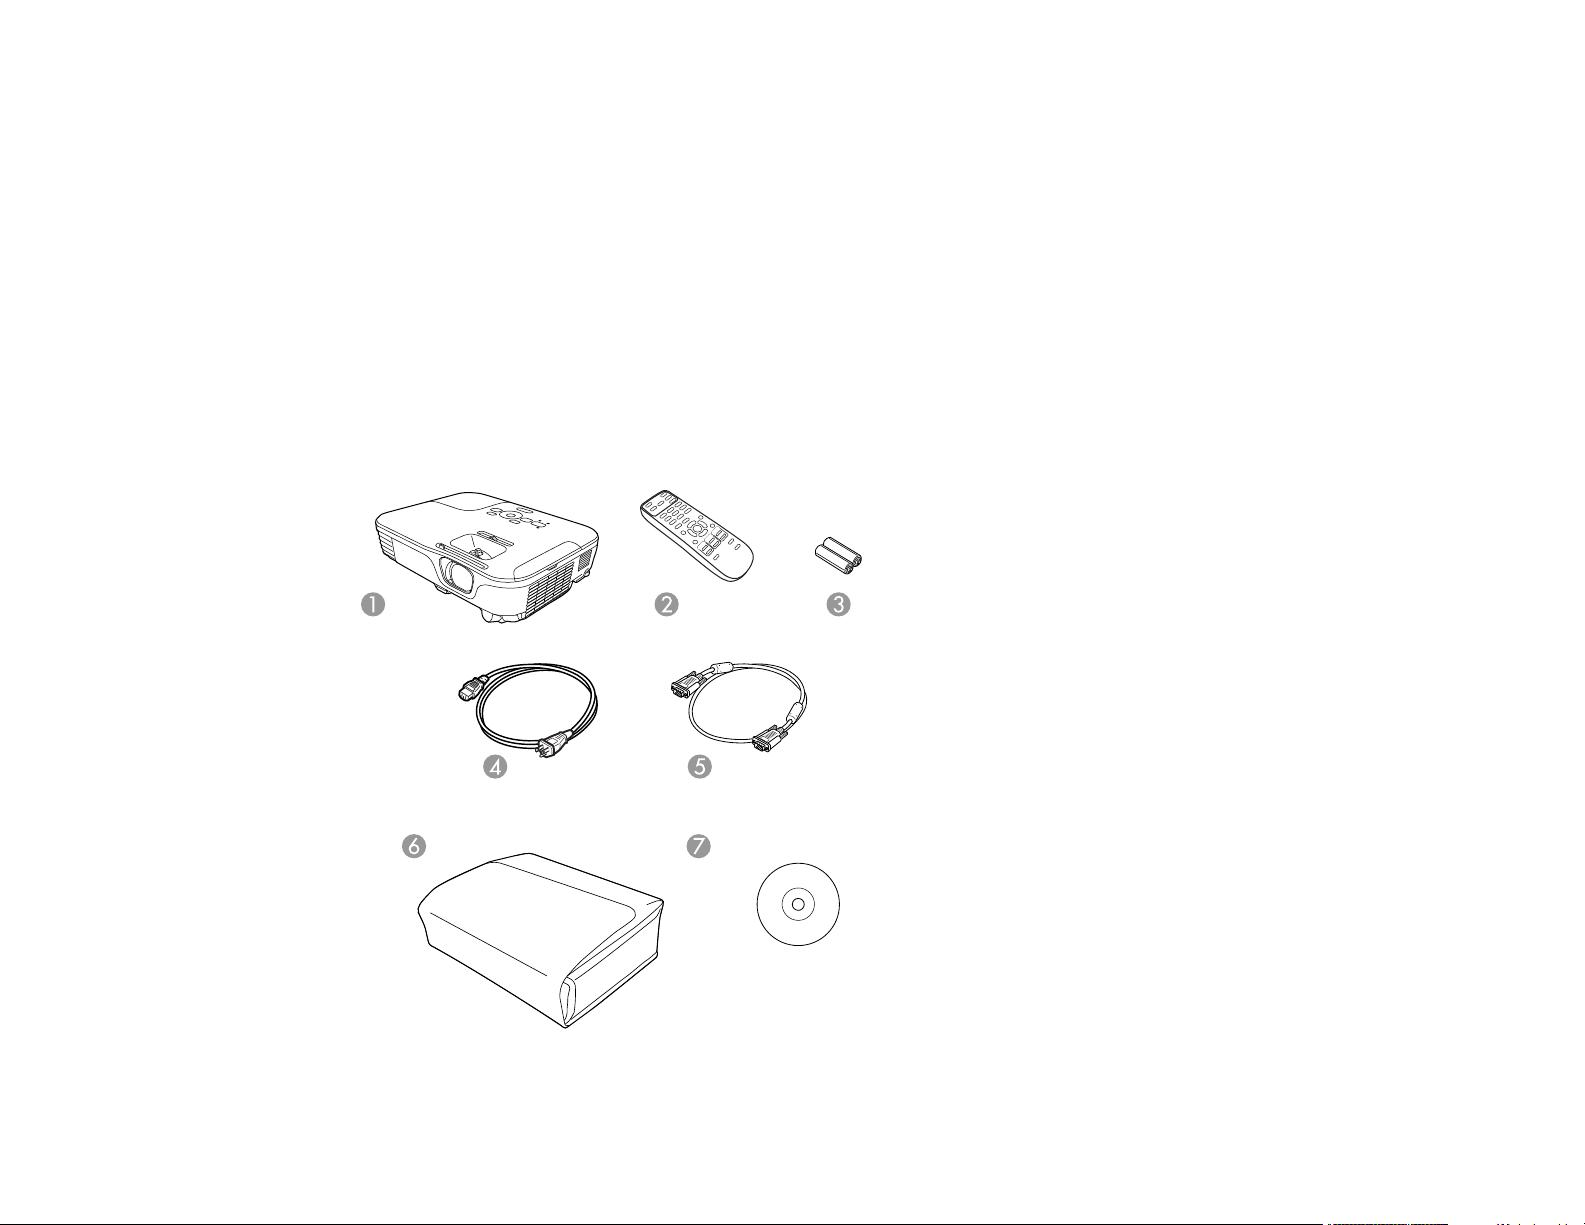
Product Box Contents
Save all the packaging in case you need to ship the projector. Always use the original packaging (or
equivalent) when shipping.
Make sure your projector box included all of these parts:
10

1 Projector
2 Remote control
3 Remote control batteries (two AA alkaline)
4 Power cord
5 VGA computer cable
6 Carrying case (PowerLite S11/X12)
7 Projector documentation CD
Parent topic: Projector Features
Additional Components
Depending on how you plan to use the projector, you may need to obtain the following additional
components:
• To receive an S-Video signal, you need an S-Video cable compatible with your device. See your local
computer or electronics dealer for purchase information.
• To receive a component video signal, you need a D-sub, 15-pin, component-to-VGA video cable. You
can purchase one from Epson or an authorized Epson reseller.
• To receive an HDMI signal, you need a compatible HDMI cable (PowerLite X12/X15). See your local
computer or electronics dealer for purchase information.
Note: To connect a Mac that includes only a Mini DisplayPort or Mini-DVI port for video output, you
need to obtain an adapter that allows you to connect to the projector's HDMI port. Contact Apple for
compatible adapter options. Older Mac computers (2009 and earlier) may not support audio through
the HDMI port.
• To project with audio from certain ports, you may need a commercially available audio cable
compatible with your device. See your local computer or electronics dealer for purchase information.
Note: To connect a Mac that includes only a Mini DisplayPort or Mini-DVI port for video output, you need
to obtain an adapter that allows you to connect to the projector's VGA video port. Contact Apple for
compatible adapter options.
Parent topic: Projector Features
11

Optional Equipment and Replacement Parts
You can purchase screens, other optional accessories, and replacement parts from an Epson authorized
reseller. To find the nearest reseller, call 800-GO-EPSON (800-463-7766). Or you can purchase online
at www.epsonstore.com (U.S. sales) or www.epson.ca (Canadian sales).
Epson offers the following optional accessories and replacement parts for your projector:
Option or part Part number
Genuine EPSON Replacement lamp (ELPLP67) V13H010L67
Air filter replacement set (2 filters; ELPAF32) V13H134A32
EPSON DC-06 document camera (ELPDC06) V12H321005
EPSON DC-11 document camera V12H377020
BrightLink Solo interactive module (IU-01) V12H415020
AP-60 Projector Sound Solution V12H329020
PixiePlus Control System ELPSP10
Accolade Duet portable projector screen ELPSC80
ES1000 Ultra Portable Tabletop Projection screen V12H002S4Y
ES3000 Ultra Portable Tabletop Projection screen V12H002S3Y
Universal projector ceiling mount ELPMBPJF
Adjustable suspended ceiling channel kit ELPMBP01
False ceiling plate kit ELPMBP02
Structural Round ceiling plate ELPMBP03
Adjustable Extension Column (pipe) 8" - 11" (20 to 28 cm) ELPMBC01
Component-to-VGA video cable (ELPKC19) V12H005C19
VGA video cable 1.8 m length ELPKC02
VGA video cable 3.0 m length ELPKC09
VGA video cable 20 m length ELPKC10
Kensington security lock ELPSL01
2-Year Extended Service Program - Exchange Service EPPEXPA1
12

Parent topic: Projector Features
Warranty and Registration Information
Your projector comes with a basic warranty that lets you project with confidence. For details, see the
warranty that came with your projector.
In addition, Epson offers free Extra Care Road Service. In the unlikely event of an equipment failure, you
won’t have to wait for your unit to be repaired. Instead, Epson will ship you a replacement unit anywhere
in the United States, Canada, or Puerto Rico. See the Extra Care Road Service brochure for details.
Register your product online using the projector CD or at this site: www.epson.com/webreg
Registering also lets you receive special updates on new accessories, products, and services.
Parent topic: Projector Features
Notations Used in the Documentation
Follow the guidelines in these notations as you read your documentation:
• Warnings must be followed carefully to avoid bodily injury.
• Cautions must be observed to avoid damage to your equipment.
• Notes contain important information about your projector.
• Tips contain additional projection information.
Parent topic: Introduction to Your Projector
Where to Go for Additional Information
Need quick help on using your projector during a presentation? Here's where to look for help:
• Built-in help system
Press the Help button on the remote control or projector to get quick solutions to common problems.
• www.epson.com/support (U.S) or www.epson.ca/support (Canada)
View FAQs (frequently asked questions) and e-mail your questions to Epson technical support 24
hours a day.
• If you still need help after checking this manual and the sources listed above, you can use the Epson
PrivateLine Support service to get help fast. For details, see "Where to Get Help".
Parent topic: Introduction to Your Projector
13
Related references
Where to Get Help
Projector Part Locations
Check the projector part illustrations to learn about the parts on your projector.
Projector Parts - Front/Top
Projector Parts - Rear
Projector Parts - Base
Projector Parts - Control Panel
Projector Parts - Remote Control
Parent topic: Introduction to Your Projector
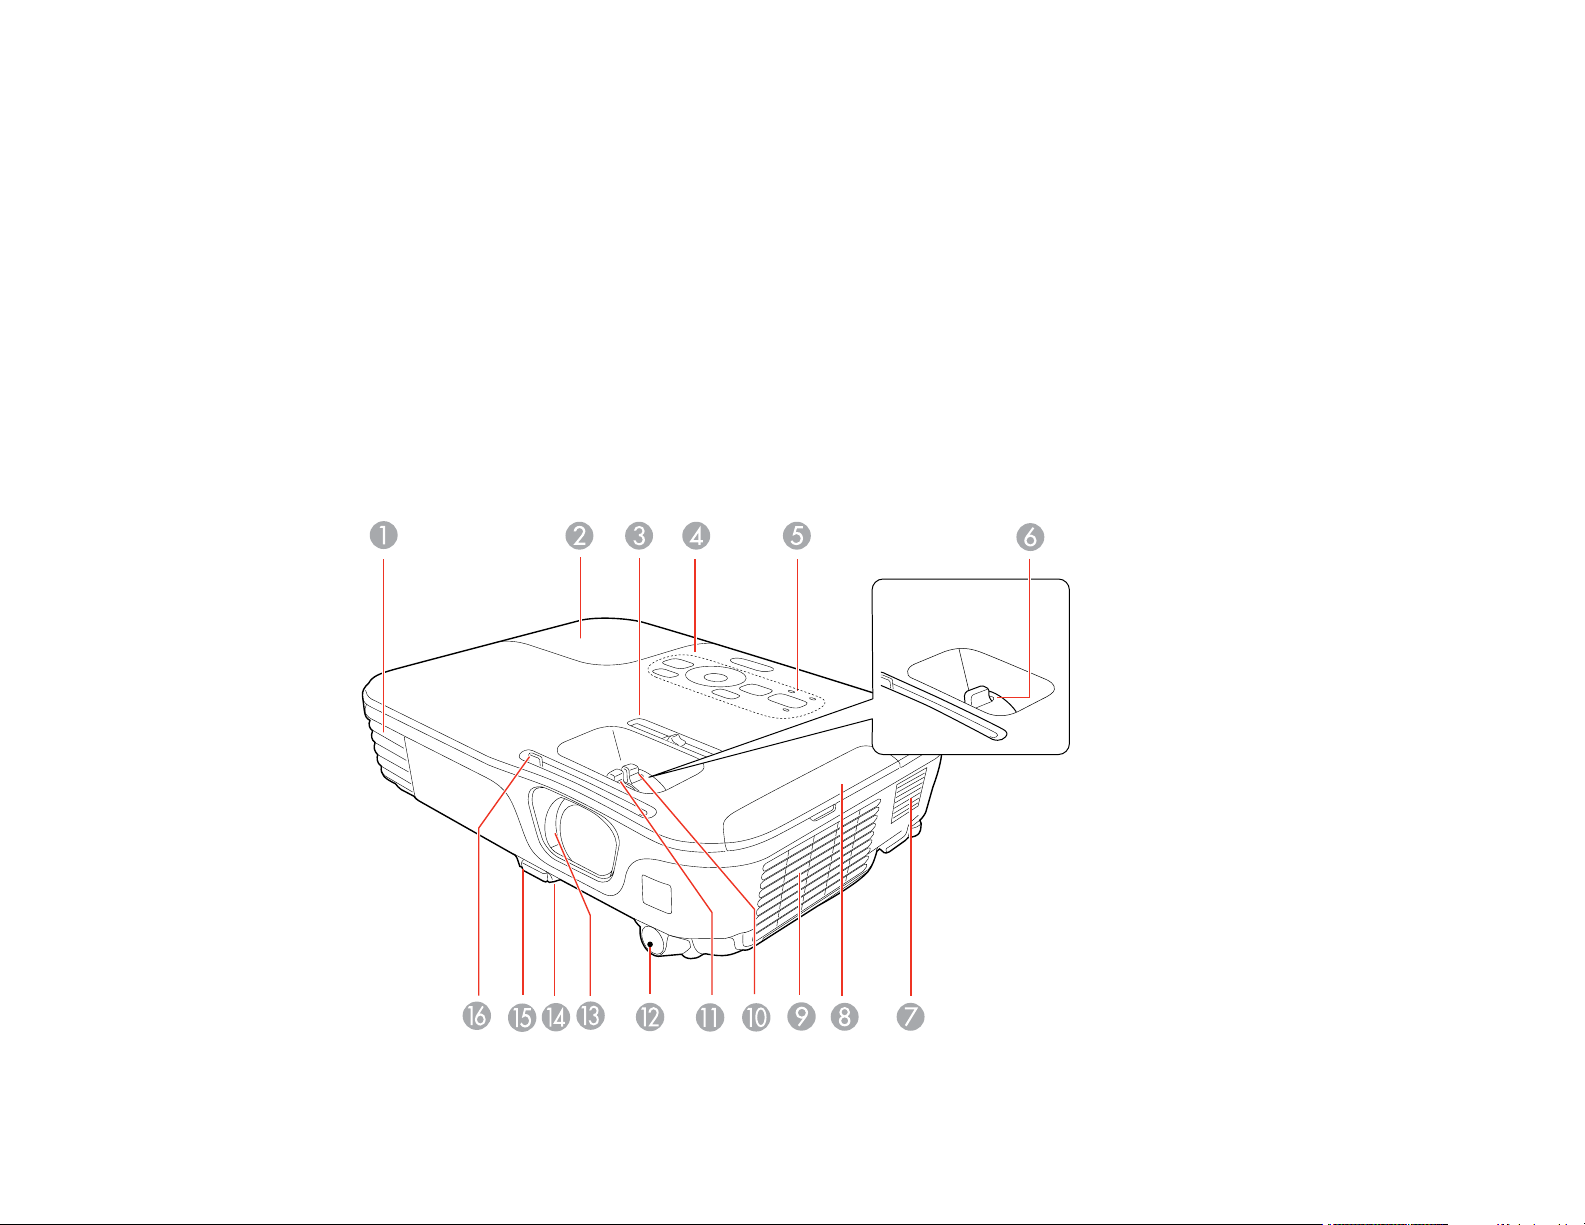
Projector Parts - Front/Top
14

1 Exhaust vent
2 Lamp cover
3 Horizontal keystone slider (PowerLite X12/X15)
4 Control panel
5 Projector status lights
6 Focus ring (PowerLite S11)
7 Speaker
8 Air filter cover
9 Intake vent
10 Zoom ring (PowerLite X12/X15)
11 Focus ring (PowerLite X12/X15)
12 Remote receiver
13 A/V Mute slide
14 Front adjustable foot
15 Foot release lever
16 A/V Mute slide lever
Parent topic: Projector Part Locations
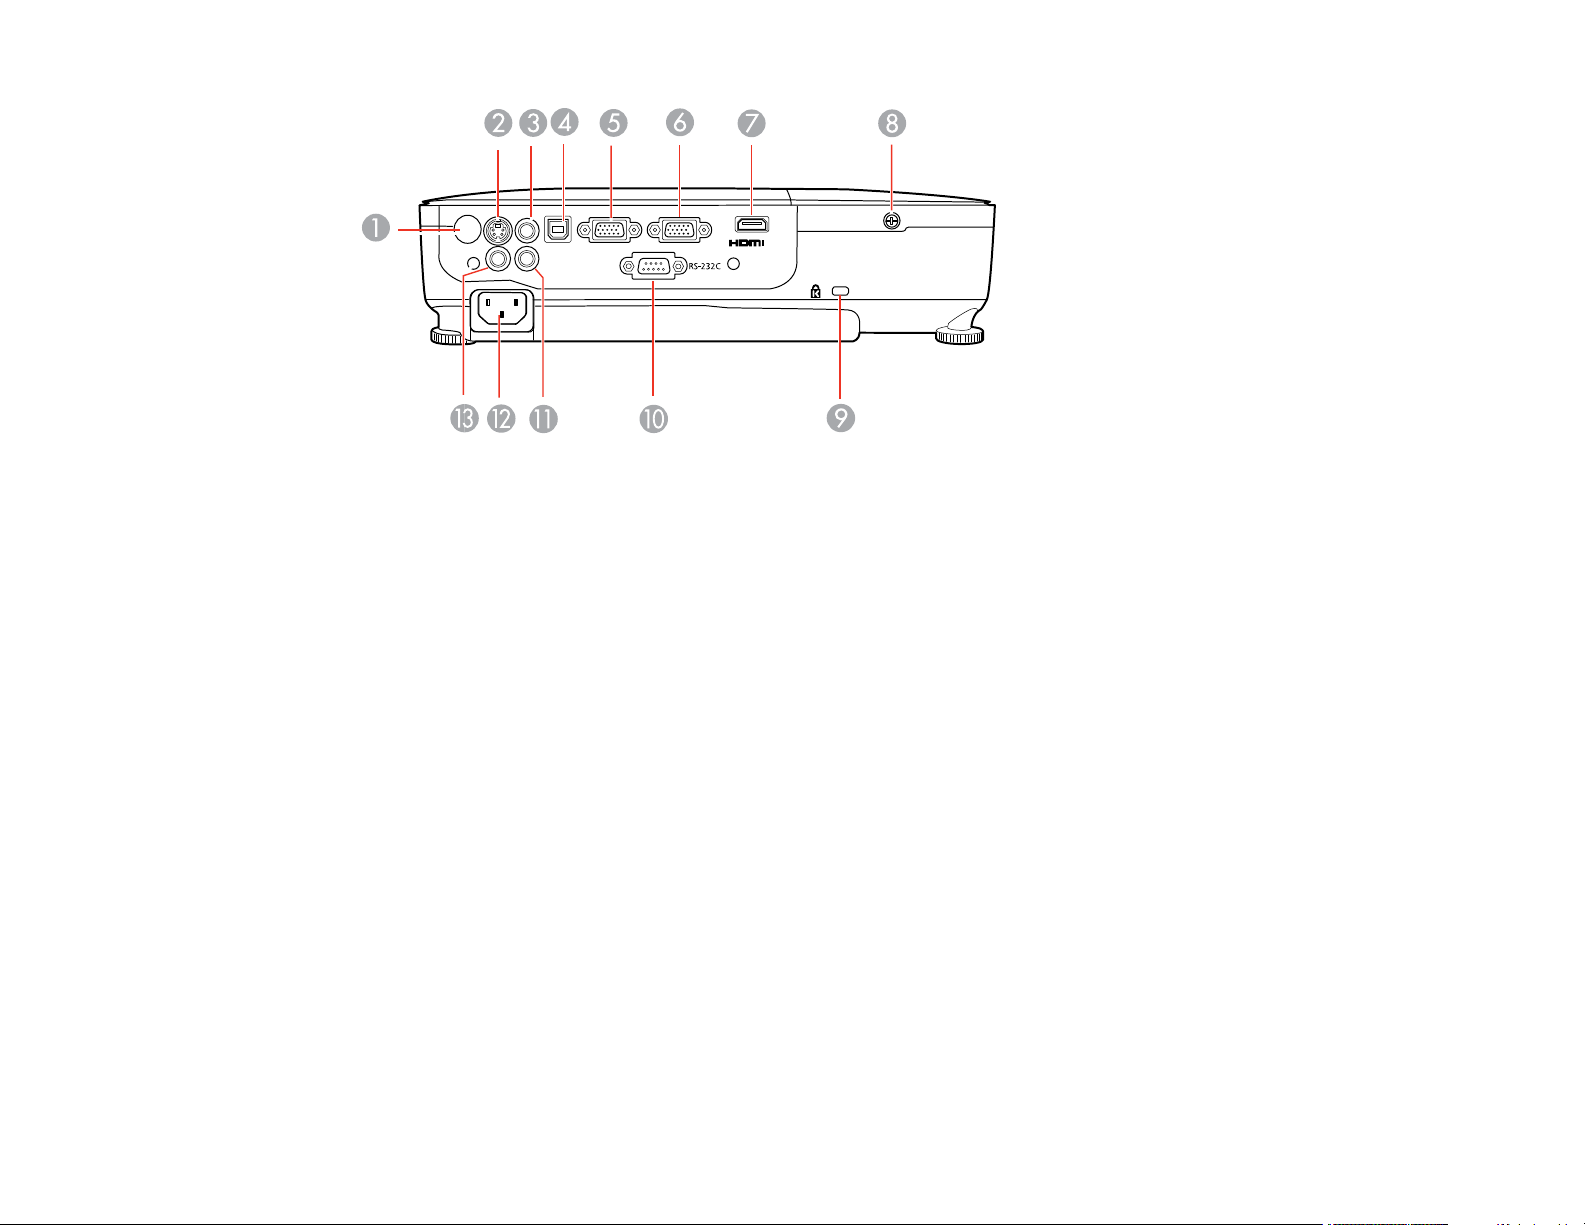
Projector Parts - Rear
PowerLite S11
15
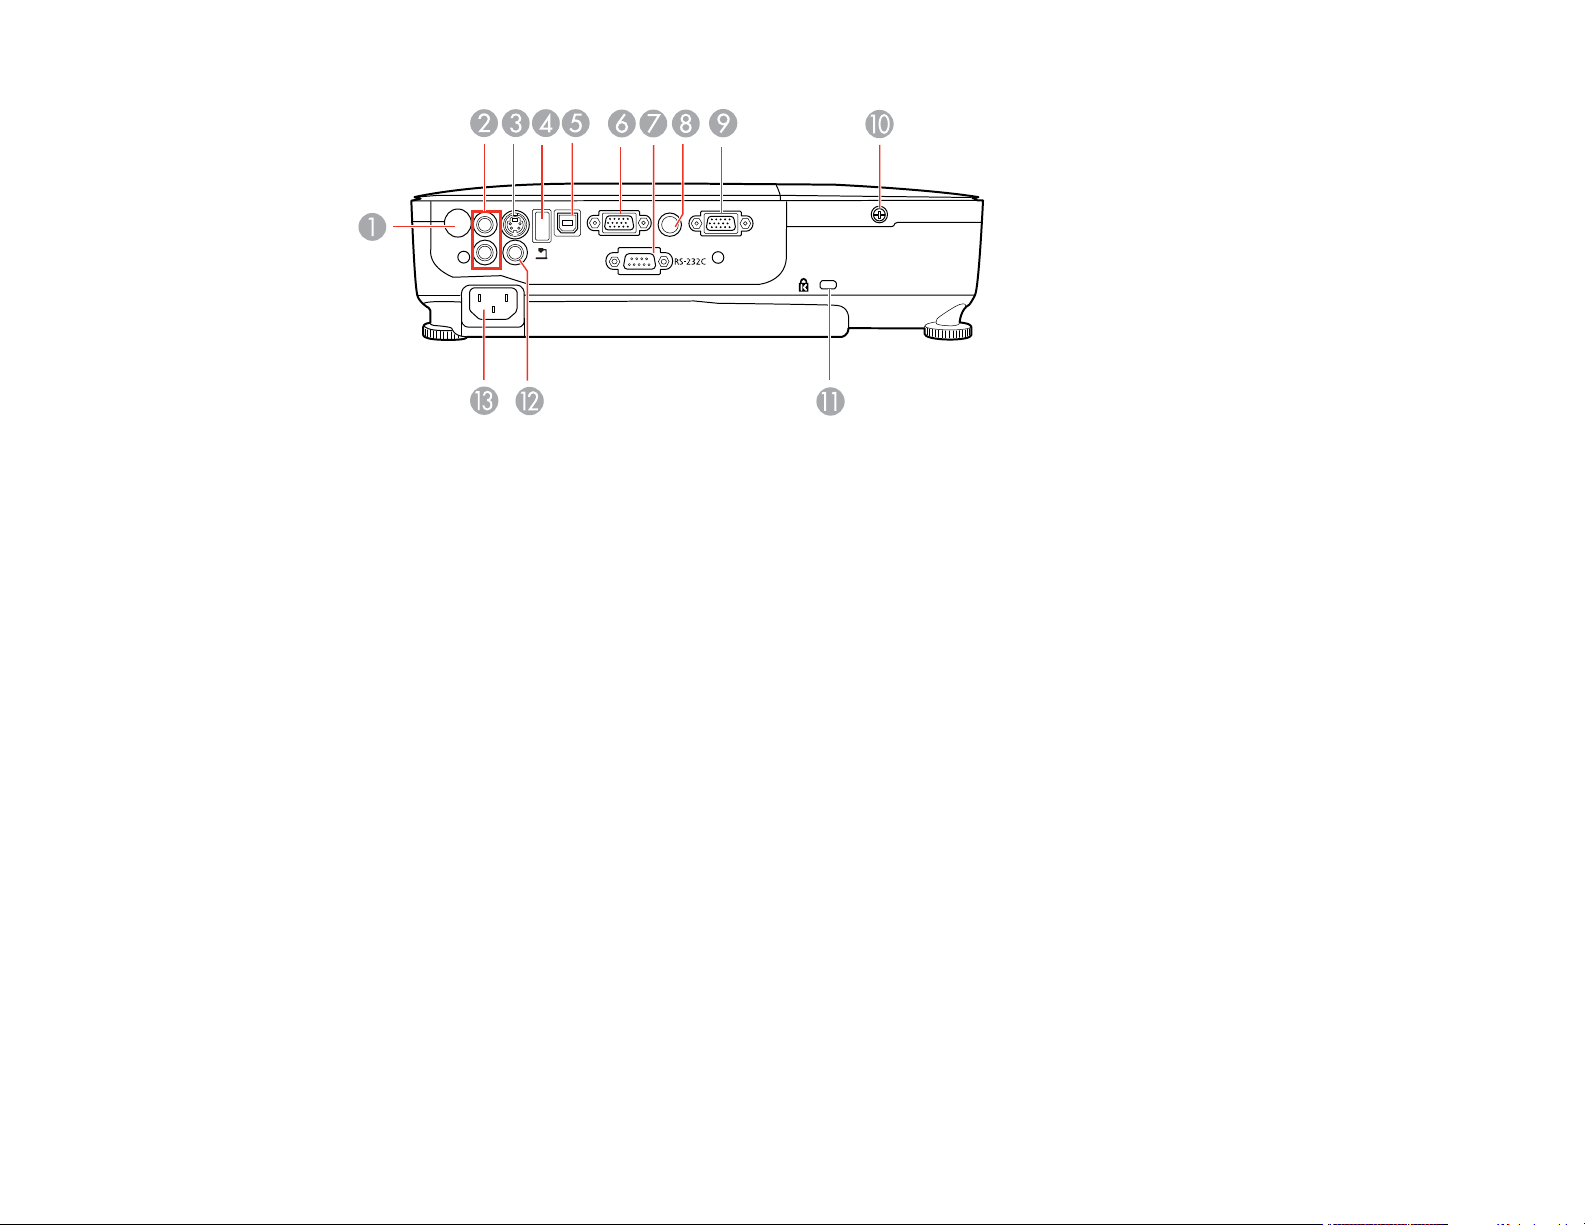
1 Remote control receiver
2 Audio ports
3 S-Video port
4 USB TypeA/document camera port
5 USB TypeB port
6 Computer port
7 RS-232C port
8 Audio Out port
9 Monitor Out port
10 Lamp cover screw
11 Security lock port
12 Video port
13 AC input port
PowerLite X12
16
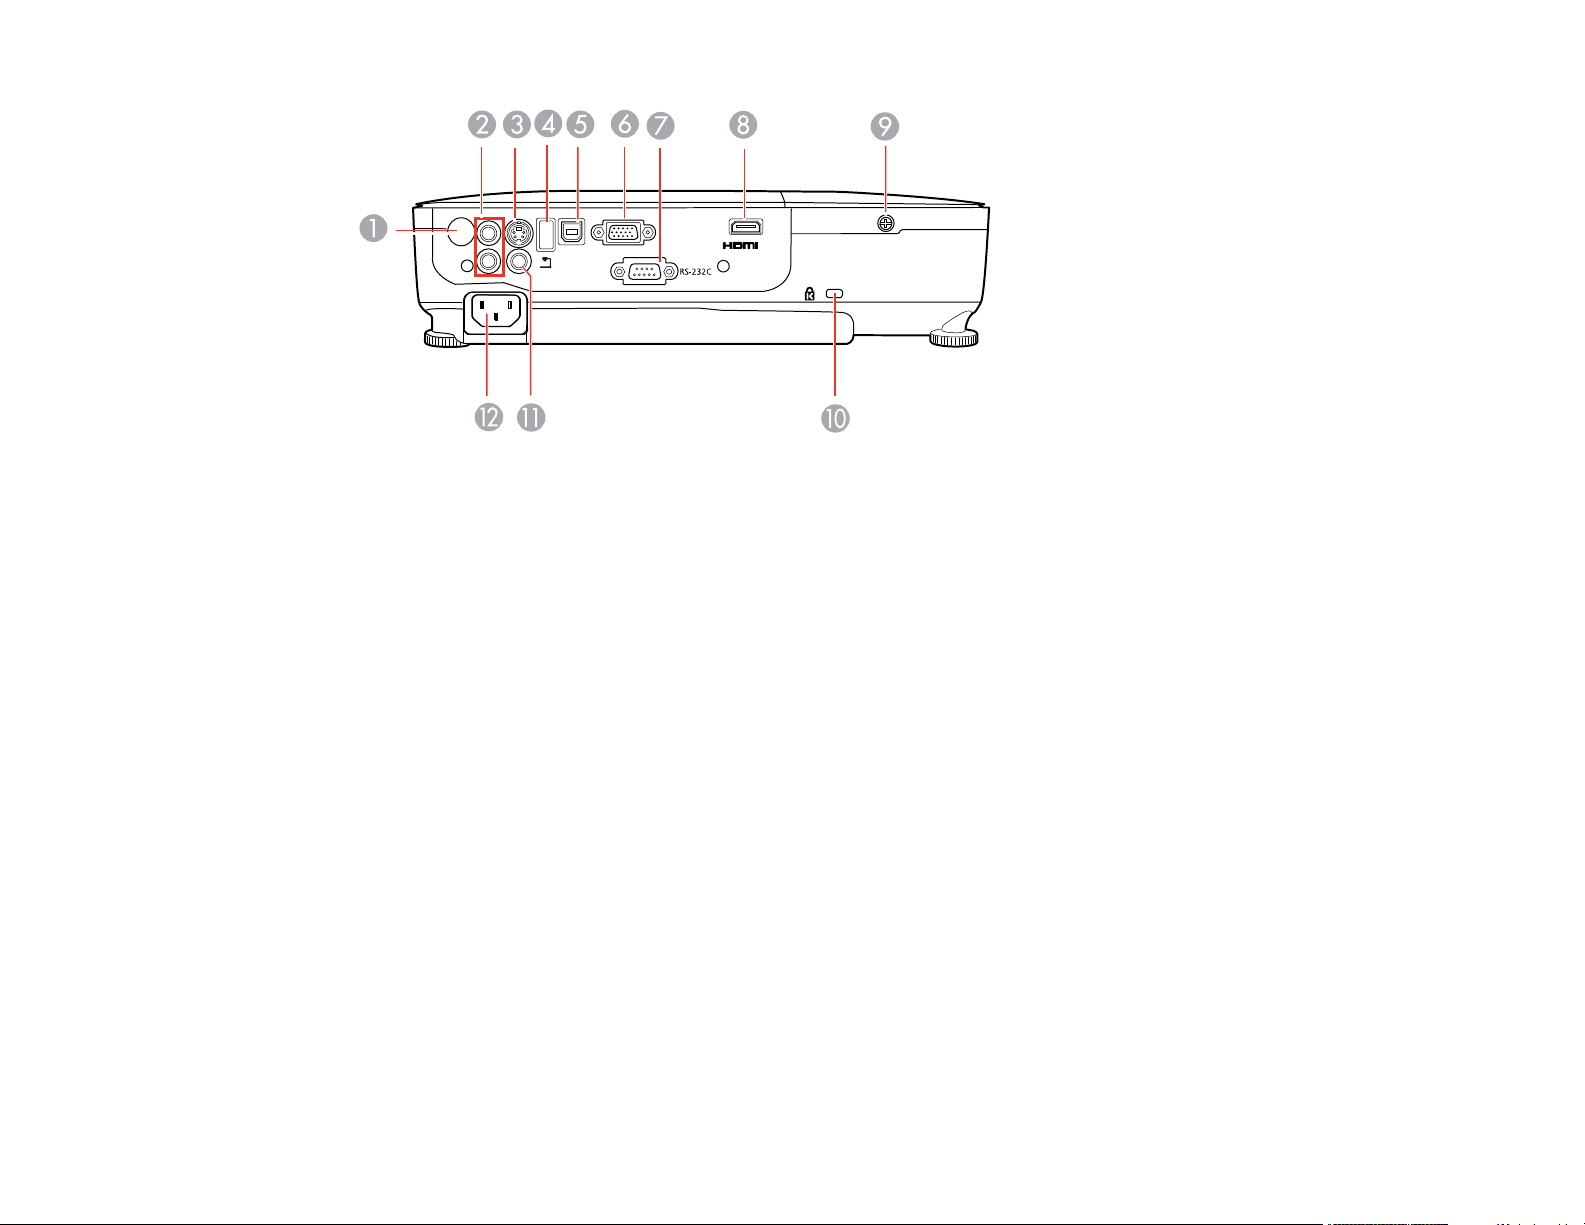
1 Remote control receiver
2 Audio ports
3 S-Video port
4 USB TypeA/document camera port
5 USB TypeB port
6 Computer port
7 RS-232C serial port
8 HDMI port
9 Lamp cover screw
10 Security lock port
11 Video port
12 AC input port
PowerLite X15
17
1 Remote control receiver
2 S-Video port
3 Audio Out port
4 USB TypeB port
5 Computer1 port
6 Computer2 port
7 HDMI port
8 Lamp cover screw
9 Security lock port
10 RS-232C serial port
11 Audio port
12 AC input port
13 Video port
Parent topic: Projector Part Locations
18
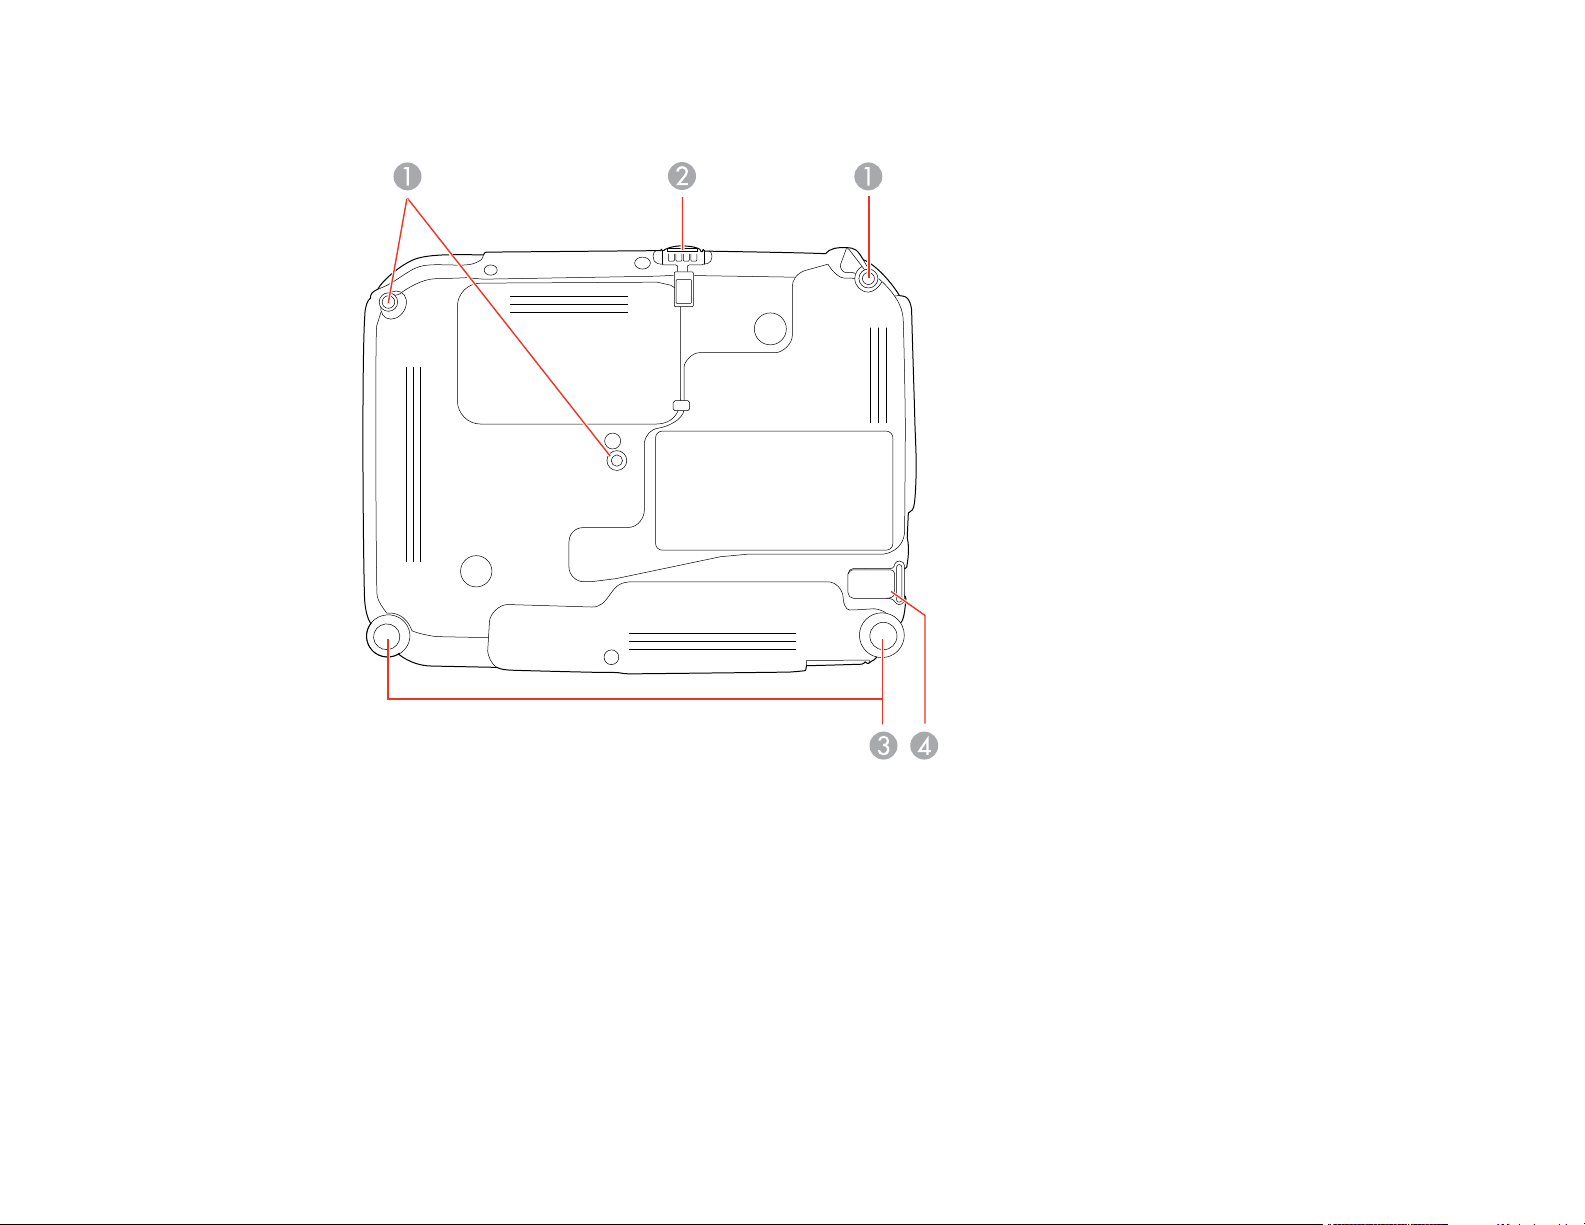
Projector Parts - Base
1 Mounting bracket holes
2 Front adjustable foot
3 Rear feet
4 Security cable attachment point
Parent topic: Projector Part Locations
Projector Parts - Control Panel
PowerLite S11
19
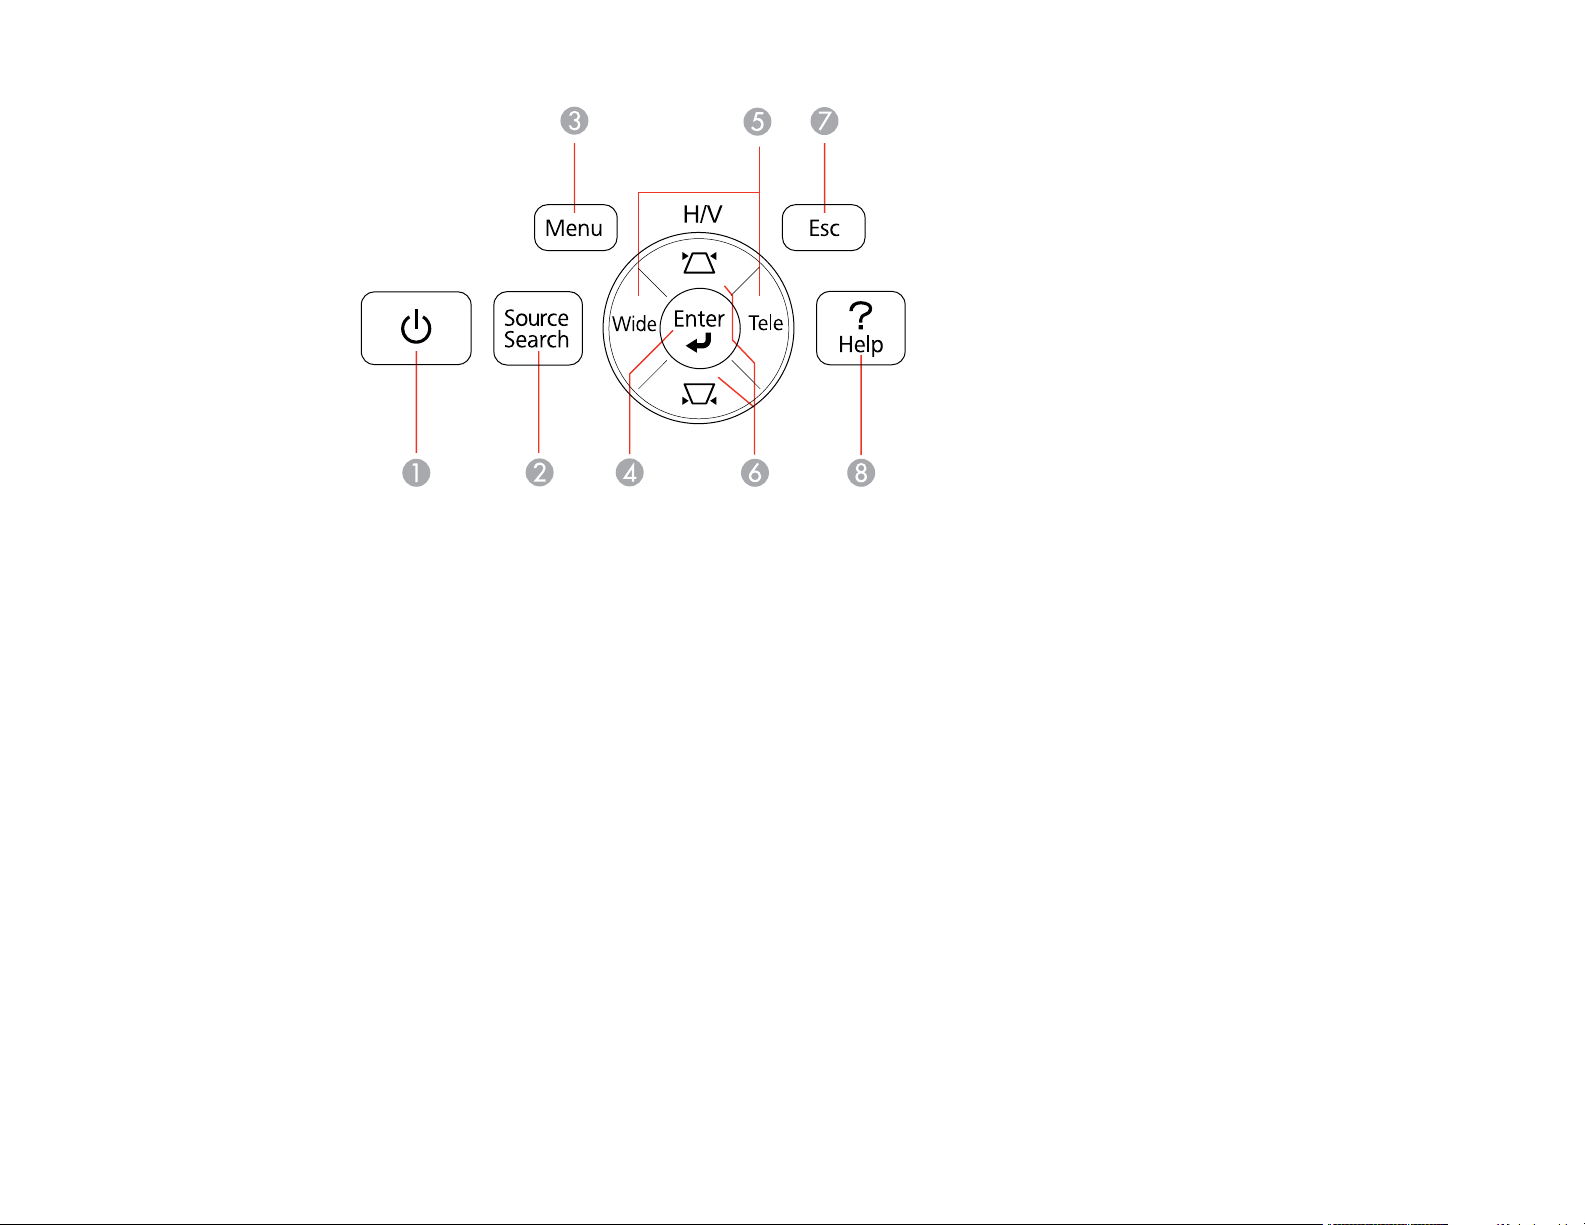
1 Power button
2 Source Search button (searches for connected sources)
3 Menu button (accesses projector menu system)
4 Enter button (selects options)
5 Wide/Tele buttons (adjusts projected image size), horizontal keystone adjustment buttons (adjust
screen shape), and arrow buttons
6 Vertical keystone adjustment buttons (adjust screen shape) and arrow buttons
7 Esc button (cancels/exits functions)
8 Help button (accesses projector help information)
PowerLite X12/X15
20
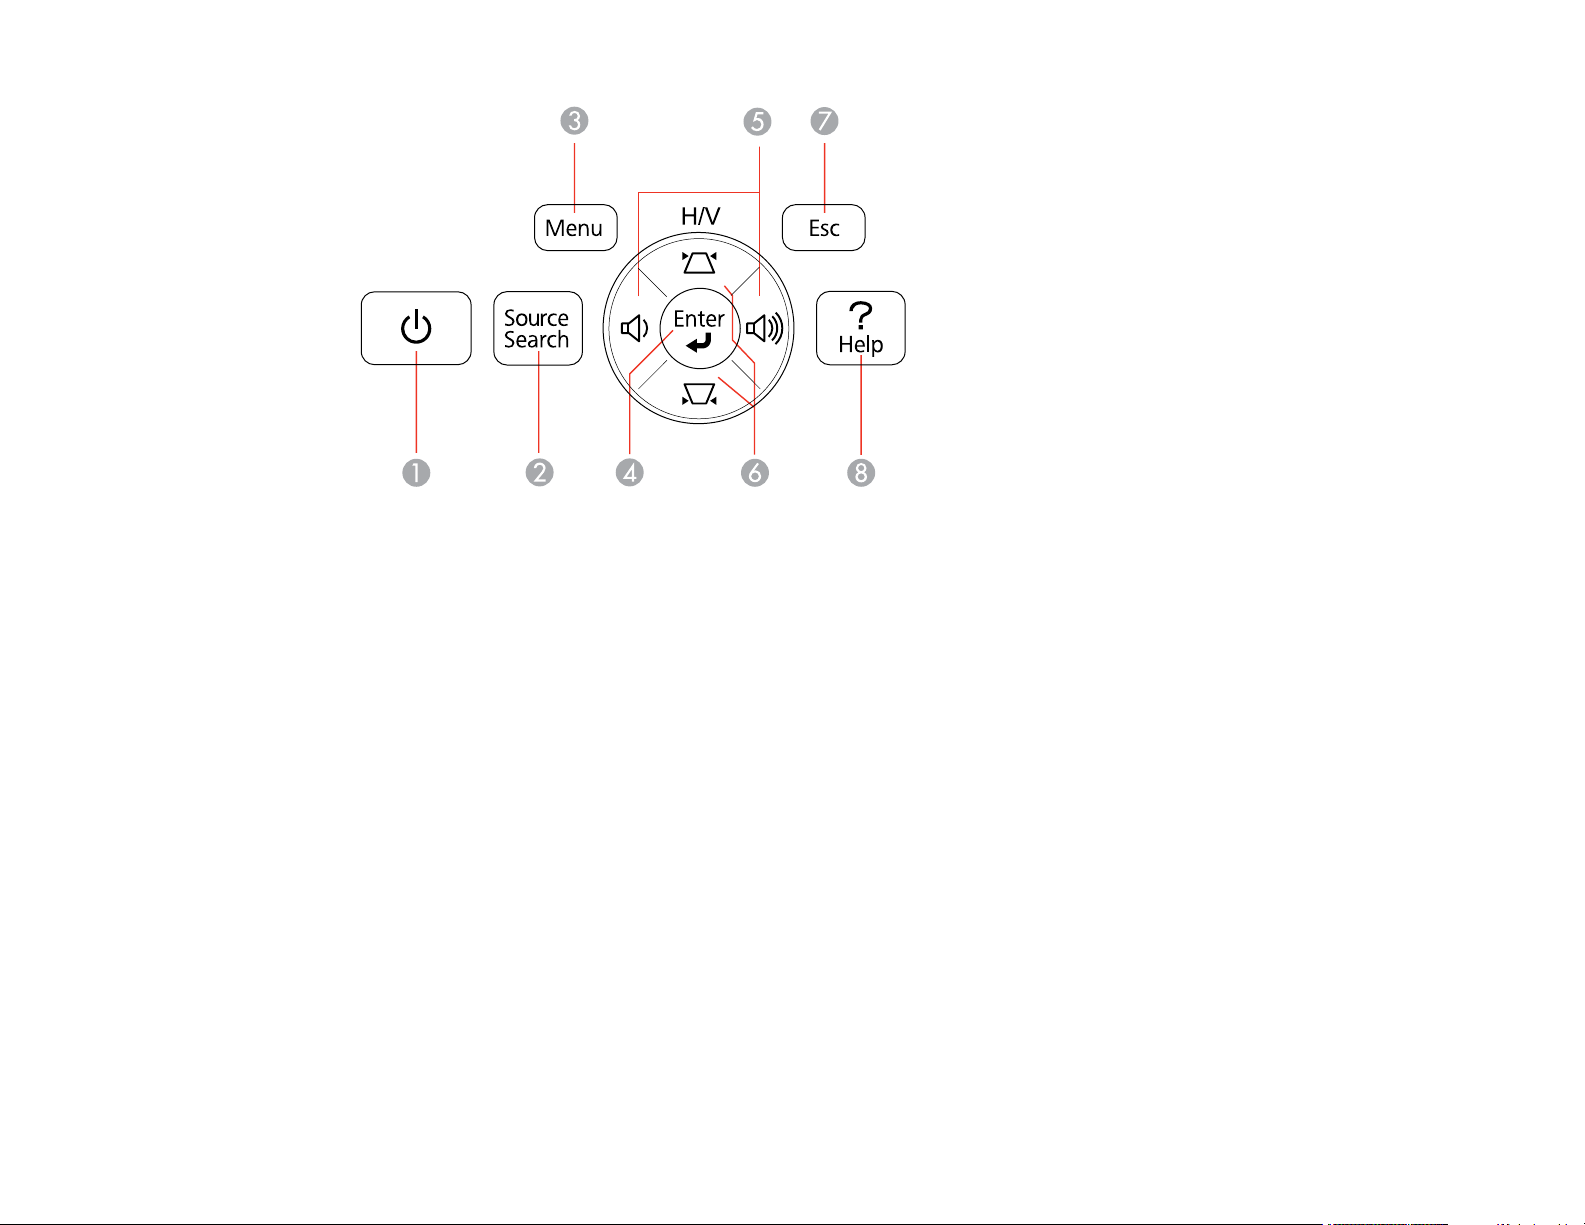
1 Power button
2 Source Search button (searches for connected sources)
3 Menu button (accesses projector menu system)
4 Enter button (selects options)
5 Volume control buttons, horizontal keystone adjustment buttons (adjust screen shape), and arrow
buttons
6 Vertical keystone adjustment buttons (adjust screen shape) and arrow buttons
7 Esc button (cancels/exits functions)
8 Help button (accesses projector help information)
Parent topic: Projector Part Locations
Related references
Projector Light Status
21
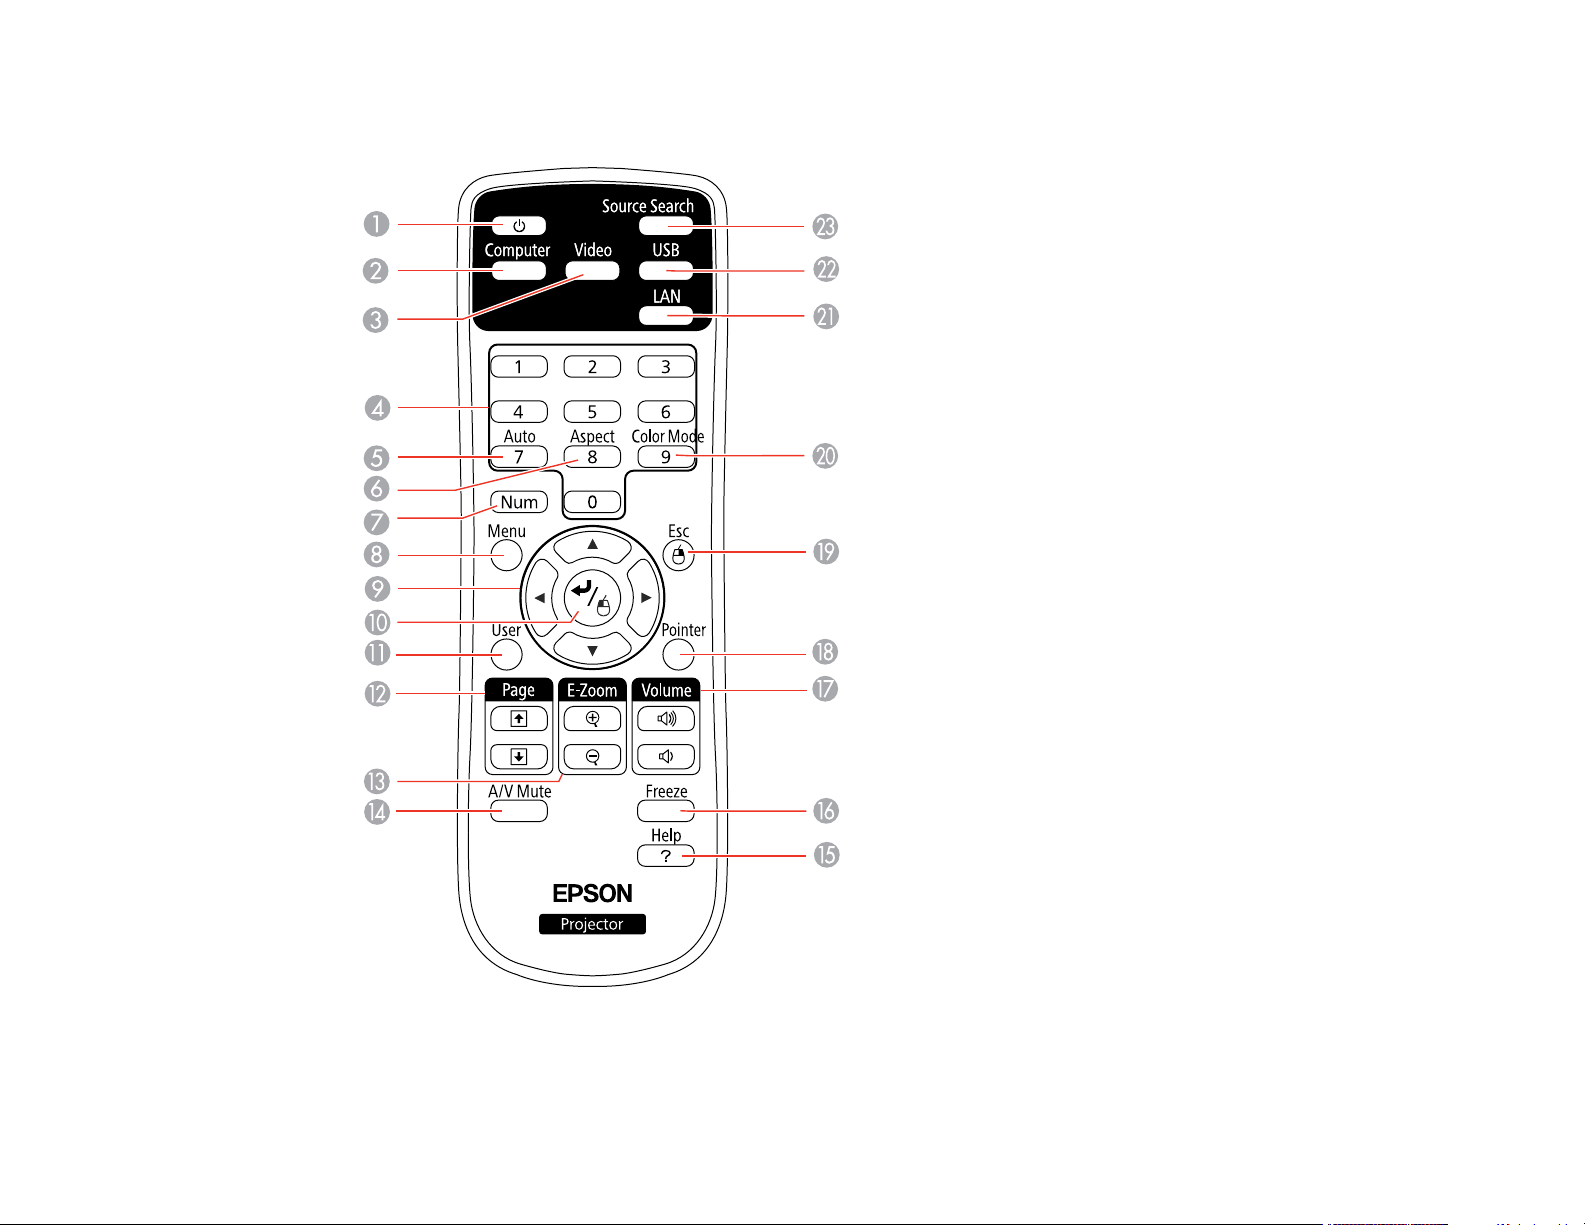
Projector Parts - Remote Control
1 Power button
22

2 Computer button (cycles through connected computer sources)
3 Video button (cycles through connected video sources)
4 Numeric buttons (enter numbers)
5 Auto button (automatically adjusts position, tracking, and sync settings)
6 Aspect button (selects the image aspect ratio)
7 Num button (when held down, switches numeric buttons to number function)
8 Menu button (accesses projector menu system)
9 Arrow buttons (move through on-screen options and control wireless mouse functions)
10 Enter button (selects options and controls wireless mouse functions)
11 User button (customizable for different functions)
12 Page up/down buttons (control presentation slides)
13 E-Zoom +/– buttons (zoom into and out of the image)
14 A/V Mute button (turns off picture and sound)
15 Help button (accesses projector help information)
16 Freeze button (stops video action)
17 Volume up/down buttons (adjust speaker volume)
18 Pointer button (activates on-screen pointer)
19 Esc button (cancels/exits functions and controls wireless mouse functions)
20 Color Mode button (selects display modes)
21 LAN button (button is not functional)
22 USB button (cycles through connected USB sources)
23 Source Search button (searches for connected sources)
Parent topic: Projector Part Locations
23
Setting Up the Projector
Follow the instructions in these sections to set up your projector for use.
Projector Placement
Projector Connections
Installing Batteries in the Remote Control
Opening the Lens Cover
Projector Placement
You can place the projector on almost any flat surface to project your presentation.
You can also install the projector in a ceiling mount if you want to use it in a fixed location.
Keep these considerations in mind as you select a projector location:
• Place the projector on a sturdy, level surface or install it using a compatible mount.
• Leave plenty of space around and under the projector for ventilation, and do not place it on top of or
next to anything that could block the vents.
• Position the projector within reach of a grounded electrical outlet or extension cord.
Projector Setup and Installation Options
Projection Distance
Parent topic: Setting Up the Projector
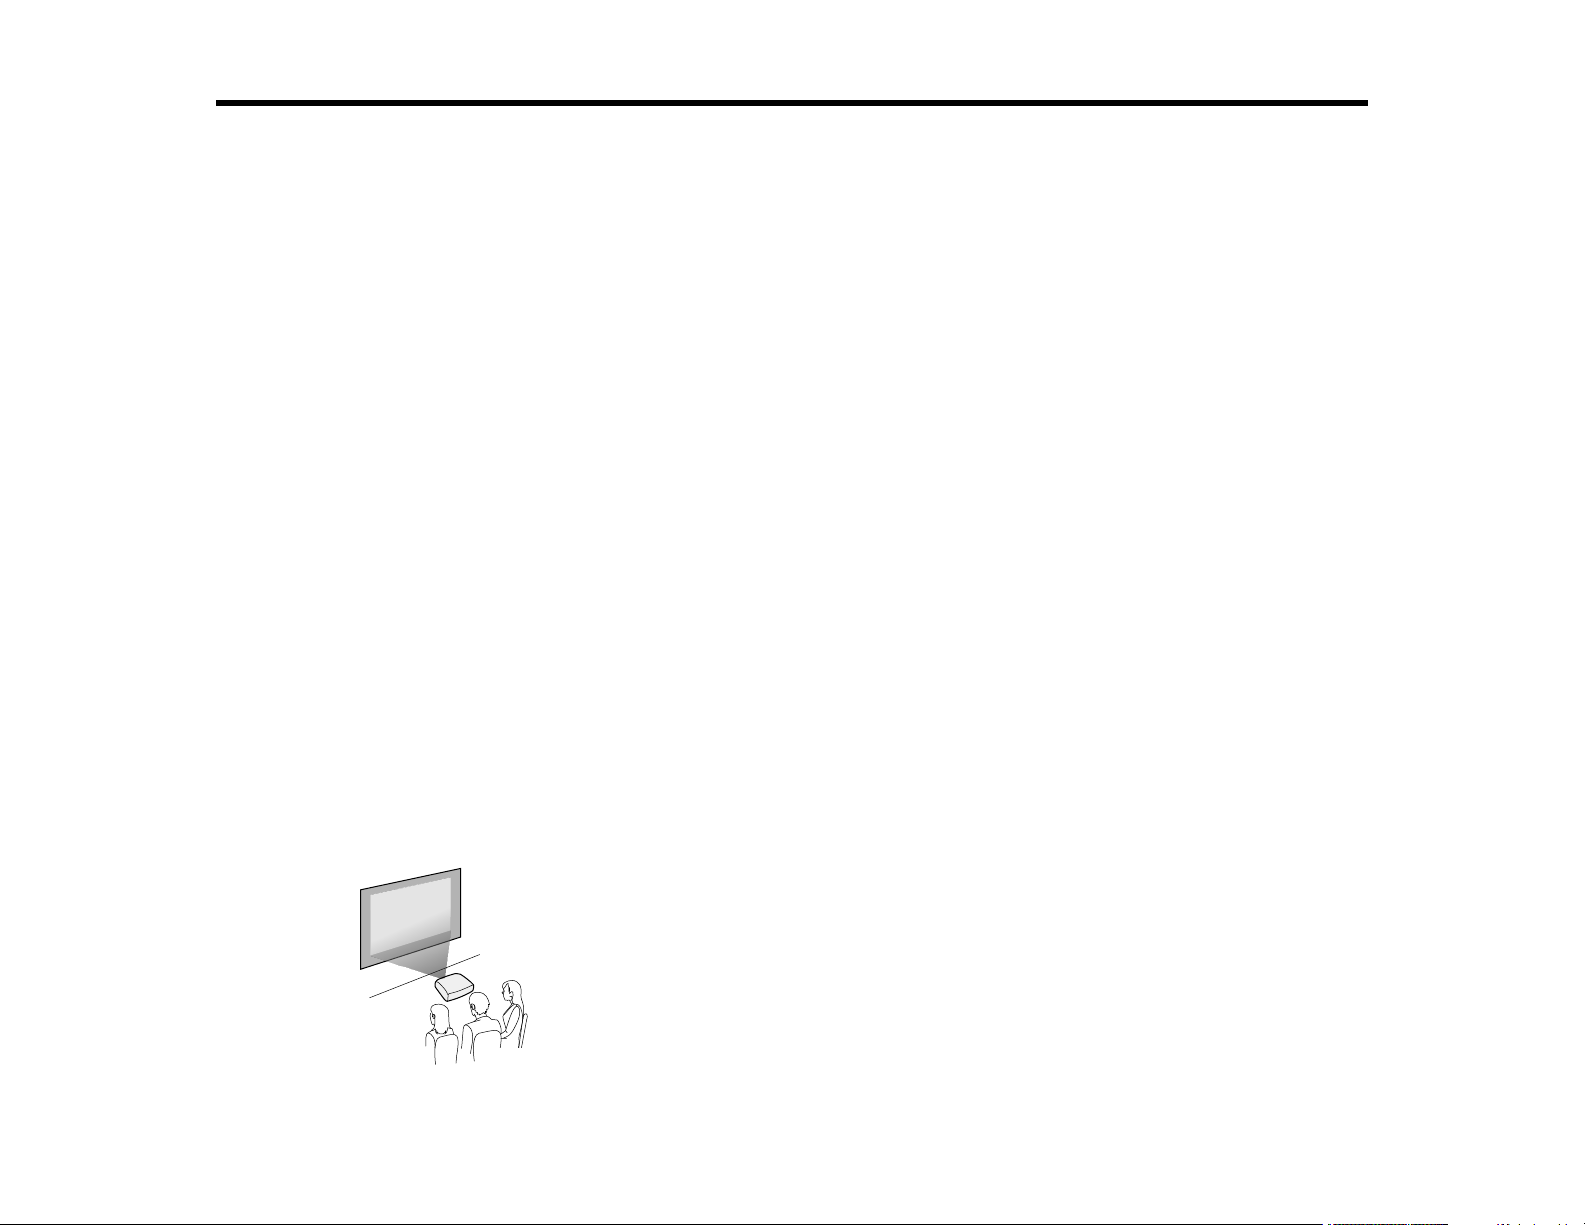
Projector Setup and Installation Options
You can set up or install your projector to view presentations in the following ways:
Front
24
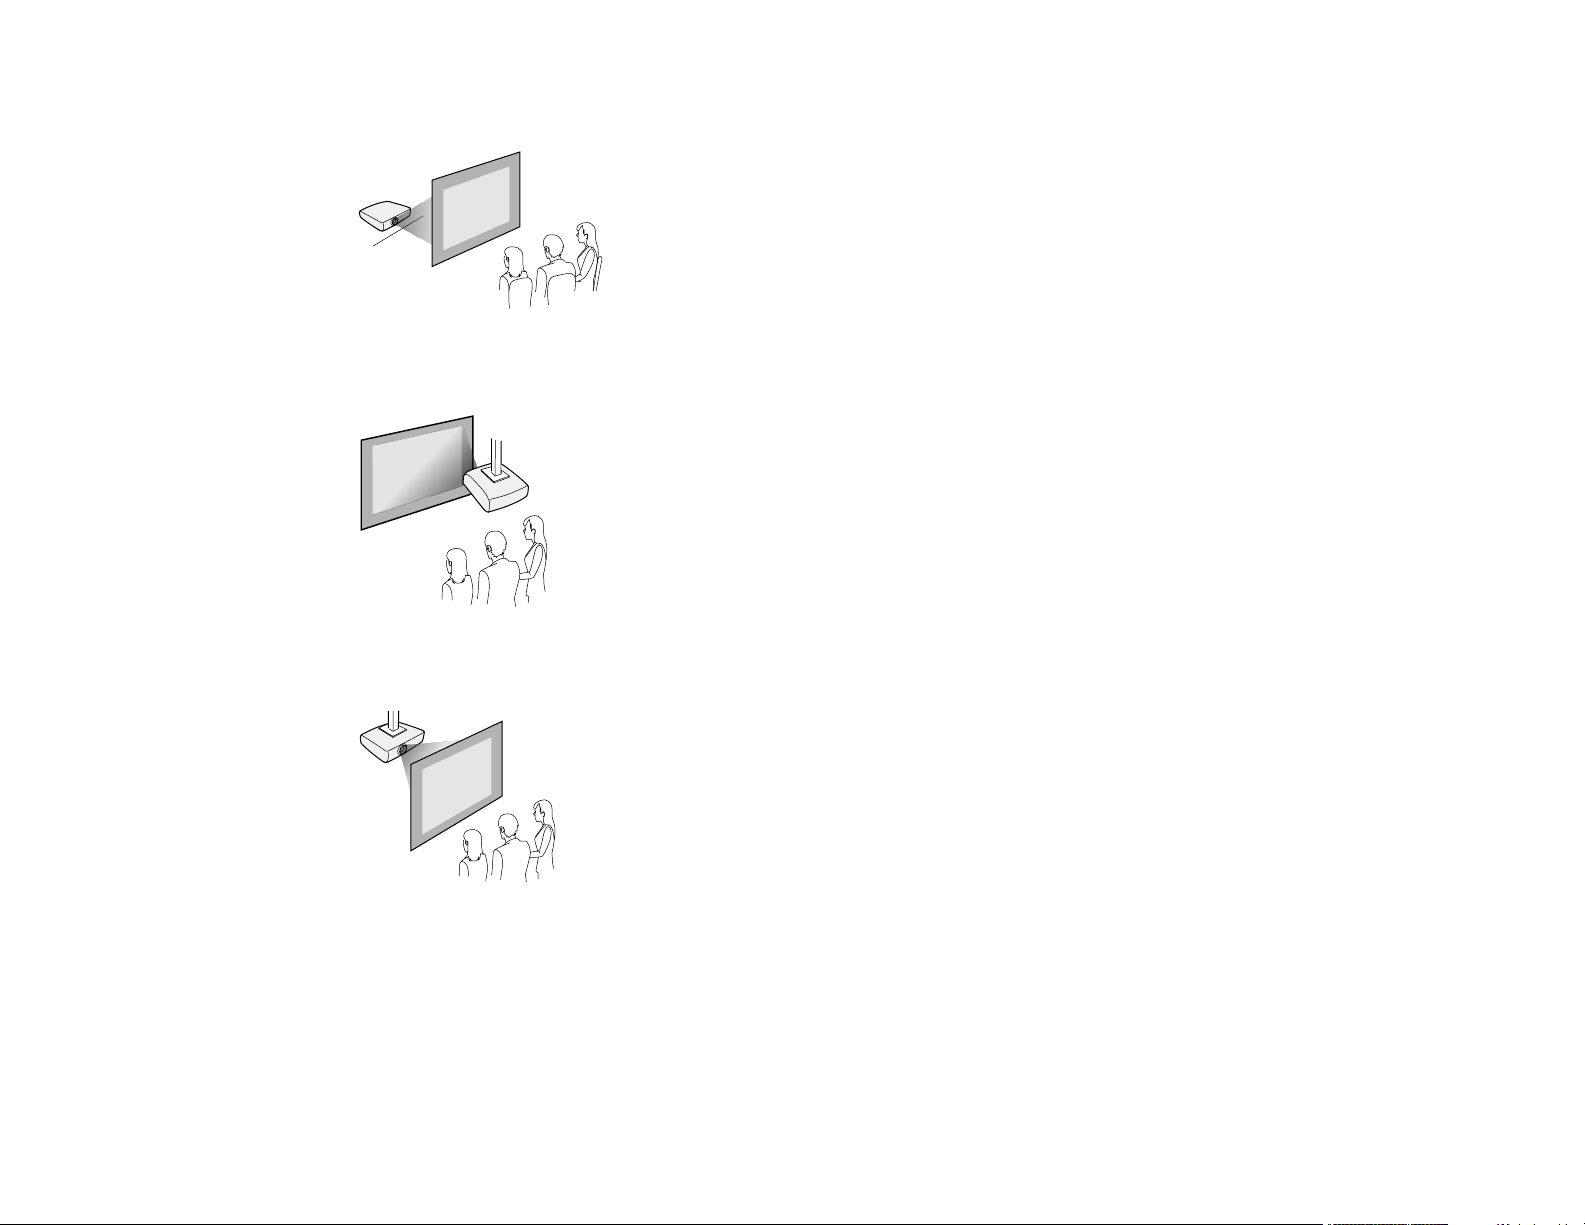
Rear
Front Ceiling
Rear Ceiling
Wherever you set up the projector, make sure to position it squarely in front of the center of the screen,
not at an angle, if possible.
If you project from the ceiling or from the rear, be sure to select the correct Projection option in the
projector's menu system.
Parent topic: Projector Placement
25
Related references
Projector Setup Settings - Extended Menu
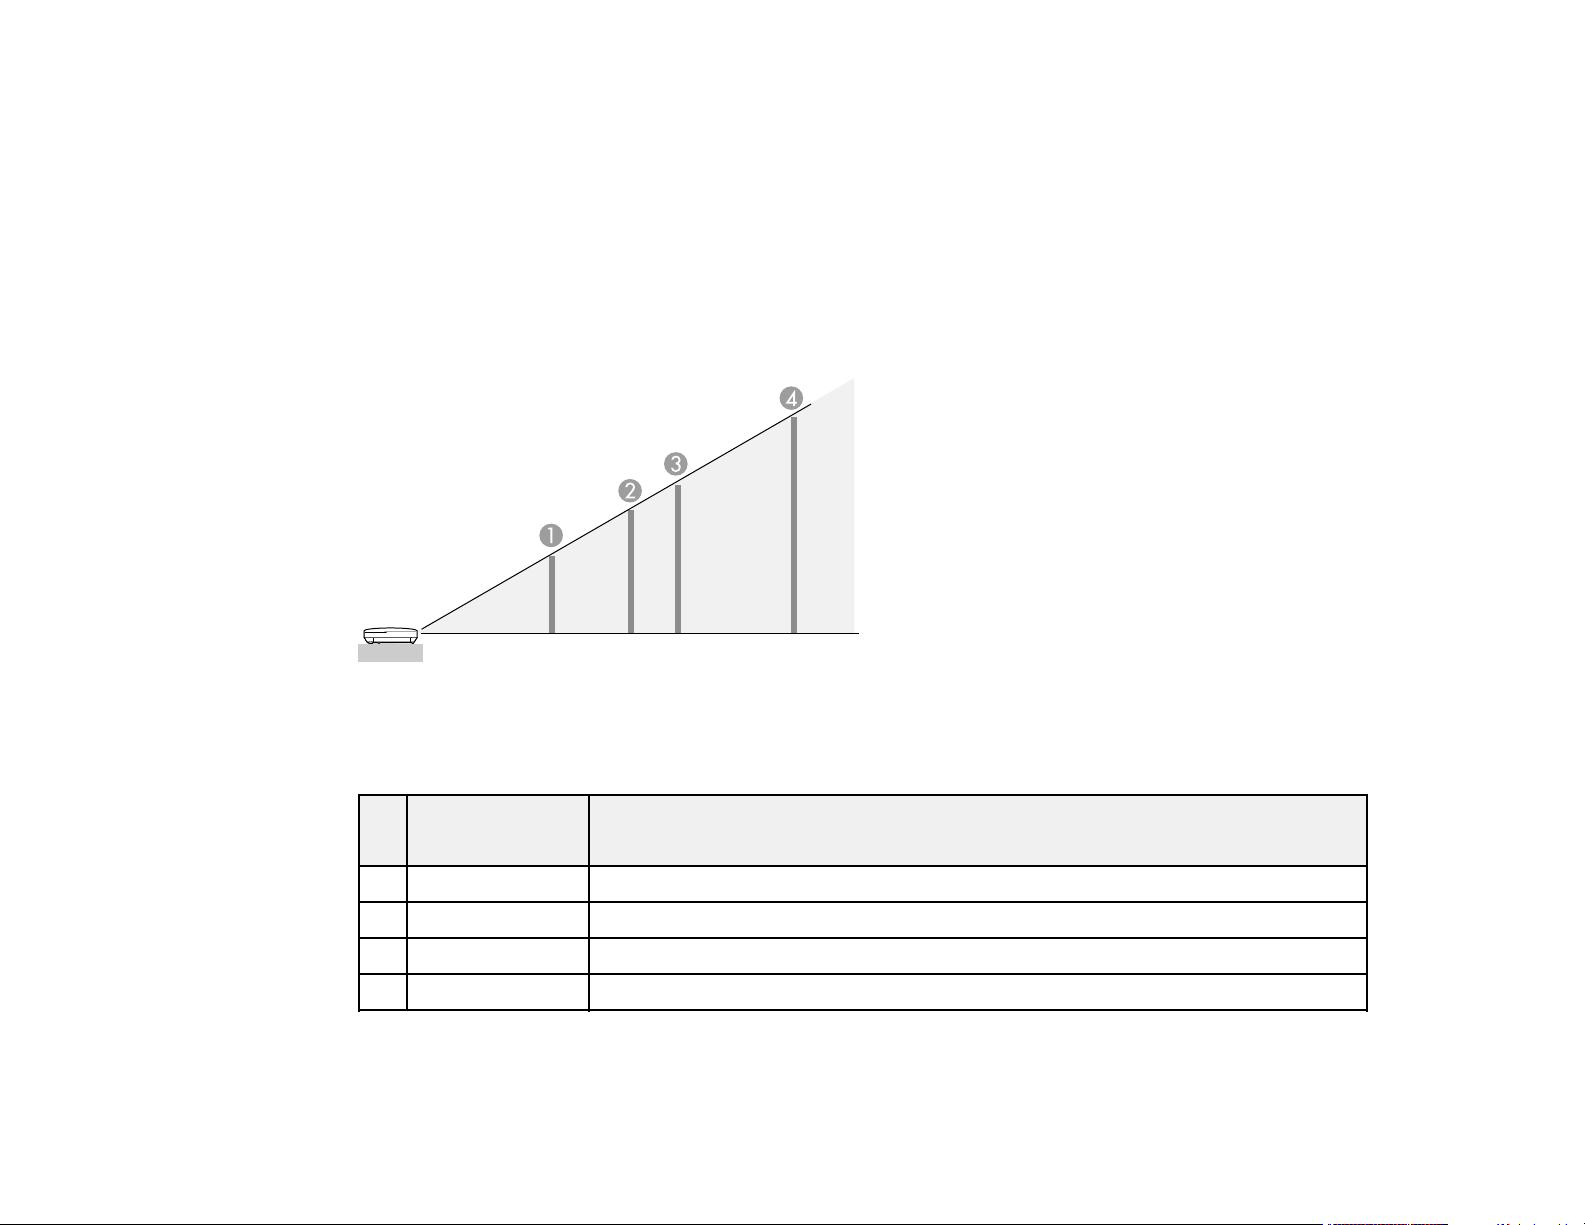
Projection Distance
The distance at which you place the projector from the screen determines the approximate size of the
image. The image size increases the farther the projector is from the screen, but can vary depending on
the zoom factor, aspect ratio, and other settings.
Use the tables here to determine approximately how far to place the projector from the screen based on
the size of the projected image. (Conversion figures may have been rounded up or down.)
PowerLite S11
4:3 Aspect Ratio Image or Screen
Screen or Projection distance
image size
1 50 inches 58 to 79 inches (147 to 200 cm)
2 80 inches 93 to 126 inches (237 to 321 cm)
3 100 inches 117 to 158 inches (297 to 401 cm)
4 150 inches 176 to 237 inches (446 to 603 cm)
PowerLite X12/X15
4:3 Aspect Ratio Image or Screen
Wide to Tele
26

Screen or Projection distance
image size
1 50 inches 59 to 71 inches (150 to 180 cm)
2 80 inches 95 to 114 inches (241 to 290 cm)
3 100 inches 119 to 143 inches (302 to 363 cm)
4 150 inches 179 to 215 inches (454 to 546 cm)
Parent topic: Projector Placement
Projector Connections
You can connect the projector to a variety of computer, video, and audio sources to display
presentations, movies, or other images, with or without sound.
• Connect any type of computer that has a USB port, standard video output (monitor) port, or HDMI port
(PowerLite X12/X15).
• For video projection, connect devices such as DVD players, gaming consoles, digital cameras, and
camera phones with compatible video output ports.
• If your presentation or video includes sound, you can connect audio input cables, if necessary.
• For slide shows without a computer (PowerLite S11/X12), you can connect USB devices (such as a
flash drive or camera) or an optional Epson document camera.
Wide to Tele
Caution: If you will use the projector at altitudes above 4921 feet (1500 m), turn on High Altitude Mode
to ensure the projector's internal temperature is regulated properly.
Connecting to Computer Sources
Connecting to Video Sources
Connecting to an External Computer Monitor
Connecting to External Speakers
Connecting to External USB Devices
Connecting to a Document Camera
Parent topic: Setting Up the Projector
Related references
Projector Setup Settings - Extended Menu
27
Product Box Contents
Connecting to Computer Sources
Follow the instructions in these sections to connect a computer to the projector.
Connecting to a Computer for USB Video and Audio
Connecting to a Computer for VGA Video
Connecting to a Computer for HDMI Video and Audio
Connecting to a Computer for USB Mouse Control
Connecting to a Computer for Sound
Parent topic: Projector Connections
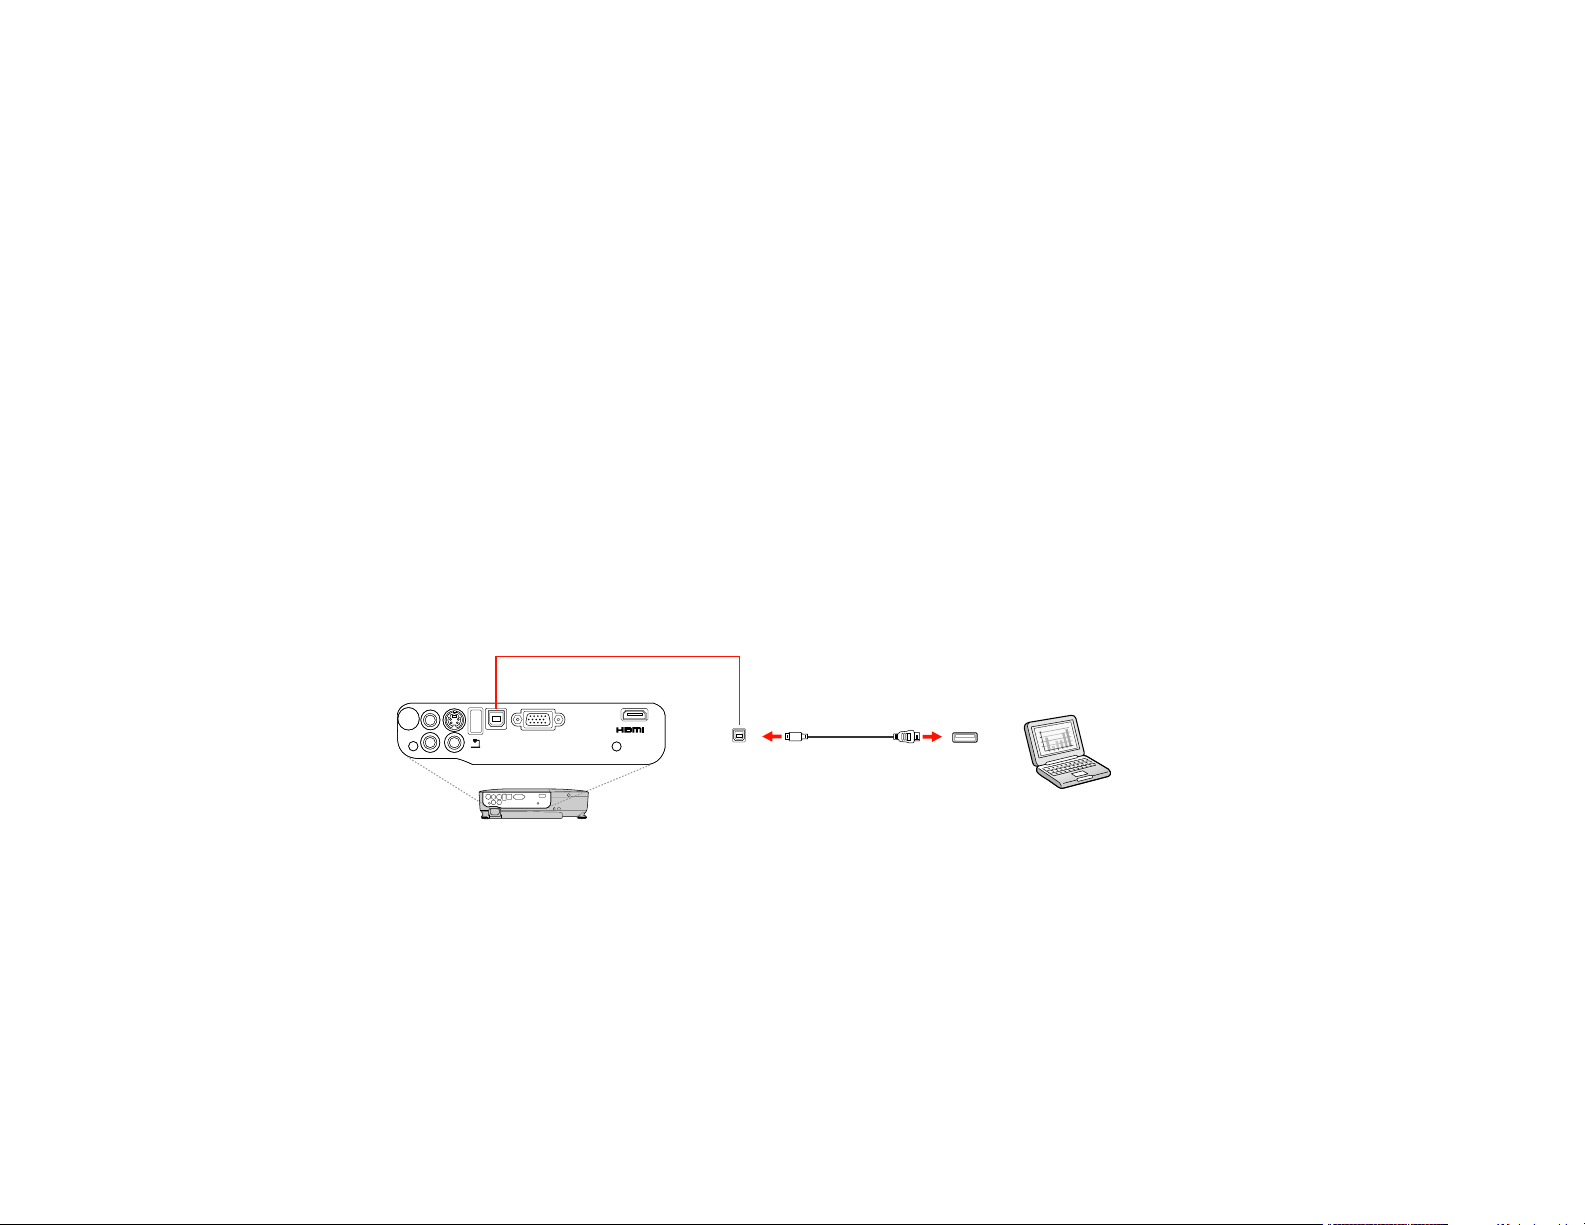
Connecting to a Computer for USB Video and Audio
If your computer meets the system requirements, you can send video and audio output to the projector
through the computer's USB port (preferably USB 2.0). Connect the projector to your computer using a
USB cable.
1. Turn on your computer.
2. Connect the cable to your projector's USB TypeB port.
PowerLite S11/X12
PowerLite X15
28

3. Connect the other end to any available USB port on your computer.
4. Do one of the following:
• Windows 7/Windows Vista: Select Run EMP_UDSe.exe in the dialog box that appears to install
the Epson USB Display software.
• Windows XP: Wait as messages appear on your computer screen and the projector installs the
Epson USB Display software on your computer.
• Windows 2000: Select Computer, EPSON_PJ_UD, and EMP_UDSe.EXE to install the Epson
USB Display software.
• Mac OS X: The USB Display setup folder appears on your screen. Select USB Display Installer
and follow the on-screen instructions to install the Epson USB Display software.
Follow any on-screen instructions. You need to install this software only the first time you connect
the projector to the computer.
The projector displays the image from your computer's desktop and outputs sound, if your presentation
contains audio.
Parent topic: Connecting to Computer Sources
Related references
Projector Setup Settings - Extended Menu
USB Display System Requirements
Connecting to a Computer for VGA Video
You can connect the projector to your computer using a VGA computer cable.
Note: To connect a Mac that includes only a Mini DisplayPort or Mini-DVI port for video output, you need
to obtain an adapter that allows you to connect to the projector's VGA video port. Contact Apple for
compatible adapter options.
29
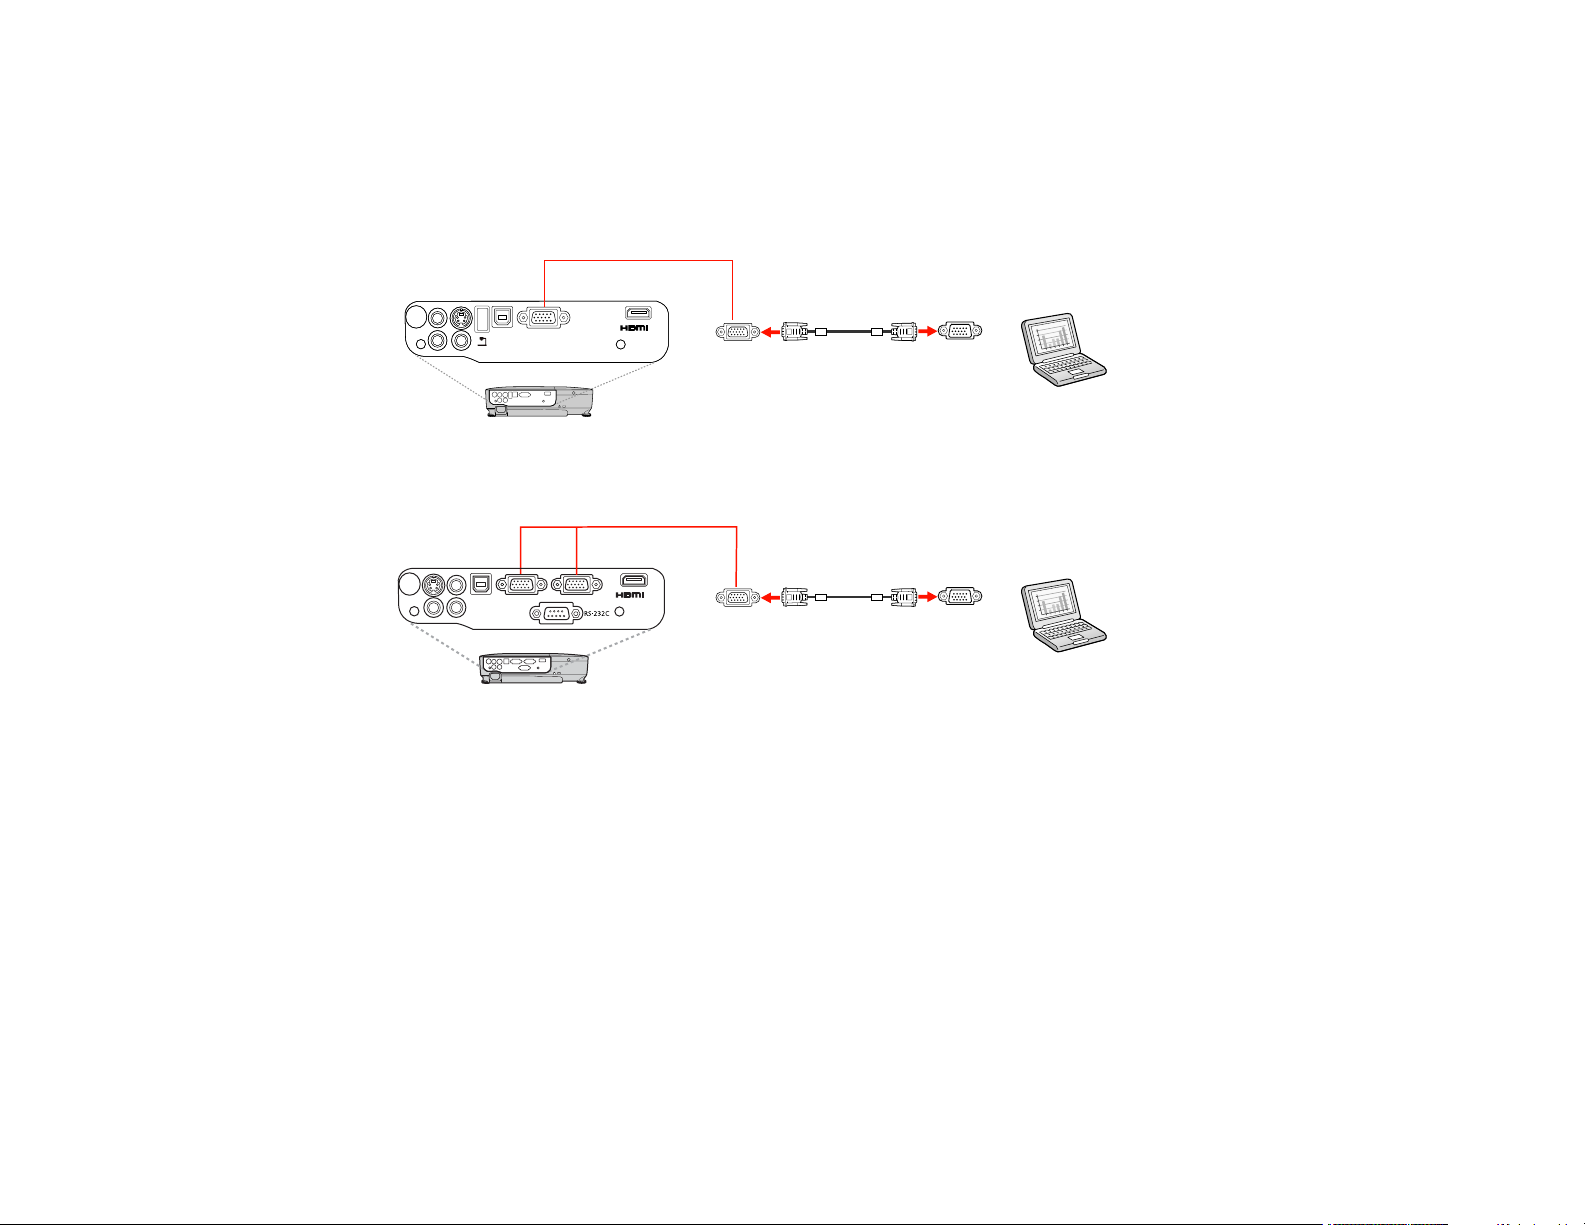
1. If necessary, disconnect your computer's monitor cable.
2. Connect the VGA computer cable to your computer's monitor port.
3. Connect the other end to a Computer port on the projector.
PowerLite S11/X12
PowerLite X15
4. Tighten the screws on the VGA connectors.
Parent topic: Connecting to Computer Sources
Connecting to a Computer for HDMI Video and Audio
If your computer has an HDMI port, you can connect it to the projector using an optional HDMI cable
(PowerLite X12/X15).
Note: To connect a Mac that includes only a Mini DisplayPort or Mini-DVI port for video output, you need
to obtain an adapter that allows you to connect to the projector's HDMI port. Contact Apple for
compatible adapter options. Older Mac computers (2009 and earlier) may not support audio through the
HDMI port.
1. Connect the HDMI cable to your computer's HDMI output port.
30
Loading...