


Basics Guide

Copyright Notice
All rights reserved. No part of this publication may be reproduced, stored in a retrieval system, or transmitted in any form or by any means, electronic, mechanical, photocopying, recording, or otherwise, without the prior written permission of Seiko Epson Corporation. The information contained herein is designed only for use with this Epson product. Epson is not responsible for any use of this information as applied to other equipment.
Neither Seiko Epson Corporation nor its affiliates shall be liable to the purchaser of this product or third parties for damages, losses, costs, or expenses incurred by purchaser or third parties as a result of: accident, misuse, or abuse of this product or unauthorized modifications, repairs, or alterations to this product, or (excluding the U.S.) failure to strictly comply with Seiko Epson Corporation’s operating and maintenance instructions.
Seiko Epson Corporation shall not be liable for any damages or problems arising from the use of any options or any consumable products other than those designated as Original Epson Products or Epson Approved Products by Seiko Epson Corporation.
A Note Concerning Responsible Use of Copyrighted Materials
Epson encourages each user to be responsible and respectful of the copyright laws when using any Epson product. While some countries’ laws permit limited copying or reuse of copyrighted material in certain circumstances, those circumstances may not be as broad as some people assume. Contact your legal advisor for any questions regarding copyright law.
Trademarks
Epson, Epson Stylus, PRINT Image Matching, and the PRINT Image Matching logo are registered trademarks and Claria, Exceed Your Vision, USB DIRECT-PRINT, and the USB DIRECTPRINT logo are trademarks of Seiko Epson Corporation.
RPM is a registered trademark, Photo Enhance is a trademark, and Epson Connection is a service mark of Epson America, Inc.
SD is a trademark.
Memory Stick, Memory Stick Duo, Memory Stick PRO, and
Memory Stick PRO Duo are trademarks of Sony Corporation.
xD-Picture Card is a trademark of Fuji Photo Film Co., Ltd.
General Notice: Other product names used herein are for identification purposes only and may be trademarks of their respective owners. Epson disclaims any and all rights in those marks.
© 2006 Epson America, Inc. 7/06
2
Contents |
|
Introduction . . . . . . . . . . . . . . . . . . . . . . . . . . . . . . . . . . . . . . . . . . . |
5 |
Using the RX580 Control Panel . . . . . . . . . . . . . . . . . . . . . . . . . . . . . . . . |
6 |
Loading Paper . . . . . . . . . . . . . . . . . . . . . . . . . . . . . . . . . . . . . . . . . |
7 |
Using Special Papers . . . . . . . . . . . . . . . . . . . . . . . . . . . . . . . . . . . . . . . |
10 |
Copying a Photo or Document . . . . . . . . . . . . . . . . . . . . . . . . . 12
Placing the Original on the Glass. . . . . . . . . . . . . . . . . . . . . . . . . . . . . . . 12
Copying Documents . . . . . . . . . . . . . . . . . . . . . . . . . . . . . . . . . . . . . . . 14
Copying Photos . . . . . . . . . . . . . . . . . . . . . . . . . . . . . . . . . . . . . . . . . . 15
Selecting Copy Settings . . . . . . . . . . . . . . . . . . . . . . . . . . . . . . . . . . . . . 16
Reprinting Photos and Restoring Color . . . . . . . . . . . . . . . . . . . . . . . . . . 18
Printing From a Memory Card . . . . . . . . . . . . . . . . . . . . . . . . . . 20
Compatible Cards and Image Formats . . . . . . . . . . . . . . . . . . . . . . . . . . . 21
Inserting the Card . . . . . . . . . . . . . . . . . . . . . . . . . . . . . . . . . . . . . . . . . 22
Printing From a USB Flash Drive . . . . . . . . . . . . . . . . . . . . . . . . . . . . . . 23
Viewing Photos. . . . . . . . . . . . . . . . . . . . . . . . . . . . . . . . . . . . . . . . . . . 24
Printing Photos. . . . . . . . . . . . . . . . . . . . . . . . . . . . . . . . . . . . . . . . . . . 25
Printing an Index Sheet to Select Photos. . . . . . . . . . . . . . . . . . . . . . . . . . 31
Touching Up Your Photos . . . . . . . . . . . . . . . . . . . . . . . . . . . . . . . . . . . 34
Cropping Your Photos . . . . . . . . . . . . . . . . . . . . . . . . . . . . . . . . . . . . . . 36
Printing Photo Greeting Cards . . . . . . . . . . . . . . . . . . . . . . . . . . . . . . . . 38
Printing Camera-Selected DPOF Photos . . . . . . . . . . . . . . . . . . . . . . . . . 40
Restoring Default Settings . . . . . . . . . . . . . . . . . . . . . . . . . . . . . . . . . . . 40
Printing From a Camera, PDA, or Phone. . . . . . . . . . . . . . . . . 41
Printing From a PictBridge Camera or Phone . . . . . . . . . . . . . . . . . . . . . . 41
Printing From a Mobile Phone or PDA . . . . . . . . . . . . . . . . . . . . . . . . . . 43
Contents 3
Printing on CDs and DVDs . . . . . . . . . . . . . . . . . . . . . . . . . . . . . 45
Measuring Your CDs/DVDs . . . . . . . . . . . . . . . . . . . . . . . . . . . . . . . . . 45
Inserting a CD or DVD . . . . . . . . . . . . . . . . . . . . . . . . . . . . . . . . . . . . . 46
Printing Photos on a CD or DVD. . . . . . . . . . . . . . . . . . . . . . . . . . . . . . 48
Copying onto a CD/DVD . . . . . . . . . . . . . . . . . . . . . . . . . . . . . . . . . . . 51
Returning the Front Tray to the Paper Position. . . . . . . . . . . . . . . . . . . . . 54
Printing a CD/DVD Jewel Case Insert. . . . . . . . . . . . . . . . . . . . . . . . . . . 55
Printing From Your Computer . . . . . . . . . . . . . . . . . . . . . . . . . . 56
Printing With Windows. . . . . . . . . . . . . . . . . . . . . . . . . . . . . . . . . . . . . 56
Printing From a Macintosh . . . . . . . . . . . . . . . . . . . . . . . . . . . . . . . . . . 59
Selecting the Correct Paper Type. . . . . . . . . . . . . . . . . . . . . . . . . . . . . . . 62
Scanning a Photo or Document . . . . . . . . . . . . . . . . . . . . . . . . 63
Scanning to Your Computer . . . . . . . . . . . . . . . . . . . . . . . . . . . . . . . . . . 63
Scanning to a Memory Card . . . . . . . . . . . . . . . . . . . . . . . . . . . . . . . . . . 66
Backing Up Your Photos . . . . . . . . . . . . . . . . . . . . . . . . . . . . . . . 67
Maintaining Your RX580 . . . . . . . . . . . . . . . . . . . . . . . . . . . . . . . 69
Checking the Print Head Nozzles . . . . . . . . . . . . . . . . . . . . . . . . . . . . . . 69
Cleaning the Print Head . . . . . . . . . . . . . . . . . . . . . . . . . . . . . . . . . . . . 70
Replacing Ink Cartridges . . . . . . . . . . . . . . . . . . . . . . . . . . . . . . . . . . . . 71
Aligning the Print Head . . . . . . . . . . . . . . . . . . . . . . . . . . . . . . . . . . . . . 77
Solving Problems . . . . . . . . . . . . . . . . . . . . . . . . . . . . . . . . . . . . . 78
Error Messages . . . . . . . . . . . . . . . . . . . . . . . . . . . . . . . . . . . . . . . . . . . 78
Problems and Solutions . . . . . . . . . . . . . . . . . . . . . . . . . . . . . . . . . . . . . 79
Where To Get Help . . . . . . . . . . . . . . . . . . . . . . . . . . . . . . . . . . . . . . . 82
Notices. . . . . . . . . . . . . . . . . . . . . . . . . . . . . . . . . . . . . . . . . . . . . . . 83
Index . . . . . . . . . . . . . . . . . . . . . . . . . . . . . . . . . . . . . . . . . . . . . . . . |
89 |
4 Contents
Introduction
After you have set up your Epson Stylus® Photo RX580 all-in-one as described on the Start Here sheet, read this book to:
■Load paper
■Make a quick copy of a document or photo
■Restore color in faded photos
■Print photos stored on a memory card
■Print photos directly from your camera, mobile phone, or PDA
■Print on CDs or DVDs
■Print a basic document or photo from your computer
■Scan a document or photo
■Back up your photos to a USB flash drive or CD
■Perform routine maintenance
■Solve simple problems
This book tells you how to do most of these things without ever turning on your computer! Of course your RX580 can do lots more when you connect it to your Windows® or Macintosh® computer. For additional instructions, see the onscreen User’s Guide by selecting the icon for it on your desktop.
Please follow these guidelines as you read your RX580 instructions:
Warning:
Warnings must be followed carefully to avoid bodily injury.
Caution:
Cautions must be observed to avoid damage to your equipment.
Note:
Notes contain important information about your RX580.
Tip:
Tips contain hints for better copying, scanning, and printing.
Introduction 5
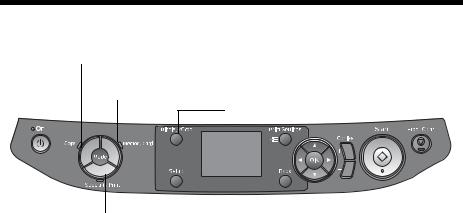
Using the RX580 Control Panel
Copy a photo or document
View and print photos
on card; scan to card Display 1 or 9 photos; crop or zoom a photo
Print on CD/DVDs; reprint or restore photos; print photo greeting cards
|
|
|
|
|
|
|
|
|
|
|
|
|
|
|
Check ink status; |
Stop printing or |
|||
maintain the RX580; |
copying; cancel |
|||
adjust CD/DVD print position; |
settings |
|||
backup photos; |
|
|
|
|
restore defaults; |
|
|
|
|
make PictBridge® or Bluetooth® settings |
|
|
|
|
To save energy, the screen goes dark after the RX580 is idle for 13 minutes. You also see a green light rotate around the Mode buttons.
Press any button to reactivate the RX580. Then press the button for the feature you want to use.
6 Introduction

Loading Paper
The type of paper you choose affects the way your printouts look, so make sure you select the correct paper for your job. If you are just making a copy or printing a rough draft, plain paper is fine.
However, for the best results, use one of Epson’s special ink jet papers designed for your printer. For example, photos look great printed on Epson® Ultra Premium Photo Paper Glossy. See page 10 for a list of Epson papers and ordering information.
1. Open the paper support, then pull up the extension.
2. Open the front cover.
Loading Paper 7
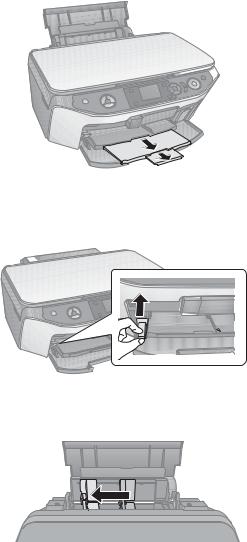
3. Slide out the front tray extensions.
Note:
Make sure the front tray is in the paper (lower) position. If it is not, lift up the tray lever to reposition the front tray.
4. Slide the edge guide to the left.
Note:
If the hinged feeder guard is in the way, flip it forward.
8 Loading Paper

5.Insert the paper, printable side up, against the right edge. The printable side is often whiter or brighter than the other side.
Always load paper short edge first, even for landscape printing. Make sure the paper lies beneath the tabs.
4 |
× 6-inch, |
Letter-size, |
5 |
× 7-inch |
8 × 10-inch |
You can load up to 120 sheets of plain paper or up to 20 sheets of photo paper. Make sure the paper stack fits under the arrow inside the left edge guide.
6. Slide the left edge guide against the left edge of the paper (but not too tightly).
|
|
4 |
× 6-inch, |
Letter-size, |
|
|
|
||||
|
|
5 |
× 7-inch |
|
× 10-inch |
|
8 |
||||
|
|
|
|
|
|
|
|
|
|
|
|
For additional information and instructions on loading envelopes, see your onscreen User’s Guide.
Loading Paper 9

Using Special Papers
You can purchase genuine Epson ink and paper from an authorized Epson reseller. To find the nearest reseller, call 800-GO-EPSON (800-463-7766).
Or you can also purchase online at www.epsonstore.com (U.S. sales) or www.epson.ca (Canadian sales).
|
|
Part |
|
Paper name* |
Size |
number |
|
|
|
|
|
Epson Ultra Premium Photo Paper Glossy |
Borderless 4 × 6 inches |
S041934 |
|
Epson Ultra Premium Glossy Photo Paper |
|
|
|
Letter (8.5 × 11 inches) |
S041935 |
||
|
|||
|
|
|
|
Epson Premium Photo Paper Glossy |
Borderless 4 × 6 inches |
S041808 |
|
Epson Premium Glossy Photo Paper |
|
S041727 |
|
|
|
|
|
|
Borderless 5 × 7 inches |
S041464 |
|
|
|
|
|
|
Borderless 8 × 10 inches |
S041465 |
|
|
|
|
|
|
Letter (8.5 × 11 inches) |
S041286 |
|
|
|
S041667 |
|
|
|
|
|
Epson Premium Photo Paper Semigloss |
Borderless 4 × 6 inches |
S041982 |
|
Epson Premium Semigloss Photo Paper |
|
|
|
Letter (8.5 × 11 inches) |
S041331 |
||
|
|||
|
|
|
|
Epson Photo Paper Glossy |
Borderless 4 × 6 inches |
S041134 |
|
Epson Glossy Photo Paper |
|
S041671 |
|
|
|
S041809 |
|
|
|
|
|
|
Letter (8.5 × 11 inches) |
S041141 |
|
|
|
S041649 |
|
|
|
S041271 |
|
|
|
|
|
Epson Bright White Paper |
Letter (8.5 × 11 inches) |
S041586 |
|
|
|
|
|
Epson Premium Presentation Paper |
Borderless 8 × 10 inches |
S041467 |
|
Matte |
|
|
|
Letter (8.5 × 11 inches) |
S041257 |
||
Epson Matte Paper Heavyweight |
|||
|
|
||
|
|
|
|
Epson Premium Presentation Paper |
Letter (8.5 × 11 inches) |
S041568 |
|
Matte Double-sided |
|
|
|
Epson Double-sided Matte Paper |
|
|
|
|
|
|
10 Loading Paper
|
|
Part |
Paper name* |
Size |
number |
|
|
|
Epson Presentation Paper Matte |
Letter (8.5 × 11 inches) |
S041062 |
Epson Photo Quality Ink Jet Paper |
|
|
|
|
|
Epson Iron-on Cool Peel Transfer paper |
Letter (8.5 × 11 inches) |
S041153 |
|
|
|
Epson Photo Quality Self Adhesive |
A4 (8.3 × 11.7 inches) |
S041106 |
Sheets |
|
|
|
|
|
Epson Ultra Premium Photo Paper Luster |
Letter (8.5 × 11 inches) |
S041405 |
Epson Premium Luster Photo Paper |
|
|
|
|
|
*The availability of paper types and sizes varies by location.
Storing and Displaying Your Prints
With proper care, photographs from your RX580 will last for many years. The special Epson Claria™ inks designed for your printer provide the ultimate combination of photo quality and longevity when used with Epson papers for prints that are properly displayed or stored. For best results, always use Epson papers.
As with traditional photos, Epson recommends proper care that will minimize color changes and lengthen display life:
■Frame prints under glass or a protective plastic sleeve to protect them from atmospheric contaminants like humidity, smoke, and high levels of ozone.
■As with all photographs, keep your prints away from direct sunlight.
■Keep your prints away from high temperature.
■For proper storage, keep your prints in a photo album or plastic photo storage box in acid-free, archival sleeves commonly available from most camera stores.
■Always keep unused paper in the original package.
Using Special Papers 11
Copying a Photo or Document
Follow the instructions in these sections:
■“Placing the Original on the Glass” (see below)
■“Copying Documents” on page 14
■“Copying Photos” on page 15
■“Selecting Copy Settings” on page 16
■“Reprinting Photos and Restoring Color” on page 18
Placing the Original on the Glass
1.Open the document cover and place your original face-down on the glass, in the upper left corner.
12 Copying a Photo or Document
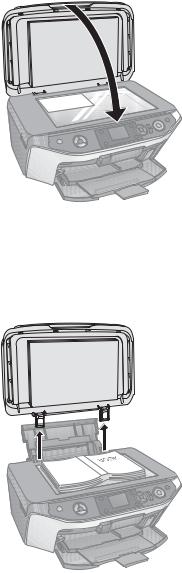
2. Close the document cover gently so that your original doesn’t move.
Caution:
Never open the document cover beyond where it stops and do not place heavy objects on top of the RX580.
If you need to copy a thick or large document, you can remove the document cover. Just open it and pull it straight up.
If you need to press the document flat while you copy it, do not press too hard and be careful not to move it.
When you are done, replace the document cover by inserting the tabs back into the slots.
Placing the Original on the Glass 13
Copying Documents
You can copy documents in color or black and white, using plain paper or a variety of Epson papers for special projects.
1.Make sure the RX580 is turned on.
2.Place your document on the glass as described on page 12. Be sure to close the document cover.
3.Load up to 120 sheets of plain paper or 20 sheets of specialty paper, as described on page 7.
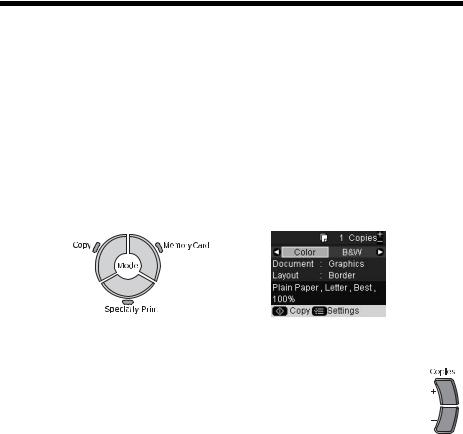
4.Press the Copy mode button.
5. Press l or r to choose Color or B&W.
6. If you want more than one copy, press the Copies + button to select the number you want.
7.If you want to resize your copy, print on special paper, or adjust other settings, see page 16.
8.Press the x Start button to start copying.
If you need to cancel copying, press the y Stop/Clear Settings button. Do not pull out paper that is being printed; it will be ejected automatically to the front tray.
Note:
The copies may not be exactly the same size as the original.
14 Copying a Photo or Document
Copying Photos
You can copy a photograph on 4 × 6, 5 × 7, 8 × 10, or 8.5 × 11-inch paper. You can easily resize your photo to fit on any size paper you want to use. The easiest way to copy photos (using default settings) is using 4 × 6 Epson Premium Photo Paper Glossy.
See page 10 for a list of special Epson papers for photos, scrapbook pages, and creative projects.
1.Place your document or photo on the glass as described on page 12. Be sure to close the document cover.
2.Load your photo paper, as described on page 7.
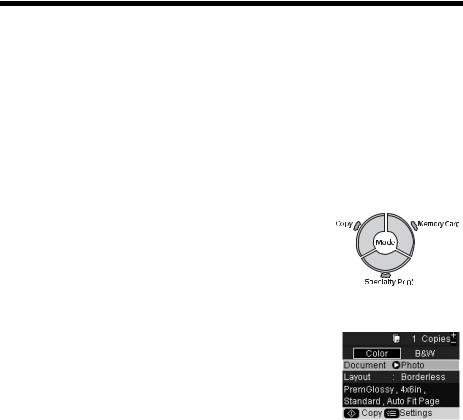
3. Press the Copy mode button.
4. Press l or r to choose Color or B&W.
5.If you want more than one copy, press the Copies + button to select the number you want.
6.Press d, then press r, select Photo, and press OK.
■These settings are automatically selected when you copy photos: Borderless prints, automatically sized to fit on 4 × 6-inch Premium Photo Paper Glossy.
■If you want to copy using a special layout, such as
white borders or multiple photos on one sheet, press d, then press r and select your layout. See page 16 for more information.
■If you want to copy on a different size or type of paper, or select other special settings, press the x Print Settings button. See page 17 for more information.
■The RX580 remembers your settings, even after you turn it off.
7.Adjust any settings as necessary, then press OK.
8.Press the x Start button to start copying.
If you need to cancel copying, press the y Stop/Clear Settings button. Do not pull out paper that is being printed; it will be ejected automatically to the front tray.
Note:
If you want to restore the color in faded photos, see page 18.
Copying Photos 15

Selecting Copy Settings
You can select special settings for copying on various sizes and types of paper, reducing or enlarging your original, or other types of copies. The settings you select will be saved, even after you turn off the RX580.
Layout Settings for Copying
1.Press the Copy mode button.
2.Press d to select Layout, then press r.
3.Press u or d to select one of the following layout settings, then press OK.
Layout Setting for Copying |
Result |
|
|
Border
Copies your original with a standard 3-mm margin.
Borderless
Copies your photo all the way to the edges of the paper (on Epson photo papers only). Your image is slightly expanded and cropped to fill the page.
CD/DVD Copy
Copies onto a CD or DVD. See page 51 for more information.
Wallet Copy
Makes wallet-sized copies of your original; 9 copies on letter-sized paper or as many will fit on smaller sheets.
2-up Copy
Copies two letter-size originals onto one sheet. After the first original is scanned, you place the second one on the glass. Then both originals are copied on one sheet of paper.
16 Copying a Photo or Document
Layout Setting for Copying |
Result |
|
|
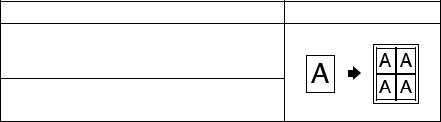
Repeat Copy
Prints a photo at actual size as many times as it will fit on one sheet.
Repeat-4
Prints a photo four times on one sheet.
Print Settings for Copying
You can choose from various sizes and types of Epson paper and other settings to get just the results you want.
1.Press the Copy mode button.
2.Press the x Print Settings button.
3.Press u or d to select a menu item, then press the r button.
4.Press u or d to select one of the following print settings, then press OK.
■Zoom: Select Actual to print your photo at its original size. You can reduce or enlarge your original by a specific percentage using the Copies + or – buttons. Or select Auto Fit Page for borderless printing and resizing the image to fit standard paper sizes.
■Paper Type: Select the type of paper you loaded. See page 28 for a list of Epson papers and the corresponding Paper Types.
■Paper Size: Select the paper size you loaded.
■Quality: Select Draft, Standard or Best Quality.
■Copy Density: Make your copies darker or lighter.
■Expansion: When you print borderless photos, your image is slightly expanded and cropped to fill the sheet of paper.
If too much of your photo edges are cut off, select Mid or Min. If you see a white edge on your photo, leave it set on Standard.
Selecting Copy Settings 17
Reprinting Photos and Restoring Color
If you have faded photos (up to 5 × 7 inches), you can bring them back to life using the Color Restoration feature.
For photos that are not faded, you can follow the same steps to crop and resize your pictures or even change a color photo to black and white.
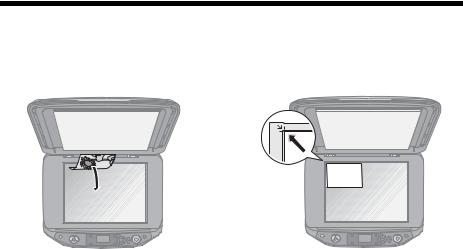
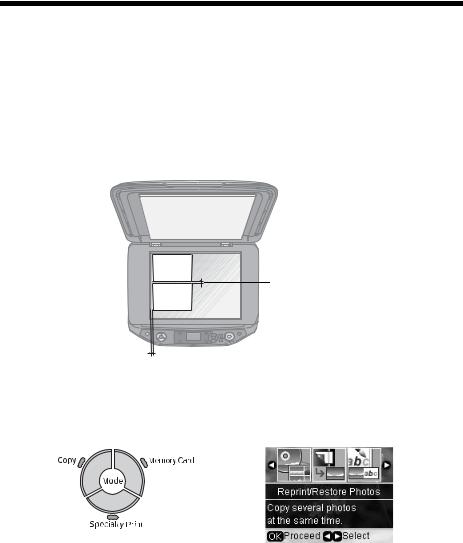
1.Place one or two photos on the scanner glass in the direction shown, making sure they are at least 1/4 inch apart and 1/4 inch from the edges of the glass.
 1/4 inch
1/4 inch
1/4 inch
2.Load your photo paper, as described on page 7.
3.Press the Specialty Print button.
4.Press l or r to highlight Reprint/Restore Photos, then press OK.
5.Press r, use the u or d buttons to set Restoration On, then press OK. (If you want to reprint photos that don’t need color restoration, choose Off.
6.Press OK again. When you see a message about the placement of your photos, press OK.
18 Copying a Photo or Document
The photo(s) are scanned and restored. You see a preview on the LCD screen.
Note:
The preview does not reflect restored color.
7.If you want to crop your photo, press the Display/Crop button and adjust the size and position of the yellow box. See page 36 for more information about cropping.
8.If you’re copying two photos, press r to preview the second photo. Repeat step 7 if you want to crop the second photo.
9.Press the x Print Settings button.
10.Press u or d to choose from the settings listed below, then press r. Press OK when you are done.
■Paper Type: choose Prem. Glossy, Ultra Glossy, Photo Paper, or
Matte, depending on the type of paper you’re using.
■Paper Size: choose the size of the paper you loaded.
■Layout: choose Border or Borderless.
■Quality: this setting can’t be changed from Standard when you are reprinting or restoring photos.
■Color Effect: choose Off (to print in color) or B&W (to print in black and white).
■Expansion: When you print borderless photos, your image is slightly expanded and cropped to fill the sheet of paper. If too much of your photo edges are cut off, select Mid or Min.
11.Press the x Start button to print your photo or photos.
Note:
If you need to cancel printing, press the y Stop/ Clear Settings button.
Reprinting Photos and Restoring Color 19
Printing From a Memory Card
The RX580 lets you print color photos directly from your digital camera’s memory card; just insert it into one of the memory card slots on the RX580 and you’re ready to print. You can follow the same steps to print photos from a USB flash drive.
The color and lighting in your images are automatically corrected. You can also crop your photos, manually adjust the brightness and contrast, and correct red eyes—all without using your computer!
See these sections:
■“Compatible Cards and Image Formats” on page 21
■“Inserting the Card” on page 22
■“Printing From a USB Flash Drive” on page 23
■“Viewing Photos” on page 24
■“Printing Photos” on page 25
■“Printing an Index Sheet to Select Photos” on page 31
■“Touching Up Your Photos” on page 34
■“Cropping Your Photos” on page 36
■“Printing Photo Greeting Cards” on page 38
■“Printing Camera-Selected DPOF Photos” on page 40
■“Restoring Default Settings” on page 40
For instructions on copying memory card files between your RX580 and a computer, or on printing from a Bluetooth device, see your on-screen User’s Guide.
To print directly from your digital camera, mobile phone, or PDA, see page 41.
20 Printing From a Memory Card
Compatible Cards and Image Formats
You can use the following types of cards with your RX580:
Slot |
Type of card |
|
Top slot |
xD-Picture Card™ |
|
|
xD-Picture Card Type M |
|
|
xD-Picture Card Type H |
|
|
MagicGate™ Memory Stick |
|
|
MagicGate Memory Stick Duo* |
|
|
Memory Stick™ |
|
|
Memory Stick Duo™* |
|
|
Memory Stick PRO™ |
|
|
Memory Stick PRO Duo™* |
|
|
MultiMediaCard |
|
Top slot |
SD™ Card |
|
SDHC Card |
||
|
||
|
miniSD™ Card* |
|
|
miniSDHC Card* |
|
|
microSD Card* |
|
|
microSDHC Card* |
|
Bottom slot |
CompactFlash® |
|
|
Microdrive™ |
* Adapter required
Bottom slot
The RX580 supports image files that meet the following requirements:
Media format |
Compliant with DCF version 1.0 or 2.0 |
|
|
File format |
JPEG or TIFF, DOS FAT (FAT 12 or 16, one partition) taken with |
|
a DCF version 1.0 or 2.0 compliant digital camera |
|
Supports Exif version 2.21 |
|
|
Image size |
80 × 80 pixels to 9200 × 9200 pixels |
|
|
Number of files |
Up to 999 |
|
|
Compatible Cards and Image Formats 21

Inserting the Card
1.Make sure the RX580 is turned on.
2.Open the memory card slot cover.
Caution:
If your card requires an adapter, make sure you insert it into the adapter before you insert it in the slot. Otherwise, the card may get stuck in the slot. Do not insert more than one card at a time, and do not force the card into the slot.
3.Make sure the memory card access light is off and that no cards are in any of the slots, then insert your card into the correct slot. See page 21 for details.
The memory card access light flashes and then stays on.
Memory card access light
4. Close the memory card slot cover. See page 25 for printing instructions.
22 Printing From a Memory Card
When you want to remove the card, make sure the memory card access light is not flashing, then pull the card straight out of its slot.
Caution:
Do not remove the card or turn off the RX580 while the memory card access light is flashing; you may lose photos on the card.
If your RX580 is connected to a computer running Windows 2000 or XP, never turn off the RX580 or disconnect the USB cable when a memory card is inserted; you may lose photos on the card.
On a Macintosh, always drag the memory card icon on the desktop into the trash to eject the card before you turn off the scanner or unplug the USB cable. Otherwise, you may lose photos on the card.
Printing From a USB Flash Drive
When your photos are saved on a USB flash drive, you can print directly from the drive.
1.Make sure the RX580 is turned on, and there are no memory cards inserted in its memory card slots.
Note:
If a memory card is inserted, the RX580 will not recognize the external USB drive.
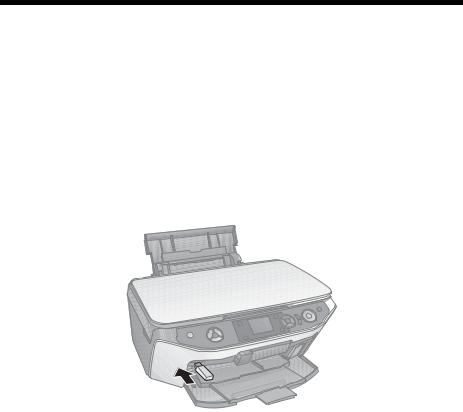
2.Plug the flash drive directly to the external device USB port (labelled EXT.I/F) on the front of the RX580.
Printing From a USB Flash Drive 23
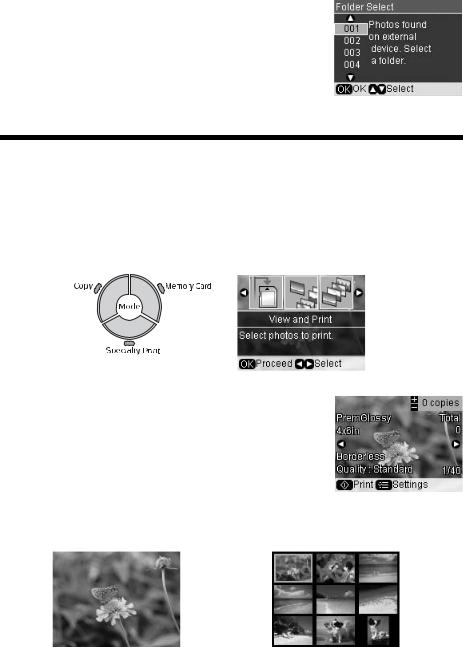
3.If you see this screen, press u or d to select the folder to print from, then press OK.
4.You can select and print your photos the same as from a memory card. See the following sections for instructions.
Viewing Photos
You can view each photo individually, play a slide show of your photos, or display nine photos at once. First, insert your memory card or USB flash drive as described above.
1. Press the Memory Card mode button.
2.Press l or r to select View and Print, then press OK.
You see your first photo, with information as shown:
■To view the photo only, without the information, press the Display/Crop button twice.
■To view nine photos at a time, press the Display/Crop button again.
24 Printing From a Memory Card
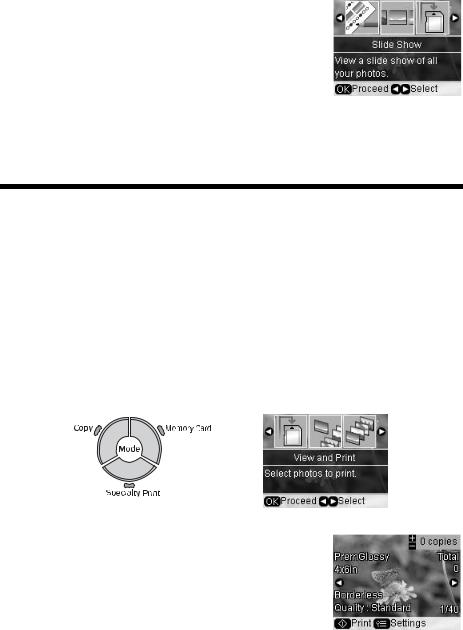
3.If you want to view a slide show of your photos, press l or r to select Slide Show.
4.Press OK to start displaying your photos one by one.
■If you want to pause or replay the show, press u or d.
■If you see a photo you want to print, press OK. Then skip to step 5 on page 26.
Printing Photos
Before you begin, make sure the RX580 is in Memory Card mode and you have inserted your camera’s memory card (see page 21) or your USB flash drive (see page 23).
Viewing and Printing Individual Photos
The View and Print Photos option lets you preview and choose individual photos to print.
1. Press the Memory Card mode button.
2.Press l or r to choose View and Print, then press OK.
3.Press l or r to choose the photo you want to print.
Printing Photos 25
4. When you see a photo you want to print, press the Copies + button. If you want more than one copy, press the Copies + button again.
5. Repeat steps 2 and 3 for each additional photo you want to print.
6.Press the x Print Settings button and choose your print settings (see page 28).
If you loaded 4 × 6 Premium Photo Paper Glossy, skip to step 8.
7.Press OK to confirm your print settings and selections.
8.Make sure you have paper loaded, then press the x Start button to print your photos.
Note:
If you need to cancel printing, press the y Stop/Clear Settings button.
Printing All the Photos on a Memory Card
You can print all the photos on your memory card at once. Before you start, make sure you press the Memory Card mode button.
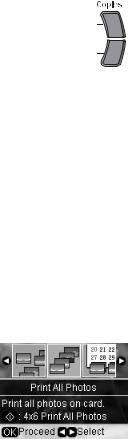
1.Press l or r to choose Print All Photos, then press
OK.
To print one copy of all your photos on 4 × 6 Premium Photo Paper Glossy, skip to step 4.
2.If you want more than one copy of all your photos, press the Copies + button.
3.Press the x Print Settings button and choose your print settings (see page 28), then press OK.
4.Make sure you have enough paper loaded, then press the x Start button to print your photos.
Note:
If you need to cancel printing, press the y Stop/Clear Settings button.
26 Printing From a Memory Card
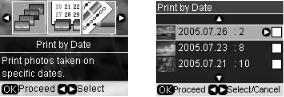
Printing Photos from Specific Dates
The Print by Date feature lets you print photos that were taken on a specific date. Before you start, make sure you press the Memory Card mode button.
1. Press l or r to choose Print by Date, then press OK to display a list of dates.
2.Press u or d to highlight a date, then press r to select it.
A checkmark appears in the box for the date you selected. If you want to cancel your selection, press r again.
3.Repeat step 2 for each date you want to choose for printing, then press OK.
4.If you want more than one copy of your set of photos, press the Copies + button. Then press OK.
5.To view the photos taken on the dates you selected, press l or r. All photos taken on those dates are automatically selected for printing. If you see a photo that you don’t want to print, press the Copies – button to deselect it.
6.Press the x Print Settings button and choose your print settings (see page 28), then press OK.
7.Press the x Start button to print your photos.
Note:
If you need to cancel printing, press the y Stop/Clear Settings button.
Printing Photos 27
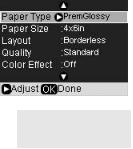
Choosing Print Settings
After choosing the photos you want to print, make sure you choose the appropriate settings for your paper type, size, and print layout, as described below. The settings you choose will apply to all your selected photos, and the RX580 will save your settings, even after you turn it off.
1.Press the x Print Settings button.
2.Press r to choose Paper Type.
3.Use u or d to select the setting that matches the type of paper you loaded, then press OK. Refer to the table below:
|
Select this Paper |
For this paper |
Type setting |
|
|
Epson Premium Photo Paper Glossy |
PremGlossy |
Epson Premium Glossy Photo Paper |
|
|
|
Epson Ultra Premium Photo Paper Glossy |
UltraGlossy |
Epson Ultra Premium Glossy Photo Paper |
|
|
|
Epson Photo Paper Glossy |
Photo Paper |
Epson Glossy Photo Paper |
|
|
|
Plain paper |
Plain Paper |
Epson Bright White Paper |
|
Epson Iron-on Cool Peel Transfer Paper |
|
|
|
Epson Premium Presentation Paper Matte |
Matte |
Epson Matte Paper Heavyweight |
|
Epson Premium Presentation Paper Matte Double-sided |
|
Epson Double-sided Matte Paper |
|
Epson Presentation Paper Matte |
|
Epson Photo Quality Ink Jet Paper |
|
Epson Photo Quality Self Adhesive Sheets |
|
|
|
4.Press d to highlight Paper Size, then press r to display a list of sizes.
5.Press u or d to choose your paper size, then press OK.
6.Press d to highlight Layout, then press r to display a list of layouts.
28 Printing From a Memory Card

7. Press u or d to select one of the following layout options, then press OK.
|
|
|
|
|
|
|
Borderless |
Prints one photo per sheet, borderless; rotates the photo |
|
|
|
|
|
|
|
|
to fit on the paper as necessary. |
|
|
|
|
|
|
|
Border |
Prints one photo per sheet with borders around the edges; |
|
|
|
|
|
|
|
|
rotates the photo to fit on the paper as necessary. |
|
|
|
|
|
|
|
Upper Half |
Prints a photo on the top half of the sheet. |
|
|
|
|
|
|
|
Photo ID |
Prints photos in two different wallet sizes on one sheet of |
|
|
|
|
|
|
|
||
|
|
|
|
|
|
|
|
paper (available only on 4 x 6 paper) |
|
|
|
|
|
|
|
|
|
|
|
|
|
|
|
|
|
|
|
|
|
|
|
|
|
Wallet |
Prints nine wallet-size copies of your photo on one sheet of |
|
|
|
|
|
|
|
||
|
|
|
|
|
|
|
|
paper (available only on letter-size paper). |
|
|
|
|
|
|
|
|
|
|
|
|
|
|
|
|
|
|
|
|
|
|
|
|
|
2-up |
Prints two photos per sheet. |
|
|
|
|
|
|
|
||
|
|
|
|
|
|
|
||
|
|
|
|
|
|
|
4-up |
Prints four photos per sheet. |
|
|
|
|
|
|
|
||
|
|
|
|
|
|
|
||
|
|
|
|
|
|
|
||
|
|
|
|
|
|
|
||
|
|
|
|
|
|
|
8-up |
Prints eight photos per sheet. |
|
|
|
|
|
|
|
||
|
|
|
|
|
|
|
||
|
|
|
|
|
|
|
20-up |
Prints 20 photos per sheet, along with the photo number |
|
|
|
|
|
|
|
|
and date for each photo. |
|
|
|
|
|
|
|
30-up |
Prints 30 photos per sheet, along with the photo number |
|
|
|
|
|
|
|
||
|
|
|
|
|
|
|
|
and date for each photo (available only on 5 x 7 paper). |
|
|
|
|
|
|
|
|
|
|
|
|
|
|
|
|
80-up |
Prints 80 photos per sheet, along with the photo number |
|
|
|
|
|
|
|
||
|
|
|
|
|
|
|
|
and date for each photo (available only on 8 x 10 or letter- |
|
|
|
|
|
|
|
|
size paper). |
Note:
Some layout settings are not available for all paper types and sizes. If you don’t see the entire image in your prints, make sure you turn off the Fit Frame setting (see page 37).
8.Press d to highlight Quality, then press r. Press u or d to select Draft, Standard, or Best, then press OK. Note that printing is slower when you use the Best Quality setting.
9.Press u or d to highlight the settings shown in the following table, then press r to display the list of options. Press u or d to select the option you want, then press OK.
Printing Photos 29
 Loading...