


 Loading...
EPSON Perfection 1640SU
EPSON Perfection 1640SU PHOTO
EPSON Perfection 1640SU OFFICE
Scanner Basics
Printed on recycled paper
Copyright Notice
All rights reserved. No part of this publication may be reproduced, stored in a retrieval system, or transmitted in any form or by any means, electronic, mechanical, photocopying, recording, or otherwise, without the prior written permission of SEIKO EPSON CORPORATION. The information contained herein is designed only for use with this EPSON scanner. EPSON is not responsible for any use of this information as applied to other scanners.
Neither SEIKO EPSON CORPORATION nor its affiliates shall be liable to the purchaser of this product or third parties for damages, losses, costs, or expenses incurred by purchaser or third parties as a result of: accident, misuse, or abuse of this product or unauthorized modifications, repairs, or alterations to this product, or (excluding the U.S.) failure to strictly comply with SEIKO EPSON CORPORATION’s operating and maintenance instructions.
SEIKO EPSON CORPORATION shall not be liable for any damages or problems arising from the use of any options or any consumable products other than those designated as Original EPSON Products or EPSON Approved Products by SEIKO EPSON CORPORATION.
A Note Concerning Responsible Use of Copyrighted Materials
Digital cameras and scanners, like photocopiers and conventional scanners, can be misused by improper copying of copyrighted material. While some countries’ laws permit limited copying of copyrighted material in certain circumstances, those circumstances may not be as broad as some people assume. EPSON encourages each user to be responsible and respectful of the copyright laws when using digital cameras and scanners.
Trademarks
EPSON and EPSON Stylus are registered trademarks and EPSON Smart Panel is a trademark of SEIKO EPSON CORPORATION.
EPSON Perfection and ColorTrue are registered trademarks, and Micro Step Drive, EPSON Software, and EPSON Store are trademarks of Epson America, Inc.
General Notice: Other product names used herein are for identification purposes only and may be trademarks of their respective owners. EPSON disclaims any and all rights in those marks.
Copyright © 2000 by Epson America, Inc. |
CPD-10858 |
|
8/00 |
Contents
A COMPLETE SCANNING SOLUTION |
1 |
About Your Scanner |
1 |
About Your Documentation |
2 |
Cautions, Notes, and Tips |
2 |
SETTING UP YOUR SCANNER |
3 |
Unpack Your Scanner |
3 |
Choose a Good Place for Your Scanner |
4 |
Unlock the Scanner |
5 |
Connect the Scanner to Your Computer |
6 |
USB |
6 |
SCSI |
7 |
Install the EPSON TWAIN Driver |
8 |
If You’re Running Windows 98 or Windows 2000 . . . |
8 |
If You’re Running Windows 95 . . . |
12 |
If You’re Running Windows NT 4.0 . . . |
15 |
If You’re Using a Macintosh . . . |
17 |
Install the Scanner and Bonus Software |
19 |
Viewing Your Electronic Manuals |
22 |
Viewing Your HTML Reference Guide |
22 |
Viewing Your EPSON Smart Panel PDF Manual |
25 |
BASIC SCANNING |
27 |
Placing Your Original Document |
27 |
Using EPSON Smart Panel |
28 |
Setting Up the Start Button in EPSON Smart Panel |
29 |
Contents i
Scanning Projects |
31 |
Scanning to E-mail |
31 |
Scanning to OCR |
32 |
Scanning and Printing Photos |
34 |
Scanning Something That Doesn’t Fit Under the Document Cover |
36 |
ADVANCED SCANNING WITH EPSON TWAIN |
37 |
Scanning with EPSON TWAIN |
37 |
Selecting TWAIN from Your Application |
38 |
Using EPSON TWAIN |
39 |
Selecting TWAIN Settings |
42 |
Tips for Getting the Best Scan |
43 |
Recommended Settings |
43 |
Selecting Resolution |
44 |
Scaling (Resizing) Images |
44 |
TRANSPARENCY UNIT |
45 |
Unpacking the Transparency Unit |
45 |
Installing the Transparency Unit |
46 |
Loading Transparencies |
47 |
Using Film Holders |
47 |
Placing the Film |
47 |
Loading 35 mm Negative or Positive Film |
48 |
Loading Brownie Size Film |
48 |
Loading 4 x 5 inch Film |
49 |
Loading Slides and Film Directly on the Document Table |
50 |
Selecting Settings |
51 |
Scanning Reflective (Non-Transparent) Documents or Photographs |
52 |
Removing the Transparency Unit |
52 |
ii Contents
AUTO DOCUMENT FEEDER |
53 |
Unpacking the Auto Document Feeder |
53 |
Installing the Auto Document Feeder |
54 |
Using the Auto Document Feeder |
55 |
Loading Paper into the Auto Document Feeder |
55 |
Selecting Settings |
56 |
Loading Documents Manually |
57 |
SCANNER MAINTENANCE |
59 |
Transporting the Scanner |
59 |
Cleaning the Scanner |
60 |
PROBLEM SOLVING |
61 |
Scanner Light and Buttons |
61 |
Problems and Solutions |
62 |
Setup Problems |
62 |
Scanner Problems |
63 |
Software Problems |
64 |
Scanning Problems |
67 |
Where To Get Help |
73 |
EPSON Technical Support |
73 |
Bonus Software Technical Support |
74 |
REQUIREMENTS AND NOTICES |
75 |
System Requirements |
75 |
Windows |
75 |
Macintosh |
76 |
Important Safety Instructions |
77 |
FCC Compliance Statement |
78 |
DECLARATION of CONFORMITY |
79 |
Contents iii
ENERGY STAR Compliance |
79 |
Warranty |
80 |
INDEX |
83 |
iv Contents

A Complete Scanning Solution
Your EPSON Perfection® 1640SU scanner is a high-quality scanner for business, home, or school. Using the EPSON® ColorTrue® Imaging System, the scanner captures your images with amazing detail and accurate colors.
About Your Scanner
Your EPSON Perfection 1640SU scanner includes the following features:
■Superior image quality:
■True optical resolution of 1600 dots per inch (dpi)
■Hardware resolution of 1600 × 3200 dpi with Micro Step Drive™ technology
■Maximum resolution of 12,800 × 12,800 dpi with interpolation
■Start button for easy, one-touch scanning
■42-bit color and 14-bit grayscale image capture
The EPSON Perfection 1640SU PHOTO includes a transparency unit for scanning negatives, slides, and positive film.
The EPSON Perfection 1640SU OFFICE includes an auto document feeder to quickly scan multi-page documents.
For a list of software included with your scanner, see the inside front cover.
A Complete Scanning Solution 1

About Your Documentation
This guide includes instructions for setting up your scanner, scanning tips, and troubleshooting advice. It also includes instructions for viewing your electronic manual. For details on using the scanner software, see your electronic Reference Guide.
Cautions, Notes, and Tips
Please follow these guidelines as you read your documentation:
Cautions must be observed to avoid damage to your equipment.
Notes contain important information about your scanner.
Tips contain hints for great scanning.
2 A Complete Scanning Solution
Setting Up Your Scanner
Setting up your scanner is easy—just follow the simple steps in this chapter in the order listed below.
1.Unpack and choose a place for your scanner.
2.Unlock the scanner.
3.Connect the scanner to your computer.
4.Install the EPSON TWAIN driver.
5.Install the software and view your electronic manuals.
Unpack Your Scanner
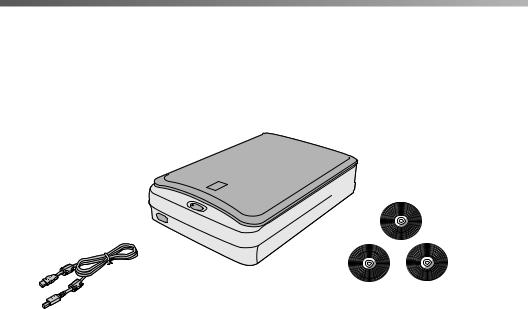
Remove the scanner from the box, then remove the packing material from your scanner. Save the packaging in case you need it later. Your EPSON Perfection 1640SU comes with this Scanner Basics book and the items shown below.
|
scanner |
USB interface cable |
2 or 3 CD-ROMs with driver, |
electronic manuals, scanner |
|
|
software, and bonus software |
The EPSON Perfection 1640SU and EPSON Perfection 1640SU PHOTO scanners include three CD-ROMs. The EPSON Perfection 1640SU OFFICE scanner includes two CD-ROMs.
Setting Up Your Scanner 3

The EPSON Perfection 1640SU PHOTO also includes the transparency unit and several film holders. See page 46 for installation instructions.
film holders
transparency unit
The EPSON Perfection 1640SU OFFICE includes an auto document feeder, which comes with the scanner instead of the document cover. See page 53 for instructions on unpacking and installing your auto document feeder.
auto document feeder
paper support
spare paper path guide
document mat
Choose a Good Place for Your Scanner
Here are some points to consider:
■Place the scanner on a flat, stable surface. If the scanner is tilted, it can’t operate properly.
■Make sure to place the scanner where you can easily unplug the power cord, and where the USB or SCSI cable can reach your computer.
■Keep the scanner away from direct sunlight and strong light sources.
■Avoid places subject to shocks and vibrations, or high or rapidly changing temperatures and humidity.
4 Setting Up Your Scanner
■Be sure there’s enough room behind the scanner for the cables, and above the scanner so you can fully raise the document cover. If you’re using the auto document feeder, make sure there’s enough room in front of the scanner to pull out the lower paper support.
18.5inches (47 cm)
3.8 inches (9.6 cm) when document cover is closed
11.4 inches (28.9 cm)
when document cover is open
 at least
3.9 inches (10 cm)
17.4 inches
(44.2 cm)
If you attach the transparency unit or auto document feeder to your scanner, the dimensions will differ from the ones listed above.
Unlock the Scanner
Before connecting the scanner to a power source, you must release the transportation lock, located on the side of the scanner.
Turn the transportation lock down to the unlocked position using a coin or similar object, as shown.
Setting Up Your Scanner 5
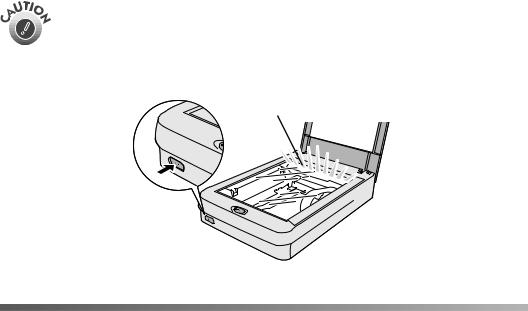
If you can’t turn the transportation lock easily, plug the scanner in; then, after a minute, unplug the scanner and try again.
Always lock the scanner carriage before transporting it; otherwise, the scanner may be damaged. Be sure the scanner lamp is in the home position (toward the back of the scanner). To ensure this, always turn on, then turn off the scanner using the P Operate button before locking the carriage.
home position
Connect the Scanner to Your Computer
You can connect your scanner with SCSI or USB. See the sections below.
USB
If you are connecting to a PC, Microsoft® Windows® 98 or Windows 2000 must be preinstalled on your system.
1.Make sure the scanner is unplugged, and the computer and any USB devices connected to your computer are turned off.
2.Locate the USB cable that came with your scanner.
6 Setting Up Your Scanner
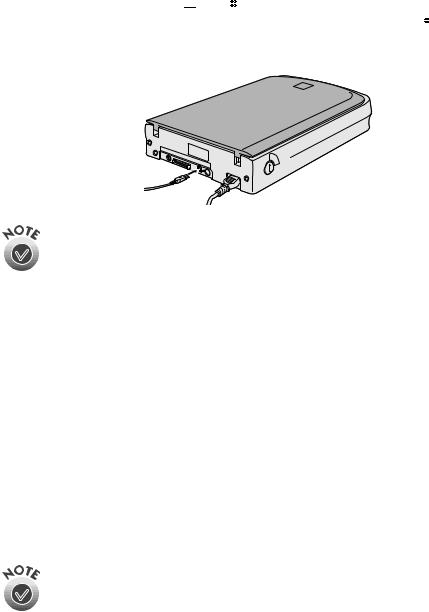
3.Plug the square connector 

 on the USB cable into the USB connector on the back of the scanner. Then plug the flat connector


 into the USB port on your computer or self-powered USB hub.
Your system may not work correctly if you use a USB cable other than the one supplied by EPSON or if you connect your scanner through more than one hub.
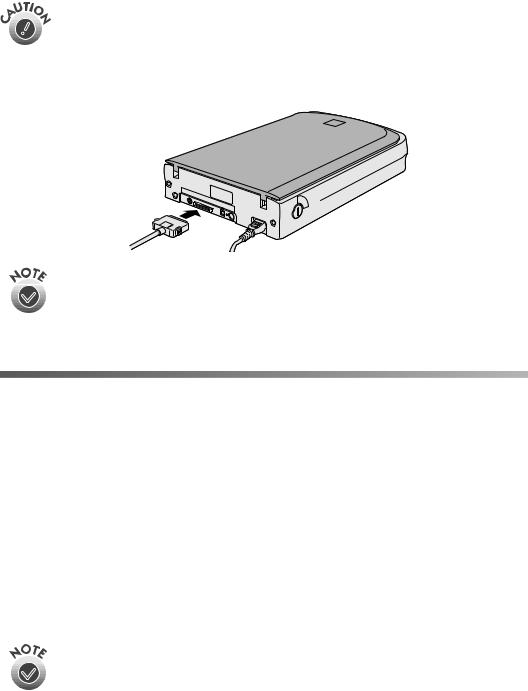
SCSI
If your computer does not have a SCSI port, you need to add a SCSI adapter board to your computer. You also need a SCSI cable. See pages 75 and 76 for adapter and cable specifications.
Set the SCSI ID Number
The scanner is preset at the factory to SCSI ID 2. If you need to change this number, turn the scanner off. Then use the tip of a small flathead screwdriver to turn the rotary switch on the back panel. Be sure to choose a unique number that doesn’t conflict with the ID number of other SCSI devices (including the SCSI interface board itself, which is usually ID 7).
Don’t use SCSI ID 8 or 9 for your scanner; these are for factory use only. Don’t use SCSI ID 0 or 1; these are reserved for storage devices.
For more information on setting your SCSI ID number, see your electronic Reference Guide, as described on page 22.
Setting Up Your Scanner 7
Connect the Scanner to Your Computer
Make sure the scanner, computer, and any SCSI devices connected to your computer are turned off. The scanner is off when the P Operate button is out (not pushed down below the surface of the panel).
Attach your SCSI cable to the scanner. The scanner is self-terminated and must be the last device in the chain.
Your scanner does not include a SCSI cable. The length of the SCSI cable must not exceed 9.8 feet (3 meters). If you are connecting multiple SCSI devices, the total length of the SCSI bus (cables) must not exceed
19.7 feet (6 meters); otherwise the system may not work properly.
Install the EPSON TWAIN Driver
The scanner comes with two CD-ROMs: one for Adobe® PhotoDeluxe® and the other for your EPSON TWAIN driver, scanner software, bonus software, and electronic documentation. If you have the EPSON Perfection 1640SU or the EPSON Perfection 1640SU PHOTO, your scanner also includes a third CD-ROM with Adobe Photoshop® 5.0 LE.
If You’re Running Windows 98 or Windows 2000 . . .
You may be asked to insert your Windows operating system CD-ROM during the scanner installation. Have your Windows CD-ROM handy, in case you need it.
The illustrations in this section show Windows 98 screens. The screens in Windows 2000 look different, but the steps are almost identical; any differences are noted in the instructions below.
8 Setting Up Your Scanner
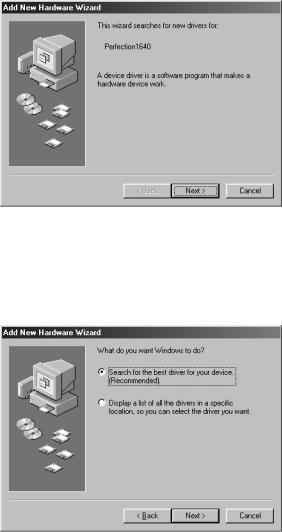
1.Make sure your scanner is turned on and connected to the computer; then turn on your computer. A screen appears saying that your system has detected new hardware. Then the New Hardware Wizard screen appears.
2.Insert the scanner software CD-ROM in the CD-ROM or DVD drive, then click
Next.
3.Select the Search for the best driver for your device option (or Search for a suitable driver for your device in Windows 2000), then click Next.
Setting Up Your Scanner 9
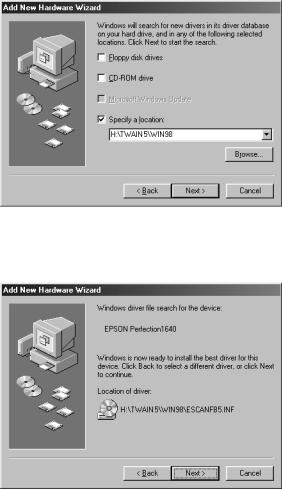
4.Check Specify a location, click Browse, select the TWAIN 5\WIN98 or
TWAIN 5\WIN2000 folder, then click OK.
5.When you return to the New Hardware Wizard, click Next. Windows finds the driver for your scanner and you see the following screen:
6.Click Next to install your TWAIN driver.
If your system stops installation and requests files from your Windows operating system CD-ROM, replace your scanner software CD-ROM with your Windows disk and click OK to continue. You may be prompted to re-insert the EPSON disk.
10 Setting Up Your Scanner
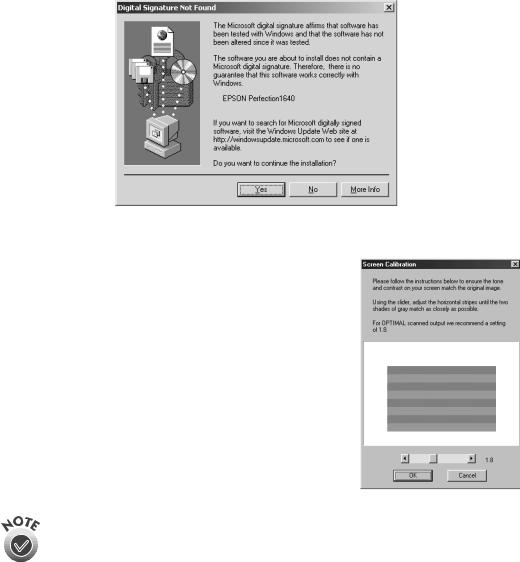
7. In Windows 2000, you see the following screen:
Click Yes to finish installing your TWAIN driver.
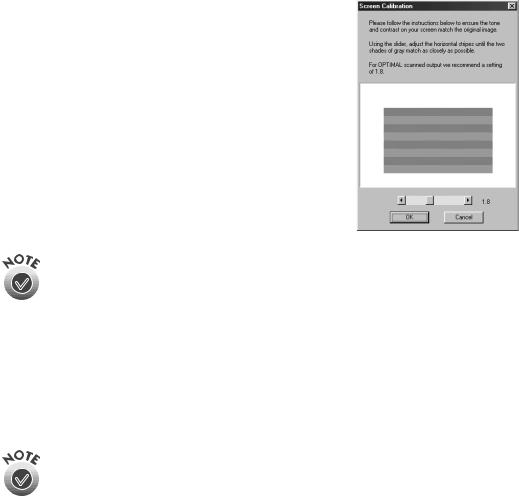
8.After the scanner software installation is complete, the Screen Calibration utility automatically starts. You must calibrate your screen and scanner to reproduce images closely matching the originals.
In the following window, move the slider to the right or left until the shades of the horizontal gray stripes appear similar. View the screen from a short distance. The gray stripes will not perfectly blend together; however, try to make the two tones match as closely as possible. For best print results from an EPSON ink jet printer, select a setting of 1.8.
9.Click OK to register the calibration setting.
You don’t need to change the screen calibration again so long as you continue to use the same monitor. If you need to recalibrate your screen at a later time, see your electronic Reference Guide for instructions.
Setting Up Your Scanner 11
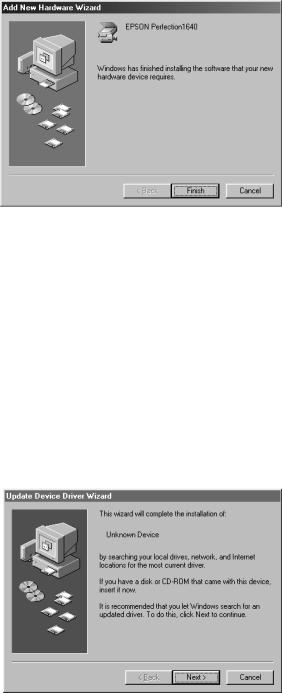
10. Click Finish to exit the New Hardware Wizard.
11.Now you can install your scanner software and bonus software as described on page 19.
If You’re Running Windows 95 . . .
You may be asked to insert your Windows operating system CD-ROM during the scanner installation. Have your Windows CD-ROM handy, in case you need it.
1.Make sure your SCSI board and SCSI driver are installed and the scanner is connected to your computer.
2.Turn on your scanner first, then turn on your computer. When you see the screen below, click Next.
12 Setting Up Your Scanner

3. When you see the next screen, click Other Locations.
4.Make sure your scanner software CD-ROM is in the drive. Browse to the following location on your CD-ROM drive: TWAIN 5\WIN95. Then click OK. (The example shows F as the CD-ROM drive. Your CD-ROM drive letter may be different.)
5. When you see the window below, click Finish. Then restart your computer.
Setting Up Your Scanner 13
6.Once your computer restarts, double-click  My Computer, then double-click the
  Epson CD-ROM icon. The CD-ROM window opens.
7.Double-click  EPSON.exe.
8.The software License Agreement appears. After reading the license agreement, click Agree to continue with the installation.
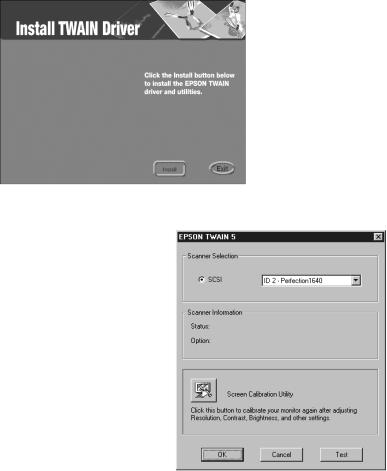
9.You see the Install TWAIN Driver screen. Click Install.
Follow the instructions on the screen to install your TWAIN driver.
10.When installation is complete, you see the window on the right. Make sure Perfection1640 appears in the Scanner Selection list.
11.Click Test to check the connection. If the scanner software is installed correctly, you see
Status: Device Ready under Scanner Information. Click OK to close the window.
14 Setting Up Your Scanner
12.After the scanner software installation is complete, the Screen Calibration utility automatically starts. You must calibrate your screen and scanner to reproduce images closely matching the originals.
In the following window, move the slider to the right or left until the shades of the horizontal gray stripes appear similar. View the screen from a short distance. The gray stripes will not perfectly blend together; however, try to make the two tones match as closely as possible. For best print results from an EPSON ink jet printer, select a setting of 1.8.
13.Click OK to register the calibration setting.
You don’t need to change the screen calibration again so long as you continue to use the same monitor. If you need to recalibrate your screen at a later time, see your electronic Reference Guide for instructions.
14. The Setup completion dialog box appears. Click OK.
Now you can install your scanner software and bonus software as described on page 19.
If You’re Running Windows NT 4.0 . . .
You may be asked to insert your Windows operating system CD-ROM during the scanner installation. Have your Windows CD-ROM handy, in case you need it.
1.Make sure your SCSI board and SCSI driver are installed and the scanner is connected to your computer.
2.Turn on your scanner first, then turn on your computer.
3.Log onto Windows NT® and insert your scanner software CD-ROM in your drive.
4.Double-click  My Computer, then double-click the
  Epson CD-ROM icon. The CD-ROM window opens.
5.Double-click  EPSON.exe.
6.The software License Agreement appears. After reading the license agreement, click Agree to continue with the installation.
Setting Up Your Scanner 15

7. You see the Install TWAIN Driver screen. Click Install.
Follow the instructions on the screen to install your TWAIN driver.
8.When installation is complete, you see the window on the right. Make sure Perfection1640 appears in the Scanner Selection list.
9.Click Test to check the connection. If the scanner software is installed correctly, you see
Status: Device Ready under Scanner Information. Click OK to close the window.
16 Setting Up Your Scanner
10.After the scanner software installation is complete, the Screen Calibration utility automatically starts. You must calibrate your screen and scanner to reproduce images closely matching the originals.
In the following window, move the slider to the right or left until the shades of the horizontal gray stripes appear similar. View the screen from a short distance. The gray stripes will not perfectly blend together; however, try to make the two tones match as closely as possible. For best print results from an EPSON ink jet printer, select a setting of 1.8.
11.Click OK to register the calibration setting.
You don’t need to change the screen calibration again so long as you continue to use the same monitor. If you need to recalibrate your screen at a later time, see your electronic Reference Guide for instructions.
12. The Setup completion dialog box appears. Click OK.
Now you can install your scanner software and bonus software as described on page 19.
If You’re Using a Macintosh . . .
If your iMac™ is running OS 8.1, you’ll need to upgrade your operating system to OS 8.5.1, or later, before installing your scanner software. To find out which operating system your iMac is running, select About This Computer in the Apple menu.
1.Make sure your scanner is plugged in to a power source and connected to the computer. Then turn on your Macintosh® and turn off any virus protection programs.
If you see a message stating that you need to install the software for your scanner, click Cancel and continue with step 2 (if you are using OS 8.6, or earlier, click
OK).
2.Insert the scanner software CD-ROM in the CD-ROM or DVD drive.
3.Double-click the EPSON CD-ROM icon to open it, if necessary, then double-click the  EPSON icon.
Setting Up Your Scanner 17
4.The software License Agreement screen appears. After reading the license agreement, click Agree to continue with the installation.
5.You see the Install TWAIN Driver screen. Click Install.
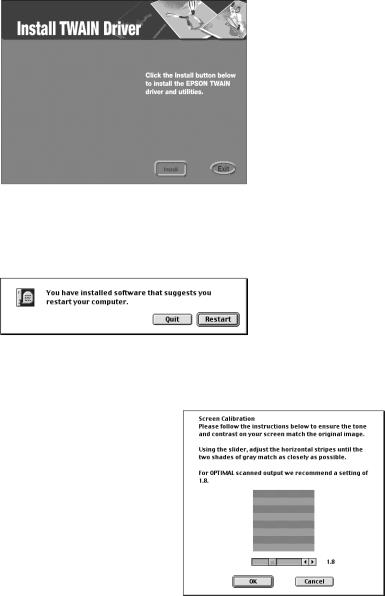
6.You see the EPSON TWAIN Driver Installer screen. Click Install to install your TWAIN driver.
7.When the scanner software installation is complete, you see this screen:
Click Quit. You see the Screen Calibration window. You must calibrate your screen and scanner to reproduce images closely matching the originals.
8.In the following window, move the slider to the right or left until the shades of the horizontal gray stripes appear similar. View the screen from a short distance. The gray stripes will not perfectly blend together; however, try to make the two tones match as closely as possible. For best print results from an EPSON ink jet printer, select a setting of 1.8.
9.Click OK to register the calibration setting.
18 Setting Up Your Scanner

You will not need to change the screen calibration again as long as you continue to use the same monitor. If you need to recalibrate your screen at a later time, select Screen Calibration in the EPSON Scanner folder.
10.Restart your Macintosh.
11.After your computer restarts, install your scanner software and bonus software as described below.
Install the Scanner and Bonus Software
Before you begin, be sure any virus protection programs are turned off.
Be sure to install EPSON Smart Panel,™ ScanSoft™ TextBridge® Pro, and Adobe PhotoDeluxe to take advantage of your scanner’s ] Start button.
Adobe PhotoDeluxe is included on a separate CD-ROM. Follow these steps to install PhotoDeluxe:
In Windows, insert the PhotoDeluxe CD-ROM in your drive, double-click My Computer, then double-click the CD-ROM icon. Open the English\Install folder and double-click Setup.exe. Follow the instructions on the screen and then restart your computer.
On a Macintosh, insert the CD-ROM in your drive and double-click the CD-ROM icon, if necessary. Double-click the English icon, then double-click the Adobe PhotoDeluxe Installer icon. Follow the steps on the screen and then restart your computer.
Follow these steps:
1.Insert the scanner software CD-ROM in your CD-ROM or DVD drive.
2.Windows: Double-click  My Computer, then double-click the
  CD-ROM icon. The CD-ROM window opens. Double-click
  EPSON.exe.
Macintosh: Double-click the EPSON CD-ROM icon to open it, if necessary, then double-click the  EPSON icon.
3.The EPSON screen appears. If the software License Agreement screen appears, read the license agreement and click Agree to continue with the installation.
Setting Up Your Scanner 19
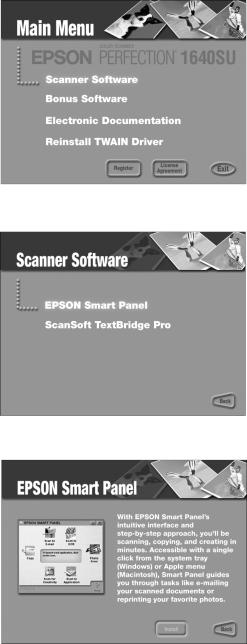
The Main Menu appears on your screen.
4. Click Scanner Software. The Scanner Software screen appears.
5. Click EPSON Smart Panel.
6.Click the Install button and follow the instructions on the screen to install EPSON Smart Panel.
20 Setting Up Your Scanner

7.When the installation is complete, you return to the EPSON Smart Panel install screen. Click Back.
8.From the Scanner Software screen, click ScanSoft TextBridge Pro.
9.Click the Install button and follow the instructions on the screen to install TextBridge Pro.
10.In Windows, when the installation is complete, you return to the TextBridge Pro install screen. Click Back. Click Back again to return to the Main Menu.
For Macintosh, click Restart to restart your computer. When your computer restarts, double-click the EPSON CD-ROM icon to open it, if necessary, then double-click the EPSON icon.
11.Click Bonus Software.
12.Click the application name or button for the program you want to install.
Setting Up Your Scanner 21

13.The install screen appears for the application you selected (the example shown is for ArcSoft™ PhotoMontage™). Click the Install button to install the selected software. (You can skip the installation by clicking the Back button at the bottom of the window.)
14.If the application requires a restart, go back to step 11 after restarting to install another application. If the application does not require a restart, you return to the application’s install screen. Select another application to install or click Back to return to the Main Menu.
If any of the software you installed requires a restart and you did not restart when you installed the software, you should restart your computer now.
Viewing Your Electronic Manuals
You always have easy access to your electronic manuals—just go to the Main Menu screen on your scanner software CD-ROM and click Electronic Documentation.
Viewing Your HTML Reference Guide
Your scanner software CD-ROM includes an electronic Reference Guide for your scanner. The manual is in HTML format, so you need a browser—such as Microsoft® Internet Explorer 3.0 or later or Netscape Navigator® 3.0 or later—to view it. If you are using a different browser, the pages may not display correctly.
22 Setting Up Your Scanner
Loading...