


lx 300

®
9-Pin Dot Matrix Printer
All rights reserved. No part of this publication may be reproduced, stored in a retrieval
system, or transmitted in any form or by any means, electronic, mechanical, photocopying,
recording, or otherwise, without the prior written permission of SEIKO EPSON
CORPORATION. T he information contained herein is d esigned only for use with this EPSON
printer. EPSON is not responsible fo r any use of this inform ation as applied to oth er printers.
Neither SEIKO EPSON CORPORATION nor its affiliates shall be liable to the purchaser of
this product or third parties for damages, losses, costs, or expenses incurred by the purchaser
or third parties as a result of: accident, misuse, or abuse of this product or unauthorized
modifications, repairs, or alterations to this product, or (excluding the U.S.) failure to strictly
comply with SEIKO EPSON CORPORATION’s operating and maintenance instructions.
SEIKO EPSON CORPORATION shall not be liable for any dam ages or problems arising from
the use of any options or any consumable products other than those designated as Original
EPSON Products or EPSON Approved Products by SEIKO EPSON CORPORATION.
EPSON and EPSON ESC/P are registered trademarks of SEIKO EPSON CORPORATION.
Microsoft, Windows, and Windows NT are registered trademarks of Microsoft Corporation.
IBM is a registered trademark of International Business Machines Corporation.
General Notice: Other product names used herein are for identification purposes only and may be
trademarks of their respective owners. EPSON disclaims any and all rights in those marks.
Copyright © 2000 by SEIKO EPSON CORPORATION, Nagano, Japan.
User’s Guide
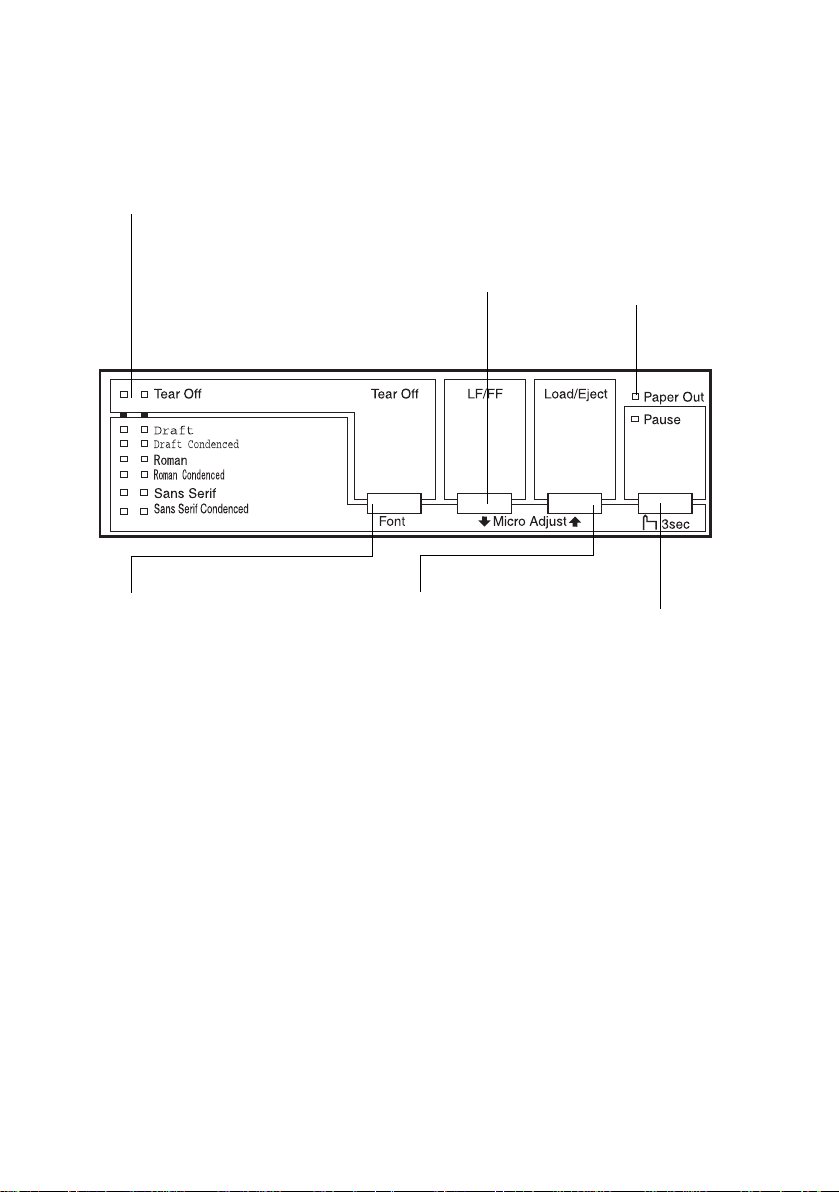
Control Panel Buttons and Lights
Tear Off lights**
when continuous paper is in the
● f f
tear-off position, otherwise the lamps
indicate the selected font.
Tear Off button**
Advances continuous paper to the
●
tear-off position.
Feeds continuous paper backward
●
from the tear-off position to the topof-form position.
LF/FF button
Feed s paper line by
●
line when pressed
and released.
Ejects a single sheet
●
or advances
continuous paper to
the next top-of-form
position when held
down.
Load/Eject button
Loads a single sheet of
●
paper.
Ejects a single sheet of
●
paper if a sheet is
loaded.
Loads continuous paper
●
from the standby
position.
Feeds continuous paper
●
backwards to the
standby position.
Paper Out light
On when no paper is
●
loaded in the
selected paper
source or paper is not
loaded correctly.
Flashes when paper
●
has not been fully
ejected or a paper
jam has occurred.
Pause button
Stops printing temporarily,
and resumes printing
when pressed again.
When pressed for three
seconds, turns on the
micro adjust mode.* To
turn off, press again.
Pause light
On when the printer is
●
paused.
Flashes when the
●
printer is in the micro
adjust mode.*
Flashes when the print
●
head has overheated.
*Micro Adjust mode
When you hold down the Pause button for three seconds, the
printer enters the micro adjust mode. In this mode, you can
press the LF/FFD and Load/EjectU buttons to adjust the topof-form or tear-off position. See Chapter 2, “Using the Printer.”
**Font select
In Micro Adjust mode, you can select the font to use for
printing by pressing the Tear Off button. The Tear Off lights turn
on, off or flash to indicate the selected font.

FCC Compliance Statement For United States Users
This equipment has been tested and found to comply with the limits for a Class B digital
device, pursuant to Part 15 of the FCC Rules. These limits are designed to provide reasonable
protection against harmful interference in a residential installation. This equipment
generates, uses, and can radiate radio frequency energy and, if not installed and used in
accordance with the instructions, may cause harmful interference to radio or television
reception. However, there is no guarantee that interference will not occur in a particular
installation. If this equipment does cause interference to radio and television reception, which
can be determined by turning the equipment off and on, the user is encouraged to try to
correct the interference by one or more of the following measures.
Reorient or relocate the receiving antenna
❑
Increase the separation between the equipment and receiver
❑
Connect the equipment into an outlet on a circuit different from that to which the receiver
❑
is connected
Consult the dealer or an experienced radio/TV technician for help.
❑
WARNING
The connection of a non-shielded equipment interface cable to this equipment will invalidate
the FCC Certification of this device and may cause interference levels which exceed the limits
established by the FCC for this equipment. It is the responsibility of the user to obtain and
use a shielded equipment interface cable with this device. If this equipment has more than
one interface connector, do not leave cables connected to unused interfaces.
Changes or modifications not expressly approved by the manufacturer could void the user’s
authority to operate the equipment.
For Canadian Users
This Class B digital apparatus complies with Canadian ICES-003.
Cet appareil numérique de la classe B est conforme à la norme NMB-003 du Canada.
ii

Contents
Getting to Know Your Printer
Important Safety Instructions . . . . . . . . . . . . . . . . . . . . . . . . . . . . . 2
Print Head Caution Symbol. . . . . . . . . . . . . . . . . . . . . . . . . . . . . . . 3
ENERGY STAR Compliance . . . . . . . . . . . . . . . . . . . . . . . . . . . . . . 4
For United Kingdom Users . . . . . . . . . . . . . . . . . . . . . . . . . . . . . . . 4
Use of options . . . . . . . . . . . . . . . . . . . . . . . . . . . . . . . . . . . . . . 4
Safety information . . . . . . . . . . . . . . . . . . . . . . . . . . . . . . . . . . 4
Warnings, Cautions, and Notes. . . . . . . . . . . . . . . . . . . . . . . . . . . . 5
Chapter 1 Setting Up the Printer
Unpacking the Printer. . . . . . . . . . . . . . . . . . . . . . . . . . . . . . . . . . . . 1-2
Choosing a place for the printer . . . . . . . . . . . . . . . . . . . . . . . 1-3
Assembling the Printer . . . . . . . . . . . . . . . . . . . . . . . . . . . . . . . . . . . 1-5
Installing the paper-feed knob . . . . . . . . . . . . . . . . . . . . . . . . 1-5
Attaching the paper supports. . . . . . . . . . . . . . . . . . . . . . . . . 1-6
Installing the ribbon cartridge . . . . . . . . . . . . . . . . . . . . . . . . 1-7
Plugging in the printer. . . . . . . . . . . . . . . . . . . . . . . . . . . . . . . 1-10
Running the Self Test . . . . . . . . . . . . . . . . . . . . . . . . . . . . . . . . . . . . 1-11
Connecting the Printer to Your Computer . . . . . . . . . . . . . . . . . .1-14
Using the parallel interface . . . . . . . . . . . . . . . . . . . . . . . . . . . 1-14
Using the serial interface . . . . . . . . . . . . . . . . . . . . . . . . . . . . . 1-16
Installing the Printer Software. . . . . . . . . . . . . . . . . . . . . . . . . . . . . 1-17
Installing the software in Windows 95, 98, or NT 4.0 . . . . .1-18
Installing the software in Windows 3.1 or NT 3.5x . . . . . . . 1-19
For DOS programs . . . . . . . . . . . . . . . . . . . . . . . . . . . . . . . . . . 1-20
Chapter 2 Using the Printer
Using the Control Panel . . . . . . . . . . . . . . . . . . . . . . . . . . . . . . . . . . 2-2
Lights and buttons . . . . . . . . . . . . . . . . . . . . . . . . . . . . . . . . . . 2-2
iii

Selecting fonts . . . . . . . . . . . . . . . . . . . . . . . . . . . . . . . . . . . . . 2-4
Printing on Continuous Paper . . . . . . . . . . . . . . . . . . . . . . . . . . . . 2-5
Printing with the push tractor . . . . . . . . . . . . . . . . . . . . . . . . 2-5
Removing a printed document from the push tractor. . . . 2-8
Switching back to single sheets . . . . . . . . . . . . . . . . . . . . . . . 2-10
Printing with the pull tractor . . . . . . . . . . . . . . . . . . . . . . . . . 2-10
Adjusting the top-of-form position. . . . . . . . . . . . . . . . . . . . 2-15
Advancing the paper to the tear-off edge . . . . . . . . . . . . . . 2-17
Printing on Single Sheets. . . . . . . . . . . . . . . . . . . . . . . . . . . . . . . . . 2-20
Loading single sheets . . . . . . . . . . . . . . . . . . . . . . . . . . . . . . . 2-20
Printing on Special Paper . . . . . . . . . . . . . . . . . . . . . . . . . . . . . . . . 2-21
Adjusting the paper-thickness lever. . . . . . . . . . . . . . . . . . . 2-21
Multipart forms . . . . . . . . . . . . . . . . . . . . . . . . . . . . . . . . . . . . 2-22
Labels . . . . . . . . . . . . . . . . . . . . . . . . . . . . . . . . . . . . . . . . . . . . 2-23
Envelopes . . . . . . . . . . . . . . . . . . . . . . . . . . . . . . . . . . . . . . . . . 2-24
About Your Printer’s Default Settings. . . . . . . . . . . . . . . . . . . . . . 2-25
Changing default settings . . . . . . . . . . . . . . . . . . . . . . . . . . . 2-30
Installing and Using Options . . . . . . . . . . . . . . . . . . . . . . . . . . . . . 2-32
Cut-sheet feeder. . . . . . . . . . . . . . . . . . . . . . . . . . . . . . . . . . . . 2-32
Pull tractor unit . . . . . . . . . . . . . . . . . . . . . . . . . . . . . . . . . . . . 2-35
Roll paper holder. . . . . . . . . . . . . . . . . . . . . . . . . . . . . . . . . . . 2-37
Color upgrade kit . . . . . . . . . . . . . . . . . . . . . . . . . . . . . . . . . . 2-39
Chapter 3 Using the Printer Software
Using the Printer Driver With Windows 95 and 98 . . . . . . . . . . 3-2
Accessing the printer driver . . . . . . . . . . . . . . . . . . . . . . . . . 3-2
Printer driver settings overview . . . . . . . . . . . . . . . . . . . . . . 3-3
Using the Printer Driver With Windows 3.1 . . . . . . . . . . . . . . . . 3-9
Accessing the printer driver . . . . . . . . . . . . . . . . . . . . . . . . . 3-9
Printer driver settings overview . . . . . . . . . . . . . . . . . . . . . . 3-10
Using the Printer Driver With Windows NT 4.0 . . . . . . . . . . . . . 3-12
Accessing the printer driver . . . . . . . . . . . . . . . . . . . . . . . . . 3-12
Printer driver settings overview . . . . . . . . . . . . . . . . . . . . . . 3-13
Using the Printer Driver With Windows NT 3.5x . . . . . . . . . . . . 3-18
Accessing the printer driver . . . . . . . . . . . . . . . . . . . . . . . . . 3-18
Printer driver settings overview . . . . . . . . . . . . . . . . . . . . . . 3-19
About the EPSON Status Monitor 3 Utility . . . . . . . . . . . . . . . . . 3-21
iv

Accessing EPSON Status Monitor 3. . . . . . . . . . . . . . . . . . . . 3-21
Chapter 4 Troubleshooting
Problems and Solutions . . . . . . . . . . . . . . . . . . . . . . . . . . . . . . . . . . 4-2
Power Supply . . . . . . . . . . . . . . . . . . . . . . . . . . . . . . . . . . . . . . . . . . . 4-2
Power is not being supplied . . . . . . . . . . . . . . . . . . . . . . . . . . 4-2
Printing . . . . . . . . . . . . . . . . . . . . . . . . . . . . . . . . . . . . . . . . . . . . . . . . 4-3
The printer does not print . . . . . . . . . . . . . . . . . . . . . . . . . . . . 4-3
The print is faint or uneven. . . . . . . . . . . . . . . . . . . . . . . . . . . 4-4
Dots are missing in printed characters or graphics . . . . . . . 4-5
Printed characters are not what you expected . . . . . . . . . . . 4-5
The print position is not what you expected . . . . . . . . . . . . 4-6
Paper Handling . . . . . . . . . . . . . . . . . . . . . . . . . . . . . . . . . . . . . . . . . 4-6
Single sheets do not feed properly. . . . . . . . . . . . . . . . . . . . . 4-6
Continuous paper does not feed properly . . . . . . . . . . . . . . 4-7
Options . . . . . . . . . . . . . . . . . . . . . . . . . . . . . . . . . . . . . . . . . . . . . . . . 4-8
When you use the cut-sheet feeder, the paper does not
feed properly . . . . . . . . . . . . . . . . . . . . . . . . . . . . . . . . . . . . 4-8
Switching between the cut-sheet feeder and the push
tractor does not work properly . . . . . . . . . . . . . . . . . . . . . 4-9
Using the pull tractor with the push tractor, continuous
paper does not feed properly . . . . . . . . . . . . . . . . . . . . . . . 4-10
With color upgrade kit installed, printer does not
operate properly. . . . . . . . . . . . . . . . . . . . . . . . . . . . . . . . . . 4-10
Appendix
Cleaning the Printer . . . . . . . . . . . . . . . . . . . . . . . . . . . . . . . . . . . . . A-2
Transporting the Printer . . . . . . . . . . . . . . . . . . . . . . . . . . . . . . . . . . A-3
Printer Specifications . . . . . . . . . . . . . . . . . . . . . . . . . . . . . . . . . . . . A-4
Mechanical. . . . . . . . . . . . . . . . . . . . . . . . . . . . . . . . . . . . . . . . . A-4
Electrical. . . . . . . . . . . . . . . . . . . . . . . . . . . . . . . . . . . . . . . . . . .A-6
Environmental . . . . . . . . . . . . . . . . . . . . . . . . . . . . . . . . . . . . . A-6
Paper. . . . . . . . . . . . . . . . . . . . . . . . . . . . . . . . . . . . . . . . . . . . . . A-7
Printable area . . . . . . . . . . . . . . . . . . . . . . . . . . . . . . . . . . . . . . A-10
Paper alignment . . . . . . . . . . . . . . . . . . . . . . . . . . . . . . . . . . . . A-12
v

Safety approvals . . . . . . . . . . . . . . . . . . . . . . . . . . . . . . . . . . . A-13
CE marking. . . . . . . . . . . . . . . . . . . . . . . . . . . . . . . . . . . . . . . . A-13
Command Lists. . . . . . . . . . . . . . . . . . . . . . . . . . . . . . . . . . . . . . . . . A-14
EPSON ESC/P control codes. . . . . . . . . . . . . . . . . . . . . . . . . A-14
IBM 2380 Plus emulation control codes . . . . . . . . . . . . . . . . A-18
Contacting Customer Support . . . . . . . . . . . . . . . . . . . . . . . . . . . . A-19
For North American Users . . . . . . . . . . . . . . . . . . . . . . . . . . . . . . . A-20
For United Kingdom and the Republic of Ireland Users . . . . . . A-21
For Australian Users . . . . . . . . . . . . . . . . . . . . . . . . . . . . . . . . . . . . A-24
For Singapore Users . . . . . . . . . . . . . . . . . . . . . . . . . . . . . . . . . . . . . A-25
For Hong Kong Users . . . . . . . . . . . . . . . . . . . . . . . . . . . . . . . . . . . A-26
For Philippines Users. . . . . . . . . . . . . . . . . . . . . . . . . . . . . . . . . . . . A-27
Index
vi

Getting to Know Your Printer
Your EPSON® LX-300+ 9-pin dot matrix printer provides highquality printing and great performance in a compact design.
Features include:
❏ A variety of paper paths to suit your printing needs
❏ The ability to handle a wide range of paper types, including
continuous paper, multipart forms with one original and up
to four copies, labels, single sheets, and envelopes.
❏ High-speed printing of up to 300 characters per second at 10
characters per inch
Your printer also comes with printer driver software, the EPSON
Status Monitor 3 utility for Microsoft
NT 4.0 that lets you check the status of your printer quickly and
easily, and other software. In addition, many options are available
to suit your individual needs.
®
Windows® 95, 98, or
Getting to Know Your Printer 1

Important Safety Instructions
Read all of these instructions and save them for later reference.
Follow all warnings and instructions marked on the printer.
❏ Do not place the printer on an unstable surface or near a
radiator or heat source.
❏ Place the printer on a flat surface. The printer will not operate
properly if it is tilted or at an angle.
❏ Do not block or cover the openings in the printer’s cabinet.
Do not insert objects through the slots.
❏ Use only the type of power source indicated on the printer’s
label.
❏ Connect all equipment to properly grounded power outlets.
Avoid using outlets on the same circuit as photocopiers or air
control systems that regularly switch on and off.
❏ Do not use a damaged or frayed power cord.
❏ If you use an extension cord with the printer, make sure the
total ampere rating of all devices plugged into the extension
cord does not exceed the cord’s ampere rating. Also, make
sure the total of all devices plugged into the wall outlet does
not exceed the wall outlet’s ampere rating.
❏ Unplug the printer before cleaning, and clean it with a damp
cloth only.
❏ Do not spill liquid on the printer.
❏ Except as specifically explained in this guide, do not attempt
to service the printer yourself.
2 Getting to Know Your Printer

❏ Unplug the printer and refer servicing to qualified
personnel under the following conditions:
If the power cord or plug is damaged; if liquid has entered the
printer; if the printer has been dropped or the cabinet
damaged; or if the printer does not operate normally or
exhibits a distinct change in performance. Adjust only those
controls that are covered by the operating instructions.
❏ Printer parts marked with this symbol may be hot.
K
❏ If you plan to use the printer in Germany, observe the
following:
To provide adequate short-circuit protection and overcurrent protection for this printer, the building installation
must be protected by a 16 amp circuit breaker.
Note for German-speaking users:
Bei Anschluß des Druckers an die Stromversorgung muß
sichergestellt werden, daß die Gebäudeinstallation mit einem 16 AÜberstromschalter abgesichert ist.
Turn off the printer and let it cool for a few minutes
before you touch any printer part marked with this
symbol.
Print Head Caution Symbol
The symbol on the print head indicates that this
part may be hot. Never touch the print head just
K
after the printer has been used. Let the print head
cool for a few minutes before touching it.
Getting to Know Your Printer 3

NERGY STAR Compliance
E
As an ENERGY STAR Partner, EPSON has
determined that this product meets the
S
TAR guidelines for energy efficiency.
E
The International
a voluntary partnership with the computer and office equipment
industry to promote the introduction of energy-efficient personal
computers, monitors, printers, fax machines, copiers, and
scanners in an effort to reduce air pollution caused by power
generation.
NERGY STAR Office Equipment program is
For United Kingdom Users
Use of options
Epson (UK) Limited shall not be liable against any damages
or problems arising from the use of any options or consumable
products other than those designated as Original EPSON
Products or EPSON Approved Products by Epson (UK) Limited.
E
NERGY
Safety information
Warning:
w
This appliance must be earthed. Refer to the rating plate for
voltage and check that the appliance voltage corresponds to the
supply voltage.
Important:
are coloured in accordance with the following code:
Green and yellow — Earth
Blue — Neutral
Brown — Live
4 Getting to Know Your Printer
The wires in the mains lead fitted to this appliance

If you have to fit a plug:
As the colours of the mains lead of this appliance may not match
coloured markings used to identify the terminals in a plug, please
proceed as follows:
The green and yellow wire must be connected to the terminal in
the plug which is marked with the letter E or the Earth symbol (
The blue wire must be connected to the terminal in the plug
marked with the letter N.
The brown wire must be connected to the terminal in the plug
marked with the letter L.
If damage occurs to the plug, replace the cord set or consult a
qualified electrician.
Replace fuses only with a fuse of the correct size and rating.
Warnings, Cautions, and Notes
This guide uses the following conventions:
G
).
Warnings
w
Cautions
c
Notes
of your printer.
contain important information and useful tips on the operation
must be followed to avoid bodily injury.
must be observed to avoid damage to your equipment.
Getting to Know Your Printer 5

6 Getting to Know Your Printer

Chapter 1
Setting Up the Printer
Unpacking the Printer. . . . . . . . . . . . . . . . . . . . . . . . . . . . . . . . . . . . 1-2
Choosing a place for the printer . . . . . . . . . . . . . . . . . . . . . . . 1-3
Assembling the Printer . . . . . . . . . . . . . . . . . . . . . . . . . . . . . . . . . . . 1-5
Installing the paper-feed knob . . . . . . . . . . . . . . . . . . . . . . . . 1-5
Attaching the paper supports. . . . . . . . . . . . . . . . . . . . . . . . . 1-6
Installing the ribbon cartridge . . . . . . . . . . . . . . . . . . . . . . . . 1-7
Plugging in the printer. . . . . . . . . . . . . . . . . . . . . . . . . . . . . . . 1-10
Running the Self Test . . . . . . . . . . . . . . . . . . . . . . . . . . . . . . . . . . . . 1-11
Connecting the Printer to Your Computer . . . . . . . . . . . . . . . . . .1-14
Using the parallel interface . . . . . . . . . . . . . . . . . . . . . . . . . . . 1-14
Using the serial interface . . . . . . . . . . . . . . . . . . . . . . . . . . . . . 1-16
Installing the Printer Software. . . . . . . . . . . . . . . . . . . . . . . . . . . . . 1-17
Installing the software in Windows 95, 98, or NT 4.0 . . . . .1-18
Installing the software in Windows 3.1 or NT 3.5x . . . . . . . 1-19
For DOS programs . . . . . . . . . . . . . . . . . . . . . . . . . . . . . . . . . . 1-20
1
Setting Up the Printer 1-1
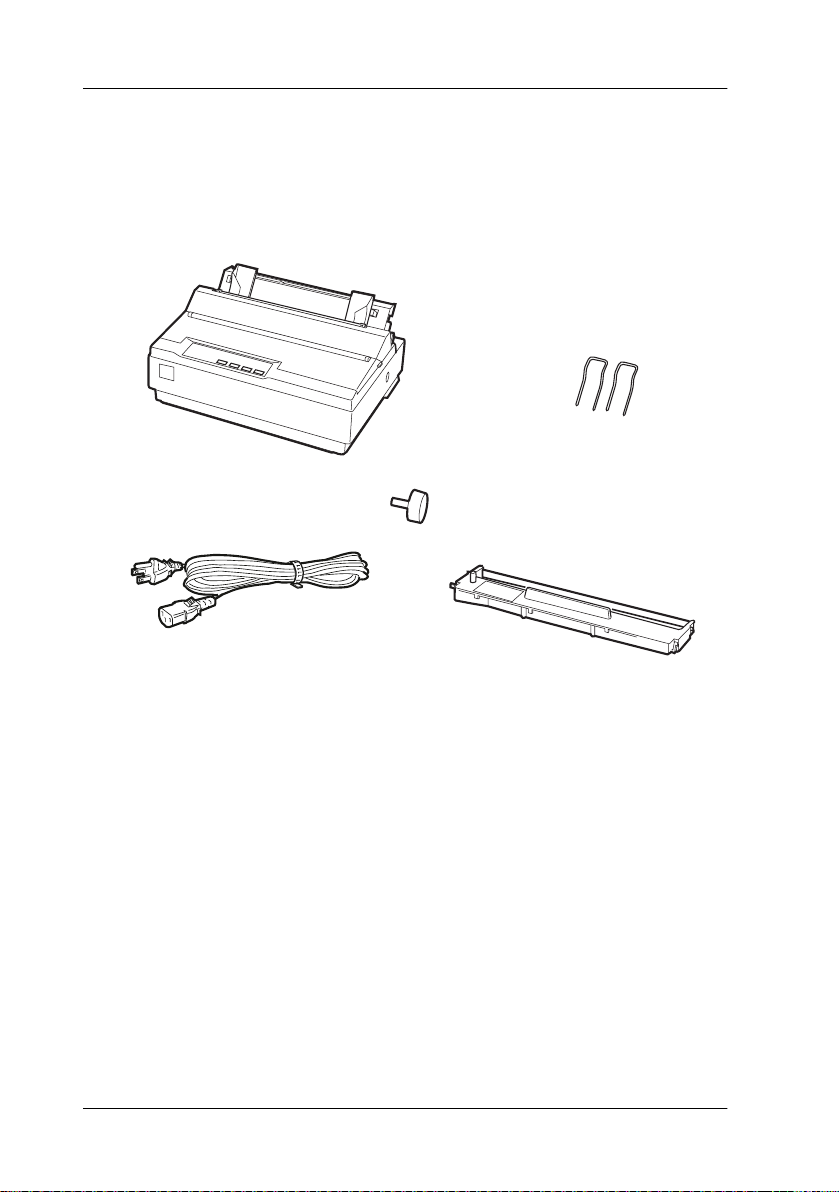
Unpacking the Printer
Besides this guide, your printer box should include an EPSON
printer software CD-ROM, a Notice Sheet, and the following
items:
printer
paper-feed knob
power cord
Note:
Depending on your printer model, the power cord may be permanently
attached to the printer. Also, the shape of the power cord plug varies
depending on the country of purchase; be sure the plug you have is the
right one for your location.
Caution:
c
There are several models of the printer designed for different
voltages, and it is not possible to adjust the printer for use with
another voltage. If the label on the back of the printer does not
show the correct voltage for your country, contact your dealer.
ribbon cartridge
paper supports
1-2 Setting Up the Printer

You must remove all protective materials packed around and
inside your printer before you set it up and turn on the power.
Follow the directions on the Notice Sheet (packed with the
printer) to remove these materials.
Save all packing and protective materials in case you need to ship
the printer in the future. It should always be transported in its
original packaging or equivalent materials.
Choosing a place for the printer
Follow the guidelines below when selecting a location for your
printer.
❏ Place the printer on a flat, stable surface. The printer will not
operate properly if it is tilted or at an angle.
❏ Place the printer where you can easily connect it to a network
interface cable, if necessary.
❏ Leave adequate room around the printer for easy operation
and maintenance.
❏ Avoid using or storing the printer in places subject to rapid
changes in temperature and humidity. Keep it away from
direct sunlight, strong light, heat sources, or excessive
moisture or dust.
1
❏ Avoid places subject to shocks and vibrations.
❏ Place the printer near a wall outlet where you can easily
unplug the power cord.
Note for French-speaking users:
Placez l'imprimante près d'une prise de contact où la fiche peut être
débranchée facilement.
Setting Up the Printer 1-3

❏ Avoid electrical outlets controlled by wall switches or
automatic timers. An interruption in power can erase
information in the memory of your printer or computer. Also
avoid outlets on the same circuit as large motors or other
appliances that can cause voltage fluctuations.
❏ Keep the entire computer system away from potential sources
of electromagnetic interference, such as loudspeakers or the
base units of cordless telephones.
❏ Use a grounded power outlet; do not use an adapter plug.
❏ Make sure the paper path is clear and unobstructed before
you print on continuous paper.
If you plan to use a printer stand, follow these guidelines:
❏ Use a stand that supports at least 8.8 kg (19.6 lb).
❏ Never use a stand that tilts the printer. The printer should
always be kept level.
❏ Position your printer’s power cord and interface cable so they
do not interfere with paper feeding. If possible, secure the
cables to a leg of the printer stand.
1-4 Setting Up the Printer

Assembling the Printer
Follow the steps in this section to get your printer up and running.
Installing the paper-feed knob
The first step in assembling the printer is installing the paper-feed
knob.
1. Insert the knob into the hole on the printer’s side and rotate
it slowly until it slips onto the shaft.
1
2. Push firmly on the paper-feed knob until it fits against the
printer case.
Setting Up the Printer 1-5

Attaching the paper supports
You should install the paper supports before you begin using the
printer.
1. Raise the paper guide. Hold one of the paper supports and
push the tips into the notches on the edge guide.
2. Repeat step 1 for the other paper support. Lower the paper
guide.
1-6 Setting Up the Printer
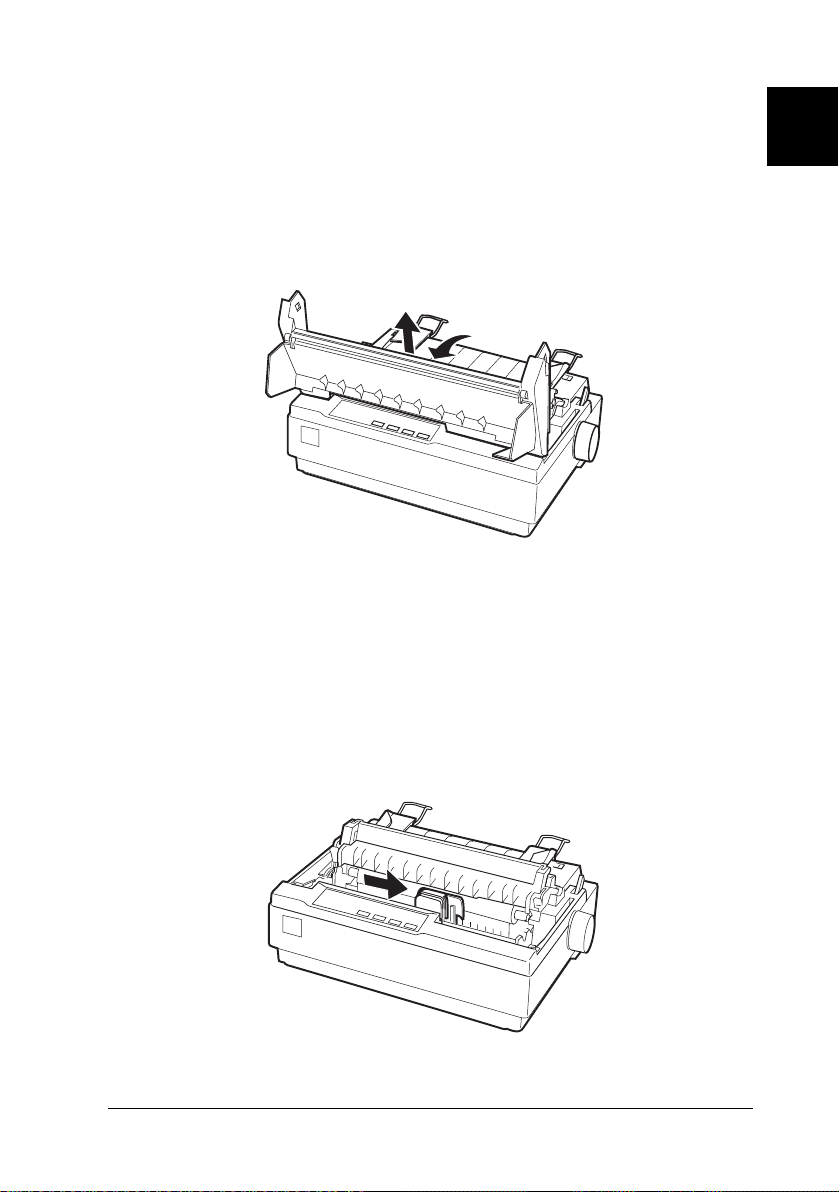
Installing the ribbon cartridge
Before installing the ribbon cartridge, make sure the printer is not
plugged into an electrical outlet.
1. Open the printer cover to the upright position, then pull it up
to remove it.
Warning:
w
Never move the print head while the printer is turned on;
this can damage the printer. Also, if you have just used the
printer, let the print head cool for a few minutes before you
touch it.
1
2. Slide the print head to the middle of the printer.
Setting Up the Printer 1-7
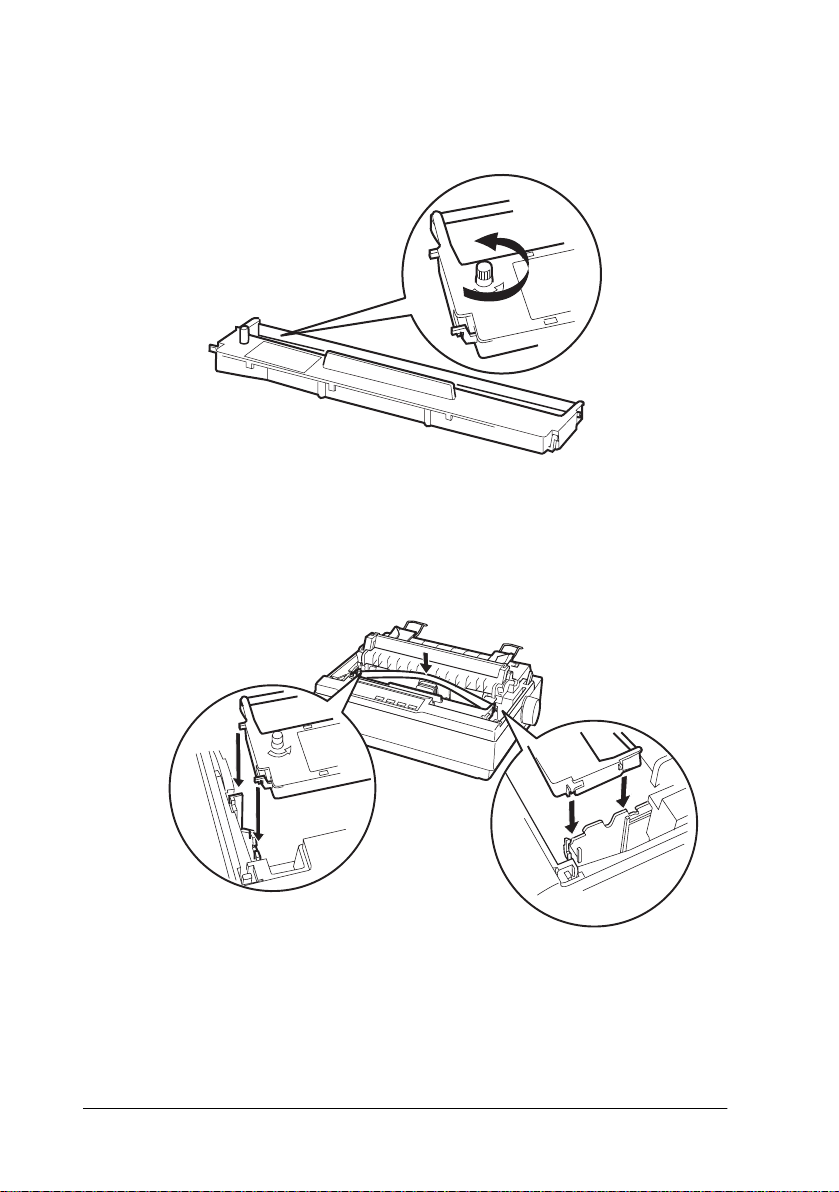
3. Turn the ribbon-tightening knob in the direction of the arrow
to remove any slack from the ribbon so it is easier to install.
4. Insert the ribbon cartridge into the printer as shown; then
press both sides of the cartridge firmly to fit the plastic hooks
into the printer slots.
1-8 Setting Up the Printer

5. Use a pointed object, such as a ball point pen, to guide the
ribbon between the print head and ribbon guide. Turn the
ribbon tightening knob to help feed the ribbon into place; it
should not be twisted or creased.
6. Slide the print head from side to side to make sure it moves
smoothly.
1
7. Re-install and close the printer cover.
When the printing becomes faint, you need to replace the ribbon
cartridge. To remove the old ribbon cartridge, first move the print
head to the center of the printer. Then remove the cartridge by
lifting the posts on the either side and taking it out of the printer.
Setting Up the Printer 1-9

Plugging in the printer
1. Make sure the power switch on the printer is turned off. It is
off when the
2. Check the label on the back of the printer to make sure the
voltage required by the printer matches that of your electrical
outlet.
Caution:
c
If the rated voltage and your outlet voltage do not match,
contact your dealer for assistance. Do not plug in the power
cord.
N side of the switch is pressed down.
3. If the power cord is not attached to the printer, connect it to
the AC inlet on the printer.
4. Plug the power cord into a properly grounded electrical
outlet.
1-10 Setting Up the Printer
Running the Self Test
The built-in self test function demonstrates that the printer is
working properly. You can run the test with either continuous
paper or single sheets; this section describes the easier way, with
single sheets.
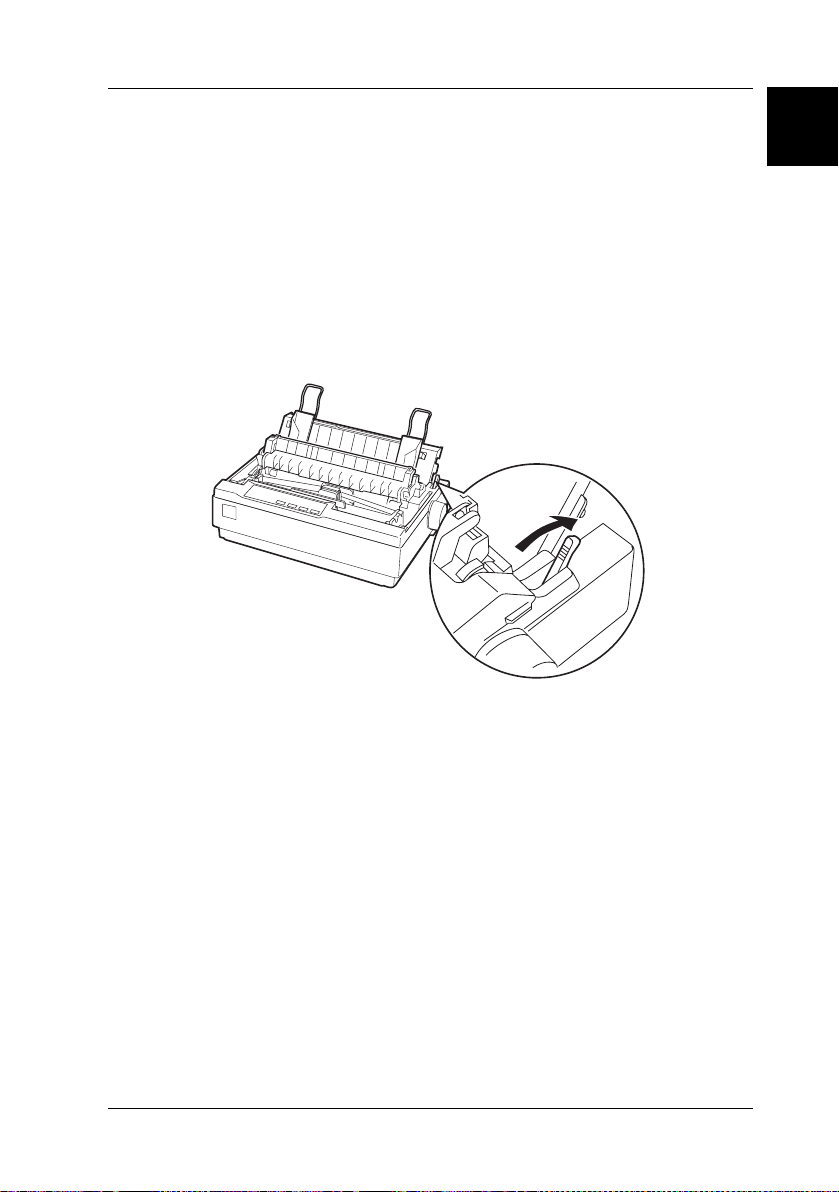
1. Make sure the printer is turned off and the paper-release lever
is pushed back to the single-sheet position, as shown below.
Raise the paper guide upright.
1
c
Caution:
You should use paper at least 210 mm or 8 1/4 inches wide
to run the self test; otherwise, the print head prints directly
on the platen.
Setting Up the Printer 1-11

2. While holding down the
PAUSE
3. Slide the left edge guide until it locks in place at the guide
mark. Next, adjust the right edge guide to match the width of
your paper.
light flashes.
LF/FF
button, turn on the printer. The
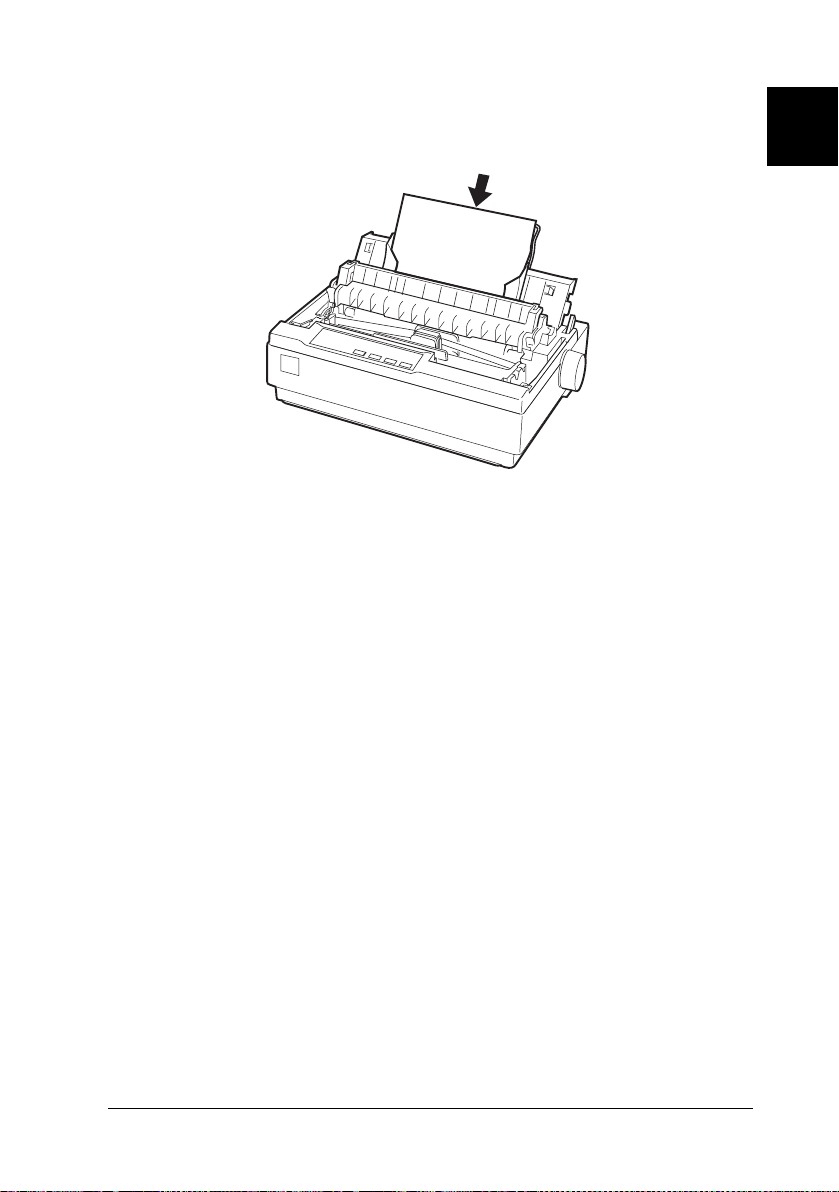
4. Slide a sheet of paper down firmly between the edge guides
until it meets resistance. The printer loads the sheet
automatically.
1-12 Setting Up the Printer
5. Press the
test.
PAUSE
button. The printer begins printing the self
1
6. To stop printing temporarily, press the
7. To end the self test, make sure the printer is not printing. Press
LF/FF
to eject the sheet; then turn off the printer.
Here is part of a typical self-test printout:
Note:
If the self test did not print satisfactorily, see Chapter 4,
“Troubleshooting.” If it prints correctly, go on to the next section.
PAUSE
button.
Setting Up the Printer 1-13

Connecting the Printer to Your Computer
Your printer includes both a Centronics®-compatible parallel
interface and an EIA-232D serial interface. Before you begin, place
the printer upright, as shown below. (This makes it easier to
connect the cable.)
Connect your computer to the desired interface as described
below.
Note:
You can connect a cable to both interfaces; the printer switches
automatically to the appropriate interface when it receives data.
Using the parallel interface
You need a shielded, twisted-pair cable no longer than 2 meters
(6 feet) to use the parallel interface.
1. Turn off both the computer and the printer.
1-14 Setting Up the Printer
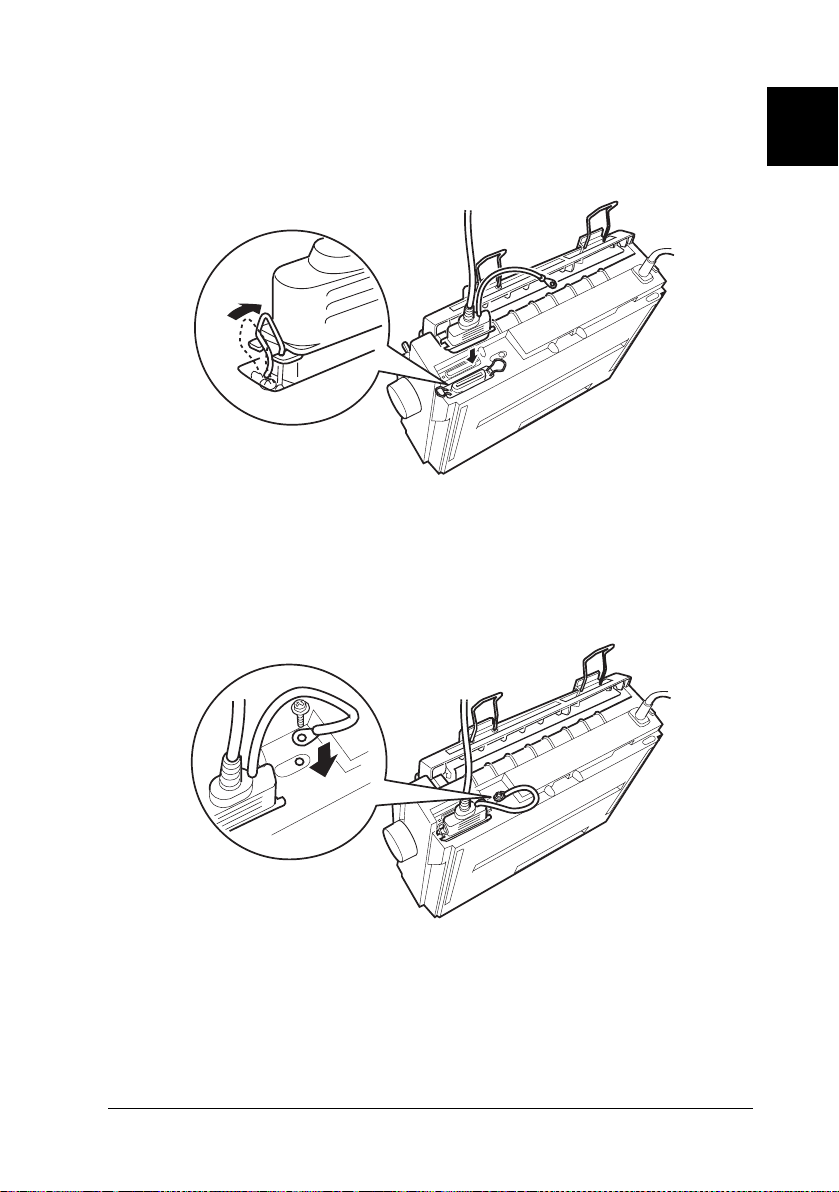
2. Plug the parallel cable connector securely into the printer’s
parallel interface. Squeeze the wire clips together until they
lock in place on either side of the connector.
Note:
If there is a ground wire at the end of the cable, attach it to the ground
connector at the right of the interface.
1
3. Plug the other end of the cable into the computer’s parallel
interface. (If there is a ground wire at the end of the cable,
attach it to the ground connector at the back of the computer.)
Setting Up the Printer 1-15

Using the serial interface
1. Turn off both the computer and the printer.
2. Plug the serial cable connector securely into the printer’s
serial interface. Tighten the screws on either side of the
connector.
Note:
If there is a ground wire at the end of the cable, attach it to the ground
connector to the right of the interface.
1-16 Setting Up the Printer

3. Plug the other end of the cable into the computer’s serial
interface; then tighten the screws on either side of the
connector. (If there is a ground wire at the end of the cable,
attach it to the ground connector at the back of the computer.)
4. Use the Printer Setting mode to change the baud rate or parity
bit if necessary. See “About Your Printer’s Default Settings”
on page 2-25.
Installing the Printer Software
After you connect the printer to your computer, you need to
install the software included on the EPSON printer software
CD-ROM shipped with your printer.
Your printer software includes:
❏ Printer driver
The printer driver is the software that runs, or “drives,” your
printer. With it, you can make printer settings such as print
quality, resolution, and paper size.
1
❏ EPSON Status Monitor 3 (Windows 95, 98, or NT 4.0 only)
The EPSON Status Monitor 3 notifies you of printer errors and
displays printer status information.
To install the printer software, see “Installing the software in
Windows 95, 98, or NT 4.0” on page 1-18 or “Installing the
software in Windows 3.1 or NT 3.5x” on page 1-19. If you are using
DOS, see “For DOS programs” on page 1-20.
Setting Up the Printer 1-17
 Loading...