


FULLY AUTOMATIC COFFEE CENTER 5500
IMPORTANT INSTRUCTIONS - SAVE THESE INSTRUCTIONS
Register this product on-line and receive a free trial issue of Cook's Illustrated. Visit http://registration.delonghi-csservice.com. Visit www.delonghi.com for a list of service centers near you. (U.S. and Canada only).
MACHINE À CAFÈ AUTOMATIQUE ESAM5500
MODE D’EMPLOI IMPORTANT - CONSERVEZ LES PRESENTES INSTRUCTIONS
Enregistrez ce produit en ligne et recevez un numéro gratuit de Cook's Illustrated. Visitez http://registration.delonghi-csservice.com.
Visitez www.delonghi.com pour y voir une liste des centres de réparation proches de chez vous. (É.-U. et Canada seulement).
CAFETERA SUPERAUTOMATICA ESAM5500
INSTRUCIONES IMPORTANTESREPASE Y GUARDE ESTAS INSTRUCCIONES-
LEA ESTE INSTRUCTIVO ANTES DE UTILIZAR EL APARATO
Registre este producto en línea y reciba un ejemplar gratis de Cook's Illustrated. Visite http://registration.delonghi-csservice.com.
Visite www.delonghi.com para ver la lista de centros de servicios cercanos a usted. (Sólo Estados Unidos y Canada
MACCHINA PER CAFFÈ SUPERAUTOMATICA ESAM5500
ISTRUZIONI IMPORTANTICONSERVARE LE ISTRUZIONI
Registra questo prodotto "on-line" per ricevere una copia omaggio della rivista “Cook’s Illustrated”. Visita http://registration.delonghi-csservice.com.
Visita www.delonghi.com per una lista dei centri di servizio a te piu vicini. (Solo Stati Uniti e Canada)
EN
FR
ES
IT
ELECTRONIC CHARACTERISTICS: CARACTÉRISTIQUES ÉLECTRIQUES: CARACTERISTICAS ELECTRICAS: CARATTERISTICHE ELETTRICHE:
120V˜60HZ 1350W

2
A |
A3 |
A5 |
B |
|
B1
B3
B6
A4
A6 |
B5 |
|
B4 |
A14 A15
B2
A13
B7
A12
A16
B8
A11 A10 A9 A8 A7
C |
|
C1 |
|
C11 |
Ready |
C2 |
|
espresso |
|
C10 |
|
C3 |
C9 |
|
C4 |
C8 |
|
C5 |
C7 |
C6 |
|
|
|
|
|
3 |
|

1 |
4 |
8 |
|
2 |
5 |
6 |
9 |
10 |
1 normal coffee
12 |
13 |
4
14 |
3 |
7
11
M
A
X
15

16 |
17 |
18 |
19 |
CLEAN |
20 |
24 |
28 |
21 |
25 |
29
5
22 |
23 |
26 |
27 |
30 |
31 |

INDEX |
|
IMPORTANT SAFEGUARDS................ |
7 |
INTRODUCTION.................................. |
8 |
Symbols used in these instructions ........... |
8 |
Letters in brackets...................................... |
8 |
Troubleshooting and repairs ...................... |
8 |
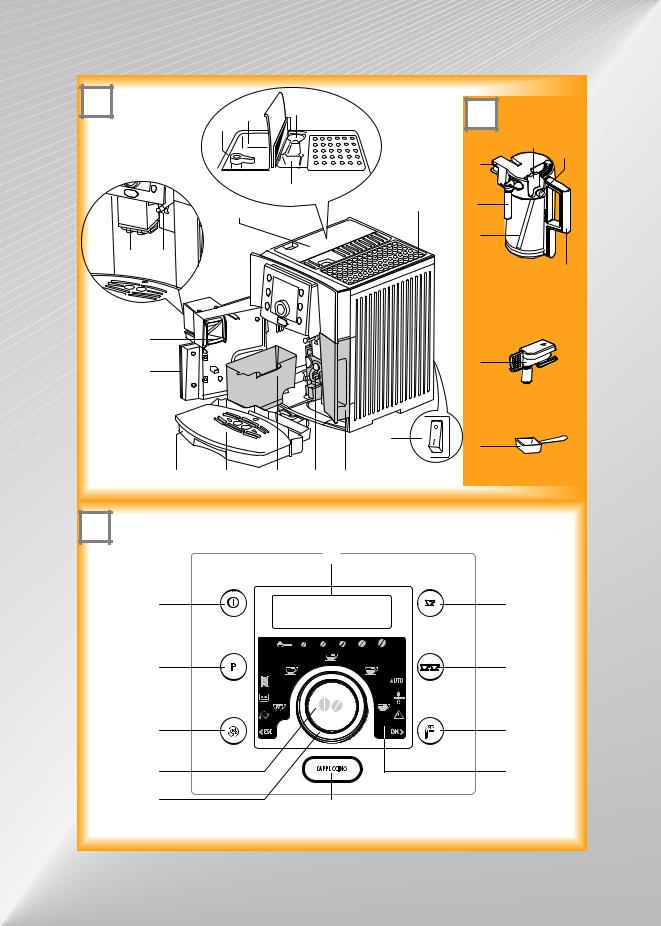
DESCRIPTION..................................... |
9 |
Description of the appliance....................... |
9 |
Description of milk container ..................... |
9 |
Description of control panel....................... |
9 |
Explanation of indicator lights.................... |
9 |
PRELIMINARY CHECKS.................... |
10 |
Controls after transport............................ |
10 |
Installing the appliance ............................ |
10 |
Connecting the appliance ......................... |
10 |
Using the appliance for the first time....... |
10 |
TURNING THE APPLIANCE ON/OFF 11 |
|
Setting the clock ...................................... |
11 |
Setting the language ............................... |
11 |
Setting automatic start up time................ |
11 |
Descaling ................................................ |
12 |
Setting the temperature ........................... |
12 |
Auto-Off ................................................... |
12 |
Setting water hardness ............................ |
12 |
Resetting factory default values (reset) ... |
12 |
Installing the filter .................................... |
12 |
Replacing the filter ("Reset water filter") .. |
12 |
Removing the filter................................... |
13 |
Statistics function .................................... |
13 |
MAKING COFFEE .............................. |
13 |
Selecting the coffee taste ......................... |
13 |
Selecting the quantity of coffee in the cup 13 |
|
Customizing the "MY COFFEE" quantity ... |
13 |
Preparing coffee using coffee beans ........ |
14 |
Making coffee using pre-ground coffee ... |
14 |
Regulating the coffee mill ........................ |
14 |
MAKING MILK-BASED DRINKS........ |
15 |
Filling and attaching the milk container.... |
15 |
Making cappuccino ................................ |
15 |
Making frothed milk ............................... |
15 |
Making caffelatte ............................... |
15 |
Making hot milk .............................. |
15 |
Programming the quantity of |
|
cappuccino............................................... |
16 |
Cleaning the milk container after use |
.....16 |
HEATING WATER .............................. |
16 |
Preparation............................................... |
16 |
Changing the quantity .............................. |
16 |
CLEANING AND MAINTENANCE ....... |
17 |
Emptying the drip tray.............................. |
17 |
Cleaning the coffee maker........................ |
17 |
Cleaning the water tank............................ |
17 |
Cleaning the drip tray............................... |
17 |
Cleaning the coffee grounds container..... |
17 |
Cleaning the spouts ................................ |
18 |
Cleaning the coffee feed funnel ................ |
18 |
Cleaning the inside of the machine .......... |
18 |
Cleaning the infuser ................................. |
18 |
Cleaning the milk container...................... |
18 |
DESCALING ..................................... |
19 |
SETTING WATER HARDNESS........... |
19 |
Measuring water hardness....................... |
19 |
Setting water hardness ............................ |
20 |
TECHNICAL SPECIFICATION ............ |
20 |
DISPLAYED MESSAGES ................... |
21 |
TROUBLESHOOTING ........................ |
23 |
LIMITED WARRANTY ....................... |
25 |
6

I M P O R T A N T S A F E G U A R D S |
EN |
|
|
||
|
|
|
When using electrical appliances, basic safety precautions should always be followed, including the following.
•Read all instructions carefully.
•Make sure the voltage of your electrical system corresponds to the voltage shown on the bottom of the machine.
•Do not touch hot surfaces. Use handles or knobs.
•To protect against fire, electrical shock and personal injury, do not immerse cord, plug or appliance in water or other liquid.
•Keep the appliance out of the reach of children and do not leave appliance unattended while in operation.
•Unplug from the outlet when not in use and before cleaning.
•Do not operate with a damaged cord or plug, or after the appliance malfunctions, or has been damaged in any manner. Return the appliance to the nearest authorized service facility for examination, repair or adjustment.
•The use of accessory attachments not recommended by the manufacturer may result in fire, electrical shock, or personal injury.
•Do not use outdoors.
•Make sure the power cord does not hang over the edge of the table or counter-top to avoid getting accidentally caught or entangled.
•Do not place the appliance or its electrical parts on or near electric stoves, cooking surfaces, or gas burners.
•Plug cord into the wall outlet. To disconnect, turn any control to “off”, then remove plug from wall outlet.
•Do not use the appliance for other than the intended use. This appliance is to be utilized for domestic use only. The manufacturer declines all responsibility for any damage caused by improper, incorrect, or irresponsible use.
WARNING: To reduce the risk of fire or electric shock, do not remove the cover. No user serv-
iceable parts inside. Repair should be done by authorized service personnel only!
SAVE THESE INSTRUCTIONS
THIS APPLIANCE IS FOR HOUSEHOLD USE ONLY
SHORT CORD INSTRUCTIONS
-A short power cord is provided to reduce risks resulting from becoming entangled in or tripping over a longer cord.
-Longer, detachable power supply cords or extension cords are available and may be used if care is exercised in their use.
-If an extension cord is used, the marked electrical rating should be at least as great as the electrical rating of the appliance. If the appliance is provided with 3- wire, grounding type cord, the extension should be a GROUNDING TYPE 3 - WIRE CORD. The longer cord should be arranged so that it will not drape over the counter-top or table top where it can be pulled on by children or tripped over.
-Your product is equipped with a polarized alternating current line plug (a plug having one blade wider than the other). This plug will fit into the power outlet only one way. This is a safety feature. If you are unable to insert the plug fully into the outlet, try reversing the plug. If the plug should still fail to fit, contact your electrician to replace your obsolete outlet. Do not defeat the safety purpose of the polarized plug.
7

INTRODUCTION
Thank you for choosing the ESAM 5500 automatic coffee maker.
We hope you enjoy using your new appliance. Take a few minutes to read these instructions. This will avoid all risks and damage to the machine.
Symbols used in these instructions
Important warnings are identified by these symbols.
These warnings must absolutely be respected. Failure to observe the instructions could result in electric shock, serious injury, burns, fire or damage to the appliance.
Danger!
Failure to observe the warning could result in possibly life threatening injury from electric shock.
 Important!
Failure to observe the warning could result in injury or damage to the appliance.
 Danger of burns!
Failure to observe the warning could result in scalds or burns.
 NB:
NB:
This symbol identifies important advice or information for the user.
Letters in brackets
The letters in brackets correspond to the legend in the Description of the appliance on page 3.
Troubleshooting and repairs
In the event of problems, first try and resolve them following the information given in the section "Displayed messages" on page 21 and "Troubleshooting" on page 23.
If this does not resolve the problem or you require further information, you should consult the customer service center by calling the number given on the "Customer Service" sheet.
If your country is not among those listed on the sheet, call the number given in the guarantee.
If repairs are required, contact the customer service center only.
The addresses are given in the guarantee certificate provided with the machine.
8
 Loading...