


Quick Start Guide
Cisco RV320/RV325 Gigabit Dual WAN VPN Router
Package Contents
•Cisco RV320/RV325 Gigabit Dual WAN VPN Router
•Ethernet Cable
•Power Adapter
•Quick Start Guide
•Documentation and software on CD-ROM
Versión en Español para México en el CD
Version en français sur CD
Versione italiana sul CD
Deutsch Version auf CD

Welcome
Thank you for choosing the Cisco RV320/RV325 Gigabit Dual WAN VPN Router.
This guide describes how to physically install your Cisco RV320/RV325 and launch the web-based Device Manager.
1 Installing Cisco RV320/RV325
To prevent the device from overheating or being damaged:
•Ambient Temperature—Do not operate it in an area that exceeds an ambient temperature of 104°F (40°C).
•Air Flow—Be sure that there is adequate air flow around the device. If wall mounting the firewall, make sure the heat dissipation holes are to the side.
•Circuit Overloading—Adding the device to the power outlet must not overload that circuit.
•Mechanical Loading—Be sure that the device is level and stable to avoid any hazardous conditions and that it is secure to prevent it from sliding or shifting out of position. Do not place anything on top of the firewall, as excessive weight might damage it.
For desktop mounting, place the device on a flat surface so that it sits on its four rubber feet.
Wall Mounting
The router has two wall-mount slots on the bottom panel. To mount the router on a wall, you need mounting hardware (not included). Suggested hardware is illustrated below (not true to scale).
RV320
2 |
Cisco RV320/RV325 Gigabit Dual WAN VPN Router Quick Start Guide |

RV325
WARNING Insecure mounting might damage the router or cause injury. Cisco is not responsible for damages incurred by insecure wallmounting.
WARNING For safety, ensure that the heat dissipation holes are facing sideways.
STEP 1 Drill two pilot holes, approximately 109 mm apart, into the surface.
STEP 2 Insert a screw into each hole, leaving a gap between the surface and the base of the screw head of 1 to 1.2 mm.
STEP 3 Place the router wall-mount slots over the screws and slide the router down until the screws fit snugly into the wall-mount slots.
Cisco RV320/RV325 Gigabit Dual WAN VPN Router Quick Start Guide |
3 |
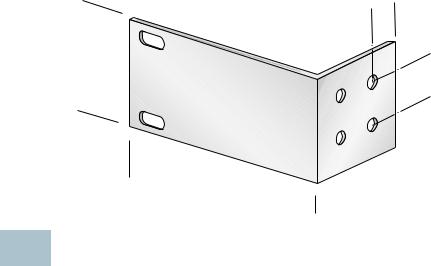
Rack Mounting Cisco RV325
Your Cisco RV325 device includes a rack-mount kit that contains:
•Two rack-mount brackets, 121 mm x 50mm x 44mm in size.
•Eight M4 x 0.7p x 6mm screws.
44 mm
121 mm
2 Cisco RV320 Features
13 mm
16 mm
50 |
|
|
688 |
||
mm |
Front Panel
PWR—Lit to indicate the unit is powered on and booted. Blinks when the device is booting.
VPN—Lit green when the designated VPN tunnel is up. Blinks green when data is being sent or received through the tunnel. Lit amber when the tunnel is disconnected. Blinks amber when attempting to establish the tunnel.
DMZ—Lit green when the DMZ/WAN port is configured as a DMZ.
DIAG—Blinks red when the firmware is updating. Lit red when the device is booting.
LINK/ACT—Lit steady when a link between a port and another device is detected. Flashes when a port is passing traffic.
GIGABIT—Lit when another device is connected to a port and a
1000 Mbps link is established. Off when the connection speed is under 1000 Mbps or no other device is attached to a port.
LAN 1-4—Lit when the LAN ports on the back panel are linked to another device. Blinks when passing traffic.
4 |
Cisco RV320/RV325 Gigabit Dual WAN VPN Router Quick Start Guide |
 Loading...