


 Loading...
Quick Start Guide
Cisco Small Business
NSS322 Smart Storage
Package Contents
•Smart Storage
•Power Adapter
•Quick Start Guide
•Ethernet Cable (2)
•Disk Tray Screws (2 Packs)
•Inline Switch Module
•HDD Sequence Label
•Product CD
Versión en Español para México en el CD Version en français sur CD
Versione italiana sul CD Deutsch Version auf CD

Welcome
Thank you for choosing the Cisco Small Business Smart Storage. The NSS322 is a 2-bay Network Attached Storage (NAS) device that appears as a native file server for the various clients within your network, including Microsoft Windows, Apple Macintosh, UNIX, and Linux platforms. The biggest benefit to your users is that they can now access data that might be stored across different physical platforms as simply as if it were on their own computers. The Smart Storage provides a single repository that is completely dedicated to storage, ensuring the integrity, reliability, and accessibility of your data for a relatively low cost.
This guide describes how to physically install your NAS and launch the Cisco Setup Wizard. If you are a new NAS user, you are strongly encouraged to use the Setup Wizard, located on the product CD.
The Setup Wizard will help you with:
•Installing the Disk Drives
•Connecting the Equipment
•Starting NAS Configuration
•Mapping a Network Drive
•Installing the Client Utility for Windows
•Installing the Client Utility for Mac
The localized language Quick Start Guide is available on the CD shipped with the product.
1 Before You Begin
Before you begin the installation, make sure that you have the following equipment and services:
•Internet connectivity (optional)
•Small Phillips screwdriver
•Ethernet switch or router
•1-2 SATA 2.5-inch disk drives or 3.5-inch disk drives (not included with some models). It is not required that the disk drives be the same physical size.
•Uninterruptible Power Supply (UPS), with a USB connection, which is able to supply power for 10 minutes or more with at least 200 watts of capacity. Strongly recommended to provide backup power and reduce the risk of system damage after power interruptions. After the initial
2 |
Cisco Small Business NSS322 Smart Storage |

installation of the NAS device, see the Cisco Small Business NSS300 Series Smart Storage Administration Guide to configure the NAS to communicate with the UPS.
• Properly grounded anti-static wrist strap (recommended).
2 Getting to Know the NSS322
The following section describes the front and back panels of the NSS322 Smart Storage.
Front Panel
1
2
3
4
|
Smart Storage |
HDD1 |
|
HDD2 |
|
LAN |
|
eSATA |
|
NSS 322 |
277555 |
|
5 |
Cisco Small Business NSS322 Smart Storage |
3 |
Number |
LED Indicator |
Description |
|
|
|
|
|
1 |
HDD1, HDD2 |
• (Green) Flashes green when the disk |
|
|
|
drive data is accessed. Solid green |
|
|
|
when the disk drive is accessible. |
|
|
|
• (Red) A hard drive read/write error |
|
|
|
occurs. |
|
|
|
|
|
|
LAN |
(Orange) Flashes when there is network |
|
|
|
traffic to or from the NAS. Solid orange |
|
|
|
when the NAS is connected to the |
|
|
|
network. |
|
|
|
|
|
|
eSATA |
(Orange) Flashes orange when an eSATA |
|
|
|
device is being accessed. |
|
|
|
|
|
2 |
Power |
• (Off) Disk drives are in standby mode |
|
|
|
or the device is powered off. |
|
|
|
• (Solid Green) The NAS is ready. |
|
|
|
• (Flashing Green) One or more of the |
|
|
|
following conditions apply: |
|
|
|
– The NAS is starting up. |
|
|
|
– The NAS is not configured. |
|
|
|
– Disk drive is not formatted. |
|
|
|
• (Flashing Red) The NAS is in |
|
|
|
degraded mode. One of the disk |
|
|
|
drives failed in RAID 1 configuration. |
|
|
|
|
|
3 |
One Touch Copy |
(Blue) USB device is detected. |
|
|
|
|
|
|
|
|
|
Number |
Item |
Description |
|
|
|
|
|
2 |
Power Button |
Press Power to power on or shutdown |
|
|
|
the NAS. |
|
|
|
|
|
3 |
One Touch Copy |
Press One Touch Copy to copy files to or |
|
|
Button |
from an external USB drive. |
|
|
|
|
|
4 |
USB 2.0 |
USB port for accessing external USB- |
|
|
|
attached storage. |
|
|
|
|
|
5 |
Disk Tray Lock |
Lift the silver tab up to lock the disk tray. |
|
|
|
Press the silver tab down to unlock the |
|
|
|
disk tray. See Locking and Unlocking |
|
|
|
the Disk Trays, page 9. |
|
|
|
|
|
4 |
|
Cisco Small Business NSS322 Smart Storage |
|

Back Panel
1
2
8
3
4
7
Number Item
1VGA
2Reset
3Ethernet Port (2)
4eSATA (2)
5Power Connector
|
5 |
6 |
277556 |
Description
Console output to VGA monitor. Used for device recovery.
Restores the network settings and password to the factory. See Reset
Network Settings and Password, page 29.
Dual Ethernet ports.
eSATA ports for accessing external eSATA-attached storage. Use eSATA connector.
Connects the device to the external power adapter, which connects to a standard power outlet.
Cisco Small Business NSS322 Smart Storage |
5 |
Number |
|
Item |
Description |
|
|
|
|
|
|
6 |
|
|
USB 2.0 (4) |
USB port for accessing USB attached |
|
|
|
|
storage and UPS status. |
|
|
|
|
|
7 |
|
|
Kensington Lock |
Attach a Kensington lock to protect the |
|
|
|
Slot |
device from theft. |
|
|
|
|
|
8 |
|
|
Fan |
System fan. |
|
|
|
|
|
|
|
Installing the NSS322 |
||
3 |
|
|||
Please place your NSS322 on a desktop or flat surface.
Placement Tips
•Ambient Temperature—To prevent the device from overheating, do not operate it in an area that exceeds an ambient temperature of 104°F (40°C).
•Air Flow—Be sure that there is adequate air flow around the device. Avoid any obstructions to air flow either in front of or behind the chassis.
•Mechanical Loading—Be sure that the device is level and stable to avoid any hazardous conditions. Do not place any other devices on top of the NAS.
•Vibration/Impacts—Be sure that the device is installed in a location where it will not be subject to vibration or impact.
4 Installing the Disk Drives
CAUTION When storing unused disk drives, do not stack multiple disk drives because this can cause drive failures.
When installing the disk drives, follow the suggestions in Cisco Electrostatic Discharge and Grounding Best Practices, located on the product CD.
Follow these steps to install disk drives in the NSS322 NAS chassis.
STEP 1 Remove the contents of the NAS package from the box. STEP 2 Place the chassis upright on a flat surface.
STEP 3 From disk bay 1, remove the disk tray.
6 |
Cisco Small Business NSS322 Smart Storage |
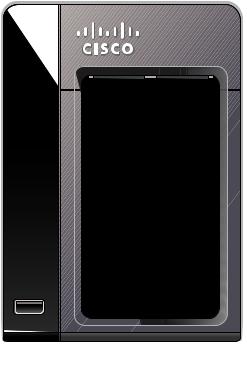
To remove the disk tray, push the silver tab down to unlock the tray, and push the lower tab to release the tray lever. Using the tray lever, pull the tray out.
|
Smart Storage |
HDD1 |
|
HDD2 |
|
LAN |
|
eSATA |
|
NSS 322 |
277587 |
NOTE If your device has the disk drives already installed, continue to the next section, Connecting the Equipment, page 10.
STEP 4 Position the disk drive into a disk tray. The electrical connectors of the disk drive must face toward the back of the drive tray.
STEP 5 Attach the disk drive to the tray by inserting the disk drive screws into the four holes at the bottom of the tray and tightening them with a Phillips screwdriver.
NOTE Use the screws provided in the box with the device. Using other screws can cause damage to your disk or disk tray.
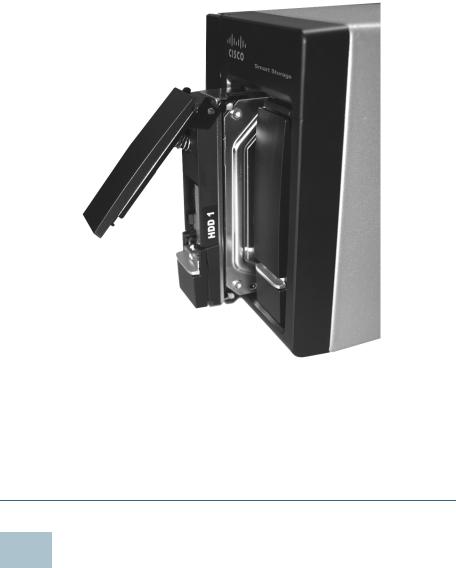
There are clearly marked disk holes to accommodate the following disk drives:
•3.5-inch disk drive (use the included silver screws)
•2.5-inch disk drive (use the included black screws)
Cisco Small Business NSS322 Smart Storage |
7 |

2.5 inch |
3.5 inch |
277517
STEP 6 Insert the tray back in the correct sequence into the empty bay of the chassis.
NOTE Drive trays should not be swapped from slot to slot.
There is also a HDD sequence label included in the package contents that can be placed on the top of the chassis, showing the disk drive sequence. For example, 1-2 for the NSS322.
|
HDD |
|
Sequence |
|
1 2 |
|
277585 |
8 |
Cisco Small Business NSS322 Smart Storage |
The disk drive sequence number is also located on the inside of the disk tray.
STEP 7 Using your thumb, apply even pressure to the middle of the tray while you insert the tray slowly and fully into position in the chassis.
The disk tray lever should be in the open position.
STEP 8 Gently push the disk tray lever down until you hear a click. STEP 9 Repeat steps 3 through 8 to install the second disk drive.
5 Locking and Unlocking the Disk Trays
An icon is located on the silver tab indicating:
•When the silver tab is up, the disk tray is locked.
•When the silver tab is down, the disk tray is unlocked.
Cisco Small Business NSS322 Smart Storage |
9 |
To lock the disk tray:
STEP 1 Verify that the disk tray is fully inserted in the chassis with the disk tray lever down.
STEP 2 Lift the silver tab up to lock the tray.
STEP 3 Continue to Connecting the Equipment, page 10.
To unlock and remove the disk tray:
STEP 1 On the disk tray, press the silver tab down to unlock the tray.
STEP 2 Press on the button below the silver tab to release the disk tray lever.
STEP 3 Using the disk tray lever, gently pull the disk tray out from the chassis.
6 Connecting the Equipment
Follow these steps to connect the NAS device to the network.
STEP 1 Connect the supplied Ethernet cable to one of the Ethernet ports on the back of the chassis.
STEP 2 Connect the other end of the Ethernet cable to a switch or router on your network.
10 |
Cisco Small Business NSS322 Smart Storage |
Loading...