


PSUS4
Table of contents
 Loading...
USER GUIDE
PrintServer for USB
with 4-Port Switch
Model: PSUS4

About This Guide
i
PrintServer for USB with 4-Port Switch
About This Guide
Icon Descriptions
While reading through the User Guide you may see
various icons that call attention to specific items. Below is
a description of these icons:
NOTE: This check mark indicates that there is
a note of interest and is something that you
should pay special attention to while using the
product.
WARNING: This exclamation point indicates
that there is a caution or warning and it is
something that could damage your property or
product.
WEB: This globe icon indicates a noteworthy
website address or e-mail address.
Online Resources
Website addresses in this document are listed without
http:// in front of the address because most current web
browsers do not require it. If you use an older web browser,
you may have to add http:// in front of the web address.
Resource Website
Linksys www.linksys.com
Linksys International www.linksys.com/international
Glossary www.linksys.com/glossary
Network Security www.linksys.com/security
Copyright and Trademarks
Linksys, Cisco and the Cisco Logo are
registered trademarks or trademarks of
Cisco Systems, Inc. and/or its affiliates
in the U.S. and certain other countries.
Copyright © 2008 Cisco Systems, Inc. All
rights reserved. Other brands and product
names are trademarks or registered
trademarks of their respective holders.

Table of Contents
ii
PrintServer for USB with 4-Port Switch
Chapter 1: Product Overview 1
Front Panel. . . . . . . . . . . . . . . . . . . . . . . . . . . . . . . . . . . . . . . . . . . . . . . . . . 1
Back Panel . . . . . . . . . . . . . . . . . . . . . . . . . . . . . . . . . . . . . . . . . . . . . . . . . . 1
Side Panel . . . . . . . . . . . . . . . . . . . . . . . . . . . . . . . . . . . . . . . . . . . . . . . . . . 1
Chapter 2: Conguration 2
How to Access the Web-Based Utility . . . . . . . . . . . . . . . . . . . . . . . . . . . . . . . . . 2
The Protocol Tab > TCP/IP . . . . . . . . . . . . . . . . . . . . . . . . . . . . . . . . . . . . . . . . 3
The Protocol Tab > Apple Talk. . . . . . . . . . . . . . . . . . . . . . . . . . . . . . . . . . . . . . 3
The Protocol Tab > NetBEUI . . . . . . . . . . . . . . . . . . . . . . . . . . . . . . . . . . . . . . . 3
The Printer Tab > Internet Printing. . . . . . . . . . . . . . . . . . . . . . . . . . . . . . . . . . . 4
The Printer Tab > Logical Port . . . . . . . . . . . . . . . . . . . . . . . . . . . . . . . . . . . . . . 4
The Status Tab > Device . . . . . . . . . . . . . . . . . . . . . . . . . . . . . . . . . . . . . . . . . 5
The Status Tab > Printer . . . . . . . . . . . . . . . . . . . . . . . . . . . . . . . . . . . . . . . . . 5
The Exit Tab . . . . . . . . . . . . . . . . . . . . . . . . . . . . . . . . . . . . . . . . . . . . . . . . . 5
Chapter 3: Internet Printing Protocol 6
Overview . . . . . . . . . . . . . . . . . . . . . . . . . . . . . . . . . . . . . . . . . . . . . . . . . . . 6
Windows IPP Client Setup . . . . . . . . . . . . . . . . . . . . . . . . . . . . . . . . . . . . . . . . 6
Chapter 4: Bi-Admin Management 9
Overview . . . . . . . . . . . . . . . . . . . . . . . . . . . . . . . . . . . . . . . . . . . . . . . . . . . 9
Bi-Admin Installation . . . . . . . . . . . . . . . . . . . . . . . . . . . . . . . . . . . . . . . . . . . 9
Starting the Bi-Admin Management Utility . . . . . . . . . . . . . . . . . . . . . . . . . . . . .10
The Bi-Admin Management Utility. . . . . . . . . . . . . . . . . . . . . . . . . . . . . . . . . . .10
Appendix A: Troubleshooting 16
Appendix B: Specications 17
Appendix C: Warranty Information 18
Limited Warranty . . . . . . . . . . . . . . . . . . . . . . . . . . . . . . . . . . . . . . . . . . . . . .18
Appendix D: Regulatory Information 20
FCC Statement . . . . . . . . . . . . . . . . . . . . . . . . . . . . . . . . . . . . . . . . . . . . . . .20
Safety Notices. . . . . . . . . . . . . . . . . . . . . . . . . . . . . . . . . . . . . . . . . . . . . . . .20
Industry Canada Statement . . . . . . . . . . . . . . . . . . . . . . . . . . . . . . . . . . . . . . .20
User Information for Consumer Products Covered by EU Directive 2002/96/EC on Waste
Electric and Electronic Equipment (WEEE) . . . . . . . . . . . . . . . . . . . . . . . . . . . . . .21
Appendix E: Software End User License Agreement 25
Cisco Products . . . . . . . . . . . . . . . . . . . . . . . . . . . . . . . . . . . . . . . . . . . . . . .25
Software Licenses . . . . . . . . . . . . . . . . . . . . . . . . . . . . . . . . . . . . . . . . . . . . .25
Chapter 1
Product Overview
1
PrintServer for USB with 4-Port Switch
Chapter 1:
Product Overview
Thank you for choosing the Linksys PrintServer for USB
with 4-Port Switch (PrintServer). The PrintServer will allow
you to network your printers.
The PrintServer lets you connect a USB printer directly to
your network, eliminating the need to dedicate a PC to
print serving chores. In addition, the PrintServer includes
a 4-port 10/100 switch, so you can easily add more devices
to your network. All four ports are auto speed negotiating,
and have automatic MDI/MDI-X crossover detection. Each
port independently negotiates the best speed and half- or
full-duplex mode, for up to 200 Mbps of bandwidth per
port. Fast store-and-forward switching prevents damaged
packets from being passed on into the network.
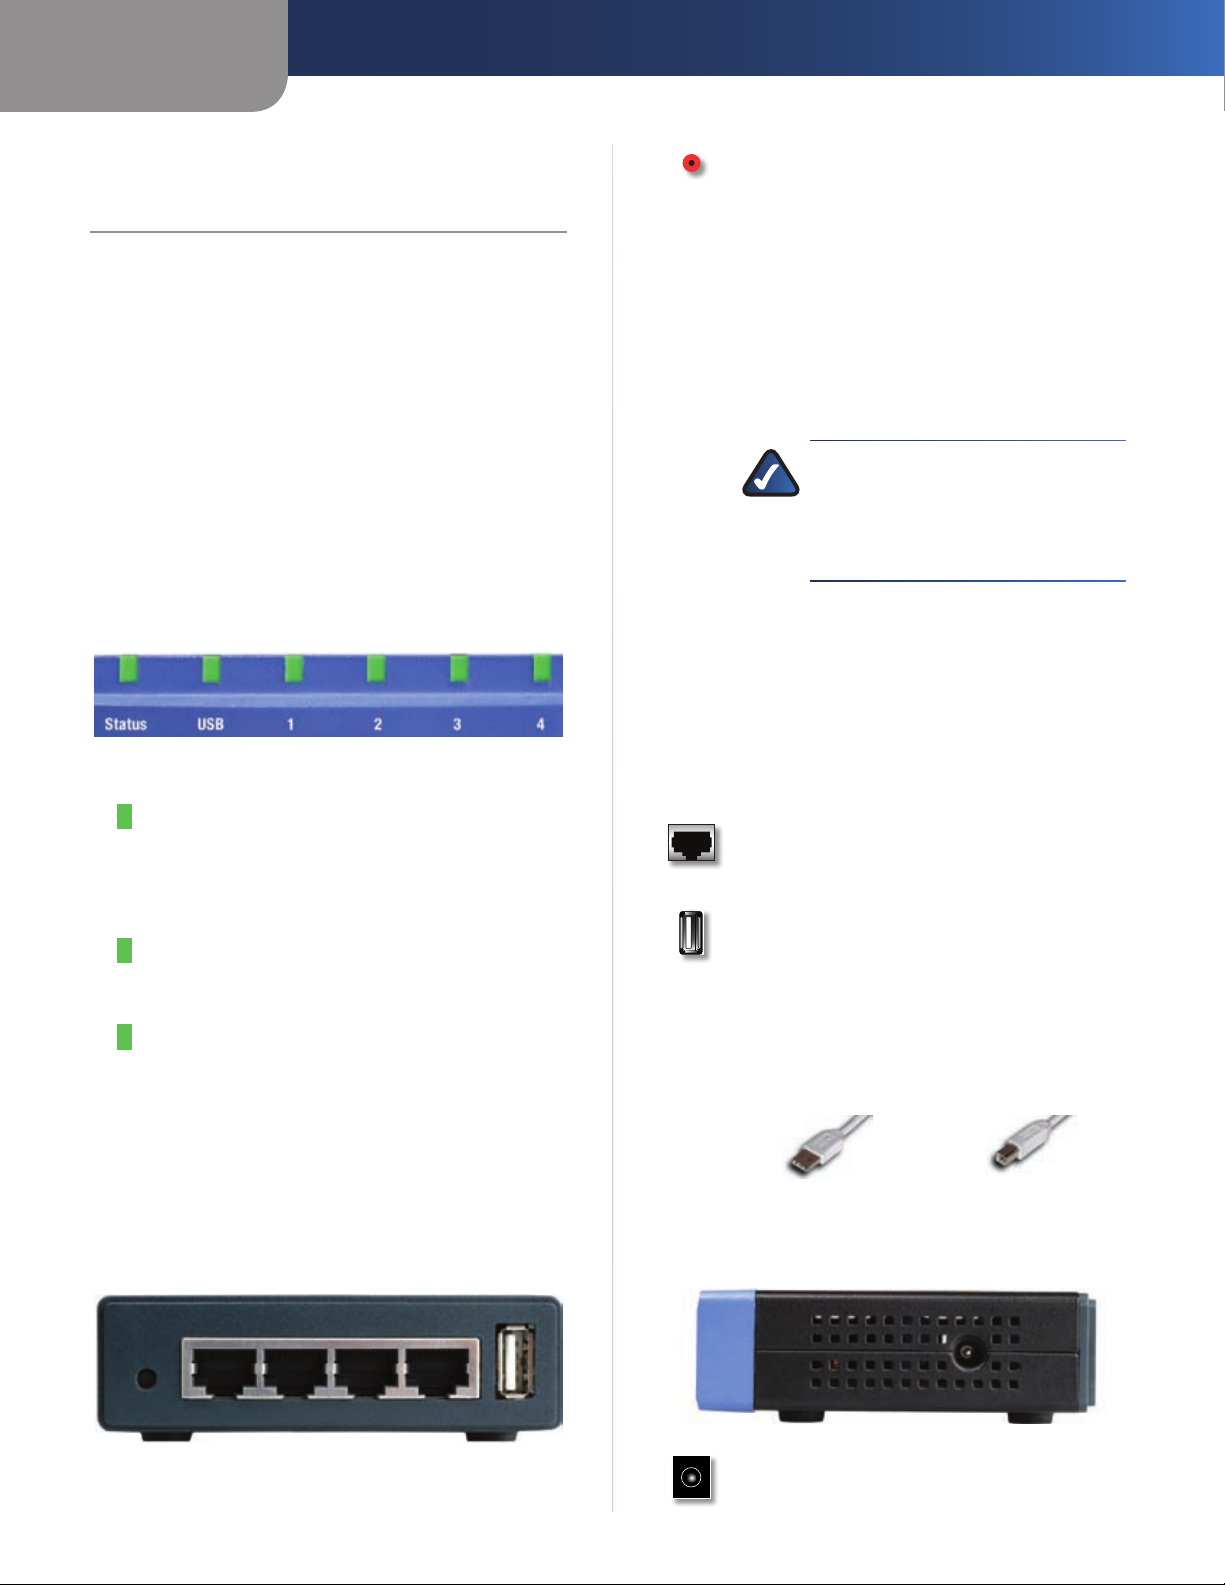
Front Panel
Status (Green) The Status LED will remain
continuously lit when a printer is correctly
connected to the PrintServer. The LED will
flicker when print jobs are being transmitted to
the printer over the network.
USB (Green/Orange) The USB LED lights up
green when a printer is connected. The USB LED
lights up orange when there is an error.
1, 2, 3, 4 (Green) These numbered LEDs,
corresponding with the numbered ports on the
PrintServer’s back panel, serve two purposes.
If the LED is continuously illuminated, the
PrintServer is successfully connected to a device
through the LAN port. If the LED is flickering,
the PrintServer is actively sending or receiving
data to the wired network.
Back Panel
Reset The Reset button can be used to reset
the PrintServer to the factory default settings,
or to generate a diagnostic printout.
To reset the factory default settings:
Unplug the PrintServer. 1.
Press and hold the Reset button. While 2.
pressing the button, plug in the PrintServer.
Continue pressing the button for 10 seconds, 3.
and the PrintServer will be reset to factory
defaults.
NOTE: Resetting the PrintServer will
erase all of your settings and replace
them with the factory defaults. Do not
reset the PrintServer if you want to
retain the settings.
To generate a diagnostic printout (non-
Postscript printers only):
Ensure that both the PrintServer and the 1.
printer attached to the Printer port are on.
Press the diagnostic button, and hold it in 2.
for 2 seconds.
The test page, containing the current 3.
settings, will be printed.
1, 2, 3, 4 The Ethernet port connects the
Adapter to your wired PC or other Ethernet
network device.
USB The USB port is where you will connect the
USB printer to the PrintServer. The PrintServer
comes with one USB cable. One end of the
USB cable has a rectangular plug, or Type A
connector. The other end of the cable has a
square plug, or Type B connector. The cable’s
Type A end connects to the PrintServer and the
Type B end connects to the printer.
USB Connector—Type A USB Connector—Type B
Side Panel
Power The Power port is where you will
connect the power adapter.
Chapter 2
Configuration
2
PrintServer for USB with 4-Port Switch
Chapter 2:
Configuration
The PrintServer has been designed to be functional right
out of the box with the default settings in the Setup
Wizard. However, if you’d like to change these settings, you
can use the PrintServer’s web-based utility. This chapter
will describe each web page in the utility and each page’s
key functions. The utility can be accessed via your web
browser through the use of a computer.
How to Access the Web-Based Utility
To access the web-based utility, launch your web browser,
and enter the PrintServer’s IP address in the Address field.
Then press Enter.
Internet Explorer Address Bar
NOTE: Use the PrintServer’s IP address that you
noted during the Setup Wizard. If you did not
note the IP address or if you have lost it, insert
the Setup CD-ROM, and when the Welcome
screen appears, click Setup Wizard. Follow the
instructions until you reach the third screen,
where the IP address is shown. After you note
the IP address, click Back until you reach the
Welcome screen of the Setup Wizard. Click Exit.
How to Use the Web-Based Utility
The web-based utility has five main tabs: Setup, Protocol,
Printer, Status, and Exit. Click a tab to display its screen. If
the tab is divided into subfunctions, the names of those
subfunctions will appear below the main tab. Select the
desired subfunction to display its screen. The default
screen for a tab is its first listed subfunction.
NOTE: Screens are identified by the convention
Tab > Sub, where Tab is a main tab, and Sub
is one of its subfunctions. For example, the
Protocol > TCP/IP screen appears when you click
the Protocol tab, then the TCP/IP subfunction.
Use the tabs and subfunctions to navigate through the
utility and make all necessary changes to the PrintServer’s
settings. When you have finished making changes on
a screen, click the Save Settings button to save the
changes, or click the Cancel Changes button to undo
your changes.
To exit the utility, click the Exit tab.
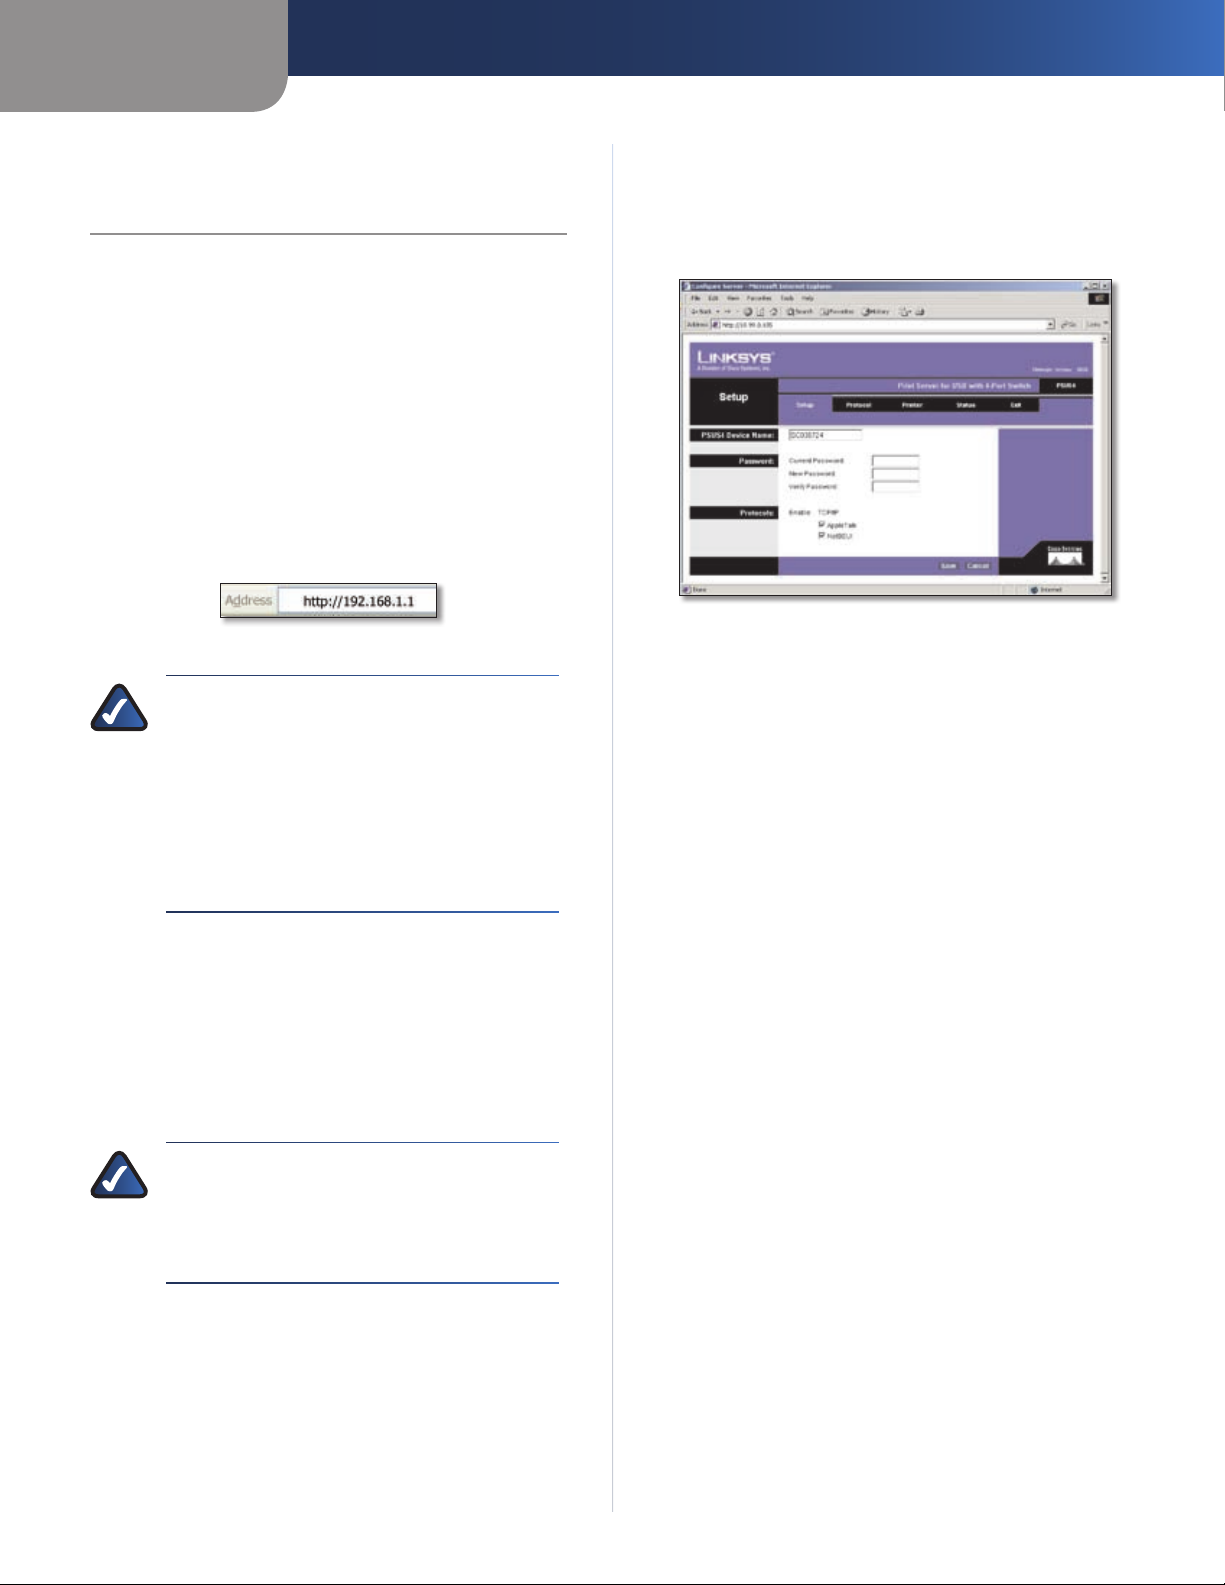
The Setup Tab
The Setup screen is the first screen you see when you
access the web-based utility. This screen allows you to
change the PrintServer ‘s general settings.
Setup
PSUS4 Device Name Enter the PrintServer’s name in this
field. The name can be located on a sticker that is on the
bottom of the PrintServer.
Password
Current Password, New Password, Verify Password To
change the PrintServer’s password, enter the current
password in the Current Password field, enter the new
password in the New Password field, and then enter the
new password again in the Verify Password field.
Protocols Select AppleTalk or NetBEUI, if they apply to
your network.
Change these settings as described here and click Save
to apply your changes or click Cancel to cancel your
changes.

Chapter 2
Configuration
3
PrintServer for USB with 4-Port Switch
The Protocol Tab > TCP/IP
Click the TCP/IP tab to view or change the TCP/IP values of
the PrintServer.
Protocol > TCP/IP
IP Address
Obtain an IP Address Automatically If you are using
DHCP to assign IP addresses, select Obtain an IP Address
Automatically. This option is enabled by default.
Use the Following IP Address If you need to assign
the PrintServer a fixed IP address (also known as Static IP
Address), select Use the Following IP Address, and enter
the appropriate values under IP Address, Subnet Mask,
and Gateway. To find your router’s IP address, consult
your router’s documentation. The Device IP Address and
Subnet Mask are the same as those of any PC connected
to the network. If you change the PrintServer’s IP address,
make sure you that you reconnect to the PrintServer
using that new IP address. Otherwise, you will not be
communicating with the PrintServer. The Gateway IP
Address is not necessary for using the PrintServer.
Connection
Delay before reconnection attempt To specify how long
you want the PrintServer to delay between attempting
connections to the network, enter the delay (in seconds).
Number of reconnection attempts If you want to specify
the number of times that the PrintServer will attempt to
reconnect after losing the connection, enter the number.
Change these settings as described here and click Save
to apply your changes or click Cancel to cancel your
changes.
The Protocol Tab > Apple Talk
AppleTalk is a network communications protocol that
allows computers to talk to each other using Ethernet.
Typically only Macintosh computers use AppleTalk,
although other platforms can be made to use it with extra
software.
Protocol > Apple Talk
Communication
Printer Object Type Enter the type of printer in this field.
This information can be obtained from the manufacturer
of the printer.
Communications Protocol For each printer connected
to the PrintServer, choose the Communications Protocol
that allows the devices on the network to communicate.
Select ASCII or Binary for each printer, according to the
recommendation of the printer’s manufacturer.
Change these settings as described here and click Save
to apply your changes or click Cancel to cancel your
changes.
The Protocol Tab > NetBEUI
NetBEUI connection settings of the PrintServer are
available on this tab.
Protocol > NetBEUI

Chapter 2
Configuration
4
PrintServer for USB with 4-Port Switch
Domain Name Enter the name of the domain that you
want to associate with the PrintServer. If you are unsure of
the Domain Name, you can find it out by looking on any
computer already on the network. In Windows 98, right-
click Network Neighborhood and select Properties.
Under the Identification tab, you will see a list of that
computer’s name, and the Domain to which it is connected.
For Windows Me and 2000, right-click My Network Places.
In Windows Me, choose Properties from the menu that
appears. In Windows 2000 or XP, choose Properties
from the menu that appears. Then, right-click Local Area
Connection and choose Properties. The Domain name
will appear. If you want the PrintServer to be connected
to that same Domain, enter that Domain name here. If
no Domain name exists there, you will use the Workgroup
name from that window.
Options
Response This allows you to specify the amount of time
(measured in seconds) that the PrintServer will wait for a
response from the network before “timing out.”
Abort Print Job if Error Select Yes if you want to
terminate a print job if an error of any kind occurs. If you
select No, print jobs that have errors will be sent to the
printer, but might not print properly.
Change these settings as described here and click Save
to apply your changes or click Cancel to cancel your
changes.
The Printer Tab > Internet Printing
Internet Printing allows you to automatically print any
e-mails that are sent to a specific e-mail account on your
network. This is especially useful for printing information
when you are not connected to the network. You can print
from anywhere that you can access e-mail.
Printer > Internet Printing
Mail Server
Mail Server IP Address Enter the address of your mail
server in the Mail Server IP Address. (This value must be a
fixed IP address.)
Account Name, Account Password, Verify
Password Enter the account name and password in the
Account Name and Account Password fields, then enter the
password again in the Verify Password field.
Check Mail every Specify how often the PrintServer will
check for e-mail to be printed by entering the time interval
in hours and minutes.
Redirect unprintable Mail to Use this to specify an
e-mail address where mail that cannot be printed will be
sent. This is useful for both graphic-intensive e-mails and
for troubleshooting purposes.
Printer
Printer Model Enter the printer model in this field. If you
do not know this information, you can find it in the Device
Manager.
Printer Port Choose the printer port from the drop down
menu.
Options
Print every E-Mail Select this option to enable it.
Print Banner Page Select this option to enable it. It is
enabled by default.
Mail response when printed Select this option to enable
it.
Change these settings as described here and click Save
to apply your changes or click Cancel to cancel your
changes.
The Printer Tab > Logical Port
The Logical Printers tab contains the logical printer
settings of the PrintServer. Select from the following fields
for each Logical Printer.
Printer > Logical Port
Chapter 2
Configuration
5
PrintServer for USB with 4-Port Switch
Select Printer
Logical Printer No: In the drop-down menu, select the
logical printer number (1-3) you wish to configure. Click
Get Data to update the display with the current data for
the selected logical printer.
Details
Pre-string (Hex) Enter the printer control string (in
hexadecimal characters) to be sent to the printer before
each print job. This string cannot exceed 30 characters.
Post String (Hex) Enter the printer control string (in
hexadecimal characters) to be sent to the printer after
each print job. This string cannot exceed 30 characters.
Convert LF to CR+LF Select this option if you want to
change all LF (line feed) characters to CR+LF (carriage
return + line feed).
Change these settings as described here and click Save
to apply your changes or click Cancel to cancel your
changes.
The Status Tab > Device
The Device tab allows you to view information about the
PrintServer. No settings can be changed on this screen.
This screen is for information only.
Status > Device
Click Refresh to cause the PrintServer to retrieve this
information again.
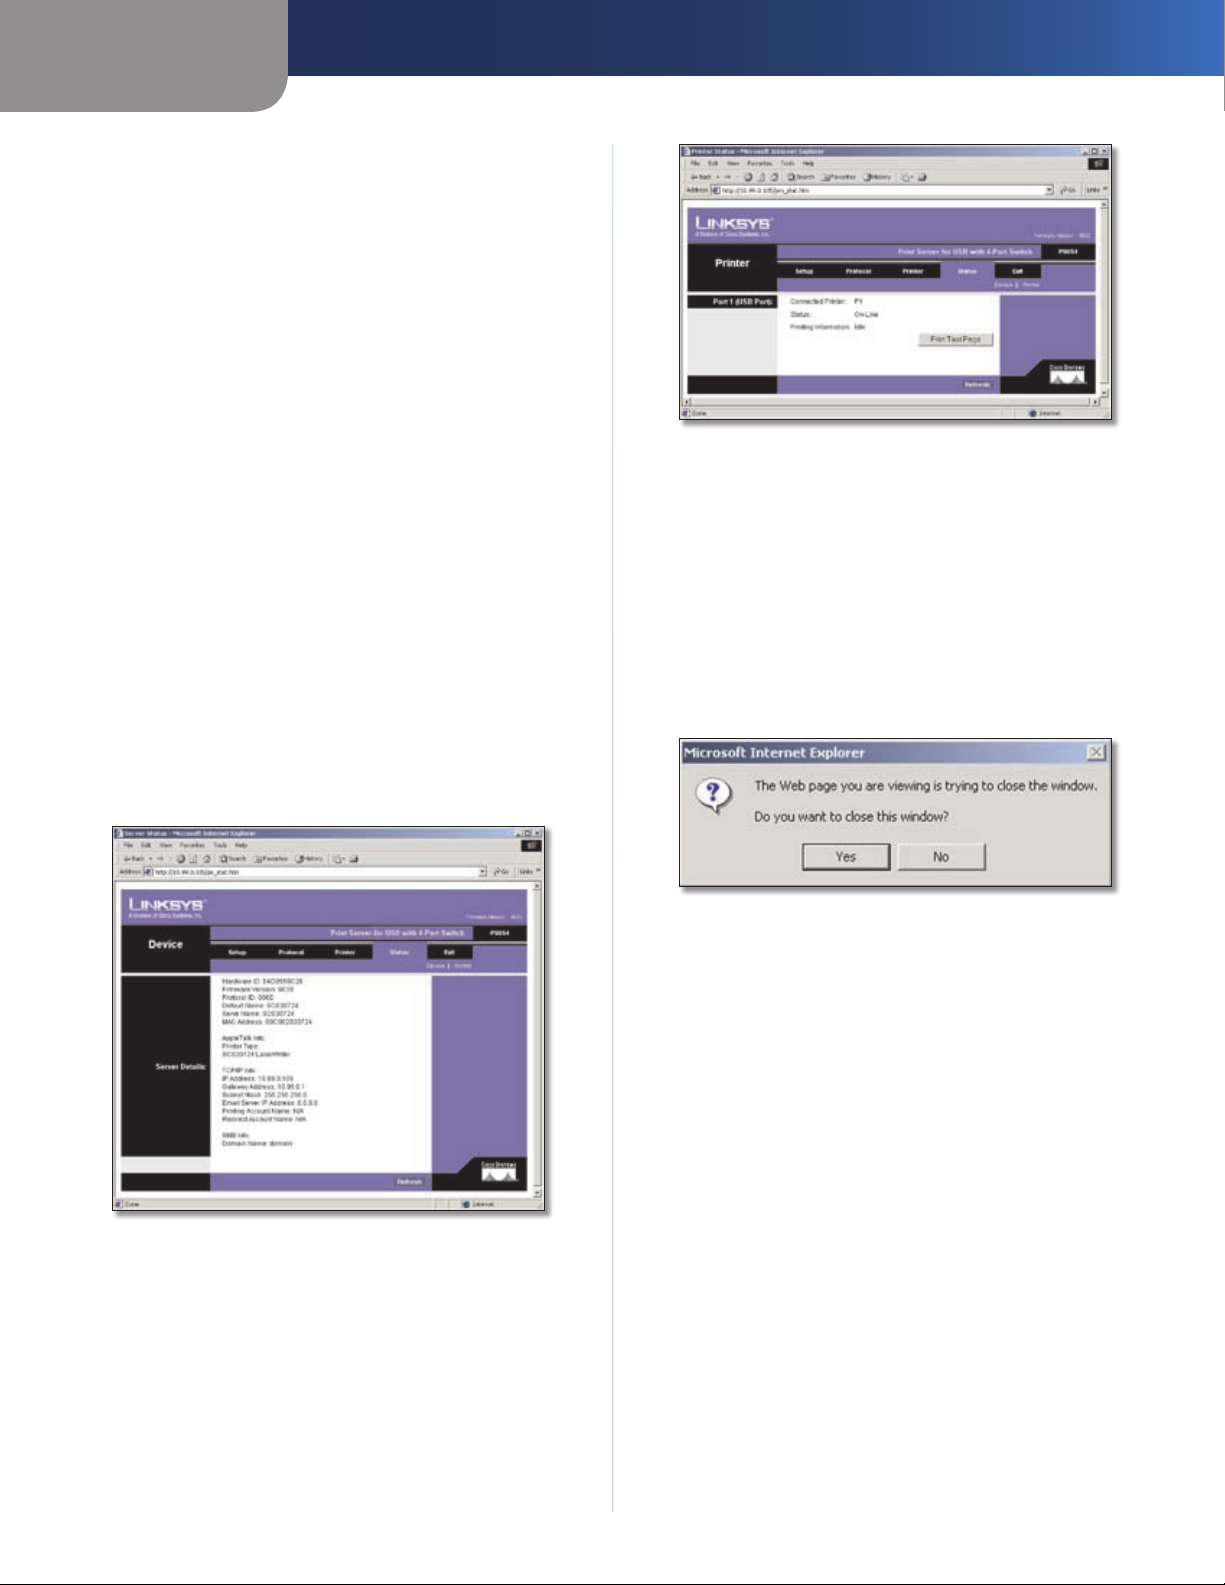
The Status Tab > Printer
The Printer tab allows you to view information about the
Printer. No settings can be changed on this screen. This
screen is for information only.
Status > Printer
Click Refresh to cause the PrintServer to retrieve this
information again.
The Exit Tab
This tab is used exclusively for exiting the Web-based
Utility.
Select the Exit tab and the following screen will appear.
Click Yes if you want to exit the Utility. Click No if you don’t
want to exit the Utility.
Status > Device
Chapter 3
Internet Printing Protocol
6
PrintServer for USB with 4-Port Switch
Chapter 3:
Internet Printing Protocol
Overview
Internet Printing Protocol (IPP) is a new standards-
based system to allow remote printing from a PC to any
accessible printer. Normally, the printer will be attached to
a computer or other device that functions as an IPP Server.
For client PCs, it is necessary to install a compatible IPP
Client program. The Client must also know the IP Address
or URL of the IPP Server.
The PrintServer contains the necessary firmware to act as
an IPP Server. No additional configuration is necessary.
However, the following requirements must be met:
The PrintServer must have a valid IP Address. For •
printing via the Internet, the PrintServer’s IP Address
must be external (allocated by your ISP), rather than an
IP Address on your local LAN.
Any Router, Gateway, or Firewall linking your LAN to •
the Internet must NOT block the IPP protocol. (IPP
Protocol uses Port Services 631/TCP.)
You must advise clients of the correct URL or IP Address •
of the IPP Server. To use a URL rather than an IP Address,
you need to register the domain name for the URL.
Unless clients are using Windows 2000, you must •
provide your clients with the supplied IPP Client
software. If it is not convenient to provide the CD-ROM,
supply the setup.exe file, located in the IPP folder.
Windows IPP Client Setup
Installation using setup.exe
Run this program, located at d:\driver\ipp\setup.exe, 1.
to unzip the included files.
The IPP Setup program will then run.2.
Follow the prompts to complete the installation.3.
IPP Client Configuration for Windows 98, Me,
2000, and XP
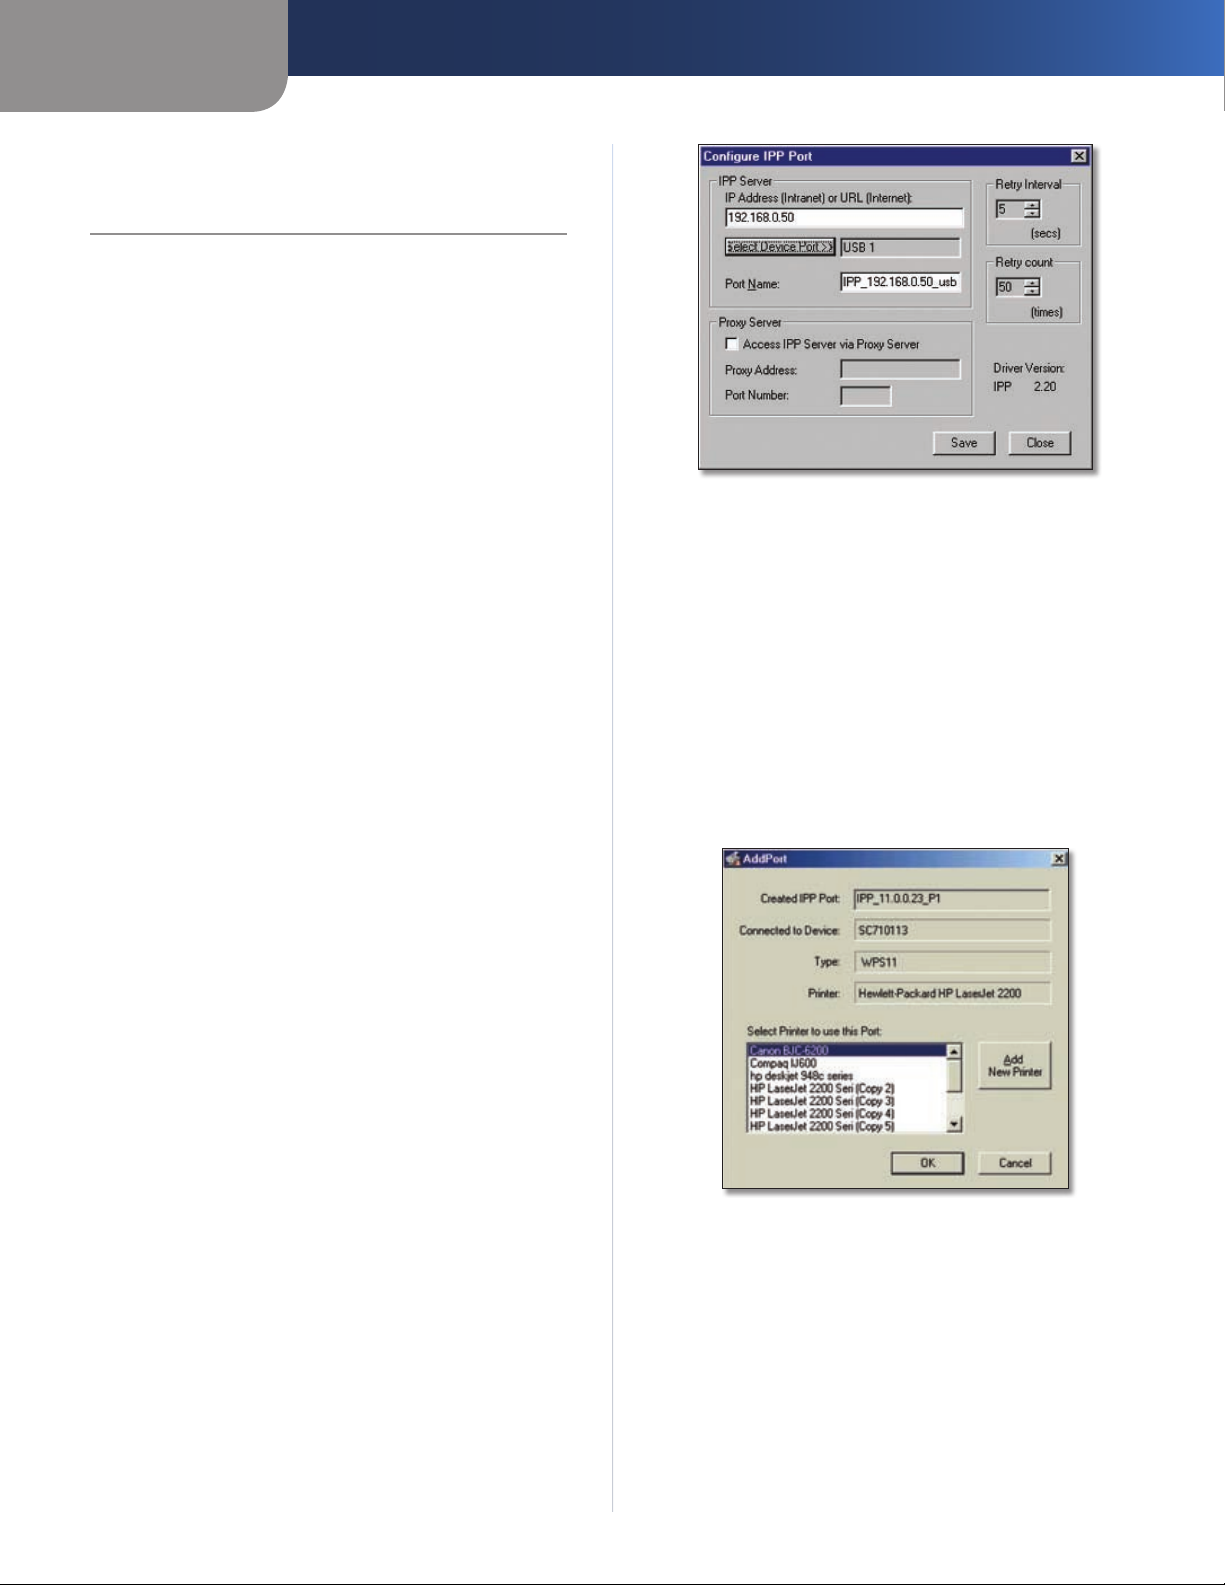
Run the Add IPP Port program entry created by the 1.
installation. The Configure IPP Port screen will appear.
Configure IPP Port
If Internet access from your location is via a Proxy 2.
Server, select Access IPP Server via Proxy Server,
and enter details of your Proxy Server. (This will be the
same as your Browser configuration.)
Enter the IP Address or URL of the IPP Server.3.
Click 4. Select Device Port to view the available ports
on the IPP Server, and select the appropriate port. A
connection to the IPP Server will be established at this
time.
Click 5. Save to create the IPP port on your system. You
will see a message confirming that the port has been
created, and then the Add Port screen will appear.
Add Port
Perform one of these steps. Select an existing printer 6.
to use the new port, and click OK.
OR
Click Add New Printer to create a new printer to use the
IPP port. This will start the Add Printer Wizard. Follow the
prompts to complete the process. Make sure that the new
printer uses the IPP port.
Installation is now complete.
Chapter 3
Internet Printing Protocol
7
PrintServer for USB with 4-Port Switch
To create additional IPP ports, repeat the entire •
procedure.
The Proxy Server and other options are set individually •
for each IPP Port.
Changing the IPP Port Settings
After the IPP port is created, you can reach the Configure
IPP Port screen by performing these steps:
Open the Printers folder (click 1. Start, click Settings,
and then click Printers).
Right-click the IPP Printer and select 2. Properties.
Click 3. Port Settings or Configure Port (Details or Port
tab, depending on your version of Windows). The
Configure IPP Port screen will appear.
Configure IPP Port
There are two settings—Retry Interval and Retry Count—
that can be adjusted if you have problems connecting to
the IPP Server.
Retry Interval sets the time interval (in seconds) •
between connection attempts. Increase this number
if you have a poor connection, or the remote server is
very busy.
Retry Count sets how many connection attempts will •
be made. Increase this number if you have a poor
connection, or the remote server is very busy.
IPP Client Setup for Windows 2000 and XP
Windows 2000 and XP have their own IPP Client, and there
is no need to install the supplied IPP Client Software. To use
this IPP Client with the PrintServer, follow this procedure:
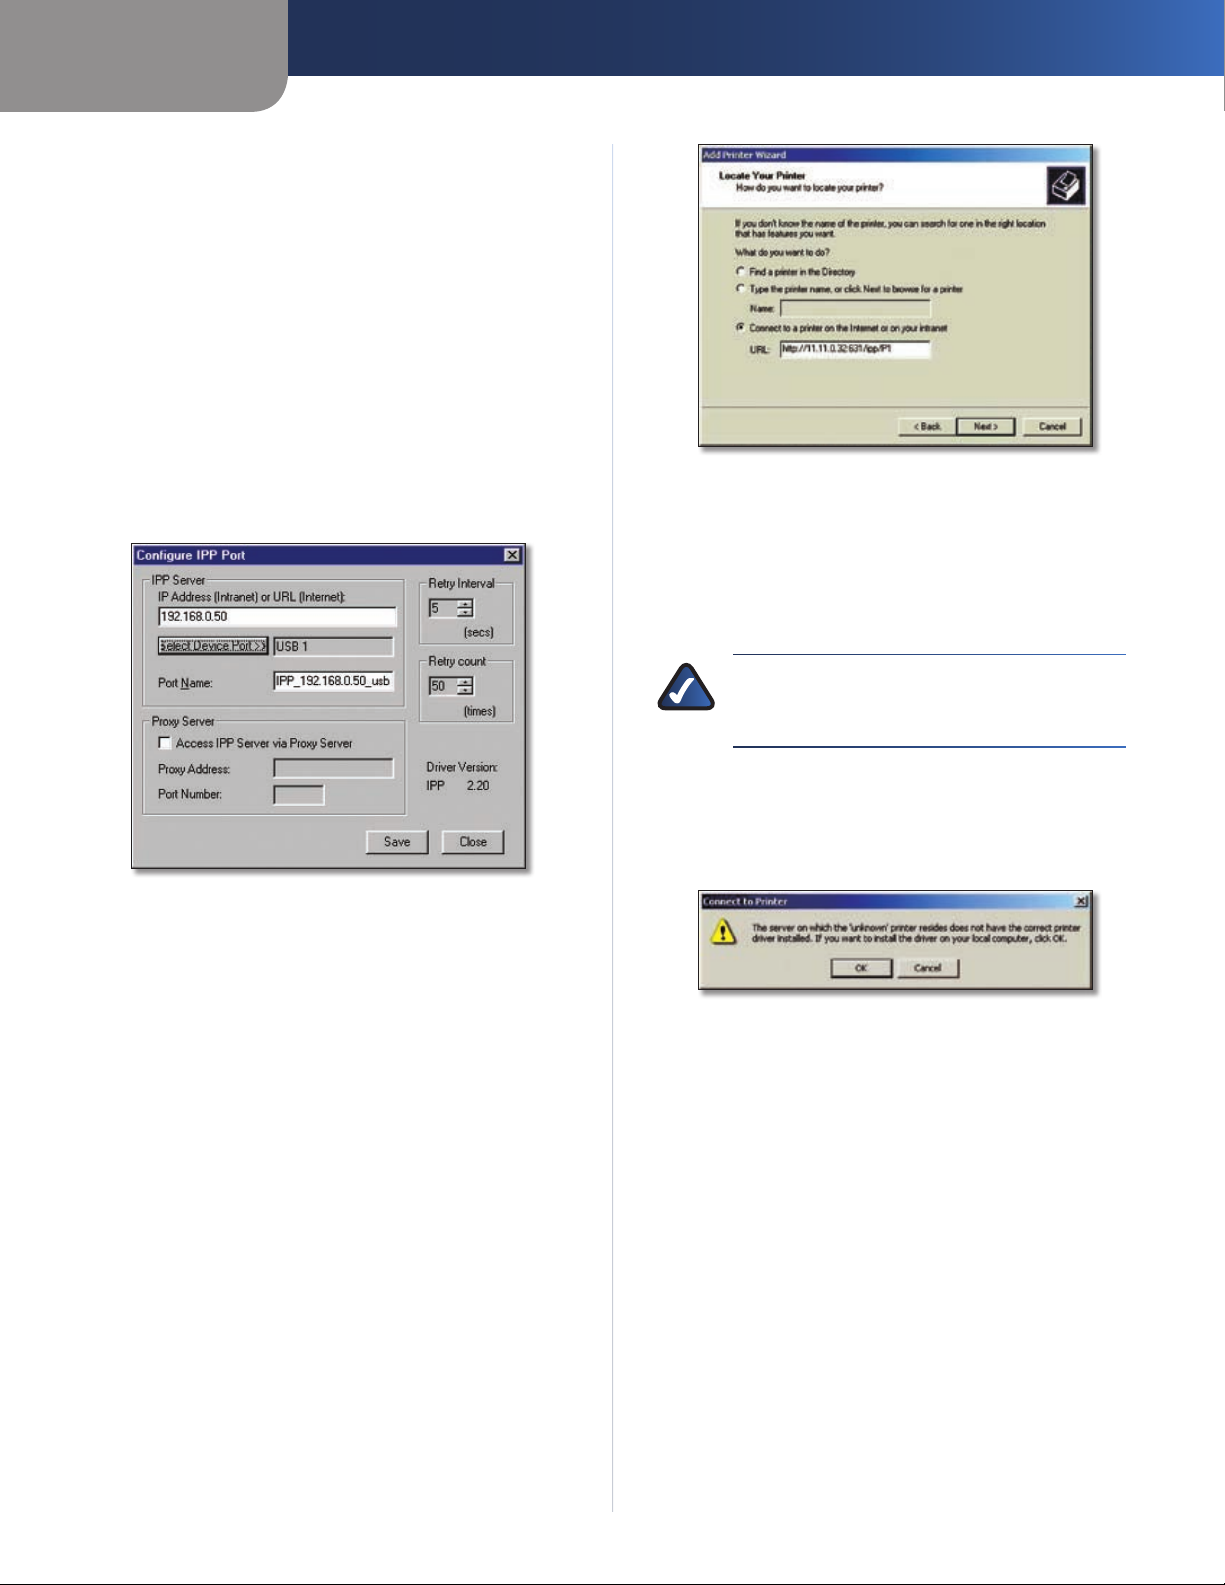
Start the Add Printer Wizard. 1.
Select2. Network Printer and click Next to display the
Locate your Printer screen.
Locate Your Printer
Select 3. Connect to a printer on the Internet or on your
intranet, and enter the URL of the IPP Server as follows,
where ip_address represents the IP Address of the IPP
Server, and 631 represents the port number.
Port 1 ip_address:631/ipp/P1
NOTE: These entries are case sensitive. They
must be entered as shown, with “ipp” in
lowercase, and P1 in UPPERcase.
If the connection can be established, and the printer 4.
on that port is online, the dialog box shown below will
be displayed. This screen notifies you that the printer
driver is not installed. Click OK.
Printer Driver Not Installed
Select the printer manufacturer and model to match 5.
the printer connected to the port on the IPP Server.
Click 6. Next to complete the Wizard.
The IPP printer is now ready for use.
Using IPP Printers
The IPP Printer can be selected and used like any other
Windows printer. If the IPP Server is not on your network,
your Internet connection needs to be active.
If you wish to check the availability of the remote IPP
Server, you can use the Query IPP Printer program installed
with Add IPP Port.
An IPP Server may be unavailable for any of the following
reasons:
It is powered off. •

Chapter 3
Internet Printing Protocol
8
PrintServer for USB with 4-Port Switch
A printer problem has caused the IPP Server to cease •
responding, and a restart (reboot) is required.
The Server’s IP Address has changed. •
The Internet connection for the IPP Server is down. •
Network congestion causes the connection attempt to •
time out.
If using the supplied IPP Client software, there are two
settings—Retry Interval and Retry Count—that can be
adjusted if you have problems connecting to the IPP
Server.
See the previous section, “Changing the IPP Port Settings”,
for details.

Chapter 4
Bi-Admin Management
9
PrintServer for USB with 4-Port Switch
Chapter 4:
Bi-Admin Management
Overview
The PrintServer is managed by a utility program called
Bi-Admin on the PrintServer’s Setup CD. Fully compatible
with Windows 98, Me, 2000, and XP, Bi-Admin allows you
to change the PrintServer’s internal settings, check the
unit’s status, and perform basic diagnostic tests.
Note that the Bi-Admin program must be installed only
on the network administrator’s computer. First, you will
install Bi-Admin on your computer. Then, you will be able
to use the management utility.
Bi-Admin Installation
If you have not already done so, insert the Setup CD-1.
ROM into the PC’s CD-ROM drive. The Setup CD-ROM
should run automatically. If it does not, click Start
and choose Run. In the box that appears, enter D:\
setupWizard.exe (if “D” is the letter of your CD-ROM
drive).
When you see the 2. Welcome screen, click Bi-Admin
Install to continue. Click Exit to end the installation.
Welcome
The Bi-Admin program’s 3. Welcome screen will appear.
If any other programs are open at this time, close
them before continuing; click Cancel to quit the setup
program, then close the open programs. Otherwise,
click Next to continue with the Bi-Admin installation.
Bi-Admin Welcome
The 4. Choose Destination Location screen lists the default
location where the Bi-Admin folder will be installed. If
you want to install the folder in a different location, click
Browse and select the location. To install the folder in
the default location, click Next to continue. Click Back
to return to the previous screen. Click Cancel to end
the Bi-Admin installation.
Choose Destination Location
The 5. Select Program Folder screen appears. An icon
will be added to the program folder listed. If desired,
change the name for the program folder. Click Next.
Click Back to return to the previous screen. Click
Cancel to end the Bi-Admin installation.
Select Program Folder

Chapter 4
Bi-Admin Management
10
PrintServer for USB with 4-Port Switch
When the Bi-Admin is installed, the 6. Setup Complete
screen will appear. Click Finish to continue.
Setup Complete
Starting the Bi-Admin Management Utility
To start the Bi-Admin program, click 1. Start, Programs,
Print Server Utility, and then Bi-Admin Management
Utility. If the Bi-Admin Management Utility icon has
been created, you can double-click it instead. You can
drag the shortcut icon onto your Desktop for easy
access to the Bi-Admin Management Utility.
When the Bi-Admin Management Utility appears, make 2.
sure that TCP/IP is the Connected Protocol. Click OK.
Connected Protocol
The Bi-Admin Management Utility will automatically 3.
scan the network for the USB PrintServer.
Searching for device
The Bi-Admin Management Utility
The Bi-Admin Management Utility screen will appear next.
Any hardware found on the network will appear on the
left-hand side of the screen. The Utility can be managed
from this screen.
Bi-Admin Management Utility
The Utility’s main menu contains the following options:
Main •
InitDevice •
Diagnostic •
Help •
These options and their submenus are described below.
Main Option
When you select Main from the menu bar, these options
are displayed:
Device Status •
Printer Status •
Configuration •
Upgrade •
Refresh •
Exit •
These options also correspond to the icons that appear
below the menu options (viewed from left to right).
Device Status This option allows you to view all of the
device settings, and optionally save the device settings to
a file, or restore a previously saved file to the device.
If you click Device Status, the Device Information screen
appears. A list of the PrintServer’s device settings is
displayed that contains the Hardware ID, Firmware version,
Protocol ID, Default Name, and Server Name. To save the
information in a txt. file, click Save to file.
Loading...