


 Loading...
INSTRUCTIONS |
MODE D'EMPLOI |
INSTRUCCIONES |
English Edition |
Edition française |
Edición española |

 Handling Precautions
1.This camera is not resistant to water, and should not be used outdoors if it is raining or snowing. If it is accidentally dropped in water, contact an authorized Canon service facility. Keep the camera out of salt spray and excessive humidity. If used at the beach, clean it thoroughly afterward with a dry cloth.
2.Store the camera in a cool, dry, dust-free place. Be sure to keep the camera out of direct sunlight, and away from “hot spots” such as the trunk or rear window shelf of a car. Avoid places where mothballs are used, and use a desiccant in excessive humidity.
3.Do not attempt to disassemble the camera yourself, since there is high-voltage circuitry inside.
4.The batteries may explode or cause burns if disassembled, recharged, shorted, exposed to high temperatures, or disposed of in a fire.
5.Use a blower brush to remove dust and sand from the lens and inside the camera. Do not apply any fluids to the lens or body. Take the camera to an authorized Canon service facility for a more thorough cleaning if necessary.
6.Film passing through X-ray examinations at an airport may be exposed and ruined even when loaded in the camera. Request a different method of inspection to avoid damage.
7.Color reproduction may be adversely affected if the film is left in the camera for a long time. Always develop exposed film promptly.
2

Précautions d’emploi
1.Cet appareil n’est pas étanche, et ne doit pas être utilisé en extérieur lorsqu’il pleut ou qu’il neige. Si l’appareil tombe accidentellement dans l’eau, portez-le au Service Après-Vente Canon. Maintenez l’appareil éloigné des embruns et d’une humidité excessive. Après l’avoir utilisé à la plage, nettoyez-le soigneusement à l’aide d’un chiffon sec.
2.Rangez l’appareil dans un endroit frais, sec et à l’abri de la poussière. Ne le laissez pas exposé au soleil et dans des “points chauds” comme la plage arrière ou le coffre d’une voiture.
3.Ne pas tenter de démonter l’appareil car il possède un circuit haute tension.
4.Si les piles sont démontées, rechargées, court-circuitées ou exposées à des températures trop élevées ou jetées dans le feu, elles peuvent exploser ou provoquer des brûlures.
5.Utilisez une brosse soufflante pour retirer la poussière et le sable de l’objectif et de l’intérieur de l’appareil. N’utilisez aucun produit liquide sur l’objectif ou le boîtier. Si un nettoyage approfondi s’imposait, portez votre appareil au Service AprèsVente Canon.
6.Un film soumis aux rayons X dans un aéroport peut être exposé et voilé même lorsqu’il est chargé dans l’appareil. Exigez une méthode d’inspection différente pour éviter tout dommage.
7.Si le film reste longtemps dans l’appareil, la reproduction des couleurs peut en être irréversiblement affectée. Faites toujours développer les films exposés rapidement.
3

 Precauciones de manipulación
1.Esta cámara no es resistente al agua y no la deberá usar bajo la lluvia o la nieve. Si se cae accidentalmente al agua, póngase en contacto con un servicio Canon autorizado. Protéjala de las salpicaduras de agua salada y de la humedad excesiva. Si la utiliza en la playa, límpiela completamente después de usarla, con un paño seco.
2.Guarde la cámara en un lugar fresco, seco y libre de polvo. No exponga la cámara a la luz solar directa, y procure no dejarla en sitios calientes tales como en el maletero o la bandeja de un automóvil.
3.No intente desarmar la cámara Ud. mismo; el interior aloja circuitos de alta tensión.
4.La pila podría estallar o causar quemaduras si la desarma, recarga, cortocircuita, expone a altas temperaturas, o arroja al fuego.
5.Utilice un pincel soplador para eliminar el polvo o la arena del objetivo y del interior de la cámara. No aplique ninguna clase de fluidos al objetivo o al cuerpo. Si se requiere una limpieza a fondo, lleve la cámara a un servicio de Canon autorizado.
6.Aunque esté cargada en la cámara, la película podría dañarse si la somete a una inspección con rayos X en los aeropuertos. Solicite un método de inspección diferente para evitar daños.
7.La reproducción del color podría resultar afectada si se deja la película cargada en la cámara por largo tiempo. Revele siempre las películas expuestas, a la mayor brevedad posible.
4

This device complies with Part 15 of the FCC Rules. Operation is subject to the following two conditions: (1) This device may not cause harmful interference, and (2) this device must accept any interference received, including interference that may cause undesired operation.
Do not make any changes or modifications to the equipment unless otherwise specified in the instructions. If such changes or modifications should be made, you could be required to stop operation of the equipment.
This equipment has been tested and found to comply with the limits for a class B digital device, pursuant to part 15 of the FCC Rules. These limits are designed to provide reasonable protection against harmful interference in a residential installation. This equipment generates, uses and can radiate radio frequency energy and, if not installed and used in accordance with the instructions, may cause harmful interference to radio communications.
However, there is no guarantee that interference will not occur in a particular installation. If this equipment does cause harmful interference to radio or television reception, which can be determined by turning the equipment off and on, the user is encouraged to try to correct the interference by one or more of the following measures:
•Reorient or relocate the receiving antenna.
•Increase the separation between the equipment and receiver.
•Consult the dealer or an experienced radio/TV technician for help.
This digital apparatus does not exceed the Class B limits for radio noise emissions from digital apparatus as set out in the interference-causing equipment standard entitled “Digital Apparatus”, ICES-003 of the Industry Canada.
Cet appareil numérique respecte les limites de bruits radioélectriques applicables aux appareils numériques de Classe B prescrites dans la norme sur le matériel brouilleur: “Appareils Numériques”, NMB-003 édictée par l’Industrie Canada.
5
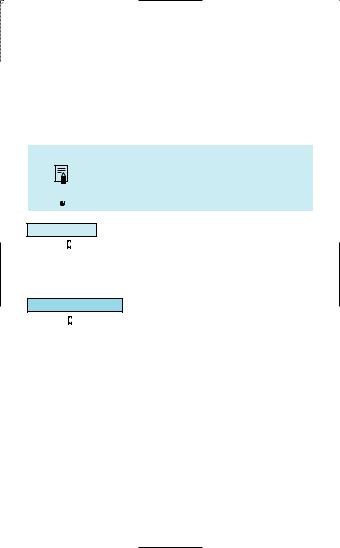
 Table of Contents
•How to use these instructions
These instructions are divided into 4 parts, in order of priority: Basic Operations, Active Operations, Advanced Operations and Additional Information. If you are using the camera for the first time, read the instructions from the beginning.
The following visual cues are used throughout the instructions:
Additional information on using the camera.
Tips on how to use or shoot with the camera.
Introduction |
|
Handling Precautions ............................................ |
2 |
Table of Contents ..................................................... |
6 |
Quick Reference..................................................... |
12 |
Nomenclature ......................................................... |
20 |
Basic Operations |
|
Loading the Battery............................................. |
26 |
Opening the Lens Cover |
|
(Turning the Main Switch On)................................. |
28 |
Zoom Operation...................................................... |
30 |
Holding the Camera................................................ |
32 |
Shutter Button Action.............................................. |
34 |
Green Indicator Lamp Operation ........................ |
36 |
Viewfinder............................................................... |
37 |
Loading the Film ..................................................... |
38 |
Taking Pictures (Full Auto) ..................................... |
41 |
AiAF (Smart AF) Function ...................................... |
46 |
Removing the Film.................................................. |
48 |
6
Active Operations |
|
Taking Pictures with the Best Shot Dial ................ |
50 |
Taking Pictures of Moving Subjects ......... |
54 |
Action Mode |
|
Taking Portraits Against a Night |
|
Background .............................................. |
56 |
Night Mode |
|
Taking Close-ups of Nearby Objects........ |
58 |
Close-up Mode |
|
Taking Portraits ........................................ |
60 |
Portrait Mode |
|
Taking Centrally-focused Pictures............ |
62 |
Spot Mode |
|
Advanced Operations |
|
Focus Lock Mode .................................................. |
64 |
Self-timer Mode................................................ |
66 |
Changing the Flash and Red-eye Reduction |
|
Modes.................................................................... |
70 |
Flash ON Mode .............................................. |
72 |
Flash OFF Mode ........................................... |
74 |
Slow-synchro Mode .................................. |
76 |
Red-eye Reduction Function ....................... |
78 |
Additional Information |
|
Questions and Answers ........................................ |
82 |
Troubleshooting..................................................... |
83 |
Specifications ........................................................ |
88 |
7
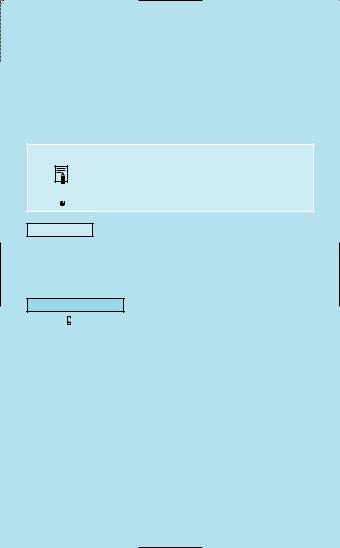
 Table des matières
•Comment utiliser ce mode d’emploi
Ce mode d’emploi est divisé en quatre chapitres classés par ordre de priorité comme suit: Opérations de base, Programmes résultats, Opérations élaborées et Informations supplémentaires.
Pour la première utilisation de l’appareil, nous vous suggérons de lire le mode d’emploi depuis le commencement.
Les symboles suivants sont utilisés dans le mode d’emploi: |
|
Information supplémentaire sur l’utilisation de l’appareil. |
|
Conseils sur l’utilisation de l’appareil. |
|
Introduction |
|
Précautions d’emploi ......................................................... |
3 |
Table des matières ............................................................. |
8 |
Utilisation rapide ............................................................. |
14 |
Nomenclature .................................................................. |
20 |
Opérations de base |
|
Mise en place de la pile................................................ |
26 |
Ouverture du volet d’objectif |
|
(Activation de l’interrupteur principal) ........................... |
28 |
Fonctionnement du zoom ................................................ |
30 |
Prise en main de l’appareil .............................................. |
32 |
Déclencheur..................................................................... |
34 |
Fonctionnement du témoin vert .................................. |
36 |
Viseur .............................................................................. |
37 |
Chargement du film......................................................... |
38 |
Prises de vues (entièrement automatique) ....................... |
41 |
Fonction AiAF (Smart AF) ............................................. |
46 |
Rembobinage du film ...................................................... |
48 |
8
Programmes résultats |
|
Prises de vues avec le sélecteur “Programmes Résultats”..50 |
|
Prises de vues de sujets en mouvement ........... |
54 |
Mode sport |
|
Portraits sur fond sombre................................. |
56 |
Mode nuit |
|
Prises de vues en gros plan de sujets rapprochés .... |
58 |
Mode macro |
|
Portrait ............................................................. |
60 |
Mode portrait |
|
Prises de vues de sujets centrés........................ |
62 |
Mode spot |
|
Opérations élaborées |
|
Mode de mise au point mémorisée ................................ |
64 |
Retardateur................................................................ |
66 |
Changement des modes flash et anti-yeux |
|
rouges ....................................................................... |
70 |
Mode flash forcé (ON) ........................................... |
72 |
Mode flash débrayé (OFF) .................................... |
74 |
Mode synchronisation lente ............................. |
76 |
Fonction anti-yeux rouges ................................... |
78 |
Informations supplémentaires |
|
Questions et réponses..................................................... |
84 |
Avant de s’adresser au S.A.V. ....................................... |
85 |
Fiche technique .............................................................. |
90 |
9
 Contenido
•Acerca de estas instrucciones
Estas instrucciones están divididas en 4 partes, en orden de prioridad: Operaciones básicas, Operaciones activas, Operaciones avanzadas e Información adicional. Si utiliza la cámara por primera vez, lea las instrucciones desde el principio.
Estas instrucciones utilizan las siguientes claves visuales:
Información adicional sobre el uso de la cámara. Consejos sobre cómo utilizar o fotografiar con la cámara.
Introducción |
|
Precauciones de manipulación ................................ |
4 |
Contenido ............................................................... |
10 |
Guía rápida............................................................. |
16 |
Nomenclatura ......................................................... |
20 |
Operaciones básicas |
|
Instalación de la pila ............................................ |
26 |
Apertura de la tapa del objetivo |
|
(Activación del interruptor principal) ....................... |
28 |
Funcionamiento del zoom ...................................... |
30 |
Sujeción de la cámara............................................ |
32 |
Accionamiento del disparador ................................ |
34 |
Funcionamiento de la luz indicadora verde ........ |
36 |
Visor ....................................................................... |
37 |
Carga de la película ............................................... |
38 |
Toma de fotos (completamente automática).......... |
41 |
Función AiAF (Smart AF) ....................................... |
46 |
Extracción de la película ........................................ |
48 |
10
Operaciones activas |
|
Fotografía con el selector “Best shot” ................... |
50 |
Fotografía de sujetos en movimiento ....... |
54 |
Modo de acción |
|
Fotografía de retratos de personas |
|
en contraste con un fondo nocturno ......... |
56 |
Modo nocturno |
|
Fotografía de primer plano de objetos |
|
cercanos ................................................... |
58 |
Modo de primer plano |
|
Fotografía de retratos ............................... |
60 |
Modo de retrato |
|
Fotografía de imágenes enfocadas en el |
|
centro........................................................ |
62 |
Modo spot |
|
Operaciones avanzadas |
|
Modo de bloqueo del enfoque............................... |
64 |
Modo de autodisparo ........................................ |
66 |
Cambio de los modos de flash y de reducción de |
|
“ojos rojos” ....................................................... |
70 |
Modo con flash (ON) ...................................... |
72 |
Modo sin flash (OFF)..................................... |
74 |
Modo de sincro lento................................. |
76 |
Función de reducción de “ojos rojos”........... |
78 |
Información adicional |
|
Preguntas y Respuestas ....................................... |
86 |
Localización de averías......................................... |
87 |
Especificaciones.................................................... |
92 |
11
 Quick Reference
• In these instructions “(→ p. ...)” means “See page ...”.
1 |
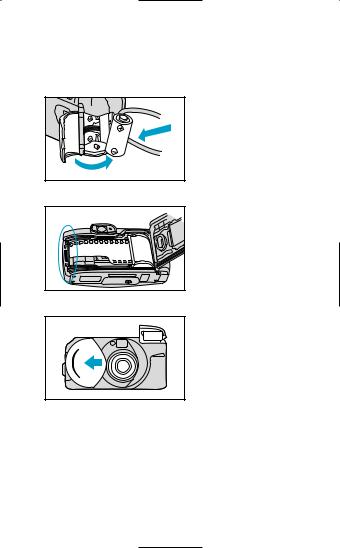
1. Load a battery. |
|
(→ p. 26) |
2 |
2.Load the film and
close the back cover. (→ p. 38)
3 |
3. Open the lens cover. |
|
(Main switch is turned |
|
on.) |
|
(→ p. 28) |
|
• The lens and flash are |
|
set. |
12
4 |
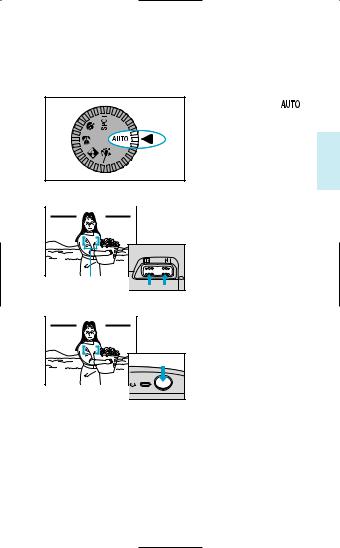
4. Turn the dial to |
. |
|
(→ p. 42) |
|
5 |
5. Place the AF frame |
|
over the subject q |
||
|
||
|
and compose your |
|
|
picture. |
|
|
q |
6 |
6.Press the shutter button lightly. Make sure the green indicator lamp is lit, then press the shutter button fully.
13
 Utilisation rapide
• Dans ce mode d’emploi, “(→ p. ...)” signifie: “voir page ...”.
1 |
1. Introduisez une pile. |
|
(→ p. 26) |
2 |
2. |
Chargez le film et fer- |
|
mez le dos. (→ p. 38) |
|
|
|
|
3 |
3. |
Ouvrez le volet d’objec- |
|
|
tif. |
|
|
(L’interrupteur principal |
|
|
est activé.) (→ p. 28) |
|
• L’objectif et le flash sont |
|
|
réglés. |
|
14
4 |
4. Tournez le sélecteur sur |
|
|
la position |
. (→ p. |
|
42) |
|
5
5. Centrez le collimateur autofocus sur le sujet q et composez l’image.
q
6 |
6.Appuyez légèrement sur le déclencheur. Assurezvous que le témoin vert est allumé, puis appuyez à fond sur le déclencheur.
15
 Guía rápida
• En estas instrucciones “(→ p. ...)” significa “Vea página...”.
1 |
1. Instale una pila. |
|
(→ p. 26) |
2 |
2. Cargue la película y |
|
cierre la tapa poste- |
||
|
||
|
rior. (→ p. 38) |
|
3 |
3. Abra la tapa del obje- |
|
|
tivo. (Se activa el |
|
|
interruptor principal.) |
|
|
(→ p. 28) |
|
|
• Se ajustan el objetivo y |
|
|
el flash. |
16
4 |
4. Gire el selector a |
|
. |
|
(→ p. 42) |
5 |
5. Sitúe el cuadro AF |
|
sobre el sujeto q y |
|
componga su imagen. |
|
q |
6 |
6.Oprima ligeramente el disparador. Asegúrese de que esté encendida la luz indicadora verde, y oprima a fondo el disparador.
17
SPOT
AUTO
18
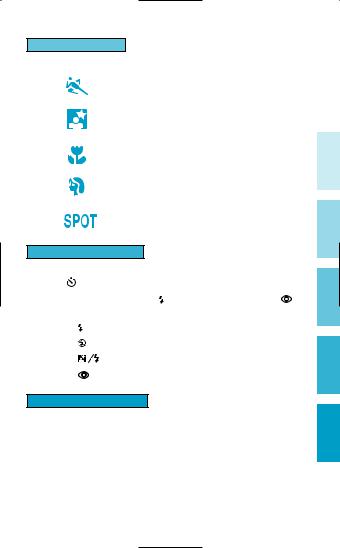
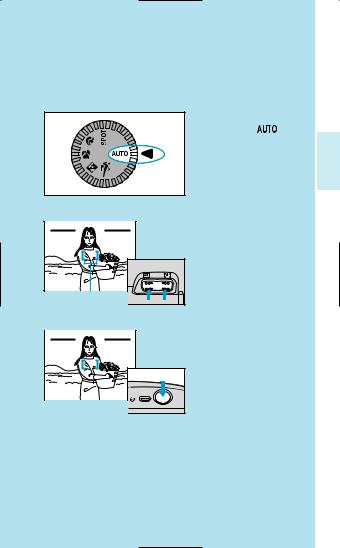
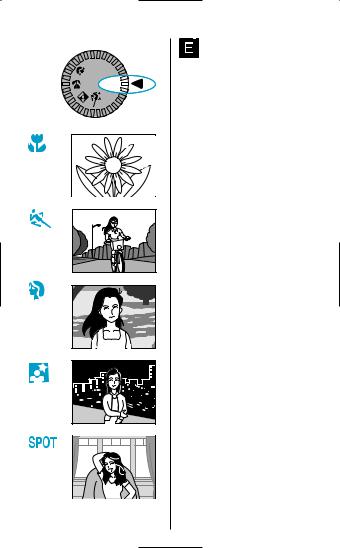
The best shot dial gives you the ideal settings for different situations.
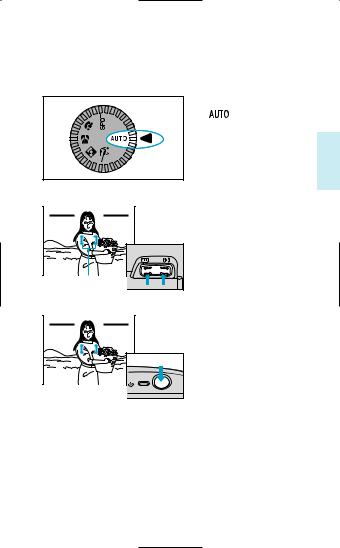
AUTO
Set to Auto.
Select this mode to take snapshots. (→ p. 41)
Close-up
Select this mode to take close-ups of nearby objects. (→ p. 58)
Action
Select this mode to take photos of a moving subject. (→ p. 54)
Portrait
Select this mode to take portraits. (→ p. 60)
Night
Select this mode to take photos of people with a night background. (→ p. 56)
Spot
Select this mode to take photos of subjects in the center of the picture.
(→ p. 62)

Le sélecteur “Programmes Résultats” vous offre les meilleurs réglages pour diverses situations.
AUTO
Réglez sur Auto. Sélectionnez ce mode pour prendre des instantanés. (→ p. 41)
Macro
Sélectionnez ce mode pour la photographie en gros plan de sujets rapprochés. (→ p. 58)
Sport
Sélectionnez ce mode pour les prises de vues de sujets en mouvement. (→ p. 54)
Portrait
Sélectionnez ce mode pour les portraits. (→ p. 60)
Nuit
Sélectionnez ce mode pour photographier des personnages la nuit. (→ p. 56)
Spot
Sélectionnez ce mode pour les photographies de sujets se trouvant au centre de l’image. (→ p. 62)
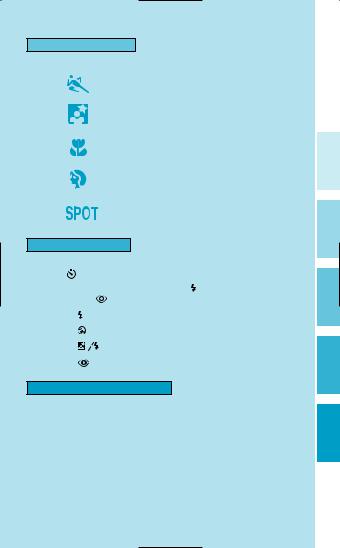
El selector “Best shot” proporciona ajustes ideales para diferentes situaciones.
AUTO
Ajuste a Auto.
Seleccione este modo para tomar fotos instantáneas. (→ p. 41)
Primer plano
Seleccione este modo para tomar fotos de primer plano de sujetos cercanos.
(→ p. 58)
Acción
Seleccione este modo para tomar fotos de sujetos en movimiento. (→ p. 54)
Retrato
Seleccione este modo para fotografiar retratos.
(→ p. 60)
Nocturno
Seleccione este modo para tomar fotos de personas con un fondo nocturno. (→ p. 56)
Spot
Seleccione este modo para tomar fotos de sujetos que están en el centro de la imagen. (→ p. 62)
19
w |
e |
|
|
q |
r |
|
t y
u  i
i
 o
o
!2
!1 |
! |
20
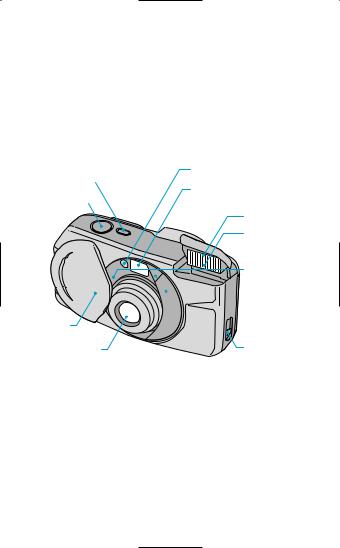
Nomenclature
q Shutter Button
w  Self-timer Button (→ p. 66) e Metering Window
r Viewfinder Window (→ p. 37) t Flash
y Red-eye Reduction/Self-timer Lamp (→ p. 66) u AF Light Emitter
i AF Sub Light Emitter o AF Light Receptor
!0Back Cover Latch (→ p. 38) !1Lens
!2Lens Cover
Nomenclature
q Déclencheur
w  Touche de retardateur (→ p. 66) e Fenêtre de posemètre
r Fenêtre du viseur (→ p. 37) t Flash
y Lampe-pilote anti-yeux rouges/témoin de retardateur (→p. 66) u Emetteur d’éclair AF
i Emetteur d’éclair AF auxiliaire o Récepteur d’éclair AF !0Verrou du dos (→ p. 38) !1Objectif
!2Volet d’objectif
Nomenclatura
q Disparador
w  Botón de autodisparo (→ p. 66) e Ventana de medición
r Ventana del visor (→ p. 37) t Flash
y Luz de reducción de “ojos rojos”/autodisparo (→ p. 66) u Emisor de luz para AF
i Emisor de luz secundaria para AF o Receptor de luz para AF
!0Cierre de la tapa posterior (→ p. 38) !1Objetivo
!2Tapa del objetivo
21
!6
!5
!4
!7
!3
!8
@0 !
@1
@2
@3
@6 @5@4
22

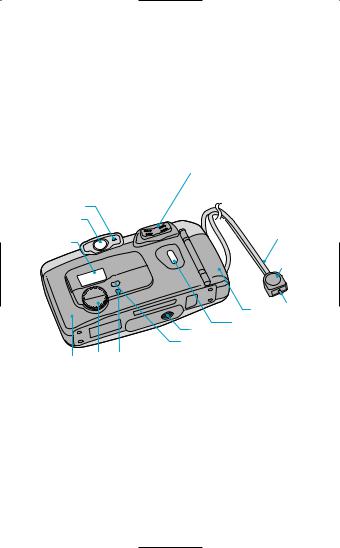
!3LCD Panel !4Viewfinder
!5Green Indicator Lamp (→ p. 36)
!6 Wide-angle/
 Telephoto Zoom Lever (→ p. 30) !7Strap
!8Strap Fixture !9Protrusion @0Battery Cover @1Film Check Window @2Tripod Socket
@3 Flash Mode Button (→ p. 70) @4
 Film Rewind Button (→ p. 48) @5Best Shot Dial (→ p. 50) @6Back Cover
!3Ecran de contrôle LCD !4Viseur
!5Témoin vert (→ p. 36)
!6Commande de zoom Grand angle/
 Téléobjectif (→ p. 30) !7Courroie
!8Attache de courroie !9Partie saillante
@0Couvercle du logement de la pile @1Fenêtre de contrôle du film @2Filetage pour trépied
@3 Touche de mode flash (→ p. 70) @4
 Touche de rembobinage (→ p. 48)
@5Sélecteur “Programmes résultats” (→ p. 50) @6Dos
!3Pantalla LCD !4Visor
!5Luz indicadora verde (→ p. 36)
!6Palanca del zoom de  Gran angular/
 Telefoto (→ p. 30)
!7Correa
!8Enganche de la correa !9Saliente
@0Tapa de la pila
@1Ventana de verificación de la película @2Rosca para el trípode
@3 Botón del modo de flash (→ p. 70)
@4
 Botón de rebobinado de la película (→ p. 48) @5Selector “Best shot” (→ p. 50)
@6Tapa posterior
23

@9 |
# |
@8 |
|
@7 |
# |
|
# |
#7 |
# |
|
|
#6 |
# |
#5 |
|
LCD Panel
This diagram shows all the symbols for explanation only. The LCD panel will never actually look like this.
Ecran de contrôle LCD
A titre explicatif, ce schéma montre tous les symboles affichés simultanément. En réalité, les symboles n’apparaissent jamais tous en même temps sur l’écran de contrôle LCD.
Pantalla LCD
Este diagrama le muestra todos los símbolos, sólo para la explicación. La pantalla LCD realmente no se asemeja a esto.
24

@7Red-eye Reduction Indicator @8 Flash OFF Indicator
@9 Flash ON Indicator
#0Slow-synchro Indicator #11-point Measurement Indicator #2Continuous Shooting Indicator #3Frame Counter
#4Battery Check Mark (→ p. 27) #5Film Indicator
#6Film Advance Indicator #7Self-timer Indicator
@7Indicateur de la fonction anti-yeux rouges @8 Indicateur de flash débrayé (OFF) @9
 Indicateur de flash forcé (ON) #0Indicateur de synchronisation lente #1Indicateur de mise au point centrée #2Indicateur de prises de vues en rafale #3Compteur de vues
#4Symbole de contrôle de la pile (→ p. 27) #5Indicateur de film
#6Indicateur d’avance du film #7Indicateur du retardateur
@7Indicador de reducción de “ojos rojos” @8 Indicador del modo sin flash
@9 Indicador del modo con flash #0Indicador de sincro lento #1Indicador de medición de 1-punto #2Indicador de tomas continuas #3Contador de exposiciones
#4Marca de verificación de la pila (→ p. 27) #5Indicador de película
#6Indicador de avance de la película #7Indicador del autodisparador
25
Basic Operations/Opérations de base/Operaciones básìcas
1 |
2 |
 Loading the Battery
This camera uses one 3V lithium battery (CR 123A or DL 123A)
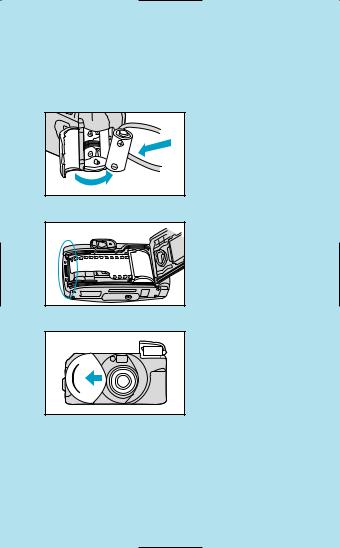
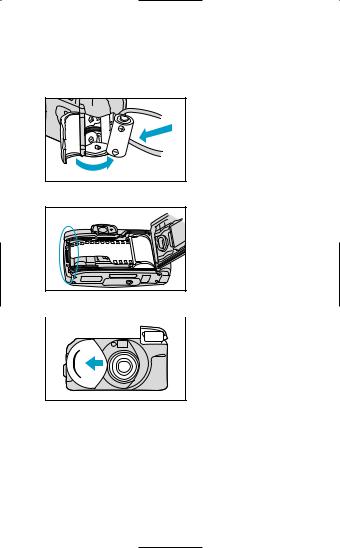
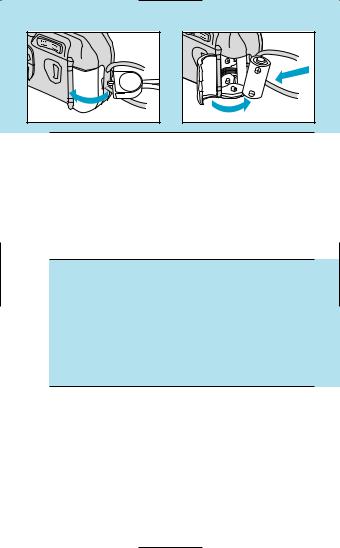
1.Open the battery cover by inserting the protrusion on the strap fixture or a coin into the slot.
2.Load the battery so that the terminals face in the direction shown in the illustration.
3.Close the battery cover until it clicks.
 Mise en place de la pile
Cet appareil est alimenté par une pile de 3 volts au lithium (CR 123A ou DL 123A).
1.Ouvrez le couvercle du logement de la pile en insérant la partie saillante de l’attache de courroie ou une pièce de monnaie dans la fente.
2.Introduisez la pile en orientant ses bornes dans la direction indiquée sur l’illustration.
3.Refermez le couvercle. Un déclic se produit lorsque celuici est parfaitement fermé.
 Instalación de la pila
Esta cámara funciona con una pila de 3V (CR 123A o DL 123A).
1.Abra la tapa de la pila insertando en la ranura una moneda o el saliente del enganche de la correa.
2.Instale la pila con los terminales orientados en la dirección que se indica en la ilustración.
3.Cierre la tapa de la pila hasta que encaje con un chasquido.
26
3
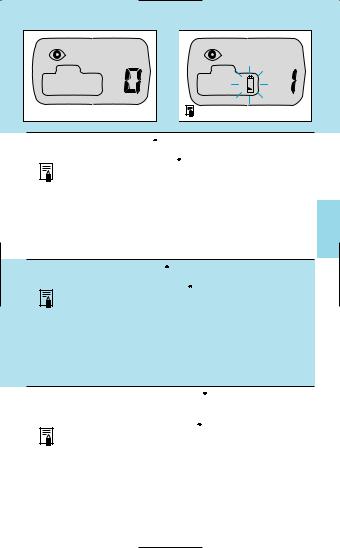
• The battery check mark  on the LCD panel disappears.
• Replace the battery when the  mark flashes in the LCD panel.
• Always check the battery before taking pictures.
•Always carry a supply of spare batteries, especially when traveling where the appropriate battery may not be available.
•When shooting continuously with the flash, the battery power is reduced temporarily and the battery check indicator display may be incorrect. In this case, wait for a while before turning on the power again.
•Le symbole de contrôle de la pile  à l’écran de contrôle LCD disparaît.
• Remplacez la pile lorsque le symbole  clignote sur l’écran de contrôle LCD.
• Contrôlez toujours la pile avant de prendre des photos.
•Pensez à vous munir de piles de rechange, en particulier lors de voyages vers des destinations où la pile appropriée peut ne pas être disponible.
•Lorsque vous prenez des photos continuellement avec le flash, la puissance de la pile est momentanément réduite et l’indicateur de contrôle de la pile peut être incorrect. Dans ce cas, attendre un instant avant de remettre sous tension.
•La marca de verificación de la pila  desaparece de la pantalla LCD.
• Reemplace la pila cuando la marca  destelle en la pantalla LCD.
• Verifique siempre el estado de la pila antes de tomar las fotos.
•Lleve siempre una provisión de pilas de repuestos, especialmente cuando tenga que viajar a lugares donde le sea difícil conseguir la pila apropiada.
•Cuando tome fotos continuamente con el flash, la energía de la pila se reducirá temporalmente y el indicador de verificación de la pila podrá ser incorrecto. En este caso, espere un momento antes de
volver a conectar la alimentación. |
27 |
|
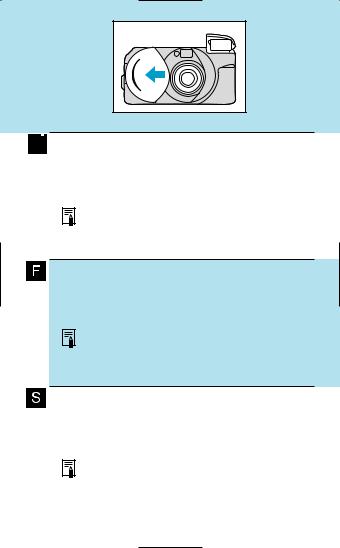
 Opening the Lens Cover
(Turning the Main Switch On)
When the lens cover is opened, the main switch is turned on and the lens and flash are automatically set for shooting.
• The lens first zooms to the full wide (28mm) position.
• Slide the lens cover open until it clicks.
•If the lens and flash are not set for shooting, check to see if there is a battery loaded .
Ouverture du volet d’objectif
(Activation de l’interrupteur principal)
Lorsque le volet d’objectif est ouvert, l’interrupteur principal est mis sous tension et l’objectif ainsi que le flash sont réglés automatiquement pour la prise de vues.
• A l’ouverture du volet, le zoom se positionne sur la focale minimum (28 mm).
•Pour ouvrir le volet d’objectif, faites-le glisser jusqu’au déclic.
•Si l’objectif et le flash ne sont pas réglés pour la prise de vues, vérifiez si une pile est installée dans l’appareil.
Apertura de la tapa del objetivo
(Activación del interruptor principal)
Al abrir la tapa del objetivo se activa el interruptor principal, asimismo el objetivo y el flash se ajustan automáticamente para fotografiar.
• El objetivo primero efectúa el zoom a la posición de abertura total (28mm).
•Deslice y abra la tapa del objetivo hasta que se escuche un chasquido.
•Si el objetivo y el flash no se ajustan para la toma, revise si hay una pila instalada.
28

N
q
Turning the Power Off
Slide the lens cover closed until it clicks.
•The lens and flash retract into the camera for protection. This also prevents the shutter being accidentally released.
Protection seal
To prevent scratching of the lens surface, a blue protection seal q is affixed to it. Remove it before using the camera.
Mise hors tension
Fermez le volet d’objectif en le faisant glisser jusqu’au déclic.
•L’objectif et le flash rentrent alors dans l’appareil. Cette protection permet d’éviter un déclenchement accidentel.
Ruban de protection
Un ruban de protection bleu q est fixé sur l’objectif pour éviter de rayer sa surface. Retirez-le avant d’utiliser l’appareil.
Para desactivar la alimentación
Deslice y cierre la tapa del objetivo hasta escuchar un chasquido.
•El objetivo y el flash se introducen en la cámara para fines de protección. Esto, también evita que el disparador se accione accidentalmente.
Sello protector
Para evitar que se raye la superficie del objectivo, se le ha adherido un sello protector azul q. Retírelo antes de usar la cámara.
29
Loading...