


 Loading...
PUB.DIE-278
DVD Camcorder
Instruction Manual English
Introduction
Prerparations
Basic
Functions
Advanced
Functions
Editing
Functions
Playing Back the Disc on an External Device
External
Connections
Additional
Information
PAL
2
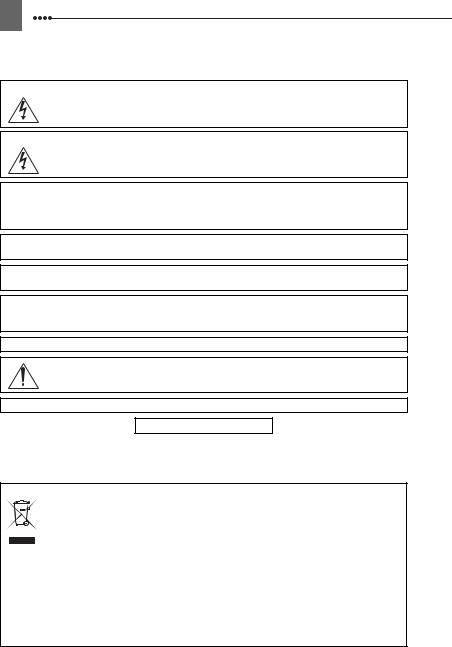
Important Usage Instructions
WARNING!
TO REDUCE THE RISK OF ELECTRIC SHOCK, DO NOT REMOVE COVER (OR BACK). NO USER SERVICEABLE PARTS INSIDE. REFER SERVICING TO QUALIFIED SERVICE PERSONNEL.
WARNING!
TO REDUCE THE RISK OF FIRE OR ELECTRIC SHOCK, DO NOT EXPOSE THIS PRODUCT TO RAIN OR MOISTURE.
CAUTION:
TO REDUCE THE RISK OF ELECTRIC SHOCK AND TO REDUCE ANNOYING INTERFERENCE, USE THE RECOMMENDED ACCESSORIES ONLY.
CAUTION:
DISCONNECT THE MAINS PLUG FROM THE SUPPLY SOCKET WHEN NOT IN USE.
The Mains plug is used as the disconnect device. The Mains plug shall remain readily operable to disconnect the plug in case of an accident.
While using the compact power adapter, do not wrap it or cover it with a piece of cloth, and do not place it in confined narrow spaces. Heat may build up, the plastic case may deform and it could result in electric shock or fire.
CA-570 identification plate is located on the bottom.
Using any device other than the Compact Power Adapter CA-570 may damage the camcorder.
This product has been classified under IEC60825-1:1993 and EN60825-1:1994.
CLASS 1 LASER PRODUCT
European Union (and EEA) only.
This symbol indicates that this product is not to be disposed of with your household waste, according to the WEEE Directive (2002/96/EC) and your national law. This
product should be handed over to a designated collection point, e.g., on an authorized one-for-one basis when you buy a new similar product or to an authorized collection site for recycling waste electrical and electronic equipment (EEE). Improper handling of this
type of waste could have a possible negative impact on the environment and human health due to potentially hazardous substances that are generally associated with EEE. At the same time, your cooperation in the correct disposal of this product will contribute to the effective usage of natural resources. For more information about where you can drop off your waste equipment for recycling, please contact your local city office, waste authority, approved WEEE scheme or your household waste disposal service. For more information regarding return and recycling of WEEE products, please visit
www.canon-europe.com/environment. (EEA: Norway, Iceland and Liechtenstein)
3
How to select a DVD disc
There are many types of DVD discs but this camcorder uses only the following three types of 8 cm mini DVD discs: DVD-R, DVD-R DL and DVD-RW. Note that what you can do with a disc depends on the type of DVD used so select the disc that best fits your purpose.
DVD-R |
Best for Compatibility |
DVD-Rs can be recorded only once - you cannot edit or delete the recordings. On the other hand, these discs are comparatively cheaper and they can be played back in most common DVD players.
DVD-R DL |
Best for Recording Time |
Dual-layered discs allow writing up to 80% more data (2.6 GB) on a single recording side. However, DVD-R DLs can only be played back on DVD devices compatible with dual-layered discs. Also, you cannot edit or delete the recordings.
Dual-layered discs have two recording layers. The camcorder |
|
|
will record on Layer 1 and then continue to Layer 2. During |
Layer 2 |
Scene 2 |
the playback of a recording spanning both layers, you may |
Layer 1 |
Scene 1 |
notice a brief stop (about 1 second) at the point where the |
|
Recording surface |
camcorder switches to the second layer. |
|
|
DVD-RW |
Best for Reusability |
Recordings made on a DVD-RW disc can be edited or deleted. Also, the disc can be initialized1 allowing you to use the same disc numerous times.
Disc specification on DVD-RWs
DVD-RW discs can be recorded using either one of two disc specifications: VIDEO mode or VR mode. When you first insert a brand new DVD-RW disc, the camcorder will automatically display the initialization screen where you can select the disc specification for the disc.
VIDEO mode: Once finalized2, discs recorded in VIDEO mode can be played back in most common DVD players offering the best compatibility. However, recordings cannot be edited (deleted, rearranged, etc.).
VR mode: You can easily edit the recordings. However, discs recorded in VR mode can only be played back with DVD players compatible with DVD-RWs in VR mode.
Note: DVD-R and DVD-R DL discs can only be recorded in VIDEO mode.
Introduction

4
Great Advantages of DVDs
Why DVDs are better than tapes
No need to worry about recording over a tape.
When you use a DVD, the camcorder will automatically record on the empty space of the disc. So you don't have to worry about mistakenly recording over a precious memory.
Just select a scene from the index screen.
You don't need to bother running a tape forwards and backwards to find the scene you want to play back. Simply select a scene from the index screen and start the playback in a breeze.
Easy Playback on a DVD player
After you finalize the disc you recorded, all you have to do is just pop it into a DVD player and start the playback. If you record your disc in VIDEO mode, you will be able to play back your disc on most tabletop DVD players and DVD devices.
Recommended Discs
The camcorder's performance was tested with single-layered discs using Hitachi-Maxell HG series DVD discs; and with dual-layered discs using Canon DVD-R DL54 discs and Verbatim DVD-R DL discs. For further details, contact directly the manufacturer's customer support center. Note that attempting to record or play with this camcorder DVD discs that were recorded, initialized or finalized with other digital devices can result in permanently losing the recordings.
For the highest compatibility with external DVD devices we recommend using the VIDEO mode.

5
Available features depend on the DVD disc used
Disc Type
Editing scenes with this camcorder (deleting scenes, editing the Playlist) ( 51)
51)
Deleting a scene or still image immediately after recording it ( 52, 56)
Initializing the disc in order to use it again for recording ( 54)
54)
Giving a title to the disc ( 55)
55)
Finalizing the disc in order to play it with a DVD player ( 58)
58)
Adding recordings to a disc already finalized ( 60)
60)
Converting still images into Photomovie scenes ( 57)
57)
DVD-RW
DVD-R |
DVD-R DL |
|
|
|
|
VIDEO |
VR |
– |
– |
– |
|
|
|
|
|
– |
– |
|
|
|
|
|
|
– |
– |
|
|
3
– |
– |
4 |
|
|
1Disc initialization clears all the recordings on the disc and restores the free space on the disc to its initial value so you can use the same disc again. DVD-R and DVD-R DL discs cannot be initialized.
2Disc finalization is the processing of the free space (the unrecorded area) on the disc in order to
make it playable on external DVD devices ( 58). To finalize a DVD-R DL disc, the camcorder has to process both layers. Therefore, and depending on the amount of free space on the disc, this process may be lengthy.
3Playback cannot be guaranteed with all external DVD devices.
4You will need to unfinalize the disc first.
Introduction

6
Table of contents
Introduction
How to select a DVD disc ............................................................................... |
3 |
About this Manual |
|
About the Joystick and the Joystick Guide ..................................................... |
9 |
About the Power Switch................................................................................ |
10 |
About the Operating Modes .......................................................................... |
10 |
Getting to Know the Camcorder |
|
Supplied Accessories.................................................................................... |
11 |
Components Guide ....................................................................................... |
12 |
Screen Displays ............................................................................................ |
14 |
Preparations |
|
|
|
Getting Started |
|
Charging the Battery Pack ............................................................................ |
17 |
Inserting and Removing a Disc ..................................................................... |
19 |
Preparing the Camcorder.............................................................................. |
20 |
Adjusting the LCD Screen............................................................................. |
21 |
Using the Menus |
|
Selecting a FUNC. Menu Option................................................................... |
22 |
Selecting an Option from the Setup Menus .................................................. |
22 |
First Time Settings |
|
Changing the Language................................................................................ |
23 |
Changing the Time Zone............................................................................... |
23 |
Setting the Date and Time ............................................................................ |
24 |
Basic Functions |
|
|
|
Recording |
|
Shooting Video.............................................................................................. |
25 |
Selecting the Aspect Ratio of your Recordings (16:9 Widescreen or 4:3) .... |
26 |
Taking Photos ............................................................................................... |
27 |
Zooming ........................................................................................................ |
28 |
Quick Start Function...................................................................................... |
28 |
Playback |
|
Playing Back the Video ................................................................................. |
29 |
Displaying the Photos ................................................................................... |
30 |
Magnifying Photos during Playback.............................................................. |
32 |
Advanced Functions |
|
|
|
Menu Options Lists |
|
FUNC. Menu ................................................................................................. |
33 |
Setup Menus................................................................................................. |
34 |
Camera Setup (Digital Zoom, Image Stabilizer, etc.).......................... |
34 |
Disc Operations (Photomovie, Finalize, etc.)...................................... |
36 |
Still Image Operations (Erase all still images) .................................... |
37 |
Display Setup (LCD Brightness, Language, etc.) ............................... |
37 |
System Setup (Volume, Beep, etc.).................................................... |
38 |
Date/Time Setup................................................................................. |
39 |

7
Recording Programs |
|
Using the Recording Programs ..................................................................... |
40 |
Flexible Recording: Changing the Aperture and Shutter Speed ............... |
41 |
Special Scene: Recording Programs to Match Special Conditions ............... |
42 |
Adjusting the Picture: Exposure, Focus and Color |
|
Manual Exposure Adjustment........................................................................ |
43 |
Manual Focus Adjustment ............................................................................. |
43 |
White Balance ............................................................................................... |
44 |
Image Effects................................................................................................. |
45 |
Still Image Recording Options |
|
Selecting the Size and Quality of Still Images ............................................... |
46 |
Automatic Focus Priority................................................................................ |
47 |
Other Functions |
|
On-Screen Displays....................................................................................... |
48 |
Self Timer ...................................................................................................... |
49 |
Digital Effects................................................................................................. |
49 |
Editing Functions |
|
Managing Scenes |
|
Adding Scenes to the Playlist ........................................................................ |
51 |
Moving Scenes in the Playlist........................................................................ |
52 |
Deleting Scenes ............................................................................................ |
52 |
Dividing a Scene............................................................................................ |
53 |
Managing the Disc |
|
Protecting the Disc ........................................................................................ |
54 |
Initializing the Disc......................................................................................... |
54 |
Changing the Disc Title ................................................................................. |
55 |
Managing Photos |
|
Erasing Photos .............................................................................................. |
56 |
Converting Photos into Photomovie Scenes ................................................. |
57 |
Playing Back the Disc on an External Device |
|
Finalizing the Disc ......................................................................................... |
58 |
Playing Back your Disc on a DVD Player or a Computer’s DVD Drive ......... |
59 |
Unfinalizing the Disc - Additional Recordings on a Finalized Disc ................ |
60 |
External Connections |
|
Connecting to a TV or VCR |
|
Connection Diagrams .................................................................................... |
61 |
Playback on a TV Screen .............................................................................. |
62 |
Recording to a VCR or Digital Video Recorder ............................................. |
62 |
Additional Information |
|
Trouble? |
|
Troubleshooting ............................................................................................. |
63 |
List of Messages............................................................................................ |
67 |
Do’s and Don’ts |
|
Handling Precautions .................................................................................... |
69 |
Maintenance/Others ...................................................................................... |
71 |
Using the Camcorder Abroad ........................................................................ |
72 |
Introduction

8 |
|
|
|
|
|
|
|
|
|
|
|
General Information |
|
||
|
System Diagram ........................................................................................... |
73 |
|
|
Optional Accessories .................................................................................... |
74 |
|
|
Specifications ................................................................................................ |
76 |
|
|
Index ............................................................................................................. |
78 |
|
About this Manual |
9 |
|
|
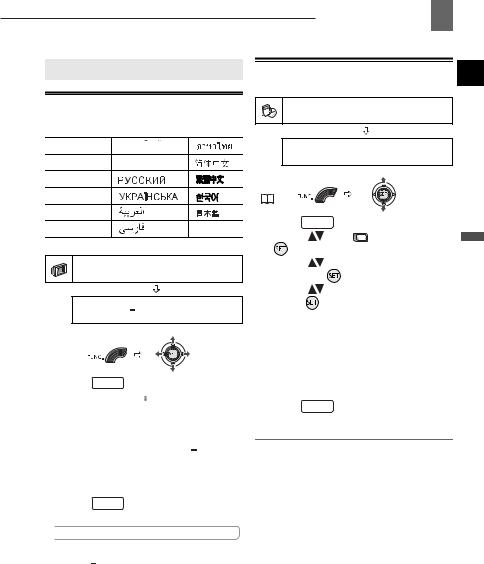
About this Manual
Thank you for purchasing the Canon DC201/DC210/DC211. Please read this manual carefully before you use the camcorder and retain it for future reference. Should your camcorder fail to operate correctly, refer to the Troubleshooting table ( 63).
63).
Conventions Used in the Manual
IMPORTANT: Precautions related to the camcorder’s operation.
NOTES: Additional topics that complement the basic operating procedures.
 POINTS TO CHECK: Restrictions that apply if the function described is not available in all operating modes (the operating mode to which the camcorder should be set, the type of disc required, etc.).
 : Reference page number.
 : Option or feature that applies or is available only with a specific model. The following terms are used in the manual:
“Screen” refers to the LCD and the viewfinder screen.
“Scene” refers to one movie unit from the point you press the start/stop button to start recording until you press again to pause the recording.
The terms “Photo” and “Still image” are used interchangeably with the same meaning.
The photos included in the manual are simulated pictures taken with a still camera. Note that unless indicated otherwise, illustrations in this manual refer to the
 model.
Brackets [ ] and capital letters are used to refer to menu options as they are displayed on screen. Menu options in boldface indicate the default setting (for example [ON], [OFF]).
Menu item shown at its default position
Buttons and switches to be perated
Names of buttons and switches other than the joystick are indicated within a “button” frame (for example FUNC. ).
 First Time Settings 29
First Time Settings |
|
Changing the Time Zone |
Default value
Changing the Language |
DATE/TIME SETUP |
Options |
|
[DEUTSCH] [ ROMANA ] |
[ |
] |
T.ZONE/DST NEW YORK |
[ENGLISH] |
[TÜRKÇE] |
|
[ |
] |
|
|
|
|
|
|
|
|||
[ESPAÑOL] |
[ |
|
] |
[ |
] |
|
|
DATE/TIME SETUP |
|
|||||
[FRANÇAIS] |
[ |
|
] |
[ |
] |
|
|
|
|
|
|
|
||
[ITALIANO] |
[ |
] |
|
[ |
] |
|
|
|
|
|
|
|
||
[POLSKI] |
[ |
] |
|
|
|
|
|
T.ZONE/DST PARIS |
|
|||||
|
|
|
|
|
|
Default value |
|
|
|
|
|
|
|
|
|
|
DISPLAY SETUP |
|
|
|
FUNC. |
|
|
|
|
||||
|
|
|
|
|
( |
|
28) |
|
|
|
|
|||
|
|
|
|
|
|
|
|
1 |
Press FUNC.. |
|
|
|||
|
|
LANGUAGE |
ENGLISH |
|
|
2 |
Select ( |
|
) the |
icon and press |
||||
|
|
|
|
|
|
|
|
|
( |
) to open the setup menus. |
||||
|
|
|
|
|
|
|
|
3 |
Select ( |
|
) [DATE/TIME SETUP] |
|||
FUNC. |
|
|
|
|
|
|
and press ( |
). |
|
|
||||
( |
|
28) |
|
|
|
|
|
4 |
Select ( |
|
) [T.ZONE/DST] and |
|||
1 |
Press FUNC.. |
|
|
|
|
|
press ( |
). |
|
|
||||
|
|
|
|
|
The time zone setting appears. The |
|||||||||
2 |
Select ( |
) the |
|
icon and press |
|
default setting is New York. The |
|
|||||||
3 |
( |
) to open the setup menus. |
|
|
default setting is Paris. |
|
||||||||
Select ( |
) [DISPLAY SETUP] and |
5 |
Select ( |
|
) your time zone and |
|||||||||
4 |
press ( |
). |
|
|
|
|
|
press ( |
). |
|
|
|||
Select ( |
) [LANGUAGE |
] and |
|
To adjust for daylight saving time, |
||||||||||
5 |
press ( |
). |
|
|
|
|
|
select the time zone with the |
mark |
|||||
Select ( |
, |
) the desired |
|
|
next to the area. |
|
|
|||||||
6 |
option and press ( |
). |
|
|
6 |
Press FUNC. to close the menu. |
||||||||
Press FUNC. to close the menu. |
|
|
|
|
|
|
|
|||||||
 NOTES
NOTES
If you changed the language by mistake, follow the  mark next to the menu item to change the setting.
The displays  and
and  that appear in some menu screens refer to the name of buttons on the camcorder and will not change, regardless of the language selected.
Preparations
About the Joystick and the Joystick Guide
Introduction
Push the joystick up, down, left or right ( ,
, 
 ) to select an item or change settings.
Press the joystick itself ( 
 ) to save the settings or confirm an action. On menu screens, this is indicated by the icon
  .
.
10 About this Manual 

The functions assigned to the joystick change according to the operation mode and the camcorder’s settings. Press ( ) to display/hide the joystick guide.
In the illustrations of the manual, |
|
|
|
|
When the joystick guide contains |
positions other than those relevant to the |
|
|
|
|
multiple ‘pages’, [NEXT] and the page |
|
|
|
|
||
function explained are marked with a |
|
|
|
|
number icon ( ) will appear at the |
|
|
|
|
||
striped pattern. Depending on the model |
|
|
|
|
bottom position. Push the joystick ( ) |
and the operation mode, these positions |
|
NEXT |
toward [NEXT] to display the next ‘page’ |
||
may be empty or show a different icon |
|
of the guide. |
|||
than the one on the illustration.
About the Power Switch
In addition to turning the camcorder on and off, the power switch
also toggles the camcorder’s operating mode.
To turn on the camcorder: Hold the lock button pressed down and
move the power switch down to ON.
To change the operating mode: From the ON position, slide down the power switch momentarily toward MODE and release it. This action will toggle the operating mode between recording (CAMERA - red indicator) and playback (PLAY - green indicator).
Lock button
About the Operating Modes
The camcorder’s operating mode is determined by the positions of the power switch and the 

 /
/ switch. In the manual,
  indicates that a function is available in the operating mode shown and
  indicates that the function is not available. When no operating mode
icons are given, the function is available in all operating modes.
Operating Mode |
Operating |
/ |
Icon Display |
Operation |
|
Mode Indicator |
Switch |
|
|||
|
|
|
|
||
|
CAMERA |
|
|
Recording movies |
25 |
|
(Red) |
|
|
on the disc |
|
|
|
|
|
||
|
PLAY |
(Movies) |
|
Playing movies |
29 |
|
(Green) |
|
|
from the disc |
|
|
|
|
|
||
|
CAMERA |
|
|
Recording still images on |
27 |
|
(Red) |
|
|
the disc |
|
|
(Still |
|
|
||
|
PLAY |
|
Viewing still images from |
|
|
|
images) |
|
30 |
||
|
(Green) |
|
the disc |
||
|
|
|
|
|
|
|
|
Getting to Know the Camcorder |
11 |
|
|
|
|
|
|
|
|
|
|||
|
|
|
|
|
|
|
|
|
|
|
|
|
|
|
|
|
|
|
Supplied Accessories |
|
|
|
|
|
|
|
|
|
|
|
|
|
|
||
|
|
|
|
|
|
|
||
|
CA-570 Compact Power |
BP-208 Battery Pack |
STV-250N Stereo Video |
|
|
|
|
|
|
Adapter |
|
Cable |
|
|
|
||
|
(incl. power cord) |
|
|
|
|
|
|
|
|
|
|
|
|
|
|
|
|
|
|
|
|
|
|
|
|
|
Introduction
Trademark Acknowledgements
• is a trademark of DVD Format/Logo Licensing Corporation.
•Manufactured under license from Dolby Laboratories.
“Dolby” and the double-D symbol are trademarks of Dolby
Laboratories. 


•Other names and products not mentioned above may be trademarks or registered trademarks of their respective companies.
•ANY USE OF THIS PRODUCT OTHER THAN CONSUMER PERSONAL USE IN ANY MANNER THAT COMPLIES WITH THE MPEG-2 STANDARD FOR ENCODING VIDEO INFORMATION FOR PACKAGED MEDIA IS EXPRESSLY PROHIBITED WITHOUT A LICENSE UNDER APPLICABLE PATENTS IN THE MPEG-2 PATENT PORTFOLIO, WHICH LICENSE IS AVAILABLE FROM MPEG LA, L.L.C., 250 STEELE STREET, SUITE 300, DENVER, COLORADO 80206.
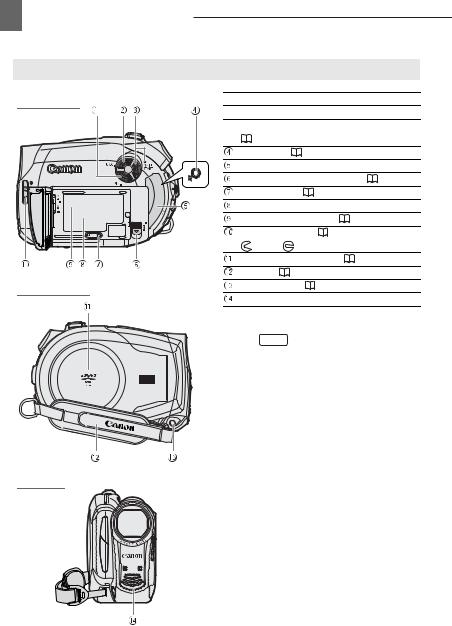
12 Getting to Know the Camcorder 

Components Guide
Left side view
Right Side View
Front view
 DISP. button (
 48)
48)
 FUNC. button (
 22, 33)
 QUICK START button and standby lamp
( |
28) |
|
|
|
|
AV terminal ( |
61) |
|
|
||
Terminal cover |
|
|
|
||
BATT. (battery release) switch ( |
17) |
||||
RESET button ( |
63) |
|
|
||
Serial number |
|
|
|
||
Battery attachment unit ( |
17) |
|
|||
Lens cover switch ( |
25, 27) |
|
|||
( |
open, |
closed) |
|
|
|
Disc compartment cover ( |
19) |
|
|||
Grip belt ( |
20) |
|
|
|
|
DC IN terminal ( |
17) |
|
|
||
Stereo microphone |
|
|
|
||
Names of buttons and switches other than the
joystick are indicated within a “button” frame (for example FUNC. ).

Back view
Top view
Bottom view

 Getting to Know the Camcorder 13
PLAY mode indicator (green) ( |
10) |
||||
Joystick ( |
9) |
|
|
|
|
CAMERA mode indicator (red) ( |
10) |
||||
LCD screen ( |
21) |
|
|
||
|
(fast reverse) button ( |
30) / |
|||
Zoom out W (wide-angle) button ( |
28) |
||||
|
(fast forward) button ( |
30) / |
|||
Zoom in T (telephoto) button ( |
28) |
||||
/ |
(play/pause) button ( |
29) / |
|||
START/STOP button ( 25) |
Introduction |
||||
(stop) button ( |
29) / |
|
|||
|
|
||||
PLAYLIST button ( 51) |
|
|
|||
Viewfinder ( |
20) |
|
|
||
Dioptric adjustment lever ( |
20) |
|
|||
/ |
(movies/still images) switch ( 10) |
||||
DISC access indicator ( |
25, 27) / |
||||
CHG (charge) indicator ( |
17) |
|
|||
Start/stop button ( |
25) |
|
|
||
Power switch ( |
10) |
|
|
||
OPEN (disc cover) switch ( |
19) |
||||
Grip belt ( |
20) |
|
|
|
|
Mode switch ( |
40) |
|
|
||
Zoom lever ( |
28) |
|
|
||
PHOTO button ( |
27) |
|
|
||
Speaker ( |
30) |
|
|
|
|
Tripod socket ( |
26) |
|
|
||
Strap mount |
|
|
|
|
|
Names of buttons and switches other than the
joystick are indicated within a “button” frame (for example FUNC. ).
14 Getting to Know the Camcorder 

Screen Displays
 Recording Movies
 Recording Still Images
Operating mode ( |
10) |
|
|
|||
Recording program ( |
40) |
|
||||
White balance ( |
44) |
|
|
|
||
Image effect ( |
45) |
|
|
|
||
Digital effects ( |
|
49) |
|
|
|
|
Recording mode ( |
33) |
|
|
|||
Self timer ( |
|
49) |
|
|
|
|
Disc type |
|
DVD-R, |
|
DVD-R DL, |
|
|
DVD-RW ( |
3) |
|
|
|
||
Disc specification |
|
|
|
|
||
(VIDEO mode, VR mode) ( |
3) |
|
||||
Finalized disc mark ( |
58) |
|
||||
Manual focus ( |
|
43) |
|
|
|
|
Image stabilizer ( |
35) |
|
|
|
||
Disc operation |
|
|
|
|
|
|
Time code (hours : minutes : seconds) |
|
|||||
Remaining recording time on the disc |
|
|||||
Recording reminder |
|
|
|
|||
Wind screen off ( |
36) |
|
|
|
||
Level marker ( |
|
37) |
|
|
|
|
Zoom ( |
28), Exposure |
( |
43) |
|||
Still image quality/size ( |
|
46) |
|
|||
 Number of still images available on the disc
 Remaining battery charge estimate
AF frame ( |
47) |
|
Camcorder shake warning ( |
34) |
|
 Autofocus (AF) and exposure (AE) locked (
 27)
27)
 Disc operation
 Record,
 Record pause,
 Playback,
  Playback pause,
 Fast playback,
 Fast reverse playback,
 Slow playback,
 Slow reverse playback
 Remaining recording time
When there is no more disc space available, “  END” will be displayed and the recording will stop.
 Recording reminder
The camcorder counts from 1 to 10 seconds when you start recording. This is helpful to avoid scenes that are too short.

 Getting to Know the Camcorder 15
 Number of still images available on the disc
 flashing in red: No disc
in green: 6 or more images
in yellow: 1 to 5 images
in red: No more images can be recorded
•When viewing the still images, the display will always be in green.
•Depending on the recording conditions, the number of available still images displayed may not decrease even after a recording has been made, or may decrease by 2 still images at once.
Disc access display
“ ” is displayed next to the number of images available while the camcorder is writing on the disc.
 Remaining battery charge estimate
•When “ ” starts flashing in red replace the battery pack with a fully charged one.
•When you attach an empty battery pack, the power may turn off without displaying “ ”.
”.
•Depending on the conditions under which the camcorder and the battery pack are used, the actual battery charge may not be indicated accurately.
Introduction
16 Getting to Know the Camcorder 

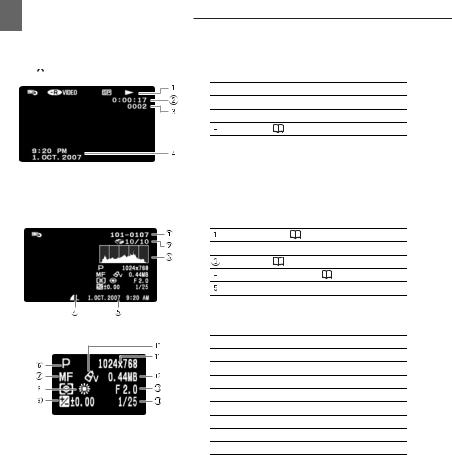
 Playing Movies (During Playback)
 Viewing Still Images
 Disc operation
 Playback time (hours : minutes : seconds)
 Scene number
Data code ( |
48) |
Image number ( |
38) |
 Current image / Total number of images
Histogram ( |
48) |
|
Still image quality/size ( |
46) |
|
Date and time of recording |
|
|
 Recording program (
 40)
40)
 Manual focus (
 43)
43)
 White balance (
 44)
44)
 Manual exposure (
 43)
43)
 Image effect (
 45)
45)
 Image size (
 46)
46)
 File size
 Aperture value
 Shutter speed (
 41)
41)

 Getting Started 17
Getting Started
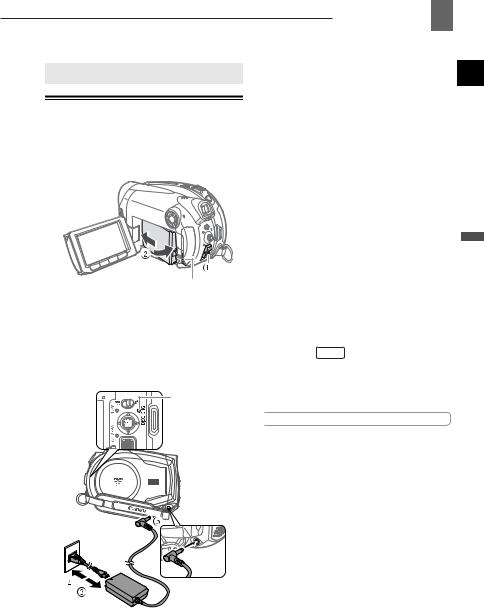
Charging the Battery Pack
The camcorder can be powered with a battery pack or directly using the compact power adapter. Charge the battery pack before use.
BATT. switch
1Turn off the camcorder.
2Attach the battery pack to the camcorder.
•Open the LCD panel.
•Slide in the connector end of the battery in the direction of the arrow and press it gently until it clicks.
CHG (charge) indicator
DC IN terminal
3Connect the power cord to the compact power adapter.
4Plug the power cord into a power outlet.
5Connect the compact power adapter to the camcorder’s DC IN terminal.
•The CHG (charge) indicator starts flashing. The indicator will stay on when the charging is completed.
•You can also use the compact power adapter without attaching a battery pack.
•When the compact power adapter is connected, even if a battery is attached its power will not be consumed.
ONCE THE BATTERY IS FULLY CHARGED
1Disconnect the compact power adapter from the camcorder.
2Unplug the power cord from the power outlet and the compact power adapter.
TO REMOVE THE BATTERY PACK
Slide down BATT. to release the battery pack, and pull out the battery pack holding it from the ridge on its bottom part.
 IMPORTANT
Turn off the camcorder before connecting or disconnecting the compact power adapter. After you turn off the power switch to  , important file allocation data is updated on the disc. Be sure to wait until the LCD display is completely off.
You may hear some noise from the compact power adapter during use. This is not a malfunction.
We recommend charging the battery pack in temperatures between 10 °C and 30 °C. Outside the temperature range of 0 °C to 40 °C, the charging will not start.
Do not connect to the camcorder’s DC IN terminal or to the compact power adapter any electrical equipment that is not expressly recommended for use with this camcorder.
To prevent equipment breakdowns and excessive heating, do not connect the supplied
Preparations

18 Getting Started 

compact power adapter to voltage converters for overseas travels or special power sources such as those on aircraft and ships, DC-AC inverters, etc.
 NOTES
NOTES
The CHG (charge) indicator also serves as a rough estimate of the battery charge status. Continuously on: Battery fully charged.
Flashes approx. twice per second: Battery over 50% charged.
Flashes approx. once per second: Battery less than 50% charged.
The charging time will vary depending on the surrounding temperature and the battery pack’s initial charge condition. In cold places, the effective usage time of the battery will decrease.
We recommend that you prepare battery packs 2 to 3 times longer than you think you might need.
Charging, Recording and Playback Times with the BP-208 Battery Pack
The recording and playback times given in following tables are approximate and vary according to the charging, recording or playback conditions.
Battery Pack |
|
|
|
BP-208 |
|
|
|
||
Recording Mode |
|
XP |
|
SP |
|
LP |
|||
Recording Times |
Maximum |
|
Typical* |
Maximum |
|
Typical* |
Maximum |
|
Typical* |
Viewfinder |
115 min. |
|
60 min. |
135 min. |
|
65 min. |
145 min. |
|
70 min. |
|
|
|
|
|
|
|
|
|
|
LCD [NORMAL] |
110 min. |
|
60 min. |
125 min. |
|
65 min. |
140 min. |
|
65 min. |
|
|
|
|
|
|
|
|
|
|
LCD [BRIGHT] |
105 min. |
|
60 min. |
120 min. |
|
60 min. |
130 min. |
|
65 min. |
|
|
|
|
|
|
|
|||
Playback Time |
140 min. |
165 min. |
175 min. |
||||||
Charging Time |
|
|
|
160 min. |
|
|
|
||
*Approximate times for recording with repeated operations such as start/stop, zooming, power on/off.
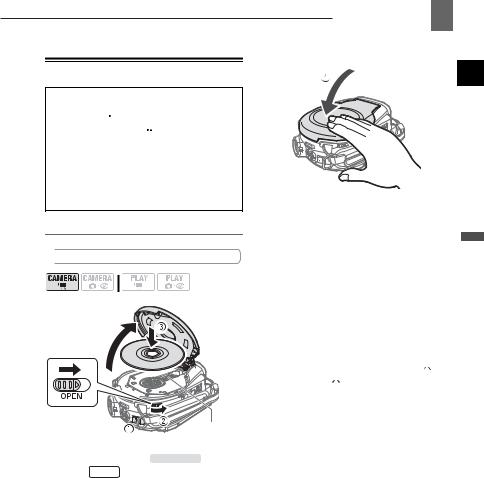
Inserting and Removing a Disc
Use only 8 cm mini DVD discs marked with the DVD-R  logo (including DVD-R DL) or the DVD-RW
  logo. Refer also to Recommended Discs (
 4).
4).
Before inserting the disc be sure to check that the recording surface is clean. If necessary, use a soft lens-cleaning cloth to remove any fingerprints, dirt buildup or smudges from the disc surface.
Inserting the Disc
 POINTS TO CHECK
( 10)
10)
Pick up lens
1Move the power switch to ON to set the camcorder in 

 mode.
mode.
2Slide OPEN fully in the direction of the arrow and gently open the disc cover completely until it stops.
Retract the grip belt under the camcorder so it will not get in the way of the disc cover.
3Insert the disc and press its center firmly until it clicks in place.
•Insert the disc with the recording side facing down (single sided discs – label side facing out).
•Be careful not to touch the recording surface of the disc or the pick up lens.

 Getting Started 19
4 Close the disc cover.
Do not force the cover closed if the disc is not correctly inserted and firmly set in place.
WHEN USING DVD-R/DVD-R DL DISCS
You can start recording movies once the record pause 
 indication appears.
WHEN USING A DVD-RW
You need to initialize new discs before you can start recording. The disc initialization screen will appear when a new DVD-RW is first inserted if the  /
/ switch is set to
  . The disc initialization screen will not appear when inserting a disc already initialized. In that case, you can start recording once the record pause
 indication appears.
 Select (
 ) the desired disc specification and press (
 ). For a comparison between the [VIDEO] and [VR] specifications, see How to select a DVD disc (
 3).
3).
 You will be asked to confirm the disc specification you selected. Select (
 ) [YES] and press (
 ) to continue, or select [NO] and press (
 ) to return and select a different disc specification.
 A confirmation message will appear on the screen. Select (
 ) [YES] and press (
 ) to start the disc initialization.
Preparations
20Getting Started 

•The disc initialization will take approximately one minute. Avoid moving the camcorder while the operation is in progress.
•You can start recording movies once the record pause  indication appears.
 NOTES
NOTES
The process of recognizing a disc may take a moment. The  display will move while the disc is being read. Wait until the camcorder finishes recognizing the disc before you start recording.
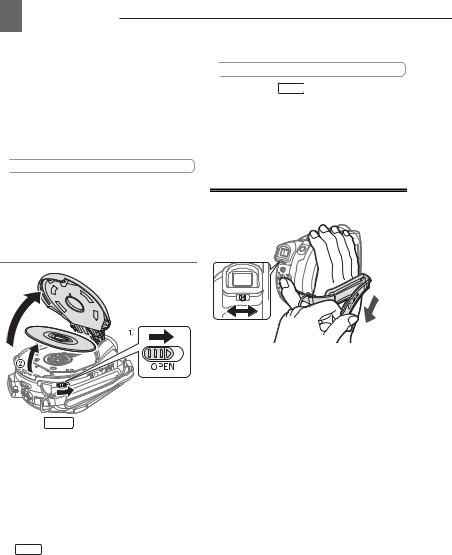
Removing the Disc
1Slide OPEN fully in the direction of the arrow and gently open the disc cover completely until it stops.
•Do not subject the camcorder to strong impacts while the DISC access indicator is on or flashing.
•Retract the grip belt under the camcorder so it will not get in the way of the disc cover.
•It may take a moment after sliding OPEN for the disc cover to open.
2Grab the edge of the disc and gently pull it out.
Be careful not to touch the recording surface of the disc or the pick up lens.
3Close the disc cover.
 IMPORTANT
When you slide OPEN after making a recording, important file allocation data is updated on the disc before the disc cover opens. While the DISC access indicator is on or flashing do not subject the camcorder to shocks such as forcefully laying it on a table.
Preparing the Camcorder
1Turn on the camcorder.
2Move the lens cover switch down to
 to open the lens cover.
3Adjust the viewfinder.
Keep the LCD panel closed to use the viewfinder and adjust the dioptric adjustment lever as necessary.
4 Fasten the grip belt.
Adjust the grip belt so that you can reach the zoom lever with your index finger, and the start/stop button with your thumb.
Adjusting the LCD Screen
Rotating the LCD Panel
Open the LCD panel 90 degrees.
•You can rotate the panel 90 degrees downward.
•You can rotate the panel 180 degrees toward the lens (allowing the subject to monitor the LCD screen while you use the viewfinder). Rotating the panel 180 degrees is also useful if you wish to include yourself when recording with the self timer. This is the only case where you can use the viewfinder and the LCD screen simultaneously.
180°
90°
180°
Subject can monitor the LCD screen

 Getting Started 21
LCD Backlight
You can adjust the brightness of the LCD screen to one of two levels.
Keep DISP. pressed down for more than 2 seconds.
Repeat this action to toggle between the normal and bright settings.
 NOTES
NOTES
This setting does not affect the brightness of the recording or the viewfinder screen.
Using the bright setting will shorten the effective usage time of the battery.
Preparations
22 Using the Menus 

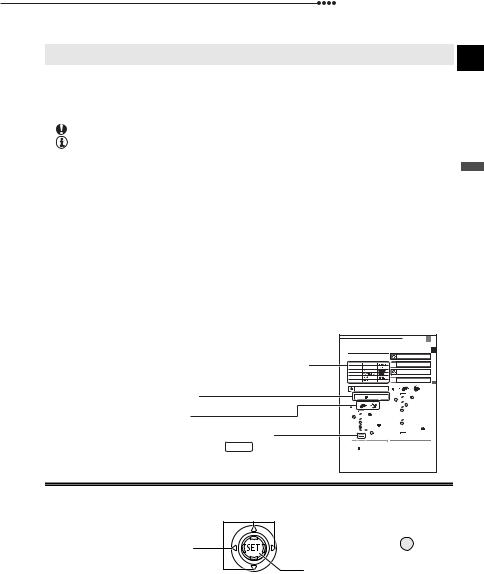
Using the Menus
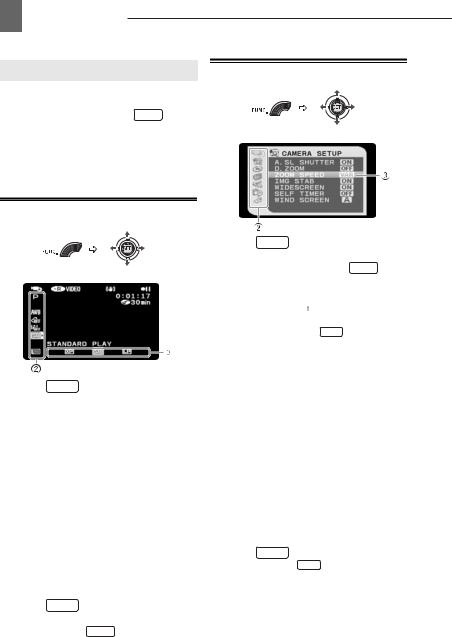
Many of the camcorder’s functions can be adjusted from the menus that open after pressing the FUNC. button ( FUNC. ).
For details about the available menu options and settings, refer to the Menu Options Lists ( 33).
33).
Selecting a FUNC. Menu Option
FUNC.
(  22)
22)
1Press FUNC. .
2Select ( ) the icon of the function you want change from the left side column.
Menu items not available will appear grayed out.
3Select ( ) the desired setting from the available options at the bottom bar.
•The selected option will be highlighted in light blue. Menu items not available will appear grayed out.
•With some settings, you will need to
make further selections ( ,
,  ) and/or press (
 ). Follow the additional operation guides that will appear on the screen (such as the
  icon, small arrows, etc.).
4Press FUNC. to save the settings and close the menu.
You can press FUNC. to close the menu at any time.
Selecting an Option from the Setup Menus
FUNC.
(  22)
22)
1 Press FUNC. .
During the playback of a disc recorded in VIDEO mode, pressing FUNC. will open directly the setup menus. Continue directly from step 3.
2Select ( ) the
) the  icon and press (
  ) to open the setup menus.
•You can also hold FUNC. pressed down for more than 1 second to open directly the setup menus screen.
•Push the joystick ( ) to return to the menu selection screen (step 3).
3Select ( ) the desired menu from the left side column and press (
  ).
).
The title of the selected menu appears on top of the screen and under it the list of settings.
4Select ( ) the setting you want to change and press (
  ).
).
The orange selection bar indicates the menu setting currently selected. Items not available appear in black.
5Select ( ) the desired option and press (
  ) to save the setting.
6Press FUNC. .
You can press FUNC. to close the menu at any time.
First Time Settings
Changing the Language
Options
[DEUTSCH] |
[ ROMANA ] |
|
[ |
] |
|
[ENGLISH] |
[TÜRKÇE] |
|
[ |
] |
|
[ESPAÑOL] |
[ |
|
] |
[ |
] |
[FRANÇAIS] |
[ |
|
] |
[ |
] |
[ITALIANO] |
[ |
] |
|
[ |
] |
[POLSKI] |
[ |
] |
|
|
|
Default value
DISPLAY SETUP
LANGUAGE ENGLISH
FUNC.
(  22)
22)
1 Press FUNC. .
2Select ( ) the
) the  icon and press (
  ) to open the setup menus.
3Select ( ) [DISPLAY SETUP] and press (
  ).
).
4Select ( ) [LANGUAGE
 ] and press (
  ).
).
5Select ( ,
, 
 ) the desired option and press (
  ).
).
6Press FUNC. to close the menu.
 NOTES
NOTES
If you changed the language by mistake, follow the  mark next to the menu item to change the setting.
The displays  and
and  that appear in some menu screens refer to the name of buttons on the camcorder and will not change, regardless of the language selected.

 First Time Settings 23
Changing the Time Zone
Default value
DATE/TIME SETUP
T.ZONE/DST PARIS
FUNC.
( |
22) |
|
|
|
|
1 |
Press FUNC. . |
|
|
||
2 |
Select ( |
) the |
icon and press |
|
|
3 |
( ) to open the setup menus. |
Preparations |
|||
Select ( |
) [DATE/TIME SETUP] |
||||
|
|||||
4 |
and press ( ). |
|
|
||
Select ( |
) [T.ZONE/DST] and |
|
|||
|
press ( |
). |
|
|
|
The time zone setting appears. The default setting is Paris.
5 Select ( ) your time zone and press (
  ).
).
To adjust for daylight saving time, select the time zone with the  mark next to the area.
6 Press FUNC. to close the menu.
Time Zones
Once you have set the time zone, date and time, you do not need to reset the clock every time you travel to another time zone. Select the time zone referring to the date and time displayed on the screen.

24 First Time Settings 

Setting the Date and Time
DATE/TIME SETUP
DATE/TIME 1.JAN.2007 12:00 AM
FUNC.
(  22)
22)
1Press FUNC. .
2Select ( ) the
) the  icon and press (
  ) to open the setup menus.
3Select ( ) [DATE/TIME SETUP] and press (
  ).
).
4Select ( ) [DATE/TIME] and press (
  ).
).
The first field of the date will be displayed in orange and indicated with up/down arrows.
5Push the joystick ( ) to set the date and time and (
 ) to move between the fields of the date and time.
6Press (  ) to start the clock.
7Press FUNC. to close the menu.
 IMPORTANT
When you do not use the camcorder for about 3 months, the built-in rechargeable lithium battery may discharge completely and the date and time setting may be lost. In such case, recharge the built-in lithium battery ( 70) and set the time zone, date and time again.
You can also change the date format ( 39).
39).
Loading...