


CX-1
Table of contents
 Loading...
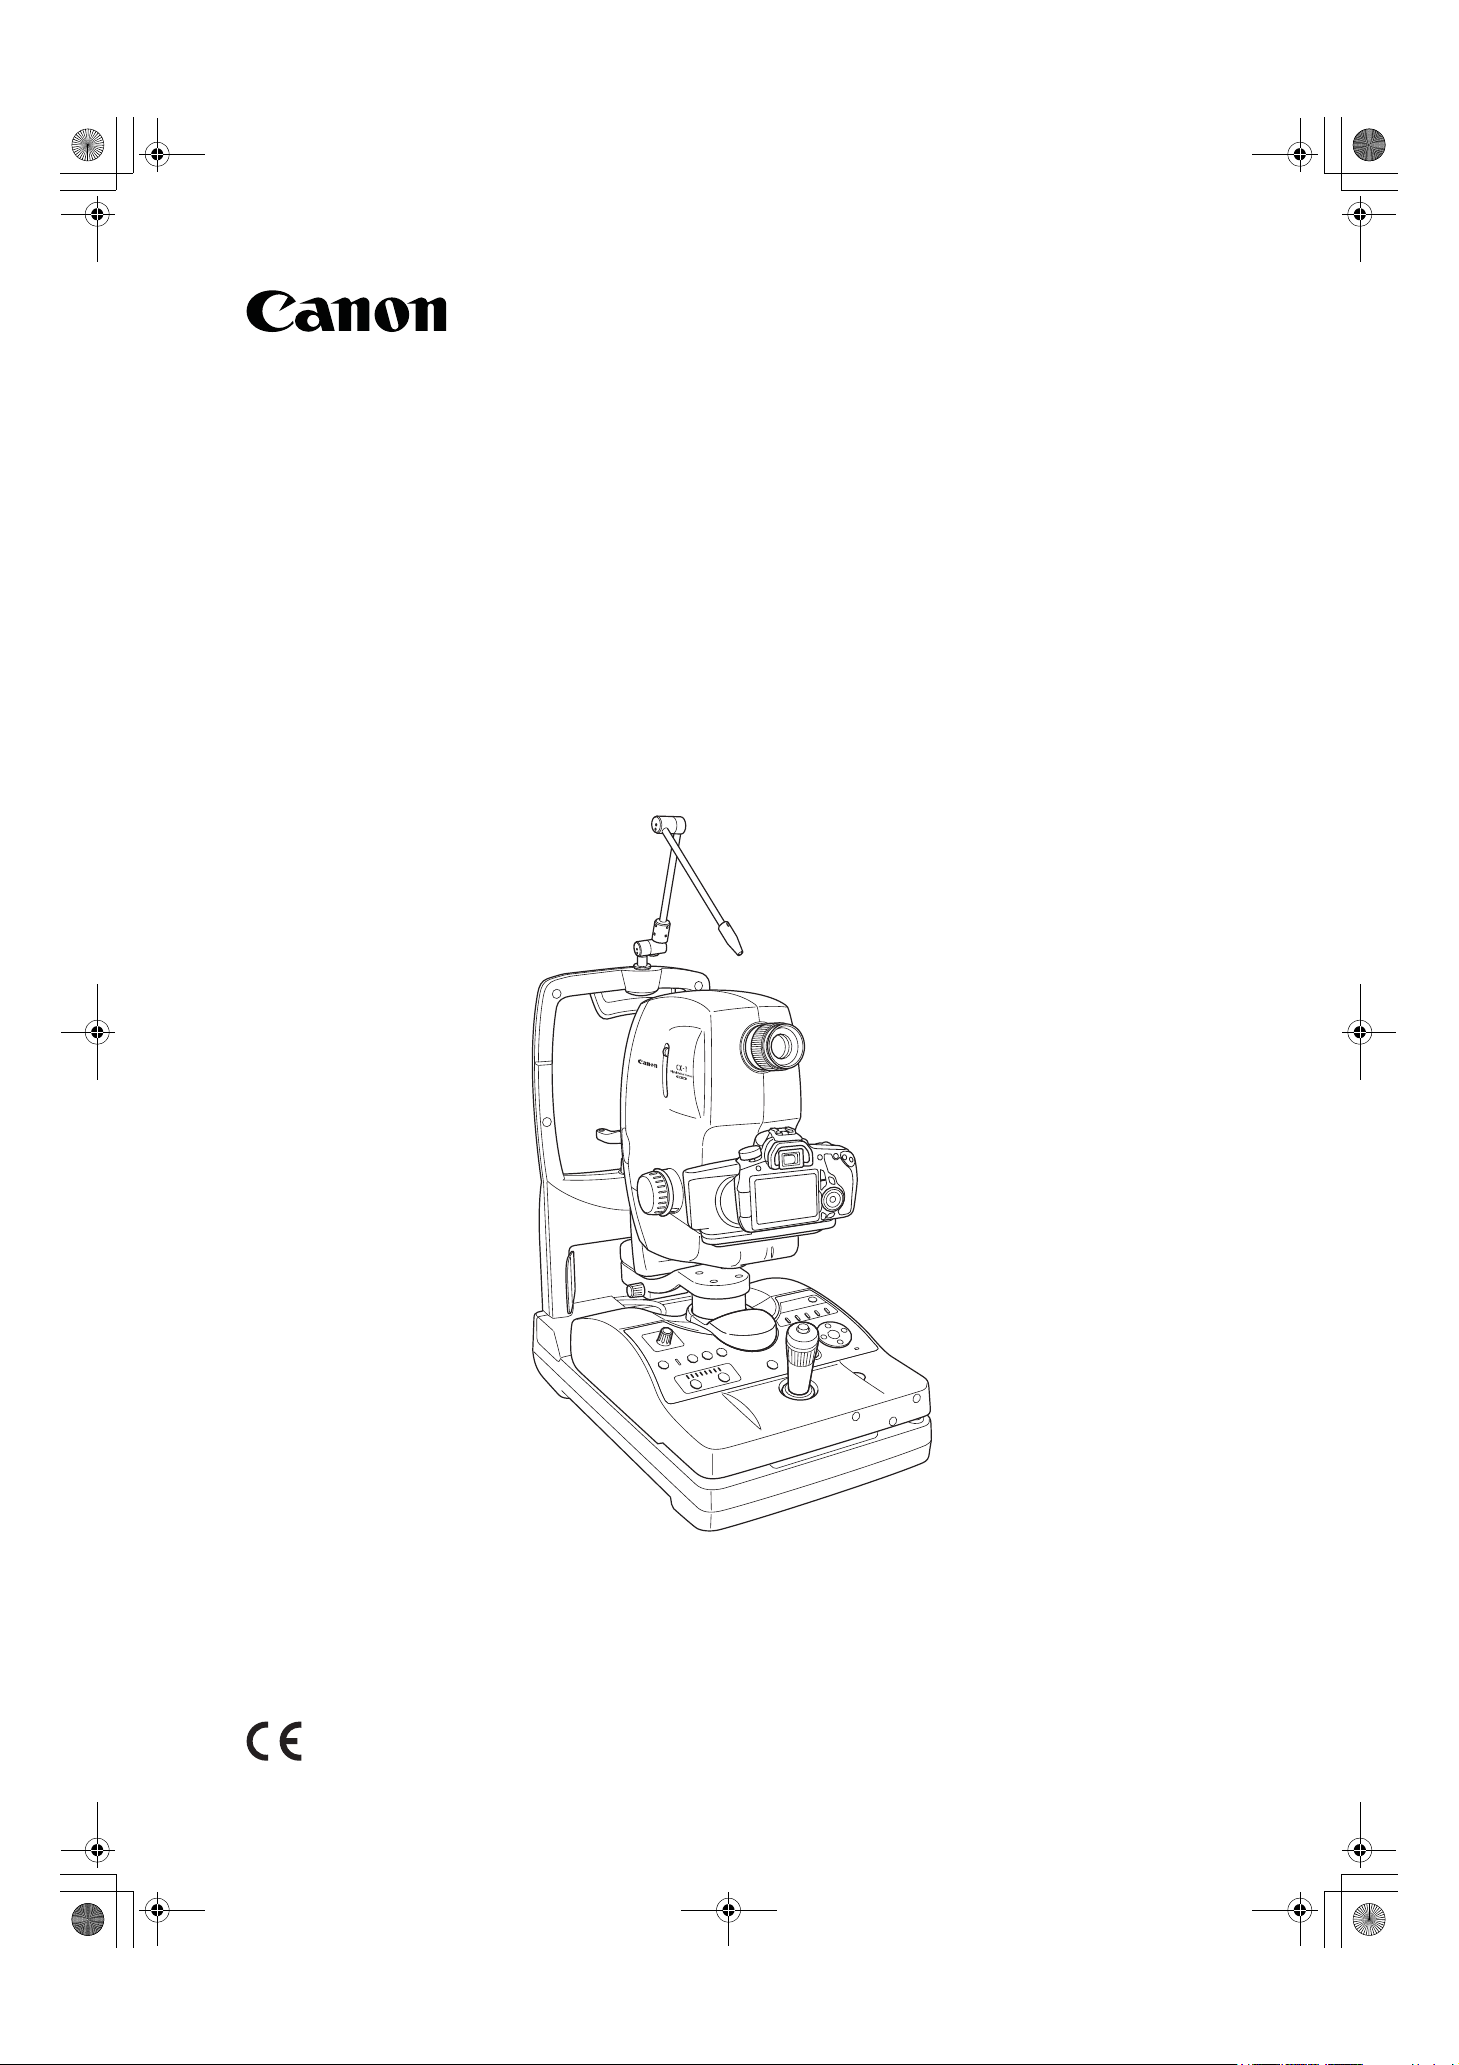
Make sure you read this manual before using the instrument.
Keep this manual in a safe place so that you can use it in the future.
Digital Retinal Camera
CX-1
Operation Manual
000_L-IE-5169D_CX-1.book Page 1 Monday, July 29, 2013 10:42 AM

PLEASE NOTE
1. Please contact your sales representative or local Canon dealer to have the instruments installed.
2. Use the computer, monitor, and other equipment that conforms to the system standard IEC 60601-1/
UL 60601-1 or IEC 60950-1/UL 60950-1 for the Digital Retinal Camera CX-1. Be sure that the entire system
conforms to IEC 60601-1-1/UL 60601-1-1. Be sure to also use an isolation transformer conforming to
IEC 60601-1/UL 60601-1 when a computer or monitor conforming to IEC 60950-1/UL 60950-1 is used. For
details, consult your sales representative or local Canon dealer.
3. To maintain compliance to IEC 60601-1-2, it is recommended that the computer, monitor, and other
equipment configured with the CX-1 be evaluated to IEC 60601-1-2 or FCC Part15 Subpart B Class B and
CISPR 24.
4. The user is responsible for the use and maintenance of the product. We suggest that a dedicated individual
is assigned responsibility for maintenance to ensure that the product is kept in good condition and can be
used safely. Also, medical products must be used only by a doctor or a legally qualified person.
5. This product may malfunction due to electromagnetic waves caused by cellular phones, transceivers, radio-
controlled toys, etc. Be sure to avoid having objects such as these, which affect this product, brought near
the product.
6. Disposal of this product in an unlawful manner may have a negative impact on human health and on the
environment. When disposing of this product, therefore, be absolutely sure to follow the procedures which
conform with the laws and regulations applicable in your area.
7. In no event will Canon be liable for direct or indirect consequential damage arising out of the use of this
product. Canon will not be liable for loss of image data due to any reason.
8. Reading of images and storage of data must be performed in accordance with the law of the country where
the product is being used. Also, the user is responsible for maintaining the privacy of image data.
9. The power cable supplied is designed to be used solely with this camera. Do not use it for any other product.
10.Canon reserves the right to change the specifications, configuration and appearance of the product without
prior notice.
© CANON INC. 2011
All rights reserved.
Under copyright laws, this manual may not be copied, in whole or in part, without the written consent
of Canon.
European Union (and EEA*) only.
This symbol indicates that this product is not to be disposed of with your household waste,
according to the WEEE Directive (2002/96/EC) and your national law. This product should
be handed over to a designated collection point, e.g., on an authorized one-for-one basis
when you buy a new similar product or to an authorized collection site for recycling waste
electrical and electronic equipment (EEE). Improper handling of this type of waste could
have a possible negative impact on the environment and human health due to potentially
hazardous substances that are generally associated with EEE. At the same time, your
cooperation in the correct disposal of this product will contribute to the effective usage of
natural resources. For more information about where you can drop off your waste
equipment for recycling, please contact your local city office, waste authority, approved
WEEE scheme or your household waste disposal service.
For more information regarding return and recycling of WEEE products, please visit
www.canon-europe.com/weee
.
* EEA : Norway, Iceland and Liechtenstein
000_L-IE-5169D_CX-1.book Page 2 Monday, July 29, 2013 10:42 AM
-3-
Safety Information
Regulations
This instrument conforms to IEC 60601-1-2:2001/A1:2004 and IEC 60601-1-2:2007.
For USA and Canada
• When the CX-1 is going to be operated at a voltage of 240V in USA or Canada, be sure to con-
nect the instrument to a center tapped voltage source.
• This instrument is CLASS I EQUIPMENT according to UL 60601-1 and CAN/CSA C22.2
No. 601.1.
• Grounding reliability can only be achieved when the equipment is connected to an equivalent
receptacle marked “Hospital Only” or “Hospital Grade”.
• The following mark indicates that the instrument is Type B Applied Parts (forehead rest and chin
rest).
• The degree of protection against ingress of water is IPX0.
• This equipment is not suitable for use in the presence of a flammable anaesthetic mixture with
air, oxygen or nitrous oxide.
• The mode of operation is Continuous Operation.
For EU Countries
• The following mark shows compliance of the instrument with Directive 93/42/EEC.
• This instrument is CLASS I EQUIPMENT according to EN 60601-1:2006 and IEC 60601-1:2005.
• The following mark indicates that the instrument is Type B Applied Parts (forehead rest and chin
rest) according to EN 60601-1.
• The degree of protection against ingress of water is IPX0.
• This equipment is not suitable for use in the presence of a flammable anaesthetic mixture with
air, oxygen or nitrous oxide.
• The mode of operation is Continuous Operation.
Für Deutschland
• Während des Betriebs liegt der Schalldruckpegel dieses Instruments bei 70 dB(A) oder weniger
gemäß ISO 7779.
MEDICAL EQUIPMENT WITH RESPECT TO ELECTRICAL SHOCK,
FIRE AND MECHANICAL HAZARDS ONLY
IN ACCORDANCE WITH UL 60601-1 and CAN / CSA C22.2 No. 601.1
41C4
000_L-IE-5169D_CX-1.book Page 3 Monday, July 29, 2013 10:42 AM
Safety Information
-4-
General Safety Information
Follow the safety instructions in this manual and all warnings and cautions printed on the warning labels.
Ignoring such cautions or warnings while handling the product may result in injury or accident. Be sure to
read and fully understand the manual before using this product. Keep this manual for future reference.
Meaning of Caution Signs
To protect the safety of users and others and to prevent accidents, this operation manual utilizes the symbols
and text shown below in warnings and cautions. Read the meanings of these caution signs and the
Safety
Precautions (see page 5)
, and follow the safety instructions.
WARNING
This indicates a potentially hazardous situation which, if not heeded, could result in
death or serious injury to you or others.
CAUTION
This indicates a hazardous situation which, if not heeded, may result in minor or
moderate injury to you or others, or may result in machine damage.
NOTE
This is used to emphasize essential information.
Be sure to read this information to avoid incorrect operation.
!
!
000_L-IE-5169D_CX-1.book Page 4 Monday, July 29, 2013 10:42 AM
Safety Information
-5-
Safety Precautions
Be sure to follow the safety instructions below to ensure correct operation of the instrument.
Installation and Environment of Use
WARNING
Do not use or store the instrument near any flammable chemicals such as alcohol,
thinner, or benzine. If chemicals are spilled or evaporate, it may result in fire or
electric shock through contact with electric parts inside the instruments. Also, some
disinfectants are flammable.
Be sure to exercise caution when using them.
CAUTION
Do not use or store the instrument in a location with the conditions listed below.
Otherwise, it may result in failure or malfunction, fall or cause fire or injury.
• Close to facilities where water is used.
• Where it will be exposed to direct sunlight.
• Close to air-conditioner or ventilation equipment.
• Close to heat source such as a heater.
• Surfaces or areas prone to vibration.
• Insecure place.
• Dusty environment.
• Saline or sulfurous environment.
• High temperature or humidity.
• Freezing or condensation.
CAUTION
Do not cover the vent holes on the cover.
Otherwise, the temperature in the instrument may rise and cause fire.
CAUTION
Place the instrument on a firm table.
Do not place it extremely near the edge of a table or it may fall and cause damage or
injury.
Installation Operation
WARNING
Do not connect the instrument except in the manner specified.
Otherwise, fire or electric shock may result.
Also, when other equipment is going to be connected to the instrument using the
connector for interface, be sure that leakage current is within the tolerable value. For
details, please contact your sales representative or local Canon dealer.
Power Supply
WARNING
Only operate with the type of power supply indicated on the rating label. Otherwise,
fire or electric shock may result.
WARNING
Be sure to turn OFF the power before plugging or unplugging the cables as indicated
in this manual. Also, do not handle the cables with wet hands. Otherwise, you may
get an electric shock that may result in death or serious injury.
WARNING
Securely plug in the power cable into the AC outlet.
If contact failure occurs, or if dust or a metal object comes in contact with the
exposed metal prong of the plug, fire or electric shock may result.
!
!
!
!
!
!
!
!
000_L-IE-5169D_CX-1.book Page 5 Monday, July 29, 2013 10:42 AM

Safety Information
-6-
WARNING
Be sure to hold the plug to disconnect the power cable.
If you pull the cable, the core wire may be damaged, resulting in fire or electric
shock.
WARNING
Do not cut or process the cables. Also, do not place anything heavy on the cables
(including the instrument). Do not step on, pull bend, or bundle the cables.
Otherwise, the cable may be damaged, which may result in fire or electric shock.
WARNING
Do not get the power for more than one instrument from the same AC outlet.
Otherwise, it may result in fire or electric shock.
CAUTION
Before connecting or disconnecting the cables, be sure to hold the instrument firmly
in order to ensure safety.
Otherwise, the main unit may fall over, possibly causing injury.
CAUTION
The instrument is shipped with a grounding type (three-core) power cable. To avoid
the risk of electric shock, this equipment must only be connected to a supply mains
with protective earth.
CAUTION
To make it easy to disconnect the plug at any time, avoid putting any obstacles near
the outlet.
Handling
WARNING
Never disassemble or modify the product as it may result in fire or electric shock.
Also, since the instrument incorporates high-voltage parts that may cause electric
shocks and other hazardous parts, touching them may cause death or serious injury.
WARNING
Do not place anything on top of the instrument.
Otherwise, the object may fall and cause injury.
Also, if metal objects such as a needle or clip falls into the instrument, or if liquid is
spilled, it may result in fire or electric shock.
WARNING
When the instrument is going to be moved, be sure to turn OFF the power, unplug
the power cable from the AC outlet, and disconnect other cables.
Otherwise, the cable may be damaged, which may result in fire or electric shock.
WARNING
When the instrument is going to be carried, be sure to tighten the stage unit lock,
hold the indentations for lifting at the left and right of the bottom panel and hold the
instrument horizontally.
Do not hold it by the digital camera or the head rest poles or other parts, as they may
come off and result in injury.
WARNING
Do not hit or drop the instrument. The instrument may be damaged if it receives a
strong jolt, which may result in fire or electric shock if the instrument is used without
first being repaired.
CAUTION
To prevent the risk of infection, wipe the forehead rest with disinfectant ethanol for
each patient. For details on how to disinfect, consult a specialist. The forehead rest
may be corroded if a disinfectant other than those above is used.
CAUTION
To ensure cleanliness, replace the chin rest paper for each patient.
Power Supply
!
!
!
!
!
!
!
!
!
!
!
!
!
000_L-IE-5169D_CX-1.book Page 6 Monday, July 29, 2013 10:42 AM
Safety Information
-7-
CAUTION
When adjusting the forward position of the main unit, be sure to move the main unit
slowly toward the patient while looking from the side of the patient, to prevent
accidental contact of the objective lens with the patient.
CAUTION
Do not place your hands or fingers or allow the patient to place his/her hands or
fingers between the stage and base. Otherwise, injury may occur.
CAUTION
When the instrument is not going to be used, turn OFF the power.
Also, unplug the power cable from the AC outlet when it is not going to be used for
long periods of time.
CAUTION
The instrument weighs approximately 26 kg (57 Ibs). Be sure that at least two
people lift the instrument to transport it and that it is lifted by gripping the
indentations for lifting. Otherwise, injury may occur.
When Problem Occurs
WARNING
Should any of the following occur, immediately turn OFF the power of each
instrument, unplug the power cable from the AC outlet, and contact your sales
representative or local Canon dealer.
• When there is smoke, an odd smell or abnormal sound.
• When liquid has been spilled into the instrument or a metal object has entered
through an opening.
• When the instrument has been dropped and it is damaged.
Maintenance and Inspection
WARNING
For safety reasons, be sure to turn OFF the power when the inspections indicated in
this manual are going to be performed. Otherwise, electric shock may result.
WARNING
When the instrument is going to be cleaned, be sure to turn OFF the power, and
unplug the power cable from the AC outlet.
Never use alcohol, benzine, thinner or any other flammable cleaning agents.
Otherwise, fire or electric shock may result.
WARNING
Clean the plug of the power cable periodically by unplugging it from the AC outlet
and removing dust or dirt from the plug, its periphery and AC outlet with a dry cloth.
If the cable is kept plugged in for a long time in a dusty, humid or sooty place, dust
around the plug will attract moisture, and this could cause insulation failure which
could result in a fire.
WARNING
The instrument must be repaired by a qualified engineer only.
If it is not repaired properly, it may cause fire, electric shock, or accident.
CAUTION
For safety reasons, be sure to inspect the instrument before using it.
CAUTION
Always take a test image to check that there is no foreign matter present that can
affect image readings before using the instrument (see page 53).
Handling
!
!
!
!
!
!
!
!
!
!
!
000_L-IE-5169D_CX-1.book Page 7 Monday, July 29, 2013 10:42 AM
Safety Information
-8-
System Use
WARNING
Do not place multiple portable socket-outlets on the floor. Otherwise, fire or electric
shock may result.
WARNING
Do not connect an additional multiple portable socket-outlet or extension cord to the
system. Otherwise, fire or electric shock may result.
WARNING
Do not connect instruments that are not specified as part of the system.
Otherwise, fire or electric shock may result.
WARNING
For the system, use a power transformer of 1000 VA of the maximum permitted load.
Otherwise, fire or electric shock may result.
WARNING
Use multiple portable socket-outlets only for supplying power to equipment that is
intended to form part of the system. Otherwise, fire or electric shock may result.
WARNING
Do not connect non-medical electrical equipment that has been supplied as a part of
the system to any power socket other than the multiple socket-outlets for the system.
Otherwise, electric shock may result.
WARNING
Do not connect any electrical equipment that has not been supplied as a part of the
system to the multiple portable socket-outlets for the system. Otherwise, fire or
electric shock may result.
WARNING
Do not simultaneously touch a patient and non-medical electrical equipment.
Otherwise, electric shock may result.
CAUTION
For cleaning equipment forming part of the system, follow the instruction manual for
the equipment. Otherwise, it may cause failure, an accident, or fire.
CAUTION
Install the system in a way that enables the user to achieve optimal use.
!
!
!
!
!
!
!
!
!
!
000_L-IE-5169D_CX-1.book Page 8 Monday, July 29, 2013 10:42 AM

Safety Information
-9-
Label on the Instrument
The CX-1 has a label on it.
The label contents and its position are indicated below.
000_L-IE-5169D_CX-1.book Page 9 Monday, July 29, 2013 10:42 AM
-10-
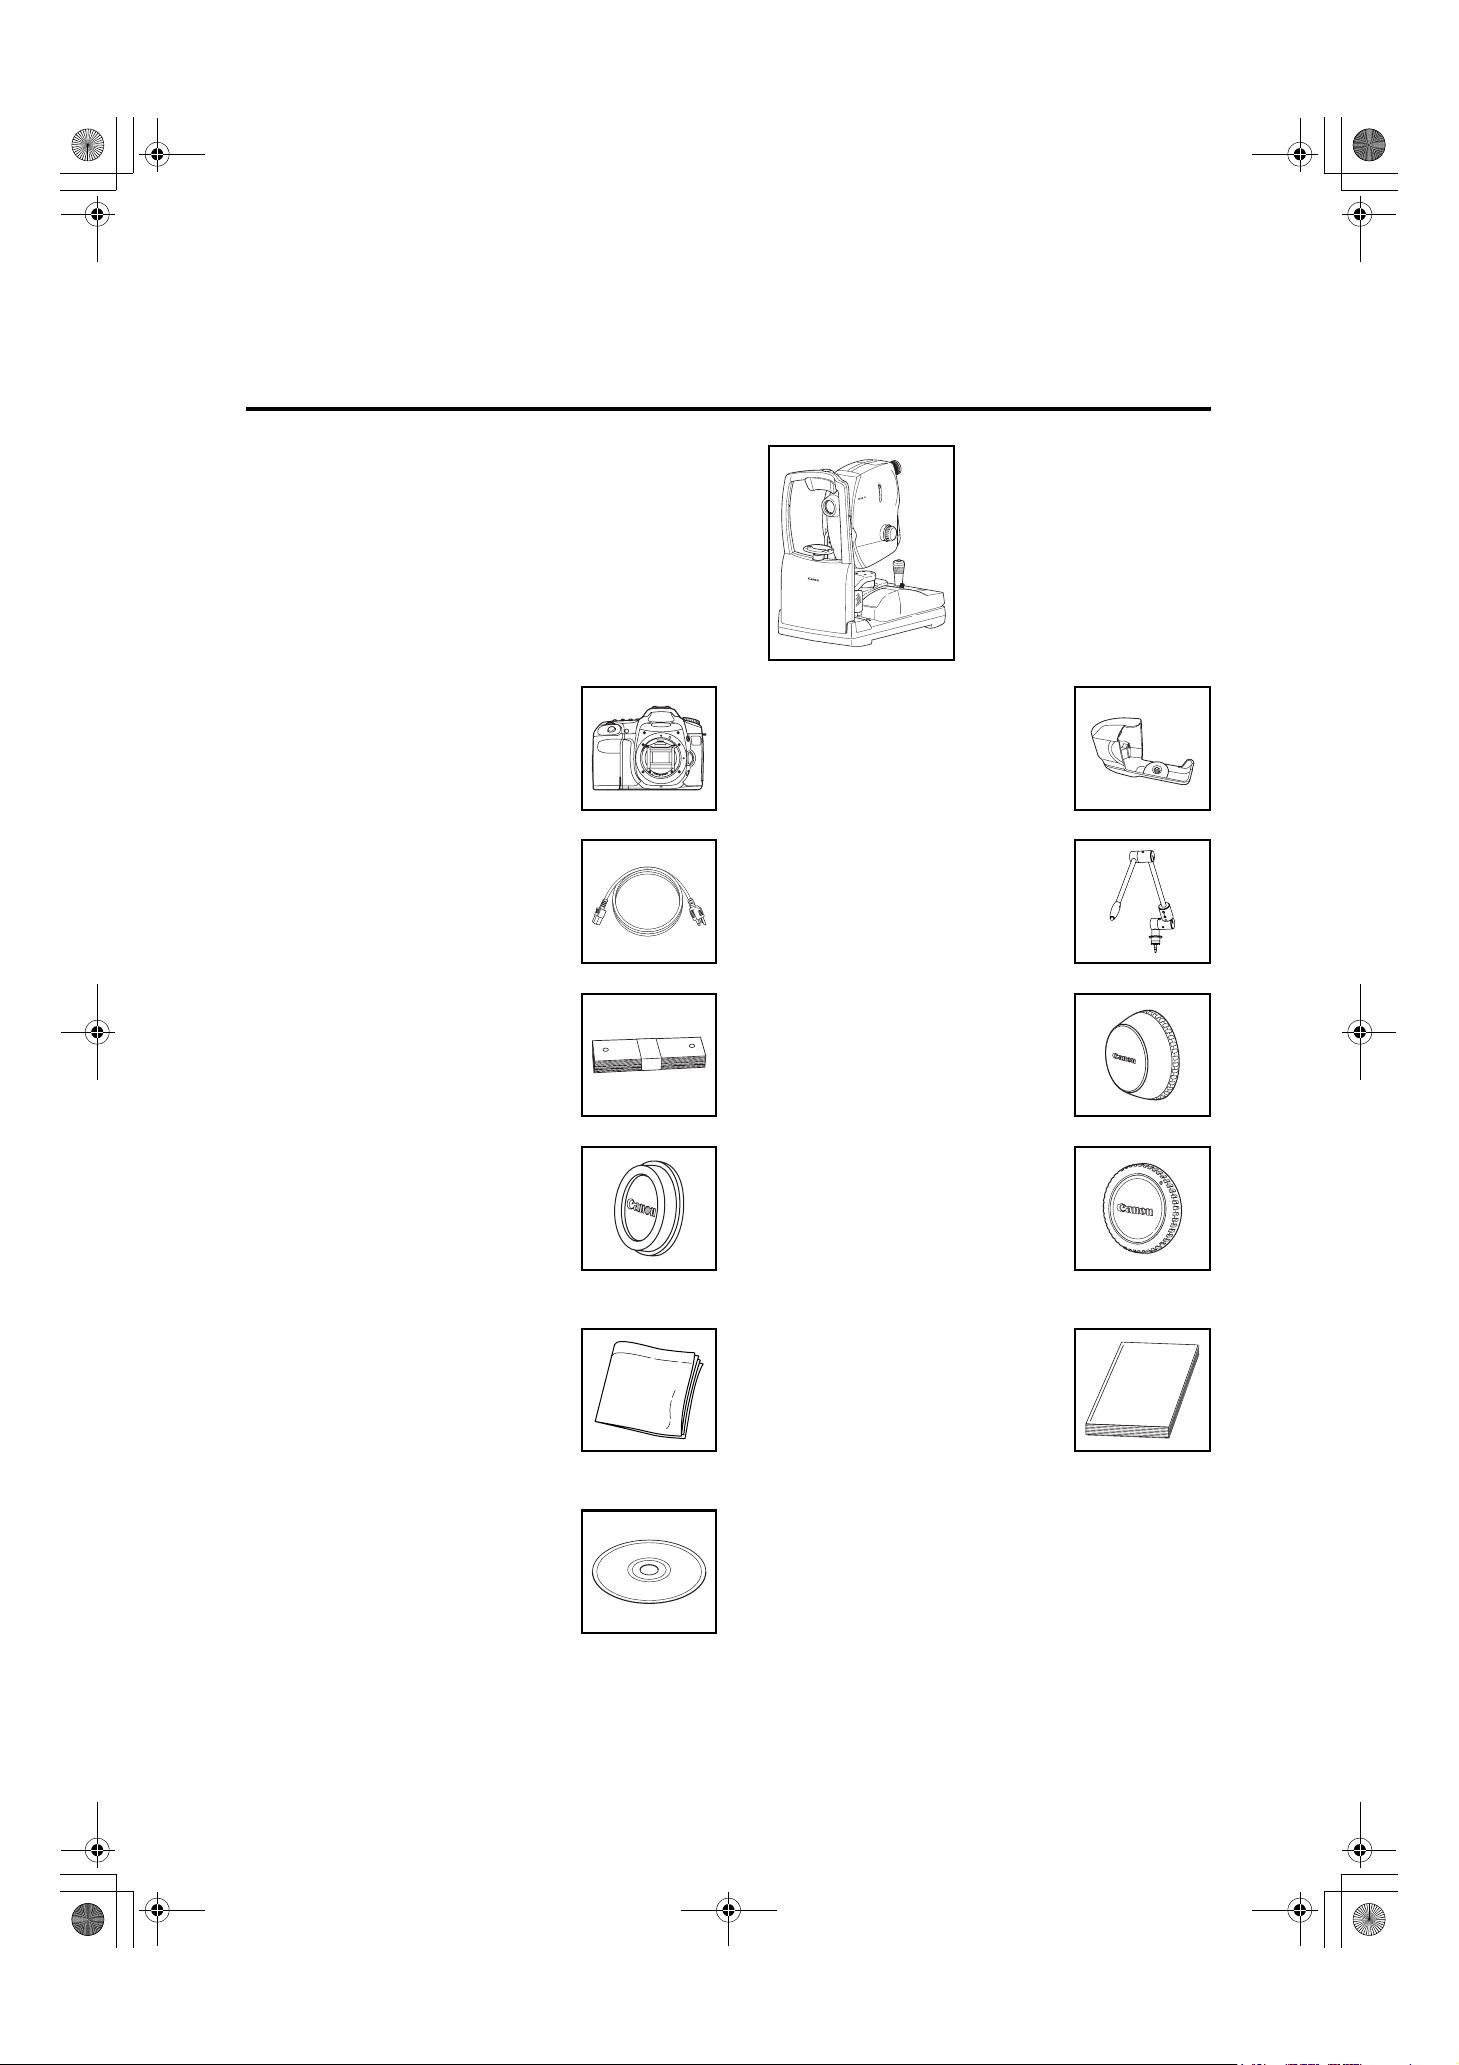
Components
Optional Units
Internal eye fixation target
Stereo unit
Chin rest paper (500 sheets)
Digital Retinal Camera CX-1............................................. 1
Digital camera .....................................1 Camera cover...................................... 1
Power cable
(3 m, Non-shielded) ............................1
* Plug shapes differ by power
specifications.
External eye fixation lamp.................. 1
Chin rest paper ................................100 Objective lens cap............................... 1
Camera mount cap...............................1 Body cap............................................. 1
Dust cover ...........................................1 Operation manual (CX-1/control
software) ..................................... 1 each
DICOM conformance statement......... 1
Software license agreement................ 1
Warranty card (for USA model only).... 1
WEEE directive leaflet (for EU model
only).................................................... 1
Installation report................................ 1
CD-ROM (Retinal imaging control
software)..............................................1
000_L-IE-5169D_CX-1.book Page 10 Monday, July 29, 2013 10:42 AM

-11-
Contents
Safety Information ................................................................................................................ 3
Components ....................................................................................................................... 10
1. Features ........................................................................................................................13
2. Notes for Using the Instrument......................................................................................14
3. Names of Parts..............................................................................................................16
3.1 Main Unit ..............................................................................................................................16
3.2 Operation Panel ...................................................................................................................18
3.3 Observation Monitor and Viewfinder ....................................................................................19
4. Preparation.................................................................................................................... 20
4.1 Power Cable Connections ....................................................................................................20
4.2 Connecting to a Computer ...................................................................................................21
4.3 Carrying the Instrument ........................................................................................................22
5. Basic Photography ........................................................................................................23
5.1 Before Taking Photographs ..................................................................................................23
5.1.1 Turn On the Power ...................................................................................................................... 23
5.1.2 Move the Stage Unit to Get Started ............................................................................................ 24
5.1.3 Adjust the Viewfinder .................................................................................................................. 24
5.2 Photography Flow ................................................................................................................25
5.3 Non-Mydriatic Mode .............................................................................................................26
5.3.1 Color Photography Mode ............................................................................................................ 26
5.3.2 Red-free Photography Mode ....................................................................................................... 32
5.3.3 Cobalt Photography Mode .......................................................................................................... 33
5.3.4 Fluorescein Angiography Mode .................................................................................................. 33
5.3.5 Fundus Autofluorescence Mode ................................................................................................. 35
5.4 Mydriatic Mode .....................................................................................................................36
5.4.1 Color Photography Mode ............................................................................................................ 36
5.4.2 Red-free Photography Mode ....................................................................................................... 42
5.4.3 Cobalt Photography Mode .......................................................................................................... 42
5.4.4 Fluorescein Angiography Mode .................................................................................................. 42
5.4.5 Fundus Autofluorescence Mode ................................................................................................. 44
6. Photography Auxiliary Functions................................................................................... 45
6.1 Using the Focus Indicator .....................................................................................................45
6.2 ×2 photography function .......................................................................................................45
6.3 Small pupil photography function .........................................................................................46
6.4 Diopter Compensation Function ...........................................................................................46
6.5 Panning Function and Tilting Function .................................................................................47
6.5.1 Panning Function ........................................................................................................................ 47
6.5.2 Tilting Function ............................................................................................................................ 47
6.6 Using the External Monitor ...................................................................................................48
7. Daily Inspection and Maintenance................................................................................. 50
7.1 Inspection .............................................................................................................................50
7.1.1 Before Turning ON the Power ..................................................................................................... 51
7.1.2 Turning ON the Power ................................................................................................................ 52
7.1.2.1 Check Items on the Behaviors of the Equipment ........................................................... 52
7.1.2.2 Check Items on the Image ............................................................................................. 53
7.2 Before Calling a Service Technician ....................................................................................54
000_L-IE-5169D_CX-1.book Page 11 Monday, July 29, 2013 10:42 AM

Contents
-12-
7.2.1 Troubleshooting .......................................................................................................................... 54
7.3 Cleaning and Disinfection .....................................................................................................57
7.3.1 Objective Lens ............................................................................................................................ 57
7.3.2 Viewfinder ................................................................................................................................... 58
7.3.3 Forehead Rest ............................................................................................................................ 58
7.3.4 Retinal Camera and Digital Camera Outer Covers ..................................................................... 59
7.4 Refilling the Chin Rest Paper ...............................................................................................60
7.5 Removing and Installing the Digital Camera ........................................................................61
7.5.1 Removing the Digital Camera ..................................................................................................... 61
7.5.2 Installing the Digital Camera ....................................................................................................... 63
7.5.3 Cleaning the Digital Camera (imaging sensor) ........................................................................... 65
8. Main Specifications and Performance........................................................................... 66
8.1 Main Specifications ..............................................................................................................66
8.2 Functions in the Observation and Photography Modes .......................................................67
8.3 Guidance and Manufacturer’s Declaration for EMC Directive ..............................................68
9. Service Information........................................................................................................73
000_L-IE-5169D_CX-1.book Page 12 Monday, July 29, 2013 10:42 AM

-13-
1. Features
The Digital Retinal Camera CX-1 is used to observe the retinas of patients’ eyes and take photographs of
them. The camera has the following features:
Both mydriatic and non-mydriatic modes in a single unit
The CX-1 includes a mydriatic mode and non-mydriatic mode; and each mode can be selected with a
single switch.
In the mydriatic mode, the optical viewfinder is used for observation. In the non-mydriatic mode, the
observation monitor on the special digital camera is used for observation.
Fundus autofluorescence photography
Fundus autofluorescence photography is possible in both mydriatic and non-mydriatic modes.
Special digital camera
The CX-1 includes a special digital camera using EOS digital technology as a standard accessory.
This enables the CX-1 to fully maximize Canon technology for shooting high-quality, high-resolution
diagnostic images.
Compact, user-friendly design
Panning and tilting functions are provided as standard features in a compact, lightweight design.
The compact body makes it easier to assist patients and provides significantly improved ease of operation.
Vertical movement of the main body by a motorized chin rest and an operation lever significantly improves
alignment operability.
Small pupil photography function
The CX-1 can photograph dilated pupils with a diameter of at least 5.1 mm in the mydriatic mode, with
50° of their field angle. It can photograph non-dilated pupils with a diameter of at least 4.3 mm in the non-
mydriatic mode, with 45° of their field angle.
The CX-1 provides the small pupil photography function for patients whose eyes are difficult to dilate.
Using this function, it can take photographs of dilated pupils with a diameter of at least 4.3 mm and non-
dilated pupils with a diameter of at least 3.8 mm.
System optimized for digital photography
With the Retinal imaging control software (called “control software” below), images photographed by the
CX-1 can be browsed, processed, stored, output to the DICOM storage server, exported to DICOM files,
and output to a printer.
The settings for the lighting system filter, flash intensity, and digital camera are automatically optimized
for each photography mode – color, red-free, cobalt, fluorescein angiography, or fundus autofluorescence.
000_L-IE-5169D_CX-1.book Page 13 Monday, July 29, 2013 10:42 AM

-14-
2. Notes for Using the Instrument
Digital camera
• The digital camera installed on the Digital Retinal Camera CX-1 is designed for the CX-1.
• The specifications differ from the typical commercially-available Canon digital cameras. Use only for
observing and taking photographs of peoples’ eyes. Do not detach the digital camera from the main unit
to use separately or failure of the instrument may result.
• If any problems with the digital camera occur or repairs are needed, please contact your sales
representative or local Canon dealer.
Before use
• Take a daily test image to ensure that there is no foreign matter present that can affect image readings.
• Check and clean the objective lens before taking an image, as any stains or scratches on it will appear
as white spots.
• Sudden heating of the room in cold areas will cause condensation to form on the objective lens or on
optical parts inside the instrument. In this case, wait until condensation disappears before performing
photography.
• Do not touch the lens of the retinal camera or the mirror of the digital camera when attaching and
detaching the digital camera from the retinal camera body. If any dirt, fingerprints, dust, or other foreign
objects attaches to the lens or mirror part, you will not be able to take a good image.
• Be sure to adjust the diopter of the viewfinder to match the diopter of the photographer’s eye. Otherwise,
focusing will not be able to be performed correctly.
After use
• Turn OFF the power of the instrument. Place the cap over the objective lens, and place the dust cover
over the instrument. You will not be able to take a good picture when the objective lens is dirty.
• If the digital camera is removed and left unattached, dust and other foreign objects can enter the retinal
camera and the digital camera. Be sure to always attach the caps to the respective mounts.
Cleaning and disinfection
• Do not let the tip of a blower touch the objective lens.
• Do not wipe off or rub the objective lens when there is dust or other substances on it.
This could scratch the lens surface.
• Never wipe the objective lens with disinfecting ethanol, eyeglass lens cleaner, or cleaning paper
containing silicon. The lens surface could be damaged or the surface may not be completely wiped off.
• Do not clean the cover of the instrument with lens cleaner. The cover of the instrument could be
damaged.
• Never use alcohol, benzine, thinner, or other solvents to clean the cover of the instrument. This could
damage the cover of the instrument.
000_L-IE-5169D_CX-1.book Page 14 Monday, July 29, 2013 10:42 AM

2. Notes for Using the Instrument
-15-
• Never use disinfecting ethanol or other solvents to clean the cover of the instrument, except the forehead
rest and the chin rest. This could damage the cover of the instrument.
• If the chin rest paper will not be used, be sure to disinfect the chin rest in the same manner as for the
forehead rest for each patient.
Environment of use
• Use, store, and transport the camera in an environment that satisfies the following requirements. Use the
original packing to store or ship it.
Use
Temperature: 10°C to 35°C
Humidity: 30% to 90% RH (no condensation)
Atmospheric pressure: 700 hPa to 1060 hPa
Storage and Transportation
Temperature: –30°C to 50°C
Humidity: 10% to 95% RH (no condensation)
Atmospheric pressure: 700 hPa to 1060 hPa
• Do not install or store the camera or leave it standing in an adverse environment such as where the
temperature and humidity levels are high. Doing so may cause misoperation and/or malfunction. Be sure
to observe the points of Installation and Environment of Use (see page 5) when selecting the
installation location.
• Dust in the air will not only attach to the objective lens, but also to the optical parts inside the instrument.
You will not be able to take a good image when dust is on these parts. Please keep the room dust free.
Installation
• Please ask your sales representative or local Canon dealer to perform installation of this product.
• Please handle this product carefully. The adjustment can be altered if it is subjected to a strong shock or
jolt.
• If this product will be transported in an automobile or shipped a long distance, protective measures need
to be taken against vibrations and shocks. Ask your sales representative or local Canon dealer for more
information.
Others
For USA
Rx only-Caution:
Federal law restricts this device to sale by or on the order of a licensed practitioner.
Intended Use:
The device is intended to be used for taking digital images of the retina of the human eye.
For European Union
Intended Use:
This medical device is intended to observe and record images of retinal fundus through the pupil without
making contact with subject’s eye for the purpose of diagnosis by way of producing fundus image
information.
000_L-IE-5169D_CX-1.book Page 15 Monday, July 29, 2013 10:42 AM

-16-
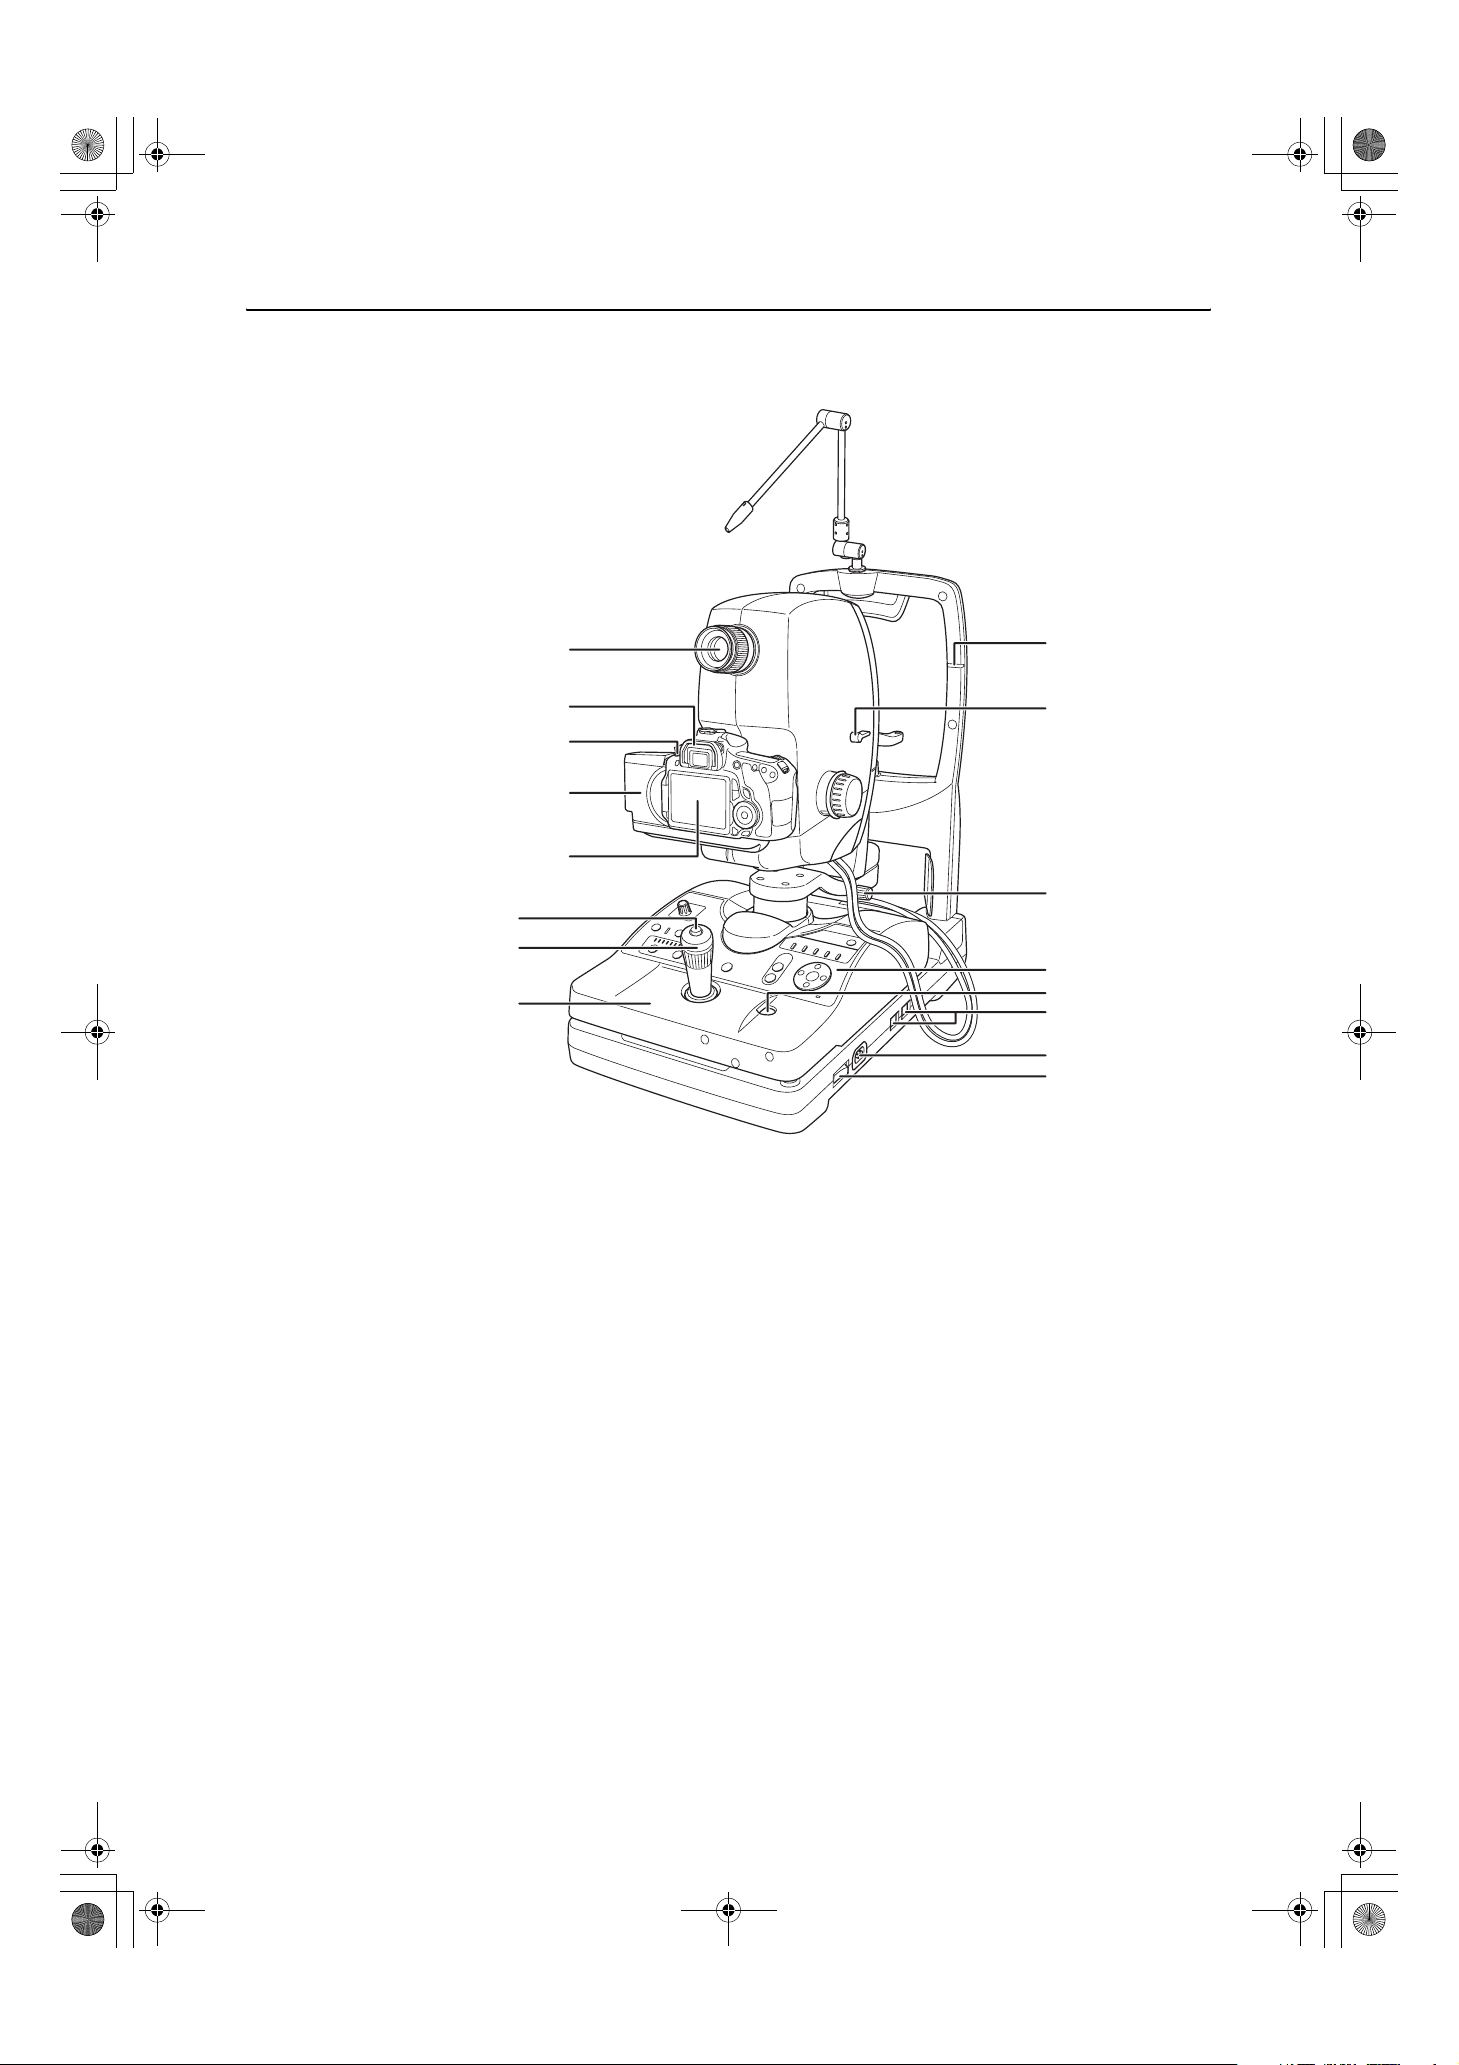
3. Names of Parts
3.1 Main Unit
1 External eye fixation lamp (see page 29,
39)
2 Head rest
3 Forehead rest (see page 58)
4 Objective lens (see page 57)
5 Objective lens cap
6 Chin rest (see page 27)
7 Diopter compensation lever
(see page 46)
8 Focus knob (see page 29, 39)
9 Pan tilt grip (see page 47)
10 Finger guard
11 Indentation for lifting (see page 22)
1
2
3
4
6
7
8
10
11
5
9
000_L-IE-5169D_CX-1.book Page 16 Monday, July 29, 2013 10:42 AM
3. Names of Parts
-17-
12 Viewfinder (see page 19)
13 Digital camera (see page 10)
14 Digital camera power switch
(see page 23)
15 Digital camera cover (see page 61)
16 Observation monitor (see page 19)
17 Shutter release button (see page 30, 33,
34, 40)
18 Operation lever (see page 24, 27, 28)
19 Stage unit (see page 24, 27, 31, 41)
20 Height adjustment mark (see page 27)
21 Tilting lock lever (see page 47)
22 Panning lock knob (see page 47)
23 Operation panel (see page 18)
24 Stage unit lock button (see page 31)
25 USB connector (see page 21)
26 AC power connector (see page 20)
27 Retinal camera power switch
14
12
15
13
18
17
19
20
21
16
22
23
24
25
26
27
000_L-IE-5169D_CX-1.book Page 17 Monday, July 29, 2013 10:42 AM
3. Names of Parts
-18-
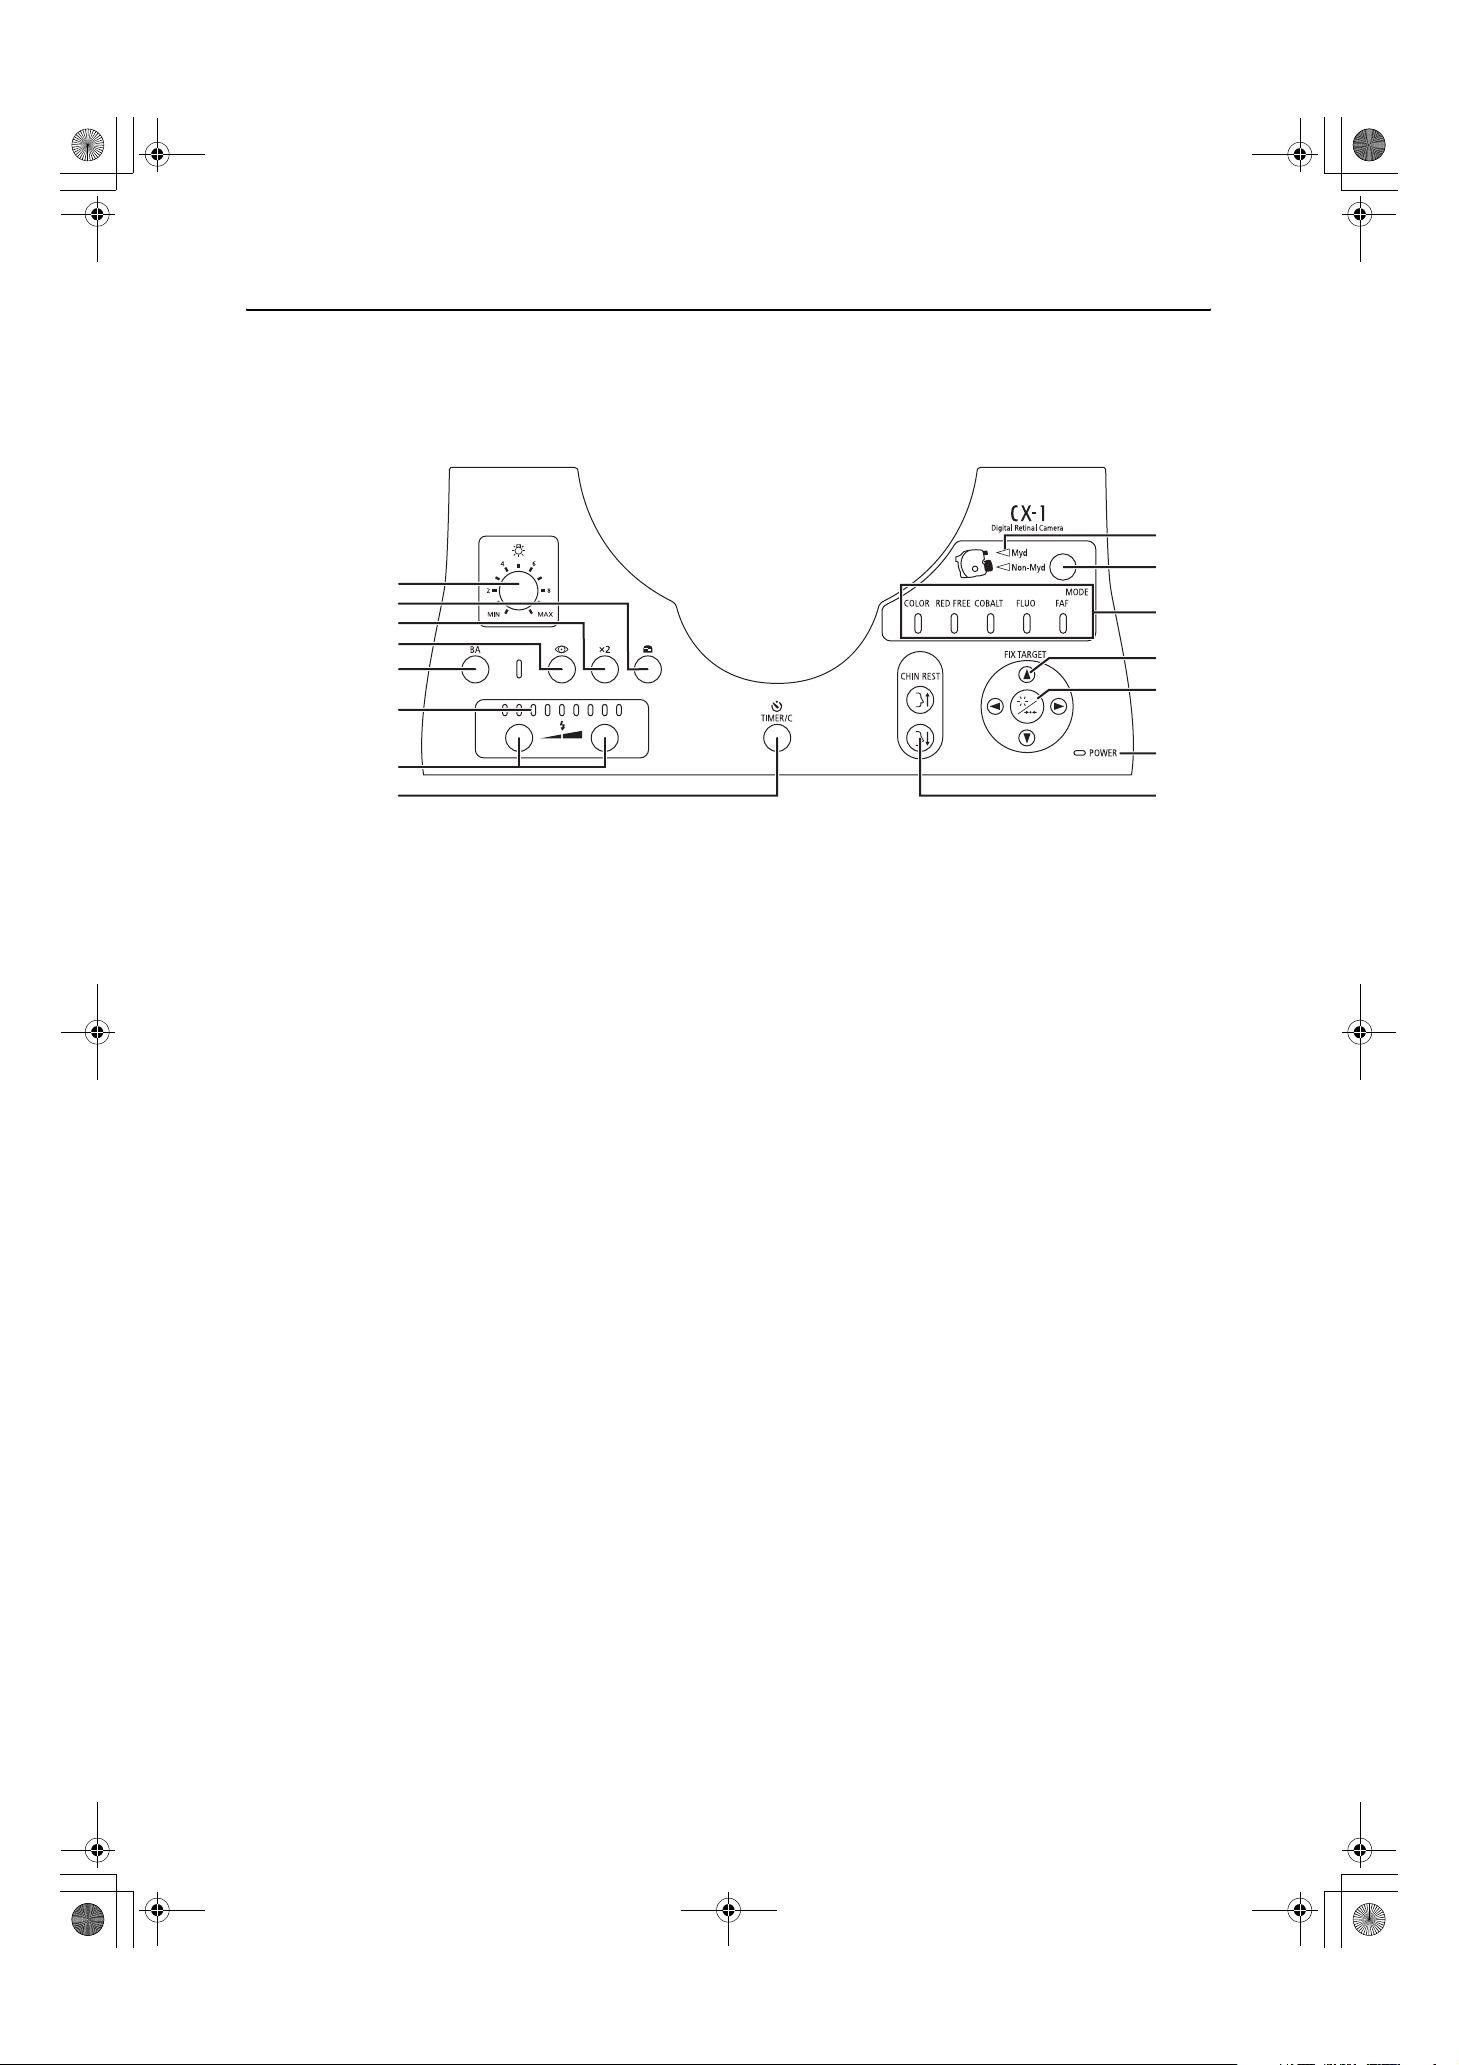
3.2 Operation Panel
1 Brightness adjuster (see page 28)
2 Focus indicator switch/lamp
(see page 45)
3 ×2 switch/lamp (see page 45)
4 Small pupil photography switch/lamp
(see page 46)
5 BA switch/lamp (see page 42)
6 Flash intensity indicator (see page 31)
7 Flash intensity switches (see page 31)
8 TIMER/C switch/lamp (see page 34)
9 Observation mode lamp
Myd (see page 36)
Non-Myd (see page 26)
10 Observation mode switch
(see page 26, 36)
11 Photography mode switches/lamps
From left to right;
COLOR (see page 26, 36)
RED FREE (see page 32, 42)
COBALT (see page 33, 42)
FLUO (see page 33, 42)
FAF (see page 35, 44)
12 FIX TARGET (internal eye fixation)
switches (see page 29)
13 Blink switch (see page 29)
14 POWER lamp (see page 23)
15 CHIN REST switch (see page 27)
5
1
4
3
2
6
8
7
9
10
13
12
14
15
11
000_L-IE-5169D_CX-1.book Page 18 Monday, July 29, 2013 10:42 AM
3. Names of Parts
-19-
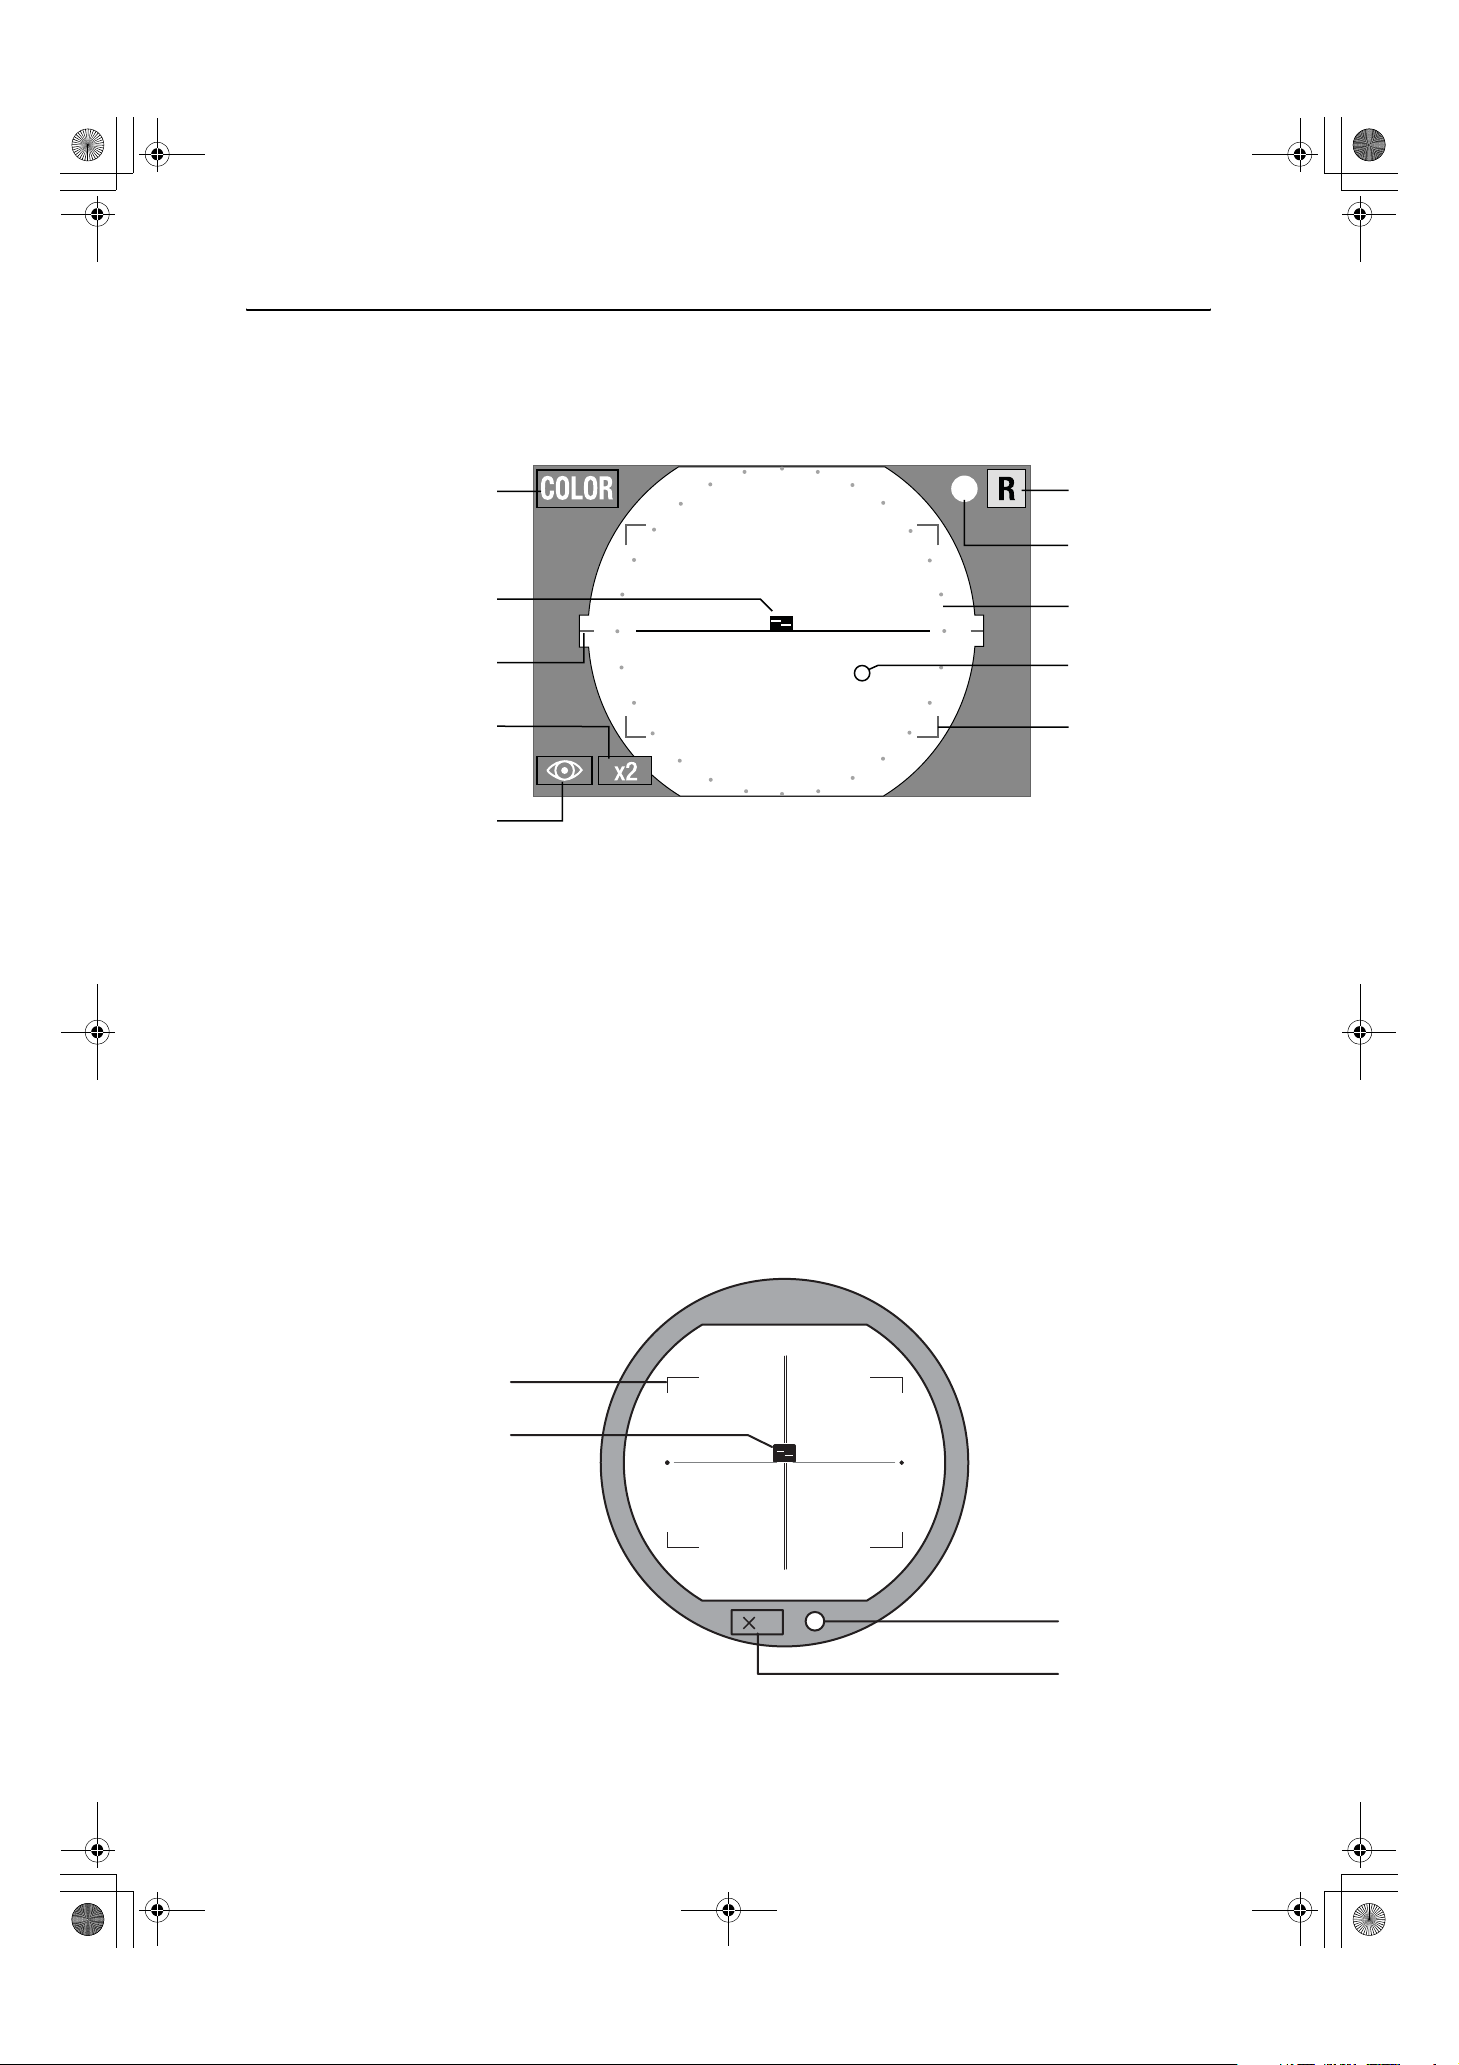
3.3 Observation Monitor and Viewfinder
Observation monitor (with x1.3 magnification)
1 Photography mode indication
COLOR: Color (see page 26)
RED FREE: Red free (see page 32)
COBALT: Cobalt (see page 33)
FLUO: Fluorescein angiography
(see page 33)
FAF: Fundus autofluorescence
(see page 35)
2 Focus indicator (see page 29)
3 WD Guide (Green)
4 ×2 photography indicator (see page 45)
5 Small pupil photography indicator
(see page 46)
6 Right/Left eye indicator
R: Right eye
L: Left eye
7 Photography ready lamp (see page 30)
8 Small pupil photography effective area
(see page 46)
9 Internal eye fixation lamp position
(see page 29)
10 ×2 photography range (see page 45)
Viewfinder
1 ×2 photography range (see page 45)
2 Focus indicator (see page 39)
3 Photography ready lamp (see page 30)
4 ×2 photography range (see page 45)
1
2
3
4
5
6
7
8
9
10
2
3
4
1
2
000_L-IE-5169D_CX-1.book Page 19 Monday, July 29, 2013 10:42 AM
-20-
4. Preparation
Please ask your sales representative or local Canon dealer to perform installation of this instrument.
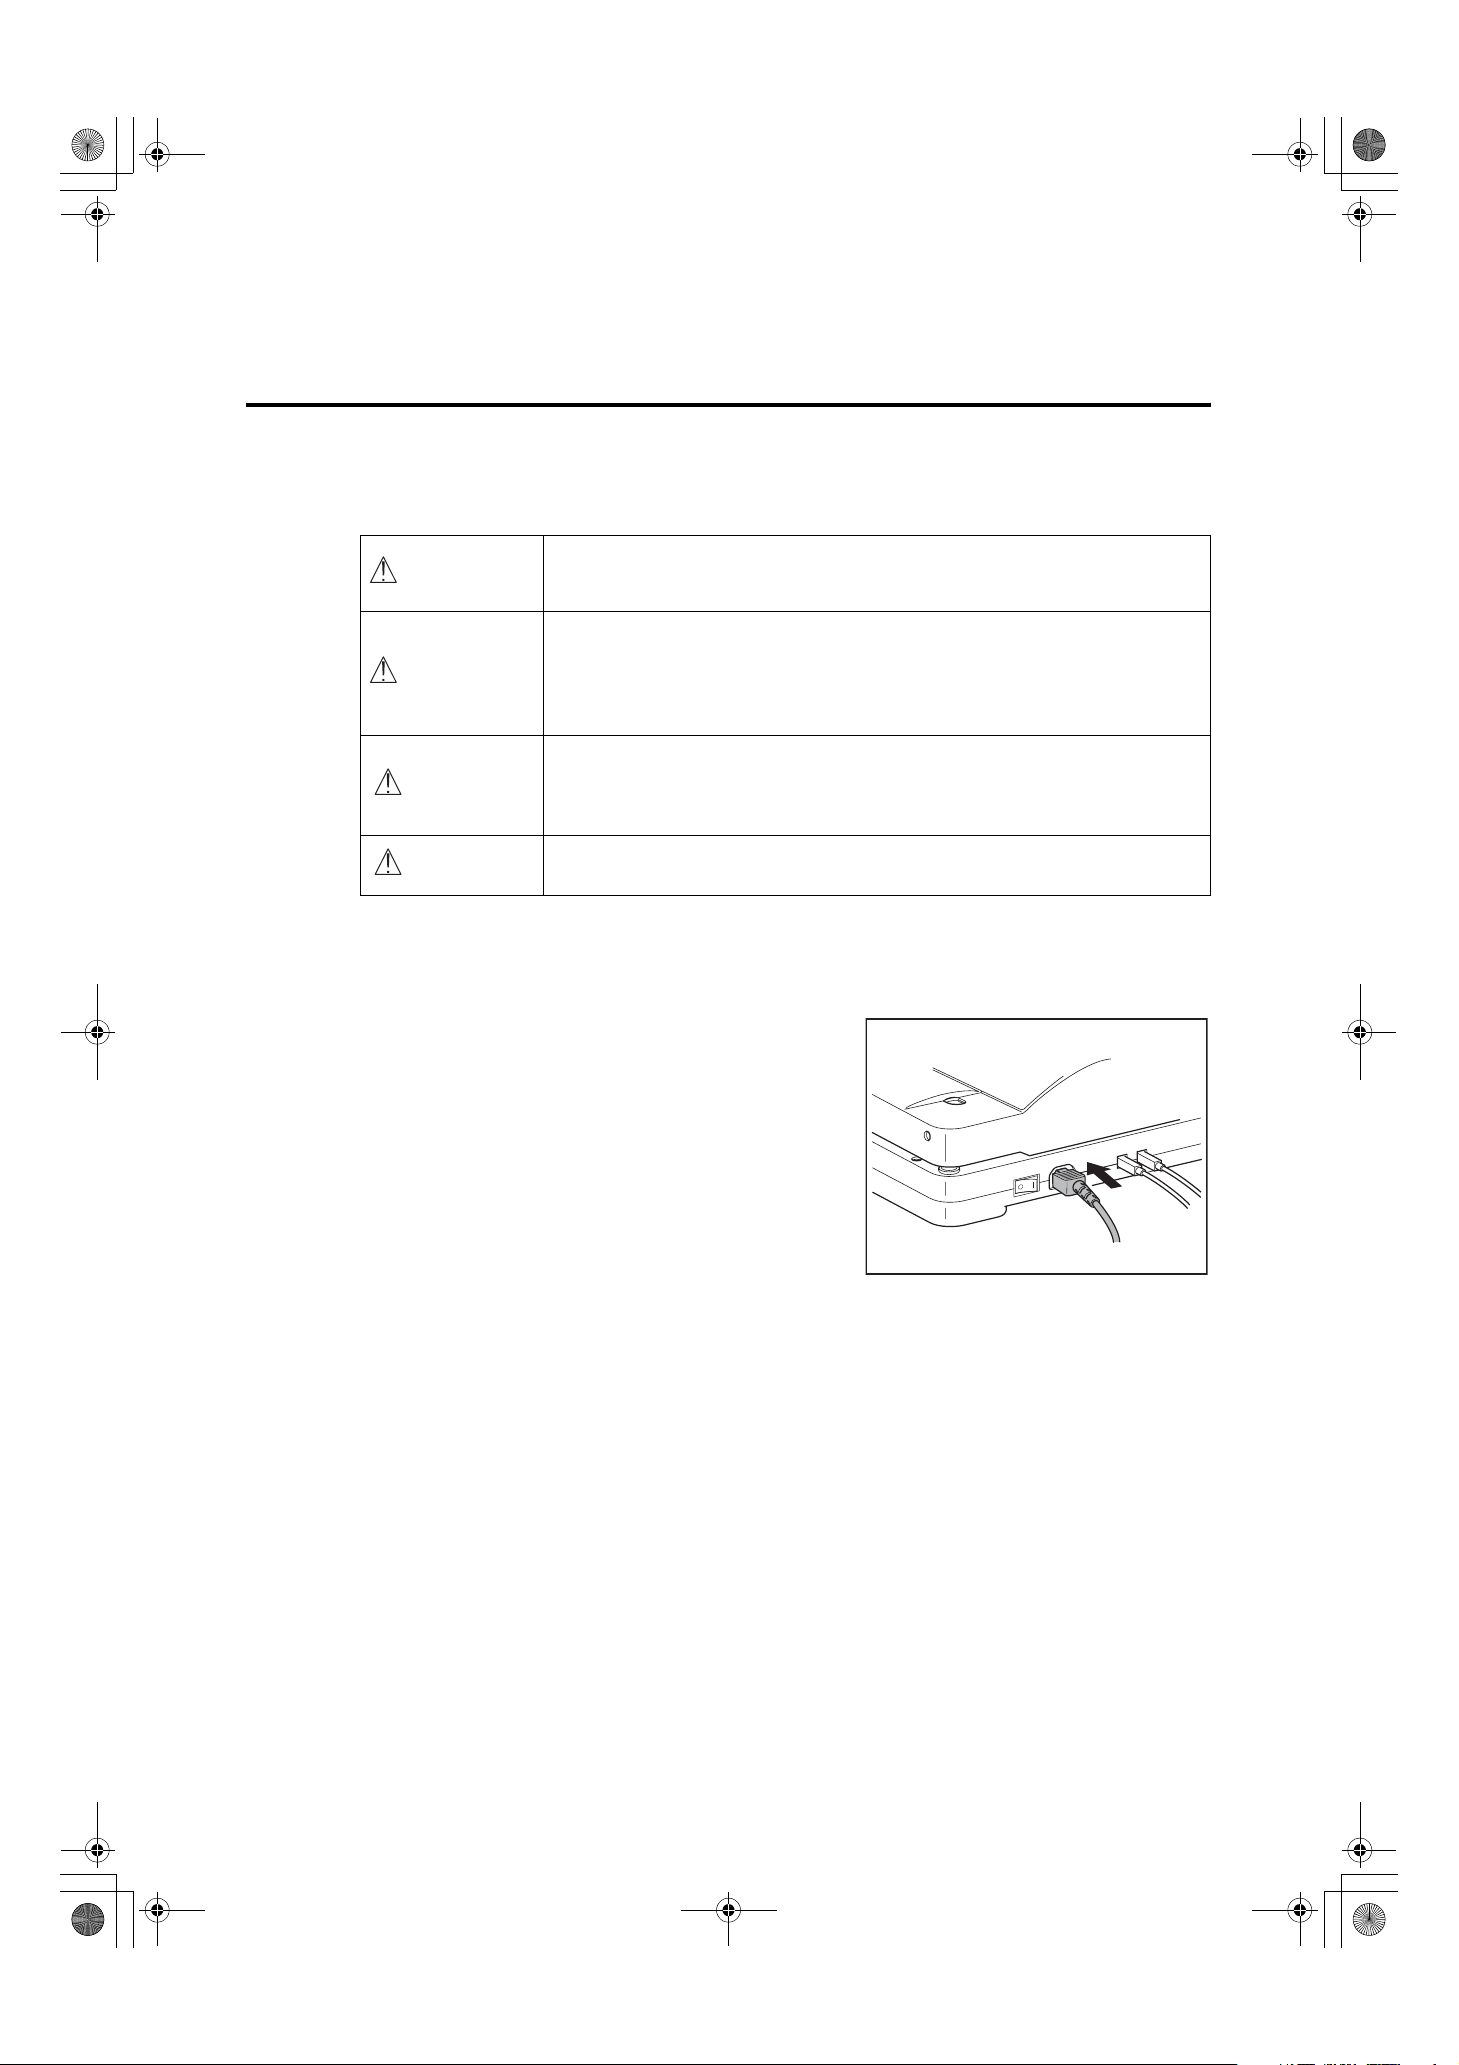
4.1 Power Cable Connections
1
Check that the power switch of the retinal camera is set to the O position (OFF).
2
Connect the power cable to the retinal camera.
Insert the power cable connector firmly into the AC
power connector while holding down the retinal
camera with your hand.
3
Insert the power plug into the AC outlet.
Insert the plug all the way into the AC outlet.
WARNING
Be sure to operate this instrument using the power supply described in the
specifications. Otherwise, fire or electric shock may result.
WARNING
Be sure to turn OFF the power before plugging or unplugging the cables as
indicated in this manual. Also, do not handle the cables with wet hands.
Otherwise, you may get an electric shock that may result in death or
serious injury.
CAUTION
Before connecting or disconnecting the cables, be sure to hold the
instrument firmly in order to ensure safety.
Otherwise, the main unit may fall over, possibly causing injury.
CAUTION
Always use a grounded AC outlet for a 3-pin plug as the power outlet.
OFF ON
000_L-IE-5169D_CX-1.book Page 20 Monday, July 29, 2013 10:42 AM
4. Preparation
-21-
4.2 Connecting to a Computer
Connect the retinal camera to a computer where the supplied software has been installed.
1
Check that the power switches for the retinal camera and digital camera are set to the OFF
position.
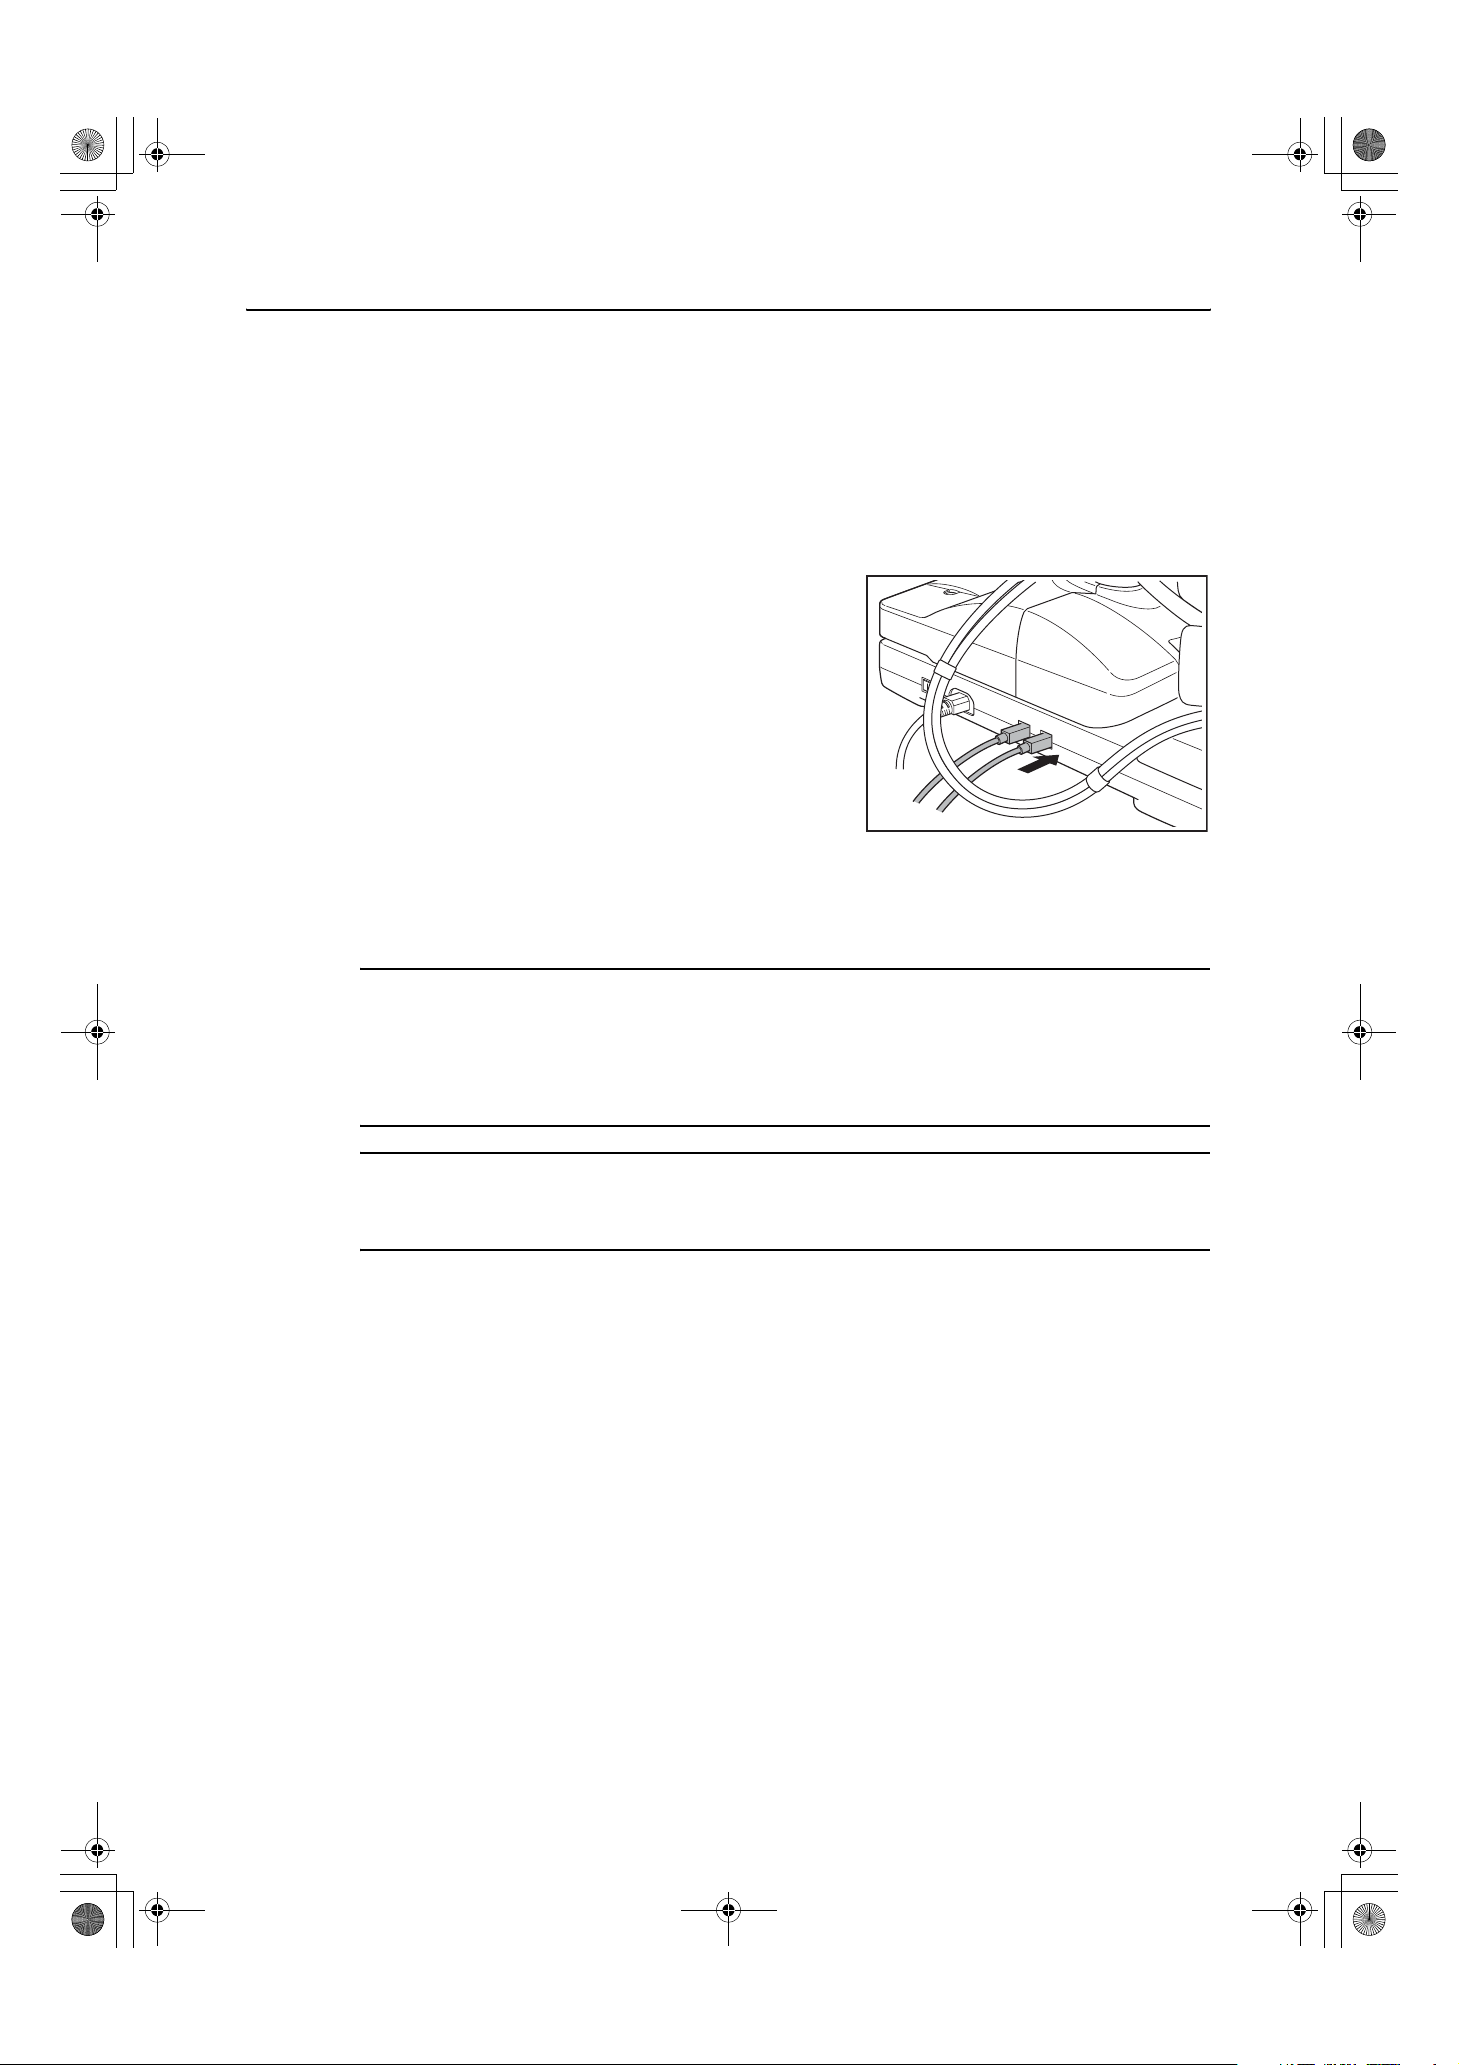
2
Connect the USB cables to the main unit.
Insert the USB cable connectors firmly into the USB
connectors while holding down the main unit with your
hand.
3
Connect the USB connectors at the other end to the computer.
Connect the connectors at the other end of the USB cables firmly into the computer’s USB ports.
Note: Use the following type of USB cables. Communication may not be possible if any other
kind of cable is used.
• Cable with type AB connector plug supporting USB 2.0 Hi-Speed, maximum length of
3 meters
For further details, contact your sales representative or local Canon dealer.
Note: When connecting the USB cable, pass it underneath the cables of the camera main unit.
If it is passed over the main unit cables, the USB cable may become disconnected as the
main unit moves for taking images.
000_L-IE-5169D_CX-1.book Page 21 Monday, July 29, 2013 10:42 AM
4. Preparation
-22-
4.3 Carrying the Instrument
Follow this procedure when carrying the instrument by hand:
1
Turn off the power of the retinal camera.
Press the power switch of the retinal camera to the O side (OFF).
2
Remove the connected cables.
Remove all power cables and USB cables.
3
Secure the parts in place.
Tighten the panning lock knob, tilting lock lever and the stage unit lock.
4
Carry the retinal camera main unit.
Hold the retinal camera main unit by gripping the indentations for lifting at the left and right of the
bottom panel, and carry the unit horizontally.
Note: If this product will be transported in an automobile or shipped a long distance, protective
measures need to be taken against vibrations and shocks. Ask your sales representative
or local Canon dealer for more information.
WARNING
When the instrument is going to be moved, be sure to turn OFF the power,
unplug the power cable from the AC outlet, and disconnect other cables.
Otherwise, the cable may be damaged, fire or electric shock may result.
Also, when the instrument is going to be carried, be sure to tighten the
stage unit lock, the panning lock knob and the tilting lock lever, grip the
indentations at the left and right of the bottom panel, and hold the
instrument horizontally.
Do not hold it by the digital camera or the head rest poles or other parts, as
they may come off and result in injury.
WARNING
Do not hit or drop the instrument. The instrument may be damaged if it
receives a strong jolt, which may result in fire or electric shock if the
instrument is used without it being repaired.
To remove the digital camera before carrying the retinal camera
See section 7.5.1 Removing the Digital Camera (page 61).
000_L-IE-5169D_CX-1.book Page 22 Monday, July 29, 2013 10:42 AM

-23-
5. Basic Photography
5.1 Before Taking Photographs
5.1.1 Turn On the Power
1
Remove the dust cover and the objective lens cap.
2
Turn on the computer.
Turn on the computer, and start the control software.
3
Turn on the power switch of the digital camera.
Set the power switch of the digital camera to .
4
Turn on the power of the retinal camera.
Press the power switch of the retinal camera to the I
side (ON).
Concerning control software operations
For details on the control software operations, refer to the operation manual of the control
software.
Concerning the Mode Dial
If the Mode Dial is set to anything other than <M>, a picture is cannot be taken.
While holding down the button at the center of the Mode Dial, turn the dial to <M>.
OFF ON
000_L-IE-5169D_CX-1.book Page 23 Monday, July 29, 2013 10:42 AM
Loading...