


Fax Guide
Please read this guide before operating this equipment. |
ENG |
After you finish reading this guide, store it in a safe place for future reference. |

 Using Your Documentation
Your machine includes the following documentation. This documentation has been designed so that you can easily use your machine to suit your particular needs.
Setting up the machine......................................
Setting up paper ..............................................
Installing Printer Driver .....................................
Document and paper handling .............................
Making copies ................................................
Maintenance ..................................................
Troubleshooting feed and copy issues ....................
Sending and receiving faxes ...............................
Speed dialing .................................................
Troubleshooting fax issues .................................
Set-up Instructions
Reference Guide
Fax Guide
Only for the imageCLASS D780 model
Printing with CAPT ........................................... |
|
|
|
..........................Checking the status of a print job |
Printer Guide |
|
|
|
|
||
Troubleshooting CAPT issues |
|
|
|
|
|
|
|
|
|
|


 • Documentation is included on the CD-ROM in PDF form.
Copyright
Copyright ©2003 by Canon, Inc. All rights reserved. No part of this publication may be reproduced, transmitted, transcribed, stored in a retrieval system, or translated into any language or computer language in any form or by any means, electronic, mechanical, magnetic, optical, chemical, manual, or otherwise, without the prior written permission of Canon, Inc.
Trademarks
Canon is a registered trademark and UHQ™ is a trademark of Canon, Inc.
i

Super G3 is a phrase used to describe the new generation of fax machines that use ITU-T V.34 standard 33.6 Kbps* modems. Super G3 High Speed Fax machines allow transmission time of approximately 3 seconds* per page which results in reduced telephone line charges.
*Approximately 3 seconds per page fax transmission time based on ITU-T No. 1 Chart (Standard Mode) at 33.6 Kbps modem speed. The Public Switched Telephone Network (PSTN) currently supports 28.8 Kbps modem speeds or lower, depending on telephone line conditions.
ii


 Contents
Chapter 1: Introduction |
|
Customer Support.......................................... |
1-1 |
Operation Panel ............................................. |
1-1 |
Standby Display ............................................. |
1-3 |
Making Connections ...................................... |
1-3 |
Connecting the Telephone Line and an |
|
External Device ........................................... |
1-3 |
Chapter 2: Registering Information |
|
Methods of Registering Information in the |
|
Machine ......................................................... |
2-1 |
Guidelines for Entering Numbers, Letters, and |
|
Symbols ......................................................... |
2-1 |
Correcting a Mistake.................................... |
2-2 |
Registering Required Sender Information ..... |
2-3 |
What is Sender Information?....................... |
2-3 |
Entering the Date and Time......................... |
2-4 |
Registering Your Fax/Telephone Number and |
|
Name ........................................................... |
2-4 |
Printing a List to Check Information |
|
Registered in Your Machine ........................ |
2-6 |
Setting the Telephone Line Type ................... |
2-7 |
Chapter 3: Speed Dialing |
|
What is Speed Dialing? ................................. |
3-1 |
Speed Dialing Methods ............................... |
3-1 |
One-Touch Speed Dialing.............................. |
3-2 |
Registering Numbers for |
|
One-Touch Speed Dialing............................ |
3-2 |
Changing/Deleting a One-Touch Speed |
|
Dialing Entry ................................................ |
3-3 |
Coded Speed Dialing..................................... |
3-4 |
Registering Numbers for |
|
Coded Speed Dialing................................... |
3-4 |
Changing/Deleting a Coded Speed Dialing |
|
Entry ............................................................ |
3-5 |
Group Dialing ................................................. |
3-7 |
Creating Groups .......................................... |
3-7 |
Speed Dialing Lists ........................................ |
3-9 |
Printing Speed Dialing Lists ........................ |
3-9 |
Canceling the Print Out List....................... |
3-11 |
Registering a Password and Subaddress ... |
3-12 |
Chapter 4: Sending Faxes |
|
Preparing to Send a Fax................................ |
4-1 |
Documents You Can Fax............................. |
4-1 |
Adjusting the Quality of Your Faxes ............ |
4-1 |
Dialing Methods........................................... |
4-2 |
Sending Methods ........................................... |
4-5 |
Memory Sending ......................................... |
4-5 |
Canceling Sending......................................... |
4-7 |
Redialing When the Line is Busy................... |
4-8 |
Manual Redialing......................................... |
4-8 |
Automatic Redialing..................................... |
4-8 |
Sequential Broadcasting ................................ |
4-9 |
Delayed Sending.......................................... |
4-11 |
Confirming Transmission Status and |
|
Sending Reservation.................................... |
4-12 |
Confirming Transmission Status................ |
4-12 |
Confirming Sending Reservation............... |
4-12 |
Documents Stored in Memory ..................... |
4-13 |
Printing a List of Documents in Memory ... |
4-13 |
Resending a Document in Memory ........... |
4-14 |
Printing a Document in Memory ................ |
4-15 |
Deleting a Document from Memory........... |
4-16 |
Chapter 5: Receiving Faxes |
|
Different Ways to Receive a Fax ................... |
5-1 |
Setting the Receive Mode.............................. |
5-2 |
Setting the Options for FaxTel Mode........... |
5-3 |
Setting the Options for Distinctive |
|
Ring Pattern Detection Feature: DRPD....... |
5-5 |
Receiving Faxes Manually............................. |
5-6 |
Registering a Password and Subaddress |
|
for Polling ....................................................... |
5-7 |
Receiving While Performing Other Tasks ...... |
5-9 |
Receiving Faxes in Memory |
|
When a Problem Occurs................................ |
5-9 |
Canceling Receiving ...................................... |
5-9 |
iii

Chapter 6: Special Features |
|
Special Dialing ............................................... |
6-1 |
Dialing Through a Switchboard ................... |
6-1 |
Dialing an Overseas Number |
|
(With Pauses) .............................................. |
6-1 |
Switching Temporarily to Tone Dialing......... |
6-2 |
Chapter 7: Reports and Lists |
|
Summary of Reports and Lists ..................... |
7-1 |
ACTIVITY REPORT....................................... |
7-2 |
TX (Transmission) REPORT.......................... |
7-3 |
MULTI TX/RX (Transaction) REPORT ........ |
7-4 |
RX (Reception) REPORT .............................. |
7-4 |
Chapter 8: Troubleshooting |
|
LCD Messages .............................................. |
8-1 |
Faxing Problems ............................................ |
8-2 |
Sending Problems ....................................... |
8-2 |
Receiving Problems..................................... |
8-3 |
Telephone Problems ...................................... |
8-5 |
If a Power Cut Occurs ................................... |
8-5 |
If You Cannot Solve the Problem................... |
8-6 |
Chapter 9: Setting the Additional |
|
Functions |
|
Understanding the “Additional Functions”...... |
9-1 |
Accessing the Additional Functions............. |
9-1 |
Menu Descriptions....................................... |
9-2 |
Appendix: Specifications |
|
Facsimile ...................................................... |
A-1 |
Telephone ...................................................... |
A-1 |
Index ................................................................ |
I-1 |
iv


 Users in the U.S.A.

 Pre-Installation Requirements for Canon Facsimile Equipment
A. Location
Supply a suitable table, cabinet or desk. See the Reference Guide for the machine’s dimensions and weight.
B. Phone Line Requirements
1.Only a single line, touch-tone or rotary telephone set is to be used.
2.Order an RJ11-C modular jack (USOC code), which should be installed by the telephone company. If the RJ11-C jack is not present, installation cannot be performed.
3.Order a normal business line from your telephone company’s business representative. The line should be a
regular voice grade line or the equivalent. Use only one line per machine. DDD (DIRECT DISTANCE DIAL) LINE
-or-
IDDD (INTERNATIONAL DIRECT DISTANCE DIAL) LINE IF YOU COMMUNICATE OVERSEAS
 • Canon recommends an individual line following industry standards, e.g., the 2500 (Touch Tone) or 500 NOTE (Rotary/Pulse Dial) telephones. A dedicated extension off a PBX unit without “Call Waiting” can be
used with your unit. Key telephone systems are not recommended because they send non-standard signals to individual telephones for ringing and special codes, which may cause a fax error.
C. Power Requirements
This equipment should be connected to a standard 120-volt AC, three-wire grounded outlet only. Do not connect this machine to an outlet or power line shared with other appliances that cause “electrical noise.” Air conditioners, electric typewriters, copiers and machines of this sort generate electrical noise which often interferes with communications equipment and the sending and receiving of documents.

 Connection of the Equipment
This equipment complies with Part 68 of the FCC rules and the requirements adopted by the ACTA. On the rear panel of this equipment is a label that contains, among other information, a product identifier in the format US:AAAEQ##TXXXX. If requested, this number must be provided to the telephone company.
This equipment may not be used on coin service provided by the telephone company. Connection to party lines is subjected to state tariffs.
An FCC compliant telephone cord and modular jack are provided with this equipment. This equipment is designed to be connected to the telephone network or premises wiring using a compatible modular jack which is Part 68 compliant. See Installation instructions for details.
The REN is used to determine the number of devices that may be connected to a telephone line. Excessive RENs on a telephone line may result in the devices not ringing in response to an incoming call. In most but not all areas, the sum of RENs should not exceed five (5.0). To be certain of the number of devices that may be connected to a line, as determined by the total RENs, contact the local telephone company. The REN for this product is part of the product identifier that has the format US:AAAEQ##TXXXX. The digits represented by ## are the REN without a decimal point (e.g., 03 is a REN of 0.3).
v


 In Case of Equipment Malfunction
Should any malfunction occur which cannot be corrected by the procedures described in this Fax Guide, disconnect the equipment from the telephone line and unplug the power cord. The telephone line should not be reconnected or the power cord plugged in until the problem is completely resolved. Users should contact Canon Authorized Service Facilities for servicing of equipment. Information regarding Authorized Service Facility locations can be obtained by calling the Canon USA Consumer Information Center. (1-800-828-4040)

 Rights of the Telephone Company
Should the equipment cause harm to the telephone network, the telephone company may temporarily disconnect service. The telephone company also retains the right to make changes in facilities and services which may affect the operation of this equipment. When such changes are necessary, the telephone company is required to give adequate prior notice to the user.

 FCC Notice
Facsimile Transceiver, Model F188300
This device complies with Part 15 of the FCC Rules.
Operation is subject to the following two conditions:
(1)This device may not cause harmful interference, and
(2)this device must accept interference received, including interference that may cause undesired operation.
 • This equipment has been tested and found to comply with the limits for a class B digital device, pursuant NOTE to Part 15 of the FCC Rules. These limits are designed to provide reasonable protection against harmful
interference in a residential installation. This equipment generates, uses and can radiate radio frequency energy and, if not installed and used in accordance with the instructions, may cause harmful interference to radio communications. However, there is no guarantee that interference will not occur in a particular installation. If this equipment does cause harmful interference to radio or television reception, which can be determined by turning the equipment off and on, the user is encouraged to try to correct the interference by one or more of the following measures:
•Reorient or relocate the receiving antenna.
•Increase the separation between the equipment and receiver.
•Connect the equipment into an outlet on a circuit different from that to which the receiver is connected.
•Consult the dealer or an experienced radio/TV technician for help.
Use of shielded cable is required to comply with class B limits in Subpart B of Part 15 of FCC Rules.
Do not make any changes or modifications to the equipment unless otherwise specified in the Fax Guide. If such changes or modifications should be made, you could be required to stop operation of the equipment.
Canon U.S.A. Inc.
One Canon Plaza, Lake Success, NY 11042, U.S.A.
TEL No. (516) 328-5000
The Telephone Consumer Protection Act of 1991 makes it unlawful for any person to use a computer or other electronic device to send any message via a telephone fax machine unless such message clearly contains in a margin at the top or bottom of each transmitted page or on the first page of the transmission, the date and time it is sent and an identification of the business or other entity, or other individual sending the message and the telephone number of the sending machine or such business, other entity, or individual.
To automatically enter this information into your machine, follow the instructions in Chapter 2 of this guide.
vi


 Users in Canada

 Pre-Installation Requirements for Canon Facsimile Equipment
A. Location
Supply a suitable table, cabinet, or desk. See the Reference Guide for the machine’s dimensions and weight.
B. Order Information
1.Provide only a single-line to touch-tone or rotary telephone set terminated with a standard 4-pin modular phone plug. (Touch-tone is recommended if available in your area.)
2.Order a CA11A modular jack (USOC code), which should be installed by the telephone company. If the CA11A jack is not present, installation cannot occur.
3.Order a normal business line from your telephone company’s business representative. The line should be a regular voice grade line or equivalent. Use one line per machine.
DDD (DIRECT DISTANCE DIAL) LINE
-or-
IDDD (INTERNATIONAL DIRECT DISTANCE DIAL) LINE IF YOU COMMUNICATE OVERSEAS
 • Canon recommends an individual line following industry standards [e.g. the 2500 (Touch Tone) or 500 NOTE (Rotary/Pulse Dial) telephones]. A dedicated extension off a PBX machine without “Camp On” signals is also permissible with your machine. Key telephone systems are not recommended because they send
non-standard signals to individual telephones for ringing and special codes, which may cause a fax error.
C. Power Requirements
The power outlet should be a three-prong grounded receptacle (Single or Duplex). It should be independent from copiers, heaters, air conditioners or any electric equipment that is thermostatically controlled. The rated value is 120 volts and 15 amperes. The CA11A modular jack should be relatively close to the power outlet to facilitate installation.

 Notice
This equipment meets the applicable Industry Canada Terminal Equipment Technical Specifications. This is confirmed by the registration number. The abbreviation, IC, before the registration number signifies that registration was performed based on a Declaration of Conformity indicating that Industry Canada technical specifications were met. It does not imply that Industry Canada approved the equipment.
Before installing this equipment, users should ensure that it is permissible to be connected to the facilities of the local telecommunications company. The equipment must also be installed using an acceptable method of connection. The customer should be aware that compliance with the above conditions may not prevent degradation of service in some situations.
Repairs to certified equipment should be coordinated by a representative designated by the supplier. Any repairs or alterations made by the user to this equipment, or equipment malfunctions, may give the telecommunications company cause to request the user to disconnect the equipment.
Users should ensure for their own protection that the electrical ground connections of the power utility, telephone lines and internal metallic water pipe system, if present, are connected together. This precaution may be particularly important in rural areas.
vii

CAUTION
NOTE
•Users should not attempt to make such connections themselves, but should contact the appropriate electric inspection authority or electrician, as appropriate.
•This Class B digital apparatus meets all requirements of the Canadian Interference-Causing Equipment Regulations.
The Ringer Equivalence Number is an indication of the maximum number of devices allowed to be connected to a telephone interface. The termination on an interface may consist of any combination of devices subject only to the requirement that the sum of the RENs of all the devices does not exceed five.
CANON CANADA INC. 1-800-652-2666
Mon. – Fri 9 AM.– 8 P.M. E.S.T. (Excluding holidays)

 For Canadian Users
Canon Canada Inc., offers a full range of customer technical support* options:
•For interactive troubleshooting, e-mail technical support, the latest driver downloads and answers to frequently asked questions (www.canon.ca)
•Automated interactive telephone support on most current products 24 hours, 7 days a week (1-800-652-2666).
•Free live technical support Monday—Friday (excluding holidays) for products still under warranty (1-800-652- 2666)
•The location of the authorized service facility nearest you (1-800-652-2666)
If the problem cannot be corrected by using one of the above technical support options, repair options are available at the time of your call to the Free live technical support number above or via the website at www.canon.ca
* Support program specifics are subject to change without notice.
viii


 Type Conventions Used in This Guide
Please read the following list of symbols, terms and abbreviations used in this guide.
WARNING
CAUTION
IMPORTANT
• Indicates a warning concerning operations that may lead to death or injury to persons if not performed correctly. In order to use the machine safely, always pay attention to these warnings.
• Indicates a caution concerning operations that may lead to injury to persons or damage to property if not performed correctly. In order to use the machine safely, always pay attention to these cautions.
• Indicates an operational warning or restriction. Be certain to read these items to operate the machine correctly, and to avoid damage to the machine.
• Indicates a note for operation or an additional explanation. Reading these is highly recommended.
NOTE |
|
(→ p. n-nn) |
A number preceded by an arrow and enclosed in parenthesis refers to a page in this guide |
|
where more information on the topic of the previous sentence can be found. |
→ Set-up Instructions |
Refer to the Set-up Instructions for details on the topic of the previous sentence. |
→ Reference Guide |
Refer to the Reference Guide for details on the topic of the previous sentence. |
machine |
The word “machine” refers to the imageCLASS D780. |
default |
A setting that remains in effect unless you change it. |
document or fax |
The original sheet(s) of paper you send or receive with the machine. |
menu |
A list of settings from which you select an item to set up or change. A menu has a title |
|
which appears in the LCD. |
transaction number |
When you send or receive a document, your machine automatically assigns the document |
|
a unique transaction number. A transaction number is a four-digit number that will help |
|
you keep track of documents you send and receive. |
TX/RX NO. |
TX/RX NO. is the abbreviation used for Transaction number. |
TX |
Denotes Sending. |
RX |
Denotes Receiving. |
In addition, this guide uses distinctive typefaces to identify keys and information in the LCD:
•The keys you press appear in this typeface: Stop/Reset.
•Information in the LCD appears in this typeface: FAX SETTINGS.
ix
x

Chapter 1
Introduction

 Customer Support
Your machine is designed with the latest technology to provide trouble-free operation. If you encounter a problem with the machine’s operation, try to solve it by using the information in Chapter 8. If you cannot solve the problem or if you think your machine needs servicing, contact your service representative, → Reference Guide.

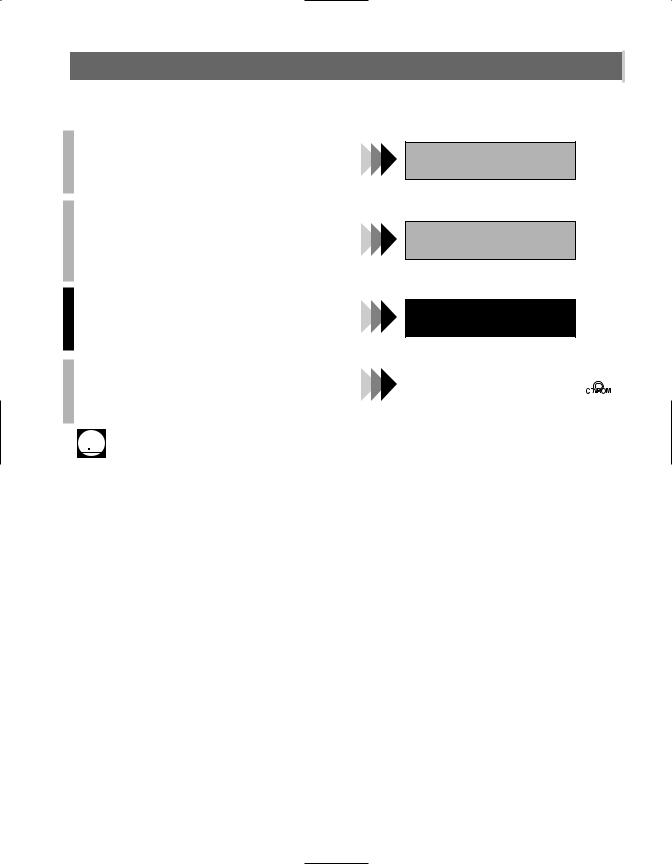
 Operation Panel
This section describes keys used when sending and receiving faxes.
LCD |
FAX Key |
Displays messages and |
Switches standby display to Fax Mode. |
prompts during operation. |
In Use/Memory indicator |
Also displays selections, |
Flashes green when a fax is being |
text and numbers when |
received or sent. Lights green when |
specifying settings. |
the reservation of fax transmission is |
|
set, or a fax is received into the memory. |
Additional Functions Key
Customizes the way your machine operates.
COPY Key
Switches
standby display to Copy Mode.
Alarm indicator
Flashes orange when the machine has a problem such as paper jams, etc. (The error message
is displayed in the LCD).
Energy Saver Key
Sets or cancels the energy saver mode manually. The key lights green when the energy saver mode is set, and goes off
when the mode is canceled.
|
Function |
Additional Functions |
Collate |
2 on 1 |
|
|
Energy Saver |
|
|
|
|
||||
Fax Monitor |
Redial / Pause |
|
|
|
|
|
In Use/Memory Alarm |
|
|
|
|
|
|
|
|
Memory |
|
|
|
|
ABC |
DEF |
Stop/Reset |
|
|
|
|
|
|||
|
|
|
|
|
|
|
|
Reference |
Coded Dial |
|
|
|
|
|
|
|
|
|
|
|
|
|
|
Report |
+ |
|
|
GHI |
JKL |
MNO |
|
|
Directory |
|
Set |
|
|
|
|
|
|
|
|
|
|
|
|
Delayed |
Space |
|
|
|
|
|
Start |
Transmission |
Receive Mode |
Enlarge/Reduce |
|
PRS |
TUV |
WXY |
|
|
|
Paper Select |
|
|
|
||
Book Sending |
Delete |
|
|
|
|
|
|
|
FAX Resolution |
|
|
|
OPER |
SYMBOLS |
|
|
|
Exposure |
Image Quality |
||||
|
|
|
|
|
|||
|
Clear |
|
|
|
|
|
|
|
|
|
|
Tone |
|
|
|
1
Introduction
4 (–), e (+) Keys
Scroll through the selections so you can see other settings.
Set Key
Determines the contents you set or register.
Also, if the document being scanned stops in the ADF, pressing this key makes the document come out automatically.
Numeric Keys
Enter numbers when dialing or registering fax/telephone numbers. Also enter characters when registering names.
Tone Key
Connects to information services that accept tone dialing only, even if you are using a rotary pulse.
Start Key
Starts sending faxes.
Stop/Reset Key
Cancels sending or receiving faxes and other operations, and returns the machine to standby mode.
1-1

One-Touch Speed Dialing Keys
The keys marked 01 to 12 can be used to dial pre-registered fax/telephone numbers. To dial using these keys, you need to register the number for one-touch speed dialing.
When the Function key is pressed and the indicator lights green, the following keys can be used for the fax functions.
Also, if fax functions are programmed into these keys, they can be used directly as One-Touch Keys without pressing Function to execute the fax functions.
Fax Monitor Key
Confirms the status of fax communication.
Memory Reference Key
Confirms documents stored in the machine for memory sending or memory receiving.
Report Key
Prints a report listing fax communications, dial list, data list or document list.
You can also use this key to cancel the printing job.
Delayed Transmission Key
Specifies the fax sending time for the delayed sending function.
Book Sending Key
This key can be used to send documents from the platen glass.
+ Key
Enters a plus sign (+).
Space Key
Enters a space between letters and numbers.
Delete Key
Deletes characters one by one.
Clear Key
Deletes all characters.
|
Function |
Fax Monitor |
Redial / Pause |
|
|
Memory |
|
Reference |
Coded Dial |
Report |
+ |
|
Directory |
Delayed |
Space |
Transmission |
Receive Mode |
Book Sending |
Delete |
|
FAX Resolution |
|
Clear |
Function Key
After pressing this key, you can use the keys marked 01 to 12 (except for 06 to 08) for the fax functions.
Lights green when the key is pressed and goes off when the key is pressed again.
Redial/Pause Key
Dials the last number dialed with the numeric keys, or inserts a pause within and/or after a number.
Coded Dial Key
The key can be used to dial fax/telephone numbers preregistered under a two-digit code. To dial by using this key, you need to register a number for the coded speed dialing.
Directory Key
Searches fax/telephone numbers pre-registered under
the One-Touch Speed Dialing Keys or Coded Speed Dialing Keys using the names of the registers.
Receive Mode Key
Selects the receive mode.
FAX Resolution Key
Selects the fax resolution: STANDARD, FINE, PHOTO, SUPER FINE or ULTRA FINE.
1-2

 Standby Display
The standby display differs depending on which mode is selected. When the machine is plugged in, the Copy Mode standby display appears. You can switch from Copy Mode to Fax Mode by pressing FAX.
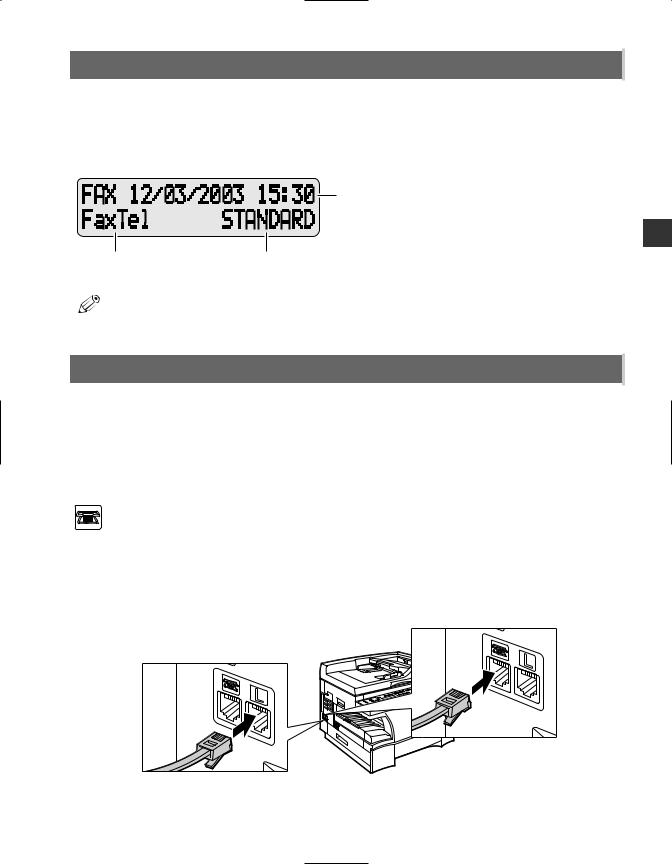
The standby display in Fax Mode is as follows:
■ Fax Mode
Date & Time |
Receive Mode |
Fax Resolution |
• The standby display in Copy Mode is, → Reference Guide.
NOTE

 Making Connections

 Connecting the Telephone Line and an External
Device
The machine has two jacks on the left side for connection of the following:
L : Telephone line
:External device, such as telephone or answering machine
1Connect the supplied telephone line to the  jack, then connect the other end of the line to the telephone jack on your wall.
2 If you neet to send and receive faxes and voice calls, connect the line from the telephone or answering machine to the  jack.
jack.
1
Introduction
1-3

External Device Connections
The external devices you connect to the machine will depend on how you want to use the machine. Recommended device connections and receive modes are shown below.
• If you have connected an external device to the machine, be sure to select the correct receive mode.
IMPORTANT |
(→ p. 5-1) |
|
|
|
|
Recommended Device Connections |
Receive Modes |
|
Machine and Telephone |
FaxTel |
|
|
|
DRPD |
|
Wall Jack |
Manual |
|
Telephone |
|
Machine Only |
FaxOnly |
|
|
Wall Jack |
|
Machine and Answering Machine |
AnsMode |
|
|
Wall Jack |
|
Answering
Machine
Machine, Answering Machine and Telephone |
AnsMode |
 Wall Jack
Telephone Answering
Machine
1-4

Chapter 2
Registering Information

 Methods of Registering Information in the Machine
To customize the machine to your particular needs, you can adjust the general operation, sending, receiving, printing, system settings and speed dialing settings.
You can adjust settings directly via the operation panel of the machine. Detailed instructions are described in this guide.

 Guidelines for Entering Numbers, Letters and Symbols
When you come to a step that requires you to enter a name or number, refer to the table below to determine which numeric key to press for the character you want:
Key |
|
Letters (:A) |
Numbers (:1) |
|||
|
|
|
|
|
|
|
1 |
|
@ . – _ / |
1 |
|||
|
|
|
|
|
|
|
ABC |
|
|
|
|
|
|
2 |
|
A B C a b c |
2 |
|||
|
|
|
|
|
|
|
DEF |
|
|
|
|
|
|
3 |
|
D E F d e f |
3 |
|||
|
|
|
|
|
|
|
GHI |
|
G H I g h i |
4 |
|||
4 |
|
|||||
|
|
|
|
|
|
|
JKL |
|
J K L j k l |
5 |
|||
5 |
|
|||||
|
|
|
|
|
|
|
MNO |
|
M N O m n o |
6 |
|||
6 |
|
|||||
|
|
|
|
|
|
|
PRS |
|
P Q R S p q r s |
7 |
|||
7 |
|
|||||
|
|
|
|
|
|
|
TUV |
|
T U V t u v |
8 |
|||
8 |
|
|||||
|
|
|
|
|
|
|
WXY |
|
W X Y Z w x y z |
9 |
|||
9 |
|
|||||
|
|
|
|
|
|
|
OPER |
|
|
|
|
|
0 |
0 |
|
|
|
|
|
|
|
|
|
|
|
|
|
SYMBOLS |
|
|
|
|
|
|
|
|
|
|
|
|
|
# |
|
|
|
|
|
|
|
|
|
|
|
|
|
Tone |
Letter input (:A) |
|
Number input (:1) |
|||
|
||||||
|
|
|
|
|
|
|
|
|
|
|
|
|
|
|
• If you do not press any key for more than 2 minutes, when entering data, the machine will |
NOTE |
automatically return to standby mode with the auto clear function. |
•AUTO CLEAR can be set within a range of 1 to 9 minutes at one minute intervals. You can also disable the auto clear function, → Reference Guide.
2
Registering Information
2-1

• The Function key will light up by pressing Function to be able to operate Space, Delete or Clear.
NOTE
■ Entering Letters |
|
1 Press T to switch to letter mode (:A). |
3 |
:A
Ex: _
2Press the numeric key that contains the letter you want.
:A
Ex: C
•Press repeatedly until the letter you want appears. Each key cycles through the letters it contains.
•If you are unsure which key to press for the letter you want, → p. 2-1.
■ Entering Symbols |
|
1 Press T to switch to letter mode (:A). |
3 |
:A
Ex: _
2Press # repeatedly until the symbol you want appears.
:A
 Ex: #
Ex: #
■ Entering Numbers
1 Press T to switch to number mode (:1). 3
:1
Ex: _
2Press the numeric key that contains the number you want.
:1
Ex: 1_
• Press Space to enter a space and move the cursor  to the next digit.
Continue entering other letters using the numeric keys.
:A
Ex: CA
•If the next letter you want to enter is under a different numeric key, simply press that key until the letter you want appears.
-or-
If the next letter you want to enter is under the same numeric key you pressed in step 2, use e
(+) to move the cursor to the right. Then press that same numeric key repeatedly until the letter you want appears.
•Press Space to enter a space and move the cursor to the right.
If you want to enter another symbol, use e
(+) to move the cursor to the right, then press # repeatedly until the symbol you want appears.
:A
Ex: #-
Continue entering other numbers using the numeric keys.
:1
Ex: 10_

 Correcting a Mistake
If you make a mistake while entering letters or numbers, you can delete it by pressing Delete or Clear.
■To delete the last letter/number
Press Delete once to delete the last letter or the last number you entered.
■To delete all letters/numbers
Press Clear to delete all letters or all numbers you entered.
2-2

 Registering Required Sender Information
In the United States, FCC rules governing the use of facsimile equipment state that the following sender information must be printed on every facsimile transmission:
•Your fax/telephone number
•Your personal name or company name
•The date and time of transmission
Your machine has been designed to print this information at the top of every fax you send. You must therefore register your machine’s fax/telephone number, your personal name or company name, and the current date and time before using your machine.
This section gives details on registering the sender information.

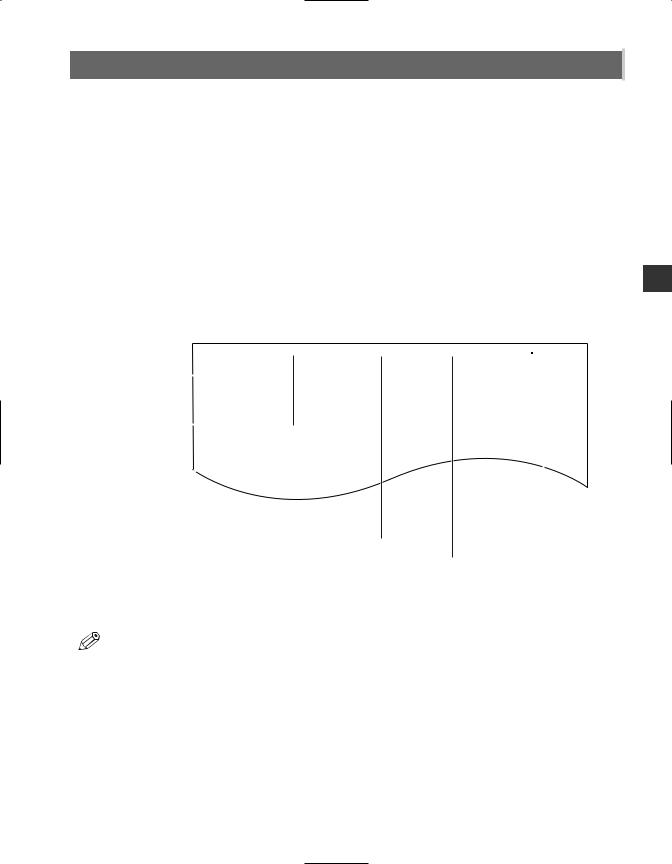
 What is Sender Information?
When you receive a fax, the name of the person or company who sent you the fax, their fax/telephone number and the date and time of transmission will be printed in small type at the top of each page. This information is called the Sender information or the Transmit Terminal Identification (TTI). Similarly, you must register your details in your machine so that whenever you send a fax, the other party knows who sent it and when it was sent. Below is an example of how your sender information would be printed on a fax sent from your machine:
12/03/2003 15:33 FAX 123 4567 CANON  CANON CANADA
  001/001
DATE AND TIME |
|
|
|
|
|
|
|
|
|
|
|
|
|
|
|
|
|
|
|
|
|
|
|
|
|
|
|
|
|
|
|
|
|
|
|
|
|
||
Date and time of |
|
|
|
THE SLEREXE COMPANY LIMITED |
|
||||||||||||||
transmission. |
|
|
|
|
|||||||||||||||
|
|
|
|
|
|
|
|
|
|
SAPORS LANE•BOOLE•DORSET•BH25 8ER |
|
|
|
|
|
||||
FAX/TELEPHONE |
|
|
|
|
|
|
|
TELEPHONE BOOLE (945 13) 51617 – FAX 1234567 |
|
|
|
|
|
||||||
|
|
|
|
|
|
|
|
|
|
|
|
|
|
|
|
|
|||
|
|
|
|
|
|
|
|
|
|
|
|
|
|
|
|
|
|||
NUMBER |
|
|
|
|
|
|
|
|
|
|
|
|
|
|
|
|
|||
Your fax/telephone |
|
|
|
|
|
|
|
|
|
|
|
|
|
|
|
|
|||
number. |
|
|
|
|
|
|
|
|
|
|
|
|
|
|
|
|
|||
You can select FAX or |
|
|
|
|
|
|
|
|
|
|
|
|
|
|
|
|
|||
TEL to be displayed in |
|
Our Ref. 350/PJC/EAC |
|
|
|
|
|
||||||||||||
front of the number. |
|
|
|
|
|
|
|
|
|
|
|
|
|
|
|
|
|||
(→ p. 9-4) |
|
|
|
|
|
|
|
|
|
|
|
|
|
|
|
|
|||
UNIT NAME |
|
|
|
|
|
|
|
|
|
|
|
|
|
|
|
|
|
|
|
|
|
|
|
|
|
|
|
|
|
|
|
|
|
|
|
|
|
|
|
Your name or |
DESTINATION |
|
|
|
|
|
|
|
|
|
|
|
|
||||||
company name. |
|
|
|
|
|
|
|||||||||||||
|
|
|
|
|
|
||||||||||||||
If you used memory sending and |
|
|
|
|
|
||||||||||||||
|
|
|
|
|
|
|
|
|
|||||||||||
|
|
|
|
dialed the fax number using one- |
PAGE NUMBER |
|
|
||||||||||||
|
|
|
|
|
|||||||||||||||
|
|
|
|
touch or coded speed dialing, the |
The page number |
||||||||||||||
|
|
|
|
other party’s name appears here. |
of the fax. |
||||||||||||||
|
• You can set the sender information to print inside or outside the image area. (→ p. 9-4) |
NOTE |
• You can enter the sender information from the Additional Functions. (→ p. 9-4) |
|
2
Registering Information
2-3


 Entering the Date and Time
1 Press Additional Functions. |
4 |
2Use 4 (–) or e (+) to select 5.TIMER SETTINGS.
ADDITIONAL FUNCTIONS 5.TIMER SETTINGS
3 Press Set twice.
The date and time currently set for the machine are displayed.
TIMER SETTINGS |
5 |
|||
1.DATE/TIME |
SETTING |
|||
|
DATE/TIME |
SETTING |
||
Ex: |
1 |
2/03/03 |
12:10 |
|
|
|
|
|
|
|
|
|
|
6 |
Use the numeric keys to enter the correct month, day, year and time in this order.
Ex:
•Use 4 (–) or e (+) to move the cursor under the number you want to change, then press the numeric key.
•Enter only the last two digits of the year.
•Use the 24-hour format for the time setting (e.g.1:00 p.m. as 13:00).
Press Set.
DATE/TIME SETTING
DATA ENTRY OK
TIMER SETTINGS 2.AUTO CLEAR
Press Stop/Reset to return to standby display.

 Registering Your Fax/Telephone Number and Name
|
• The Function key will light up by pressing Function to be able to operate the Space, Delete, |
NOTE |
Clear or + key. |
1Press Additional Functions.
2Use 4 (–) or e (+) to select 3.FAX SETTINGS.
ADDITIONAL FUNCTIONS 3.FAX SETTINGS
3 Press Set four times.
FAX SETTINGS 1.USER SETTINGS
USER SETTINGS
1.TEL LINE SETTINGS
TEL LINE SETTINGS 1.USER TEL NO.
USER TEL NO.
 Ex: TEL=
4Use the numeric keys to enter your fax number (max. 20 digits, including spaces).
USER |
TEL NO. |
Ex: TEL= |
123 4567 |
•If you have already registered your fax/telephone number, the previous entry will be displayed. To change your fax/telephone number, use the numeric keys to enter your fax number.
•Press Space to enter a space.
•To enter a plus sign (+) before the number, press + key.
•If you make a mistake, press Delete or 4 (–) to delete the last number or press Clear to delete all the numbers you entered.
2-4

5 Press Set.
USER TEL NO.
DATA ENTRY OK
TEL LINE SETTINGS 2.TEL LINE TYPE
6 Press Additional Functions.
USER SETTINGS
1.TEL LINE SETTINGS
7Use 4 (–) or e (+) to select 2.UNIT NAME.
USER SETTINGS 2.UNIT NAME
8 Press Set.
:A
Ex: _
9Use the numeric keys to enter your name or company name (max. 24 characters, including spaces).
:A
Ex:
•If you are unsure how to enter characters, → p. 2-1.
•If you have already registered your name or company name, previous entry will be displayed. To change your name, press Clear to delete the previous entry and re-enter.
•Press Space to enter a space and move the cursor to the right.
•If you make a mistake, press 4 (–) or e (+) to move the cursor to the incorrect character, then press Delete. Or press Clear to delete all characters you entered.
10 Press Set.
:A
Ex: DATA ENTRY OK
USER SETTINGS 3.TX TERMINAL ID
11Press Stop/Reset to return to standby display.
2
Registering Information
2-5

 Printing a List to Check Information Registered in Your Machine
You can print the USER’S DATA LIST to check the sender information and current settings of your machine.
1 |
Press Additional Functions. |
3 |
Press Set twice. |
||||
|
|
|
|
|
|
|
|
|
|
|
|
|
|
PRINT LISTS |
|
2 |
Use 4 (–) or e (+) to select 7.PRINT |
|
|||||
|
|
1.USER DATA |
|
||||
|
LISTS. |
|
|
|
|||
|
|
• The machine returns to standby mode then prints |
|||||
|
|
|
|
|
|||
|
|
ADDITIONAL FUNCTIONS |
|
|
|
the USER’S DATA LIST. |
|
|
|
7.PRINT LISTS |
|
|
|
|
|
|
|
|
|
|
|
|
|
The sender information is shown at the beginning of the list. The current settings of the machine are listed after this.
12/03/2003 16:40 FAX 123 4567 |
CANON |
001 |
*****************************
*** |
USER S DATA LIST *** |
***************************** |
|
1. COMMON SETTINGS |
|
DEFAULT SETTINGS |
COPY |
SW AFTER AUTO CLR |
DEFAULT MODE |
VOLUME CONTROL |
|
KEYPAD VOLUME |
ON |
VOLUME |
1 |
ALARM VOLUME |
ON |
VOLUME |
1 |
TX DONE TONE |
ERROR ONLY |
VOLUME |
1 |
RX DONE TONE |
ERROR ONLY |
2-6

 Setting the Telephone Line Type
Before using your machine, you need to make sure it is set for your telephone line type. If you are unsure of your telephone line type, check with your local telephone company. Your machine is factory-set to operate with a tone line (TOUCH TONE). If you need to change the setting, follow this procedure.
1Press Additional Functions.
2Use 4 (–) or e (+) to select 3.FAX SETTINGS.
ADDITIONAL FUNCTIONS 3.FAX SETTINGS
3 Press Set three times.
FAX SETTINGS 1.USER SETTINGS
USER SETTINGS
1.TEL LINE SETTINGS
TEL LINE SETTINGS 1.USER TEL NO.
4Use 4 (–) or e (+) to select 2.TEL LINE TYPE.
TEL LINE SETTINGS 2.TEL LINE TYPE
5 Press Set.
|
TEL LINE TYPE |
Ex: |
TOUCH TONE |
|
6Use 4 (–) or e (+) to select the telephone line type setting you want to set.
|
TEL LINE TYPE |
Ex: |
ROTARY PULSE |
|
•You can select from the following:
-ROTARY PULSE
-TOUCH TONE
7 Press Set.
TEL LINE SETTINGS 3.TX START SPEED
8Press Stop/Reset to return to standby display.
2
Registering Information
2-7

2-8

Chapter 3
Speed Dialing

 What is Speed Dialing?
Speed dialing allows you to simplify dialing procedures by registering a fax/telephone number(s) and name under a one-touch speed dialing key or coded speed dialing keys. You can then dial that number by pressing only one or a few keys.

 Speed Dialing Methods
There are three speed dialing methods available with your machine as follows:
■One-Touch Speed Dialing (→ p. 3-2)
Allows you to dial a fax or telephone number by pressing only one key. You can register up to 12 destinations for one-touch speed dialing.
■Coded Speed Dialing (→ p. 3-4)
Allows you to dial a fax or telephone number by pressing Coded Dial followed by a two-digit code of your choice. You can register up to 100 different destinations.
■Group Dialing (→ p. 3-7)
Allows you to dial a group of registered one-touch and/or coded speed dialing fax numbers. By registering a group for one-touch or coded speed dialing, you press only one or a few keys to send the same document to several destinations.
The following pages describe how to register numbers for speed dialing.
• For instructions on dialing using the speed dialing methods, → pp. 4-3, 4-4.
NOTE
3
Speed Dialing
3-1


 One-Touch Speed Dialing
 • The Function key will light up by pressing Function to be able to operate Space, Delete or Clear.
NOTE

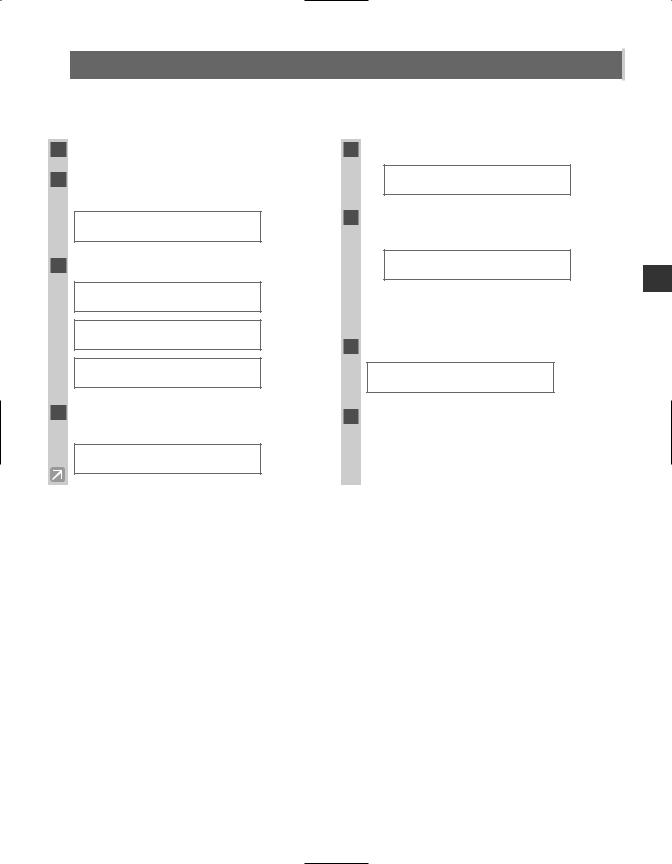
 Registering Numbers for One-Touch Speed Dialing
1Press Additional Functions.
2Use 4 (–) or e (+) to select 4.ADD. REGISTRATION.
ADDITIONAL FUNCTIONS 4.ADD. REGISTRATION
3 Press Set twice.
ADD. REGISTRATION 1.1-TOUCH SPD DIAL
|
1-TOUCH SPD |
DIAL |
|
|
Ex: |
01= |
905 |
795 |
1111 |
|
|
|
|
|
4Use 4 (–) or e (+) to select a one-touch speed dialing key (01 to 12).
1-TOUCH SPD DIAL
Ex: 04=
•You can directly select the one-touch speed dialing key by pressing it.
•If a one-touch speed dialing key has already been registered, the number registered under that key appears.
•If a group is already registered under a one-touch speed dialing key, GROUP DIAL appears.
•If the fax functions have been programmed into the keys marked 01 to 12 using PROG 1-TOUCH KEY in the Additional Functions, PROG 1-TOUCH KEY will appear.
5 Press Set twice.
1-TOUCH SPD DIAL 1.TEL NUMBER ENTRY
TEL NUMBER ENTRY
TEL=
6Use the numeric keys to enter the fax/ telephone number you want to register (max. 120 digits, including spaces and pauses).
Ex:
•Press Space to enter a space and move the cursor to the next digit. Spaces are optional and are ignored during dialing.
 • Press Redial/Pause to enter a pause (→ p. 6-1).
•If you make a mistake, move the cursor to the incorrect number by pressing 4 (–) or e (+), and press Delete repeatedly to delete the numbers one by one. Or, press Clear to delete all the numbers you have entered.
7 Press Set twice.
TEL NUMBER ENTRY
DATA ENTRY OK
1-TOUCH SPD DIAL 2.NAME
:A
_
8Use the numeric keys to enter the name that goes with the number (max. 16 characters, including spaces).
:A
Ex: Canon ITALIA
• If you are unsure how to enter characters, → p. 2-1.
9 Press Set.
:A
DATA ENTRY OK
1-TOUCH SPD DIAL 3.OPTIONAL SETTING
•For details of OPTIONAL SETTING, refer to the following items as required.
–Registering a Password and Subaddress (→ p. 3-12)
–Registering a Password and Subaddress for Polling (→ p. 5-7)
–TX TIME SETTING in the Additional Functions (→ p. 9-9)
10To continue registering other one-touch speed dialing keys, press Additional Functions then repeat the procedure from step 4.
– or –
Press Stop/Reset to return to standby display.
|
• Use the destination label provided on your |
NOTE |
machine for easy reference dialing. |
3-2


 Changing/Deleting a One-Touch Speed Dialing Entry
• The Function key will light up by pressing Function to be able to operate Space, Delete or Clear.
NOTE
1Follow steps 1 to 3 of “Registering
Numbers for One-Touch Speed Dialing.” (→ p. 3-2)
2Use 4 (–) or e (+) to select the one-touch speed dialing key assigned to the entry you want to change or delete.
|
1-TOUCH SPD DIAL |
|
||
Ex: |
06= |
1 |
432 |
2015 |
|
|
|
|
|
•You can directly select the one-touch speed dialing key by pressing it.
3 Press Set twice.
1-TOUCH SPD DIAL 1.TEL NUMBER ENTRY
TEL NUMBER ENTRY
TEL=1 432 2015_
To Change a One-Touch Speed Dialing Entry:
4Press Function, then Clear to delete the previous entry, then re-enter the fax/telephone number.
Ex:
•If you do not want to change the fax/telephone number, ignore this step.
•Press Space to enter a space and move the cursor to the next digit. Spaces are optional and are ignored during dialing.
•Press Redial/Pause to enter a pause.
•If you make a mistake, move the cursor to the incorrect number by pressing 4 (–) or e (+), and press Delete repeatedly to delete the numbers one by one. Or, press Clear to delete all the numbers you have entered.
5 Press Set twice.
TEL NUMBER ENTRY
DATA ENTRY OK
1-TOUCH SPD DIAL 2.NAME
:A
 Ex: Canon OPTIX
6
7
8
4
5
6
Press Clear to delete the previous entry, then re-enter the name.
:A
Ex:
•If you do not want to change the name, ignore this step. Proceed to step 7.
•If you are unsure how to enter characters, → p. 2-1.
Press Set.
:A
DATA ENTRY OK
1-TOUCH SPD DIAL 3.OPTIONAL SETTING
Press Stop/Reset to return to standby display.
To Delete a One-Touch Speed Dialing Entry:
Press Function, then Clear to delete the fax/telephone number.
TEL NUMBER ENTRY
TEL=
 • If you delete the number by mistake, press NOTE Stop/Reset before you press Set, so that
the number is not deleted.
Press Set.
TEL NUMBER ENTRY
ERASING END
1-TOUCH SPD DIAL 2.NAME
Press Stop/Reset to return to standby display.
•The registered name is automatically cleared when you clear the fax/telephone number.
3
Speed Dialing
3-3


 Coded Speed Dialing

 Registering Numbers for Coded Speed Dialing
• The Function key will light up by pressing Function to be able to operate Space, Delete or Clear.
|
NOTE |
|
|
|
Press Additional Functions. |
|
Use the numeric keys to enter the fax/ |
1 |
8 |
||
|
Use 4 (–) or e (+) to select 4.ADD. |
|
telephone number you want to register (max. |
2 |
|
120 digits, including spaces and pauses). |
REGISTRATION.
ADDITIONAL FUNCTIONS 4.ADD. REGISTRATION
3 Press Set.
ADD. REGISTRATION 1.1-TOUCH SPD DIAL
4Use 4 (–) or e (+) to select 2.CODED SPD DIAL.
ADD. REGISTRATION 2.CODED SPD DIAL
5 Press Set.
CODED SPD |
DIAL |
Ex: A00= |
2131 1250 |
6Use 4 (–) or e (+) to select a coded speed dialing code (00 to 99).
Ex:
•Press Space to enter a space and move the cursor to the next digit. Spaces are optional and are ignored during dialing.
•Press Redial/Pause to enter a pause.
•If you make a mistake, move the cursor to the incorrect number by pressing 4 (–) or e (+), and press Delete repeatedly to delete the numbers one by one. Or, press Clear to delete all the numbers you have entered.
9 Press Set twice.
TEL NUMBER ENTRY
DATA ENTRY OK
CODED SPD DIAL 2.NAME
:A
_
10Use the numeric keys to enter the name that goes with the number (max. 16 characters, including spaces).
:A
Ex: Canon FRANCE
•If you are unsure how to enter characters, → p. 2-1.
7
3-4

11 Press Set.
:A
Ex: DATA ENTRY OK
CODED SPD DIAL 3.OPTIONAL SETTING
12 To continue registering other coded speed dialing codes, press Additional Functions then repeat the procedure from step 6.
– or –
Press Stop/Reset to return to standby display.
• For details of OPTIONAL SETTING, refer to the |
|
• You can print the CODED DIAL LIST |
following items as required. |
|
|
– Registering a Password and Subaddress (→ p. 3-12) |
NOTE |
showing all the numbers and names |
|
|
|
– Registering a Password and Subaddress for |
|
registered for coded speed dialing |
Polling (→ p. 5-7) |
|
(→ pp. 3-9, 3-10). Keep this list near your |
– TX TIME SETTING in the Additional Functions |
|
machine for easy reference when dialing. |
(→ p. 9-9) |
|
|

 Changing/Deleting a Coded Speed Dialing Entry
• The Function key will light up by pressing Function to be able to operate Space, Delete or Clear.
NOTE
1Follow steps 1 to 5 of “Registering
Numbers for Coded Speed Dialing.” (→ p. 3-4)
2Use 4 (–) or e (+) to select the coded speed dialing code assigned to the entry you want to change or delete.
CODED SPD |
DIAL |
Ex: A32= |
81 773 3115 |
•You can enter the coded speed dialing code (2- digit) with the numeric keys after pressing Coded Dial.
3 Press Set twice.
CODED SPD DIAL 1.TEL NUMBER ENTRY
TEL NUMBER ENTRY
TEL=81 773 3115_
To Change a Coded Speed Dialing Entry:
4Press Function, then Clear to delete the previous entry, then re-enter the fax/telephone number.
Ex:
•If you do not want to change the fax/telephone number, ignore this step.
•Use Space to enter a space and move the cursor to the next digit. Spaces are optional and are ignored during dialing.
•Press Redial/Pause to enter a pause.
•If you make a mistake, move the cursor to the incorrect number by pressing 4 (–) or e (+), and press Delete repeatedly to delete the numbers one by one. Or, press Clear to delete all the numbers you have entered.
5 Press Set twice.
TEL NUMBER ENTRY
DATA ENTRY OK
CODED SPD DIAL 2.NAME
:A
 Ex: Canon UC_
3
Speed Dialing
3-5
6Press Function, then Clear to delete the previous entry, then re-enter the name.
:A
Ex: Canon UK
•If you do not want to change the name, ignore this step.
•If you are unsure how to enter characters, → p. 2-1.
7 Press Set.
:A
DATA ENTRY OK
CODED SPD DIAL 3.OPTIONAL SETTING
8Press Stop/Reset to return to standby display.
To Delete a Coded Speed Dialing Entry:
4Press Function, then Clear to delete the fax/telephone number.
TEL NUMBER ENTRY
TEL=
5 Press Set.
TEL NUMBER ENTRY
ERASING END
CODED SPD DIAL 2.NAME
6Press Stop/Reset to return to standby display.
•The registered name is automatically cleared when you clear the fax/telephone number.
3-6
 Loading...