


RO16106DWMCE

EN

!
2
Thank you for choosing this product.
We are proud to offer the ideal product for
you and the best complete range of home
appliances for your daily routine.
Carefully read this manual for correct and
safe appliance use and for helpful tips on
efficient maintenance.
Only use the washing machine after
carefully reading these instructions. We
recommend you always keep this manual on
hand and in good condition for any future
owners.
Each product is identified by a unique 16character code, also called the “serial
number”, printed on the sticker. This can be
found inside the door opening. This code is
a unique code for your product that you will
need to register the product warranty, or if
you need to contact the Customer Service
Centre.
This appliance is marked according to
the European directive 2012/19/EU
on Waste Electrical and Electronic
Equipment (WEEE).
WEEE contains both polluting substances (which
can cause negative consequences for the
environment) and basic components (which can
be re-used). It is important to have WEEE
subjected to specific treatments, in order to
remove and dispose properly all pollutants, and
recover and recycle all materials. Individuals can
play an important role in ensuring that WEEE
does not become an environmental issue; it is
essential to follow some basic rules:
! WEEE should not be treated as household
waste;
! WEEE should be handed over to the relevant
collection points managed by the municipality or
by registered companies. In many countries, for
large WEEE, home collection could be present.
In many countries, when you buy a new
appliance, the old one may be returned to the
retailer who has to collect it free of charge on a
one-to-one basis, as long as the equipment is of
equivalent type and has the same functions as
the supplied equipment.
1. GENERAL SAFETY RULES
2. INSTALLATION
3. DETERGENT DRAWER
4. PRACTICAL HINTS
5. CLEANING AND MAINTENANCE
6. REMOTE CONTROL (WI-FI)
7. QUICK USER GUIDE
8. CONTROLS AND PROGRAMS
9.
TROUBLESHOOTING AND WARRANTY
FOR U.K. ONLY
On receipt of your appliance please
check it carefully for damage. Any
damage found must be reported
to the
delivery driver immediately.
Alternatively damage found must be
reported to the retailer within 2 days of
receipt.
Environmental conditions
Contents

!
EN
3
1. GENERAL SAFETY
RULES
! This appliance is intended to
be used in household and
similar applications such as:
- Staff kitchen areas in shops, offices
and other working environments;
- Farm houses;
- By clients in hotels, motels and
other residential type environments;
- Bed and breakfast type environments.
A different use of this appliance
from household environment
or from typical housekeeping
functions, as commercial use by
expert or trained users, is excluded
even in the above applications. If
the appliance is used in a manner
inconsistent with this it may reduce
the life of the appliance and may
void the manufacturer’s warranty.
Any damage to the appliance or
other damage or loss arising
through use that is not consistent
with domestic or household use
(even if located in a domestic or
household environment) shall not
be accepted by the manufacturer to
the fullest extent permitted by law.
! This appliance can be used by
children aged from 8 years and
above and persons with reduced
physical, sensory or mental
capabilities or lack of experience
and knowledge if they have been
given supervision or instruction
concerning use of the appliance
in a safe way and understand the
hazards involved.
Children shall not play with the
appliance. Cleaning and user
maintenance shall not be made
by children without supervision.
! Children should be supervised
to ensure that they do not play
with the appliance.
! Children of less than 3 years
should be kept away unless
continuously supervised.
! If the supply cord is damaged, it
must be replaced by a special
cord or assembly available from
the manufacturer or its service
agent.
! Only use the hose-sets
supplied with the appliance for
the water supply connection
(do not reuse old hose-sets).
! Water pressure must be between
0.05 MPa and 0.8 MPa.
! Make sure carpets or rugs do
not obstruct the base or any of
the ventilation openings.
! After installation, the appliance
must be positioned so that the
plug is accessible.
! The maximum load capacity of
dry clothes depends on the
model used (see control panel).
! To consult the product technical
specification please refer to the
manufacturer website.

!
4
! The technical details (supply
voltage and power input) are
indicated on the product rating
plate
! Make sure that the electrical
system is earthed, complies
with all applicable law and that
the (electricity) socket is
compatible with the plug of the
appliance. Otherwise, seek
qualified professional assistance.
! The use of converters, multiple
sockets or extension cords is
strongly advised against
! Before cleaning or maintaining
the washing machine, unplug
the appliance and turn off the
water tap.
! Do not pull on the power cord
or appliance to unplug the
machine.
! Make sure there is no water in
the drum before opening the
door.
! Do not expose the washing
machine to rain, direct sunlight
or other weather elements.
Protect from possible freezing.
! When moving, do not lift the
washing machine by the knobs
or detergent drawer; during
transport, never rest the door on
the trolley. We recommend two
people lift the washing machine.
! In the event of fault and/or
malfunction, turn off the
washing machine, close the
water tap and do not tamper
with the appliance.
Immediately contact the
Customer Service Centre and
only use original spare parts.
Failure to observe these
instruction may jeopardise
appliance safety.
Electrical connections and
safety instructions
WARNING:
water may reach very high
temperatures during the
wash cycle.
!
EN
5
2. INSTALLATION
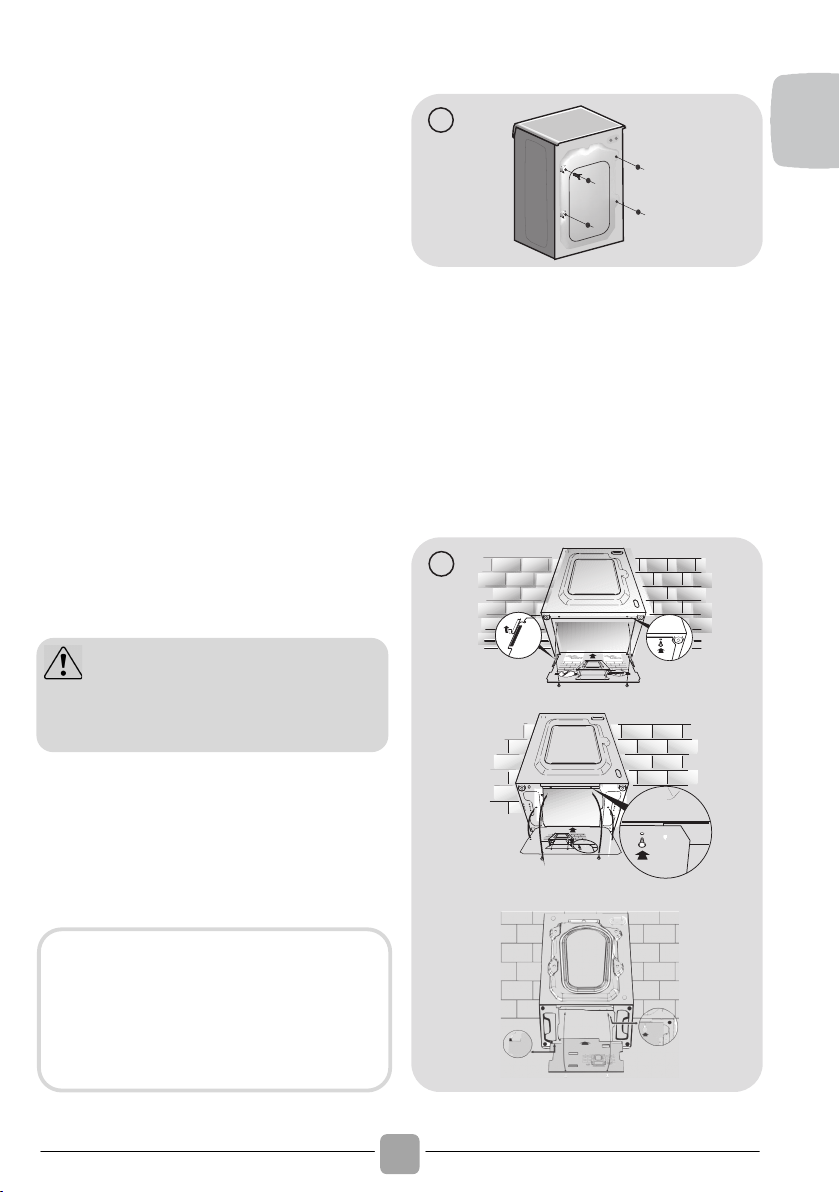
! Remove the 2 or 4 transportation
screws (A) on the back and
remove the 2 or 4 flat washers,
rubber bungs and plastic spacer
tubes (B) as illustrated in figure 1.
! If the washing machine is built-in,
unscrew the 3 or 4 transportation
screws (A) and remove the 3 or 4
flat washers, rubber bungs and
plastic spacer tubes (B).
!
During the removal of the screws
occasionally spacer tubes fall
inside the product, these can be
remove by tilting the product forward
and recovering them from the floor or
inside the base of the machine.
! Cover the open transportation screw
holes with the 2 or 4 plastic caps
included in the instruction bag.
! Place the corrugated plastic sheet,
found on top of the appliance during
the unpacking process, into the base
of the appliance as shown in figure 2
(according to the model, consider
version A, B or C).
A
A
A
A
B
B
B
B
1
3
2
1
3
1
2
A
C
B
2
WARNING:
keep packaging materials
away from children.
In some models this operation
will not be necessary, because
the corrugated plastic sheet
will be already placed on the
bottom of the appliance.
!
6
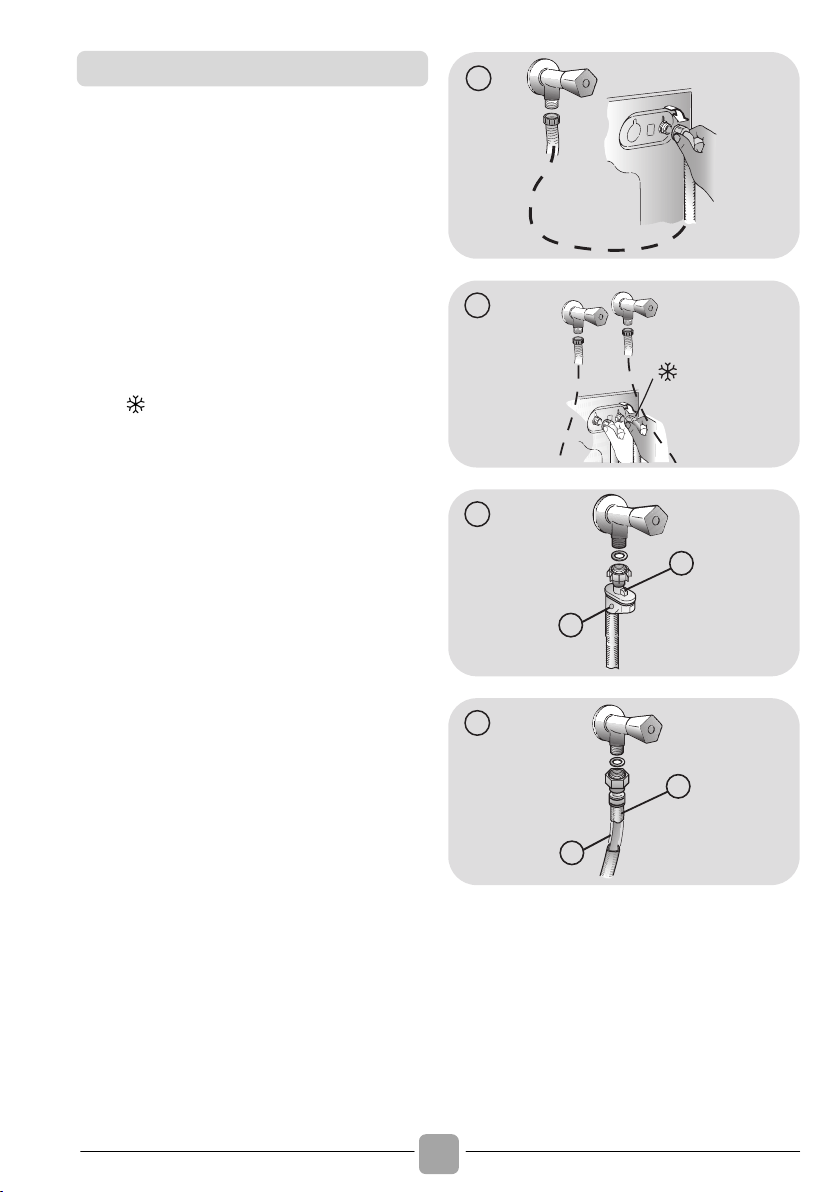
! Connect the water hose to the water
supply tap (fig. 3) only using the hose
supplied with the appliance (do not
reuse old hose-sets).
! SOME MODELS may include one or
more of the following features:
! HOT&COLD (fig. 4):
water mains connection settings with hot
and cold water for higher energy savings.
Connect the grey tube to the cold water
tap and the red one to the hot water
tap. The machine can be connected to
the cold water tap only: in this case, some
programs may start a few minutes later.
! AQUASTOP (fig. 5):
a device located on the supply tube that
stops water flow if the tube deteriorates;
in this case, a red mark will appear in the
window “A” and the tube must be
replaced. To unscrew the nut, press the
one-way lock device "B".
! AQUAPROTECT – SUPPLY TUBE WITH
GUARD (fig. 6):
Should water leak from the primary
internal tube "A", the transparent
containment sheath "B" will contain water
to permit the washing cycle to complete.
At the end of the cycle, contact the
Customer Service Centre to replace the
supply tube.
3
1
4
B
A
5
B
A
6
Hydraulic connections
!
EN
7
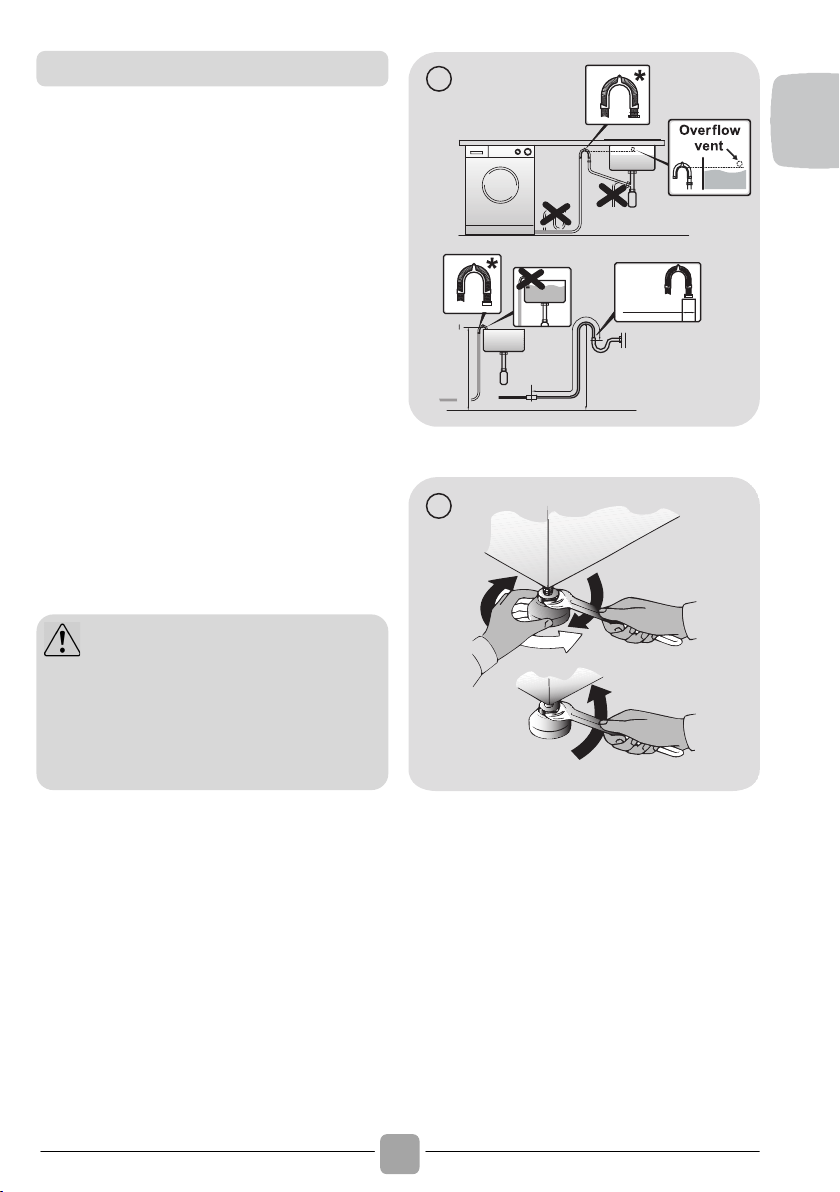
! The washing machine should be installed in
its final position such that the water fill hose
is not kinked or trapped. The corrugated
drain hose should be inserted into suitable
drain pipe of between 50 cm and 85 cm
height above the floor using the curved drain
hose support. If an under sink connection is
used the drain hose must be routed above
the sink overfill opening to prevent back
siphoning. Care must be taken to avoid
kinking or trapping the drain hose (fig. 7).
! Level the appliance using the feet as
illustrated in figure 8:
a. turn the nut clockwise to release the
screw;
b. rotate the foot to raise or lower it until it
touches to the floor;
c. lock the foot, screwing in the nut, until it
tightens against to the bottom of the
washing machine.
! Plug in the appliance.
min 50 cm
max 85 cm
+2,6 mt
max
max 100 cm
min 4 cm
7
* ACCESSORY SOLD SEPARATELY
A
B
C
8
Setting
WARNING:
contact the Customer Service Centre
should the power cord need
replacement.
Installation faults are not covered by
the manufacturers warranty.
!
8
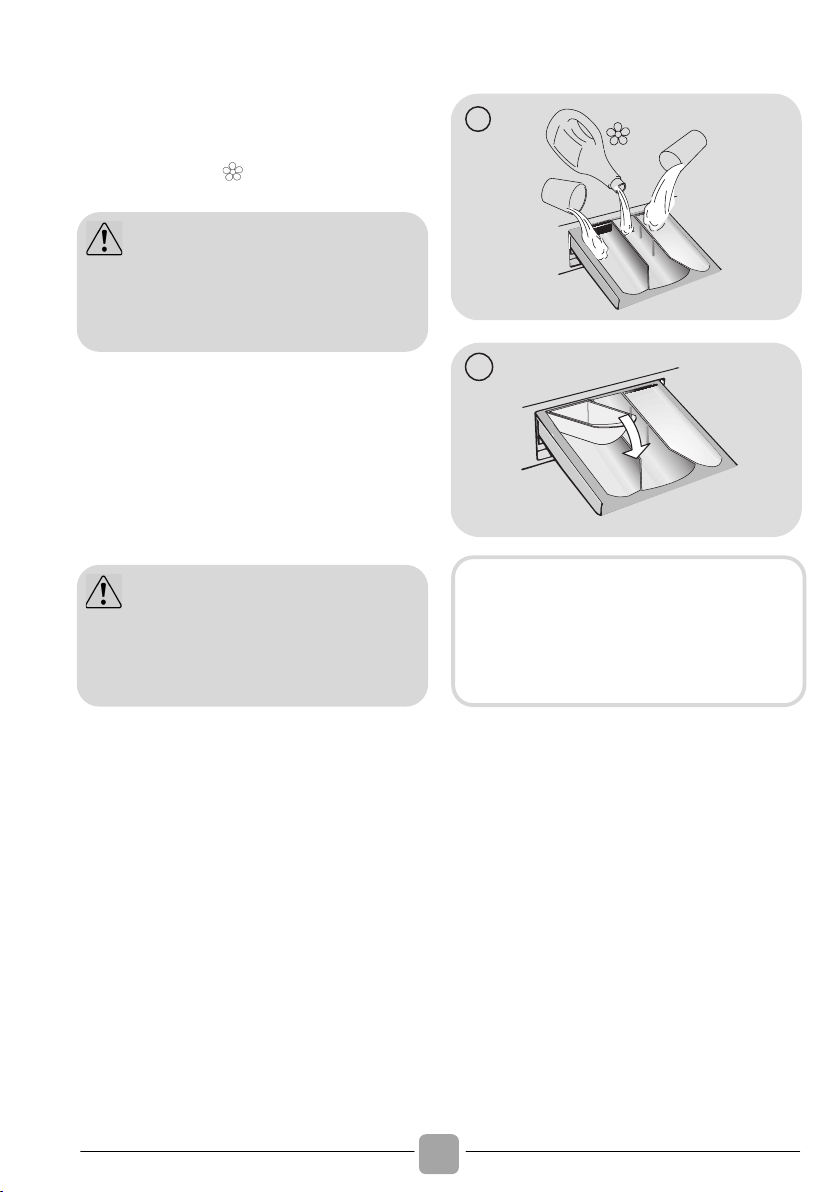
3. DETERGENT DRAWER
The detergent draw is split into 3
compartments as illustrated in figure 9:
! compartment "1": for prewash detergent;
! compartment “ ”: for special additives,
softeners, starch fragrances, etc.;
! compartment "2": for washing
detergent.
A liquid detergent cup is also included IN
SOME MODELS (fig. 10). To use it, place it
in compartment "2". This way, liquid
detergent will only enter the drum at the
right time. The cup can also be used for
bleach when the “Rinse” program is
selected.
2
1
9
10
WARNING:
only use liquid products; the washing
machine is set to automatically dose
additives at each cycle during the last
rinse.
WARNING:
some detergents are not designed for
use in the dispenser drawer but are
supplied with their own dispenser that
is placed in the drum directly.
SOME MODELS are provided with the
automatic dosage, this carries out a
precise measurement of detergent and
softener.
In this case, refer to the
specific section in the CONTROLS
AND PROGRAMS chapter for details.

!
EN
9
4. PRACTICAL HINTS
When sorting laundry, make sure:
- have eliminated metallic objects such as
hair clips, pins, coins, from laundry;
- to have buttoned pillow cases, closed
zips, tied loose belts and long robe
ribbons;
- to have removed rollers, hooks or clips
from curtains;
- to have carefully read clothing washing
labels;
- to have removed any persistent stains
using specific detergents.
! When washing rugs, bedcovers or other
heavy clothing, we recommend you avoid
the spinning cycle.
! To wash wool, make sure the item can be
machine washed. Check the fabric label.
! Leave the appliance’s door slightly open
between washes, to prevent possible bad
smells developing inside the machine.
Tips on how to save money and not
damage the environment when using your
appliance.
! Load the machine to the highest capacity
shown in the programme table for each
programme - this will allow you to SAVE
energy and water.
! Noise and residual laundry moisture are
affected by spin speed: a faster spin is
associated with greater noise and lower
residual moisture in the laundry.
! The most efficient programmes in terms
of combined use of water and energy are
usually the longer-lasting ones with lower
temperature.
Maximise the load size
! Achieve the best use of energy, water,
detergent and time by using the
recommended maximum load size.
Save up to 50% energy by washing a full
load instead of 2 half loads.
Do you need to pre-wash?
! For heavily soiled laundry only!
SAVE detergent, time, water and
between 5 to 15% energy consumption
by NOT selecting Prewash for slight to
normally soiled laundry.
Is a hot wash required?
! Pretreat stains with stain remover or soak
dried in stains in water before washing to
reduce the necessity of a hot wash
programme. Save energy by using a low
temperature wash programme.
Before using a drying programme
(WASHER-DRYERS)
! SAVE energy and time by selecting a
high spin speed to reduce the water
content in laundry before using a drying
programme.
Below is a short guide with tips and advice
on the use of detergent.
! Only use detergents suitable for machine
washing.
! Select your detergent according to the
type of fabric (cotton, delicates,
synthetics, wool, silk, etc.), the colour, the
type and level of soiling and the
programmed washing temperature.
! To use the right amount of detergent,
softener or any other additives, carefully
follow the manufacturer’s instructions
every time: correctly using the
appliance with the right dose allows
you to avoid waste and to reduce the
environmental impact.
Load tips
Useful advice for saving
Dosing the detergent
 Loading...