


TRIO 9503/1X

Downloaded from www.vandenborre.be
INSTRUCTIONS FOR USE AND INSTALLATION
ISTRUZIONI D'USO E DI INSTALLAZIONE
NOTICE D'EMPLOI ET D'INSTALLATION
MANUAL DE INSTRUCCIONES
GEBRAUCHS- UND INSTALLATIONSANWEISUNGEN
INSTRUCTIES VOOR GEBRUIK EN INSTALLATIE
GB
IT
FR
ES
DE
NL
CANDY ELETTRODOMESTICI - Via Privata Eden Fumagalli - 20047 Brugherio Milano Italy
Downloaded from www.vandenborre.be
UNPACKING THE APPLIANCE
Inside the appliance, you will find the booklet and, for gas model, a bag containing :
- if you have to change the type of gas: new jets for the gas modifications, Butane Gas G30 28-30 mbar or Propane Gas G31-37 mbar,
- for connection by soft rubber tube, an end piece for Natural Gas and an end piece for Butane or Propane gas with seal.
RECOMMENDATIONS
READ THE INSTRUCTIONS CAREFULLY TO MAKE THE MOST
OF YOUR APPLIANCE.
We recommend you keep the instructions for installation and use
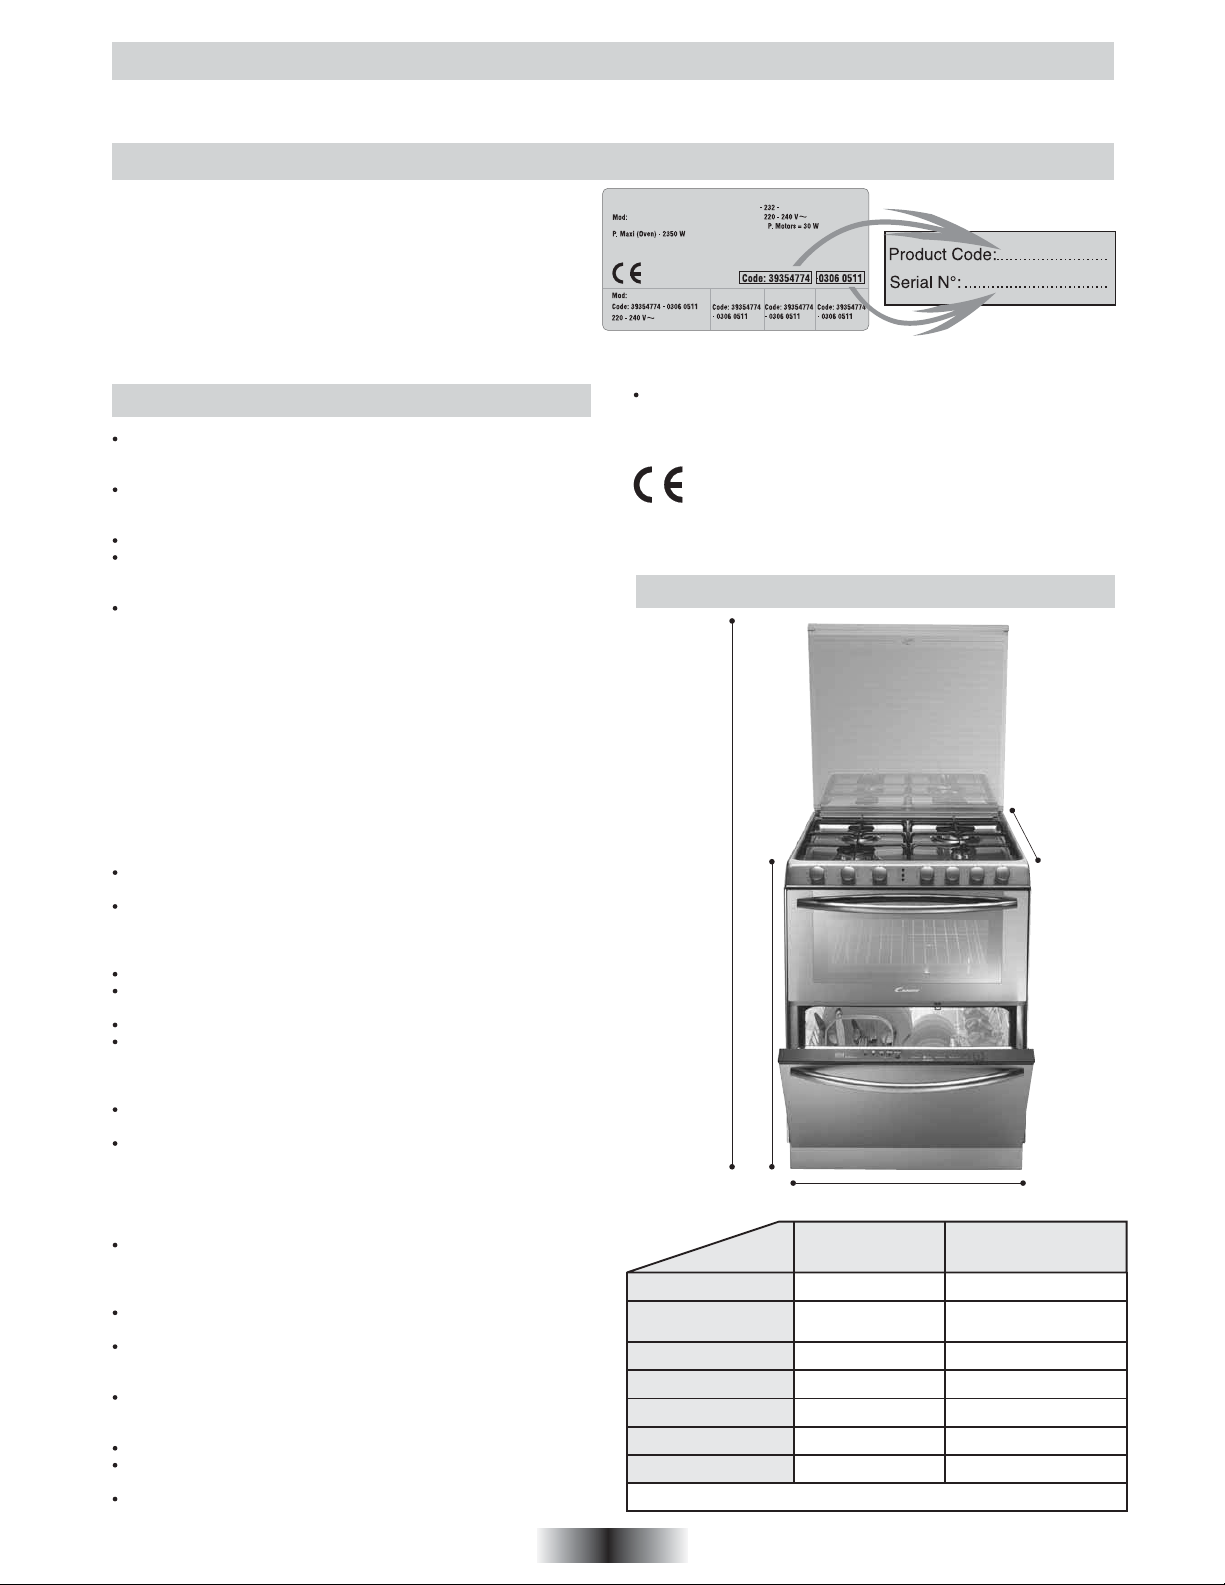
for later reference, and before installing the appliance, note its
serial number below in case you need to get help from the after
sales service.
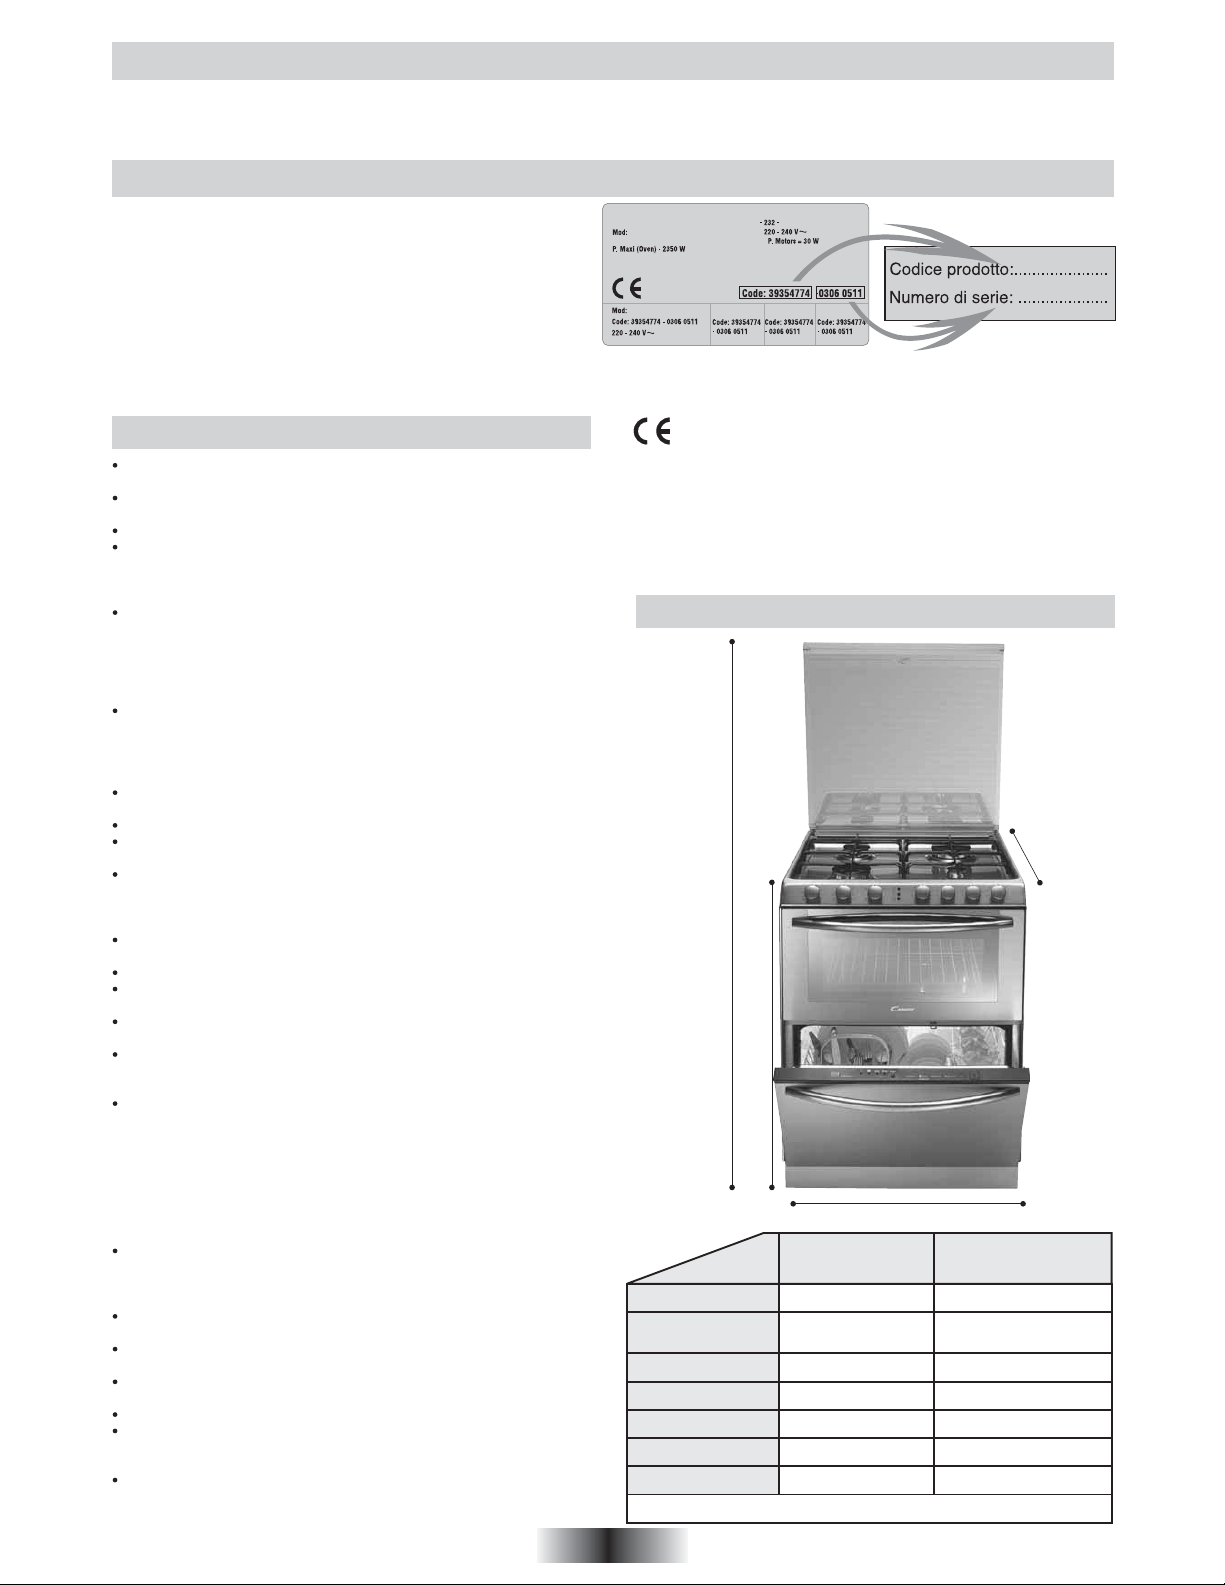
. Identification plate is located at the back of the Trio.
THE COMPANY SHALL NOT BE LIABLE IF THE INSTRUCTIONS PROVIDED IN THIS DOCUMENT ARE NOT
COMPLIED WITH.
SAFETY INSTRUCTIONS
You should entrust the gas installation of your appliance
and its electrical connection to an approved installer or
technician with similar qualifications.
The Trio consists of three elements, a hob, an oven and a
diswasher. For safety reasons under no circumstances should
any modifications be carried out to this appliance.
This appliance is designed for domestic use only.
If the Trio shows even the smallest defect, do not connect it.
Disconnect from the power supply and immediately contact an
approved service agent.
There are certain basic safety rules which are valid for any
domestic appliance. They are the following :
- Never touch the appliance when your hands or feet are wet or
damp.
- Do not use it when your feet are bare.
- Do not remove the plug from the mains supply socket by pulling
the mains cable or the machine itself.
- Do not leave the appliance exposed to the elements (rain, sun etc...).
• This appliance is not intended for use by persons (including
children) with reduced physical, sensory or mental capabilities,
or lack of experience and knowledge, unless they have been
given supervision or instruction concerning use of the appliance
by a person responsible for their safety.
• Children should be supervised to ensure that they do not play
with the appliance.
- Do not lean on the doors or not allow children to do so.
All accessible parts are hot when the Trio is in operation. Keep
young children away from the Trio when in use.
After each use we recommend that some cleaning of the Trio is
undertaken. This prevents the accumulation of dirt or grease
which gets re-cooked and burns, generating unpleasant smells
and smoke.
Never use a steam or high pressure spray to clean the appliance.
Do not store flammable products in the Trio as they can catch
fire if the appliance is inadvertlanty switched on.
Use oven gloves when placing or removing a dish from the oven.
Do not line the oven walls with aluminium foil or single-use oven
protectors available from some stores. Aluminium or any other
protection, in direct contact with the hot enamel, risks melting
the enamel or causing deterioration to the inside.
When cooking with fats or oils, always take care to watch the
cooking process as heated fats and oils can catch fire rapidly.
The hob lid (for gas model):
- While the cooker is in use, keep the lid in the upright position.
- before opening the lid, remove any items from it, to avoid any
spillage.
- before closing the lid, let all the hot parts of the cooker cool down.
- do not store heavy or metallic objects on the lid.
The dishwasher is designed for normal kitchen utensils. Objects
that have been contamined by petrol, paint, traces of steel or
iron, corrosive chemicals, acids or alkalis must not be washed
in the dishwasher.
There should not be water left in the machine or on the dishes
at the end of the wash programme.
If you wish to dispose of an old dishwasher be careful to remove
the door to eleminate the risk of children becoming trapped
inside it.
The dishwasher has been made from materials which can be
recycled so that it can be disposed of in an environmentally
friendly way.
Ensure that the dishwasher does not crush power cables.
It is not advisable to use adaptors, multiple plugs and/or extension
cables.
Any queries regarding the power supply cord should be referred
to After Sales Service or a qualified technician.
When the appliance is located on a carpet floor, attention must
be paid to ensure that there is no obstructions to the bottom vents.
Any failure to follow the above advice may have serious
consequences for the safety of the appliance.
In order to improve the quality of the products, CANDY
may carry out modifications linked to technical
improvements.
Appliance complies with European Directives 73/23/EEC and
89/336/EEC, replaced by 2006/95/EC and 2004/108/EC, and
subsequent amendments.
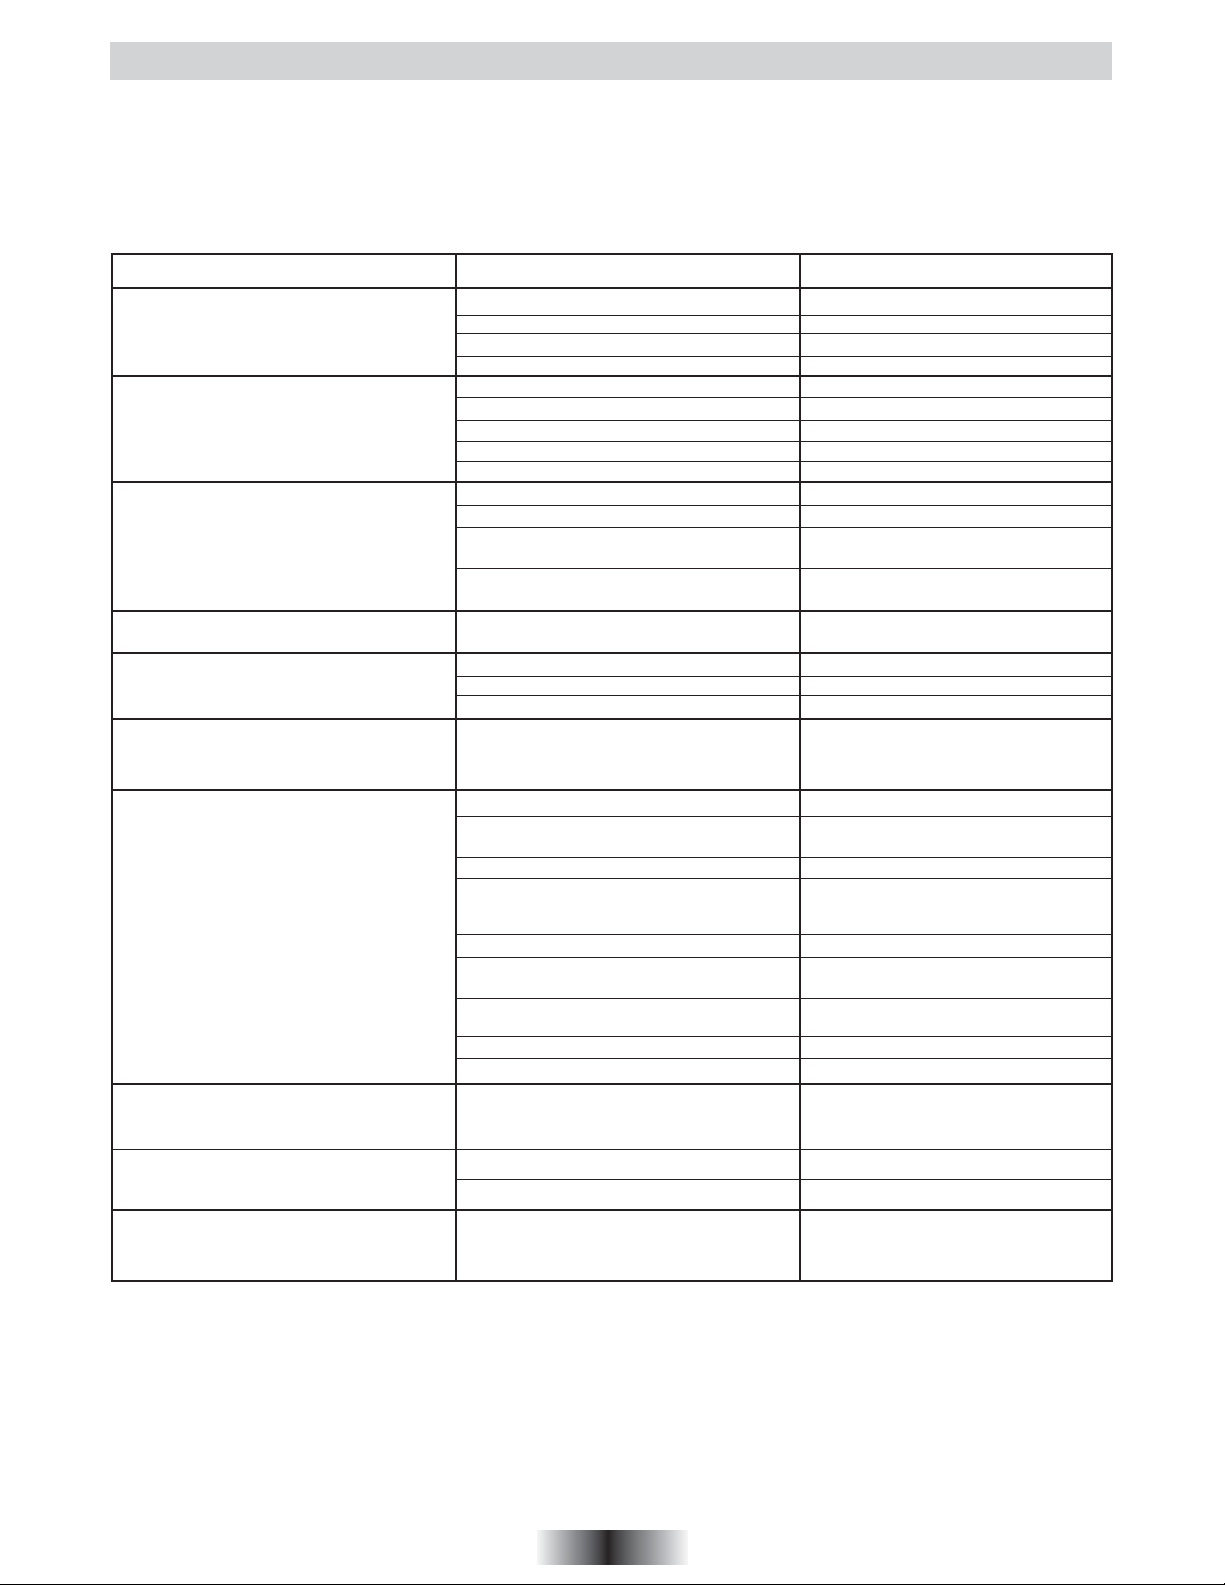
TECHNICAL DATA
60 cm
142 - 143 cm (Model with hob lid)
86,5 - 87,5 cm
59,6 cm
TRIO 9501 TRIO 9503
Power
Front Right
Rear Right
Front Left
Rear Left
Place settings EN50242
Water consumption
Water pressure mini 0,08 - max 0,8 MPa
2100 W
Auxiliary mijorose
1 kW
Ultra-rapid 3,5 kW
Rapid 2,50 kW
Semi-rapid 1,75 kW
6
8 lt
8570 W
hilight Ø 165/1200 W
hilight Ø 220/2300 W
hilight Ø 200/1800 W
hilight Ø 140/1200 W
6
8 lt
1 GB

Downloaded from www.vandenborre.be
INSTALLATION
Installing a domestic appliance can be a complicated operation which if not carried out correctly, can seriously affect
consumer safety.
It is for this reason that a professionally qualified person should undertake the task who will carry it out in accordance
with the technical regulations in force.
In the event that this advice is ignored and the installation is carried out by an unqualified person, the manufacturer declines
all responsibility for any technical failure of the product whether or not it results in damage to goods or injury to individuals.
GAS MODEL
• Before installing the appliance, the technician must :
- Check the compatibility between the Trio and the gas installation.
The Trio is factory set for use with the gas type as stated on the packaging and repeated on the rating plate affixed to the cooker.
Natural gas G 20-20 mbar / G 25-25 mbar : main gas
- If necessary, change the gas.
To adapt the gas burners cooker fit suitable jets that provide the nominal flow rate go to page 3.
• For installation the technician must :
The Trio is Class2 - Sub class 1 ; furniture adjacent to the unit must not be higher than the top of the appliance.
- The cooker has adjustable feet for perfect levelling on the floor.
- Make the gas connection to the installation according to the gas supply.
- Connect the cooker electrically in compliance with the information given on page 4.
- If the gas type has been changed, adjust the minimum flow of each gas burner on page 3.
- Connect the Trio to the water supply and the water drainage (page 5).
ANY MODIFICATION MADE TO THE GAS SETTING SHOULD BE NOTED ON THE RATING PLATE AFFIXED TO THE COOKER.
• GAS CONNECTION
This must be done in compliance with the regulations in force in the installation country. In all cases, on the gas feed pipe provide a
stopcock, a regulator or regulator release device for propane gas. Only use valves, regulators ends and flexible tubes, regulators with
the official mark of the installation country.
Gas connection according to installation :
Natural Rigid, Flexible hose with mechanical fittings (1) - Soft rubber tube (2)
Butane Rigid, Flexible hose with mechanical fittings (1) - Soft rubber tube (2)
Propane Rigid, Flexible hose with mechanical fittings (1) - Soft rubber tube (2)
1 -provided the flexible hose can be inspected for its entire length.
2 -provided the soft rubber tube can be inspected for its entire length, its length does not exceed 1.5 metres and it is fitted with suitable
clamps at the ends.
1, 2 - soft tubes and flexible hoses with mechancial fittings must be arrange to be away from any flames, and not deteriorated by the
combustion gases, hot cooker parts or by any spills of hot food.
• THREE CONNECTION OPTIONS :
• RIGID PIPE CONNECTION
Connect directly to the manifold fittings.
• CONNECTION BY FLEXIBLE HOSE WITH MECHANICAL FITTINGS
We recommend this type of connection.
Screw the hose nuts directly onto the manifold fitting on the one hand and onto the stop cock of the piping on the other hand.
• CONNECTION BY SOFT RUBBER
We do not recommend this type of connection.
To be reserved solely for old installations not enabling any other option.
Screw the compliant end piece (2)
Fit the soft tube to the end piece on
the one hand and to the regulator or
to the valve outlet on the other hand.
(2) In all cases, make sure the seal is fitted. Following the connection operations, test the leak tightness using soapy water, testing by
flame is strictly prohibited.
2 GB

Downloaded from www.vandenborre.be
INSTALLATION
CHANGING THE GAS TYPE :
the calorific capacity and pressure of the gas vary according to the type of gas.
When changing the gas, the technician should successively : change the jets, make the gas connection to the installation and set the
minimum flow of all the gas burner tap.
• CHANGING THE GAS TYPE
GAS/GAZ/Pression (mbar)
• Factory setting :
Natural gas = G20-20 mbar/G25-25 mbar
Gas setting possible according to installation
Butane gas G30-29 mbar or Propane gas
G 31-37 mbar
CAT.
II 2E+3+ BE-FR
II 2H3+ CH-ES-GB
IT-PT
II 2H3B/P CZ-DK-FI
NO-SE
II 2H3B/P HU
I 2E DE
II 2L3B/P NL
II 2ELs3B/P PL
G20/20 G20/25 G25/25 G30/29 G30/36 G31/30 G31/37
G350/13
• CHANGING THE JETS OF THE GAS BURNERS
Hob burner jets
To gain access to the jets :
- lift the hob lid,
- remove the top, grills, caps and
heads of all burners,
- use a tube spanner (7) inside the
burner,
- according to the information given
in the table, install jets suitable for
the burner type and gas type
supplied.
For reinstallation, fit the heads, burner
and top grills.
• SETTING THE IDLE FLAME
If the gas type has been altered, the stability of the flame in the minimum flow
must be checked and set by adjusting the by-pass screw.
To access the top burner by-pass screw, remove the control panel knobs.
a) Butane- propane gas :
the setting is done by screwing right in (without forcing) the by-pass screw
whose calibrated hole provides the minimum flow.
b) Natural gas :
- unscrew the by-pass screw one turn,
- replace the knob, light the burner and set to low flame,
- remove the knob again, screw the by-pass screw until a
reduced flame is obtained, staying stable when going from high to low position.
- replace the knob.
JET
Each jet is identified with a mark.
BURNER
G20 20 mbar
G20 25 mbar
G25 25 mbar
G30 29 mbar
G31 30 mbar
G31 37 mbar
AUXILIARY
Front right Rear left Front left Resr right
Jet
76
50
Never loosen
the others
SEMI-RAPID RAPID ULTRA-RAPID
kW
1,00
1,20
0,90
1,00
0,90
1,00
Warning :
screws !
Jet
101
66
Jet
kW
1,75
2,00
118
1,60
1,75
1,60
80
1,75
By-pass screw
kW
2,50
2,80
2,30
2,50
2,25
2,50
Jet
144
94
kW
3,50
4,00
3,20
3,50
3,20
3,50
3 GB
INSTALLATION
Downloaded from www.vandenborre.be
ELECTRICAL CONNECTION
"The installation must conform to the standard directives".
The manufacturer declines all responsibility for any damage that
may be caused by unsuitable or unreasonable use.
Warning :
• Always check before any electrical operation, the supply tension
shown on the electricity meter, the adjustment of the circuitbreaker, the continuity of the connection to earth to the installation
and that the fuse is suitable.
• The electrical connection to the installation should be made via
a socket with a plug with earth, or via an omni pole cut-out
switch .
If the appliance has a socket outlet, it must be installed so that
the socket outlet is accessible.
The manufacturer cannot be held responsible for any accidents
resulting from the use of an appliance which is not connected
to earth, or with a faulty earth connection continuity.
• Any queries regarding the power supply cord should be referred
to After Sales Service or a qualified technician.
Warning! This appliance must be earthed. In the absence of
adequate earthing you will notice that when touching the
metal parts of your appliance an electrical dispersion can be
felt due to the presence of a radio interference suppressor.
• TRIO 9501
A power cord is supplied with the Trio which allows it to be
connected only to a power supply of 220-230 V between
phases, or between phase and neutral. Connect to a 10/16
Amp socket.
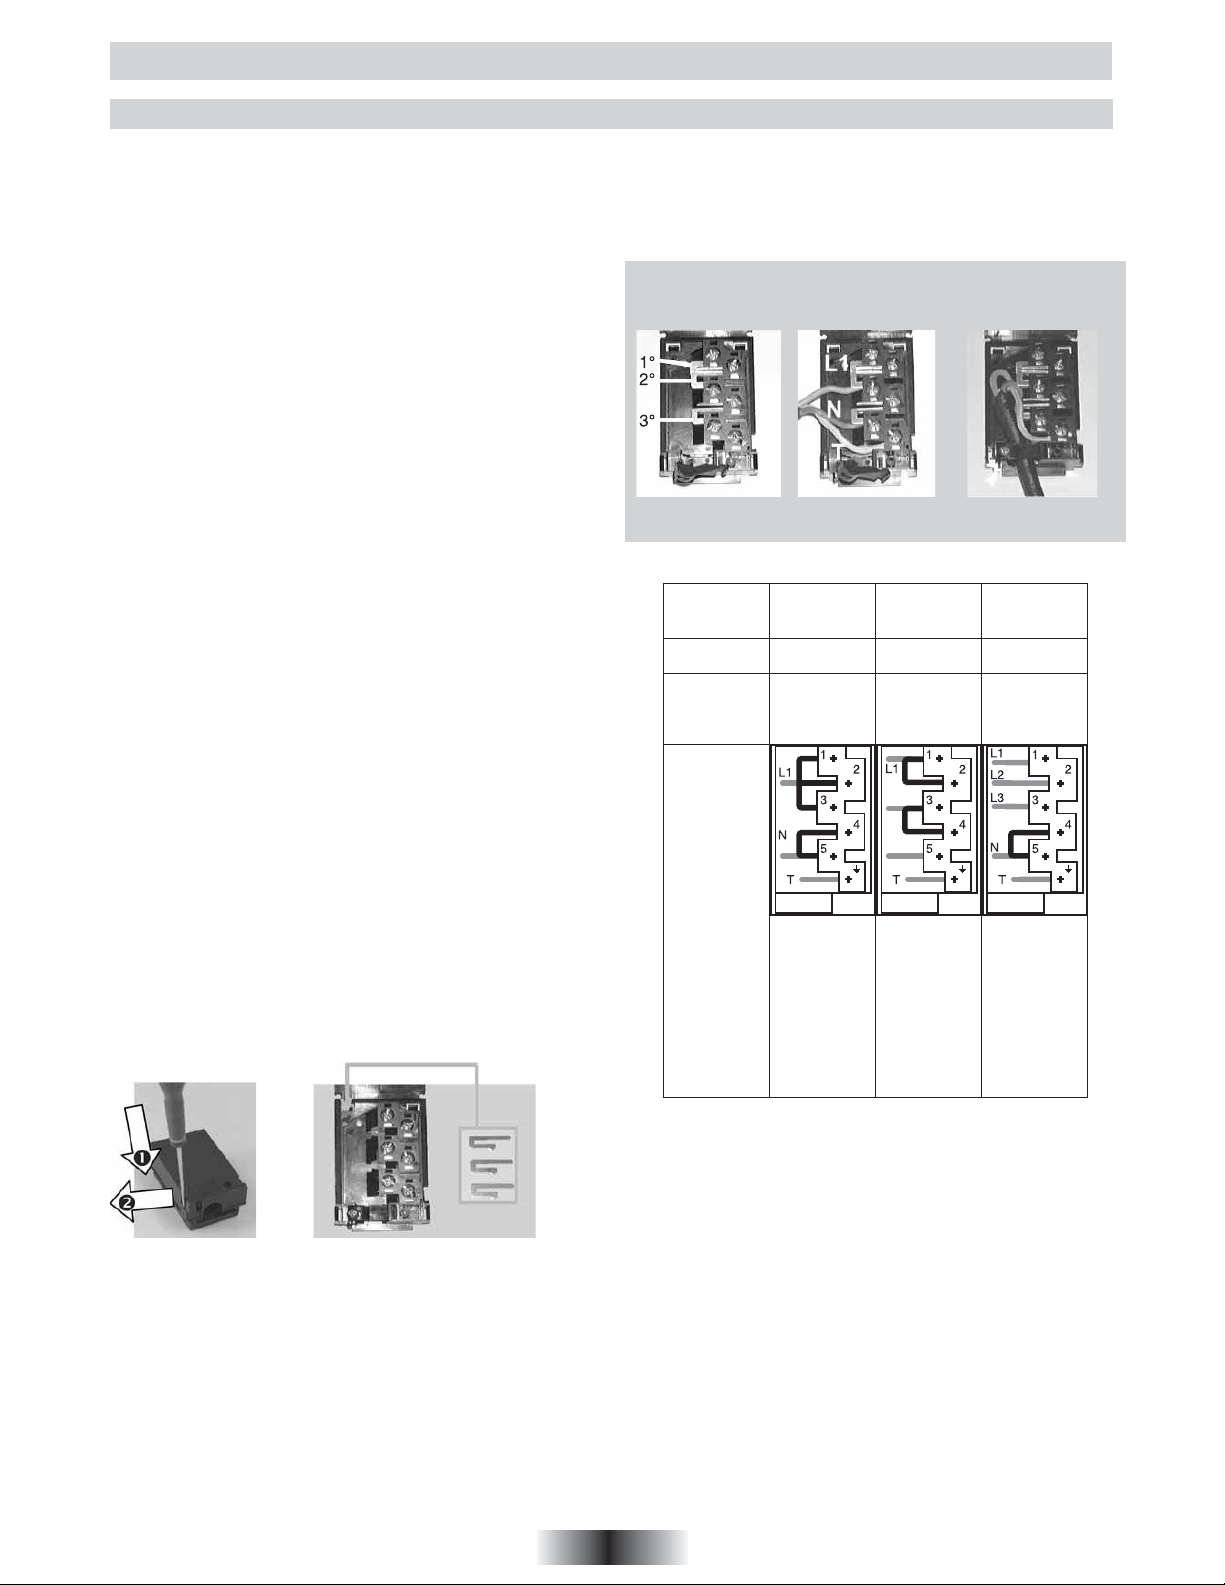
• TRIO 9503
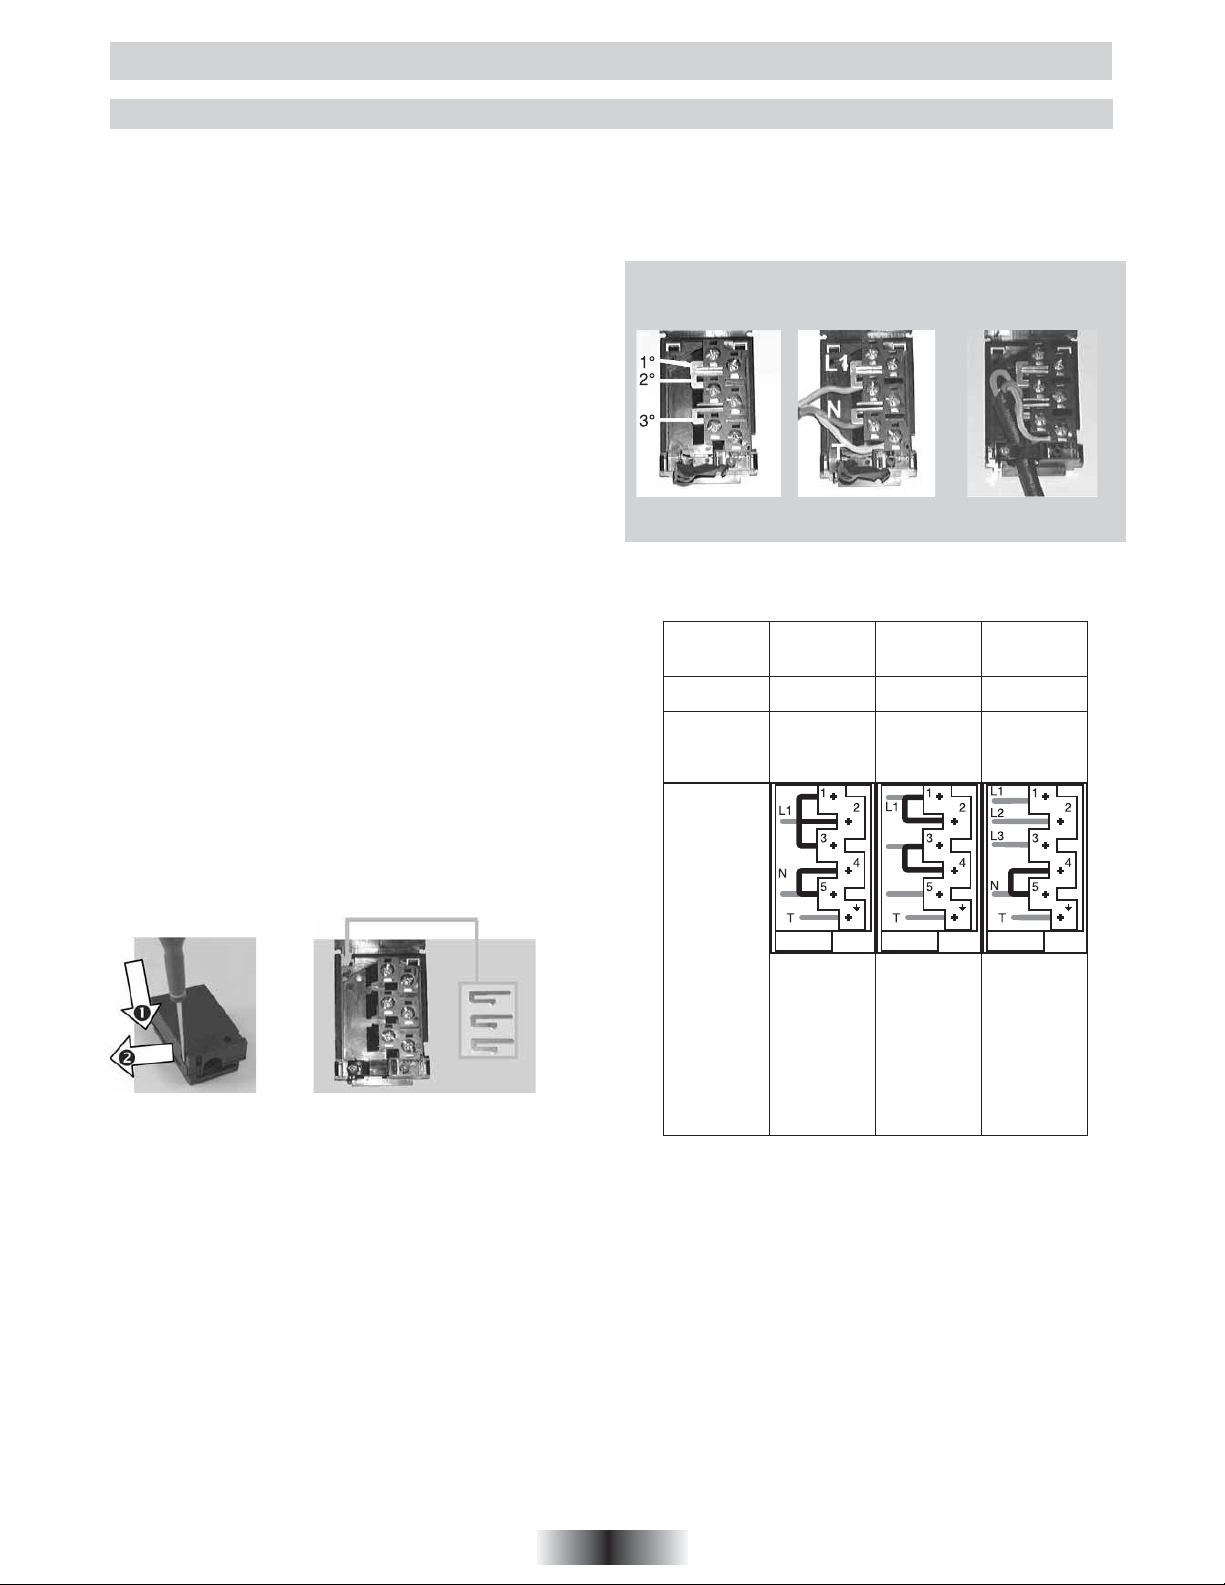
A power cord is not supplied with this Trio, but it is equipped with
a terminal block that enables you to choose the correct connection
for the particular power supply.
The terminal block is located at the back of the Trio.
To open the terminal block :
. Locate the two tabs on the sides,
. place the screwdriver blade on the front of the tab, insert it (1)
and press down (2)
. Lift the cover off.
Terminal block
To connect :
. unscrew the cable grip,
. pass the cable through the cable grip,
. strip the insulation off the end of the each wire and connect them
to the according to the numbers shown in the table as well as
the "bars shunts".
Example of connection in monophase
1- Put in the
bars shunts
Caution: incorrect tightening can cause dangerous heating
risks for the power supply cable.
When the connection operation to the appliance terminals is
finished, tighten the cable clamp and close the cover.
CABLE
TYPE-AERA
CONNEC-
TION TO
THE
TERMINAL
BLOCK
2- Put in
the wires
Monophase
220-230V~
25 AFUSE
H05VV-F
3 G 2,5 mm
through the cable grip
Three phases
220-230V3~
25 A 16 A
H05RR-F,
2
H05VV-F or,
4 G 2,5 mm
L2
L3
3- Pass the cable
Three phases
380-415V3N~
H05VV-F or,
H05RR-F
2
5 G 1,5 mm
2
x 3 bars shunts
To Shunt:
make a
bridge with a
shunt bar
2 Phase
Shunt 1-2
Shunt 2-3
5 Neutral
Shunt 4-5
T Earth
1 Phase
Shunt 1-2
3 Phase
Shunt 3-4
5 Phase
T Earth
1 Phase
2 Phase
3 Phase
5 Neutral
Shunt 4-5
T Earth
4 GB
Downloaded from www.vandenborre.be
INSTALLATION
WATER CONNECTION - WATER DRAINAGE
WATER CONNECTION :
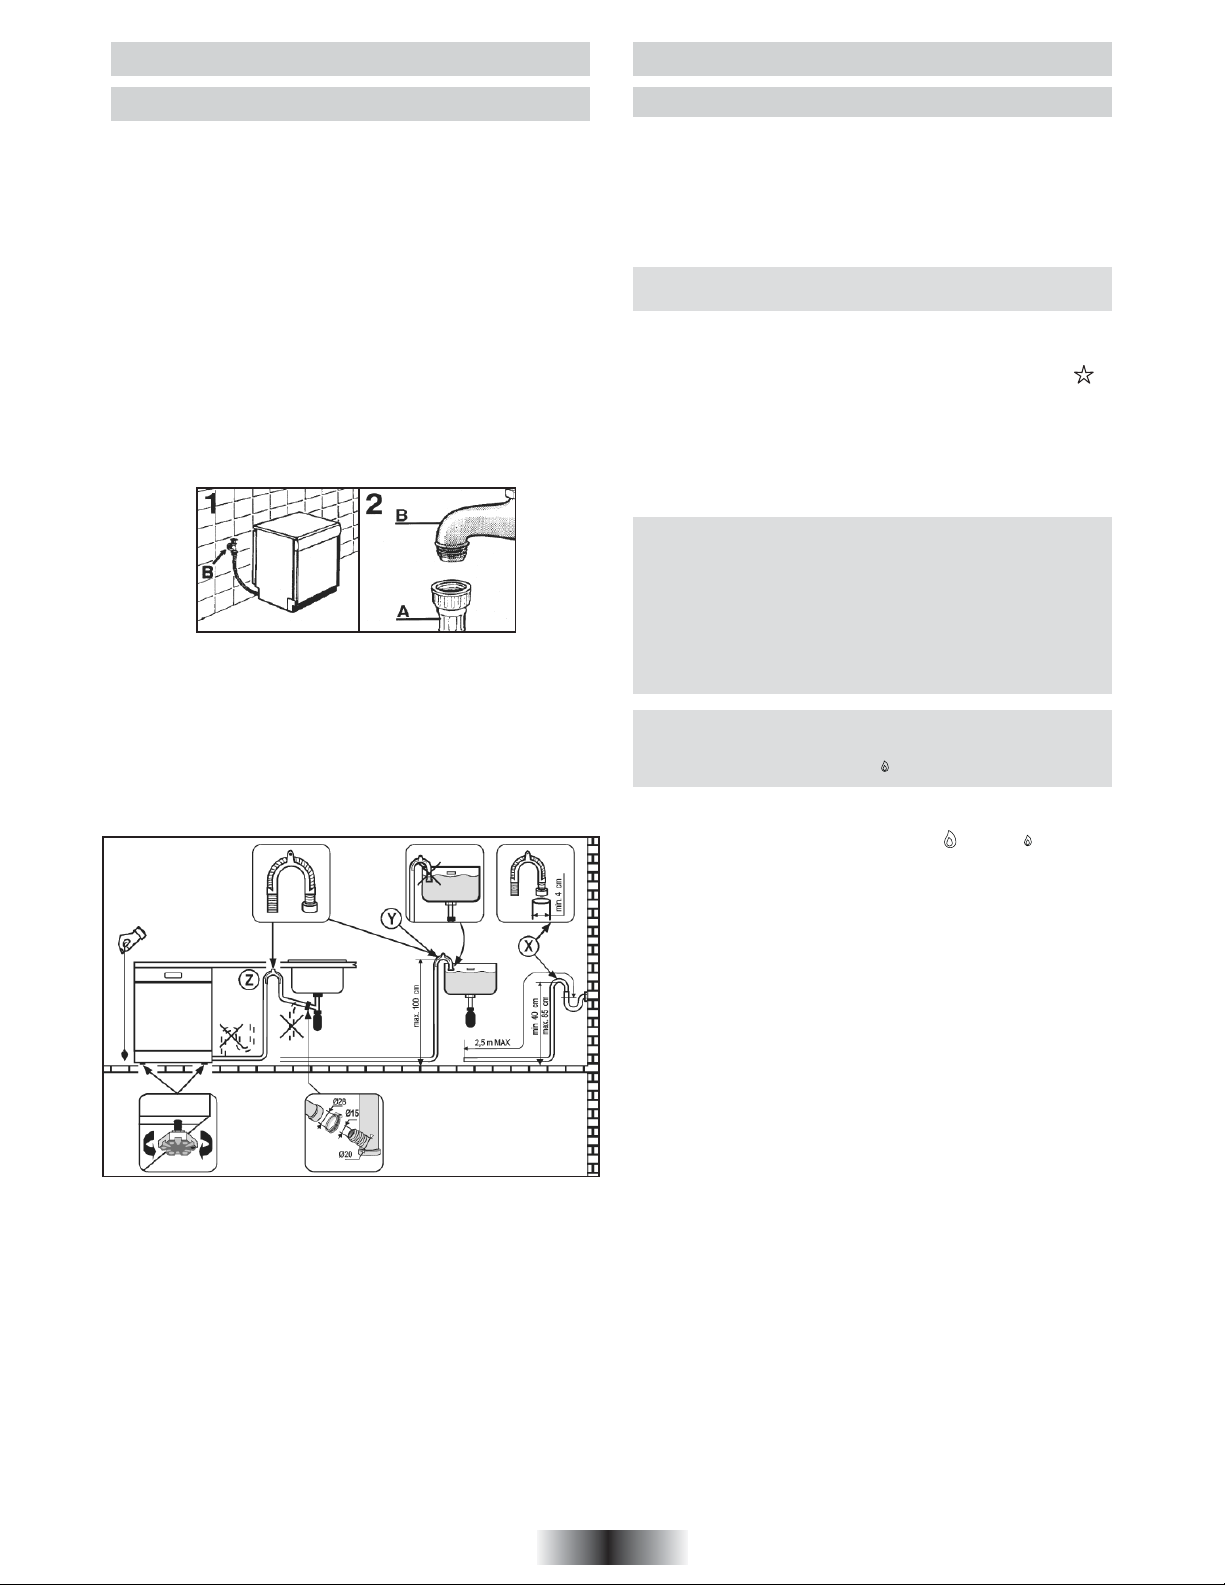
The inlet and drain hoses can be directed to left or right.
The dishwasher can be connected to either cold or hot water, as
long as it is no hotter than 60 C.
Water pressure mut be between 0,08 MPa and 0,8 MPa. If the
pressure is below the minimum consult the service department
for advice.
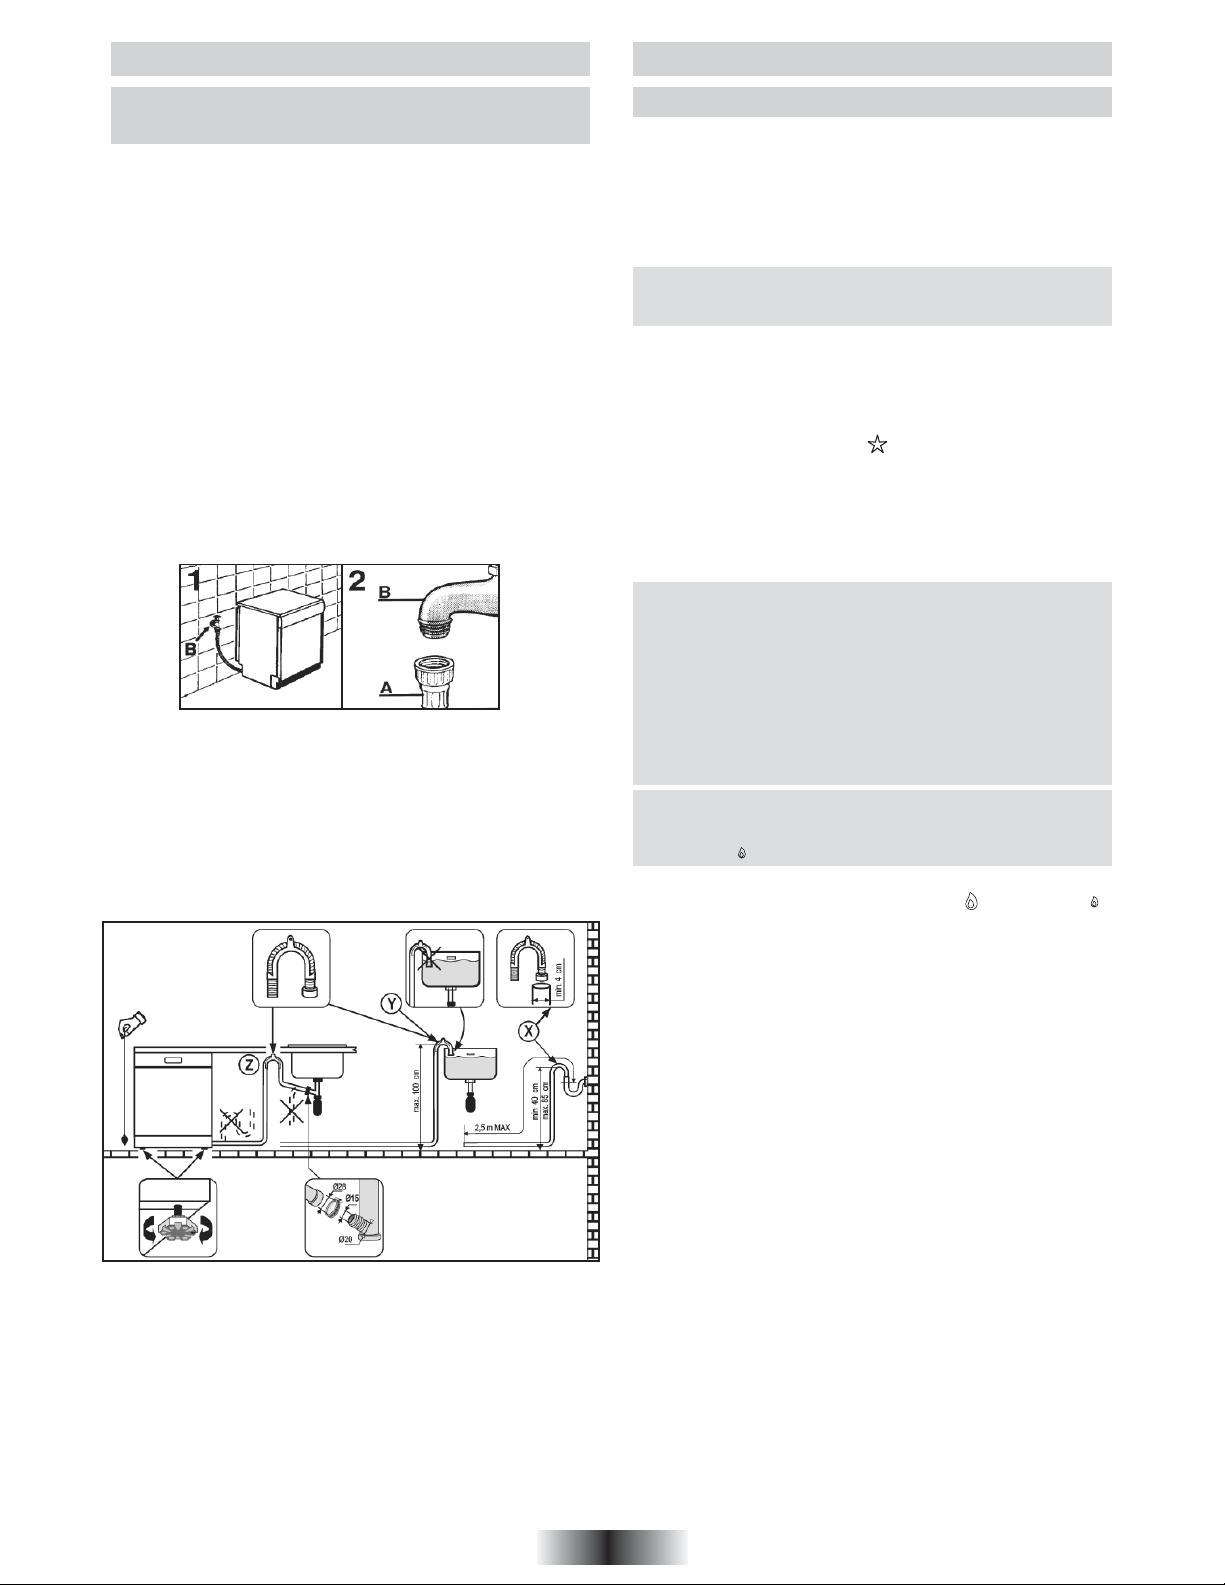
The inlet hose must be connected to a tap so that the water supply
can be cut off when the machine is not in use (fig.1). The dishwasher
inlet hose is fitted with a 3/4" threaded connector (fig.2). The inlet
hose "A" should be tightly connected to a 3/4" tap "B".
The water connection of the dishwasher must be done exclusively
with the pipe supplied. Do not use an old pipe.
If the machine is connected to new pipes or to pipes which have
not been in use for long time, run water through for a few minutes
before connecting the inlet hose. In this way no deposits of sand
or rust will clog up the water inflow filter.
WATER DRAINAGE :
Take care not to bend or kink the drain hose when connecting it
to the machine so that the water can drain freely from it (fig.4y).
The drain hose must be at least 40 cm above floor level and it
must have an internal diameter af at least 4 cm. It is advisable to
fit an anti-odour air trap (fig.4x).
If necessary, the outlet hose can be extended up to 2,6 m, provided
that it is kept at a maximum height of 85 cm above floor level. For
this, contact Customer Service.
4
The hose can be hooked over the side of the sink (it must not be
immersed in water, in order to prevent water from being siphoned
back to the machine when this is in operation) Check that there
are no kinks in the inlet and outlet hoses. To extend, if necessary
the intlet hose, contact the Customer Service.
USE
GAS BURNERS
Each burner is contolled by a tap with progressive settings allowing:
* a wider choice of settings from the maximum position to the
lowest and most precise one,
* easier flame regulation according to the pan diameter,
* no risk of cutting off the flame or switching off when the
flame is turned down quickly.
IGNITION
RECOMMENDATIONS : when the burners are not in service,
the general gas supply tap should always be turned off.
• Turn on the gas tap,
• A symbol next to each control knob indicates which burner is lit.
• Turn and press in the relevant burner control knob to the
symbol, keeping it pressed in until the flame ignites. On
models fitted with electronic ignition the flame is ignited by an
electric spark. This is operated by the button or by pressing the
knob (for models with ignition under the knob).
For models not fitted with electronic ignition, or if there is no
electric power, light the flame with a match.
NB: for models fitted with the SAFETY thermocouple, keep
the knob pressed in for a few seconds in order to activate
the safety system. If the knob is released straightaway
there is not time for the safety system to be activated and
the flame goes out. If this happens, repeat the ignition
procedure from the beginning waiting longer after the
flame is lit.
The rapid thermocouple safety device automatically cuts
off the gas supply if the flame is accidentally extinguished.
If there are particular local gas supply conditions which make
ignition difficult, you are advised to repeat the ignition procedure,
turning the knob to “minimum” ( ).
• Set the flame according to your cooking requirements. Intermediate
positions are available between the ( ) and ( ) settings
on the control knob.
• To turn the flame out, turn the control knob back to stop position.
• If the burner is accidentally extinguished, turn the knob to “0”,
wait one minute and then try to ignite again.
PANS
For a proper use of the burners, choose pans which match the
dimensions given below :
* Very fast Ø 18 cm and more
* Fast Ø from 16 to 18 cm
* Semi-fast Ø 12 cm
* Auxiliary Ø 10 cm
• Pans with curved, ridged or warped bottoms are not
recommended.
• Aluminium pans may leave marks on the enamelled
pan support. These marks can easily be removed with
a damp cloth and a light abrasive product.
SOME TIPS ....
• Avoid boiling food too intensely. Food is not cooked any more
quickly this way. In fact, it is subjected to severe agitation, which
may cause the food to lose some of its flavour.
• To save gas, make sure that the flames do not overlap the bottom
of the pan.
• Do not use the gas burner with an empty pan.
5 GB
USE
Downloaded from www.vandenborre.be
THE VITROCERAMIC ZONE
ADVICES
The use of high quality utensils is important to obtain good cooking
results :
• Always use good quality cookware with perfectly flat and thick
bases.
• Ensure that the base of the pot or pan is dry.
• Use pans whose diameter is wide enough to completely cover
the surface unit.
CHOOSING UTENSILS
The following information will help you to choose cookware which
will give good performance.
On the label, check the mark that shows if
the pan is compatible with the vitroceramic.
Stainless Steel : highly recommended. Especially good with a
sandwich clad base. The sandwich base combines the benefits
of stainless steel (appearance, durability and stability) with the
advantages of aluminium or copper (heat conduction, even heat
distribution).
Aluminium : heavy weight recommended. Good conductivity.
Aluminium residues sometimes appear as scratches on the hob,
but can be removed if cleaned immediately.
Because of its low melting point, thin aluminium should not be
used.
Cast Iron : usable, but not recommended. Poor performance.
May scratch the surface.
Copper Bottom / stoneware: heavy weight recommended. Good
performance, but copper may leave residues which can appear
as scratches. The residues can be removed, as long as the hob
is cleaned immediately. However, do not let these pots boil
dry. Overheated metal can bond to glass hobs. An overheated
copper pot will leave a residue that will permanently stain the hob.
Porcelain/enamel : Good perfomance only with a thinly smooth,
flat base.
THE ZONES
• highlight zone : it is operational within 3 seconds and is suitable
for steady, homogeneous and sustained cooking.
• Sprinter: with the sprinter facility, reduced cooking times of
up to 15% can be achieved.
USE
• Locate the sign corresponding to the cooking
zone that you need.
• It is recommended that heat setting is at its
highest until it has properly warmed up and then
lower to the desired cooking setting.
• The power-on indicator light comes on to show
that the heat zone is operating.
• Each zone is linked to a residual heat indicator located on the
hob. It lights up when the heat zone temperature reaches 60 C
and above. It will stay on, even if the unit is switched off, until
the surface has cooled down.
• To switch off a heat zone, turn the corresponding control knob
until the position "0".
• Positions : the examples below are intended as a guide. When
you become familiar with using your hob you will be able to
work out the settings that suit you best.
12
11
10
9
5
8
7
6
Positions Some Tips
1
1-2
2
3
4
5
6
3-4
5-6
7-8
9-10
11-12
Very Low
Low
Moderate
Medium
High
Very High
To keep a dish hot, melt butter and chocolate...
Slow cooking, sauces, stews, rice pudding
poached eggs...
Beans, frozen foods, fruit, boiling water...
Steamed apples, fresh vegetables, pasta,
crepes, fish...
More intense cooking, omelettes, steaks...
Steaks, chops, frying...
Recommendations :
• Never cook food directly on the glass ceramic hob. Always use
the appropriate cookware.
• Always place the pan in the centre of the unit that you are cooking on.
• Do not use the surface as a cutting board.
• Do not slide cookware across the hob.
• Do not store heavy items above the hob. If they drop onto the
hob, they may cause damage.
• Do not store heavy items above the hob. If they drop onto the
hob, they may cause damage.
• Do not use the hob as a working surface.
• Aluminium foil and plastic pans must not be placed on heating
zones.
It is strongly recommended to keep children away from the
cooking zones while they are in operation or when they are
switched off, so long as the residual heat indicator is on, in
order to prevent the risks of serious burns.
OVEN EQUIPMENT (According to the model)
It is necessary to do an initial cleaning of the equipment
before the first use of each of them. Wash them with a sponge.
Rinse and dry off.
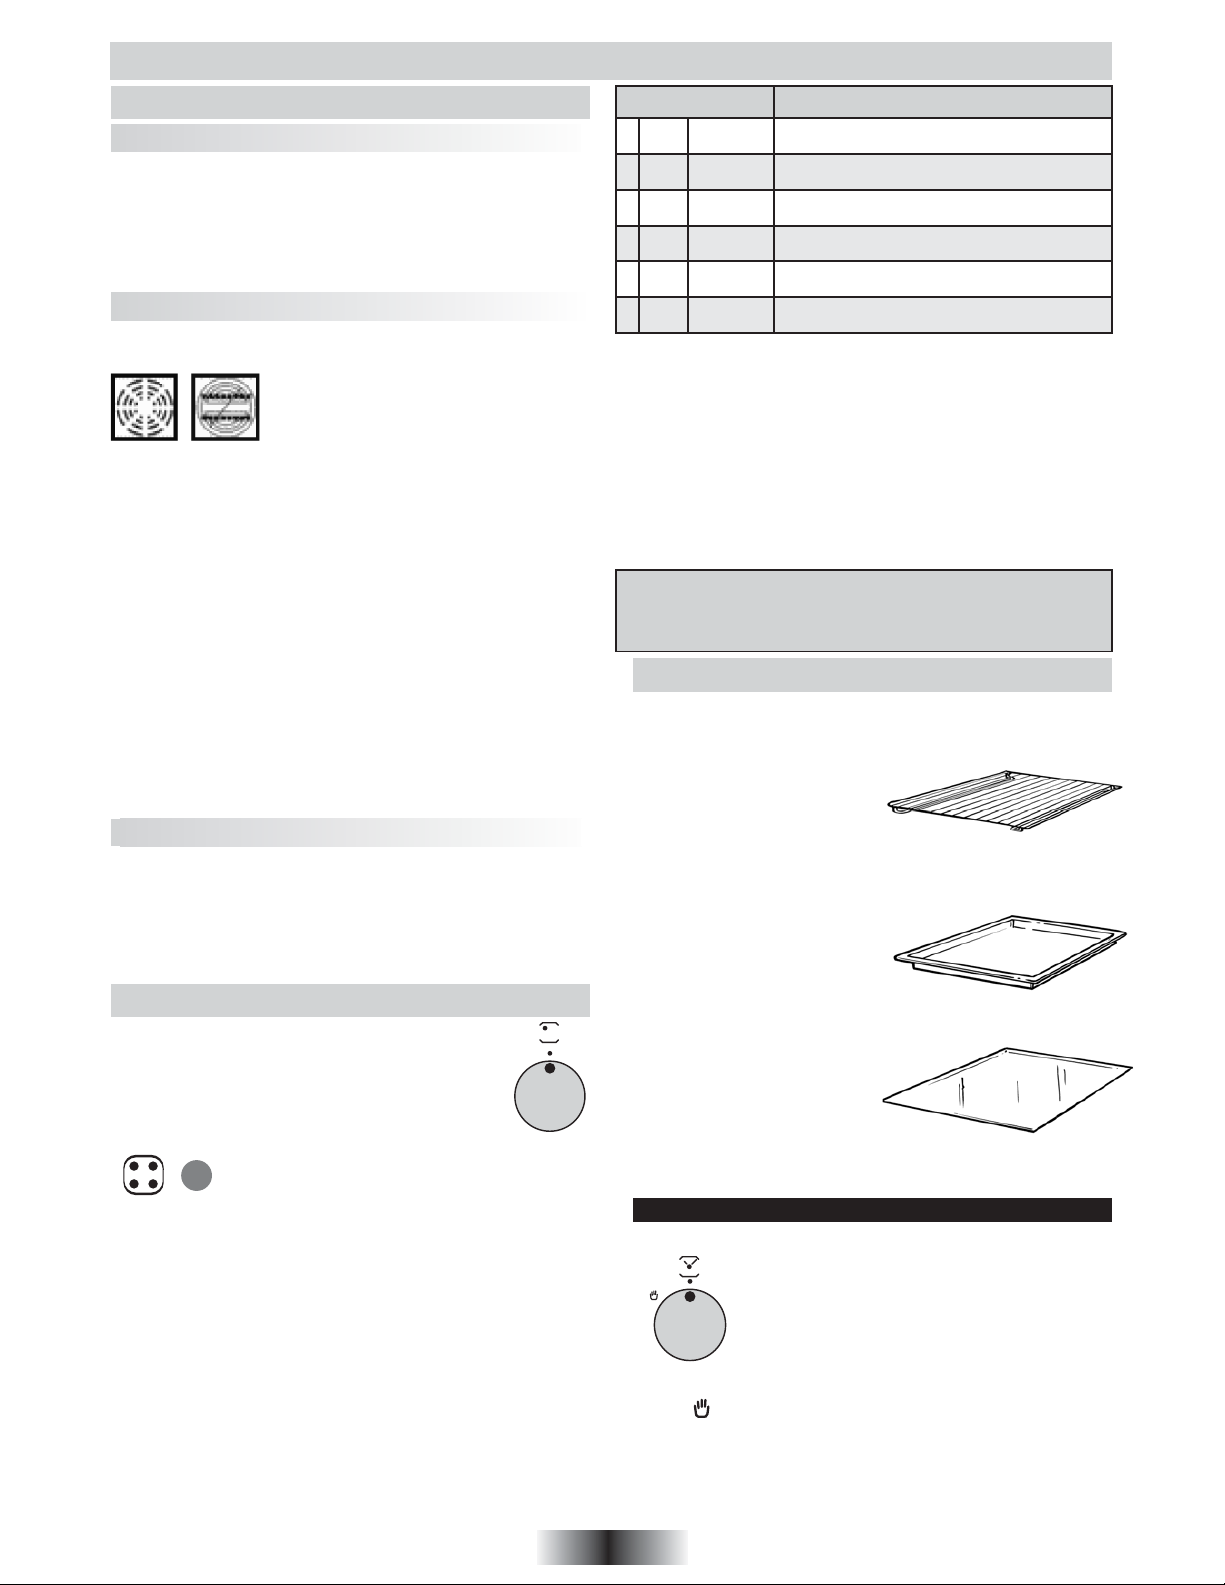
• THE SHELF : it is for holding
dishes, plates, and meat
joints when cooking with the grill.
It is fitted with rails which enables
the drip tray to be slid into.
Thanks to its special shape, the shelf always remains horizontal,
even when pulled to its fullest extent towards the front of the oven,
thus avoiding the risk of dishes sliding off or tipping over.
• THE DRIP TRAY : collects meat
and grilling juices during grilling.
It can be put on the shelf, or slid
under it. Unless used with the
grill, the drip tray must not be
stored in the oven while in use.
Never use the drip tray as a roasting tray. This would cause smoke
to be produced, fat to be splashed and the oven would become
rapidly stained.
1
• THE PASTRY TRAY must be
2
placed on the shelf. It is for
3
cooking small pastries like choux,
4
biscuits, meringues, etc...
Never place the pastry tray directly on the oven bottom.
• THE ROTISSERIE is equipped with a skewer and an handle,
two forks and a skewer support.
When the oven is in use, any unused accessories should be removed.
• THE CIRCUIT-BREAKER TIMER
120
110
100
90
80
programming. In this case, turn the control knob to the Hand
position .
Nota : to set a time, turn the control knob clockwise up to the 120
minutes mark and then turn it back to the required time.
• It takes in charge the functioning of the oven,
for between 1 and 120 minutes, with immediate
10
start and automatic stop. When the time is up,
20
the timer automatically cuts off the power supply
30
to the oven.
40
50
60
70
• However, the oven could be used without
6 GB
USE
Downloaded from www.vandenborre.be
THE OVEN USE
VERY IMPORTANT : the oven and the dishwaher cannot be
used at the same time.
To use the oven, you have to close the dishwasher.
IMPORTANT : always keep small children away from the Trio
while it is in use. If the Trio is fitted with a lid, lift it up before use.
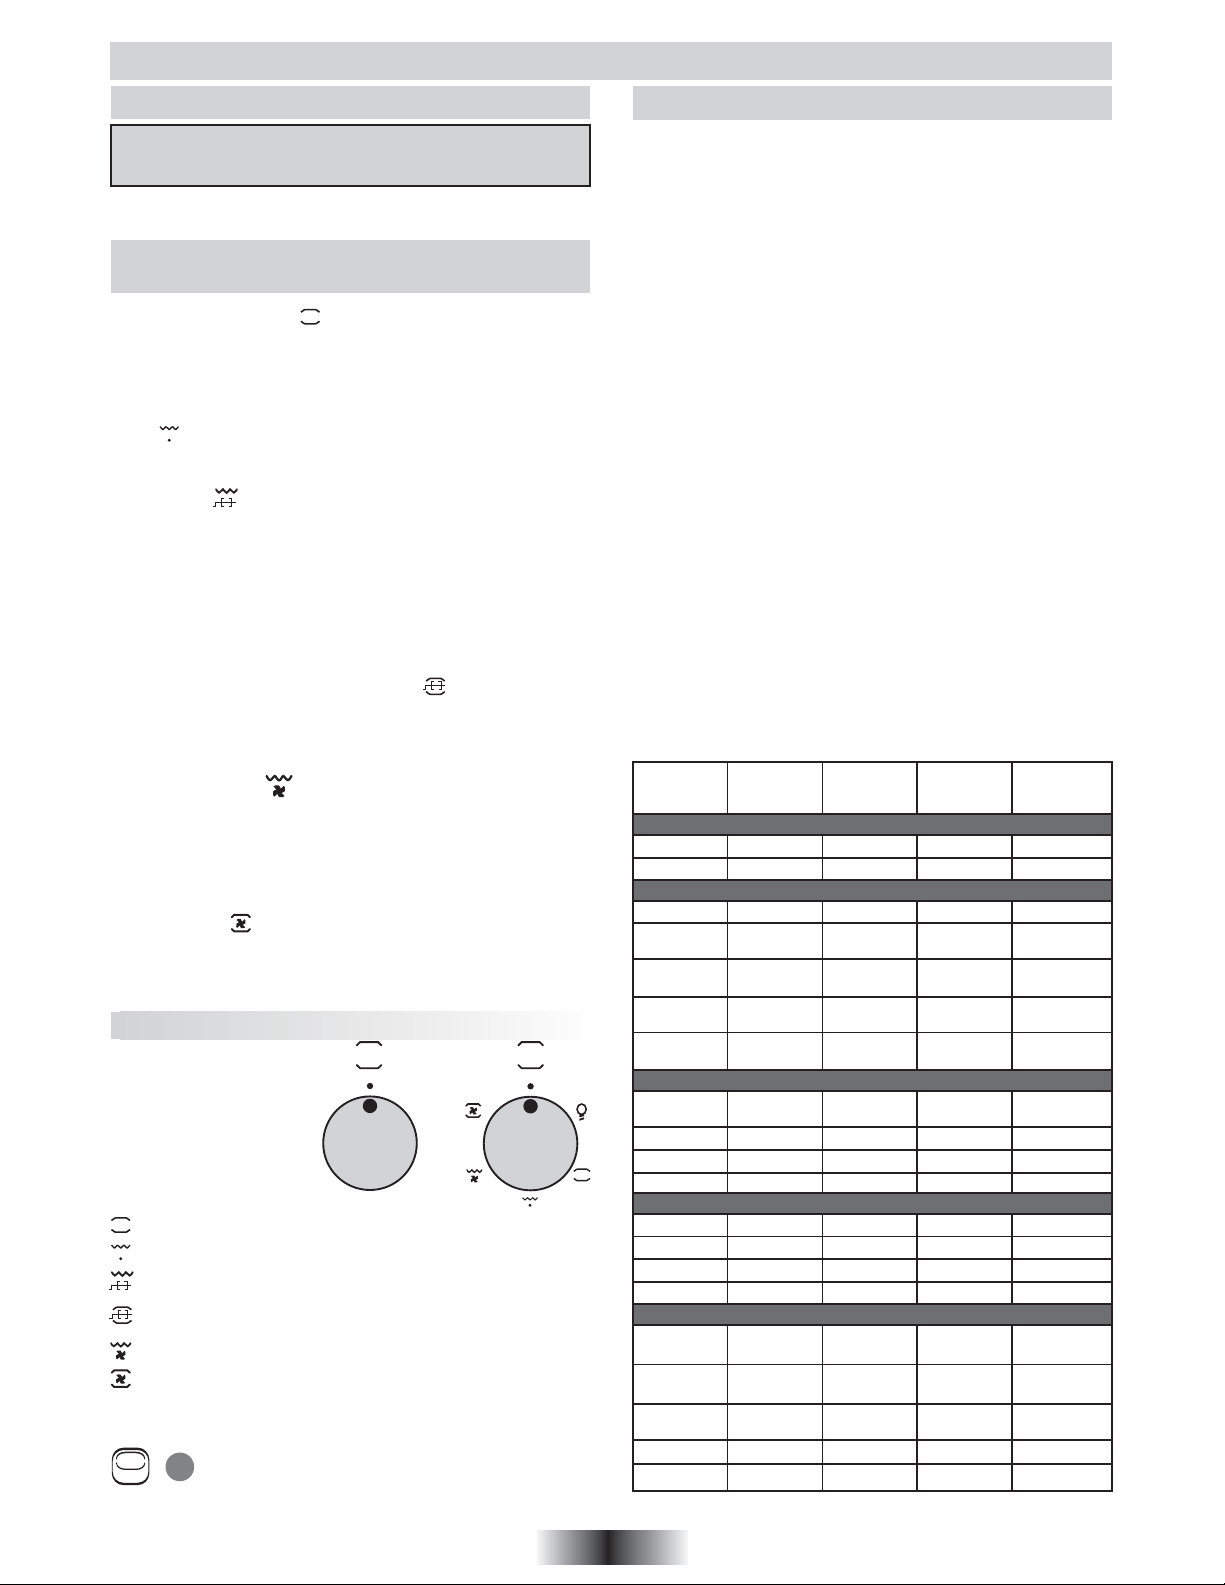
THE COOKING METHODS
(According to the model)
• Conventional cooking : the top and bottom heating elements
are used together.
This method is ideal for all traditional roasting and baking, for
sealing red meats, roast beef, leg of lamb, bread, flaky pastry.
Preheat the oven for about ten minutes and place the cooking
meat in the mid shelf position.
• Grill : using the top-heating element. Success is guaranteed
for mixed grills, kebabs and "gratin dishes". Five minutes
preheating is required to get the element hot.
• Rotisserie : using the top-heating element in conjunction
with the rotisserie providing the real flavour of a traditional roast.
. Remove all accessories from the oven.
. Place the drip tray on the oven bottom.
. Skewer the food to be cooked and centre it between the two
forks.
. Fit the skewer into the bracket and slide the bracket and skewer
on to the second level. The end of the skewer will then be facing
the slot in the drive mechanism.
. Fit the skewer into the drive mechanism.
• Rotisserie and conventional cooking : using in the same
time the rotisserie and the conventional cooking. It allows to
save time when cooking. However, you have to take care of
placing the shelf with rails up side down, with rails towards the
top and place the drip tray on it.
• Fan assisted grill : using the top heating element with the
fan circulating the air inside the oven. Ideal for cooking thick
food items, whole pieces such as roast pork, poultry etc..
Preheating is necessary for red meats but not for white meats.
Slide the drip tray under the shelf to collect juices. Make sure
that the food is not too close to the grill. Turn the food over
halfway through cooking.
• Fan cooking : both top and bottom heating elements are
used with the fan circulating the air inside the oven. We
recommend you use this method for poultry, pastries, fish and
vegetables.. heat penetrates into the food better and both the
cooking and preheating times are reduced.
USE
• Turn the control
C
knob on the
requesting cooking
method and set a
temperature :
Conventional cooking
Grill
Rotisserie
Rotisserie + Conventional
230
210
190
65
90
115
140
165
Temperature from 65 C to 230 C
Temperature 230 C
Temperature 230 C
Temperature 230 C
cooking
Fan assisted grill
Fan cooking
Temperature 230 C
Temperature from 65 C to 230 C
• Turn the control knob of the circuit-breaker timer to the Hand
position or on a programming duration.
• The regulator indicator light indicates that the
thermostat is working. It goes on and off regularly
during the cooking time.
P
COOKING ADVICES
MEAT :
It is better not to salt meats until after cooking as salt encourages
the meat to splatter fat.
This will dirty the oven and make a lot of smoke.
Joints of white meat, pork, veal, lamb and fish can be put into the
oven cold. The cooking time is longer than in a preheated oven,
but it cooks through to the centre better as the heat has more
time to penetrate the joint.
CORRECT PRE-HEATING IS THE BASIS OF SUCCESSFUL
RED MEAT COOKERY.
CAKE - PASTRIES AND BISCUITS :
Avoid using shiny moulds because they reflect heat and can spoil
your cakes. If your cakes brown too quickly, cover them with
greaseproof paper or aluminium foil.
Caution : the correct way to use foil is with the shiny side inwards.
If not the heat is reflected by the shiny surface and does not
penetrate the cake.
Avoid opening the door during the first 20 to 25 minutes of
cooking: sponge cake, soufflés, brioche, etc., will tend to fall.
You can check if cakes are done, by pricking the centre with a
knife blade or metal knitting needle. If the blade comes out nice
and dry, your cake is ready, and you can stop the cooking. If the
blade comes out moist or with bits of cake attached, continue
baking but slightly lower the thermostat so that it finished off
without burning.
The following instructions are for guidance only. You may
wish to alter them according to your own experience or your
personal taste.
Pre-heating times :
. 20 minutes between 210 and 230 C
. 15 minutes between 140 and 190 C
. 10 minutes between 65 and 115 C
QUANTITY FOOD
Oven
Temperature
in C
FISH
Trout 200 1 15 / 25
1 kg
Whiting 190 1 50
MEAT
1 - 1,5 kg Roast-beef 190 1 90
1 kg
2 kg
1 - 1,5 kg
1 - 1,5 kg
Roast
veal
Blanquette
of veal
Leg
of lamp
Leg
of mutton
150 / 160 1 120 / 150
170 / 190 1 60 / 90
150 / 160 1 60 / 75
150 / 160 1 50 / 60
POULTRY
2 kg
4 kg Goose 160 1 240 / 270
2 - 2,5 kg Duck 175 1 90 / 150
1 - 1,5 kg Chicken 170 1 60 / 80
Pigeons
150 / 160 1 45
VARIOUS
Lasagne 200 1 40
Soufflès 200 1 20
Fritter 200 1 20
Pizza 200 1 20
PASTRY
Buckwheat
cake
Tart with
fruits
Biscuit
(leaven dough)
Meringue 100 1 90
Puff pastry 200 1 20
175 1 40 / 50
180 / 190 1 20 / 30
160 1 40 / 45
Shelf
position from
the bottom
Cooking
time
in minutes
7 GB
Downloaded from www.vandenborre.be
USE THE DISHWASHER
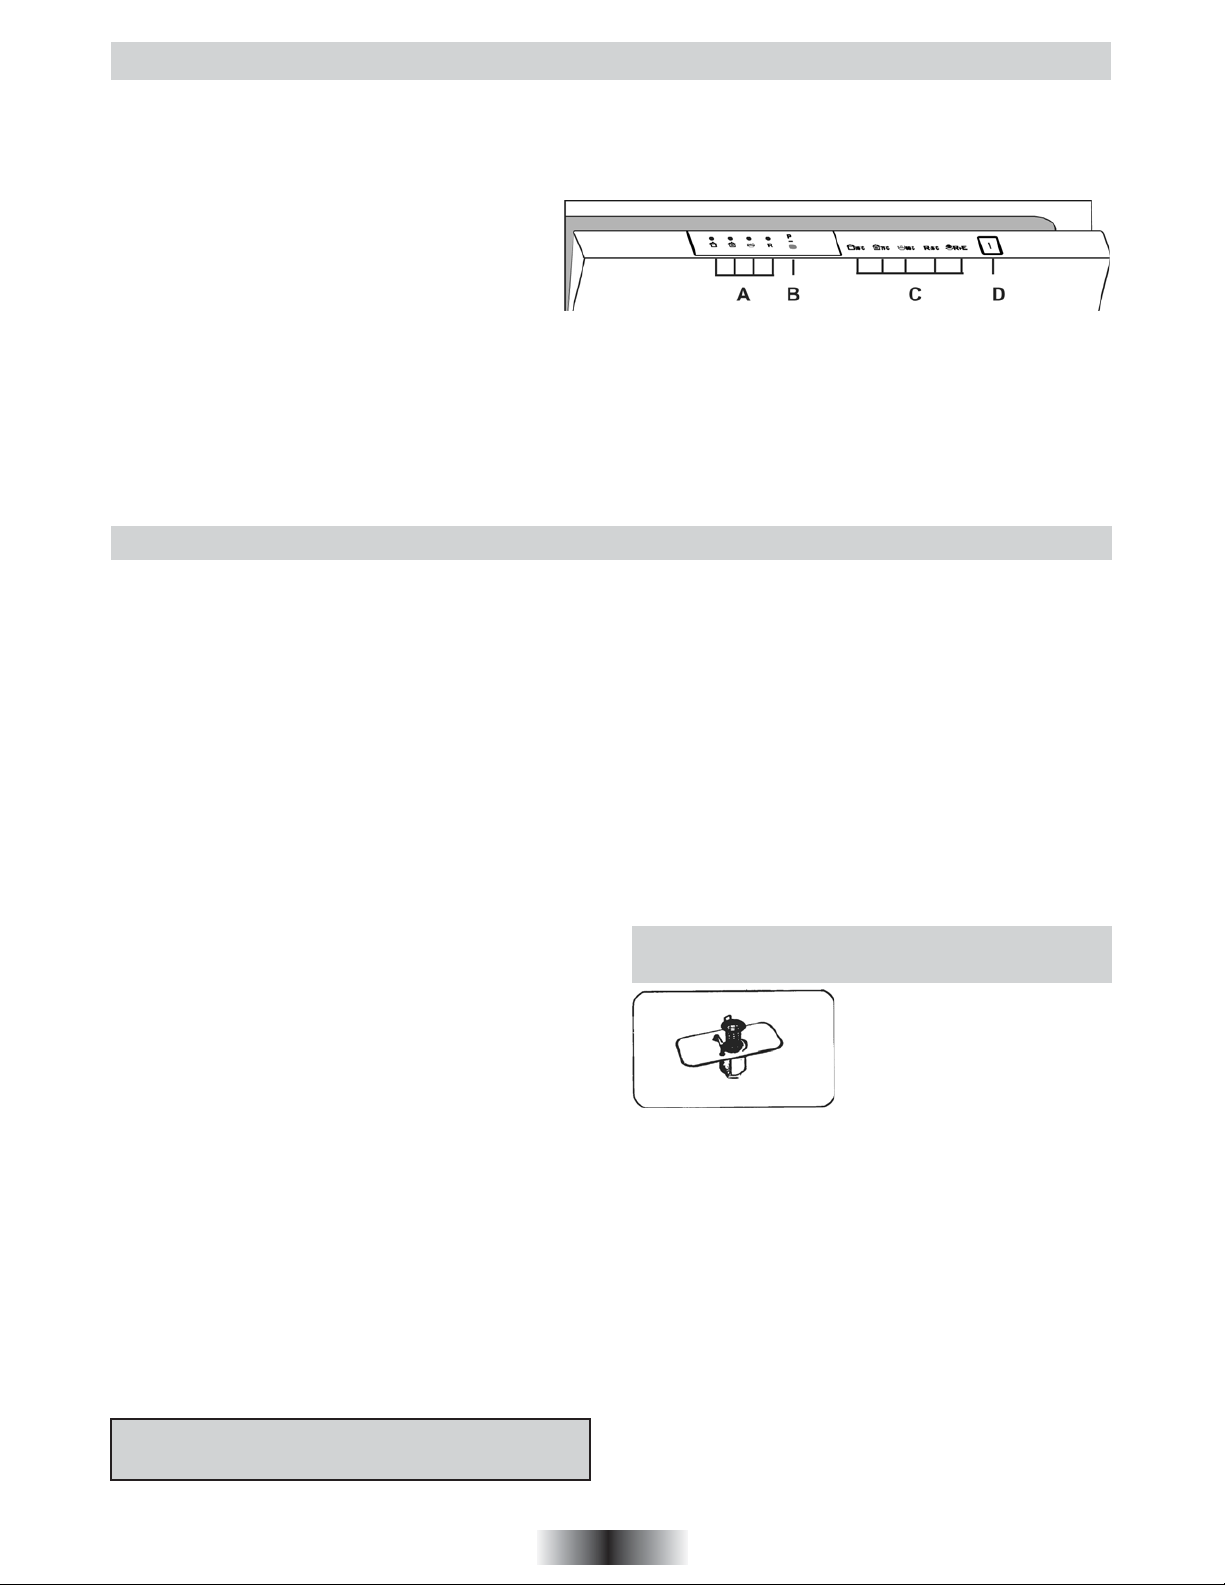
DISHWASHER CONTROLS
A Programme selection indicator lights
B Programme selection button
C Programme description
D On/off button
SELECTING THE PROGRAMMES AND SPECIAL FUNCTIONS
The dishwasher and the oven cannot be used simultaneously.
Setting a programme
Open the door and press the On/off button ; the 4 Program selection LEDs start flashing.
- Set the required programme by pressing Programme selection button, LED of the chosen programme will turn on (2 LEDs for COLD
RINSE programme).
- Close the door (after audible signal), the chosen programme will start automatically.
USE THE DISHWASHER
Opening the door
Grip the handle in the front panel and pull forward. If the machine
comes open while it is working, an electrical safety device
automatically switches everything off. For the machine to work
properly, the door should not be opened while it is in operation.
Closing the door
Place the basket in the dishwasher. Make sure that the spray arm
is free to rotate and is not obstructed by cutlery, crockery or pans.
Close the door, pressing on it to make sure it is firmly shut.
Interrupting a programme
lt is not recommended that the door be opened while a programme
is running, and especially not during the main wash phase and
final drying.
However, the appliance stops automatically when the door is
opened.
When the door is closed again, the programme continues
automatically.
If you wish to change or cancel a programme that is running, carry
out the following procedure:
. open the door, keeping the Programme selection button "P"
pressed in until all 4 indicator lights are flashing. The current
programme is cancelled. A new setting can now be made.
Before starting a new programme, you should check that there is
still detergent in the dispenser. If necessary, top up the dispenser.
WARNING: if the door is opened during the drying phase, an
intermittent audible signal is activated to advise that the cycle is
not yet completed.
End of programme
The end of the programme is indicated by an audible signal. When
the door is opened the programme selection indicator lights start
flashing. Release the On/off button.
Deactivating the audible signal
The audible function can be deactivated in the following way:
- press the On / Off button
- wait till the programme LEDs blink
- within 2 minutes, press and keep pressed for at least 30 seconds
the Programme Selection button (the programme LEDs will still
blink and an intermittent audible signal is heard).
- Once the first two LEDs on the left are illuminated without blinking
and the audible signal is off, release the button (the audible
signal function is active).
- Press again the Programme Selection button, the first two LEDs
on the left will go off and the other two LEDs will turn on (the
audible signal function is deactivated)
- An audible signal will confirm that the setting is completed
- To set again the audible signal function repeat the whole
procedure.
Fault Signals
If malfunctions or faults occur when a program is running, the
LED that corresponds to the selected cycle (2 LEDS for COLD
RINSE programme) will blink rapidly and an audible signal will be
activated.
In this case, turn the dishwasher off by pressing the On / Off
button. After checking to make sure the water inlet hose tap is
open, that the drain hose is not bent and that the siphon or filters
are not clogged, re-start the selected program. If the anomaly
persists, contact Customer Service.
Important !
To ensure the correct operation of the anti-overflow safety
device, it is recommended not to move or to tilt the dishwasher
during operation.
If it is necessary to move or to tilt the dishwaher, first make
sure the washing cycle is finished and that no water is left
in the tank.
PRELIMINARY OPERATIONS AND CLEANING
THE FILTER UNIT
The filtering system is composed
of :
- a central filter cup which traps the
largest food particles.
- a flat filter which continuously filters
the washing water.
- the micro filter, situated under the
flat filter, which traps the smallest food particles ensuring a perfect
rinse.
For best results, the filter unit should be checked and cleaned
after each wash.
To remove the filter unit, simply grip the handle and lift the whole
unit out.
The central cup is just resting on top for easy cleaning.
The dishwasher is fitted with a self cleaning micro filter, which
only requires checking about once every 15 days.
However, it is advisable to check after every wash, that the central
cup and the flat filter are not clogged.
NB : After cleaning the filters, make sure that they are correctly
reassembled, one inside the other, and that the flat filter is properly
positioned at the bottom of the dishwasher.
A poor seating of the filter unit could have an adverse effect on
the efficiency of the appliance.
Important : Never use the dishwasher without filter.
Attention - The dishwasher is equipped with an anti-overflow
safety device which in the event of anomaly intervenes by
evacuating water in excess.
8 GB
USE
Downloaded from www.vandenborre.be
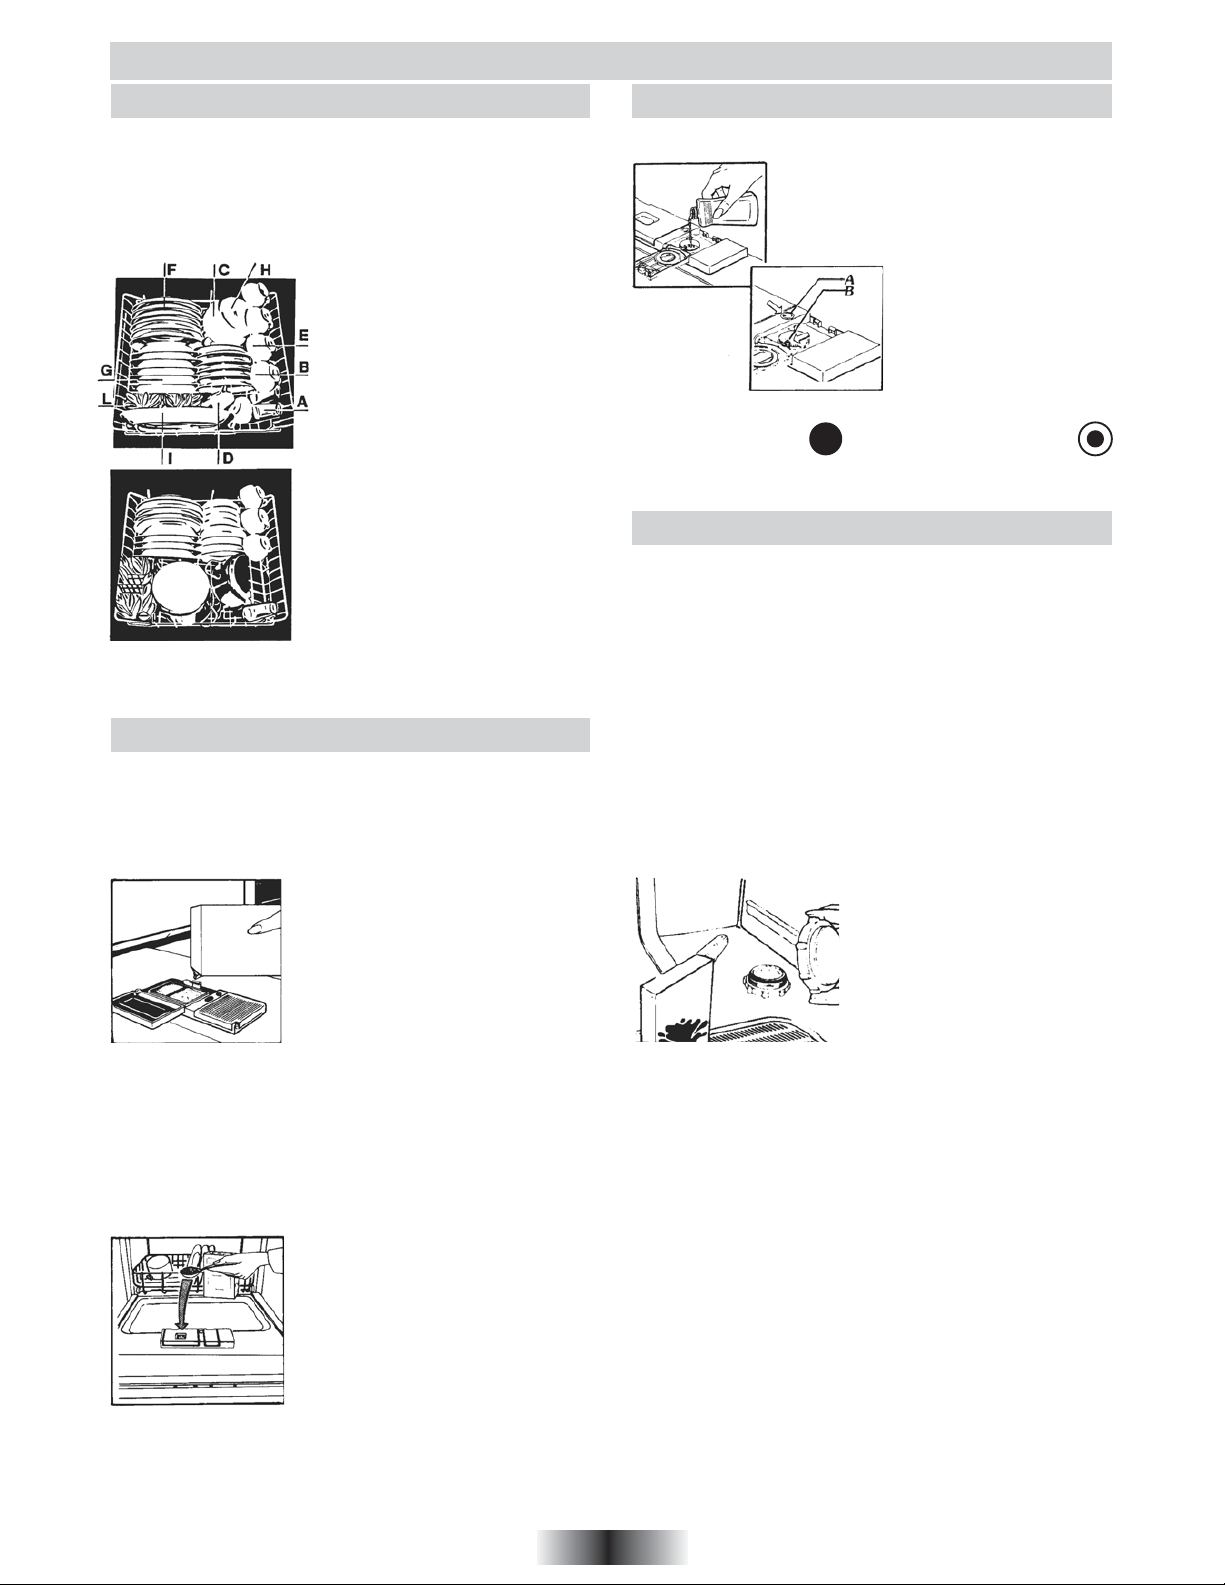
LOADING DISHES
The basket has been carefully designed to make loading easy.
For good wash performance, remove any debris from the dishes
(bones, tooth picks, the remains of meat and vegetables) to avoid
blocking the filters, water outlet and washing arm nozzle and, as
a result, reducing washing efficiency.
Warning ! to avoid any injury from cutlery with blades or sharp
points, they can be placed with the handles upwards.
LOADING A 6 PLACES SETTING
(EN 50242)
A- 6 glasses
B- 6 dessert plates
C- 6 saucers
D- Small bowl
E- 6 tea or coffee cups
F - 6 flat plates
G- 6 deep plates
H- Medium bowl
I - Serving dish
L – Cutlery
LOADING 4 PLACE SETTINGS
PLUS CASSEROLES
Casseroles, salad bowls, soup pans,
lids etc., can be loaded on the basket.
It is advisable to arrange the cutlery
in the basket provided for that
purpose. If there is any cutlery with
narrow handles, it should be placed
with handles upwards, to avoid falling
through the bottom of the basket and blocking the washing
arm. Do not put wooden handled lids in the basket, or any whose
lids are bonded with resin.
LOADING THE DETERGENT
It is essential to use a detergent that is specifically designed
for dishwashers either in powder, liquid or tablet form.
Unsuitable detergents, (like those for washing up by hand) do not
contain the proper ingredients for use in a dishwasher and impede
the efficient functioning.
Normal wash
The detergent dispenser is inside the door.
The dispenser lid should be closed before
every wash.To open it, simply press the
catch. At the end of each wash cycle the
lid is always open and ready for the next
time the dishwasher is used.
The amount of detergent to be used varies
according to how dirty the dishes are and
the type of wash. A 15g dose is normally
recommended. If the water is hard or the
dishes are exceptionally dirty, 25g of detergent should be
loaded. After pooring the detergent into the dispenser, close the
lid, since not all detergents are the same and the instructions on
the boxes of detergent can vary.
We should just like to remind users that too little detergent does
not clean the dishes properly whilst too much detergent not only
does not produce better results but is also a waste. Do not use
an excessive amout of detergent and help limit damage to the
environment at the same time.
Intensive washing
When using the intensive wash
programme, add a second dose of
detergent of about 15g (1 soup spoonful).
This extra dose should be put in the curved
part of the dispenser when it is closed
(see diagram).
FILLING THE RINSE AID DISPENSER
The rinse aid dispenser "B" is to the right of the detergent dispenser
and has a capacity of about 130 ml.
Open the lid and pour in enough liquid, which
will last several washes. Try to avoid
overloading. Close the lid.
This additive, which is automatically released
during the last rinse cycle, helps the dishes to
dry quickly and prevents spots and stains
forming. It is always advisable
to use rinse aid.
Check the rinse aid level
through the indicator eye "A"
which is situated in the centre
of the dispensers.
FULL - Dark EMPTY - Bright
REGULATING THE RINSE AID (from 1 to 6).
The regulator control "B" is below the indicator and can be turned
with the finger, the recommended position is "3".
The hardness of the water can be judged by incrustation or by
the level of dryness.
It is therefore important that the correct dosage of Rinse Aid is
regulated to give the best results.
After the wash,
. if streaks occur on the dishes, decrease the amount by one
position.
. if whitish spots occur, increase the amount by one position.
LOADING THE SALT
The dishwasher is fitted with a softener that clears the water of
lime which could cause scale and damage the dishwasher.
On the bottom of the diswasher there is a salt dispenser for
regenerating the softener.
The filter element of the softener unit should be recharged with
a salt specially produced for dishwashers. This salt can be bought
either as tablets or as granules.
To add salt, unscrew the cap of the
salt dispenser on the bottom and
refill the dispenser.
During this operation a little water
will overflow but keep adding salt
until the dispenser is fill, clean the
thread of salt residue and retighten
the cap.
If the dishwasher is not required straightaway, set the
programme Cold rinse ("Eco+Rapid, 2 Leds") so that the salt
solution which has overflowed is discharged from the washing
tank.
The salt dispenser has a capacity of between 1.5 kg for efficient
use of the appliance, it should be refilled from time to time according
to the regulation of the water softener unit.
NB: it is necessary to add water until the dispenser overflows.
Only install the dishwasher completely filling the salt dispenser.
9 GB
Downloaded from www.vandenborre.be
USE
Regulating the water softener with electronic programmer
The water softener can treat water with a hardness level of up to 60 Fh (French grading) or 33 Dh (German grading) through 5 settings.
The settings are listed in the panel below:
Level
Water hardness
fH (French)
Water hardness
dH (German)
Use of regenerating
salt
Water softener
setting
0
1
2
3
4
The softener unit is set in the factory at level 3 (indicator light N.3) as this is suitable for the majority of users.
Regulate the setting of your water softener unit according to the degree of hardness of your water as follows: Open the door, press
On / Off button, within 2 minutes press and keep pressed for at least 10 seconds the Programme Selection button; the first three LEDs
on the left turn on for 3 seconds.
The LED associated with the set water softener starts flashing; successive button pushing will set the water hardness levels (see table).
0-8
9-20
21-30
31-40
41-60
LEDs
4
5-11
12-17
18-22
23-33
PROGRAMME SELECTION BUTTON
no
yes
yes
yes
yes
Indicator light N.1
Indicator light N.1
Indicator light N. 2
Indicator light N. 3
Indicator light N. 4
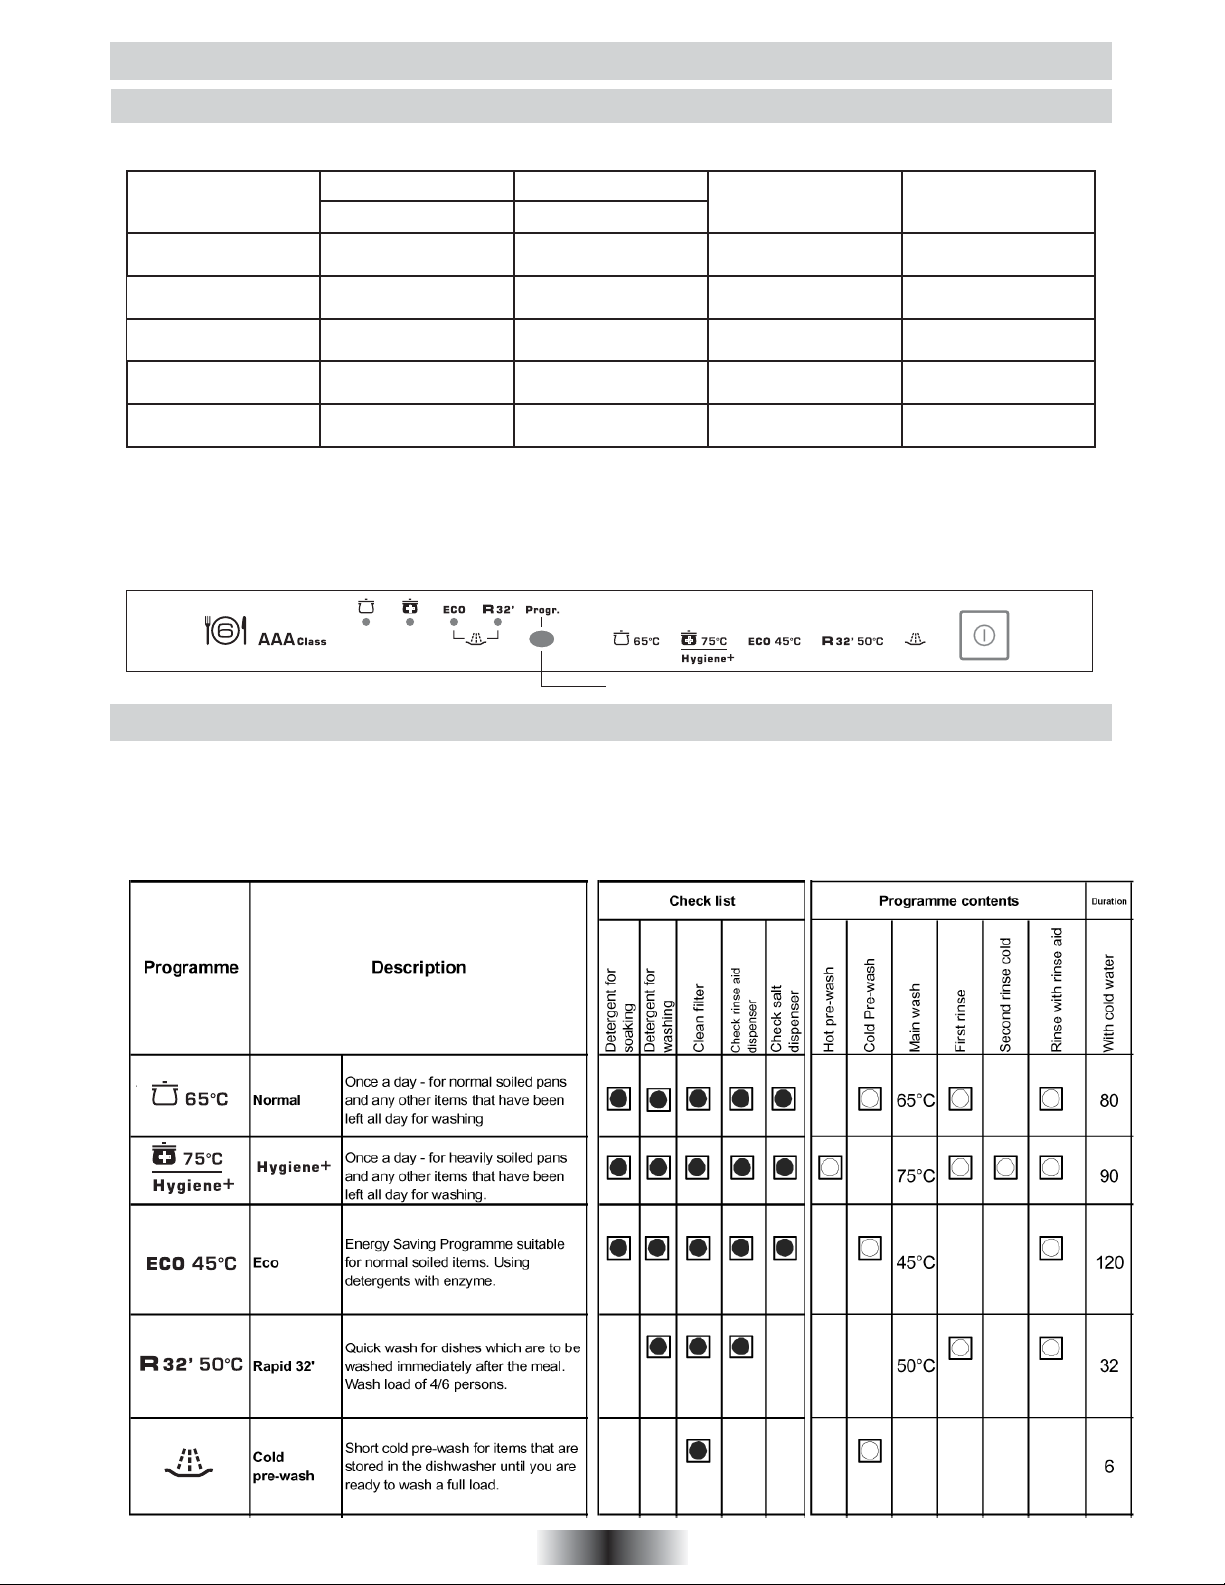
WASHING PROGRAMME
Information for the test laboratories General programme comparison
Ref. EN 50242 standards:
1) Normal load
2) Shine setting: "4"
3) Amount of detergent: 18gr. for wash
10 GB

Downloaded from www.vandenborre.be
USE
SOME PRACTICAL HINTS ....
- To carry out a wash programme with a full load of dishes load the machine correctly after each meal and do a cold pre-wash between
each load to get rid of stains and remove the larger residues of food.
HOW TO GET GOOD WASH RESULTS
1) Place the dishes face downwards.
2) Try to place the dishes in such a way that they are not touching one another. If they are loaded properly you will get better results.
3) Before placing the dishes in the dishwasher remove any remaining food (bones, shells, pieces of meat or vegetables, coffee grounds,
skin of fruit, cigarette ash etc. that could clog up the outflow and the washing arm jets.
4) After loading the dishes, check that the washing arm can rotate freely.
5) Pans and other dishes that have particularly stubborn food particles or remnants of burnt food should be left to soak in water with
dishwasher detergent.
6) To wash silver properly:
a) - rinse the silver immediately after use especially if it has been used for mayonnaise, eggs, fish etc.
b) - do not sprinkle detergent onto it.
c) - keep it seperate from other metals.
WHAT TO DO IF ...
You want to stop the dishwasher to put in more dishes whilst it is in the middle of a wash. Open the door, put in the dishes, and close
the door, the machine will start up again automatically.
WHAT NOT TO WASH ...
It should also be remembered that not all dishes are suitable for washing in a dishwasher.
We advise again using the dishwasher to wash items in thermoplastic, cutlery with wooden or plastic handles, saucepans with wooden
handles, items in aluminium, crystal, leaded glass unless otherwise stated.
Certain decorations may fade. It is therefore a good idea before loading the whole batch to wash just one of the items first so as to be
sure that others like it will not fade.
It is also a good idea not to put silver cultery with non-stainless steel handles into the dishwasher as there could be a chemical reaction
between them.
NB : when buying new crockery or cutlery always make sure that they are suitable for washing in a dishwasher.
AFTER USE - After each wash, close the tap which supplies the water to the dishwasher and press the On/Off button to the Off position.
If the dishwasher is not going to be used for some time, the following precautions are advisable:
1 - carry out a wash programme, but with no dishes, to degrease the machine,
2 - pull the plug out,
3 - turn off the water supply tap,
4 - fill the rinse aid dispenser,
5 - leave the door slightly ajar,
6 - leave the inside of the machine clean,
7 - if the machine is to be left in a place where the
temperature is below 0 C, the water left in the dispenser could freeze.
Therefore, it is advisable to raise the temperature above 0 C, approximately 24 hours before using the machine again.
CLEANING
• Before carrying out any cleaning, you must :
• Disconnect the appliance from the electrical supply and wait for all the hot parts to cool.
• Never use abrasive cleaners, wire wool or sharp objects to clean the appliance.
• THE ENAMELLED PARTS :
never use abrasives, scouring pads or sharp objects, as this will cause irreparable damage to the enamel.
Once the appliance has cooled down, simply clean with soapy water and dry with a clean cloth.
• THE VITROCERAMIC HOB
Do not use a sponge that is too wet.
It is advisable to keep away from the hob all substances which are liable to melt, such as plastic items, sugar, or sugar-based products.
Maintenance :
- place a few drops of a specialist cleaning product on the hob surface.
- rub any stubborn stains with a soft cloth or with slightly damp kitchen paper.
- wipe with a soft cloth or dry kitchen paper until the surface is clean.
Stubborn stains :
- place a few drops of a specialist cleaning product on the hob surface.
- scrape with a scraper, holding it at an angle of 30 to the hob, until the stains disappear.
- wipe with a soft cloth or dry kitchen paper until the surface is clean.
- repeat the operation if necessary.
A scraper with a razor blade will not damage the surface, as long as it is
kept at an angle of 30 . Never leave a scraper with a razor blade within
reach of children.
A few hints :
Frequent cleaning leaves a protective layer which is essential for preventing scratches and wear.
Make sure that the surface is clean before using the hob again.
To remove marks left by water, use a few drops of white vinegar or lemon juice. Then wipe with absorbent paper and a few drops of
specialist cleaning fluid.
The glass ceramic surface will withstand scraping from flat-bottomed cooking vessels, however, it is always better to lift them when
moving.
30 Maxi
11 GB

Downloaded from www.vandenborre.be
CLEANING
• OVEN LIGHTING
The bulb and its cover are made of material resistant to high temperatures: 230 V~ - E 14 base - 15 W - Temperature 300 C mini.
Replacing the bulb : disconnect the power supply from the oven before attempting to replace the lamp. Wait for the oven to cool down
before doing any operation.
To change a defective bulb, just unscrew the glass cover, unscrew the bulb, replace it with the same type, after replacing the defective
bulb, screw back the protective glass cover.
• THE ACCESSORIES
The oven shelf - the pastry tray : do not clean the oven shelf with harsh abrasives, scouring pads or sharp objects. Simply use a cloth
wrung out in hot soapy water. Rinse with clean water and then dry.
The drip tray : after grilling, remove the drip tray from the oven and pour the grease into a container. Wash and rinse the drip tray in
very hot water, using a sponge and washing powder. If still stained withs sticky food, immerse in soapy water. The drip tray can be clean
in the dishwasher. Never put the drip tray back in the oven if still dirty.
• THE OVEN DOOR GLASS
It is recommended to wipe the oven door glass with absorbent paper after each cooking cycle. If there is heavy staining, the glass can
be cleaned with a sponge cleaning agent.
• OVEN DOOR :
it is possible to clean the oven door while in position or after removal.
To remove the door, carry out the following :
. open the door fully,
. release the hooks,
. pull the door upwards, closing it partially, until it is free.
To refit it, make sure you reposition the hinges carefully ; a notch located below them lets you fit he hinges correctly.
After the door is put back on its supports, fit the hinges in their initial position.
• GAS BURNERS : for cleaning, it is recommended to remove all greasy or burnt deposits with ammonia based products or usual
cleaning products. Do not immerse the burner caps in cold water immediately after use, to avoid cracking the enamel from the thermal
shock. If the holes become clogged, brush them with soapy water and dry with a cloth.
When re-assembling the burners, make sure that the burner caps and the burners themselves are dry and after, seat them correctly.
• Caution : Be careful not to let any water get into the burners.
• LID : once the Trio has cooled down, simply clean with soapy water and dry with a clean cloth. Before lifting the lid, make sure that
anything that might spill over has been removed.
This appliance is marked according to the
European directive 2002/96/EC on Waste
Electrical and Electronic Equipment (WEEE).
By ensuring this product is disposed of correctly,
you will help prevent potential negative
consequences for the environment and human
health, which could otherwise be caused by
inappropriate waste handling of this product.
The symbol on the product indicates that this
Instead it shall be handed over to the applicable collection point
for the recycling of electrical and electronic equipment
Disposal must be carried out in accordance with local
environmental regulations for waste disposal.
For more detailed information about treatment, recovery and
recycling of this product, please contact your local city office,
your household waste disposal service or the shop where you
purchased the product.
product may not be treated as household waste.
12 GB
Downloaded from www.vandenborre.be
TROUBLESHOOTING
REMEMBER! the oven and the dishwasher cannot be used in the same time.
Should the dishwasher fail to operate, before contacting the Service Centre, make the following checks:
FAULT
1 - Machine completely dead
2 - Machine does not drawwater
3 - Machine does not discharge water
4 - Machine discharges water continuously
5 - Spray arm is not heard to rotate
6 - On electronic appliance without a
display: "Eco" indicator light and indicator
light "No 1", with audible signal
7 - Load of dishes is only
partially washed
8 - Presence of white spots on dishes
CAUSE REMEDY
Plug is not connected correctly
O/I button has not been pressed
No electricity
Door is open
See causes for No 1
Water tap is turned off
Programme selector is not at correct position
The inlet hose is bent
The inlet hose filter is blocked
Filter is dirty
Outlet hose is kinked
The outlet hose extension is not correctly connected
The outlet connection on the wall is pointing
downwards not upwards
Position of outlet hose is too low
Excessive amount of detergent
Item prevents arm from rotating
Plate and cup filter very dirty
Water inlet tap turned off
See causes for No 5
Bottom of saucepans have not been washed well
Edge of saucepans have not been washed well
Spray arm is blocked
The dishes have not been properly loaded
The end of the outlet hose is in thewater
The incorrect amount of detergent has been
measured out; the detergent is old and hard
The tap of the salt dispenser is not closed very well
The wash programme is not thorough enough
Water is too hard
Connect electric plug
Press button
Check the electricity supply
Close door
Check
Turn water tap on
Turn programme selector to correct position
Eliminate the bends in the hose
Clean the filter at the end of the hose
Clean filter
Straighten outlet hose
Follow the instructions forconnecting the outlet
hose carefully
Call a qualified technician
Lift outlet hose to at least 40 cm
above floor level
Reduce amount of detergent
Check
Clean plate and cup filter
Switch off the appliance - Turn on the
tap - Re-set the cycle
Check
Burnt on food remains must be soaked before
putting pans indishwasher
Reposition saucepans
Remove spray arm by unscrewing ring nut
clockwise and wash under running water
Do not place the dishes too closely together
The end of the outlet hose must not come into
contact with the outflow water
Increase the measure according to how dirty
the dishes are and change detergent
Tighten it fully.
Choose a more vigorous programme
Check salt and rinse aid level and regulate
amount. Should the fault persist, contact Service
Centre
9 - Noise during wash
10 - The dishes are not
completely dry
The dishes knock against one another
The revolving arm knock against the dishes
Inadequate air flow
13 GB
Load dishes better onto the basket
Load dishes better
Leave the dishwasher door ajar at
the end of wash program to allow dishes to dry
naturally
Downloaded from www.vandenborre.be
APERTURA IMBALLO DELL'APPARECCHIO
Una volta aperto l'imballo del TRIO, troverete questo libretto d'istruzioni e, per i modelli gas, un sacchettino contenente:
- nuovi iniettori per utilizzare il TRIO con un tipo di gas differente da quello predisposto all'origine. I nuovi iniettori permettono di adattare
la cucina al Gas Butano G 30 28-30 mbar o al Gas Propano G 31 37 mbar,
- una riduzione Gas Naturale e una riduzione Gas Butano o Propano con una guarnizione per l'allacciamento con tubo di gomma.
RACCOMANDAZIONI
• Leggere attentamente le istruzioni incluse in questo libretto.
Vi danno importanti indicazioni sulla sicurezza d'installazione e
d'impiego, per la manutenzione e la pulizia, ed alcuni consigli
per un ottimo utilizzo dell'apparecchio. Conservare con cura
questo documento per ogni ulteriore consultazione ed annotare
qui sotto, prima dell'installazione della cucina, il numero di serie
dell'apparecchio, nel caso di richiesta d'intervento del servizio
di assistenza.
• Targa matricola (situata sul retro del prodotto).
IL PRODUTTORE DECLINA OGNI RESPONSABILITÀ IN CASO DI MANCATO RISPETTO DELLE ISTRUZIONI RIPORTATE
NEL PRESENTE LIBRETTO.
PRESCRIZIONI DI SICUREZZA
L'installazione della cucina ed il collegamento gas ed elettrico
dovranno essere effettuati da un installatore qualificato.
Il TRIO che avete appena acquistato possiede delle caratteristiche
tecniche ben definite e perciò non potrete apportare modifiche.
Il TRIO dovrà essere destinato solo all'uso domestico.
In caso di guasto e/o di cattivo funzionamento dell'apparecchio,
spegnerlo, chiudere il rubinetto del gas e dell'acqua e non
manomettere l'elettrodomestico. Per l'eventuale riparazione
rivolgersi solamente ad un Centro di Assistenza tecnica autorizzato.
L'uso di un qualsiasi apparecchio elettrico comporta l'osservanza
di alcune regole fondamentali. In particolare :
-Non toccare l'apparecchio con mani o piedi bagnati o umidi.
-Non usare l'apparecchio a piedi nudi.
-Non tirare il cavo di alimentazione del TRIO per staccare la
spina dalla presa di corrente.
Non esporre il Trio ad agenti atmosferici (pioggia, sole, ecc.).
Questo apparecchio non è destinato ad essere usato da
•
bambini e persone incapaci o inesperte all'uso del prodotto, a
meno che non vengano sorvegliate o istruite riguardo all'uso
dell'apparecchio da una persona responsabile della loro sicurezza.
Non permettere che l'apparecchio sia usato dai bambini senza
sorveglianza.
Non appoggiatevi e non lasciate che i bambini si siedano sulle porte.
Tutte le parti accessibili si riscaldano durante il funzionamento
dell'apparecchio, perció si raccomanda di tenere lontano i bambini.
Dopo ogni utilizzo si raccomanda di pulire l'apparecchio, per
evitare l'accumulo di sporcizie e grassi. Questi infatti potrebbero
originare fumi ed odori sgradevoli ad ogni uso successivo
dell'apparecchio.
Non utilizzare mai macchine a vapore o ad alta pressione per
la pulizia dell'apparecchio.
Non mettere alcun materiale infiammabile nell'apparecchio.
Utilizzare gli appositi guanti da cucina, per introdurre ed estrarre
dal forno recipienti, cibi ed accessori.
Non rivestire mai le pareti del forno con dell'alluminio. Si rischia
di bruciare il foglio d'alluminio e di danneggiare le pareti del forno.
I grassi di cottura o l'olio caldi provocano degli schizzi. Si consiglia
di non allontanarsi dall'apparecchio, poiché queste sostanze
possono infiammarsi.
Per un buon utilizzo del coperchio del piano di cottura gas,
prendere le seguenti precauzioni:
-prima dell'uso del forno, il coperchio deve essere sempre
aperto,
-È necessario eliminare tutti i residui causati da tracimazione
dalla superficie del coperchio prima di aprirlo.
-prima di chiudere il coperchio, attendere che tutte le parti
dell'apparecchio si raffreddino.
-non lasciare appoggiati sul coperchio oggetti pesanti o metallici.
La lavastoviglie è progettata per il lavaggio di normali utensili
domestici: oggetti contaminati da benzina, vernice, avanzi di
acciaio o ferro, prodotti chimici corrosivi, acidi o alcalini non
devono essere lavati in lavastoviglie.
Non si deve bere l'acqua che rimane nella macchina o sulle
stoviglie alla fine dei programmi di lavaggio.
Questo apparecchio è fabbricato con materiali riciclabili, per
permetterne un corretto smaltimento degli stessi.
Fare attenzione che l'apparecchio non schiacci il cavo di
alimentazione.
È sconsigliabile l'uso di adattatori, prese multiple e/o prolunghe.
La sostituzione del cavo di alimentazione deve essere effettuata
dal servizio di assistenza tecnica o da personale altamente
qualificato, in conformità alle caratteristiche d'origine.
Le aperture alla base dell’apparecchio non devono essere ostruite
in nessun caso da tappeti, moquette o altre.
Il mancato rispetto di quanto sopra può compromettere la sicurezza
dell'apparecchio e dell'utilizzatore.
14 IT
Tutte le caratteristiche sono fornite a titolo indicativo. Dati i
continui miglioramenti qualitativi dei suoi prodotti, il produttore
potrà apportare delle modifiche ai suoi apparecchi legate
all'evoluzione tecnica nel rispetto delle norme vigenti.Dichiarazione
di conformità. Questa apparecchiatura, nelle parti destinate a
venire a contatto con sostanze alimentari, è conforme alla
prescrizione della dir. CEE 89/109 e al D.L. di attuazione n 108
del 25.01.92. Apparecchio conforme alle Direttive Europee
73/23/CEE e 89/336/CEE , sostituite rispettivamente da 2006/95/CE
e 2004/108/CE , e successive modifiche.
SCHEDA TECNICA
60 cm
142 - 143 cm (Modello con coperchio)
86,5 - 87,5 cm
59,6 cm
TRIO 9501 TRIO 9503
Potenza Max
Ant. DX
Post. DX
Ant. SX
Post. SX
Coperti LS EN50242
Consumo Acqua
Pressione ammessa nell'impianto idraulico mini 0,08 - max 0,8 MPa
2100 W
ausiliario mijorose
1 kW
ultra-rapido 3,5 kW
rapido 2,50 kW
semi-rapido 1,75 kW
6
8 lt
8570 W
hilight Ø 165/1200 W
hilight Ø 220/2300 W
hilight Ø 200/1800 W
hilightØ 140/1200 W
6
8 lt
Downloaded from www.vandenborre.be
INSTALLAZIONE
Il collegamento e la messa in funzione degli apparecchi elettrodomestici nel loro ambiente è un'operazione delicata che,
se non è effettuata correttamente, può causare delle conseguenze anche gravi per la sicurezza dei consumatori.
Per questo è importantissimo che l'operazione di collegamento venga svolta da un professionista che dovrà attenersi alle
norme tecniche in vigore.
Se nonostante questa raccomandazione il consumatore deciderà di realizzare personalmente il collegamento, il produttore
non sarà ritenuto responsabile per eventuali incidenti tecnici sul prodotto, e neppure per eventuali incidenti a cose o
persone.
MODELLO GAS
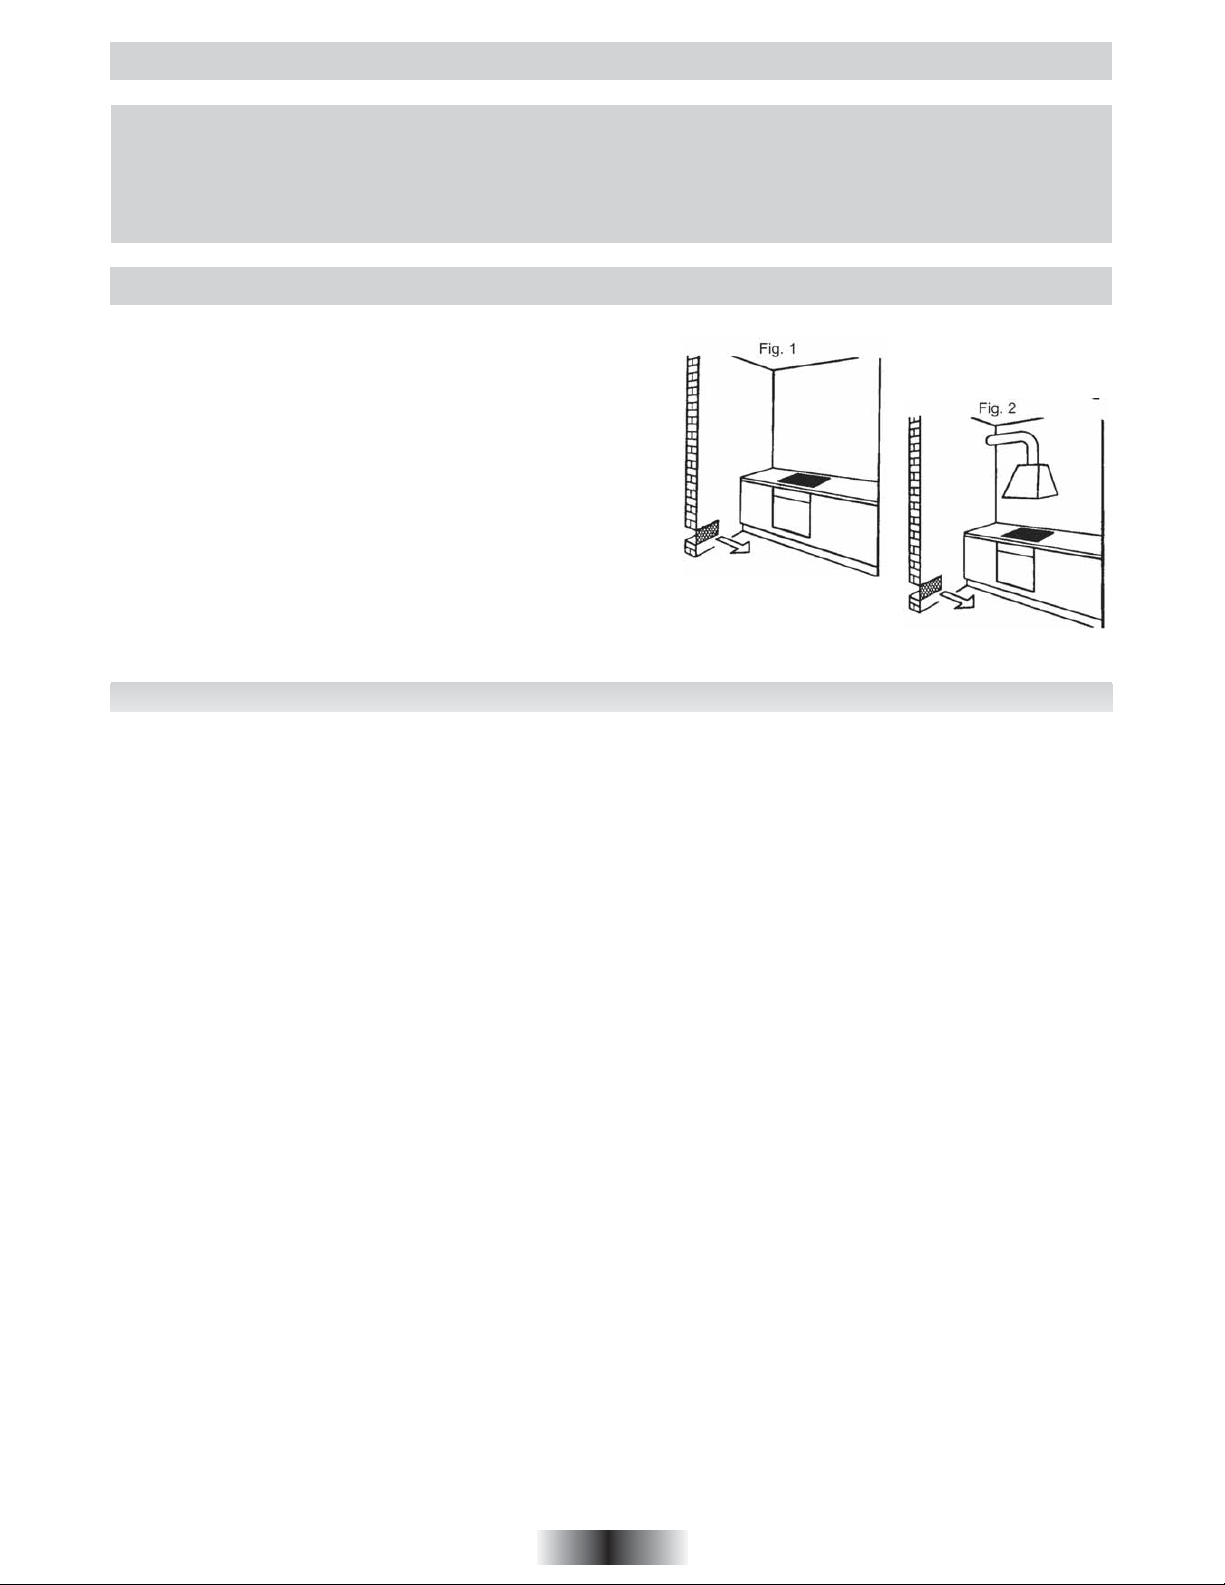
• LOCALE DI INSTALLAZIONE
L'utilizzo di un apparecchio di cottura a gas produce calore ed umidità nel
locale in cui è installato. Vogliate assicurare una buona aerazione del locale
mantenendo libere le aperture per la ventilazione naturale o instal-lando una
cappa aspirante con condotto di scarico (fig.1-2). Un utilizzo intensivo e
prolungato dell'apparecchio può necessitare un'aerazione sup-plementare
come per esempio l'apertura di una finestra o un'aerazione piú efficace
aumentando la potenza di aspirazione meccanica se essa esiste.
Nel caso in cui l'apparecchio fosse sprovvisto di termocoppia (dispositivo
di sicurezza) la presa di ventilazione di fig. 1 dovrà essere di 200 cm minimo.
In caso non sia possibile installare la cappa è necessario l'impiego di un
elettroventilatore applicato alla parete esterna o alla finestra dell'ambiente
purché esistano nel locale le aperture per l'entrata di aria.
Questo elettroventilatore deve avere una portata tale da garantire, per un
ambiente cucina un ricambio orario d'aria di 3-5 volte il suo volume.
L'installatore deve atternersi alle norme in vigore UNI-CIG 7129 e 7131.
• COLLEGAMENTO GAS
La cucina è isolata termicamente (secondo norma EN) e può essere installata vicino a pareti che non superino in altezza il piano di
lavoro. La cucina può essere accostata ad altri mobili purchè questi siano realizzati in materiale resistente ad una temperatura di 100 C.
Il collegamento dell'apparecchio alla tubazione o alla bombola del gas dovrà essere effettuato come prescritto dalle Norme UNI-CIG
7129 e 7131, solo dopo essersi accertati che è regolato per il tipo di gas con cui sarà alimentato. In caso contrario eseguire le
operazioni indicate al paragrafo "Sostituzione degli iniettori".
ALLACCIAMENTO
1) ALLACCIAMENTO CON TUBO DI GOMMA
Usare esclusivamente tubi conformi alle Norme UNI-CIG 7140.
Alle estremità dei tubi di gomma è necessario montare le apposite fasce stringitubo rispettando le Norme UNI-CIG 7141. I tubi non
devono essere sottoposti a sforzi di trazione o torsione e non devono presentare curve eccessivamente strette o strozzature.
Per il gas liquido eseguire il collegamento alla bombola usando un apposito tubo di gomma calzato sulla riduzione per GPL (contenuta
nel sacchetto accessori) avvitata sul portagomma. Il tubo di gomma deve essere accessibile per tutta la sua lunghezza. La sua lunghezza
non deve essere maggiore di 2 metri ed inoltre deve essere equipaggiato di fascette di serraggio alle estremità. Il tubo deve essere
disposto in modo da evitare il contatto con le fiamme, con i gas di combustione, con liquidi o cibi caldi ed al sicuro dalla tracimazione
di prodotti caldi.
Attenzione: l'allacciamento con il tubo in gomma non è ammesso per gli apparecchi incorporati in modo fisso tra i mobili della cucina
(installazione della cucina secondo le condizioni della classe 2 sottoclasse 1).
2) ALLACCIAMENTO CON TUBO RIGIDO
L'allacciamento all'impianto del gas deve essere effettuato in modo da non provocare sollecitazioni di alcun genere all'ap-parecchio.
Sulla rampa di alimentazione dell'apparecchio è presente un raccordo orientabile secondo le necessità.
3) ALLACCIAMENTO CON TUBO FLESSIBILE IN ACCIAIO
Noi vi consigliamo questo tipo di allacciamento. La messa in opera di questi tubi deve essere effettuata in modo che la loro lunghezza,
in condizioni di massima estensione, non sia maggiore di 2 MT. Utilizzare esclusivamente tubi conformi alla Norma UNI-CIG 9891 e
guarnizioni di tenuta conformi alla Norma UNI-CIG 9264.
Importante: ad installazione ultimata controllare la perfetta tenuta di tutti i raccordi utilizzando una soluzione saponosa e mai una
fiamma. Assicurarsi inoltre che il tubo flessibile non possa essere a contatto con una parte mobile del modulo da incasso (es. cassetto)
e che non sia situato in luoghi dove possa essere danneggiato o schiacciato.
15 IT

Downloaded from www.vandenborre.be
INSTALLAZIONE
CAMBIO GAS e REGOLAZIONI
Gli apparecchi vengono regolati presso la casa produttrice per il funzionamento al tipo di gas indicato sull'imballo e riportato sull'etichetta
applicata sull'apparecchio. In caso di funzionamento con un altro gas, é necessario adattare l'apparecchio
procedendo secondo la sequenza seguente:
• CAMBIO DI GAS E REGOLAZIONI
GAS/GAZ/Pressione (mbar)
• Regolazione d'origine:
Gas Naturale = G20-20 mbar/G25-25 mbar
Regolazione possibile secondo l'installazione,
Gas Butano G30-29 mbar o Gas Propano
G 31-37 mbar
CAT.
II 2E+3+ BE-FR
II 2H3+ CH-ES-GB
IT-PT
II 2H3B/P CZ-DK-FI
NO-SE
II 2H3B/P HU
I 2E DE
II 2L3B/P NL
II 2ELs3B/P PL
G20/20 G20/25 G25/25 G30/29 G30/36 G31/30 G31/37
G350/13
• SOSTITUZIONE DEGLI INIETTORI
Iniettore dei bruciatori del piano
Ogni iniettore è identificato da un numero di riconoscimento.
Per accedere agli iniettori, eseguire
nell'ordine le seguenti operazioni:
- sollevare il coperchio del piano,
- asportare la griglia, lo spartifiamma
ed il corpo del bruciatore,
- introdurre una chiave per tubazioni
(7) dentro il corpo del bruciatore,
- svitare l'iniettore e sostituirlo con
quello adatto al tipo di gas
disponibile.
Il rimontaggio si effettua ripetendo
l'operazione all'inverso.
INIETTORE
BRUCIATORI
G20 20 mbar
G20 25 mbar
G25 25 mbar
G30 29 mbar
G31 30 mbar
G31 37 mbar
• REGOLAZIONE DEL MINIMO DEL BRUCIATORE
Se la modifica del gas naturale è stata effettuata, la stabilità della fiamma in
posizione di minimo deve essere verificata ed aggiustata mediante la regolazione
della vite del by-pass di ciascun bruciatore del piano.
Per accedere al by-pass dei bruciatori del piano cottura estrarre le manopole.
Agire come segue:
a) gas naturale (metano):
- svitare la vite del by-pass di un giro,
- riposizionare la manopola, accendere il bruciatore, posizionare
la manopola in posizione "minimo".
- estrarre di nuovo la manopola, ed avvitare la vite del bypass sino ad avere una fiamma ridotta e stabile quando si ruota la manopola
dalla posizione "massimo" alla posizione "minimo".
b) butano- propano:
la regolazione si ottiene avvitando fino a fondo la vite del by- pass il cui
orifizio calibrato assicura il flusso ridotto.
AUSILIARIO
anteriore
destro
Iniettore
76
50
Non svitare
le altre viti!
SEMI-RAPIDO RAPIDO ULTRA-RAPIDO
kW
1,00
1,20
0,90
1,00
0,90
1,00
posteriore
sinistro
Iniettore
101
66
kW
1,75
2,00
1,60
1,75
1,60
1,75
anteriore
sinistro
Iniettore
118
80
kW
2,50
2,80
2,30
2,50
2,25
2,50
Vite del by-pass del bruciatore
posteriore
destro
Iniettore
144
94
kW
3,50
4,00
3,20
3,50
3,20
3,50
16 IT
INSTALLAZIONE
Downloaded from www.vandenborre.be
COLLEGAMENTO ELETTRICO
L'installazione di questo apparecchio deve essere effettuata in
conformità delle Norme vigenti.
La casa costruttrice, declina ogni responsabilità in caso di mancato
rispetto delle suddette norme.
Importante: la casa costruttrice resta sollevata da ogni
responsabilità per eventuali danni a persone o cose, derivanti sia
da una errata regolazione dei bruciatori a gas, che dal mancato
allacciamento della linea di terra. Quando la cucina è collegata
alle rete elettrica, alcune parti sono sotto tensione.
Il Trio é conforme ai requisiti di sicurezza previsti dalle norme.
L'efficacia della sicurezza è comunque subordinata anche alla
corretta messa a terra del vostro impianto. Pertanto, prima di
alimentare elettricamente il Trio accertarsi che la presa abbia un
corretto collegamento di messa a terra e che la portata
amperometrica del contatore elettrico risulti idonea per
l'assorbimento indicato dai dati di targa dell'apparecchio.
NOTA: non dimenticate che l'apparecchio potrebbe aver bisogno
di manutenzione da parte dell'assistenza tecnica. Ponete quindi
la presa di corrente in una posizione facilmente accessibile.
Attenzione: nel caso si desideri realizzare una connessione fissa
alla rete, si dovrà interporre, tra l'apparecchio e la rete, un dispositivo
omnipolare di interruzione. Il cavo di terra non deve essere interrotto
dall'interruttore.
FAR VERIFICARE L'EFFICIENZA DELL'IMPIANTO DI MESSA
A TERRA.
La sostituzione del cordone di alimentazione deve essere effettuata
dal servizio di assistenza tecnica o da personale altamente
qualificato, in conformità alle caratteristiche d'origine.
Prima di effettuare qualsiasi operazione di smontaggio, si deve
staccare la spina dalla presa di corrente o togliere corrente a
mezzo dell'interruttore generale dell'impianto elettrico.
• TRIO 9501
Questo apparecchio é venduto provvisto di cordone di
alimentazione e deve essere utilizzato esclusivamente con
una tensione di 220-230 V monofase.
• Allacciarlo ad una presa di corrente da 10/16 Ampere.
• TRIO 9503
Il Trio è fornito senza cavo di alimentazione. É equipaggiato
con un terminale che permette di scegliere il tipo di allacciamento
elettrico appropriato all'installazione.
Connessione ai terminali del Trio. La placca è situata dietro
della cucina:
Per aprire il coperchio :
. individuare le due linguette situate sui lati.
. piazzare la punta di un cacciavite davanti ogni linguetta,
spingere (1) e premere (2),
. sollevare il coperchio.
X 3 PONTI
Per realizzare l'allacciamento :
. svitare il passacavo,
. posizionare il cavo nel passacavo,
. privare della gomma l'estremità di ogni conduttore del cavo ed
attaccarli ai terminali, rispettando i segni e la posizione delle
derivazioni come mostrato nella tabella dei collegamenti.
Esempio di connessione monofase.
1- Messa a punto
dei ponti
Attenzione! Un serraggio non corretto può comportare il
rischio di surriscaldamento del cavo di alimentazione.
CAVO
SEZIONE
TIPO
CONNESSIONE AL
TERMINA-
LE
Shuntare:
stabilire un
ponte con
l’aiuto di una
derivazione
2- Installazione
dei fili
Monofase
220-230V~
25 AFUSIBILE
H05VV-F
3 G 2,5 mm
2 Fase
Ponticello 1-2
Ponticello 2-3
5 Neutro
Ponticello 4-5
T Terra
Trifase
220-230V3~
25 A 16 A
H05RR-F,
2
H05VV-Fo,
4 G 2,5 mm
L2
L3
1 Fase
Ponticello 1-2
3 Fase
Ponticello 3-4
5 Fase
T Terra
3- Posizionamento
del cavo nel passacavo
Trifase
380-415V3N~
H05VV-Fo,
H05RR-F
2
5 G 1,5 mm
1 Fase
2 Fase
3 Fase
5 Neutro
Ponticello 4-5
T Terra
2
ATTENZIONE!
La sicurezza è subordinata alla corretta installazione e messa a
terra dell’apparecchio.
In mancanza di un’efficace messa a terra può avvenire una leggera
dispersione di corrente sulle parti metalliche dell’apparecchio,
dovuta alla presenza del filtro anti disturbo.
17 IT
Downloaded from www.vandenborre.be
INSTALLAZIONE
ALIMENTAZIONE IDRICA
Collegamento allo scarico d’acqua
ALIMENTAZIONE IDRICA
I tubi di carico e scarico possono essere orientati indifferentemente
verso destra o verso sinistra. La lavastoviglie pùo essere
indifferentemente allacciata all' impianto dell'acqua
fredda o calda purchè non superi i 60 C.
La pressione idrica deve variare da un minimo di 0,08 Mpa a un
massimo di 0,8 Mpa. Per pressioni inferiori a 0,08 Mpa chiedere
istruzioni al Centro Assistenza.
E' necessario un rubinetto a monte del tubo di carico per isolare
la macchina dall'impianto idrico quando non è in funzione (fig. 1).
La lavastoviglie è dotata di un tubo per la presa d'acqua
terminante con ghiera filettata 3/4'' (fig. 2). Il tubo di carico "A"
deve essere avvitato ad un rubinetto dell'acqua "B" con attacco
da 3/4" assicurandosi che la ghiera sia ben stretta.
L'apparecchio deve essere collegato alla rete idrica esclusivamente
con il tubo fornito.
Non utilizzare un vecchio tubo.
Se la macchina viene collegata a tubazioni nuove o rimaste
inutilizzate per lungo tempo, è consigliabile far scorrere l'acqua
per alcuni minuti prima di allacciare il tubo di carico. In tal
modo eviterete che depositi di sabbia o di ruggine possano otturare
il filtrino di ingresso acqua.
COLLEGAMENTO ALLO SCARICO D'ACQUA :
Infilare il tubo nell'impianto di scarico, senza creare pieghe
(fig. 4). Lo scarico fisso deve avere il diametro interno di almeno
4 cm e dev'essere posto ad una altezza minima di 40 cm. Si
raccomanda di predisporre il sifone antiodore (fig. 4x). Se
necessario si puó allungare il tubo di scarico fino a 2,6 m, tenendolo
però ad una altezza massima di 85 cm dal pavimento. A tale
scopo, contattare il Centro di Assistenza Tecnica.
4
L'estremità ricurva del tubo di scarico può essere appoggiata al
bordo di un lavello (l'estremità non deve rimanere immersa
nell'acqua, per evitare il risucchio nell'apparecchio durante il
programma di lavaggio. Fig. 4y).
Nell'installare la macchina, controllare che i tubi di carico e scarico
non siano piegati.
Se necessario, per allungare il tubo di carico, contattare il Centro
di Assistenza Tecnica.
UTILIZZO
BRUCIATORI A GAS
• Ogni bruciatore ha una regolazione progressiva che permette:
* flessibilità di regolazione tra il minimo e il massimo ed una
facilità d'adattare la fiamma del bruciatore in funzione del
diametro delle pentole,
* diminuire la fiamma velocemente senza rischio che questa
si spenga.
ACCENSIONE
Raccomandazione importante : quando i bruciatori non
sono in servizio, il rubinetto di alimentazione generale
deve essere sempre chiuso
• Aprire il rubinetto di alimentazione generale.
• Un simbolo accanto a ciascuna manopola permette di identificare
il bruciatore comandato.
• Premere e girare la manopola di comando del bruciatore
interessato sino al simbolo e mantenerla premuta sino
all’accensione; sui modelli dotati di accensione elettronica la
fiamma viene accesa da una scintilla elettrica; innescata
dal l’apposito tasto o dalla pressione della manopola (per i modelli
con accensione sottomanopola).
Per i modelli non dotati di accensione elettronica, o in caso di
assenza di corrente elettrica, accendere la fiamma con un
fiammifero.
ATTENZIONE: per i modelli dotati di termocoppia di
SICUREZZA continuare a mantenere premuta a fondo la
manopola per alcuni secondi per attivare il sistema di
sicurezza, se la manopola viene rilasciata subito il sistema
di sicurezza non ha il tempo di attivarsi e la fiamma si
spegne. In questo caso ripetere l’operazione di accensione
dall’inizio attendendo più tempo dopo l’accensione della
fiamma .
La termocoppia di sicurezza rapida è un dispositivo che
blocca automaticamente l'afflusso del gas in caso di
spegnimento accidentale della fiamma.
Qualora particolari condizioni di fornitura del gas erogato
localmente rendessero difficoltosa l’accensione si consiglia di
ripetere l’operazione di accensione posizionando la manopola
sul minimo ( ).
• Regolare la fiamma in funzione del recipiente e della vostra
cottura. Tra le due posizioni massimo ( ) e minimo ( )
é possibile ottenere tutte le regolazioni intermedie.
• Per arrestare la fiamma del bruciatore, posizionare la manopola
su ‘0’.
• Nel caso di una estinzione accidentale delle fiamme del bruciatore,
portare la manopola su ‘0’, attendere 1 minuto e procedere a
una nuova accensione.
PENTOLE
Per un miglior utilizzo dei bruciatori, si raccomanda di usare
pentole di diametro non inferiore ai seguenti:
* Ultra-rapido Ø 18 cm in sù
* Rapido Ø da16 a18 cm
* Semi-rapido Ø 12 cm
* Ausiliario Ø 10 cm
• Evitare le pentole con fondo curvo o deformato.
• Le pentole di alluminio possono lasciare dei residui sulla griglia
smaltata, tale deposito è facilmente asportabile utilizzando un
panno umidi e prodotti leggermente abrasivi.
CONSIGLI
• Evitare le bolliture troppo intense. La bollitura violenta peggiora
il gusto degli alimenti.
• La fiamma non deve superare i bordi del recipiente, in tale
condizione si ottiene solo spreco di gas.
• Non fare funzionare un fuoco a gas con un recipiente vuoto.
18 IT
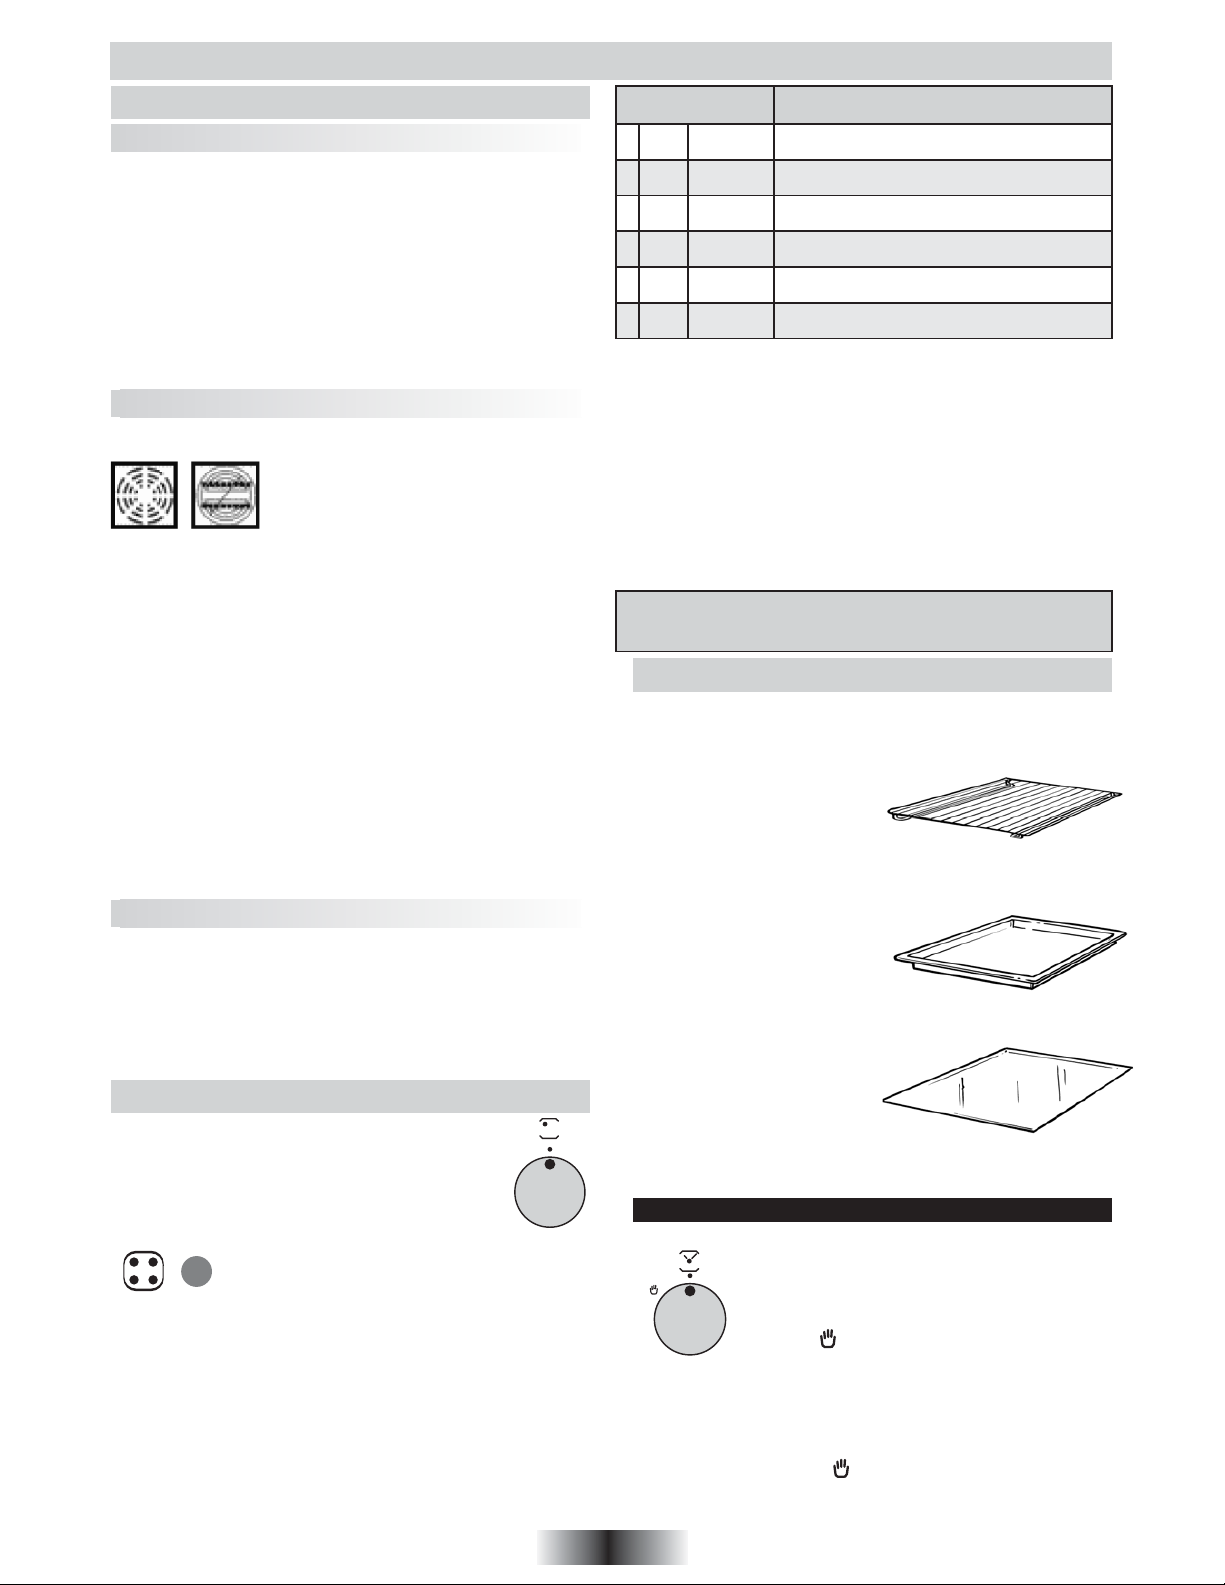
UTILIZZO
Downloaded from www.vandenborre.be
LA SUPERFICIE IN VETROCERAMICA
CONSIGLI D'UTILIZZO
• Utilizzare recipienti di buona qualità con fondo piatto: il
fondo assolutamente piatto elimina tutti i punti di surriscaldamento
sui quali si attaccano gli alimenti e lo spessore del metallo
permette una perfetta distribuzione del calore.
• Assicurarsi che il fondo del recipiente sia asciutto: al momento
di riempire il recipiente o quando viene utilizzata una pentola
che esce direttamente dal frigorifero, ad esempio, assicurarsi
che il fondo sia perfettamente asciutto; questa precauzione
eviterà che il piano di cottura si sporchi.
• Utilizzare recipienti di diametro sufficientemente grande da
coprire completamente il fuoco: è consigliabile assicurarsi
che il fondo sia grande almeno quanto la zona di cottura.
Se il fondo è leggermente più grande, l’energia viene utilizzata
in maniera ottimale.
LA SCELTA DEI RECIPIENTI
Le informazioni seguenti vi aiuteranno a scegliere i recipienti più
adatti e migliori per ottenere dei buoni risultati.
Etichette indicanti la compatibilità del
recipiente con il piano in vetroceramica.
Inox: consigliato. Particolarmente buono con il fondo “Sandwich”.
Il fondo “Sandwich” unisce le qualità dell’Inox (aspetto, durata e
stabilità) con i vantaggi dell’alluminio o del rame (trasmissione del
calore e ripartizione uniforme).
Alluminio: raccomandato fondo spesso. Buona conduttività.
Talvolta i residui di alluminio possono lasciare qualche macchia
sul piano, che possono essere tolte se pulite rapidamente.
L’alluminio con poco spessore non deve essere ulilizzato.
Ghisa/Vetroceramica: sconsigliato. Prestazioni scarse. Può rigare
la superficie.
Fondo in rame: raccomandato fondo spesso. Buona performance,
ma il rame può lasciare delle macchie che possono sembrare
delle righe, che si possono togliere se il piano viene pulito
rapidamente. Tuttavia, non lasciare evaporare l’acqua
completamente dai recipienti, poiché il metallo surriscaldato può
aderire alla superficie. Un recipiente in rame surriscaldato può
lasciare delle macchie che rischiano di sporcare definitivamente
il piano.
Porcellana/Acciaio smaltato: buone prestazioni. Solamente con
fondo piatto, poco spesso e liscio.
I FUOCHI
Fuoco hilight: efficace in 3 secondi. Offre la possibiità di avere
una partenza a fuoco vivo ed anche di effettuare cotture rapide
alla massima posizione ed in più, grazie alla sua ripartizione,
assicura delle cotture a fuoco lento o cotture lunghe in tutta
sicurezza.
Sprinter: la tecnologia sprinter consente una riduzione dei tempi
di cottura fino al 15%.
USO
• Visualizzare i simboli corrispondenti ai fuochi
necessari alla vostra cottura.
• Per avviare l’apparecchio, iniziare con la potenza
maggiore, e regolare in seguito su di una velocità
intermedia che tenga conto della natura degli
alimenti e dei loro volumi.
• La spia di messa sotto tensione si accende quando
un fuoco è in funzionamento e si ferma quando
tutti i fuochi sono in posizione di arresto.
• Ogni fuoco é collegato a una spia del calore residuo, la spia si
accende quando la temperatura del piano è superiore a 60 ca.
Resterà accesa anche se il fuoco è spento, e fino a che la
temperatura della superficie del fuoco non si sia sufficientemente
raffreddata, e si sarà abbassata sotto i 60 .
• Per fermare un fuoco, ruotare la manopola corrispondente sulla
posizione “0”.
• Posizioni: Le diverse velocità di riscaldamento corrispondono
approssimativamente agli impieghi esemplificati qui di seguito.
L’esperienza personale permette in seguito di adattare queste
regole ai gusti e alle abitudini di ciascuno.
12
11
10
9
5
8
7
6
Posizioni Alcuni consigli...
1-2
3-4
5-6
7-8
9-10
11-12
Lentissimo
Lento
Moderato
Medio
Forte
Vivo
Tenere in caldo un piatto, burro fuso cioccolata
Cottura a fuoco lento, besciamella, stufato,
riso al latte, uova al piatto...
Legumi secchi, surgelati, frutta, acqua bollente
Patate al vapore, verdure fresce, pasta,
crepe, pesce
Cottura a fuoco lento più impegnative,
omelette, bistecche, trippa
Bistecche, cotolette, fritture
1
2
3
4
5
6
Precauzioni di uso del vetro :
• Non cucinare mai direttamente sul piano, utilizzare sempre le
pentole.
• Appoggiare sempre la pentola ben centrata sul bruciatore da
utilizzare.
• Non utilizzare la superficie vetroceramica né come piano per
tagliare né come piano di lavoro.
• Non far scivolare le pentole sul piano: rischio di graffiature.
• Non appoggiare oggetti pesanti sul piano, potrebbero cascare
e rovinare il piano.
• Non lasciare oggetti depositati sul piano di qualunque tipo essi
siano.
• La carta stagnola e i recipienti in materia plastica non devono
essere appoggiati sulla superficie calda.
Attenzione: Il piano è caldo durante il suo funzionamento. La
temperatura del piano può essere localmente molto elevata;
pertanto si raccomanda la prudenza. Tenere lontano i bambini.
IL FORNO - DOTAZIONE (Secondo modello)
Prima di utilizzare gli accessori del forno per la prima volta
è necessario pulirli. Per questa operazione si consiglia di
utilizzare una spugna. Successivamente risciacquare ed
asciugare gli accessori.
La griglia serve da supporto per
teglie, pirofile, stampi per i dolci.
La griglia sostiene anche la
leccarda.
Grazie al suo profilo, la griglia resta sempre in orizzontale, anche
quando viene estratta verso l'esterno. Non c'é nessun rischio
quinci che i tegami scivolino o si ribaltino.
La leccarda serve a raccogliere
i grassi che colano durante la
cottura con il grill. Può essere
inserita nelle apposite guide della
griglia o, ancora, posta sul fondo
del forno.
Non usare mai la leccarda per cuocere gli arrosti perché ne
risulterebbe un eccesivo sviluppo di fumo e vapori e il forno si
sporcherebbe inutilmente.
La piastra pasticceria
Si trova direttamente sulla griglia,
e serve da supporto per la
pasticceria.
Non si deve mai posizionare la piastra sul fondo del forno.
1
Il girarrosto è composto di uno spiedo con maniglia, due forchette
2
e di un supporto.
3
Gli accessori devono essere tolti dal forno se non vengono utilizzati.
4
Il programmatore di fine cottura -Il funzionamento del forno è
10
120
110
100
90
70
80
in considerazione lacottura realizzata nel forno per una durata da
1 a 120 minuti con partenza immediata e arresto automatico delle
funzioni del forno.
Posizione manuale: il forno puó essere utilizzato manualmente,
senza programmare la durata di cottura, girando la manopola
sulla posizione manuale . A fine cottura, la manopola del
contaminuti deve essere riposizionata sulla posizione arresto "0".
Nota : Per indicare un tempo di cottura sul contaminuti girare
la manopola in senso orario fino a 120 minuti poi
19 IT
riposizionarla sul tempo scelto.
direttamente collegato al contaminuti. È dunque
necessario selezionare:
20
• una programmazione di una durata, tra 1 e
30
120 minuti, oppure,
40
• la posizione manuale, rappresentata da una
50
mano .
60
Programmazione durata: il contaminuti prende
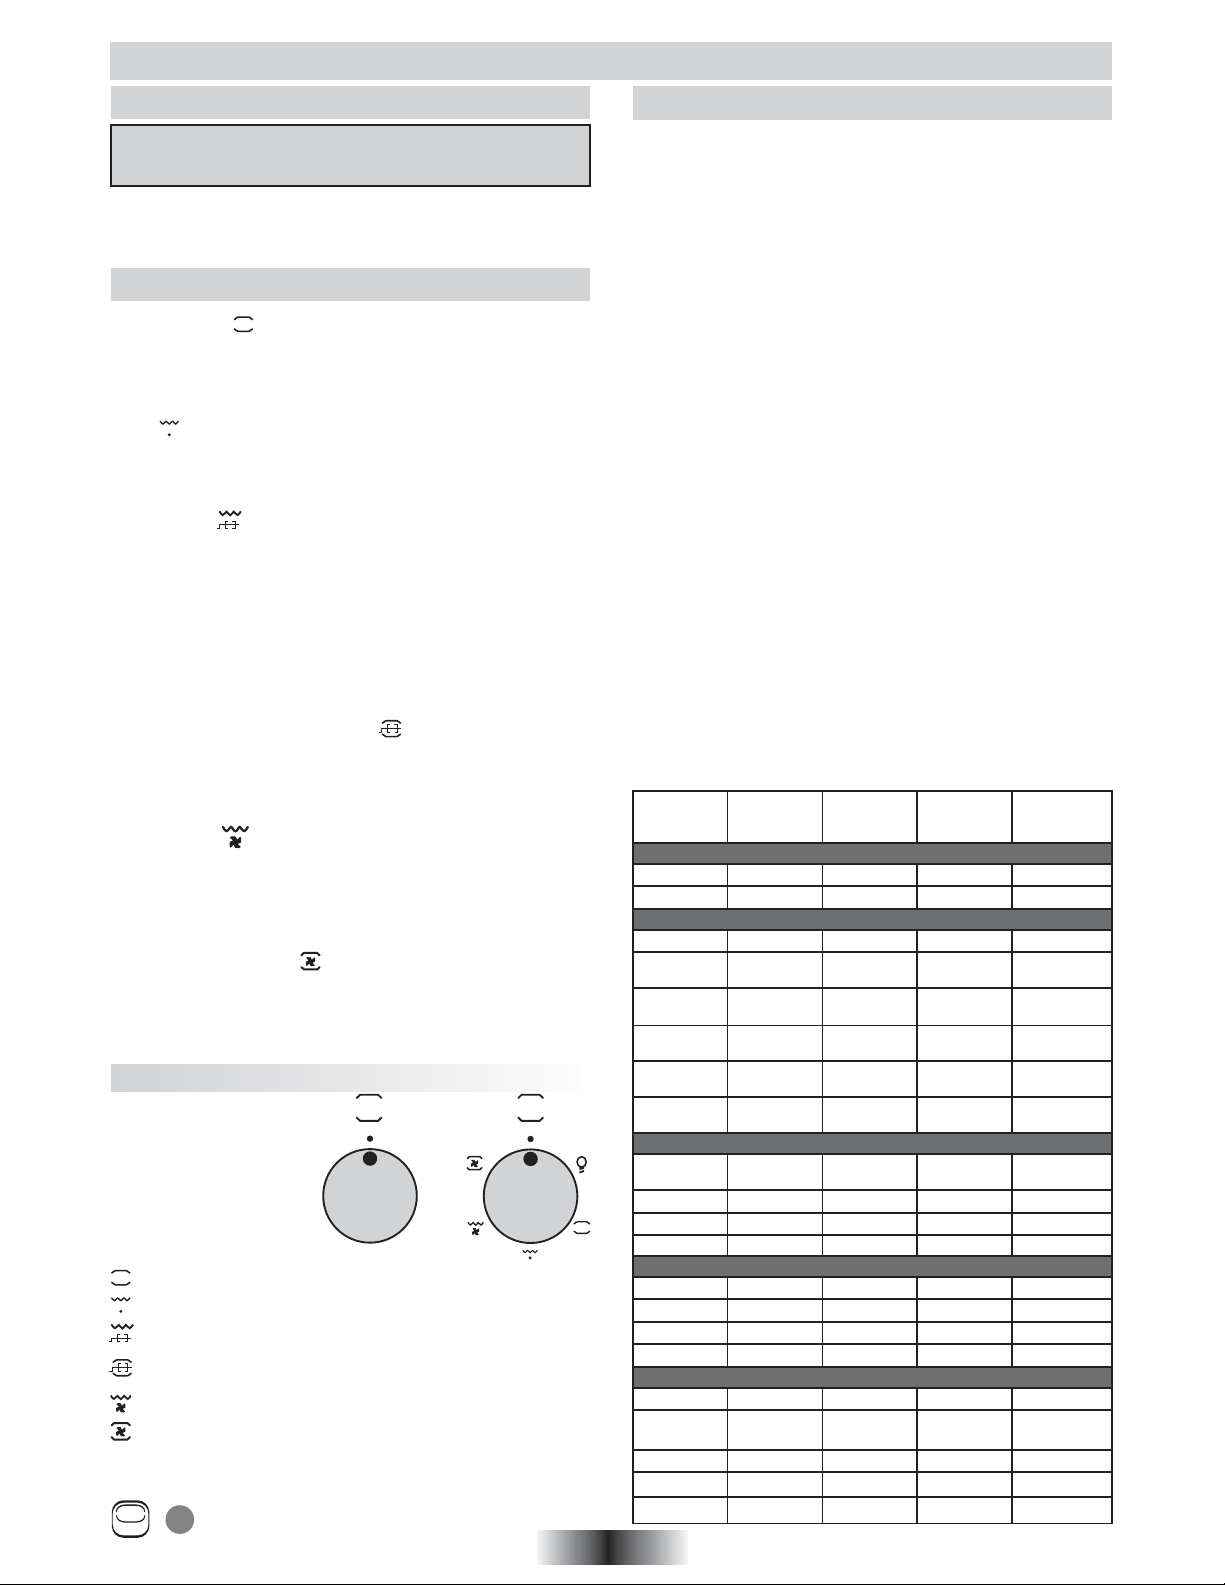
UTILIZZO
Downloaded from www.vandenborre.be
IL FORNO - USO
IMPORTANTE: il forno e la lavastoviglie non possono
funzionare simultaneamente.
La lavastoviglie deve essere fermata prima di utilizzare il forno.
IMPORTANTE: Il forno è per sua natura un apparecchio che
diventa caldo, in modo particolare in corrispondenza della porta.
È buona norma quindi impedire che i bambini possano avvicinarsi
al forno quando è in funzione.
I DIVERSI MODI DI COTTURA (secondo modello)
• Forno statico : utilizzo simultaneo della resistenza di suola
e di cielo. Questa funzione è ideale per tutte le cotture tradizionali,
per scottare le carni rosse, per dorare il pane, per il pesce al
cartoccio e la pasta sfoglia.Un preriscaldamento per circa 10
minuti é consigliato.
Posizionate il ripiano a metà del forno.
• Grill : utilizza unicamente la resistenza superiore del forno.
Ideale per la carne alla griglia, gli spiedini e le verdure gratinate.
È necessario un preriscaldamento di circa cinque minuti per
portare la resistenza all'incandescenza. L'utilizzo del grill richiede
la porta chiusa.
• Il girarrosto : utilizza la resistenza superiore più il girarrosto
che permette la rotazione degli alimenti da cuocere.
È la cottura ideale per ritrovare tutti i sapori dello spiedo
tradizionale. L'utilizzo del girarrosto richiede la porta chiusa.
- Togliere dal forno gli accessori e porre la leccarda sul fondo,
- Infilare sullo spiedo la vivanda da cuocere centrandola tra le due
forchette,
- Appoggiare lo spiedo sul supporto, infilare il tutto sul secondo
livello del forno partendo dal basso.
L'estremità dello spiedo si troverà a questo punto di fronte al foro
quadrato dell'organo di trascinamento.
- Inserire lo spiedo nel foro.
• Girarrosto e convezione naturale : utilizza simultaneamente
il girarrosto e la convezione naturale. Questa funzione permette
un guadagno di tempo per la realizzazione della cottura.
Consiglio: usando questa funzione, è necessario mettere la
griglia porta leccarda sul fondo in posizione inversa e posizionarvi
sopra la leccarda.
• Turbogrill : utilizzando la ventola e la resistenza
cielo contemporaneamente, si cuocionoperfettamente grandi
pezzi di cibo, come arrosto, pollame, ecc. Il preriscaldamento
è necessario per la carne rossa, ma non per la bianca. Mettete
la griglia a metà del forno eposizionate la leccarda sotto di essa
per raccogliere i grassi. Assicuratevi che il cibo non siatroppo
vicino al grill. Girate la carne a metà cottura.
• Convezione forzata : utilizza entrambe le resistenze
insieme con la ventilazione.Questa funzione è raccomandata
per pollame, pasticceria, pesce e verdure. Grazie allacircolazione
forzata il calore penetra meglio nel cibo ed il tempo di cottura
e di riscaldamentoè inferiore.
USO
• Girare la manopola
C
del selettore delle
funzioni sul tipo di
cottura e impostare
una temperatura:
Convezione naturale
Grill
Girarrosto
Girarrosto + Convezione
230
210
190
65
90
115
140
165
Temperature tra 65 C e 230 C
Temperatura 230 C
Temperatura 230 C
Temperatura 230 C
naturale
Turbogrill
Convezione forzata
Temperatura 230 C
Temperature tra 65 C e 230 C
• Regolare il programmatore su un tempo di cottura o sulla
posizione manuale.
• La spia di regolazione indica il funzionamento del
termostato. Essa si accende e si spegne regolarmente
per tutta la durata della cottura.
P
CONSIGLI DI COTTURA
ARROSTO :
É consigliabile salare la carne solo a fine cottura, poiché il sale
favorisce la fuoriuscita dei grassi, il forno si sporca più facilmente
e produce più fumo.
Gli arrosti di carne bianca, vitello, agnello e pesce possono essere
messi nel forno freddo.
La cottura risulterà più lunga ma il cibo verrà cotto uniformemente
anche nel suo interno.
Per la carne rossa, un buon preriscaldamento del forno è alla
base di una migliore cottura.
PASTICCERIA :
Evitate di utilizzare degli stampi lucidi perché questi riflettono il
calore e possono bruciare l'esterno del dolce. Se la doratura del
dolce fosse troppo rapida, ricoprirlo con un foglio di
carta da forno e di alluminio.
Attenzione : usate il foglio d'alluminio dalla parte giusta: la parte
lucida deve essere rivolta verso il dolce. In caso contrario il calore
sarà riflesso e non penetrerà all'interno dell'alimento.
Evitate di aprire la porta del forno durante i primi 20-25 minuti di
cottura altrimenti tutti i dolci che richiedono una lievitazione durante
la cottura come soufflés, brioches, etc. si sgonfieranno
immediatamente.
Per controllare la cottura, pungete il centro del dolce con la punta
di una lama di coltello. Se una volta estratta sarà pulita, allora il
dolce è cotto ed è possibile fermare la cottura. Nel
caso in cui la punta della lama rimanga umida, o con dei residui
di pasta, continuate la cottura abbassando leggermente la
temperatura per evitare che il dolce si bruci esternamente.
Le temperature ed i tempi di cottura vengono forniti a titolo
indicativo per facilitare l'uso del forno.
L'esperienza personale dovrebbe permettere di adattare le
ricette ad i gusti ed alle abitudini personali.
Durata del preriscaldamento :
. 20 minuti tra 210 e 230 C
. 15 minuti tra 140 e 190 C
. 10 minuti tra 65 e 115 C
QUANTITÀ PIATTO
Temperatura
forno in C
PESCE
Trota 200 1 15 / 25
1 kg
Merluzzo 190 1 50
CARNI
1 - 1,5 kg Roast-beef 190 1 90
1 kg
2 kg
1 - 1,5 kg
1 - 1,5 kg
1 - 1,5 kg
Arrosto
di vitello
Spezzatino
di vitello
Arrosto di
agnello
Arrosto di
capretto
Cosciotto
di cinghiale
150 / 160 1 120 / 150
170 / 190 1 60 / 90
150 / 160 1 60 / 75
150 / 160 1 50 / 60
190 1 120
POLLAME
2 kg
4 kg Oca 160 1 240 / 270
2 - 2,5 kg Anatra 175 1 90 / 150
1 - 1,5 kg Pollo 170 1 60 / 80
Piccioni
arrosto
150 / 160 1 45
VARIE
Lasagne 200 1 40
Soufflès 200 1 20
Bignè 200 1 20
Pizza 200 1 20
PASTICCERIA
Focaccia 175 1 40 / 50
Crostata
con frutta
Torta 160 1 40 / 45
Meringhe 100 1 90
Sfogliatine 200 1 20
180 / 190 1 20 / 30
20 IT
Posizione
griglia dal
basso
Tempo
cottura
in minuti
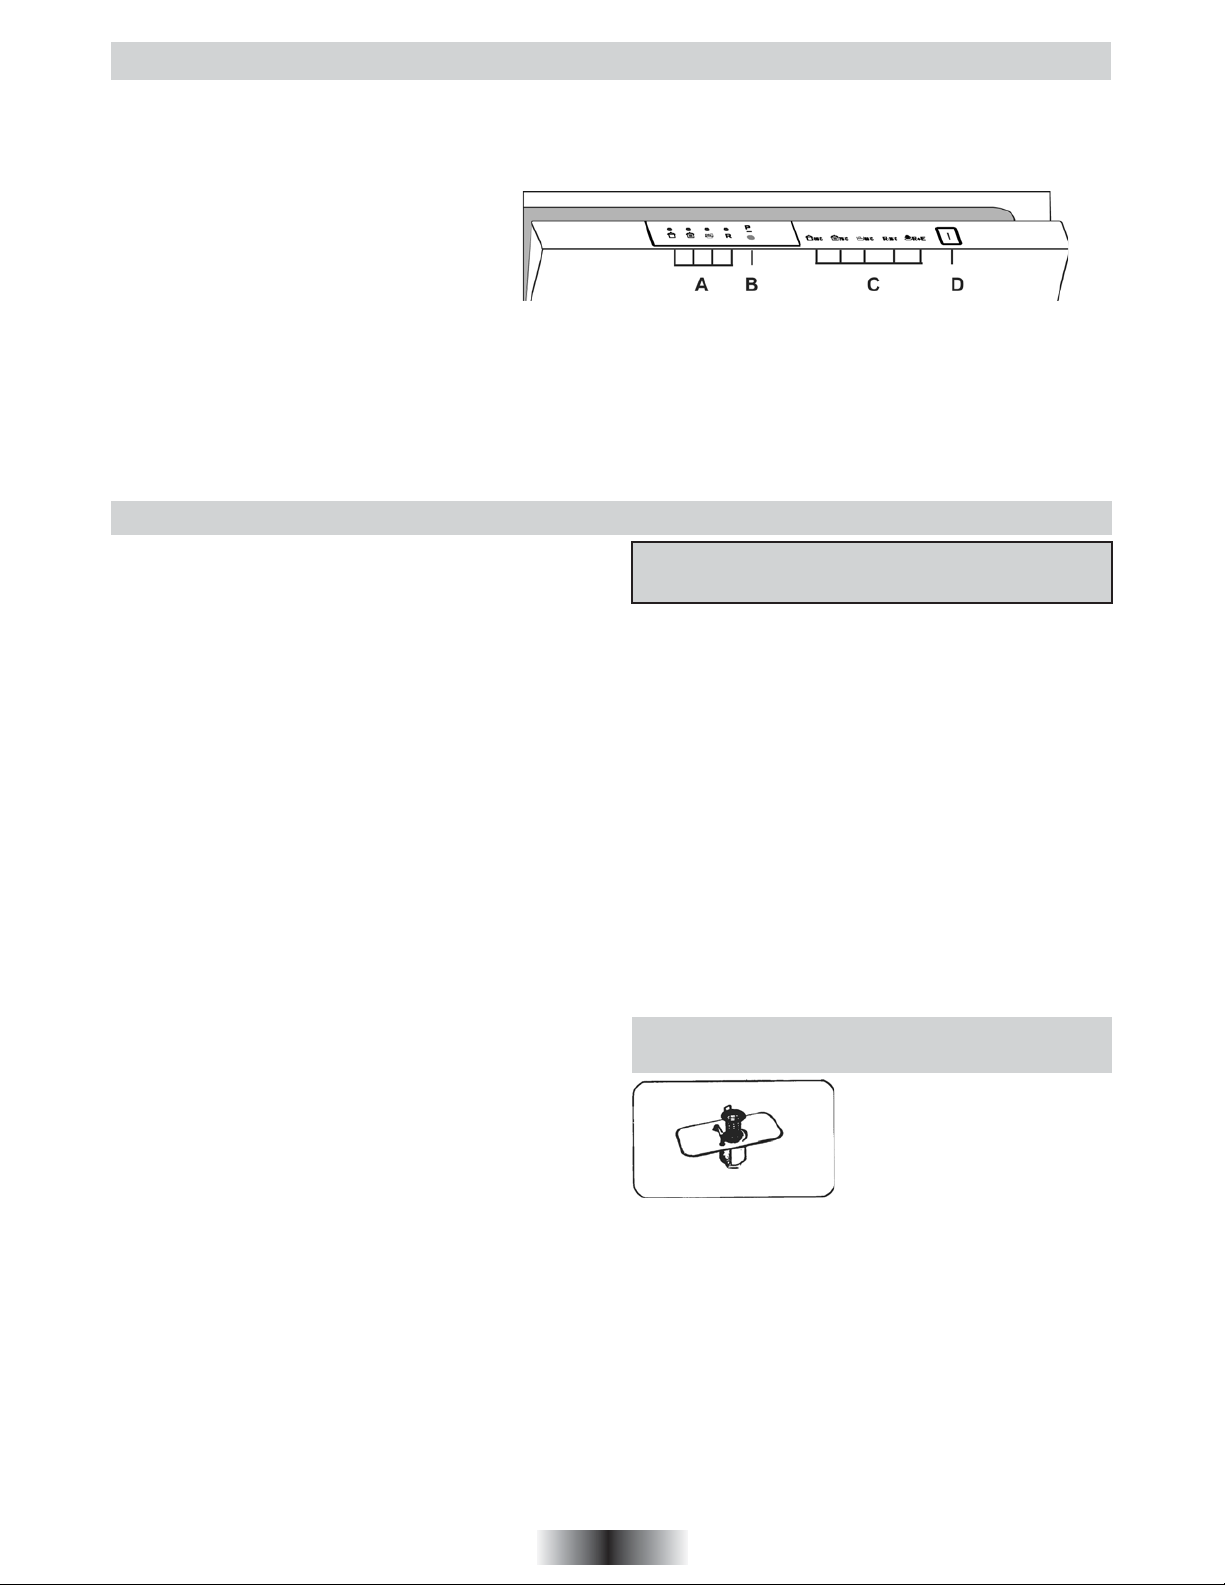
Downloaded from www.vandenborre.be
UTILIZZO LA LAVASTOVIGLIE
DESCRIZIONE DEI COMANDI
A Spia selezione programmi
B Tasto selezione programmi
C Descrizione dei programmi
D Avvio - Arresto
SCELTA DEL PROGRAMMA E FUNZIONI PARTICOLARI
La lavastoviglie e il forno non possono funzionare simultaneamente.
Impostazione dei programmi
Aprire lo sportello e premere il tasto "AVVIO/ARRESTO" ; le 4 spie di selezione programmi lampeggiano.
- Scegliere un programma premendo il pulsante "Selezione Programma", la spia corrispondente al programma scelto si illuminerà
(2 spie per il programma "AMMOLLO").
- Chiudere lo sportello (dopo un segnale acustico) il programma "C" avvierà automaticamente.
USO DELLA LAVASTOVIGLIE
Apertura della porta
Afferrare la maniglia frontale ed aprire lo sportello.
L'apertura della porta durante il funzionamento provoca il
disinserimento elettrico della macchina.
Per un corretto funzionamento non aprire lo sportello con la
lavastoviglie in funzione.
Per chiudere la porta
Inserire il cestello. Verificare che la rampa di lavaggio possa
ruotare e che non ci siano posate, pentole o piatti che ne limitino
o impediscano la rotazione.
Chiudere la porta e bloccarla mediante leggera pressione.
Interruzione di un programma
Sconsigliamo l'apertura della porta durante lo svolgimento del
programma, in particolare durante la fase centrale del lavaggio
e del risciacquo finale caldo.
La macchina comunque si ferma automaticamente all'apertura
della porta.
Richiudendo la porta il programma continua automaticamente.
Se si vuol cambiare o annullare un programma già in corso,
procedere nel seguente modo:
aprire la porta, tenere premuto il tasto selezione programmi "P"
fino a quando le 4 spie dei programmi lampeggiano. Il programma
in corso verrà annullato. A questo punto è possibile
effettuare una nuova impostazione.
Prima di fare ripartire un nuovo programma è bene accertarsi che
non sia già stato asportato il detersivo; se lo fosse, ripristinare la
dose nel contenitore.
Attenzione : se si apre lo sportello mentre la lavastoviglie è nella
fase di asciugatura, viene attivato un segnale acustico intermittente
per avvisare che il ciclo non è ancora terminato !
Fine programma
La fine del programma viene segnalata dal suono di un segnalatore
acustico. Aprendo la porta le 4 spie di selezione programmi
lampeggiano, disinserire il tasto "AVVIO/ARRESTO".
Esclusione suoneria
La funzione del segnalatore acustico può essere disattivata nel
seguente modo:
- premere il tasto "AVVIO/ARRESTO",
- attendere che le spie dei programmi inizino a lampeggiare.
- entro 2 minuti dall'accensione della lavastoviglie, mantenere
premuto il pulsante "Selezione Programma" per almeno 30
secondi (le spie dei programmi continueranno a lampeggiare
accompagnate da un segnale acustico intermittente).
- rilasciare il pulsante nel momento in cui le prime due spie da
sinistra si illumineranno a luce fissa (per indicare che la suoneria
è attiva) e non si udirà più il segnale acustico.
- premere nuovamente il pulsante "Selezione Programma", le
prime due spie da sinistra si spegneranno, mentre le altre 2 si
illumineranno per indicare che la suoneria è stata disattivata.
- attendere il segnale acustico che indicherà che l'impostazione
é stata memorizzata.
- per riattivare la suoneria, seguire la stessa procedura.
Attenzione - Questa lavastoviglie è dotata di un dispositivo
di sicurezza antitrabocco che, in caso di anomalia, interviene
scaricando l'acqua in eccesso.
Segnalazione anomalie
Qualora durante lo svolgimento di un programma si dovesse
verificare un malfunzionamento o un'anomalia, la spia
corrispondente al ciclo scelto (2 spie per il programma "AMMOLLO")
lampeggerrà in maniera molto veloce e verrà emesso un segnale
acustico.
In questo caso, spegnere la lavastoviglie premendo il tasto
"AVVIO/ARRESTO". Dopo aver controllato che il rubinetto
dell'acqua sia aperto, che il tubo di scarico non sia piegato, che
il sifone non sia otturato o i filtri intasati, impostare nuovamente
il programma scelto.
Se l'anomalia dovesse ripetersi sarà necessario contattare il
Servizio Assistenza Tecnica.
IMPORTANTE !
Per evitare l'intervento intempestivo del dispositivo di
sicurezza antitrabocco, si raccomanda di non muovere o
inclinare la lavastoviglie durante il funzionamento.
Nel caso sia necessario muovere o inclinare il Trio, assicurarsi
prima che abbia completato il ciclo di lavaggio e che non ci
sia acqua nella vasca.
La porta non deve rimanere aperta perché potrebbe provocare
incidenti.
OPERAZIONI PRELIMINARI E PULIZIA DEI
FILTRI
Il sistema filtrante è costituito da :
Il bicchierino centrale, che trattiene
le particelle più grosse di sporco.
- La piastra, che filtra continuamente
l'acqua di lavaggio.
- Il microfiltro, posto sotto la piastra,
che cattura anche le
particelle di sporco più piccole assicurando un ottimo filtraggio.
Per ottenere sempre ottimi risultati bisogna ispezionare e pulire
i filtri prima di ogni lavaggio, passandoli sotto un getto di acqua
ed eventualemente aiutandosi con uno spazzolino. Per estrarre
il gruppo dei filtri, basta impugnare il manico e sollevarlo. Il
bicchierino centrale è asportabile, per facilitare le operazioni di
pulizia. La lavastoviglie è dotata di Microfiltro Autopulente, la
manutenzione è ridotta e l'ispezione dei gruppo filtri puo essere
effettuata ogni 15 giorni. Tuttavia è consigliabile controllare dopo
ogni lavaggio che il bicchierino centrale e la piastra non siano
intasati.
Attenzione : dopo aver pulito i filtri, assicurarsi che siano fissati
correttamente tra loro e che la piastra sia inserita perfettamente
sul fondo della lavastoviglie. Un inserimento impreciso
del gruppo filtrante puo pregiudicare il funzionamento della
macchina.
Importante : non usare la lavastoviglie senza filtri.
21 IT
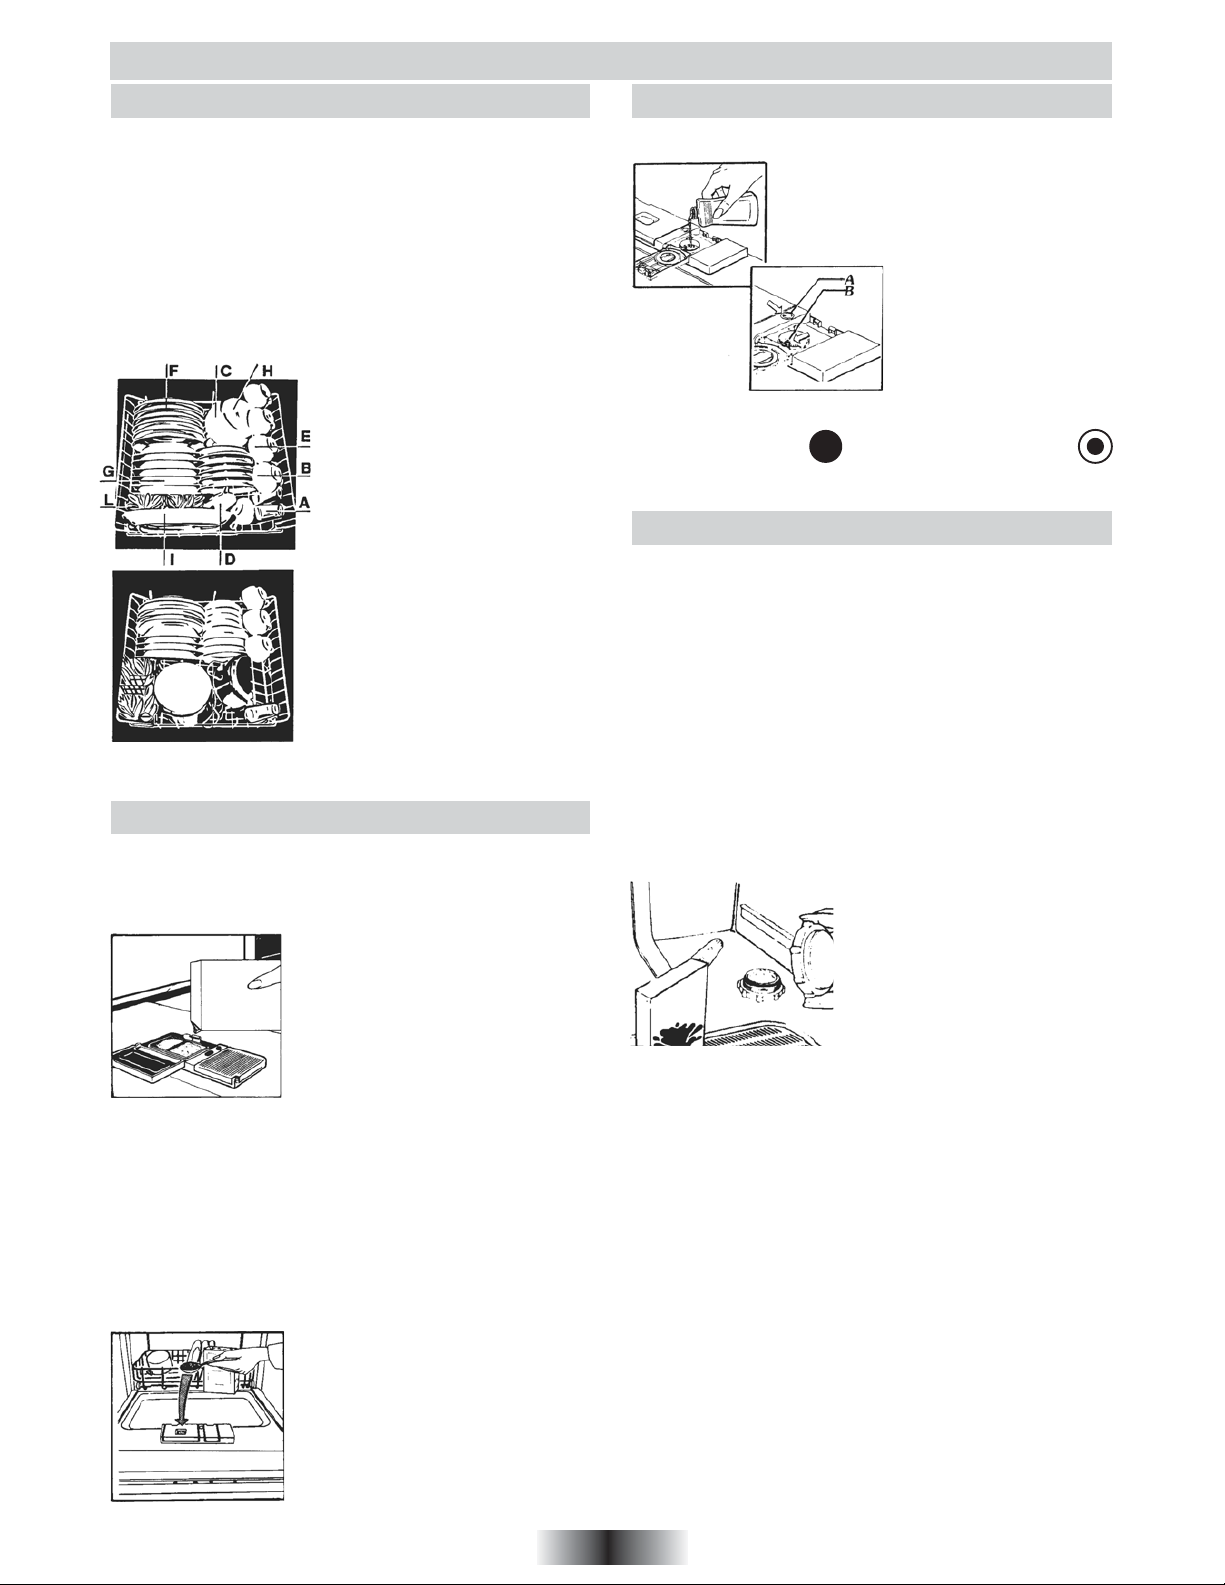
UTILIZZO
Downloaded from www.vandenborre.be
CARICARE LE STOVIGLIE
Il cesto del TRIO è stato studiato per consentire un'ampia possibilità
di carico per soddisfare qualunque esigenza.
Prima di disporre le stoviglie nella macchina, asportare i residui
più grossi delle pietanze (ossicini, lische, stuzzicadenti, avanzi di
carne o verdure, bucce di frutta, ecc.) per evitare il pericolo di
intasamento del filtro con conseguente riduzione dell'efficacia di
lavaggio.
Il cesto è studiato per contenere ogni tipo di stoviglie.
Attenzione! I coltelli e gli altri utensili con parti appuntite o taglienti
devono essere disposti con le punte rivolte verso il basso o in
orizzontale.
CARICO DA 6 COPERTI (secondo EN 50242)
La corretta dispozisione del carico è quella indicata nella figura.
A - 6 bicchieri F - 6 piatti piani
B - 6 piatti da frutta G - 6 piatti fondi
C - 6 sotto tazze H - Coppa media
D - Coppa piccola I - Piatto di portata
E - 6 tazze da caffè o tè L - Gruppo
posate
CARICO DA 4 COPERTI PIU
PENTOLE - Nel cestello vanno
sistemati bicchieri, pentole, padelle,
zuppiere, insalatiere, piatti di portata,
coperchi e mestoli. Le posate vanno
sistemate nell'apposito contenitore
in plastica che a sua volta andrà
posizionato secondo la necessità.
Per conseguire un buon risultato di
lavaggio, si raccomanda di alternare
i cucchiai con le altre posate, in modo
che non aderiscano. E' consigliabile
che le posate siano poste nel cestino
con i manici rivolti verso l'alto ; nel
caso peró di posate con i manici
particolarmente stretti, è necessario
sistemarle con i manici verso l'alto,
per evitare la loro fuoriuscita dal fondo
del cestino e il possibile bloccaggio del mulinello di lavaggio.
CARICARE IL DETERSIVO
E' indispensabile usare un detersivo specifico per il lavaggio delle
stoviglie. Detersivi non idonei (come quelli per il lavaggio a mano),
non contengono gli ingredienti adatti al lavaggio in lavastoviglie
ed impediscono il corretto funzionamento della macchina.
Lavaggio normale
La vaschetta per il detersivo del lavaggio
è situata all'interno della porta. Se il
coperchio del contenitore risultasse
chiuso, per aprirlo basta premere sul
pulsante di aggancio : al termine di un
qualsiasi programma di lavaggio il
coperchio risulta sempre aperto, pronto
per il successivo impiego.
La dose di detersivo può variare in
funzione del grado di sporco e del tipo di
stoviglie. Noi vi consigliamo di versare 15 gr di detersivo. Nel caso
di acque dure o in presenza di sporco particolarmente tenace,
impiegare 25 g. di detersivo.
Dopo aver versato il detersivo nel contenitore richiudete il coperchio.
Poichè i detersivi non sono tutti uguali, consultate anche le istruzioni
sulle confezioni.
Ricordiamo che quantità insufficienti di detersivo provocano
un'incompleta asportazione dello sporco, mentre un eccesso di
detersivo, oltre a non migliorare i risultati di lavaggio,
rappresenta uno spreco. Non eccedere nell'uso di detersivo:
rappresenta un contributo al contenimento dell'inquinamento
ambientale.
Lavaggio con ammollo
Nel caso si imposti il programma intensivo,
occorre aggiungere nella macchina una
seconda dose di detersivo, circa 15 gr.
(1 cucchiaio da tavola).
Questa dose va messa nell'incavo dello
sportello chiuso del detersivo o diret-
tamente nella vasca.
La quantità di detersivo è riferita a polvere
del tipo tradizionale.
CARICARE IL BRILLANTANTE
Alla destra della vaschetta del detersivo si trova il
contenitore dell'additivo per il risciacquo, la cui capacità è
di circa 130 ml. Aprire lo sportellino e versare
il liquido, che servirà per numerosi lavaggi,
evitando di farlo traboccare.
Richiudere lo sportellino.
Questo additivo, che viene immesso
automaticamente nell'ultima fase di risciacquo,
favorisce una rapida
asciugatura delle stoviglie
evitando il formarsi di macchie
e sedimenti opachi. Usare
sempre additivi di risciacquo
adatti a lavastoviglie
automatiche. E' possibile
controllare il livello del
brillantante per mezzo del visualizzatore posto al centro dei due
sportelli "A".
PIENO - Riflesso scuro VUOTO - Riflesso chiaro
REGOLAZIONE DEL BRILLANTANTE (da 1 a 6)
Il regolatore "B" è posto sotto lo sportellino, e si può ruotare con
un dito. La posizione consigliata è "3".
Il contenuto in calcare dell'acqua influenza notevolmente sia la
presenza di incrostazioni che il grado di asciugatura. E' perciò
importante regolare il dosaggio del brillantante per ottenere
prestazioni sempre ottimali.
Nel caso le stoviglie presentino delle striature al termine del
lavaggio, diminuire la regolazione di una posizione. Nel caso le
stoviglie presentino macchie o aloni biancastri aumentare la
regolazione di una posizione.
IMPIANTO DI DECALCIFICAZIONE - CARICARE IL SALE
La lavostiviglie è dotata di un decalcificatore che depura l'acqua
dal calcare che potrebbe incrostarla o dannegiarla.
Sul fondo della macchina é sistemato il contenitore del sale che
serve a rigenerare l'apparecchio decalcificatore.
La massa filtrante dell'impianto di depurazione deve essere
riattivata con sale di rigenerazione per decalcificatori di lavastoviglie,
reperibile in pastiglie o in granuli.
In mancanza, può essere usato sale
grosso da cucina, purchè non
contenga leganti calcarei.
Fate la prova del sale : versate mezzo
cucchiaio da cucina in un bicchiere
d'acqua ; solo se l'acqua rimane
limpida, il sale è adatto alla
rigenerazione del decalcificatore.
Leganti calcarei intorbidirebbero
l'acqua e provocherebbero l'otturazione dell'impianto di depurazione.
Per l'introduzione del sale, svitare il tappo del contenitore che si
trova sul fondo.
Durante l'operazione un po' d'acqua trabocca; continuate in ogni
caso a versare il sale fino al riempimento del contenitore (mescolare
le miscele con un cucchiaio).
Ultimata l'operazione, pulire la filettatura dai resti di sale e riavvitare
il tappo.
Se non si deve effettuare alcun lavaggio subito, inserire il
programma "AMMOLLO" ("Eco + Rapido", 2 led) in modo che
la soluzione salina traboccata venga scaricata dalla macchina.
Il contenitore ha una capacità di circa 1.5 kg di sale e, per una
efficace utilizzazione dell'apparecchio, é necessario riempirlo ogni
35 lavaggi.
Importante : Solo all'installazione della lavastoviglie dopo aver
riempito completamente il contenitore del sale é necessario
aggiungere dell'acqua, fino al trabocco dal contenitore.
22 IT
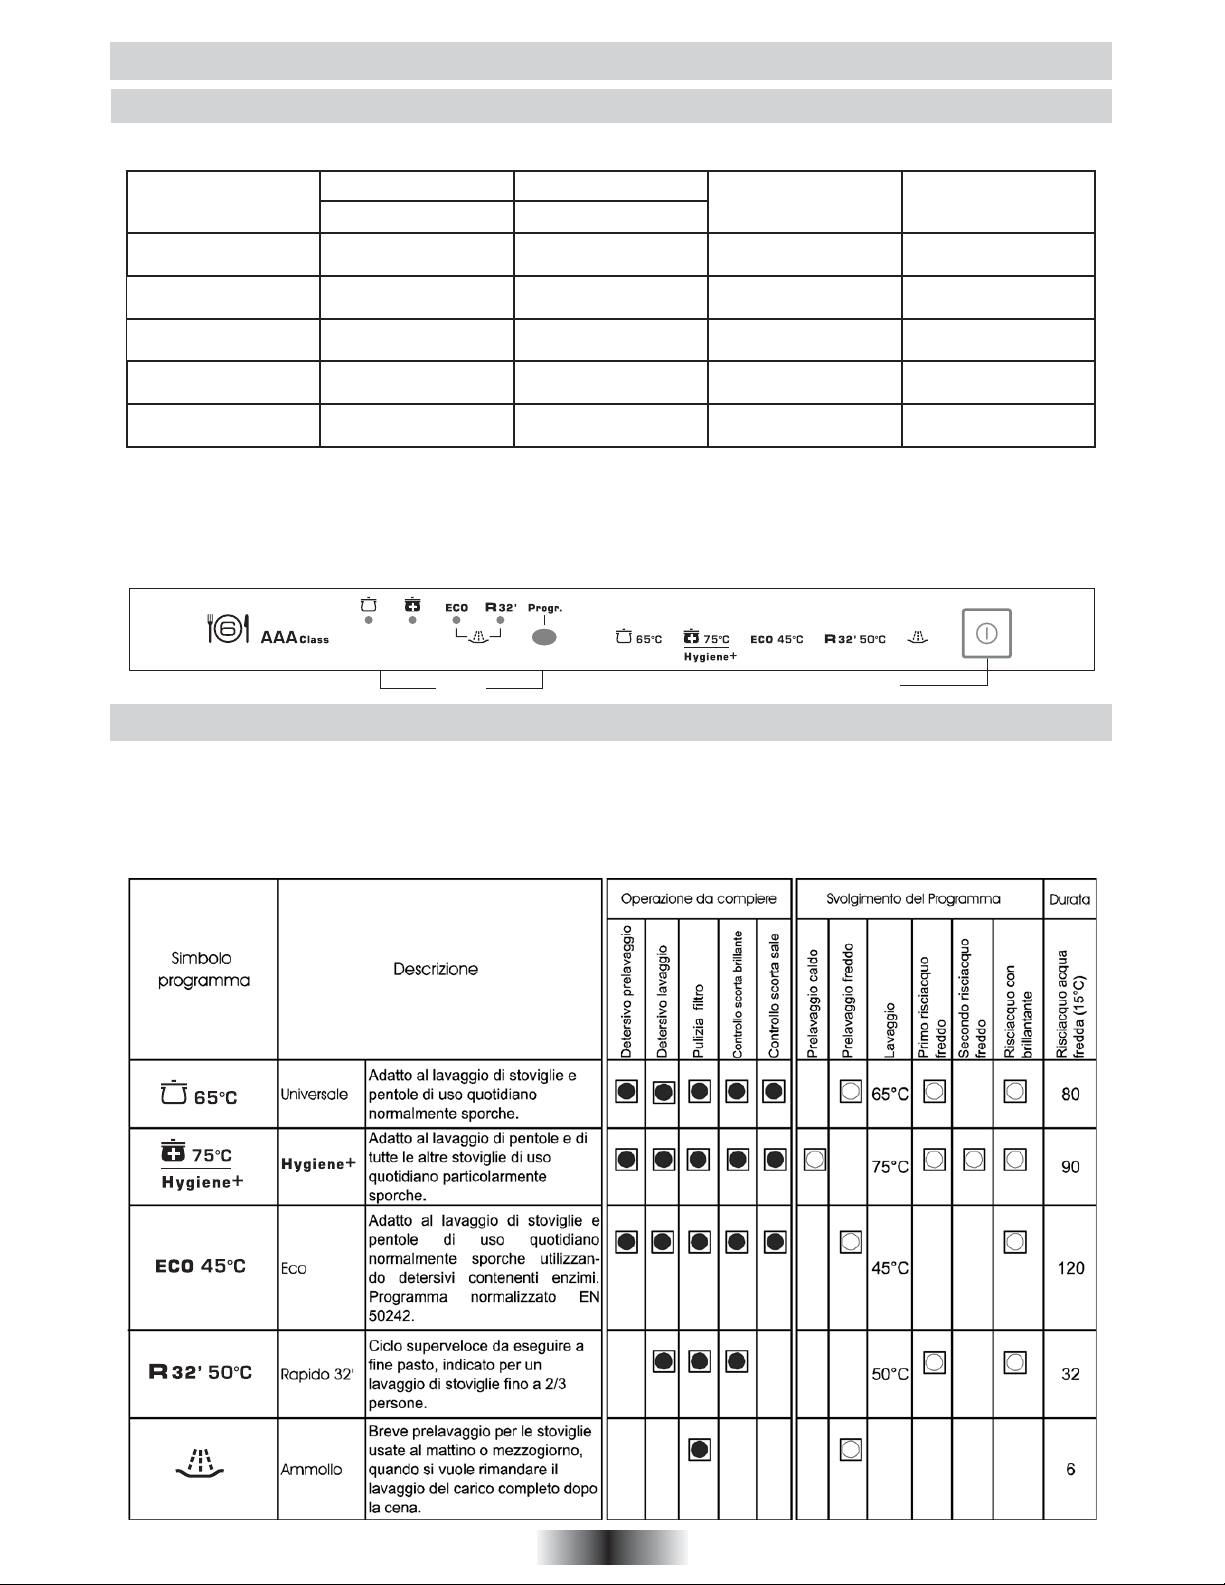
Downloaded from www.vandenborre.be
UTILIZZO
Regolazione decalcificazione con programmatore elettronico
Il decalcificatore può trattare acque con durezza fino a 60 fH (gradi francesi), 33 dH (gradi tedeschi) tramite 5 livelli di regolazione.
I livelli di regolazione vengono riportati nella tabella seguente con la relativa acqua di rete a trattare.
Livello
Durezza dell’acqua
fH (Francesi)
Durezza dell’acqua
fH (Tedeschi)
Uso sale rigenerante
Regolazione di
decalcificazione
0
1
2
3
4
La regolazione è stata impostata dalla fabbrica al livello 3 (Spia N.3) in quanto questo soddisfa la maggior parte dell'utenza. A seconda
del livello di appartenenza della vostra acqua impostare il valore di decalcificazione nel seguente modo: aprire lo sportello, premere il
tasto "Avvio/Arresto", nei primi 2 minuti deve essere premuto il pulsante "Selezione Programma" per almeno 10 secondi, dopodiché i
3 Led partendo da sinistra si accendono a luce fissa per 3 secondi.
Il Led relativo al valore di durezza impostato inizia a lampeggiare, le pressioni successive del pulsante determinano i vari gradi di
durezza dell'acqua (vedi tabella).
0-8
9-20
21-30
31-40
41-60
SPIE TASTO MARCIA/ARRESTO
4
5-11
12-17
18-22
23-33
no
si
si
si
si
Spia N.1
Spia N.1
Spia N.2
Spia N.3
Spia N.4
PROGRAMMI DI LAVAGGIO
Informazioni per laboratori di prova
Programma comparativo generale
Secondo le norme EN 50242:
1) Carico normalizzato
2) Regolazione regolatore brillantante indice "4"
3) Quantità di detersivo: 18 gr.per il lavaggio
23 IT
 Loading...