


Brother RJ-4250WB, RJ-4230B, RJ-3050, RJ-3150, RJ-2030 Software Developer's Manual Raster Command Reference
...Software Developer's Manual
Raster Command Reference
RJ-4250WB/4230B/3050/3150/2030/2050/2140/2150
Version 1.03
The Brother logo is a registered trademark of Brother Industries, Ltd.
Brother is a registered trademark of Brother Industries, Ltd.
© 2014-2018 Brother Industries, Ltd. All rights reserved.
Each owner whose software title is mentioned in this document has a Software License Agreement specific to its proprietary programs.
Any trade names and product names of companies appearing on Brother products, related documents and any other materials are all trademarks or registered trademarks of those respective companies.

IMPORTANT - PLEASE READ CAREFULLY
Note
This documentation (“Documentation”) provides information that will assist you in controlling your Printer RJ-XXXX (where “XXXX” is the model name).
You may use the Documentation only if you first agree to the following conditions.
If you do not agree to the following conditions, you may not use the Documentation.
Condition of Use
You may use and reproduce the Documentation to the extent necessary for your own use of your Printer Model (“Purpose”). Unless expressly permitted in the Documentation, you may not;
(i)copy or reproduce the Documentation for any purpose other than the Purpose,
(ii)modify, translate or adapt the Documentation, and/or redistribute it to any third party,
(iii)rent or lease the Documentation to any third party, or,
(iv)remove or alter any copyright notices or proprietary rights legends included within the Documentation.
No Warranty
a.Any updates, upgrades or alteration of the Documentation or Printer Model will be performed at the sole discretion of Brother. Brother may not respond to any request or inquiry about the Documentation.
b.THIS DOCUMENTATION IS PROVIDED TO YOU "AS IS" WITHOUT WARRANTY OF ANY KIND, WHETHER EXPRESS OR IMPLIED, INCLUDING, BUT NOT LIMITED TO, THE IMPLIED WARRANTY OF FITNESS FOR A PARTICULAR PURPOSE. BROTHER DOES NOT REPRESENT OR WARRANT THAT THIS DOCUMENTATION IS FREE FROM ERRORS OR DEFECTS.
c.IN NO EVENT SHALL BROTHER BE LIABLE FOR ANY DIRECT, INDIRECT, PUNITIVE, INCIDENTAL, SPECIAL OR CONSEQUENTIAL DAMAGES OR ANY DAMAGES WHATSOEVER, ARISING OUT OF THE USE, INABILITY TO USE, OR THE RESULTS OF USE OF THE DOCUMENTATION OR ANY SOFTWARE PROGRAM OR APPLICATION YOU DEVELOPED IN ACCORDANCE WITH THE DOCUMENTATION.

Raster Command Reference
Contents
1.Introduction ································································································1
2.About Raster Commands ·············································································2
3.Printing Using Raster Commands·································································3
4.Print Data ····································································································5
4.1Print data overview ······························································································5
4.2Sample (analyzing the print data of the test page) ····················································7
4.2.1 Preparation............................................................................................................. |
7 |
4.2.2 Checking the print data .......................................................................................... |
8 |
4.2.3 Explanation of print data for the test page ........................................................... |
11 |
4.3 Page data details······························································································· 13
4.3.1 Resolution ............................................................................................................ |
13 |
4.3.2 Page size ............................................................................................................. |
13 |
4.3.3 Feed amount ........................................................................................................ |
17 |
4.3.4 Maximum and minimum lengths .......................................................................... |
17 |
4.3.5 Raster line ............................................................................................................ |
18 |
5.Status ······································································································· 22
5.1Status overview ································································································· 22
5.2Definitions of each part ······················································································· 24
5.2.1 Series/model ........................................................................................................ |
24 |
5.2.2 Error information 1 ............................................................................................... |
24 |
5.2.3 Error information 2 ............................................................................................... |
25 |
5.2.4 Media width and length ........................................................................................ |
26 |
5.2.5 Media type............................................................................................................ |
27 |
5.2.6 Status type ........................................................................................................... |
28 |
5.2.7 Phase type and phase number ............................................................................ |
28 |
5.2.8 Notification number .............................................................................................. |
29 |
5.2.9 Battery level ......................................................................................................... |
30 |
6.Print Command List ··················································································· 31
7.Printing Command Details·········································································· 32
NULL |
Invalidate ..................................................................................................... |
32 |
ESC @ |
Initialize ....................................................................................................... |
32 |
ESC i S |
Status information request .......................................................................... |
32 |
ESC i a |
Switch dynamic command mode ................................................................ |
33 |
ESC i ! |
Switch automatic status notification mode .................................................. |
33 |
ESC i U w Additional media information command...................................................... |
34 |
|
ESC i z |
Print information command ......................................................................... |
36 |
ESC i d |
Specify margin amount (feed amount) ........................................................ |
37 |
M |
Select compression mode........................................................................... |
38 |
g |
Raster graphics transfer.............................................................................. |
41 |
Z |
Zero raster graphics .................................................................................... |
41 |
FF |
Print command ............................................................................................ |
41 |
Control-Z Print command with feeding........................................................................ |
41 |
|
ESC i CANCancel ......................................................................................................... |
42 |
|
8.Flow Charts······························································································· 43
8.1Buffered printing normal flow for USB connection··················································· 44
8.2Buffered printing error flow for USB connection······················································ 45
8.3Buffered printing cooling flow for USB connection ·················································· 46
8.4Buffered printing waiting for peeling/resumed flow for USB connection ····················· 47
8.5Buffered printing cancelling flow in USB connection ··············································· 48
-i -
Raster Command Reference
Appendix A: USB Specifications ···································································· 49 Appendix B: Introducing the Brother Developer Center ··································· 50
- ii -
Raster Command Reference
1. Introduction
This material provides the necessary information for directly controlling the Brother printer RJ-XXXX (where “XXXX” is the model name).
This information is provided assuming that the user has full understanding of the operating system being used and basic mastery of USB and networks in a developer's environment.
Details concerning the USB interface are not described in this material. If a USB interface is being used, refer to “Appendix A: USB Specifications” to prepare the interface.
We accept no responsibility for any problems caused by programs that you develop using the information provided in this material, affecting software, data or hardware, including the Brother printer RJ-XXXX, and any problems resulting directly or indirectly from them. These materials are provided in their current condition, and we assume no responsibility for their content. Use this material only if you accept these terms.
This material shall not be reproduced, in part or in full, without prior approval. In addition, this material shall not be used as evidence in a lawsuit or dispute in a way that is unfavorable towards our company.
Read the model names that appear in the screens in this manual as the name of your printer.
- 1 -
1. Introduction
Raster Command Reference
2. About Raster Commands
Using raster commands an RJ-XXXX printer (where “XXXX” is the model name) can be used to print without using our printer driver.
This operation is useful in the following situations.
When printing from an operating system other than Windows (Example: When printing from a Linux computer or mobile terminal)
When adding print functions to an existing system
In addition, printing can be performed with advanced settings.
In this material, “raster” refers to binary bitmap data (collection of dots).
Refer to this material to print by sending initialization commands and control codes together with raster data to the RJ-XXXX printer (hereafter, referred to as “printer”).
This manual describes the procedure for adding these codes and sending the data.
- 2 -
2. About Raster Commands
Raster Command Reference
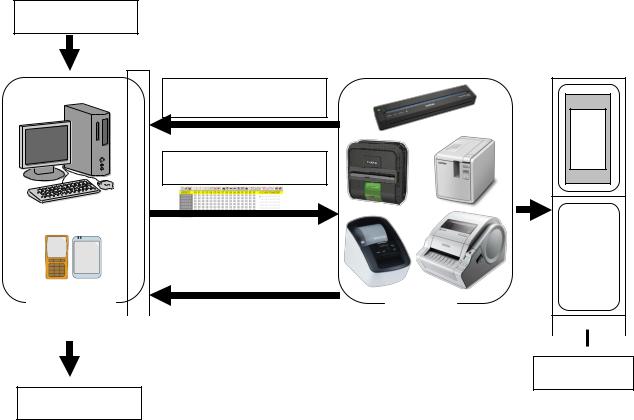
3. Printing Using Raster Commands
The printing procedure is described below. For detailed flow charts, refer to “8. Flow Charts”. For details on
each command, refer to “7. Printing Command Details”.
(1) Open the port
Port
(2) Send the status
(Confirm the printer status.)
<![if ! IE]><![endif]>side your At
(3) Send the print data
|
|
|
|
|
|
|
|
|
|
|
|
|
|
|
|
|
|
|
|
|
|
|
|
|
|
(5) Send the status |
|
|
|
|
|
|
|
|
|
|
(Confirm that printing is completed.) |
|
|
|
|
|
|
|
|
|
|
|
|
|
|
|
|
|
Computer, mobile |
|
|
|
Your printer |
|
|
|
|
||
|
|
|
|
|
|
|||||
terminal, etc. |
|
|
|
|
|
|
|
|
||
|
|
|
|
|
|
|
|
|
|
|
|
|
|
|
|
|
|
|
|
|
|
|
|
|
|
|
|
|
|
|
|
|
|
|
|
|
|
|
|
|
|
|
|
(4) Print
(6) Close the port
- 3 -
3. Printing Using Raster Commands
Raster Command Reference
(1)Open the USB/network port
Open the USB/network port in the operating environment. The procedure for opening the USB/network port is not described in this material.
(2)Confirm the printer status sent from the printer
The “status information request” command is sent to the printer, the status information received from the printer is analyzed, and then the status of the printer is determined.
For details on the “status information request” command and on the definitions of “status”, refer to “Status information request” in “7. Printing Command Details”.
(3)Send the print data
If the status analysis confirms that media compatible with the print data is loaded into the printer and that no error has occurred, the print data is sent.
The structure of the print data is explained in the next section, “4. Print Data”.
Note:
No command can be sent to the printer after the print data is transmitted and until the completion of printing is confirmed.
Even the “status information request” command cannot be sent during printing.
(4)Print the data
(5)Confirm that printing is completed
When printing is completed, the status is received from the printer.
If this status is analyzed to confirm that printing is completed, printing one page is considered finished. If the print job has multiple pages, (2) through (4) are repeated.
(6)Close the USB/network port
After all printing is finished, close the USB/network port.
- 4 -
3. Printing Using Raster Commands

Raster Command Reference
4. Print Data
4.1 Print data overview
The print data is constructed of the following: (1) initialization commands, (2) control codes, (3) raster data, and (4) print commands. If the print job consists of multiple pages, (2) through (4) are repeated.
(1)Initialization commands
Specified only once at the beginning of the job.
|
Sequence |
|
|
Command Name |
|
|
Description/Example |
|
|
|
|
|
|
|
|||
|
|
|
|
|
|
|||
|
|
|
|
|
|
|
|
|
|
|
|
|
|
|
|
Sends a 350-byte invalidate command with the |
|
1 |
|
|
Invalidate |
|
RJ-4250WB/4230B/3050/3150 or a 200-byte invalidate command |
|||
|
|
|
with the RJ-2030/2050/2140/2150, and then resets the printer to |
|||||
|
|
|
|
|
|
|
||
|
|
|
|
|
|
|
the receiving state. |
|
|
|
|
|
|
|
|
|
|
2 |
|
|
Initialize |
|
Initializes for printing. |
|||
|
|
|
1Bh, 40h (Fixed) |
|||||
|
|
|
|
|
|
|
||
|
|
|
|
|
|
|
|
|
(2)Control codes
Added at the beginning of each page and sent for each page.
|
Sequence |
|
|
Command Name |
|
|
|
Description/Example |
|
|
|
|
|
|
|
|
|||
|
|
|
|
|
|
|
|
|
|
1 |
|
|
Switch dynamic |
|
|
Switches the command mode of the printer to raster mode. |
|||
|
|
command mode |
|
|
1Bh, 69h, 61h, 01h |
||||
|
|
|
|
|
|
||||
|
|
|
|
|
|
|
|
|
|
|
|
|
|
Switch automatic |
|
|
Dynamically switches whether an automatic status notification is |
||
|
|
|
|
|
|
given during printing. |
|||
2 |
|
|
status notification |
|
|
||||
|
|
|
|
1Bh, 69h, 21h, 00h |
|||||
|
|
|
|
mode |
|
|
|||
|
|
|
|
|
|
*The RJ-3000 / RJ-2000 does not support this command. |
|||
|
|
|
|
|
|
|
|
||
|
|
|
|
|
|
|
|
|
|
|
|
|
|
|
|
|
|
1Bh, 69h, 55h, 77h, 01h, 127 bytes of media information |
|
|
|
|
|
Additional media |
|
|
Note |
||
3 |
|
|
information |
|
|
If the media information is the same as when printing was |
|||
|
|
|
|
command |
|
|
last performed, it is unnecessary to send the additional |
||
|
|
|
|
|
|
|
|
media information command. |
|
|
|
|
|
|
|
|
|
|
|
|
|
|
|
|
|
|
|
Sets the print information for the printer. |
|
4 |
|
|
Print information |
|
|
For a length setting of 100 mm for 80-mm-wide continuous length |
|||
|
|
command |
|
|
tape: |
||||
|
|
|
|
|
|
||||
|
|
|
|
|
|
|
|
1Bh, 69h, 7Ah, 00h, 0Ah, 50h, 64h, F0h, 02h, 00h, 00h, 00h, 00h |
|
|
|
|
|
|
|
|
|
|
|
5 |
|
|
Various mode |
|
|
To select “Mirror Printing” |
|||
|
|
|
|
1Bh, 69h, 4Dh, 40h |
|||||
|
|
|
|
|
|
|
|
||
|
|
|
|
|
|
|
|
|
|
|
|
|
|
Specify margin |
|
|
Specifies the amount of the margins. |
||
6 |
|
|
|
|
For 3 mm margins: |
||||
|
|
amount |
|
|
|||||
|
|
|
|
|
|
1Bh, 69h, 64h, 18h, 00h |
|||
|
|
|
|
|
|
|
|
||
|
|
|
|
|
|
|
|
|
|
|
|
|
|
Select compression |
|
|
Selects the compression mode for raster graphics. |
||
7 |
|
|
|
|
To send the data compressed to TIFF format: |
||||
|
|
mode |
|
|
|||||
|
|
|
|
|
|
4Dh, 02h |
|||
|
|
|
|
|
|
|
|
||
|
|
|
|
|
|
|
|
||
|
|
|
|
|
|
- 5 - |
|
||
|
|
|
|
|
|
|
|
4. Print Data |
|
Raster Command Reference
(3)Raster data
Repeated for each page in the print job.
|
Sequence |
|
|
Command Name |
|
|
Description/Example |
|
|
|
|
|
|
|
|||
|
|
|
|
|
|
|||
|
|
|
|
|
|
|
|
|
- |
|
|
Raster graphics |
|
Sends a raster line that contains data with pixels set to “ON”. |
|||
|
|
transfer |
|
|||||
|
|
|
|
|
|
|
||
|
|
|
|
|
|
|
|
|
- |
|
|
Zero raster graphics |
|
Sends a raster line with all pixels set to “0”. |
|||
|
|
|
5Ah (Fixed) |
|||||
|
|
|
|
|
|
|
||
|
|
|
|
|
|
|
|
|
(4)Print commands
Specified at the end of the page.
|
Sequence |
|
|
Command Name |
|
|
Description/Example |
|
|
|
|
|
|
|
|||
|
|
|
|
|
|
|||
|
|
|
|
|
|
|
|
|
- |
|
|
Print command |
|
Specifies at the end of a page that is not the last page. |
|||
|
|
|
0Ch |
|||||
|
|
|
|
|
|
|
||
|
|
|
|
|
|
|
||
- |
|
|
Print command with |
|
Specifies at the end of the last page. |
|||
|
|
feeding |
|
1Ah (Fixed) |
||||
|
|
|
|
|
||||
|
|
|
|
|
|
|
|
|
- 6 -
4. Print Data

Raster Command Reference
4.2 Sample (analyzing the print data of the test page)
The print data created by the printer driver is described here.
As an example, we will check the print data created when the [Print Test Page] button in the printer Properties dialog box is clicked to print the test page.
Since the print data differs depending on the print settings of the printer, refer to this procedure and try creating print data with various print settings.
Furthermore, this procedure is for the Windows® 7 operating environment. A similar procedure can be performed if you are using a different operating system.
Printer Properties |
Test page |
4.2.1 Preparation
Install the two listed below.
Printer driver of the Brother RJ-XXXX
Binary file editor
The data that we will analyze in this sample is a binary file.
Therefore, use a binary file editor to display and check the contents of the binary file.
*If you are using RJ-4250WB/4230B, please follow the steps below to set registry:
1:Open the [Run] box (keyboard shortcut [Windows Key] + [R])
2:Type “regedit” and click [OK]. Click [Yes] to confirm when UAC prompt appears.
Run
- 7 -
4. Print Data

Raster Command Reference
3: Open the path below in TreeView on the left-side of the Registry Editor.
RJ-4250WB:
\HKEY_LOCAL_MACHINE\SOFTWARE\Brother Industries, Ltd.\P-touch\Driver\3.0\Brother RJ-4250WB
RJ-4230B:
\HKEY_LOCAL_MACHINE\SOFTWARE\Brother Industries, Ltd.\P-touch\Driver\3.0\Brother RJ-4230B
4:Right-click on the right pane and select [New] → [DWORD (32-bit) Value]
5:Rename the added key to [TIFF Compression]
6:Right-click the added key and select [Modify]
7:Change the [Value data] to “1” on the edit dialogue
Registry Editor (After [TIFF Compression] registry key added)
4.2.2 Checking the print data
The procedure for checking the print data is provided below.
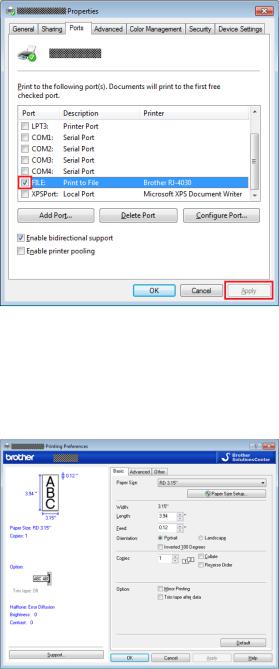
Step 1: Change the port of the printer to “FILE:”.
Step 2: Print the desired item (in this case, the test page), and then specify the file name. Step 3: Open the created file in the binary file editor to check it.
- 8 -
4. Print Data
Raster Command Reference
Step 1: Change the port of the printer to “FILE:”.
Open the [Devices and Printers] window, right-click the printer, and then display the printer’s Properties dialog box. Click the [Ports] tab in the printer’s Properties dialog box, select the “FILE:” check box, and then click the [Apply] button.
[Ports] tab of the printer Properties dialog box
Step 2: Print the item (in this case, the test page), and then specify the file name.
For this sample, print the test page with the default print settings, which were specified immediately after the printer driver was installed.
Default settings immediately after installation of the printer driver
- 9 -
4. Print Data
Raster Command Reference
When the test page is printed with the printer, a dialog box appears so that the file name can be specified. (Refer to the illustration below.)
After a file name is typed in and the [OK] button is clicked, the printer driver creates the print data and saves it in a file with the specified name.
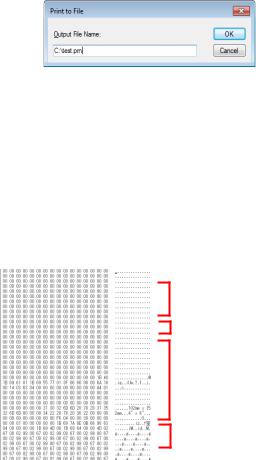
Dialog box for specifying the file name
Step 3: Open the print data in the binary file editor.
Open the saved file in the binary file editor. The rows of numbers that appear are the print data. (Refer to the illustration below.)
The print data is constructed of the following: (1) initialization commands, (2) control codes, (3) raster data and (4) print commands, which were described in “4.1 Print data overview”. For details on the print data, refer to “4.2.3 Explanation of print data for the test page”.
(1) Initialization
commands
(2) Control codes
(3) Raster data
(4) Print commands
Print data
- 10 -
4. Print Data

Raster Command Reference
4.2.3 Explanation of print data for the test page
The print data for the test page outputted in the previous section is described below.
The following illustration shows the print data created in section “4.2.1 Preparation” opened in the binary file editor.
Print data (Left: RJ-3000 and RJ-2000, Right: RJ-4200)
- 11 -
4. Print Data
Raster Command Reference
Descriptions for the numbers in the print data on the previous page are provided in the following table. For details on each command, refer to “7. Printing Command Details”.
|
No. |
|
|
Command Name |
|
|
Description |
|
|
|
|
|
|
|
|||
|
|
|
|
|
|
|||
|
|
|
|
|
|
|
|
|
|
|
|
Invalidate |
|
A 350-byte invalidate command is sent. |
|||
|
|
|
(With the RJ-2000, a 200-byte invalidate command is sent.) |
|||||
|
|
|
|
|
|
|
||
|
|
|
|
|
|
|||
2 |
|
|
Initialize |
|
The “initialize” command is sent. |
|||
|
|
|
|
|
|
|
||
3 |
|
|
Switch dynamic |
|
The printer is switched to raster mode. |
|||
|
|
command mode |
|
Send this command before sending raster data to the printer. |
||||
|
|
|
|
|
||||
|
|
|
|
|
|
|
|
|
|
|
|
|
|
|
|
Internal specification commands. |
|
4 |
|
|
Job ID setting |
|
Since this is a command for outputting with the commercial |
|||
|
|
commands |
|
version of the driver, it is unnecessary for the user to send this |
||||
|
|
|
|
|
||||
|
|
|
|
|
|
|
command. |
|
|
|
|
|
|
|
|
||
5 |
|
|
Additional media |
|
Additional media information on the media size is sent. |
|||
|
|
information command |
|
This is the command for “3.15" (80 mm)”. |
||||
|
|
|
|
|
||||
|
|
|
|
|
|
|
||
6 |
|
|
Print information |
|
Media size information for the print data is sent. |
|||
|
|
command |
|
This is the command for “3.15" (80 mm)” continuous length tape. |
||||
|
|
|
|
|
||||
|
|
|
|
|
|
|
||
7 |
|
|
Various mode settings |
|
This command specifies the settings such as mirror printing. |
|||
|
|
(1Bh+69h+4Dh+00H) |
|
Normally no settings required here. |
||||
|
|
|
|
|
||||
|
|
|
|
|
|
|||
8 |
|
|
Specify margin amount |
|
This command specifies the amount of margins. |
|||
|
|
|
|
|
|
|
|
|
9 |
|
|
Select compression |
|
TIFF compression mode is selected. |
|||
|
|
mode |
|
|||||
|
|
|
|
|
|
|
||
|
|
|
|
|
|
|||
10 |
|
|
Raster data |
|
Raster data continues. |
|||
|
|
|
|
|
|
|
||
11 |
|
|
Print command with |
|
Since one page will be printed, this is sent at the end of the first |
|||
|
|
feeding |
|
page. |
||||
|
|
|
|
|
||||
|
|
|
|
|
|
|
|
|
|
|
|
|
Switch automatic |
|
Dynamically switches whether an automatic status notification is |
||
12 |
|
|
status notification |
|
||||
|
|
|
given during printing. |
|||||
|
|
|
|
mode |
|
|||
|
|
|
|
|
|
|
||
|
|
|
|
|
|
|
||
13 |
|
|
Switch dynamic |
|
This command resets to default mode that is switched by No.3. |
|||
|
|
command mode |
|
Send this command after [Print command with feeding] is sent. |
||||
|
|
|
|
|
||||
|
|
|
|
|
|
|
|
|
- 12 -
4. Print Data
 Loading...