


SCC--20002000
STORE OPERATIONS MANUAL

 WARNING
1.To reduce the risk of fire or electric shock, do not disassemble this unit or allow it to get wet.
2.This unit produces a bright flash. Do not open the stamp compartment cover until the xenon lamp has flashed.
3.To reduce the risk of electric shock, do not put your hand into the xenon lamp unit compartment.
 CAUTION
1.To reduce the risk of burns, do not touch the thermal head.
2.Avoid contact of the stamp ink, stamp correction pen, or print head cleaning pen with your mouth, eyes and skin.
3.Keep the stamp correction pen and print head cleaning pen away from flames.

Table of Contents
SET UP |
|
FCC Compliance ............................................... |
2 |
General Precautions ......................................... |
2 |
Unpacking ........................................................ |
3 |
Machine Mode Operations ............................... |
5 |
System Requirements ........................................ |
5 |
Connecting the Interface and |
|
Power Supply Cables ........................................ |
6 |
Installing the software ...................................... |
7 |
Stampcreator P-touch Editor and |
|
printer driver ................................................. |
7 |
Stampcreator Express ................................... |
14 |
First Steps ....................................................... |
16 |
DESIGNING A STAMP |
|
Overview ........................................................ |
18 |
Stampcreator P-touch Editor .......................... |
19 |
Tools for Formatting ....................................... |
20 |
Property Dock ............................................. |
20 |
Tools ............................................................ |
21 |
Object Dock ................................................ |
22 |
Formatting a Stamp ........................................ |
23 |
Selecting the stamp size ............................... |
23 |
Typing text ................................................... |
23 |
Changing the font ........................................ |
23 |
Changing the character size ......................... |
24 |
Changing style effects .................................. |
24 |
Changing the font of a text block ................. |
24 |
Changing the character size of a text block .. |
25 |
Centering text within a block ....................... |
26 |
Vertical and horizontal block alignment ...... |
26 |
Drawing lines in a stamp ............................. |
27 |
Drawing a frame .......................................... |
28 |
Changing the frame size .............................. |
28 |
Using special design frames ......................... |
29 |
Creating stamps with clip art images ............ |
30 |
Creating stamps with pictures ...................... |
30 |
Advanced Steps .............................................. |
31 |
Importing graphics from a scanner, digital |
|
camera, or other clip art source ................... |
31 |
Making a stamp containing a photo ............. |
32 |
Auto Format ................................................ |
36 |
Stampcreator Express ..................................... |
37 |
Formatting a stamp ...................................... |
37 |
Printing a draft sheet .................................... |
38 |
Making an ID label ...................................... |
39 |
Adding new styles to |
|
the Stampcreator Express software ............... |
40 |
MAKING A STAMP |
|
Final Steps ...................................................... |
42 |
Getting ready ............................................... |
42 |
Printing a draft sheet .................................... |
42 |
Engraving a stamp ....................................... |
44 |
Assembling the stamp .................................. |
46 |
Average ink cure times ................................ |
46 |
Making an ID label ...................................... |
47 |
Applying an ID label ................................... |
47 |
CARE & TROUBLE SHOOTING |
|
Periodic Maintenance ..................................... |
48 |
Cleaning the draft sheet rollers .................... |
48 |
Cleaning the ID label rollers ........................ |
48 |
Cleaning the Print Heads ............................. |
49 |
Replacing the xenon lamp unit .................... |
49 |
Removing a jam and Correcting a Stamp ........ |
50 |
Removing a jammed draft sheet or ID label |
|
sheet ............................................................ |
50 |
Correcting an imperfect stamp surface ......... |
51 |
Correction cure times .................................. |
51 |
Refilling the Stamp Ink ................................... |
52 |
Easy Reference Trouble Shooting Guide ......... |
53 |
Error message list ......................................... |
55 |
SUPPLIES & ACCESSORIES |
|
Stamp Ordering Information .......................... |
56 |
How to order stamps ................................... |
56 |
Stamp samples ............................................. |
57 |
Supply items ................................................ |
58 |
Maintenance items ...................................... |
60 |
SUPPORT NUMBERS |
|
1
FCC Compliance
Federal Communications Commission (FCC) Declaration of Conformity (For USA Only)
Brother International Corp. 100 Somerset Corporate Blvd. Bridgewater, NJ 08807-0911 USA
TEL: (908) 704-1700 declares that the product:
Brother Stamp Creation System “Stampcreator Pro”
Model Number: SC-2000
complies with Part 15 of the FCC Rules. Operation is subject to the following two conditions: (1) this device may not cause harmful interference, and (2) this device must accept any interference received, including interference that may cause undesired operation.
This equipment has been tested and found to comply with the limits for a Class B digital device, pursuant to Part 15 of the FCC Rules. These limits are designed to provide reasonable protection against harmful interference in a residential installation. This equipment generates, uses, and can radiate radio frequency energy and, if not installed and used in accordance with the instructions, may cause harmful interference to radio communications. However, there is no guarantee that interference will not occur in a particular installation. If this equipment does cause harmful interference to radio or television reception, which can be determined by turning the equipment off and on, the user is encouraged to try to correct the interference by one or more of the following measures.
To correct interference
•Reorient or relocate the receiving antenna.
•Increase the separation between the equipment and receiver.
•Connect the equipment to an outlet on a circuit different from that to which the receiver is connected.
•Consult the dealer or an experienced radio/TV technician for help.
•The enclosed interface cable should be used in order to ensure compliance with the limits for a Class B digital device.
General Precautions
•Be sure the machine is always placed on a level, stable surface.
•Keep the machine and its accessories out of direct sunlight and extremely dusty places. Dust and dirt can cause distortion to the stamp image.
•Do not expose the machine, or any of its accessories, to extreme temperatures or high humidity.
•Do not try to disassemble the machine or any of its accessories.
•When connecting and disconnecting the cables, always be sure to grab the connectors, not the cords.
•Store the draft sheets, ID labels, and cleaning sheets in their packages.
•Do not use folded or damaged draft sheets, ID labels, or cleaning sheets.
•Do not look directly at the flash from the xenon lamp unit.
•Be careful that the CD ROM is not scratched.
•Do not put heavy objects on the CD ROM.
•Do not touch the printed draft sheet before creating a stamp.
•Do not remove the clear protective film before engraving a stamp.
•Do not reuse the ink pad as ink will have permeated the pad surface.
•Do not stand the stamp upside down immediately after it is assembled.
•Do not place the stamp on its side immediately after it is assembled.
•Do not touch the print heads.
•Do not use cleaning devices other than the print head cleaning pen and cleaning sheets supplied with the Stampcreator Pro.
•Only lift the machine by grabbing the specified areas.
•Make sure that the power requirements specified for this machine are met.
•Do not touch the machine’s internal parts since they can become extremely hot after the machine has been used for a long period of time.
•To prevent dust from entering the machine, do not leave the machine for a long period of time with the ink ribbon compartment cover or stamp compartment cover open or the xenon lamp unit or draft sheet magazine tray uninstalled.
•Do not touch any of the machine’s internal sensors.
•Microsoft® and Microsoft Windows® are registered trademarks of Microsoft Corp. in the US and other countries.
•All other software and product names mentioned are trademarks or registered trademarks of their respective companies.
•Changes or modifications not expressly approved by Brother Industries, Ltd. could void the user’s authority to operate the equipment.
2

SET UP
Unpacking
SC-2000
Draft sheet magazine tray slot Mode and Set buttons
Stamp compartment
LCD |
cover |
Exit slot
Xenon lamp unit
ID label slot Ink ribbon compartment cover
Xenon lamp unit release button
Power switch
STARTER KIT
Power supply cord (for connecting the SC-2000 to the AC outlet)
|
|
5 ID label sheets (for printing |
|
|
a label that can be attached to |
|
|
each stamp for identification) |
|
|
size 1438 ( × 2) |
150 draft sheets (for printing the |
Draft sheet magazine tray (for |
size 1850 ( × 2) |
data in order to engrave the stamp) |
feeding in the draft sheets) |
size 2770 ( × 1) |
5 stamps with caps |
|
|
size 1438 ( × 2) |
|
|
size 1850 ( × 2) |
|
|
size 2770 ( × 1) |
5 stamp skirts |
5 grips |
Ink Ribbon Cartridge |
Xenon Lamp Unit |
|
|
|
|
|
|
|
3
SET UP
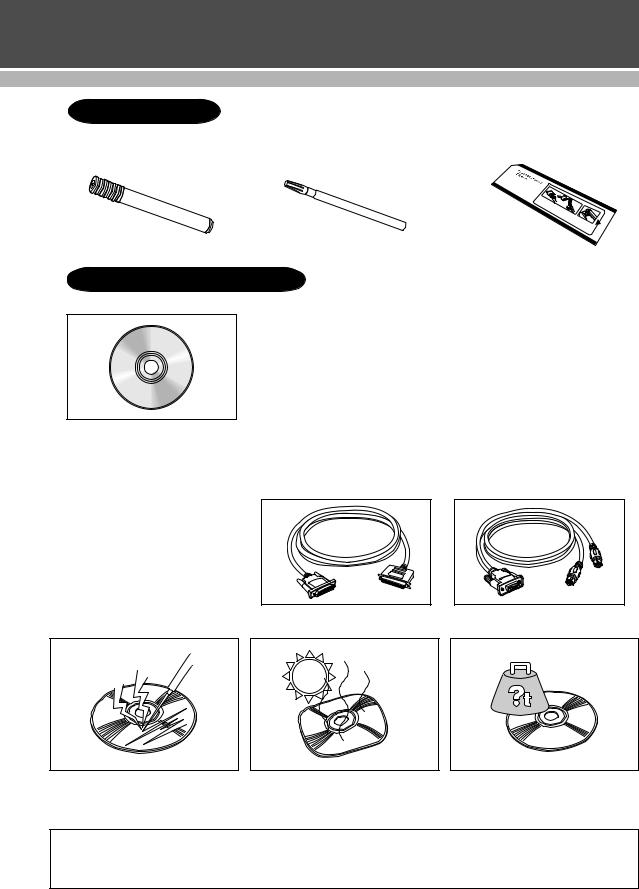
MAINTENANCE KIT
Print head cleaning pen (for |
|
Stamp correction pen (for |
9 cleaning sheets (for |
|||
cleaning the print head) |
|
correcting the engraved stamp) |
cleaning the rollers) |
|||
|
|
|
|
|
|
|
|
|
|
|
|
|
|
|
|
|
|
|
|
|
|
|
|
|
|
|
|
CONNECTING YOUR COMPUTER
CD-ROM containing the computer software and their manuals
Interface cables (for connecting the SC-2000 to the computer)
Parallel interface cable (for the parallel port of a computer running
Windows® 98/98SE/Me/NT4.0/ 2000 Professional/XP Professional/ XP Home Edition)
Serial interface cable (for the serial port of a computer running Windows® 98/98SE/Me/NT4.0/ 2000 Professional/XP Professional/ XP Home Edition)
Precautions:
•Be careful that the CD-ROM is not scratched.
•Do not subject the CD-ROM to extremely high or extremely low temperatures.
•Do not put heavy objects on the CD-ROM.
Brother Co., Ltd. and its suppliers possess all rights and copyrights to this software (including, but not limited to, the programming, images, clip art, templates, and text incorporated into the software), the text in the enclosed manuals, and duplicates of the software. This software, either in part or in whole, may not be duplicated, modified, reverse-engi- neered, disassembled or decompiled without permission.
4

SET UP
Machine Mode Operations
The Stampcreator Pro has different modes for performing different operations.
Follow the operations described below to select the desired mode.
Initializing the machine
•Turn the machine off, then on again to initialize it. The message “INITIALIZE” appears in the LCD.
•When data has been cleared, the message “READY” appears in the LCD.
Removing the draft sheet and clearing data
•Press the Mode button once until “RESET” appears in the LCD.
•Press the Set button (see page 44).
Periodic machine cleaning
•Press the Mode button twice until “CLEAN” appears in the LCD, and then insert a cleaning sheet.
•Press the Set button (see page 48).
Resetting the xenon lamp counter
•Reset the counter only after the xenon lamp unit has been replaced with a new one.
•Press the Mode button four times until “RESET COUNTER” appears in the LCD, and then install a new xenon lamp unit.
•Press the Set button (see page 49).
Baud rate
The baud rate of the machine must match the baud rate of the Stamp Editor software. A larger number will give you faster data transmission.
System Requirements
Computer requirements
Check that your system meets the following requirements.
•IBM PC or compatible 486DX or faster (Pentium® 100 MHz recommended)
•Microsoft Windows® 98, 98SE, Me, NT 4.0, 2000 Professional, XP Professional, or XP Home Edition
•Available hard-disk space: Minimum 70 MB
•Available memory: Minimum 64 MB
•VGA or higher graphic card
•Port: COM port (9-pin RS-232C serial port that supports 57,600 bps)
Parallel port (25-pin parallel port (LPT port))
•CD ROM drive
•Pointing device
5
SET UP
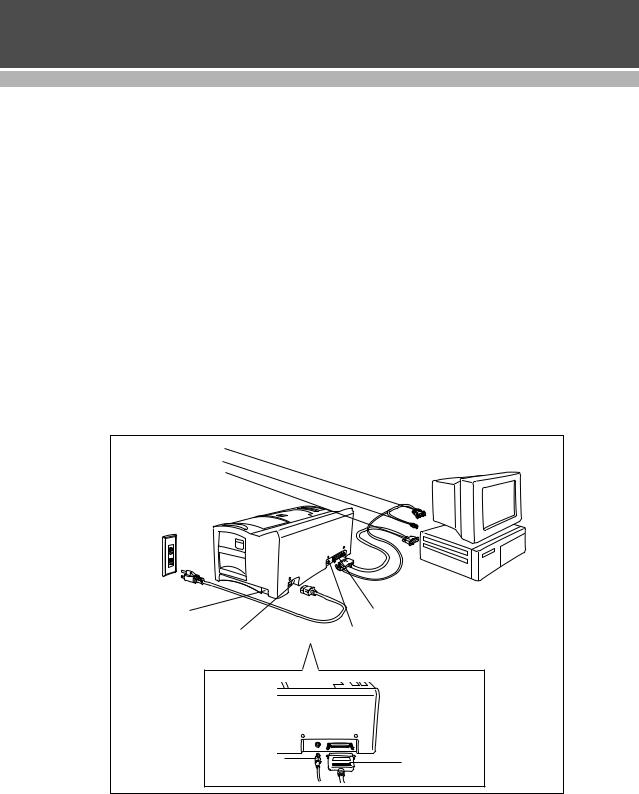
Connecting the Interface and Power
Supply Cables
After connecting the interface and power supply cables to the SC-2000, it can be used to create stamps from any layout that you design in the Stampcreator P-touch Editor software or Stampcreator Express software installed on your computer.
1 Be sure both the SC-2000 and the computer are turned off.
2Attach the appropriate interface cable connector to the computer port.
NOTE: After connecting the 9- or 25-pin connector, be sure to tighten the screws to lock it into place.
3 Connect the other end of the interface cable to the interface jack on the back of the SC-2000.
NOTE: After connecting the interface cable to the 36-pin connector jack on the
SC-2000, be sure to squeeze the wire clips against the connector until they lock into place.
4Insert one end of the power supply cord into the power supply jack on the SC-2000 and the other end of the cord into an AC outlet.
25-pin connector |
|
9-pin connector |
|
25-pin connector |
|
Power switch |
36-pin connector jack |
Power supply jack |
8-pin connector jack |
Back: |
|
8-pin connector |
36-pin connector |
|
6
SET UP
Installing the Software
Stampcreator P-touch Editor and printer driver
Before stamps can be engraved on the SC-2000, the stamp-editing tool Stampcreator P-touch Editor software or Stampcreator Express software and the SC-2000 printer driver must be installed.
Follow the procedure described below to install the stamp-editing tool Stampcreator P-touch Editor software onto the computer.
NOTE: You must have administrator privileges in order to install the Stampcreator
P-touch Editor software and change the baud rate on a computer running Windows NT 4.0, 2000 or XP.
1 Connect the SC-2000 to the computer’s serial or parallel port, and then turn on only the computer.
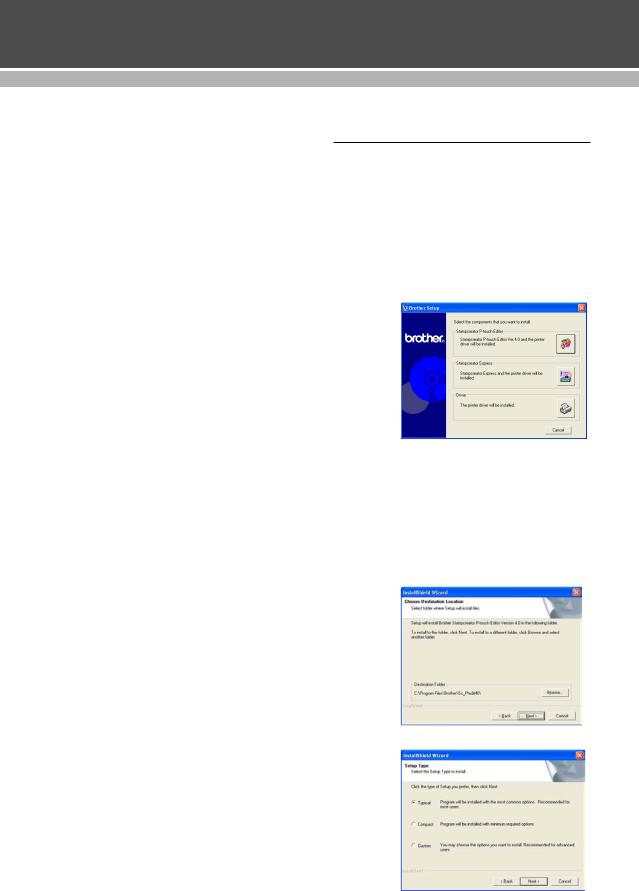
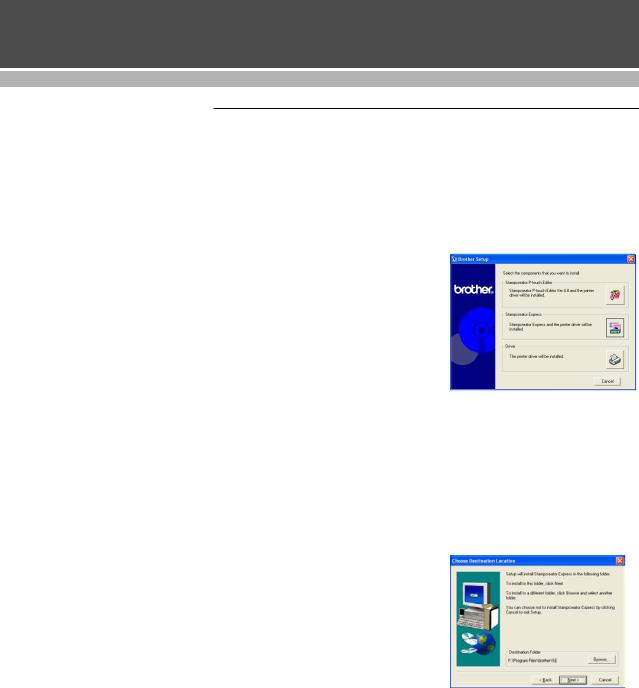
2Insert the Stampcreator P-touch Editor Version 4.0 CD-ROM into the computer’s CD-ROM drive. A dialog box appears, allowing you to select which components to install. Click the Stampcreator P-touch Editor button.
The InstallShield® Wizard for installing the Stampcreator P-touch Editor software starts up. When the Welcome dialog box appears, click the Next button to continue.
If the dialog box does not automatically appear, double-click “My Computer” on the desktop, double-click the icon for the CD-ROM drive containing the CD-ROM, and then double-click “Setup” to display the dialog box.
3When the License Agreement dialog box appears, please read the license agreement carefully.
If you accept all terms of the preceding license agreement, click the Yes button to continue.
4In the Customer Information dialog box, type the necessary information into the appropriate boxes, and then click the Next button.
If the information has already been registered in Windows®, it will appear in the appropriate boxes.
5In the Choose Destination Location dialog box, if it is OK to install the Stampcreator P-touch Editor software into the folder shown in the “Destination Folder” box, click the Next button.
6In the Setup Type dialog box, select the installation method, and then click the Next button.
7
SET UP
7In the Add shortcut dialog box, specify where to add shortcuts for Stampcreator P-touch Editor, and then click the Next button.
8If you are satisfied with the settings that appear in the Start Copying Files dialog box, click the Next button to begin copying files.
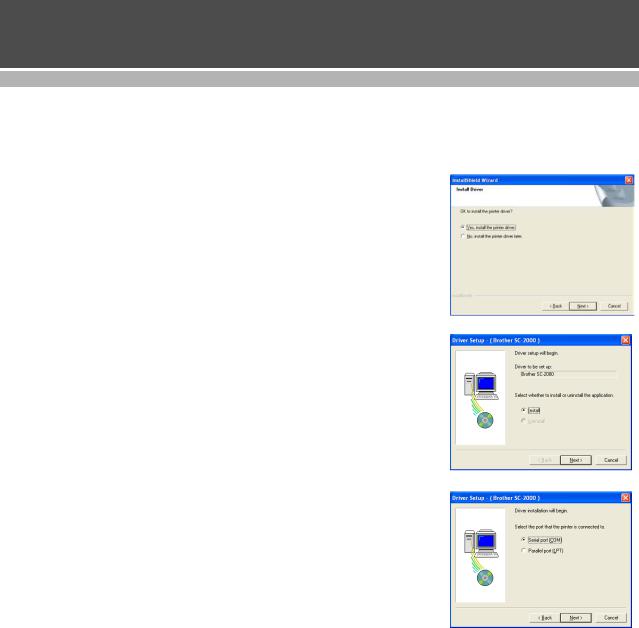
9When the Install Driver dialog box appears, select “Yes, install the printer driver.”, and then click the Next button.
NOTE: To install the printer driver, click the Driver button in the dialog box that allows you to select which components to install.
0A Driver Setup dialog box appears, allowing you to select whether to install or uninstall the printer driver. Check that “Brother SC-2000” is selected for installation, select “Install”, and then click the Next button.
ASelect “Serial port (COM)” if the SC-2000 is connected to a serial port or select “Parallel port (LPT)” if the SC-2000 is connected to a parallel port, and then click the Next button.
For a serial port connection, continue with step 12. For a parallel port connection, skip to step 24.
8
SET UP
For a serial port connection:
B For Windows® NT4.0/2000 Professional/XP Professional/XP Home Edition users:
If a P-touch (PTCOM) port is not installed, add one by clicking the Add button to display the Port Name dialog box.
If a P-touch (PTCOM) port is already installed, click the Next button and continue with step 13.
DIn the dialog box that appears, allowing you to confirm how the installation will be carried out, check that the installation will be carried out as desired, and then click the Next button.
EA dialog box showing that the printer driver has been installed appears.
To check the connection between the SC-2000 and the computer, select “Start up the Change Baud Rate Wizard”, ONLY THEN turn on the SC-2000, and then click the Next button.
FThe Change Baud Rate Wizard starts up. When asked to select the port where the SC-2000 is connected, select the same port selected in step 13, and then click the Next button.
GSelect the desired baud rate, and then click the Next button.
Normally “57600 bps” is selected; however, your computer may not be able to support a baud rate of 57,600 bps. If this is the case, refer to your computer's instruction manual and select the maximum possible baud rate.
9
SET UP
HWhen the “Are the following settings OK?” dialog box appears, check that the baud rate will be changed as desired, and then click the Next button.
To change the setting, click the Back button, and make the necessary changes.
IUsing the buttons on the SC-2000, change its baud rate to the baud rate selected in step 17.
Then, click the Next button in the “PC settings were changed.” dialog box. A test transmission is sent to check that the settings of both the computer and the SC-2000 are the same.
NOTE: The default baud rate of the SC-2000 is 57,600 bps. If the baud rate of the COM port is changed, be sure to follow the procedure described below to change the baud rate of the SC-2000.
(a)Press the Mode button on the SC-2000 four times until “BAUD RATE” appears, and then press the Set button.
(b)The currently selected baud rate appears. Press the Mode button until the baud rate selected with the Change Baud Rate Wizard appears.
(c)Press the Set button.
JWhen the “The settings are changed.” dialog box appears, showing that the baud rate has been set as specified, click the Finish button.
KWhen the “Driver setup is completed” dialog box appears, click the Finish button to exit Driver Setup.
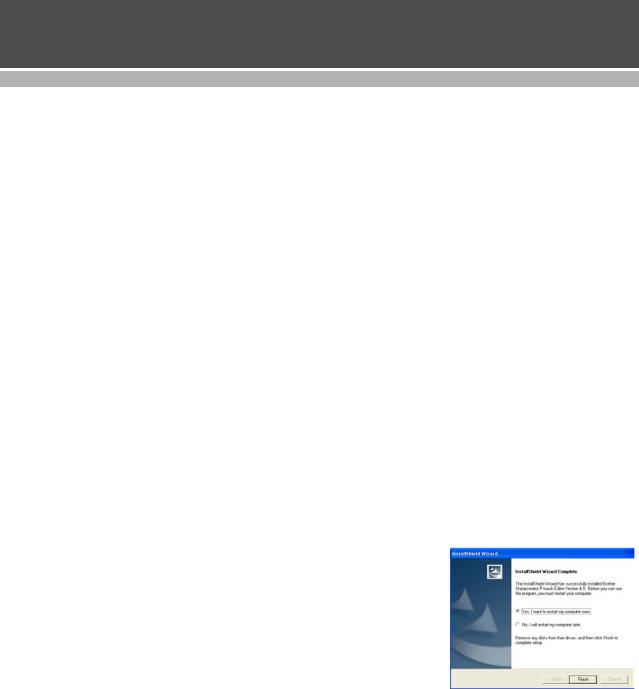
LAfter the Setup Status window appears, the InstallShield Wizard Complete dialog box appears.
MRemove the CD-ROM from the computer.
In the InstallShield Wizard Complete dialog box select “Yes, I want to restart my computer now.” and then click the Finish button to complete the setup and to restart the computer.
This completes the installation of the Stampcreator P-touch Editor software and the printer driver for a serial port connection.
10
SET UP
For a parallel port connection:
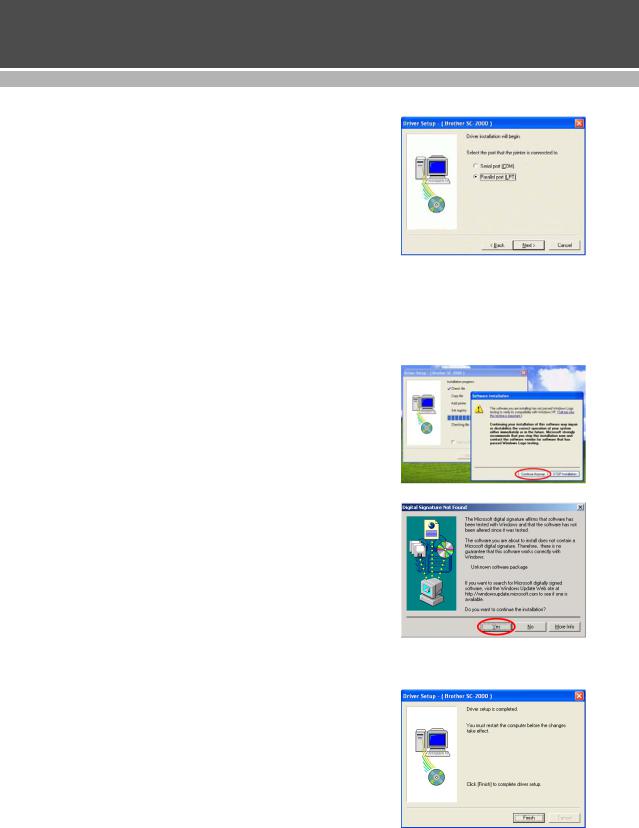
N Select “Parallel port (LPT)”, and then click the Next button.
OA dialog box appears, allowing you to select the LPT port where the SC2000 is connected. Usually “LPT1” is the appropriate port. Then, click the Next button.
PIn the dialog box that appears, allowing you to confirm how the installation will be carried out, check the installation will be carried out as desired, and then click the Next button.
QFor Windows® XP users only
After checking the files during the installation procedure, when the Software Installation dialog box appears, click the Continue Anyway button.
For Windows® 2000 users only
After checking the files during the installation procedure, when the Digital Signature Not Found dialog box appears, click the Yes button.
RA dialog box shows that the installation has been completed. Click the Next button.
SWhen the “Driver setup is completed.” dialog box appears, click the Finish button to exit Driver Setup.
TAfter the Setup Status window appears, the InstallShield Wizard Complete dialog box appears.
11
SET UP
For Windows® 98/98SE/Me/NT4.0 users
URemove the CD-ROM from the computer.
In the InstallShield Wizard Complete dialog box select “Yes, I want to restart my computer now.” and then click the Finish button to complete the setup and to restart the computer.
After the computer is restarted and the Desktop screen appears, then turn on the SC-2000.
This completes the installation of the Stampcreator P-touch Editor software and the printer driver for a parallel connection.
*Whenever you turn on the SC-2000, turn on the computer first and wait for the Desktop to appear.
When the New Hardware Wizard starts up, click the Cancel button.
For Windows® 2000 users
U Turn on the SC-2000.
VRemove the CD-ROM from the computer.
In the InstallShield Wizard Complete dialog box select “Yes, I want to restart my computer now.” and then click the Finish button to complete the setup and to restart the computer.
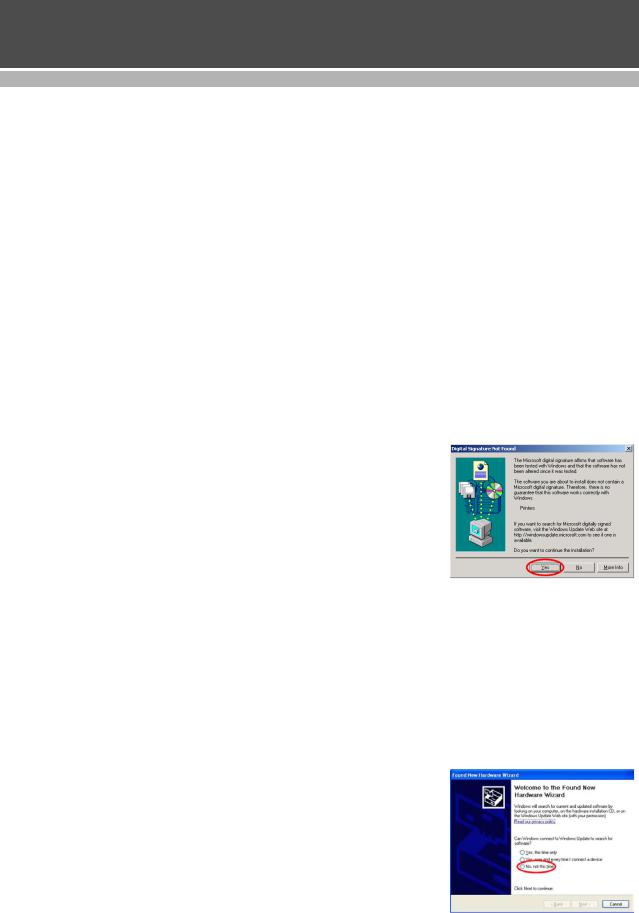
WAfter the computer has restarted, when the Digital Signature Not Found dialog box appears, click the Yes button.
This completes the installation of the Stampcreator P-touch Editor software and the printer driver for a parallel connection.
For Windows® XP users
URemove the CD-ROM from the computer.
In the InstallShield Wizard Complete dialog box select “Yes, I want to restart my computer now.” and then click the Finish button to complete the setup and to restart the computer.
V After the computer has restarted, turn on the SC-2000.
WThe Found New Hardware Wizard starts up.
When asked if Windows can connect to Windows Update to search for software, select “No, not this time”, and then click the Next button.
If the Wizard does not start up automatically, please restart the computer with the SC-2000 turned on. This should start up the Wizard.
12
SET UP
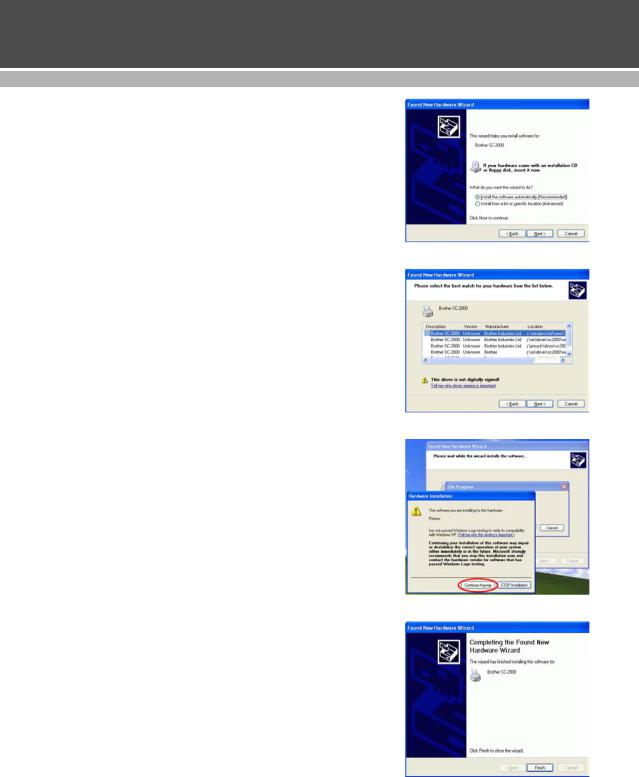
XIn the next dialog box, select “Install the software automatically (Recommended)”, and then click the Next button.
NOTE: Please ignore the message “If your hardware came with an installation CD or floppy disk, insert it now.” Please do not insert the Stampcreator P-touch Editor CD-ROM again.
If you do not remove the CD-ROM from the computer prior to restarting it, a dialog box asking you to select the best match for your hardware from the list will appear.
Please click the Cancel button. Remove the CD-ROM, then restart the computer with the SC-2000 turned on.
Then continue from Step 33.
Y When the Hardware Installation dialog box appears, click the Continue
Anyway button.
Z Click the Finish button to exit the Found New Hardware Wizard.
This completes the installation of the Stampcreator P-touch Editor software and the printer driver for a parallel connection.
13
SET UP
Stampcreator Express
The Stampcreator Express software is a simple stamp-editing tool that is very easy to operate. Simply select a style (template), and then change the text as you wish.
Follow the procedure described below to install the Stampcreator Express software onto the computer.
NOTE: You must have administrator privileges in order to install the Stampcreator Express software on a computer running Windows NT 4.0, 2000 or XP.
1Insert the Stampcreator P-touch Editor Version 4.0 CD-ROM into the computer’s CD-ROM drive. A dialog box appears, allowing you to select which components to install. Click the Stampcreator Express button.
If the dialog box does not automatically appear, double-click “My Computer” on the desktop, double-click the icon for the CD-ROM drive containing the CD-ROM, and then double-click “Setup” to display the dialog box.
2When the Welcome dialog box appears, click the Next button to continue.
3In the User Information dialog box, type the necessary information into the appropriate boxes, and then click the Next button.
If the information has already been registered in Windows®, it will appear in the appropriate boxes.
4When the Registration Confirmation dialog box appears, if the registration information is correct, click the Yes button to register the entered information.
5In the Choose Destination Location dialog box, if it is OK to install the Stampcreator Express software into the folder shown in the “Destination Folder” box, click the Next button.
The installation of the Stampcreator Express software starts.
To install the software into a different folder, click the Browse button, and then select the folder.
14
SET UP
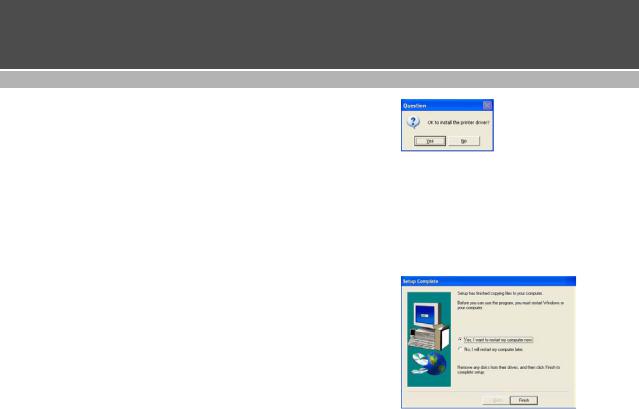
6When the Question dialog box appears, if this is your first time to install the SC-2000 printer driver, click the Yes button to continue.
For details on installing the SC-2000 printer driver, refer to steps 10 through 39 in the section “Installing the Stampcreator P-touch Editor software and the SC-2000 printer driver” of this STORE OPERATIONS MANUAL.
If you have installed the SC-2000 printer driver when you installed the Stampcreator P-touch Editor software, you do not need to install it at this point. Click the No button to skip this operation.
For this procedure, suppose that the SC-2000 printer driver has already been installed and click the No button.
7Remove the CD-ROM from the computer, select “Yes, I want to restart my computer now.”, and then click the Finish button to complete the setup and to restart the computer.
This completes the installation of the Stampcreator Express software.
15
SET UP
First Steps
After you have designed a stamp layout using the Stampcreator P-touch Editor software or Stampcreator Express software, you can engrave it into a stamp.
Installing the ink ribbon cassette
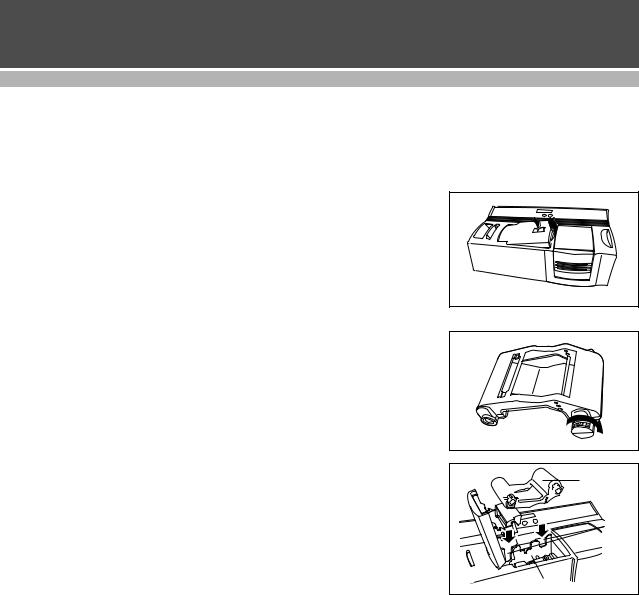
1 Press the ink ribbon compartment cover button to open the cover.
NOTE: Open and close the ink ribbon compartment cover by pressing only on the position specified.
2If the ink ribbon in the cassette is loose, turn it over and use your finger to wind the toothed wheel on the large knob on the right side until there is no slack in the ribbon.
3Insert the knobs on the left end of the cassette into the slots on the left side of the compartment, and then push down on the right end of the cassette so that the knobs on the right side slide into the slots on the right side of the compartment.
Ink ribbon 


 cassette
Slots
Ink ribbon compartment
4 Slowly close the ink ribbon compartment cover so that it locks into place.
NOTE: Be careful not to pinch your fingers with the compartment cover while closing it.
Replacing a used ink ribbon cassette
1 Remove the empty cassette by pulling it straight up.
2Follow the instructions described above to insert the new ink ribbon cassette.
NOTE: One ink ribbon cassette will yield approximately150 stamps and ID labels. The message “CHECK RIBBON” will appear on the Stampcreator Pro’s LCD when the cartridge is empty. To order more ink ribbon cassettes, see page 59.
16
SET UP
Loading draft sheets and installing the draft sheet magazine tray
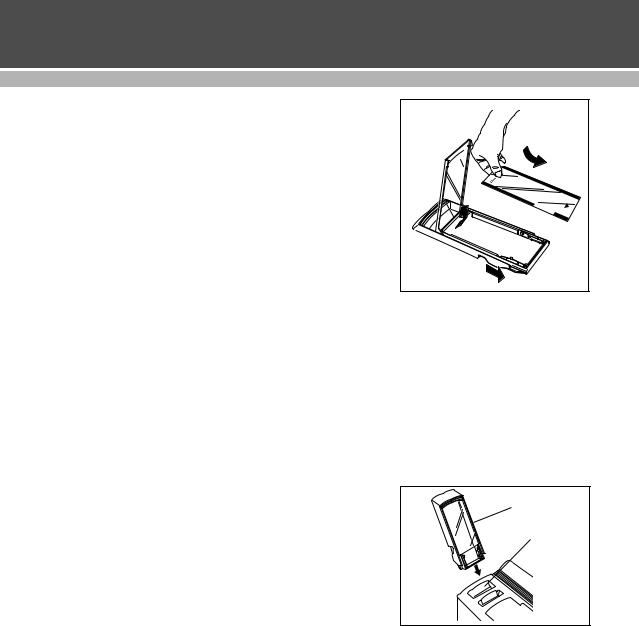
1 Slide the magazine tray out from its outer case.
2 Lift up the magazine tray lid.
3Place the draft sheets (with the words “DRAFT SHEET” facing up) into the magazine tray so that the corners of the sheets fit under the tabs in the front corners of the tray.
NOTE: No more than 50 draft sheets should be loaded into the magazine tray.
Be sure that there is no dust, fingerprints, etc. on the draft sheets.
Do not use a draft sheet that has been folded.
Be sure that a cleaning sheet is not accidentally inserted together with the draft sheets.
Cleaning sheets are to be used to clean the inside of the machine (see page 48). Be sure to separate the cleaning sheets from the draft sheets.
4 Close the magazine tray lid.
5 Slide the magazine tray back into its outer case.
6Fully insert the magazine tray straight into the draft sheet magazine tray slot.
NOTE: Be careful not to pinch your fingers while inserting the magazine tray.
To remove the draft sheet magazine tray, grab its outer case, and then pull out the entire magazine tray.
2 |
3 |
1 |
Draft sheet magazine tray
Draft sheet magazine tray slot
After installing the ink ribbon cassette and the magazine tray loaded with draft sheets, you can use the Stampcreator P- touch Editor software or Stampcreator Express software to create any layout containing graphics and text, and then engrave it into a stamp.
Checking the baud rate (For serial connection only)
Before engraving a stamp, make sure that the baud rate of the SC-2000 is the same as the baud rate selected using the Change Baud Rate Wizard.
1Press the Mode button on the SC-2000 until “BAUD RATE” appears on its LCD, and then press the Set button. The current baud rate is shown in the LCD.
2Press the Mode button until the desired baud rate is displayed, and then press the Set button. The message “READY” appears in the LCD.
17

DESIGINING A STAMP
Overview
There are two stamp-editing tools: Stampcreator P-touch Editor and Stampcreator Express. Use the Stampcreator P-touch Editor software to create a stamp design with a wide variety of functions. The Stampcreator Express software is a simple stamp-editing tool. Simply select a style (template), and then change the text.
18
 Loading...