


 Loading...
User’s Guide
Brother Laser Printer
HL-1200
HL-1201
HL-1210W
HL-1211W
For visually-impaired users
You can read this manual with Screen Reader ‘text-to-speech’ software.
You must set up the hardware and install the driver before you can use the machine.
Please use the Quick Setup Guide to set up the machine. You can find a printed copy in the box. Please read this User’s Guide thoroughly before you use the machine.
Please visit us at http://support.brother.com where you can get product support, the latest driver updates and utilities, and answers to frequently asked questions (FAQs) and technical questions.
Note: Not all models are available in all countries.
Version 0
OCE/ASA/SAF/GLF
Brother numbers
IMPORTANT
For technical and operational help, you must call the country where you bought the machine.
Register your product
Please complete the Brother Warranty Registration or, for your convenience and most efficient way to register your new product, register on-line at
http://www.brother.com/registration
Frequently asked questions (FAQs)
The Brother Solutions Center is our one-stop resource for all your machine needs. You can download the latest drivers, software and utilities, read FAQs and troubleshooting tips to learn how to get the most from your Brother product.
http://support.brother.com
You can check here for Brother driver updates.
Customer Service
Visit http://www.brother.com for contact information on your local Brother office.
Internet Addresses
Brother Global website: http://www.brother.com
For Frequently Asked Questions (FAQs), Product Support and Technical Questions, and Driver Updates and Utilities: http://support.brother.com
i
User’s Guides and where to find them?
Which manual? |
What's in it? |
Where is it? |
||
Windows users |
Macintosh users |
|||
|
|
|||
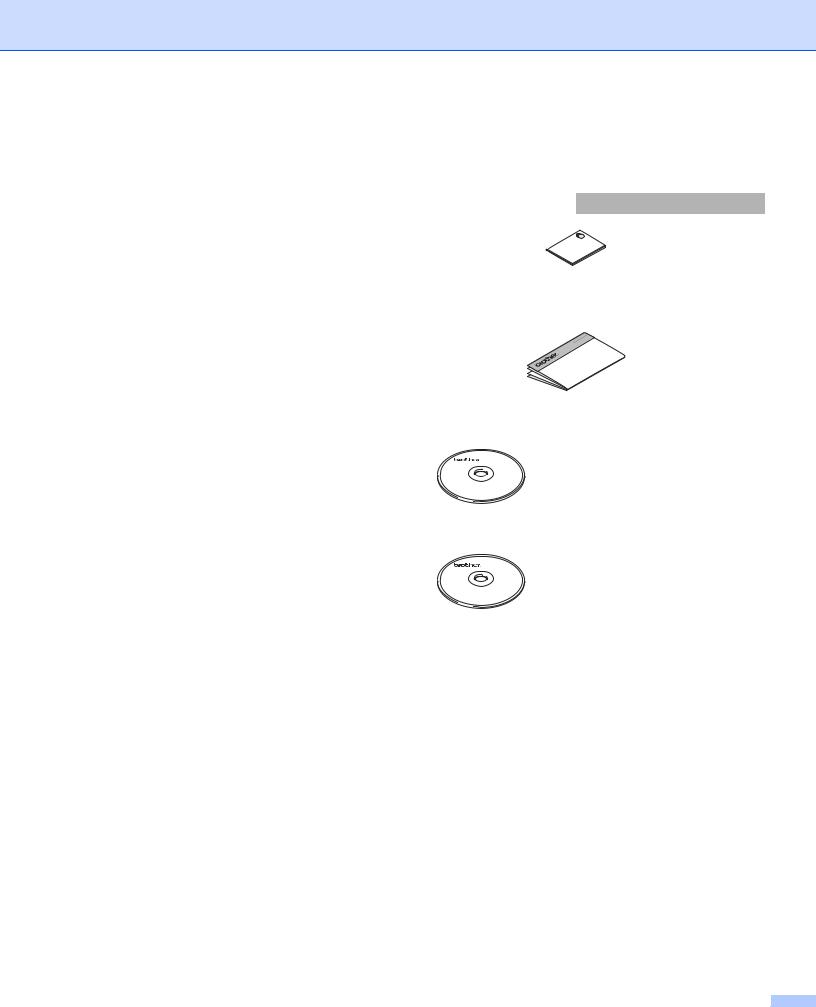
Product Safety Guide |
Read this Guide first. |
|
|
|
|
Please read the Safety |
|
|
|
|
Instructions before you set |
|
|
|
|
up your machine. See this |
|
|
|
|
Guide for trademarks and |
http://support.brother.com |
||
|
legal limitations. |
|
|
|
|
|
|
|
|
Quick Setup Guide |
Follow the instructions for |
|
|
|
|
setting up your machine |
|
|
|
|
and installing the drivers |
|
|
|
|
and software for the |
|
|
|
|
operating system and |
|
|
|
|
connection type you are |
http://support.brother.com |
||
|
using. |
|||
|
|
|
||
|
|
|
|
|
User’s Guide |
Learn the print operations, |
|
http://support.brother.com |
|
|
how to replace |
|
|
|
|
consumables, and |
|
|
|
|
performing routine |
|
|
|
|
maintenance. See |
|
|
|
|
troubleshooting tips. |
http://support.brother.com |
|
|
|
|
|
|
|
Network User’s |
This Guide provides useful |
|
http://support.brother.com |
|
Guide |
information about wireless |
|
|
|
(HL-1210W and HL- |
network settings and |
|
|
|
security settings using the |
|
|
||
1211W) |
|
|
||
Brother machine. You can |
|
|
||
|
|
|
||
|
also find supported |
http://support.brother.com |
|
|
|
protocol information for |
|
|
|
|
your machine and detailed |
|
|
|
|
troubleshooting tips. |
|
|
|
|
|
|
|
|
Mobile Print/Scan |
This Guide provides useful |
http://support.brother.com |
||
Guide for Brother |
information about printing |
|
|
|
iPrint&Scan |
from your mobile device |
|
|
|
(HL-1210W and HL- |
and scanning from your |
|
|
|
Brother machine to your |
|
|
||
1211W) |
|
|
||
mobile device when |
|
|
||
|
|
|
||
|
connected on a Wi-Fi® |
|
|
|
|
network. |
|
|
|
|
|
|
|
|
ii
Using the documentation
Thank you for buying a Brother machine! Reading the documentation will help you make the most of your machine.
Symbols and conventions used in the documentation
The following symbols and conventions are used throughout the documentation.
|
|
WARNING |
WARNING indicates a potentially hazardous situation which, if not avoided, |
|
|
could result in death or serious injuries. |
|
IMPORTANT |
IMPORTANT indicates a potentially hazardous situation which, if not avoided, |
||
|
|
|
may result in damage to property or loss of product functionality. |
NOTE |
NOTE specifies the operating environment, conditions for installation, or |
||
|
|
|
special conditions of use. |
|
|
|
Prohibition icons indicate actions that must not be performed. |
|
|
|
Electrical Hazard icons alert you to possible electrical shock. |
|
|
|
Fire Hazard icons alert you to the possibility of fire. |
|
|
|
Hot Surface icons warn you not to touch machine parts that are hot. |
|
|
|
|
Bold |
Bold style identifies keys on the machine control panel or computer screen. |
||
Italics |
Italicized style emphasizes an important point or refers you to a related topic. |
||
iii
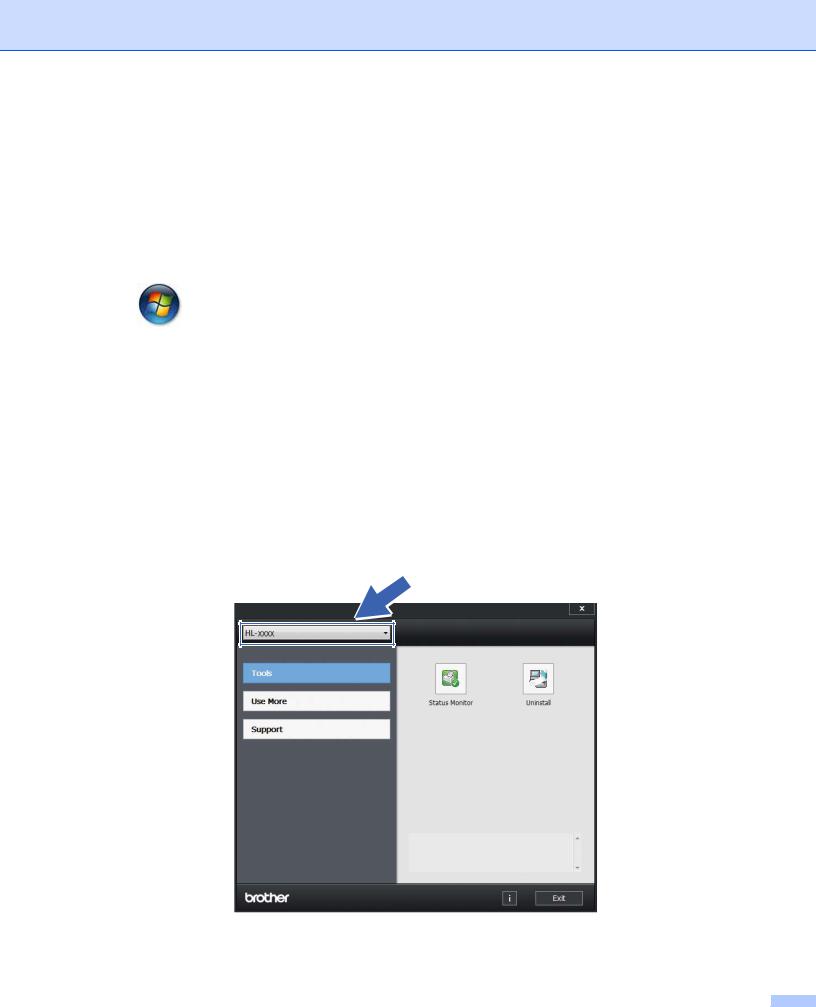
Accessing Brother Utilities (Windows®)
Brother Utilities  is an application launcher that offers convenient access to all Brother applications installed on your device.
a (Windows® XP, Windows Vista®, Windows® 7, Windows Server® 2003, Windows Server® 2008 and Windows Server® 2008 R2)
Click |
(Start) > All Programs > Brother > Brother Utilities. |
(Windows® 8 and Windows Server® 2012)
Tap or double-click  (Brother Utilities) either on the Start screen or the desktop. (Windows® 8.1 and Windows Server® 2012 R2)
Move your mouse to the lower left corner of the Start screen and click  (if you are using a touchbased device, swipe up from the bottom of the Start screen to display the Apps screen). When the
Apps screen appears, tap or click  (Brother Utilities). b Select your machine.
c Choose the operation you want to use.
iv

Table of Contents |
|
|
1 |
Printing Methods |
1 |
|
About this Machine .................................................................................................................................... |
1 |
|
Machine overview................................................................................................................................ |
1 |
|
Acceptable paper....................................................................................................................................... |
2 |
|
Paper capacity of the paper tray.......................................................................................................... |
2 |
|
2-sided printing .......................................................................................................................................... |
3 |
|
Guidelines for printing on both sides of the paper ............................................................................... |
3 |
|
Manual 2-sided printing ....................................................................................................................... |
4 |
2 |
Driver and Software |
5 |
|
Printer driver .............................................................................................................................................. |
5 |
|
Printing a document............................................................................................................................. |
6 |
|
Printer driver settings........................................................................................................................... |
7 |
|
Windows® .................................................................................................................................................. |
8 |
|
Accessing the printer driver settings.................................................................................................... |
8 |
|
Features in the Windows® printer driver.............................................................................................. |
8 |
|
Basic tab.............................................................................................................................................. |
9 |
|
Advanced tab..................................................................................................................................... |
15 |
|
Print Profiles tab ................................................................................................................................ |
21 |
|
Device Settings tab............................................................................................................................ |
23 |
|
Support .............................................................................................................................................. |
24 |
|
Uninstalling the printer driver............................................................................................................. |
25 |
|
Status Monitor ................................................................................................................................... |
26 |
|
Macintosh ................................................................................................................................................ |
28 |
|
Features in the printer driver (Macintosh).......................................................................................... |
28 |
|
Choosing page setup options ............................................................................................................ |
28 |
|
Removing the printer driver ............................................................................................................... |
35 |
|
Status Monitor ................................................................................................................................... |
35 |
|
Software .................................................................................................................................................. |
37 |
|
Remote Printer Console (Windows® HL-1200 and HL-1201 only).................................................... |
37 |
|
Software for networks (HL-1210W and HL-1211W only) .................................................................. |
37 |
3 |
General Information |
38 |
|
Control panel ........................................................................................................................................... |
38 |
|
LEDs (Light Emitting Diodes) ............................................................................................................ |
38 |
|
Service call indications ...................................................................................................................... |
43 |
|
Power On/Off key .............................................................................................................................. |
44 |
|
Print a Printer Settings page.................................................................................................................... |
45 |
|
Using the Power On/Off key .............................................................................................................. |
45 |
|
Using the printer driver ...................................................................................................................... |
45 |
|
Ecology features...................................................................................................................................... |
46 |
|
Toner Save ........................................................................................................................................ |
46 |
|
Sleep Time ........................................................................................................................................ |
46 |
|
Deep Sleep mode.............................................................................................................................. |
46 |
|
Auto Power Off .................................................................................................................................. |
47 |
v

A |
Troubleshooting and other information |
48 |
|
Consumable items................................................................................................................................... |
48 |
|
Toner Setting ........................................................................................................................................... |
50 |
|
Identifying your problem .......................................................................................................................... |
51 |
|
Error messages in the Status Monitor ..................................................................................................... |
52 |
|
Improving the print quality........................................................................................................................ |
53 |
|
Paper jams............................................................................................................................................... |
57 |
|
If you are having difficulty with your machine .......................................................................................... |
61 |
|
Cleaning and Checking the machine ....................................................................................................... |
63 |
|
Machine Information ................................................................................................................................ |
64 |
|
Default settings.................................................................................................................................. |
64 |
B |
Specifications |
66 |
|
General .................................................................................................................................................... |
66 |
|
Print media............................................................................................................................................... |
69 |
|
Important information for choosing your paper........................................................................................ |
70 |
|
Printer ...................................................................................................................................................... |
71 |
|
Network (LAN) (HL-1210W and HL-1211W only).................................................................................... |
72 |
C |
Index |
73 |
vi
 1 Printing Methods
1
About this Machine
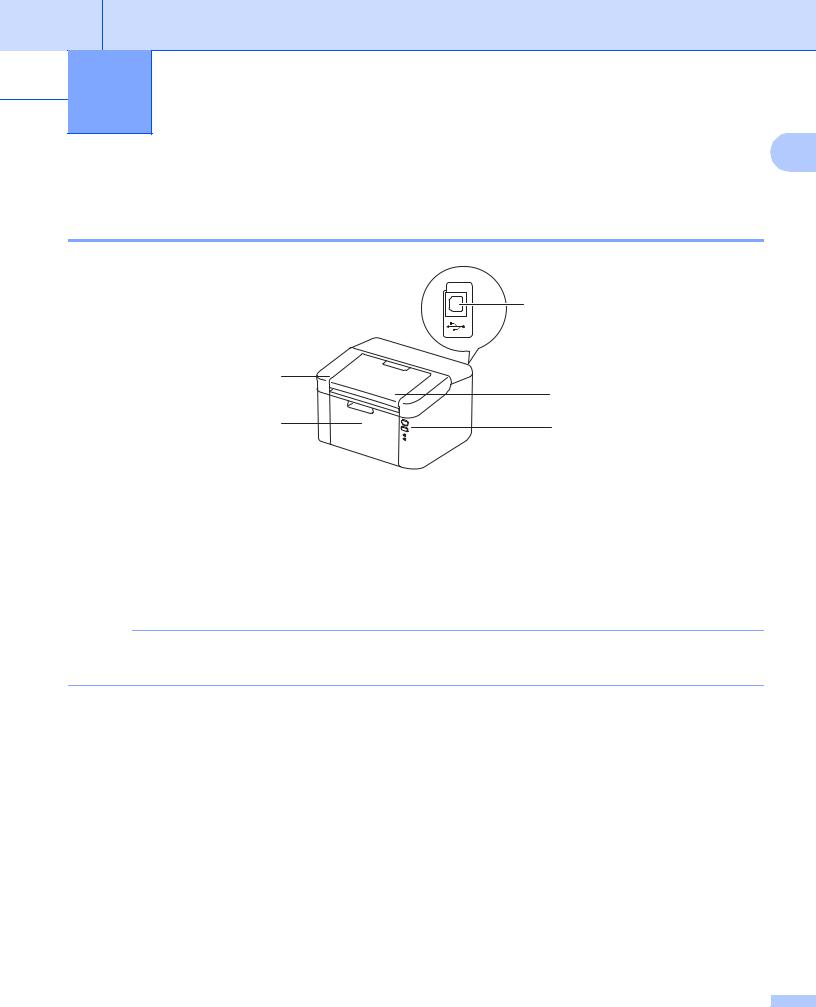
Machine overview
5
1
3
4 |
2 |
1Top cover
2Control panel
3Face-down output tray support flap (support flap)
4Paper tray
5USB port
NOTE
For details about how the LEDs show the machine’s status, see LEDs (Light Emitting Diodes) on page 38. For the Power On/Off key functions, see Power On/Off key on page 44.
1

Printing Methods
Acceptable paper
1
Print quality may vary according to the type of paper you are using. For best results, follow the instructions below:
DO NOT put different types of paper in the paper tray at the same time because it may cause paper jams or misfeeds.
For correct printing, you must choose the same paper size from your software application as the paper in the tray.
Avoid touching the printed surface of the paper immediately after printing.
Before you buy a lot of paper, test a small quantity to make sure that the paper is suitable.
Paper capacity of the paper tray
Paper size |
Paper types |
No. of sheets |
Paper weight |
A4, Letter, Legal, Folio 1, |
Plain paper and |
Up to 150 sheets (80 g/m2) |
65 - 105 g/m2 |
A5, A5(Long Edge), B5, |
Recycled paper |
|
|
Executive |
|
|
|
|
|
|
|
1 Folio size is 215.9 mm x 330.2 mm.
2

Printing Methods
2-sided printing
1
The supplied printer drivers all enable 2-sided printing. For more information about how to choose the settings, see 2-sided / Booklet on page 12 for Windows® and 2-sided Printing on page 34 for Macintosh.
Guidelines for printing on both sides of the paper
If the paper is thin, it may wrinkle.
If paper is curled, straighten it and put it back in the paper tray. If the paper continues to curl, replace the paper.
If the paper is not feeding correctly, it may be curled. Remove the paper and straighten it. If the paper continues to curl, replace the paper.
When you use the manual 2-sided function, it is possible that there may be paper jams or poor print quality. (If there is a paper jam, see Paper jams on page 57. If you have a print quality problem, see Improving the print quality on page 53.)
3
Printing Methods
Manual 2-sided printing
|
1 |
|
If you are using the Macintosh Printer Driver, see Manual 2-sided Printing on page 34. |
||
|
Manual 2-sided printing with the Windows® printer driver
a Choose the following settings from each drop-down list of the printer driver.
Paper Size
You can use all the paper sizes specified for the tray you are using.
Media Type
You can use all the media types that are specified for the tray you are using.
2-sided / Booklet Choose 2-sided (Manual).
2-sided Type in 2-sided Settings
There are four options for each orientation. (See 2-sided / Booklet on page 12.)
Binding Offset in 2-sided Settings
You can specify the offset for binding. (See 2-sided / Booklet on page 12.)
For any other settings, see Driver and Software in Chapter 2.
b Send the print data to the machine. The machine will print all the even-numbered pages on one side of the paper first. Then, the Windows® driver instructs you (with a pop-up message) to reinsert the paper to print the odd-numbered pages.
NOTE
Before reinserting the paper, straighten it well, or you may get a paper jam. Very thin or thick paper is not recommended.
4

 2 Driver and Software
Printer driver
2
A printer driver is software that translates data from the format used by a computer to the format that a particular printer needs. Typically, this format is page description language (PDL).
The printer drivers for the supported versions of Windows® is on the CD-ROM we have supplied and for Macintosh it is on the Brother Solutions Center website at http://support.brother.com. Install the drivers by
following the steps in the Quick Setup Guide. The latest printer drivers for Windows® and Macintosh can be downloaded from the Brother Solutions Center website at:
http://support.brother.com
For Windows®
Windows® printer driver (the most suitable printer driver for this product)
For Macintosh
Macintosh printer driver (the most suitable printer driver for this product)
For Linux® 1 2
LPR printer driver
CUPS printer driver
1For more information and to download the printer driver for Linux please visit your model page at http://support.brother.com or use the link on the CD-ROM we have supplied.
2Depending on Linux distributions, the driver may not be available or it may be released after the initial release of your model.
5

Driver and Software
Printing a document
When the machine receives data from your computer, it begins printing by picking up paper from the paper |
|
tray. The paper tray can feed plain paper and recycled paper to the machine. (See Paper capacity of the |
2 |
paper tray on page 2.) |
a From your application, choose the Print command.
If any other printer drivers are installed on your computer, choose Brother HL-XXXX (Where XXXX is your model name.) as your printer driver from the Print or Print Settings menu in your software application, and then click OK or Print to begin printing.
b Your computer sends the data to the machine. The Ready LED ( ) will blink.
c When the machine finishes printing all the data, the Ready LED ( ) finishes blinking.
NOTE
•You can choose the paper size and orientation in your application software.
•If your application software does not support your custom paper size, choose the next largest paper size.
•Then adjust the print area by changing the right and left margins in your application software.
6

Driver and Software
Printer driver settings
You can change the following printer settings when you print from your computer:
Paper Size |
2 |
|
Orientation |
||
|
||
Copies |
|
|
Media Type |
|
|
Print Quality (For HL-1200 and HL-1201) |
|
|
Resolution (For HL-1210W and HL-1211W) |
|
|
Print Settings |
|
|
Multiple Page |
|
|
2-sided / Booklet |
|
|
Print Preview |
|
|
Scaling |
|
|
Reverse Print |
|
|
Use Watermark |
|
|
Header-Footer Print |
|
|
Toner Save Mode |
|
|
Administrator |
|
|
Density Adjustment |
|
|
Improve Print Output |
|
|
Skip Blank Page |
|
|
Print Text in Black |
|
|
Print Archive |
|
|
Print Profile |
|
7
Driver and Software
Windows®
Accessing the printer driver settings
2
a (For Windows® XP and Windows Server® 2003) Click Start, and then Printers and Faxes.
(For Windows Vista® and Windows Server® 2008)
Click the |
(Start) button, Control Panel, Hardware and Sound, and then Printers. |
(For Windows® 7 and Windows Server® 2008 R2) |
|
Click the |
(Start) button, and then click Devices and Printers. |
(For Windows® 8)
Move your mouse to the lower right corner of your desktop. When the menu bar appears, click Settings, and then click Control Panel. In the Hardware and Sound group, click View devices and printers.
(For Windows Server® 2012 and Windows Server® 2012 R2)
Move your mouse to the lower right corner of your desktop. When the menu bar appears, click Settings, and then click Control Panel. In the Hardware group, click View devices and printers.
b Right-click the Brother HL-XXXX icon (where XXXX is your model name) and select Printer properties (Properties), and Brother HL-XXXX if necessary. The printer properties dialog box appears.
c Choose the General tab and then click Preferences... (Printing Preferences...).
Features in the Windows® printer driver
For more information, see the Help text in the printer driver.
NOTE
•The screens in this section are from Windows® 7. The screens on your PC will vary depending on your operating system.
•To access the printer driver settings, see Accessing the printer driver settings on page 8.
8

Driver and Software
Basic tab
You can also change the Page Layout settings by clicking the illustration on the left side of the Basic tab.
2
1
3
2
4
a Choose the Paper Size, Orientation, Copies, Media Type, Print Quality 1 or Resolution 2 and Print Settings (1).
b Choose Multiple Page and 2-sided / Booklet (2). c Confirm your current settings in the window (3).
d Click OK to apply your chosen settings.
To return to the default settings, click Default, then OK.
1For HL-1200 and HL-1201
2For HL-1210W and HL-1211W
NOTE
If you want to preview your document before printing, check the Print Preview check box (4).
Paper Size
From the drop-down list choose the Paper Size you are using.
9
Driver and Software
Orientation
Orientation selects the position of how your document will be printed (Portrait or Landscape).
Portrait (Vertical) |
Landscape (Horizontal) |
2 |
|
|
|
|
|
|
Copies
The copies selection sets the number of copies that will be printed.
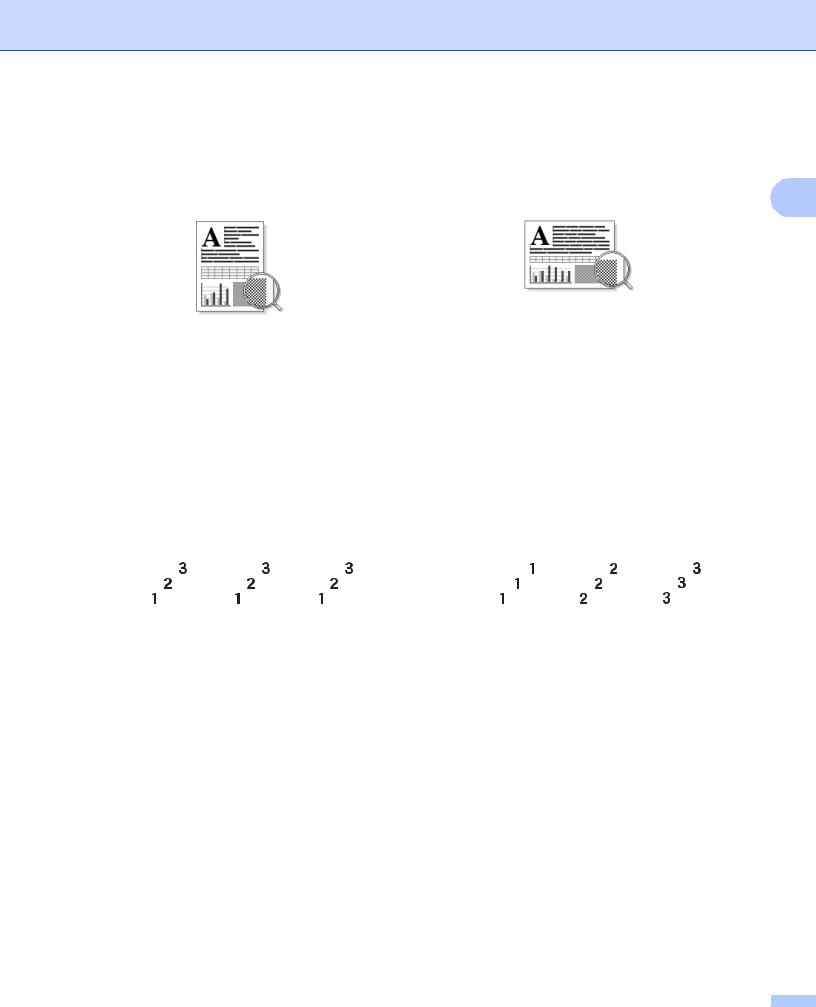
Collate
With the Collate check box selected, one complete copy of your document will be printed and then repeated for the number of copies you selected. If the Collate check box is not selected, then each page will be printed for all the copies selected before the next page of the document is printed.
Collate checked |
|
|
|
|
|
|
|
Collate non-checked |
|
|
|
||||||||||||||||||
|
|
|
|
|
|
|
|
|
|
|
|
|
|
|
|
|
|
|
|
|
|
|
|
|
|
|
|
|
|
|
|
|
|
|
|
|
|
|
|
|
|
|
|
|
|
|
|
|
|
|
|
|
|
|
|
|
|
|
|
|
|
|
|
|
|
|
|
|
|
|
|
|
|
|
|
|
|
|
|
|
|
|
|
|
|
|
|
|
|
|
|
|
|
|
|
|
|
|
|
|
|
|
|
|
|
|
|
|
|
|
|
|
|
|
|
|
|
|
|
|
|
|
|
|
|
|
|
|
|
|
|
|
|
|
|
|
|
|
|
|
|
|
|
|
|
|
|
|
|
|
|
|
|
|
|
|
|
|
|
|
|
|
|
|
|
|
|
|
|
|
|
|
|
|
|
|
|
|
|
Media Type
You can use the following types of media in your machine. For the best print quality, select the type of media that you wish to use.
Plain Paper
Recycled Paper
Print Quality (For HL-1200 and HL-1201)
You can change the print quality as follows:
Draft
Normal
Fine
10

Driver and Software
Resolution (For HL-1210W and HL-1211W)
You can change the resolution as follows:
300 dpi
600 dpi |
2 |
HQ 1200
Print Settings
You can change the print settings as follows:
Graphics
This is the best mode for printing documents that contain graphics.
Text
This is the best mode for printing text documents.
Manual
You can change the settings manually by choosing Manual and clicking the Manual Settings... button. You can set brightness, contrast and other settings.
Multiple Page
The Multiple Page selection can reduce the image size of a page allowing multiple pages to be printed on one sheet of paper or enlarge the image size for printing one page on multiple sheets of paper.
Page Order
When N in 1 option is selected, the page order can be selected from the drop-down list.
Border Line
When printing multiple pages onto one sheet, with the Multiple Page feature, you can choose to have a solid border, dash border or no border around each page on the sheet.
Print cut-out line
When 1 in NxN Pages option is selected, the Print cut-out line option can be selected. This option allows you to print a faint cut-out line around the printable area.
11
Driver and Software
2-sided / Booklet
When you want to print a booklet or do 2-sided printing, use this function.
None
This disables 2-sided printing. |
2 |
2-sided (Manual)
When you want to do 2-sided printing, use this option.
•2-sided (Manual)
The machine prints all the even numbered pages first. Then the printer driver will stop and show the instructions required to re-insert the paper. When you click OK the odd numbered pages will be printed.
When you choose 2-sided (Manual), the 2-sided Settings... button becomes available to choose. You can set following settings in the 2-sided Settings dialog box.
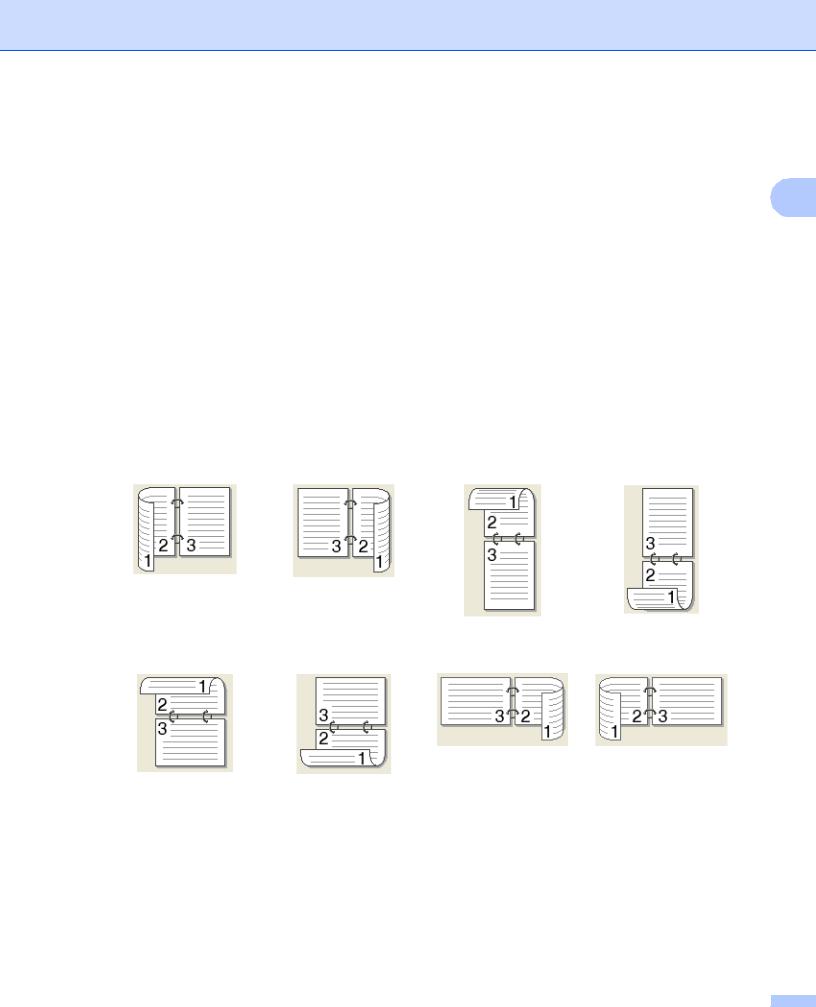
•2-sided Type
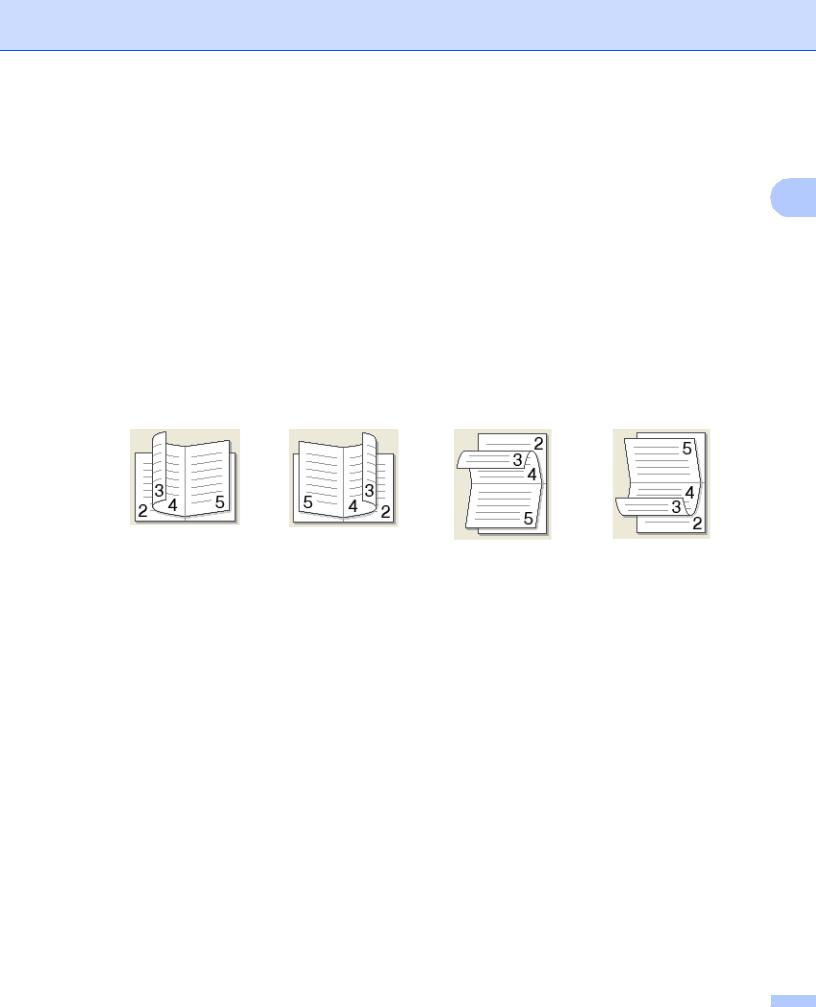
There are four types of 2-sided binding directions available for each orientation.
Portrait |
|
|
|
Long Edge (Left) |
Long Edge (Right) |
Short Edge (Top) |
Short Edge (Bottom) |
Landscape |
|
|
|
Long Edge (Top) |
Long Edge (Bottom) |
Short Edge (Right) |
Short Edge (Left) |
•Binding Offset
When you check Binding Offset, you can also specify the offset for binding in inches or millimetres.
12
Driver and Software
Booklet (Manual)
Use this option to print a document in booklet format using 2-sided printing; it will arrange the document |
|
|
according to the correct page number and allows you to fold at the centre of the print output without having |
|
|
to change the order of the page number. |
2 |
|
• Booklet (Manual) |
||
|
The machine prints all the even numbered sides first. Then the printer driver will stop and show the instructions required to re-install the paper. When you click OK the odd numbered sides will be printed.
When you choose Booklet (Manual), the 2-sided Settings... button becomes available to choose. You can set the following settings in the 2-sided Settings dialog box.
•2-sided Type
There are two types of 2-sided binding directions available for each orientation.
Portrait |
|
Landscape |
|
Left Binding |
Right Binding |
Top Binding |
Bottom Binding |
•Booklet Printing Method
When Divide into Sets is selected:
This option allows you to print the whole booklet into smaller individual booklet sets, it still allows you to fold at the center of the smaller individual booklet sets without having to change the order of the page number. You can specify the number of sheets in each smaller booklet set, from 1 to 15. This option can help when folding the printed booklet that has a large number of pages.
•Binding Offset
When you check Binding Offset, you can also specify the offset for binding in inches or millimetres.
13
Driver and Software
Print Preview
You can preview a document before it is printed. If you check the Print Preview check box, the Print Preview Viewer window will open before printing starts.
2
1
2
1Page List Area
The Page List Area displays the page numbers for the actual pages that will be printed. If you chose a page in this list, a preview of the print results for the page will be displayed in the Preview Area.
If you do not want to print a page, clear the check mark.
2Preview Area
The Preview Area displays a preview of the print results for the pages chosen in the Page List Area.
NOTE
If 2-sided (Manual) or Booklet (Manual) was chosen in the Printer driver settings, you cannot use the Print Preview function.
14
Driver and Software
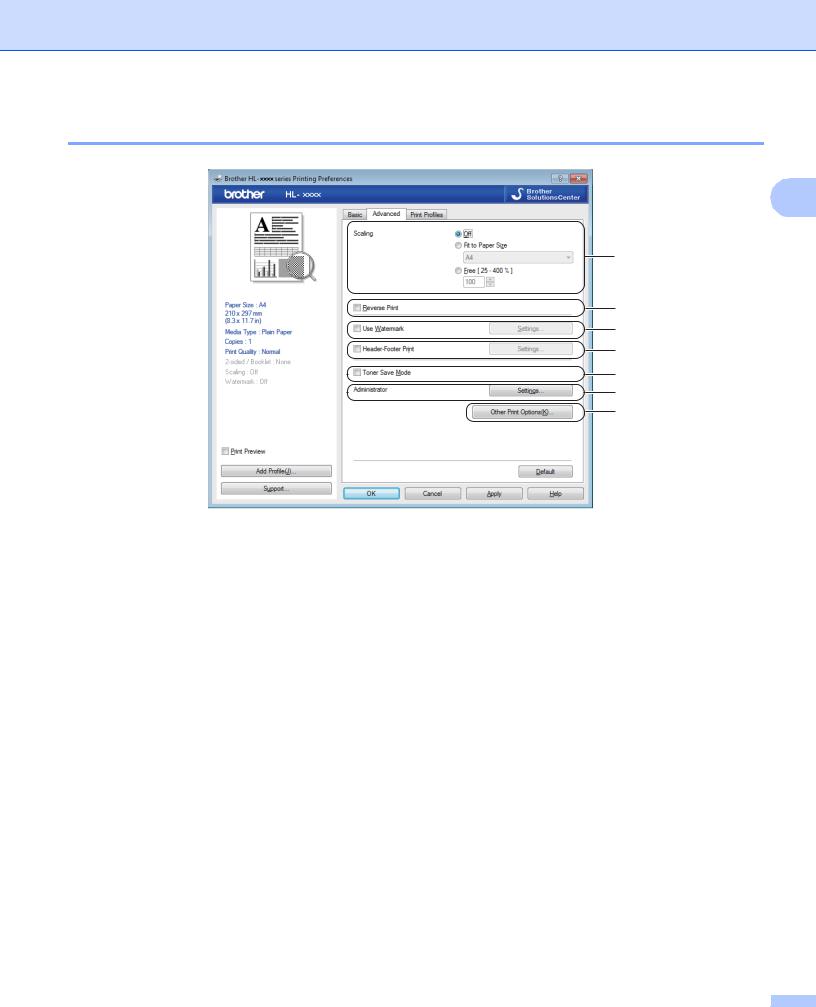
Advanced tab
2
1
2
3
4
5
6
7
Change the tab settings by clicking one of the following selections:
Scaling (1)
Reverse Print (2)
Use Watermark (3)
Header-Footer Print (4)
Toner Save Mode (5)
Administrator (6)
Other Print Options (7)
Scaling
You can change the print image scaling.
Reverse Print
Check Reverse Print to reverse the data from up to down.
Use Watermark
You can put a logo or text into your document as a watermark. You can choose one of the preset Watermarks, or you can use a bitmap file that you have created. Check Use Watermark and then click the Settings...
button.
15
Driver and Software
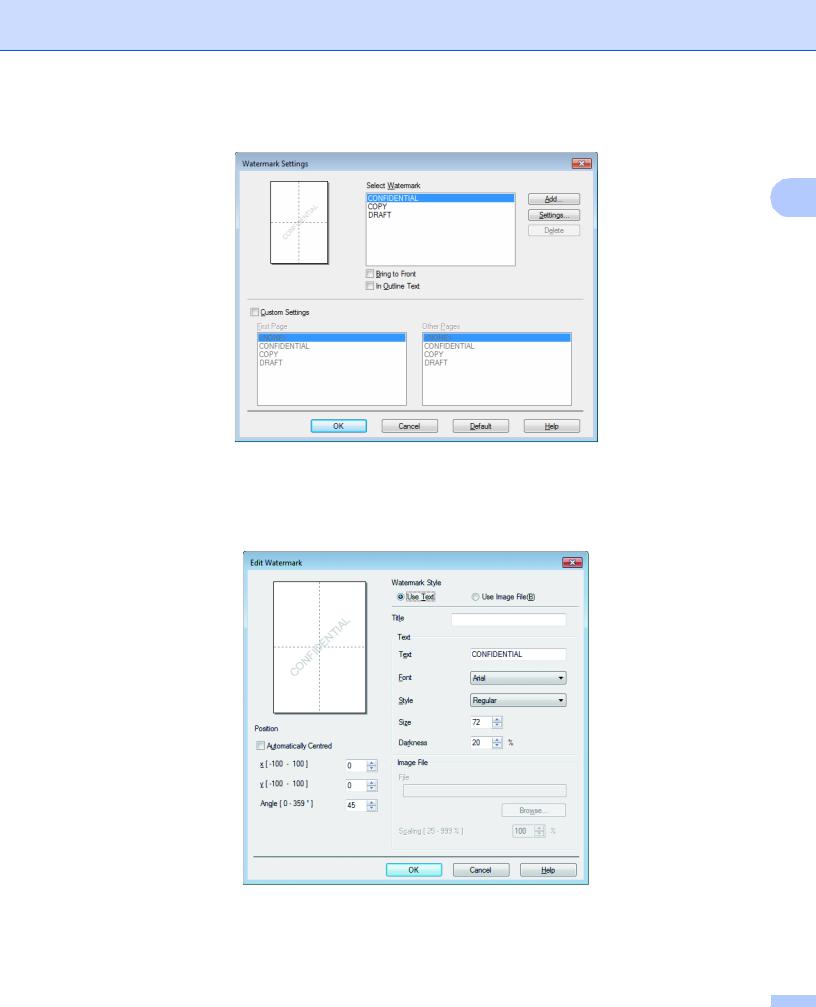
Watermark Settings
2
Select Watermark
Choose a watermark to use.
To make an original watermark, click the Add button to add the watermark settings and then choose
Use Text or Use Image file in Watermark Style.
•Title
Enter a suitable title into the field.
16

Driver and Software
•Text
Enter your Watermark Text into the Text box, and then choose the Font, Style, Size and Darkness.
• Image File
Enter the file name and location of your bitmap image in the File box, or click Browse to search for the 2 file. You can also set the scaling size of the image.
•Position
Use this setting if you want to control the position of the watermark on the page.
Bring to Front
This option will overlay the selected characters or image onto your printed document.
In Outline Text
Check In Outline Text if you only want to print an outline of the watermark. It is available when you choose a text watermark.
Custom Settings
You can choose which watermark is to be printed on the first page or on the other pages.
Header-Footer Print
When this feature is enabled, it will print the date and time on your document from your computer’s system clock and the PC login user name or the text you entered. By clicking Settings, you can customize the information.
ID Print
If you select Login User Name, your PC login user name will be printed. If you select Custom and enter text in the Custom edit box, the text you entered will be printed.
Toner Save Mode
You can conserve toner use with this feature. When you set Toner Save Mode to on, print appears lighter. The default setting is off.
NOTE
•We do not recommend Toner Save Mode for printing photo or Greyscale images.
•Toner Save Mode is not available for Fine for Print Quality 1 or HQ 1200 for Resolution 2 is selected.
1For HL-1200 and HL-1201
2For HL-1210W and HL-1211W
17
Driver and Software
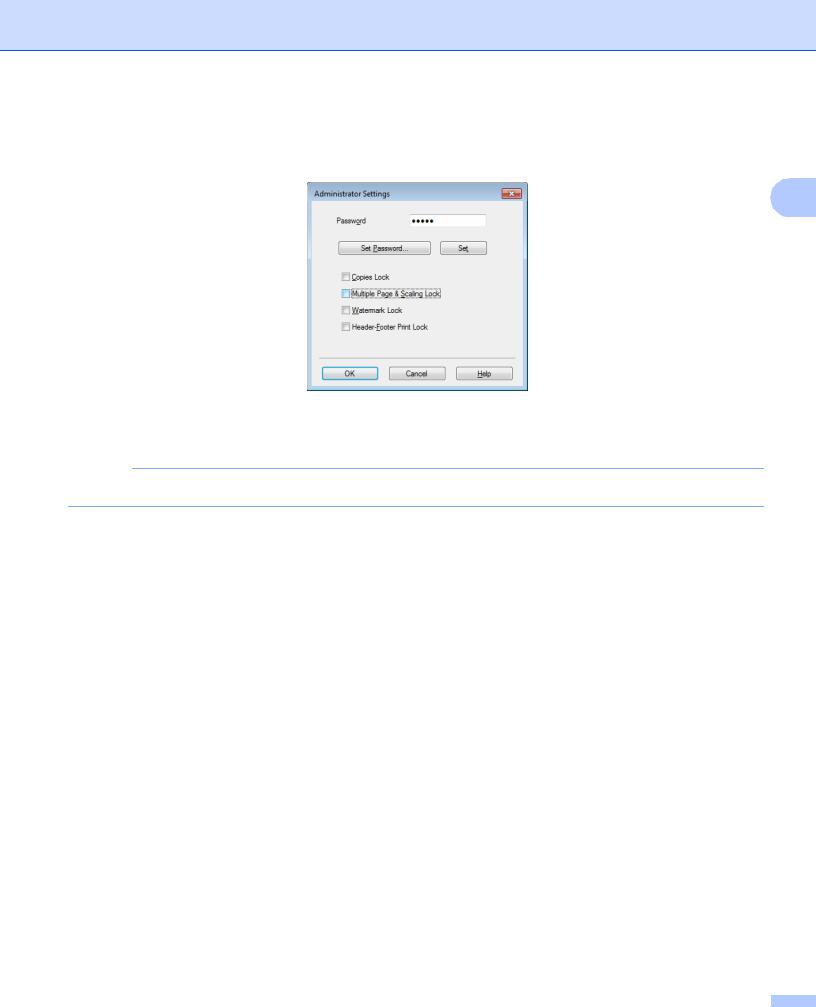
Administrator
Administrators have the authority to limit access to functions such as scaling and watermark.
2
Password
Enter the password into this box.
NOTE
Click Set Password... to change the password.
Copies Lock
Lock the copy pages selection to prevent multiple copy printing.
Multiple Page & Scaling Lock
Lock the scaling setting and multiple page setting.
Watermark Lock
Lock the current settings of the Watermark option to prevent changes being made.
Header-Footer Print Lock
Lock the current settings of the Header-Footer Print option to prevent changes being made.
18
Loading...