


KBD-DIGITAL
IntuiKey Keyboard
Keyboard
Version 1.93
en User Manual


IntuiKey Keyboard Table of Contents | en iii
Table of Contents
1 Introduction to the IntuiKey Keyboard Series 1
1.1 Operating the IntuiKey Keyboard 1
1.2 The Status Display 2
1.3 The Keypad 3
1.4 The Softkeys and the Softkey Display 3
1.5 The Joystick 4
1.6 Navigating the System with the IntuiKey Keyboard 4
1.6.1 General Guidelines for Navigating the IntuiKey Menus 4
1.6.2 The Product Selection Menu 4
1.6.3 Selecting a Device for Control 5
1.6.4 Easy Switching between Devices 5
1.6.5 Using the Keypad for Numeric Entry (Camera Control) 5
1.6.6 Using the Quick Selection Softscreen Feature 5
1.7 Alarm/Alert/Action Indication 6
2 Controlling Allegiant Series Video Switchers 7
2.1 The Allegiant Main Control Menu 8
2.2 Programming and Controlling Allegiant Functions 8
2.3 Allegiant User Function Menus 15
2.4 Allegiant Error Messages 17
3 Controlling Divar Series Digital Video Recorders 19
3.1 Accessing the Divar Main Control Menu 20
3.2 Programming/Controlling DVR Functions 21
3.2.1 The DVR Main Control Menu 21
3.2.2 DVR On-screen Menu Controls 24
3.2.3 DVR Control Menu 25
3.3 DVR Error Messages 26
4 Controlling System4 Video Multiplexers 27
4.1 Accessing the MUX Main Control Menu 27
4.2 Programming/Controlling MUX Functions 28
4.2.1 Password Entry 28
4.2.2 MUX Main Control Menu Command Descriptions 28
4.3 MUX Error Messages 32
A IntuiKey Menu Reference 33
B Camera Control Command Reference 37
C Keyboard Camera Commands 41
Bosch Security Systems, Inc. User Manual F.01U.127.291 | 1.93 | 2009.03

iv en | Table of Contents IntuiKey Keyboard
F.01U.127.291 | 1.93 | 2009.03 User Manual Bosch Security Systems, Inc.
IntuiKey Keyboard Introduction to the IntuiKey Keyboard Series | en 1
Prod Mon
Clr
321
654
987
0
Shot
Monitor Camera
MUX/DVR
1 1
SoftKeys
SoftKey Display
Status Display
Numeric
Entry Cell
Numeric Keypad
SoftKey Descriptor
Exit
^ Up Zoom
v Down
< Left Right >
1 Introduction to the IntuiKey Keyboard Series
This manual contains all the information necessary to operate the IntuiKey Keyboard. Step-bystep procedures, illustrations, and sample menus guide you through each phase of IntuiKey
operation. Throughout the manual, you will see sample drawings of each menu as they appear
on the keyboard. These drawings display the softkey text in relation to the Softkey. For the
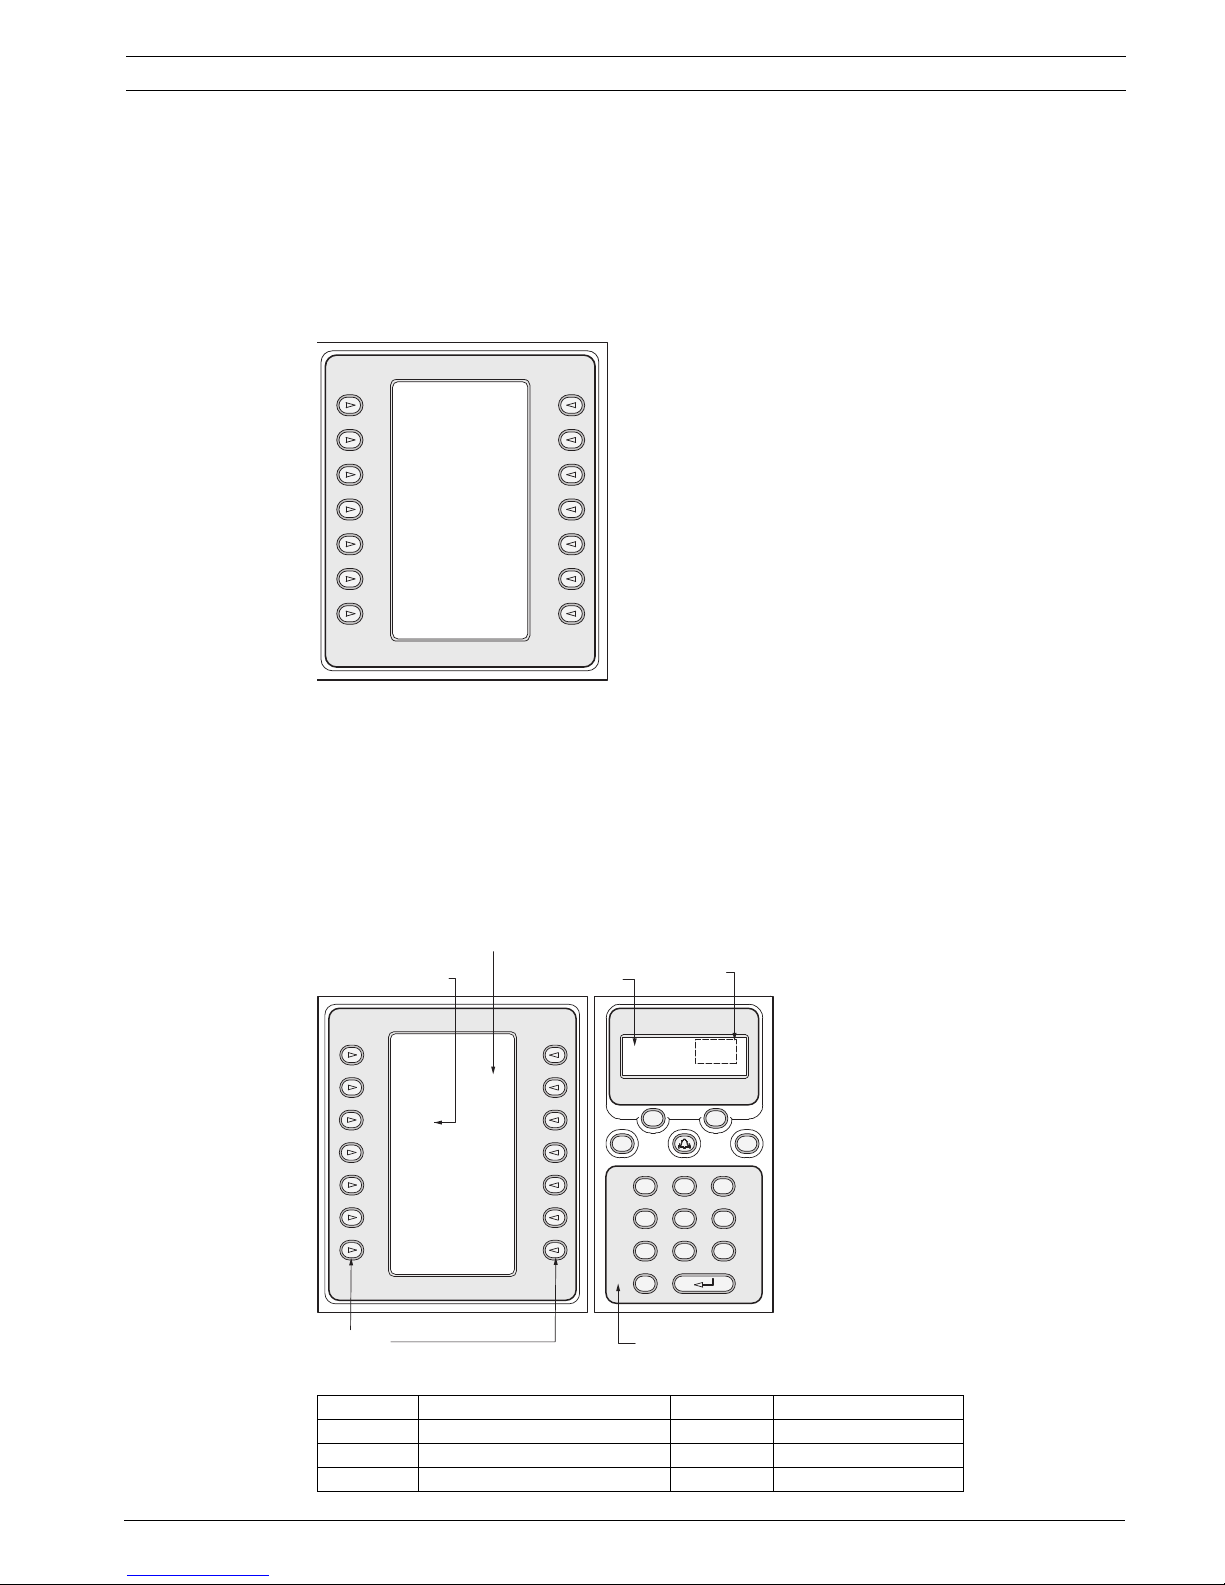
purposes of this manual, each key is numbered from 1 to 14, using the convention found
below.
Figure 1.1 Softkey Numbering Guide
Following the menu diagram, the function of each key is described in a paragraph indicated
with an icon that identifies the particular softkey. Be aware that some instructions are modelspecific; be sure to read the appropriate information for your IntuiKey model.
1.1 Operating the IntuiKey Keyboard
Learning the IntuiKey Keyboard components is accomplished easily by dividing the keyboard
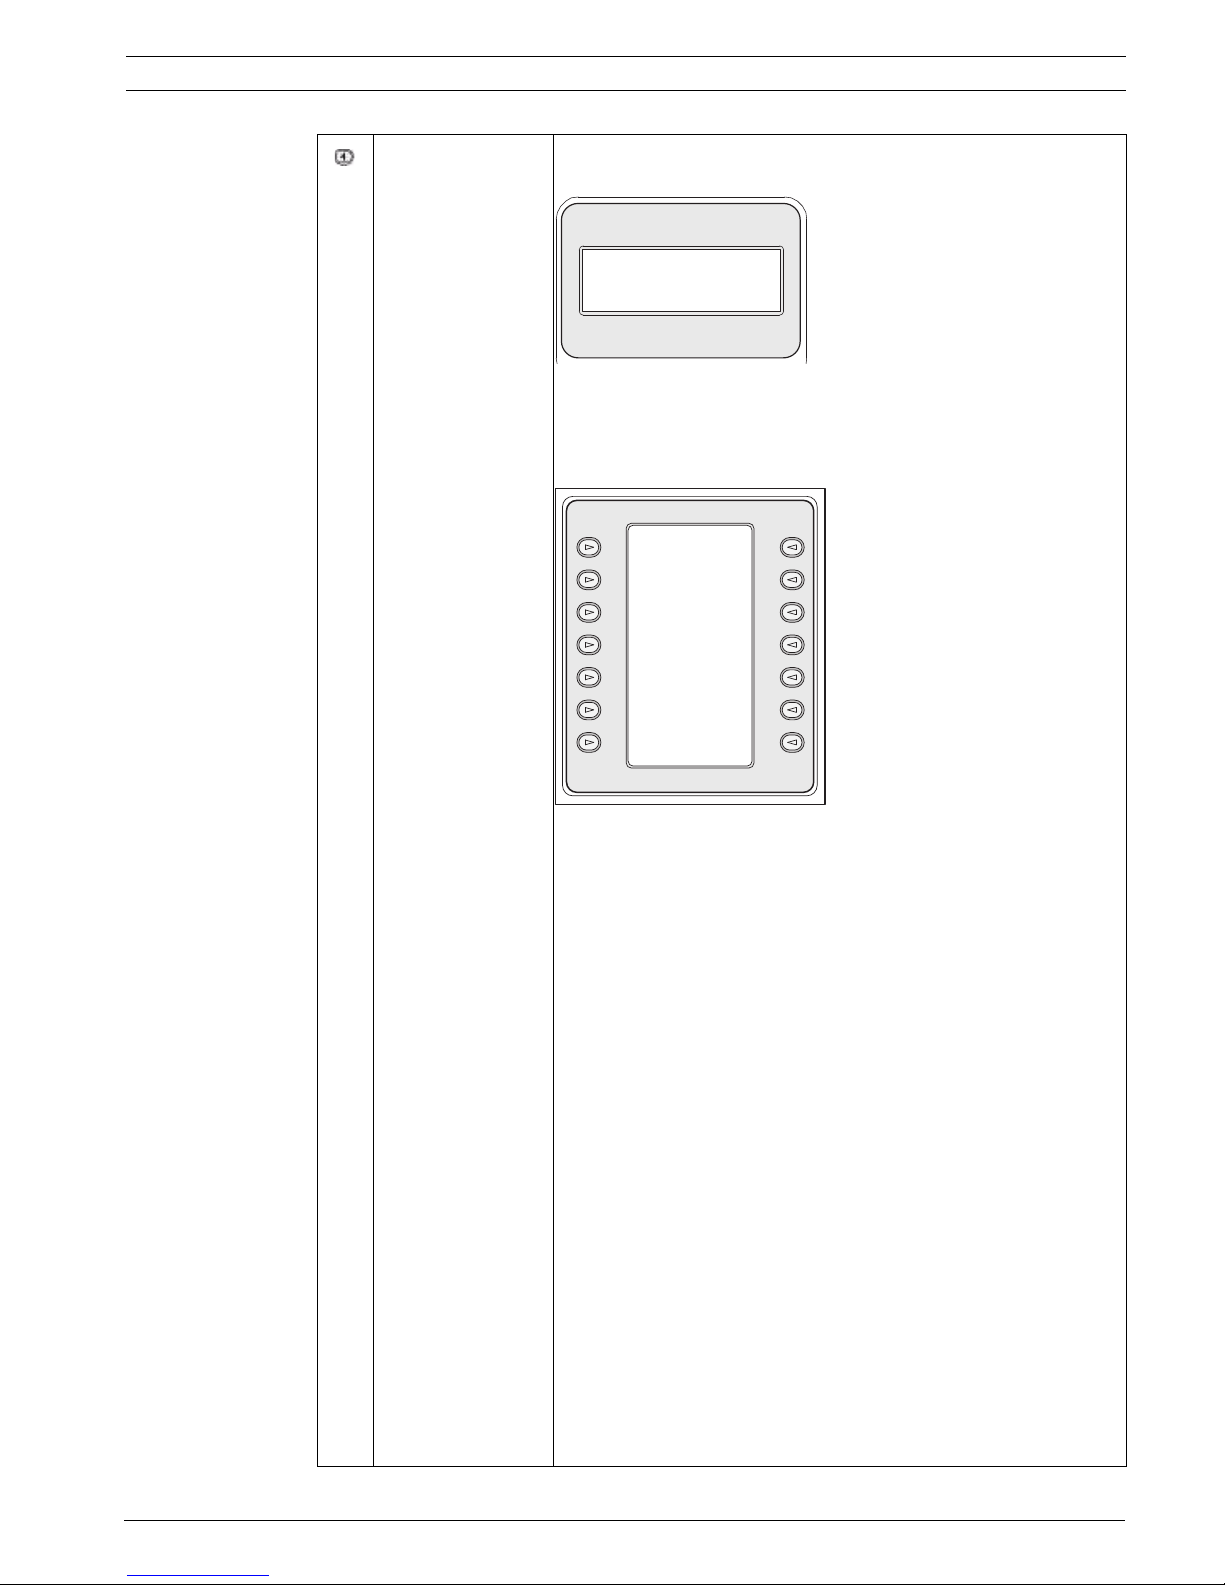
into separate functional areas as illustrated below:
Bosch Security System, Inc. User Manual F.01U.127.291 | 1.93 | 2009.03
Figure 1.2 IntuiKey Components
Reference Description Reference Description
1 Softkey Descriptor 4 Status Display
2 Softkeys 5 Numeric Keypad
3 Softkey Display 6 Numeric Entry Cell

2 en | Introduction to the IntuiKey Keyboard Series IntuiKey Keyboard
1.2 The Status Display
The Status Display changes dynamically to display pertinent information about the keyboard’s
present mode of operation. Typically, its information conveys one of two keyboard operating
modes: Normal Mode or Error Code.
In Normal Mode, the status display provides data pertaining to the present device under
control (e.g. monitor number, camera number, device under control status, etc.). Common
elements in the display for all devices are a product indicator centered on the bottom line of
the display and one or more numeric entry cells. Each numeric entry cell has a title that
describes what the number represents.
When a user operation results in an error, the status display changes to Error Code (see
Section 2.4 Allegiant Error Messages, Page 17, for Allegiant Error Messages, Section 3.3 DVR
Error Messages, Page 26, for Divar Error Messages, and Section 4.3 MUX Error Messages,
Page 32, for MUX Error Messages). The display shows the error number, a short description of
the error, and the present device under control.
The display reverts to Normal Mode either automatically in two seconds (on its own) or when
CLR is pressed.
In Terminal Mode, the third-party software application determines the displayed text via the
IntuiKey display screen.
F.01U.127.291 | 1.93 | 2009.03 User Manual Bosch Security System, Inc.

IntuiKey Keyboard Introduction to the IntuiKey Keyboard Series | en 3
i
1.3 The Keypad
The Keypad includes the five function buttons (located directly below the status display), as
well as the numeric keypad.
PROD displays the keyboard’s Product Selection menu. This function key (in conjunction with
the Softkeys/Softkey Display) selects the device under the control of the keyboard. The
Product Selection menu also provides access to the Keyboard Control menu.
MON functioning depends on the IntuiKey Model and device under control. For KBD-Universal
keyboards, MON allows entry of a Monitor Number when controlling an Allegiant Switcher.
When controlling a DVR or multiplexer, MON toggles between monitors A and B.
CLR clears any numeric entry and the display reverts to Normal Mode.
provides acknowledgement of an external alarm/ alert/action condition. When this condition
is detected, an audible alarm is enabled, and the key flashes red. The key then functions
differently depending on the device presently under keyboard control.
Note: Refer to Section 1.4 The Softkeys and the Softkey Display, Page 3, for additional
information on alarm/alert/action indication and acknowledgement.
SHOT allows selection of camera pre-positions and is also used to assign softkey display
screen numbers. Pressing SHOT twice enters the preposition programming entry mode. If
SHOT is pressed twice inadvertently, press SHOT again to return to the pre-position selection
mode.
NOTICE! To avoid inadvertent mode changes, you must hold the SHOT button down for 2
seconds in order to change it to the SET mode.
The Numeric Keypad allows numeric entry (shown in the status display) as required by the
present function. Note that the default state of the Keypad is camera entry (i.e. pressing a
numeric key places that number in the status display under the camera title).
In Terminal Mode, the third-party software application will determine the IntuiKey’s behavior.
1.4 The Softkeys and the Softkey Display
The Softkeys and Softkey Display allow easy and flexible control and programming of system
devices under keyboard control.
The Softkey Buttons are located on either side of the softkey display. Each softkey may have a
special descriptor associated with it that consists of up to three lines of ten characters.
Pressing a softkey initiates the action described by the associated text. The actual on-screen
display may vary depending on the model being controlled.
The Softkey Display associates commands with the softkey buttons. The commands shown in
the display changes depending on the operational mode of the keyboard and previous softkey
selections. Note that the softkey display initially shows a default menu tailored to the device
under control. This initial menu contains softkey functions that represent commonly used
commands, as well as keys that represent links to other command menus.
In Terminal Mode, the third-party software application determines the displayed text via the
IntuiKey display screen.
Bosch Security System, Inc. User Manual F.01U.127.291 | 1.93 | 2009.03

4 en | Introduction to the IntuiKey Keyboard Series IntuiKey Keyboard
i
Allegiant
ADIM
DVR 1
Unit A
1
DVR 2
Unit B
17
DVR 3
Unit C
33
DVR 4
Unit D
49
DVR 5
Unit E
65
DVR 7
Unit F
97
DVR 8
Unit G
113
DVR 9
Unit H
129
DVR 10
Unit J
145
DVR 11
Unit K
161
1.5 The Joystick
The IntuiKey Joystick provides three levels of system functionality: control of pan/tilt/zoom
for an external camera, navigating the on-screen programming menus of the Allegiant Video
Switchers, AutoDome® Series Cameras and other devices, and playback control when
operating DVR devices. Use of the joystick to control playback of DVR devices is covered later
in this manual.
Moving the joystick in one of eight directions provides pan/tilt control of appropriately
equipped cameras. Rotating the knob in either a clockwise or counterclockwise direction
provides lens zoom control.
Focus and Iris Control, located above and to the right of the joystick, are rocker-style buttons
that provide keyboard control of camera lens focus (near/far) and camera iris function (open/
close).
In Terminal Mode, operating of the Joystick will send an event to the 3rd party software
application which will determine the action.
NOTICE! If power is temporarily interupted to the keyboard while operating the joystick, you
will need to release the joystick and power off/on the keyboard to re-calibrate the joystick
position.
1.6 Navigating the System with the IntuiKey Keyboard
Learning basic navigation techniques with the IntuiKey ensures readiness for control of the
system devices. The following procedures are general in nature and may be applied to the
control of various system devices/operating modes.
1.6.1 General Guidelines for Navigating the IntuiKey Menus
The following keys are important for entering and exiting the IntuiKey programming/control
menus:
– EXIT. This softkey command is located in the upper left corner of each softkey menu. Use
this key to move back one level in the menu structure (complete menu diagrams are
provided in APPENDIX A at the back of this manual).
– PROD. Press PROD at any time to return directly to the Main Product Selection menu.
– CLR. Press CLR to clear any numeric entry and revert the display to Normal Mode.
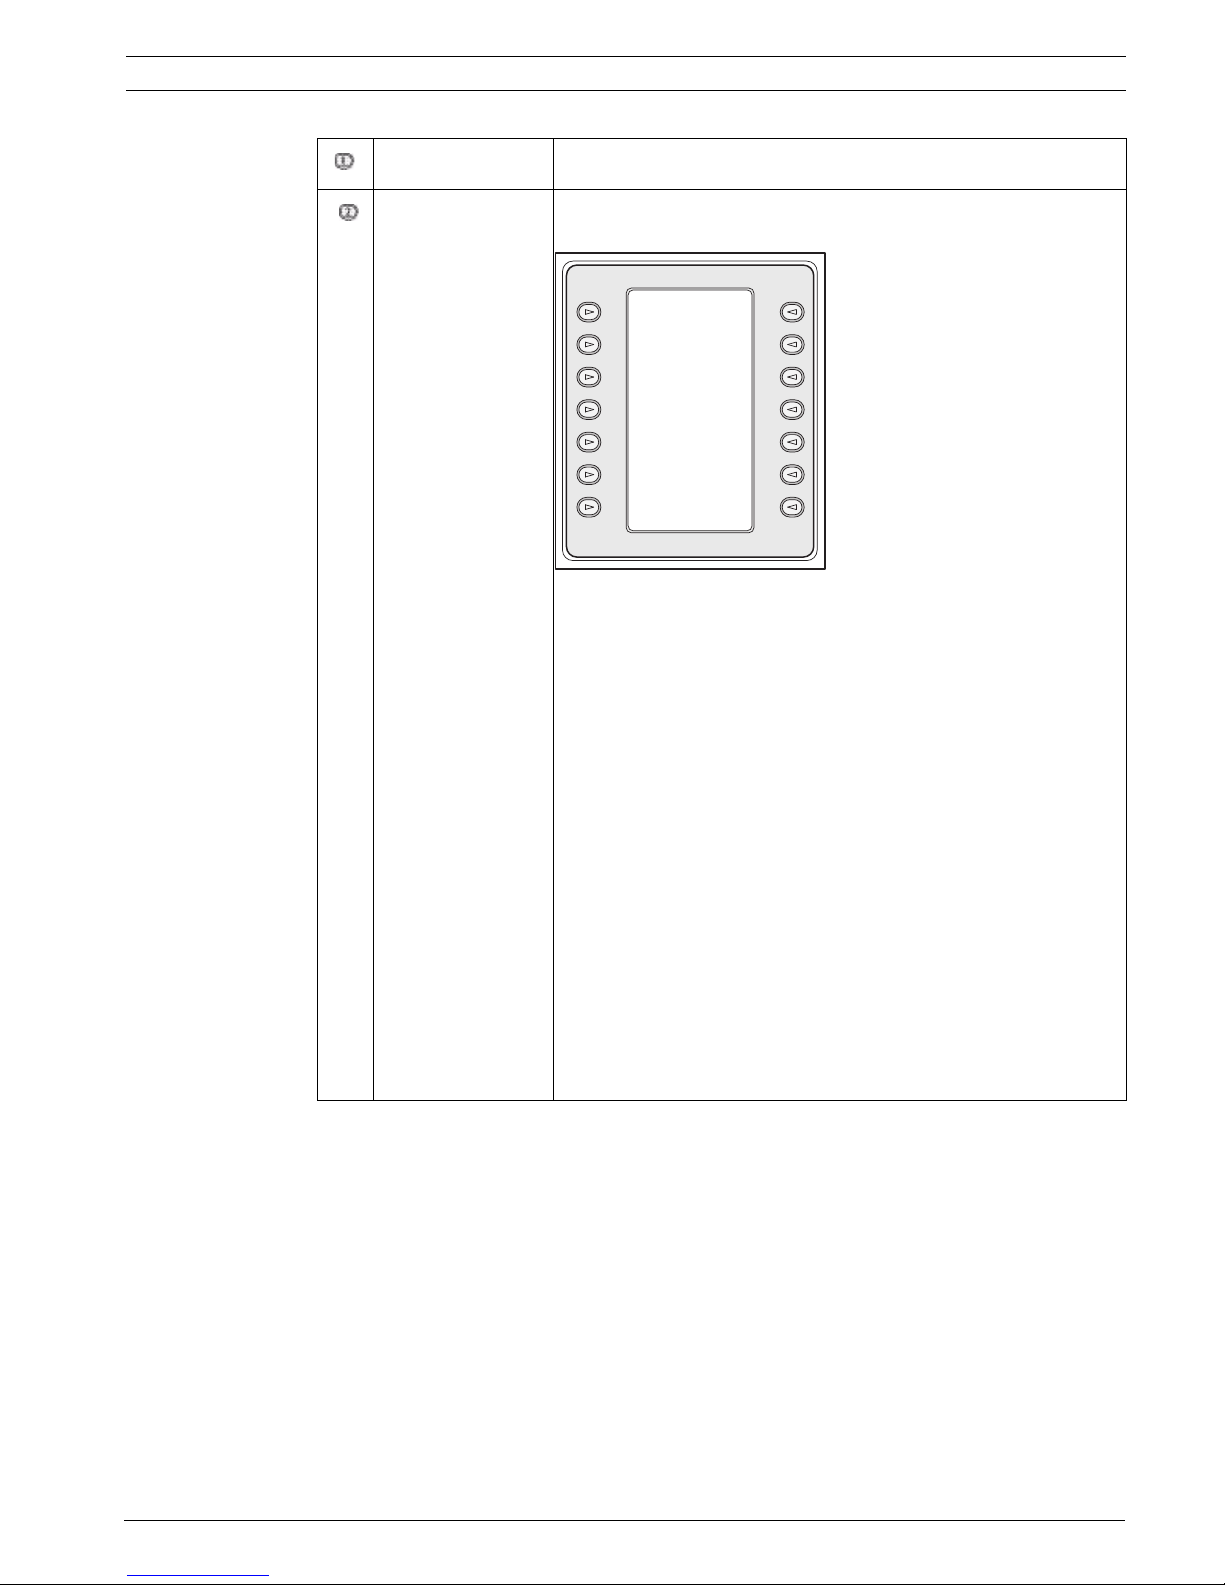
1.6.2 The Product Selection Menu
The Product Selection menu lists the devices that are in communication with the IntuiKey.
When using Divar XF, Divar MR, and Divar Easy up to two (2) devices will be displayed. If using
Divar Series 1 or 2, up to 12 devices can be shown on a single screen. When more than 12
devices are connected, the arrow softkeys at the bottom of the screen can be used to scroll
through the additional menu(s).
The softkey to enter the Keyboard Control menu can always be found at the very end of the
device listings.
F.01U.127.291 | 1.93 | 2009.03 User Manual Bosch Security System, Inc.
Figure 1.3 Main Product Selection Menu

IntuiKey Keyboard Introduction to the IntuiKey Keyboard Series | en 5
i
i
i
NOTICE! When the IntuiKey is first connected up to a device, or whenever a new video device
is added to an existing system, enter the Product Selection menu and press the PROD key.
The keyboard will initiate a scan of the communication lines and update the list of devices
connected to it.
If communication is ever lost with an existing device, the product name display will indicate
an Off_Line condition. After communication with the device is restored, this message will
disappear.
For multiplexers, the device address number will be shown. For DVRs, the DVR address
number, its name, and the starting camera offset number will be displayed.
1.6.3 Selecting a Device for Control
1. Press the PROD button to put the keyboard in the Product Selection Mode. The softkey
display shows the Product Selection menu (refer to Figure 1.3).
2. Press the desired softkey button adjacent to the desired product name in the display.
Upon selection of a system device to be controlled, the keyboard indicates what product
it is controlling by displaying its name (up to 10 characters maximum) at the bottom of
the status display. The softkey display menu also changes to the top level menu
associated with the selected device.
1.6.4 Easy Switching between Devices
Pressing and holding the PROD key for longer than 1 second while using a DVR Series 1 and 2
or multiplexer enters the device address selection mode. Entering the address of a device will
cause the keyboard to switch to that device’s main menu. If the device address does not exist,
an error message will result, and no change will occur.
1.6.5 Using the Keypad for Numeric Entry (Camera Control)
1. Press a desired numeric key to place the number in the status display under the camera
title.
NOTICE! The additional key entries add digits to the RIGHT side of the camera number. If
more than the maximum number of digits allowed for the specific entry is entered, the
leftmost digit is lost, and all other digits promoted.
2. Leading zeros may be entered but are not required.
3. Press ENTER to complete numeric entry.
1.6.6 Using the Quick Selection Softscreen Feature
The IntuiKey softkey display screens can be assigned a reference number which can then be
recalled to quickly return to the desired screen.
1. To assign a number to a softkey display screen, first navigate to the desired screen.
Simultaneously press the digit 0 and ENTER to enter the softkey screen programming
mode. Press SHOT followed by the single digit (0 to 9) that you want to assign to this
screen.
2. To quickly jump to a previously programmed softkey display screen, simultaneously press
the digit 0 and ENTER. Press the desired softkey display screen number.
NOTICE! Ten (10) softkey numbers are available within a single product category. Softkey
screen numbers can only jump between screens within the same product category. If an
existing softkey screen number is assigned to a new softkey screen, the old one is no longer
valid. Assignments remain even if power is lost.
Bosch Security System, Inc. User Manual F.01U.127.291 | 1.93 | 2009.03

6 en | Introduction to the IntuiKey Keyboard Series IntuiKey Keyboard
i
1.7 Alarm/Alert/Action Indication
When the IntuiKey detects that an alarm/alert/action condition has occurred on the presently
controlled device, the key flashes red and an audible tone is heard. During alarm
responses, Divar DVRs and System4 multiplexers will also show special icons to represent the
different types of alarm conditions. Contact type alarm conditions will be represented by a
icon, and action alarm conditions will be represented by a icon. To silence an alarm,
press the Alarm/Alert/Action key.
If the alert occurs on a device that is not presently under control, the product indicator (in the
status display) alternates between the present product designator and the alarmed product,
with the text ALERT added. The present product is displayed for two seconds, while the
alarmed product is displayed for 0.5 seconds.
NOTICE! This functionality is not supported when the IntuiKey is operating in Terminal Mode.
F.01U.127.291 | 1.93 | 2009.03 User Manual Bosch Security System, Inc.

IntuiKey Keyboard Controlling Allegiant Series Video Switchers | en 7
Monitor
123
Camera
1234
Allegiant
99
2 Controlling Allegiant Series Video Switchers
Before you can take control of an Allegiant Video Switcher, you may have to perform a log-on
procedure to gain access to the Allegiant Main Control menu to control the switcher.
Note: This chapter applies to the KBD-Universal Model only.
– The keyboard generates a short, audible “beep” when first entering the Allegiant log-in
screen. This beep notifies operators that the keyboard is ready to accept user number
and password data. The keyboard may not correctly accept data entered before this
beep.
– If log-on information is required, the status display requests a USER NUMBER. Enter the
number using the keypad and press ENTER.
– The status display requests a PASSWORD. Enter the password using the keypad and
press ENTER.
– If an invalid user number or password is entered, the status display requests the log-on
again.
– Following a successful log-on, the softkey display shows the Allegiant Main Control menu,
as illustrated in
– If user log-on is not required, the softkey display shows USER LOGGED ON briefly, then
displays the Allegiant Main Control menu. The menu displayed depends on the camera
display mode, either four-digit or six-digit.
Monitor
123
Camera
1234
Allegiant
Figure 2.1 Status Display in Four-digit Allegiant Mode
Figure 2.2 Status Display in Six-digit Allegiant Mode
Bosch Security System, Inc. User Manual F.01U.127.291 | 1.93 | 2009.03

8 en | Controlling Allegiant Series Video Switchers IntuiKey Keyboard
Exit
Device
Program
Alarm
Load
Hold
<Previous
Lockout
Sequence
Control
Sequence
Sequence
<Sequence
<Step
User
Log Off
Command
Script
Camera
Control
User
Functions
ADIM
Controls
Start
Sequence
Next >
Sequence>
Step>
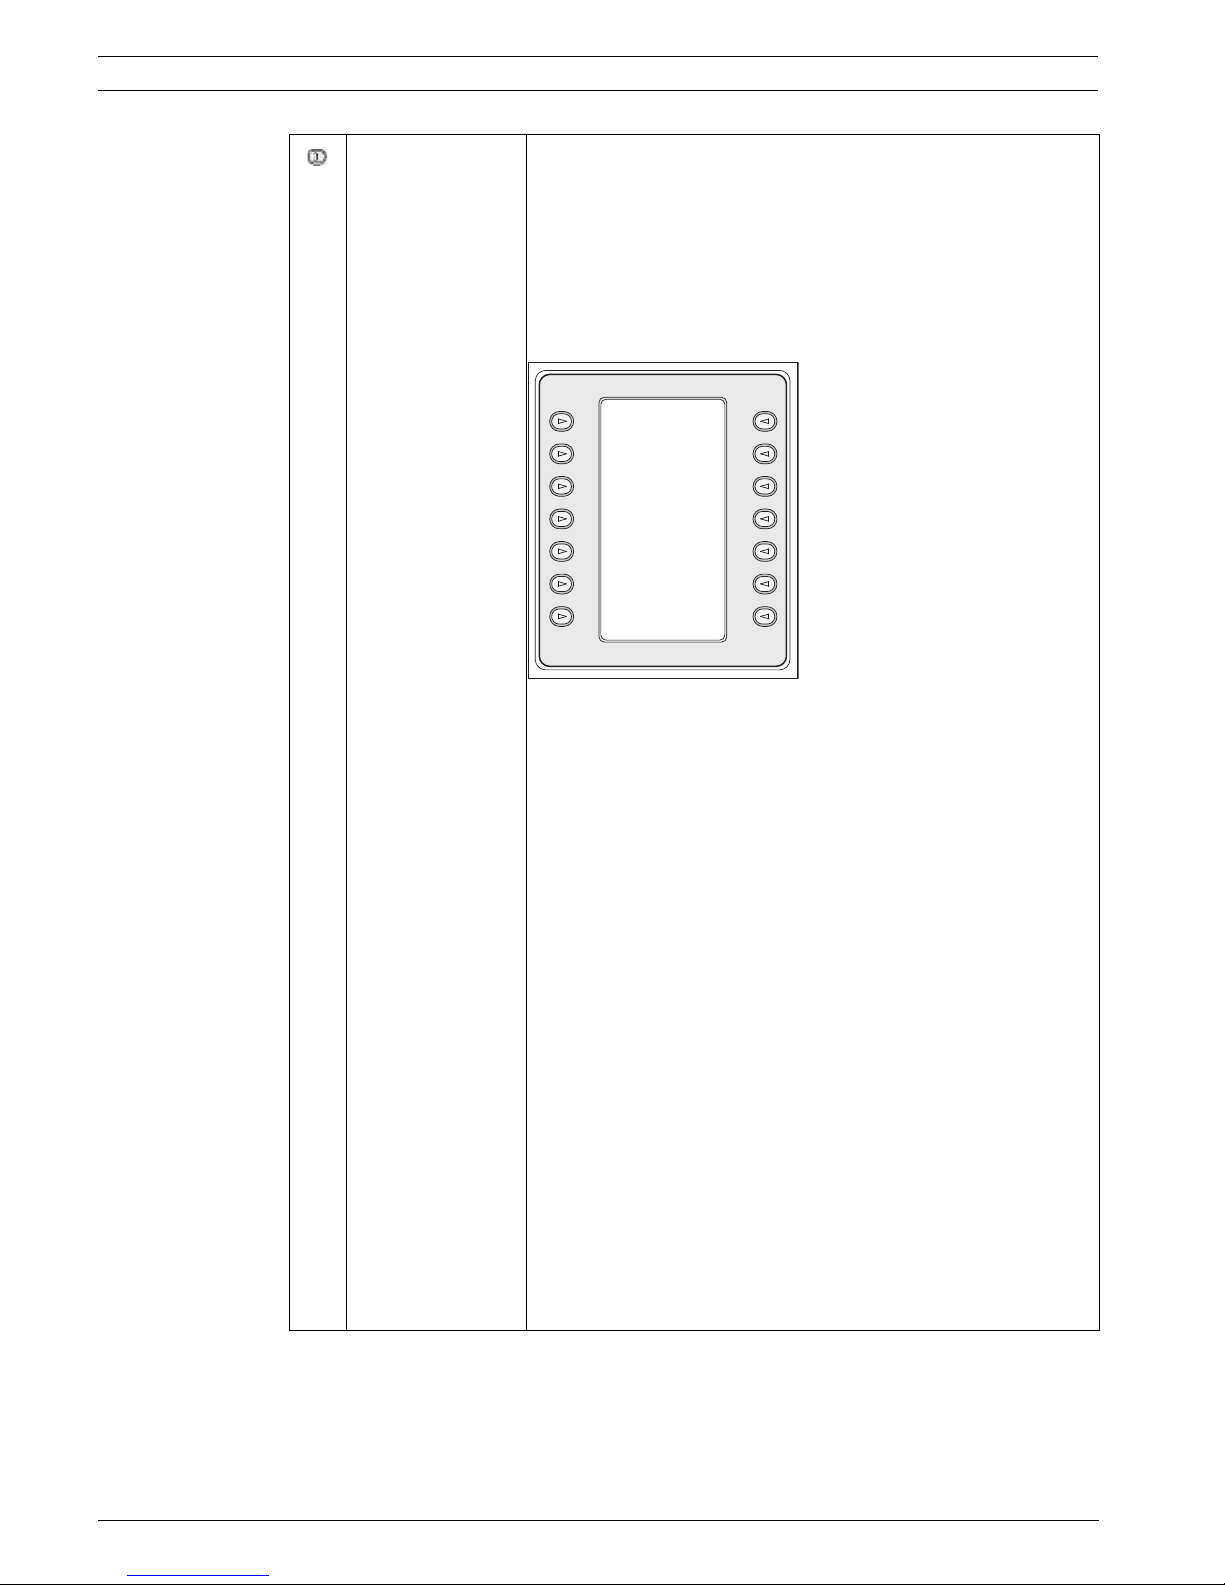
2.1 The Allegiant Main Control Menu
To access the Allegiant Main Control menu:
1. Press PROD to put the keyboard in Product Selection Mode. The keyboard displays the
the Product Selection menu in the softkey display.
2. Press the Allegiant softkey button. The status display shows the Allegiant mode.
3. To select a camera, enter a valid 1 to 4 digit camera number using the numeric keypad
and press ENTER.
If the Allegiant is configured to operate in "6-digit Camera ID" mode, up to 6 digits can be
entered. If the new camera is at the same "site" as the current camera, simply enter 1 to
4 camera number digits.
If the desired camera is at a different "site", 5 or 6 digits must be entered. The first and
second digits are the site number and the remaining 4 digits, including any leading zeros
are the camera number at that site.
4. While in Allegiant mode, keyboard operators can use a convenient “Go Back” feature. To
go back to the previously selected camera, press and hold the CLR key for more than 1
second.
Figure 2.3 Allegiant Main Control Menu
2.2 Programming and Controlling Allegiant Functions
The Allegiant Main Control menu, displayed on the softkey display, uses the softkey buttons to
execute commands or to gain access to other submenus for additional programming/
configuration. Detailed command descriptions follow. Refer to the Allegiant Switcher
Instruction Book for additional information.
F.01U.127.291 | 1.93 | 2009.03 User Manual Bosch Security System, Inc.
IntuiKey Keyboard Controlling Allegiant Series Video Switchers | en 9
Exit
Monitor
Lock
Remote
Lock
Monitor
Unlock
Remote
Unlock
Exit Exits one menu and reverts to the main menu for the particular
function being programmed/controlled.
Device Lockout Accesses a softkey menu, allowing the locking/unlocking of
specified cameras and monitors.
Figure 2.4 Device Lockout Menu
– Monitor Lock/Unlock
– If the monitor to be locked/unlocked is not the present
monitor, press MON on the keypad. Then enter the
monitor number, followed by ENTER.
– Press the monitor Lock/Unlock softkey.
– If the monitor is locked, the display shows an ML on the
monitor’s on-screen status display, indicating that the
monitor is locked. If the monitor is unlocked, ML is
removed.
– Remote Lock/Unlock
– If the Camera to be locked/unlocked is not the present
camera, enter the camera number followed by ENTER.
– Press the Remote Lock/Unlock softkey.
– If the camera is locked, the display shows an RL in the
monitor’s on-screen status display, indicating that the
remote device is locked. If the camera is unlocked, RL is
removed.
To exit the Device Lockout menu press EXIT.
Bosch Security System, Inc. User Manual F.01U.127.291 | 1.93 | 2009.03
10 en | Controlling Allegiant Series Video Switchers IntuiKey Keyboard
Alarm Control Alarm commands control the system’s automatic video switching
capabilities in response to alarm signals activated in the Allegiant
system. The camera activated by an alarm is normally the same as
the alarm number, but this relationship can be changed using the
optional LTC 8059/00 Master Control Software for Windows® or
the optional LTC 8850/00 Graphical User Interface software
package. These optional software packages even permit up to
four (4) cameras to be alarmed by a single alarm input.
Exit
Arm
Alarm
Arm
All
Alarms
Disarm
Alarms
All
Arm
Monitor
Figure 2.5 Alarm Control Menu
Disarm
Monitor
– Arm/Disarm Alarm
To arm/disarm an individual alarm on the monitor currently
controlled by the keyboard:
a. Press the Arm/Disarm Alarm softkey. The status display
changes to the following:
b. Enter the alarm number to be armed/disarmed, using
the numeric keypad.
c. Press ENTER.
– Arm/Disarm All Alarms
To arm/disarm all alarms on the currently controlled monitor,
simply press the Arm/Disarm All Alarms softkey.
– Arm Monitor
Press the Arm Monitor softkey to arm the monitor currently
controlled by the keyboard, permitting cameras for armed
alarms to automatically display when an alarm occurs.
NOTE: Alarm video appears on a given monitor only if the monitor
is armed and the alarm is armed for that monitor. The on-screen
monitor status display shows MA (Monitor Armed).
– Disarm Monitor
Pressing the Disarm Monitor softkey disarms the monitor
currently controlled by the keyboard, thus prohibiting the
monitor from responding to alarms.
F.01U.127.291 | 1.93 | 2009.03 User Manual Bosch Security System, Inc.
IntuiKey Keyboard Controlling Allegiant Series Video Switchers | en 11
Allegiant
Alarm#
- - -
Exit/
Save
Previous
Step Step
Step
Next
Step
Exit/
Run
Insert
Delete
Current
Delete
from Here
to End
Program Sequence Changes the softkey display and requests entry of a sequence
number to program. The status display shows the following:
Figure 2.6 Program Sequence Display
Upon entry of a sequence number followed by ENTER, the softkey
display changes to the following menu to support sequence
programming:
Figure 2.7 Program Sequence Menu
– Exit/Save
Saves the present sequence and exits the Program Sequence
menu.
– Previous Step
Displays the previous sequence step on the OSD (on-screen
display) and allows editing.
– Next Step
Displays the next sequence step on the OSD and allows
editing.
– Exit/Run
Saves the present sequence, loads it, runs it, then exits the
Program Sequence menu.
– Insert Step
Inserts a step before the sequence step presently displayed
on the OSD.
– Delete Current Step
Deletes the current step. Note that if this is done on the first
step of a single-step sequence, the sequence is erased and
the programming mode is automatically exited.
– Delete from Here to End
Deletes all remaining steps after the step presently displayed
on the OSD.
Bosch Security System, Inc. User Manual F.01U.127.291 | 1.93 | 2009.03
 Loading...