Bosch HBN211E2M Instruction manual

Built-in oven HBN211.2M
en Instruction manual

Table of contents |
|
Important safety information..................................................... |
3 |
Causes of damage ............................................................................. |
4 |
Your new oven ............................................................................ |
5 |
Control panel ....................................................................................... |
5 |
Function selector................................................................................. |
5 |
Temperature selector ......................................................................... |
5 |
Timer ..................................................................................................... |
6 |
Cooking compartment ....................................................................... |
6 |
Your accessories........................................................................ |
6 |
Inserting the accessories .................................................................. |
6 |
Optional accessories ......................................................................... |
7 |
Before using the oven for the first time.................................... |
7 |
Heating up the oven........................................................................... |
7 |
Cleaning the accessories.................................................................. |
7 |
Setting the oven.......................................................................... |
7 |
Types of heating and temperature .................................................. |
7 |
Care and cleaning ...................................................................... |
8 |
Cleaning agents .................................................................................. |
8 |
Detaching and refitting the rails ....................................................... |
8 |
Detaching and attaching the oven door......................................... |
9 |
Removing and refitting the door panels...................................... |
10 |
Troubleshooting ....................................................................... |
10 |
Malfunction table.............................................................................. |
10 |
Replacing the bulb in the oven ceiling light ............................... |
10 |
Glass cover ....................................................................................... |
11 |
After-sales service ................................................................... |
11 |
E number and FD number ............................................................. |
11 |
Energy and environment tips.................................................. |
11 |
Saving energy................................................................................... |
11 |
Environmentally-friendly disposal.................................................. |
11 |
Measures to be noted during transport....................................... |
11 |
Tested for you in our cooking studio ..................................... |
12 |
Cakes and pastries ......................................................................... |
12 |
Baking tips ........................................................................................ |
13 |
Meat, poultry, fish............................................................................. |
14 |
Tips for roasting and grilling.......................................................... |
15 |
Bakes, gratins, toast with toppings .............................................. |
16 |
Preprepared products..................................................................... |
16 |
Special dishes .................................................................................. |
16 |
Defrosting .......................................................................................... |
17 |
Drying................................................................................................. |
17 |
Acrylamide in foodstuffs ......................................................... |
17 |
Test dishes................................................................................ |
18 |
Baking ................................................................................................ |
18 |
Grilling................................................................................................ |
18 |
Additional information on products, accessories, replacement parts and services can be found at www.bosch-home.com and in the online shop www.bosch-eshop.com
:Important safety information
Read these instructions carefully. Only then will you be able to operate your appliance safely and correctly. Retain the instruction manual and installation instructions for future use or for subsequent owners.
This appliance is only intended to be fully fitted in a kitchen. Observe the special installation instructions.
Check the appliance for damage after unpacking it. Do not connect the appliance if it has been damaged in transport.
Only a licensed professional may connect appliances without plugs. Damage caused by incorrect connection is not covered under warranty.
This appliance is intended for domestic use only. The appliance must only be used for the preparation of food and drink. The appliance must be supervised during operation. Only use this appliance indoors.
This appliance is intended for use up to a maximum height of 2000 metres above sea level.
This appliance may be used by children over the age of 8 years old and by persons with reduced physical, sensory or mental capabilities or by persons with a lack of experience or knowledge if they are supervised or are instructed by a person responsible for their safety how to use the appliance safely and have understood the associated hazards.
Children must not play with, on, or around the appliance. Children must not clean the appliance or carry out general maintenance unless they are at least 8 years old and are being supervised.
Keep children below the age of 8 years old at a safe distance from the appliance and power cable.
Always slide accessories into the cooking compartment correctly. See "Description of accessories in the instruction manual.
3
Risk of fire!
■Combustible items stored in the cooking compartment may catch fire. Never store combustible items in the cooking compartment. Never open the appliance door if there is smoke inside. Switch off the appliance and unplug it from the mains or switch off the circuit breaker in the fuse box.
■A draught is created when the appliance door is opened. Greaseproof paper may come into contact with the heating element and catch fire. Do not place greaseproof paper loosely over accessories during preheating. Always weight down the greaseproof paper with a dish or a baking tin. Only cover the surface required with greaseproof paper. Greaseproof paper must not protrude over the accessories.
Risk of burns!
■The appliance becomes very hot. Never touch the interior surfaces of the cooking compartment or the heating elements. Always allow the appliance to cool down. Keep children at a safe distance.
■Accessories and ovenware become very hot. Always use oven gloves to remove accessories or ovenware from the cooking compartment.
■Alcoholic vapours may catch fire in the hot cooking compartment. Never prepare food containing large quantities of drinks with a high alcohol content. Only use small quantities of drinks with a high alcohol content. Open the appliance door with care.
Risk of scalding!
■The accessible parts become hot during operation. Never touch the hot parts. Keep children at a safe distance.
■When you open the appliance door, hot steam may escape. Open the appliance door with care. Keep children at a safe distance.
■Water in a hot cooking compartment may create hot steam. Never pour water into the hot cooking compartment.
Risk of injury!
Scratched glass in the appliance door may develop into a crack. Do not use a glass scraper, sharp or abrasive cleaning aids or detergents.
Risk of electric shock!
■Incorrect repairs are dangerous. Repairs may only be carried out by one of our trained after-sales engineers. If the appliance is faulty, unplug the mains plug or switch off the fuse in the fuse box. Contact the after-sales service.
■The cable insulation on electrical appliances may melt when touching hot parts of the appliance. Never bring electrical appliance cables into contact with hot parts of the appliance.
■Do not use any high-pressure cleaners or steam cleaners, which can result in an electric shock.
■When replacing the cooking compartment bulb, the bulb socket contacts are live. Before replacing the bulb, unplug the appliance from the mains or switch off the circuit breaker in the fuse box.
■A defective appliance may cause electric shock. Never switch on a defective appliance. Unplug the appliance from the mains or switch off the circuit breaker in the fuse box. Contact the after-sales service.
Causes of damage
Caution!
■Accessories, foil, greaseproof paper or ovenware on the cooking compartment floor: do not place accessories on the cooking compartment floor. Do not cover the cooking compartment floor with any sort of foil or greaseproof paper. Do not place ovenware on the cooking compartment floor if a temperature of over 50 ºC has been set. This will cause heat to accumulate. The baking and roasting times will no longer be correct and the enamel will be damaged.
■Water in a hot cooking compartment: do not pour water into the cooking compartment when it is hot. This will cause steam. The temperature change can cause damage to the enamel.
■Moist food: do not store moist food in the cooking compartment when it is closed for prolonged periods This will damage the enamel.
■Fruit juice: when baking particularly juicy fruit pies, do not pack the baking tray too generously. Fruit juice dripping from the baking tray leaves stains that cannot be removed. If possible, use the deeper universal pan.
■Cooling with the appliance door open: only allow the cooking compartment to cool when it is closed. Even if the appliance door is only open a little, front panels of adjacent units could be damaged over time.
■Very dirty door seal: If the door seal is very dirty, the appliance door will no longer close properly when the appliance is in use. The fronts of adjacent units could be damaged.Always keep the door seal clean.
4

■Appliance door as a seat, shelf or worktop: Do not sit on the appliance door, or place or hang anything on it. Do not place any cookware or accessories on the appliance door.
■Inserting accessories: depending on the appliance model, accessories can scratch the door panel when closing the
appliance door. Always insert the accessories into the cooking compartment as far as they will go.
■Carrying the appliance: do not carry or hold the appliance by the door handle. The door handle cannot support the weight of the appliance and could break.
Your new oven
Here you will learn about your new oven. The control panel and the individual operating controls are explained. You will find information on the cooking compartment and the accessories.
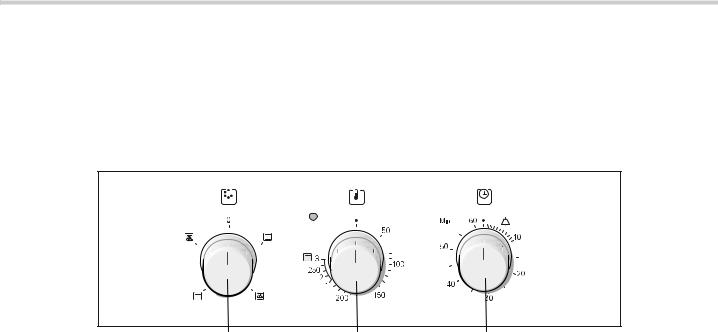
Control panel
Here you can see an overview of the control panel. The design depends on the respective appliance model.
|
|
|
|
|
|
|
|
|
|
|
|
|
|
|
|
|
|
|
|||
|
|
|
|
|
Settings |
|
Function |
|
||
Explanations |
|
|
|
|
||||||
|
|
|
|
( |
Radiant grilling, |
Can be used to grill a large number |
|
|||
1 |
Function selector |
|
||||||||
|
|
|
|
|
|
large area |
of beef steaks, sausages and fish, |
|
||
2 |
Temperature selector |
|
|
|
||||||
|
|
|
|
or to toast bread. The whole area |
|
|||||
|
|
|
|
|
|
|
|
|
||
3 |
Timer |
|
|
|
|
|
|
below the grill heating element |
|
|
|
|
|
|
|
|
|
|
becomes hot. |
|
|
Function selector |
|
|
|
|
|
|
|
|||
|
|
|
|
|
|
|
||||
|
|
4 |
Hot air grilling |
Hot air grilling is particularly suita- |
|
|||||
With the function selector knob you can set the heating mode |
|
|
|
|
ble for grilling fish, poultry and |
|
||||
|
|
|
|
larger pieces of meat. The grill ele- |
|
|||||
for the oven. The function selector knob can be rotated to the |
|
|
|
|
|
|||||
|
|
|
|
ment and fan switch on and off |
|
|||||
right or to the left. |
|
|
|
|
|
|
|
|||
|
|
|
|
|
|
alternately. The fan distributes the |
|
|||
When the required type of heating is set, the oven light lights |
|
|
|
|
|
|||||
|
|
|
|
heated air around the food. |
|
|||||
up. |
|
|
|
|
|
|
|
|
||
|
|
|
|
|
|
|
|
|
|
|
|
|
|
|
* Type of heating in accordance with energy efficiency class |
|
|||||
|
|
|
|
|
|
|||||
|
|
|
|
|
|
EN50304. |
|
|
|
|
Settings |
Function |
|
|
|
|
|
|
|||
|
|
|
|
|
|
|
||||
|
|
|
|
|
|
|
|
|
|
|
ý |
Off |
The oven is switched off. |
|
Temperature selector |
|
|
||||
|
|
|
|
|
|
|
||||
% |
Top/bottom heatBaking, roasting or grilling is possi- |
|
Use the temperature selector to set the temperature and the |
|
||||||
|
ing |
ble on a single level only. This set- |
|
|
||||||
|
|
grill setting. |
|
|
|
|
||||
|
|
ting is well-suited for cakes and |
|
|
|
|
|
|||
|
|
|
|
|
|
|
|
|
||
|
|
pizza in tins or on the baking tray, |
|
|
|
|
|
|
|
|
|
|
|
Positions |
|
|
Function |
|
|||
|
|
and for lean joints of beef, veal and |
|
|
|
|
||||
|
|
|
|
|
|
|
|
|
||
|
|
game. Heat is emitted evenly from |
û |
|
Off |
|
Oven not hot. |
|
||
|
|
the top and bottom. |
|
|
|
|
|
|
|
|
|
|
50-270 |
Temperature range Temperature in °C |
|
||||||
|
|
|
|
|
||||||
2 |
Hot air* |
Meringues and puff pastries can be |
|
|||||||
|
|
|
|
|
|
|
||||
1, 2, 3 |
Grill settings |
The grill settings for "Grill, |
|
|||||||
|
|
baked on a single level. |
|
|||||||
|
|
|
|
|
|
|
large( area". |
|
||
|
|
Small baked items, cookies and |
|
|
|
|
|
|
||
|
|
|
|
|
|
|
Setting 1 = low |
|
||
|
|
puff pastries can be baked at the |
|
|
|
|
|
|
||
|
|
same time on two levels. |
|
|
|
|
|
Setting 2 = medium |
|
|
|
|
The fan on the rear side of the |
|
|
|
|
|
Setting 3 = high |
|
|
|
|
appliance takes the air that comes |
|
|
|
|
|
|
|
|
|
|
|
|
|
|
|
|
|
||
|
|
from above and below and distrib- |
|
The small light above the temperature selector is lit when the |
|
|||||
|
|
utes it evenly around the food. |
|
|
oven is heating. It goes out during pauses in the heating. For |
|
||||
* Type of heating in accordance with energy efficiency class |
|
some settings, it does not light up. |
|
|||||||
|
EN50304. |
|
|
|
Grill settings |
|
|
|
|
|
|
|
|
|
|
|
|
|
|
||
With ( Radiant grilling, use the temperature selector to set a grill setting.
5

Timer
Using the timer, you can set a time of up to 60 minutes. The timer runs independently of the oven. It can be used like a kitchen timer.
Setting |
|
Function |
|
|
|
û |
Zero position |
Setting off |
|
|
|
S |
End of the set cook- |
Signal when the set time has |
|
ing time |
elapsed |
|
|
|
S - 60 |
Minute display |
Time display, in minutes. |
|
|
|
Setting procedure
Set the timer for the desired cooking time.
The time has elapsed
When the time has elapsed, a signal sounds. The switch turns to the OFF position • automatically.
Cooking compartment
The oven light is located in the cooking compartment. A cooling fan protects the oven from overheating.
Oven light
During oven operation, the oven light is on. By turning the function selector to any position, the oven light can also be switched on without the oven heating up.
Cooling fan
The cooling fan switches on and off as required. The hot air escapes above the door.
So that the cooking compartment cools down more quickly after operation, the cooling fan continues to run for a certain period afterwards.
Caution!
do not cover the ventilation slots. Otherwise the oven will overheat.
Your accessories
The accessories supplied with your appliance are suitable for making many meals. Ensure that you always insert the accessories into the cooking compartment the right way round.
There is also a selection of optional accessories, with which you can improve on some of your favourite dishes, or simply to make working with your oven more convenient.
Inserting the accessories
The accessories can be inserted in the oven at 4 different levels. Always insert the accessories as far as they can go to ensure that they do not touch the door glass.
When the accessories are pulled approximately halfway out, they lock into position. This allows meals to be taken out easily.
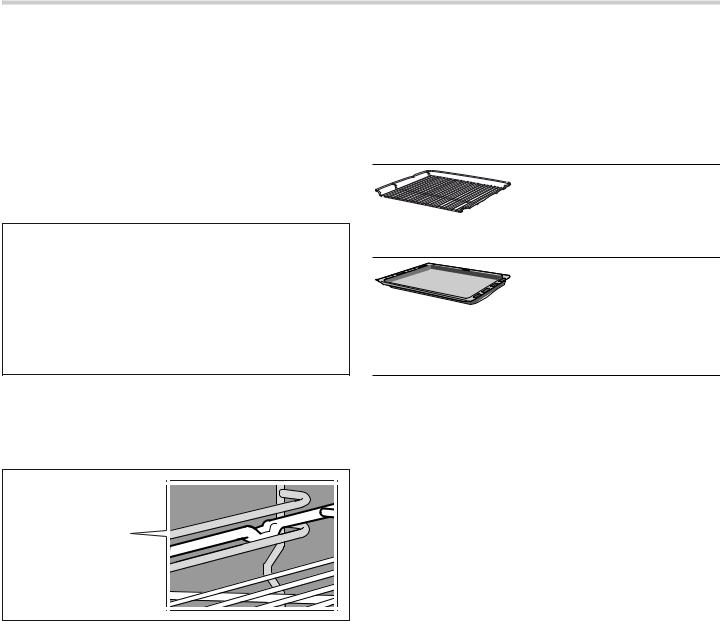
When placing the accessories in the oven, check that the indentation is at the back. They can only lock correctly in place in this position.
Hold the baking tray securely on the sides with both hands and push it parallel into the frame. Avoid movements to the right or left when pushing the baking tray in. Otherwise, it will be difficult to push the tray in and the enamelled surfaces could be damaged.
You can buy accessories from the after-sales service, from specialist retailers or online. Please specify the HEZ number.
Wire rack
For ovenware, cake tins, joints, grilled items and frozen meals.
Insert the wire rack with the open side facing the oven door and the
curvature pointing downwards ¾.
Universal pan
For moist cakes, pastries, frozen meals and large roasts. It can also be used to catch dripping fat when you are grilling directly on the wire rack.
Slide in the universal pan with the sloping edge facing the oven door.
Note: Heat may cause the accessories to deform. As soon as the accessories cool down, they regain their original shape. Their function is not impaired.
6
 Loading...