


OBJ_DOKU-36692-001.fm Page 1 Monday, February 3, 2014 11:17 AM
Robert Bosch GmbH
Power Tools Division
70745 Leinfelden-Echterdingen
Germany
www.bosch-pt.com
2 609 140 921 (2014.02) O / 224 EURO
GDR | GDS | GDX Professional
14,4 V-EC | 18 V-EC
|
|
|
|
|
|
|
|
|
|
|
|
|
|
|
|
|
|
|
|
|
de |
Originalbetriebsanleitung |
tr |
Orijinal işletme talimatı |
mk |
Оригинално упатство за работа |
|
en |
Original instructions |
pl |
Instrukcja oryginalna |
sr |
Originalno uputstvo za rad |
|
fr |
Notice originale |
cs |
Původní návod k používání |
sl |
Izvirna navodila |
|
es |
Manual original |
sk |
Pôvodný návod na použitie |
hr |
Originalne upute za rad |
|
pt |
Manual original |
hu |
Eredeti használati utasítás |
et |
Algupärane kasutusjuhend |
|
it |
Istruzioni originali |
ru |
Оригинальное руководство |
lv |
Instrukcijas oriģinālvalodā |
|
nl |
Oorspronkelijke |
|
по эксплуатации |
lt |
Originali instrukcija |
|
|
gebruiksaanwijzing |
uk |
Оригінальна інструкція з |
ar |
ςТЎϩХʉ ЌТϾϦφЍʉ ʌμВТЎϺυ |
|
da |
Original brugsanvisning |
|
експлуатації |
fa |
ΖЎϩʉ ˒μВЖЙʉʓ И ϞφЁʑ |
|
sv |
Bruksanvisning i original |
kk |
Пайдалану нұсқаулығының |
|
|
|
no |
Original driftsinstruks |
|
түпнұсқасы |
|
|
|
fi |
Alkuperäiset ohjeet |
ro |
Instrucţiuni originale |
|
|
|
el |
Πρωτότυπο οδηγιών χρήσης |
bg |
Оригинална инструкция |
|
|
|
OBJ_BUCH-2047-001.book Page 2 Monday, February 3, 2014 11:18 AM
2 |
Deutsch. . . . . . . . . . . . . . . . . . . . . . . . . . . . . . . . . . . . . |
. . . . Seite |
6 |
English . . . . . . . . . . . . . . . . . . . . . . . . . . . . . . . . . . . . . . |
. . . .Page |
13 |
Français . . . . . . . . . . . . . . . . . . . . . . . . . . . . . . . . . . . . . |
. . . .Page |
20 |
Español . . . . . . . . . . . . . . . . . . . . . . . . . . . . . . . . . . . . . . |
. . Página |
27 |
Português . . . . . . . . . . . . . . . . . . . . . . . . . . . . . . . . . . . . |
. . Página |
34 |
Italiano . . . . . . . . . . . . . . . . . . . . . . . . . . . . . . . . . . . . . . |
. . Pagina |
41 |
Nederlands . . . . . . . . . . . . . . . . . . . . . . . . . . . . . . . . . . . |
. . Pagina |
49 |
Dansk . . . . . . . . . . . . . . . . . . . . . . . . . . . . . . . . . . . . . . . |
. . . . Side |
56 |
Svenska . . . . . . . . . . . . . . . . . . . . . . . . . . . . . . . . . . . . . |
. . . . Sida |
62 |
Norsk. . . . . . . . . . . . . . . . . . . . . . . . . . . . . . . . . . . . . . . . |
. . . . Side |
68 |
Suomi . . . . . . . . . . . . . . . . . . . . . . . . . . . . . . . . . . . . . . . |
. . . . Sivu |
74 |
Ελληνικά . . . . . . . . . . . . . . . . . . . . . . . . . . . . . . . . . . . . . |
. . Σελίδα |
81 |
Türkçe . . . . . . . . . . . . . . . . . . . . . . . . . . . . . . . . . . . . . . . |
. . . Sayfa |
88 |
Polski . . . . . . . . . . . . . . . . . . . . . . . . . . . . . . . . . . . . . . . |
. . Strona |
95 |
Česky . . . . . . . . . . . . . . . . . . . . . . . . . . . . . . . . . . . . . . . |
. . Strana |
102 |
Slovensky . . . . . . . . . . . . . . . . . . . . . . . . . . . . . . . . . . . . |
. . Strana |
108 |
Magyar . . . . . . . . . . . . . . . . . . . . . . . . . . . . . . . . . . . . . . |
. . . Oldal |
115 |
Русский . . . . . . . . . . . . . . . . . . . . . . . . . . . . . . . . . . . . |
Страница |
122 |
Українська . . . . . . . . . . . . . . . . . . . . . . . . . . . . . . . . . . . |
Сторінка |
130 |
Қазақша . . . . . . . . . . . . . . . . . . . . . . . . . . . . . . . . . . . . . |
. . . . . Бет |
138 |
Română. . . . . . . . . . . . . . . . . . . . . . . . . . . . . . . . . . . . . . |
. . Pagina |
145 |
Български . . . . . . . . . . . . . . . . . . . . . . . . . . . . . . . . . . |
Страница |
152 |
Македонски . . . . . . . . . . . . . . . . . . . . . . . . . . . . . . . . . |
. . Страна |
159 |
Srpski . . . . . . . . . . . . . . . . . . . . . . . . . . . . . . . . . . . . . . . |
. . Strana |
167 |
Slovensko . . . . . . . . . . . . . . . . . . . . . . . . . . . . . . . . . . . . |
. . . Stran |
173 |
Hrvatski. . . . . . . . . . . . . . . . . . . . . . . . . . . . . . . . . . . . . . |
. Stranica |
180 |
Eesti . . . . . . . . . . . . . . . . . . . . . . . . . . . . . . . . . . . . . . . . |
Lehekülg |
186 |
Latviešu . . . . . . . . . . . . . . . . . . . . . . . . . . . . . . . . . . . . . |
.Lappuse |
192 |
Lietuviškai. . . . . . . . . . . . . . . . . . . . . . . . . . . . . . . . . . . . |
. Puslapis |
199 |
. . . . . . . . . . . . . . . . . . . . . . . . . . . . . |
. |
213 |
. . . . . . . . . . . . . . . . . . . . . . . . . . . . . |
. |
221 |
2 609 140 921 | (3.2.14) |
|
|
Bosch Power Tools |
||||
|
|
|
|
|
|
|
|
|
|
|
|
|
|
|
|
|
|
|
|
|
|
|
|
OBJ_BUCH-2047-001.book Page 3 Monday, February 3, 2014 11:18 AM
3 |
2 609 140 921 | (3.2.14) |
|
|
Bosch Power Tools |
||||
|
|
|
|
|
|
|
|
|
|
|
|
|
|
|
|
|
|
|
|
|
|
|
|
OBJ_BUCH-2047-001.book Page 4 Monday, February 3, 2014 11:18 AM |
|
|
4 | |
|
|
1 |
2 |
|
|
|
|
|
|
13 |
11 |
|
|
10 |
|
|
9 |
|
|
8 |
|
|
7 |
|
|
6 |
|
|
5 |
|
3 |
|
4 |
12 |
GDR 18 V-EC |
|
|
2 609 140 921 | (3.2.14) |
Bosch Power Tools |
|
OBJ_BUCH-2047-001.book Page 5 Monday, February 3, 2014 11:18 AM |
|||
5 | |
|
|
|
A GDR ... |
|
B |
GDS ... |
|
1 |
2 |
|
14 |
|
|
1 |
|
|
|
|
|
|
|
17 |
15 |
|
16 |
|
|
|
|
|
16 |
|
|
|
C GDX ... |
|
D |
|
1 |
2 |
|
|
17 |
|
|
|
|
|
9 |
9 |
14 |
|
|
|
15 |
16 |
|
|
16 |
|
|
|
2 609 140 921 | (3.2.14) |
|
|
Bosch Power Tools |
OBJ_BUCH-2047-001.book Page 6 Monday, February 3, 2014 11:18 AM
6 | Deutsch
Deutsch
Sicherheitshinweise
Allgemeine Sicherheitshinweise für Elektrowerkzeuge
 WARNUNG Lesen Sie alle Sicherheitshinweise und Anweisungen. Versäumnisse bei der Ein-
haltung der Sicherheitshinweise und Anweisungen können elektrischen Schlag, Brand und/oder schwere Verletzungen verursachen.
Bewahren Sie alle Sicherheitshinweise und Anweisungen für die Zukunft auf.
Der in den Sicherheitshinweisen verwendete Begriff „Elektrowerkzeug“ bezieht sich auf netzbetriebene Elektrowerkzeuge (mit Netzkabel) und auf akkubetriebene Elektrowerkzeuge (ohne Netzkabel).
Arbeitsplatzsicherheit
Halten Sie Ihren Arbeitsbereich sauber und gut beleuchtet. Unordnung oder unbeleuchtete Arbeitsbereiche können zu Unfällen führen.
Arbeiten Sie mit dem Elektrowerkzeug nicht in explosionsgefährdeter Umgebung, in der sich brennbare Flüssigkeiten, Gase oder Stäube befinden. Elektrowerkzeuge erzeugen Funken, die den Staub oder die Dämpfe entzünden können.
Halten Sie Kinder und andere Personen während der Benutzung des Elektrowerkzeugs fern. Bei Ablenkung können Sie die Kontrolle über das Gerät verlieren.
Elektrische Sicherheit
Der Anschlussstecker des Elektrowerkzeuges muss in die Steckdose passen. Der Stecker darf in keiner Weise verändert werden. Verwenden Sie keine Adapterstecker gemeinsam mit schutzgeerdeten Elektrowerkzeugen. Unveränderte Stecker und passende Steckdosen verringern das Risiko eines elektrischen Schlages.
Vermeiden Sie Körperkontakt mit geerdeten Oberflächen wie von Rohren, Heizungen, Herden und Kühlschränken. Es besteht ein erhöhtes Risiko durch elektrischen Schlag, wenn Ihr Körper geerdet ist.
Halten Sie Elektrowerkzeuge von Regen oder Nässe fern. Das Eindringen von Wasser in ein Elektrowerkzeug erhöht das Risiko eines elektrischen Schlages.
Zweckentfremden Sie das Kabel nicht, um das Elektrowerkzeug zu tragen, aufzuhängen oder um den Stecker aus der Steckdose zu ziehen. Halten Sie das Kabel fern von Hitze, Öl, scharfen Kanten oder sich bewegenden Geräteteilen. Beschädigte oder verwickelte Kabel erhöhen das Risiko eines elektrischen Schlages.
Wenn Sie mit einem Elektrowerkzeug im Freien arbeiten, verwenden Sie nur Verlängerungskabel, die auch für den Außenbereich geeignet sind. Die Anwendung eines für den Außenbereich geeigneten Verlängerungskabels verringert das Risiko eines elektrischen Schlages.
Wenn der Betrieb des Elektrowerkzeuges in feuchter Umgebung nicht vermeidbar ist, verwenden Sie einen Fehlerstromschutzschalter. Der Einsatz eines Fehlerstromschutzschalters vermindert das Risiko eines elektrischen Schlages.
Sicherheit von Personen
Seien Sie aufmerksam, achten Sie darauf, was Sie tun, und gehen Sie mit Vernunft an die Arbeit mit einem Elektrowerkzeug. Benutzen Sie kein Elektrowerkzeug, wenn Sie müde sind oder unter dem Einfluss von Drogen, Alkohol oder Medikamenten stehen. Ein Moment der Unachtsamkeit beim Gebrauch des Elektrowerkzeuges kann zu ernsthaften Verletzungen führen.
Tragen Sie persönliche Schutzausrüstung und immer eine Schutzbrille. Das Tragen persönlicher Schutzausrüstung, wie Staubmaske, rutschfeste Sicherheitsschuhe, Schutzhelm oder Gehörschutz, je nach Art und Einsatz des Elektrowerkzeuges, verringert das Risiko von Verletzungen.
Vermeiden Sie eine unbeabsichtigte Inbetriebnahme. Vergewissern Sie sich, dass das Elektrowerkzeug ausgeschaltet ist, bevor Sie es an die Stromversorgung und/oder den Akku anschließen, es aufnehmen oder tragen. Wenn Sie beim Tragen des Elektrowerkzeuges den Finger am Schalter haben oder das Gerät eingeschaltet an die Stromversorgung anschließen, kann dies zu Unfällen führen.
Entfernen Sie Einstellwerkzeuge oder Schraubenschlüssel, bevor Sie das Elektrowerkzeug einschalten.
Ein Werkzeug oder Schlüssel, der sich in einem drehenden Geräteteil befindet, kann zu Verletzungen führen.
Vermeiden Sie eine abnormale Körperhaltung. Sorgen Sie für einen sicheren Stand und halten Sie jederzeit das Gleichgewicht. Dadurch können Sie das Elektrowerkzeug in unerwarteten Situationen besser kontrollieren.
Tragen Sie geeignete Kleidung. Tragen Sie keine weite Kleidung oder Schmuck. Halten Sie Haare, Kleidung und Handschuhe fern von sich bewegenden Teilen. Lockere Kleidung, Schmuck oder lange Haare können von sich bewegenden Teilen erfasst werden.
Wenn Staubabsaugund -auffangeinrichtungen montiert werden können, vergewissern Sie sich, dass diese angeschlossen sind und richtig verwendet werden. Verwendung einer Staubabsaugung kann Gefährdungen durch Staub verringern.
Verwendung und Behandlung des Elektrowerkzeuges
Überlasten Sie das Gerät nicht. Verwenden Sie für Ihre Arbeit das dafür bestimmte Elektrowerkzeug. Mit dem passenden Elektrowerkzeug arbeiten Sie besser und sicherer im angegebenen Leistungsbereich.
Benutzen Sie kein Elektrowerkzeug, dessen Schalter defekt ist. Ein Elektrowerkzeug, das sich nicht mehr einoder ausschalten lässt, ist gefährlich und muss repariert werden.
2 609 140 921 | (3.2.14) |
|
|
Bosch Power Tools |
||||
|
|
|
|
|
|
|
|
|
|
|
|
|
|
|
|
|
|
|
|
|
|
|
|
OBJ_BUCH-2047-001.book Page 7 Monday, February 3, 2014 11:18 AM
Ziehen Sie den Stecker aus der Steckdose und/oder entfernen Sie den Akku, bevor Sie Geräteeinstellungen vornehmen, Zubehörteile wechseln oder das Gerät weglegen. Diese Vorsichtsmaßnahme verhindert den unbeabsichtigten Start des Elektrowerkzeuges.
Bewahren Sie unbenutzte Elektrowerkzeuge außerhalb der Reichweite von Kindern auf. Lassen Sie Personen das Gerät nicht benutzen, die mit diesem nicht vertraut sind oder diese Anweisungen nicht gelesen haben. Elektrowerkzeuge sind gefährlich, wenn sie von unerfahrenen Personen benutzt werden.
Pflegen Sie Elektrowerkzeuge mit Sorgfalt. Kontrollieren Sie, ob bewegliche Teile einwandfrei funktionieren und nicht klemmen, ob Teile gebrochen oder so beschädigt sind, dass die Funktion des Elektrowerkzeuges beeinträchtigt ist. Lassen Sie beschädigte Teile vor dem Einsatz des Gerätes reparieren. Viele Unfälle haben ihre Ursache in schlecht gewarteten Elektrowerkzeugen.
Halten Sie Schneidwerkzeuge scharf und sauber. Sorgfältig gepflegte Schneidwerkzeuge mit scharfen Schneidkanten verklemmen sich weniger und sind leichter zu führen.
Verwenden Sie Elektrowerkzeug, Zubehör, Einsatzwerkzeuge usw. entsprechend diesen Anweisungen. Berücksichtigen Sie dabei die Arbeitsbedingungen und die auszuführende Tätigkeit. Der Gebrauch von Elektrowerkzeugen für andere als die vorgesehenen Anwendungen kann zu gefährlichen Situationen führen.
Verwendung und Behandlung des Akkuwerkzeuges
Laden Sie die Akkus nur mit Ladegeräten auf, die vom Hersteller empfohlen werden. Durch ein Ladegerät, das für eine bestimmte Art von Akkus geeignet ist, besteht Brandgefahr, wenn es mit anderen Akkus verwendet wird.
Verwenden Sie nur die dafür vorgesehenen Akkus in den Elektrowerkzeugen. Der Gebrauch von anderen Akkus kann zu Verletzungen und Brandgefahr führen.
Halten Sie den nicht benutzten Akku fern von Büroklammern, Münzen, Schlüsseln, Nägeln, Schrauben oder anderen kleinen Metallgegenständen, die eine Überbrückung der Kontakte verursachen könnten. Ein Kurzschluss zwischen den Akkukontakten kann Verbrennungen oder Feuer zur Folge haben.
Bei falscher Anwendung kann Flüssigkeit aus dem Akku austreten. Vermeiden Sie den Kontakt damit. Bei zufälligem Kontakt mit Wasser abspülen. Wenn die Flüssigkeit in die Augen kommt, nehmen Sie zusätzlich ärztliche Hilfe in Anspruch. Austretende Akkuflüssigkeit kann zu Hautreizungen oder Verbrennungen führen.
Service
Lassen Sie Ihr Elektrowerkzeug nur von qualifiziertem Fachpersonal und nur mit Original-Ersatzteilen reparieren. Damit wird sichergestellt, dass die Sicherheit des Elektrowerkzeuges erhalten bleibt.
Deutsch | 7
Sicherheitshinweise für Schlagschrauber
Halten Sie das Gerät an den isolierten Griffflächen, wenn Sie Arbeiten ausführen, bei denen die Schraube verborgene Stromleitungen treffen kann. Der Kontakt der Schraube mit einer spannungsführenden Leitung kann auch metallene Geräteteile unter Spannung setzen und zu einem elektrischen Schlag führen.
Sichern Sie das Werkstück. Ein mit Spannvorrichtungen oder Schraubstock festgehaltenes Werkstück ist sicherer gehalten als mit Ihrer Hand.
Warten Sie, bis das Elektrowerkzeug zum Stillstand gekommen ist, bevor Sie es ablegen. Das Einsatzwerkzeug kann sich verhaken und zum Verlust der Kontrolle über das Elektrowerkzeug führen.
Öffnen Sie den Akku nicht. Es besteht die Gefahr eines Kurzschlusses.
Schützen Sie den Akku vor Hitze, z. B. auch vor dauernder Sonneneinstrahlung, Feuer, Wasser und Feuchtigkeit. Es besteht Explosionsgefahr.
Bei Beschädigung und unsachgemäßem Gebrauch des Akkus können Dämpfe austreten. Führen Sie Frischluft zu und suchen Sie bei Beschwerden einen Arzt auf. Die Dämpfe können die Atemwege reizen.
Verwenden Sie den Akku nur in Verbindung mit Ihrem Bosch Elektrowerkzeug. Nur so wird der Akku vor gefährlicher Überlastung geschützt.
Durch spitze Gegenstände wie z. B. Nagel oder Schraubenzieher oder durch äußere Krafteinwirkung kann der Akku beschädigt werden. Es kann zu einem internen Kurzschluss kommen und der Akku brennen, rauchen, explodieren oder überhitzen.
Produktund Leistungsbeschreibung
Lesen Sie alle Sicherheitshinweise und Anweisungen. Versäumnisse bei der Einhaltung
der Sicherheitshinweise und Anweisungen
können elektrischen Schlag, Brand und/oder schwere Verletzungen verursachen.
Bitte klappen Sie die Aufklappseite mit der Darstellung des Elektrowerkzeugs auf, und lassen Sie diese Seite aufgeklappt, während Sie die Betriebsanleitung lesen.
Bestimmungsgemäßer Gebrauch
Das Elektrowerkzeug ist bestimmt zum Eindrehen und Lösen von Schrauben sowie zum Anziehen und Lösen von Muttern jeweils im angegebenen Abmessungsbereich.
Das Licht dieses Elektrowerkzeuges ist dazu bestimmt, den direkten Arbeitsbereich des Elektrowerkzeuges zu beleuchten und ist nicht geeignet zur Raumbeleuchtung im Haushalt.
|
Bosch Power Tools |
2 609 140 921 | (3.2.14) |
|
||||
|
|
|
|
|
|
|
|
|
|
|
|
|
|
|
|
|
|
|
|
|
|
|
|

OBJ_BUCH-2047-001.book Page 8 Monday, February 3, 2014 11:18 AM
8 | Deutsch
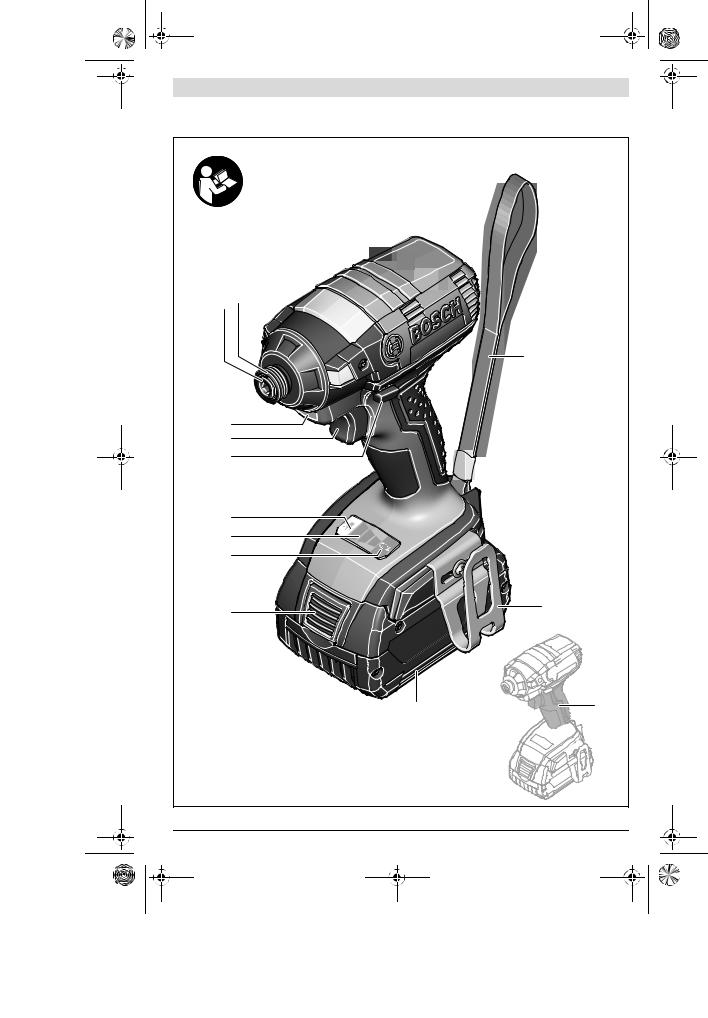
Abgebildete Komponenten
Die Nummerierung der abgebildeten Komponenten bezieht sich auf die Darstellung des Elektrowerkzeuges auf der Grafikseite.
1 Werkzeugaufnahme
2 Verriegelungshülse
3 Gurthalteclip*
4 Akku*
5 Akku-Entriegelungstaste*
6 Taste für elektronische Drehzahlvorwahl
7 Drehzahlanzeige
8 Taste für Lampe „PowerLight“
Technische Daten
9 Drehrichtungsumschalter
10Ein-/Ausschalter
11Lampe „PowerLight“
12Handgriff (isolierte Grifffläche)
13Tragschlaufe
14Doppelbit*
15Universalbithalter*
16Schrauberbit*
17Einsatzwerkzeug (z. B. Schraubernuss)*
*Abgebildetes oder beschriebenes Zubehör gehört nicht zum Standard-Lieferumfang. Das vollständige Zubehör finden Sie in unserem Zubehörprogramm.
Akku-Schlagschrauber |
|
GDR 14,4 V-EC |
GDR 18 V-EC |
||
Sachnummer |
|
3 601 JB9 2.. |
3 601 JB9 2.. |
3 601 JB9 3.. |
3 601 JB9 3.. |
mit Akku |
|
„premium“ |
„compact“ |
„premium“ |
„compact“ |
Nennspannung |
V= |
14,4 |
14,4 |
18 |
18 |
Leerlaufdrehzahl |
min-1 |
|
|
|
|
– Einstellung 1 |
0 – 1300 |
0 – 1300 |
0 – 1300 |
0 – 1300 |
|
– Einstellung 2 |
min-1 |
0 – 2000 |
0 – 2000 |
0 – 2000 |
0 – 2000 |
– Einstellung 3 |
min-1 |
0 – 2800 |
0 – 2800 |
0 – 2800 |
0 – 2800 |
Schlagzahl |
min-1 |
0 – 1100 |
0 – 1100 |
0 – 1100 |
0 – 1100 |
– Einstellung 1 |
|||||
– Einstellung 2 |
min-1 |
0 – 2600 |
0 – 2600 |
0 – 2600 |
0 – 2600 |
– Einstellung 3 |
min-1 |
0 – 3200 |
0 – 3200 |
0 – 3200 |
0 – 3200 |
max. Drehmoment harter Schraubfall |
Nm |
160 |
160 |
170 |
170 |
nach ISO 5393 |
|||||
Maschinenschrauben-Ø |
mm |
M6 – M14 |
M6 – M14 |
M6 – M14 |
M6 – M14 |
Werkzeugaufnahme |
|
¼" Innensechs- |
¼" Innensechs- |
¼" Innensechs- |
¼" Innensechs- |
|
|
kant |
kant |
kant |
kant |
Gewicht entsprechend EPTA- |
kg |
1,5 |
1,3 |
1,6 |
1,4 |
Procedure 01/2003 |
|||||
|
|
Akku-Schlagschrauber |
|
|
GDS 14,4 V-EC |
GDS 18 V-EC |
|
|
||||||
|
|
Sachnummer |
|
3 601 JB9 5.. |
|
3 601 JB9 5.. |
3 601 JB9 5.. |
3 601 JB9 5.. |
|
|
||||
|
|
mit Akku |
|
|
„premium“ |
|
„compact“ |
„premium“ |
„compact“ |
|
|
|||
|
|
Nennspannung |
V= |
14,4 |
14,4 |
18 |
18 |
|
|
|||||
|
|
Leerlaufdrehzahl |
min-1 |
|
0 – 1300 |
|
0 – 1300 |
0 – 1300 |
0 – 1300 |
|
|
|||
|
|
– Einstellung 1 |
|
|
|
|
||||||||
|
|
– Einstellung 2 |
min-1 |
|
0 – 2000 |
|
0 – 2000 |
0 – 2000 |
0 – 2000 |
|
|
|||
|
|
– Einstellung 3 |
min-1 |
|
0 – 2800 |
|
0 – 2800 |
0 – 2800 |
0 – 2800 |
|
|
|||
|
|
Schlagzahl |
min-1 |
|
0 – 1100 |
|
0 – 1100 |
0 – 1100 |
0 – 1100 |
|
|
|||
|
|
– Einstellung 1 |
|
|
|
|
||||||||
|
|
– Einstellung 2 |
min-1 |
|
0 – 2600 |
|
0 – 2600 |
0 – 2600 |
0 – 2600 |
|
|
|||
|
|
– Einstellung 3 |
min-1 |
|
0 – 3200 |
|
0 – 3200 |
0 – 3200 |
0 – 3200 |
|
|
|||
|
|
max. Drehmoment harter Schraubfall |
Nm |
175 |
175 |
185 |
185 |
|
|
|||||
|
|
nach ISO 5393 |
|
|
||||||||||
|
|
Maschinenschrauben-Ø |
mm |
|
M6 – M16 |
|
M6 – M16 |
M6 – M16 |
M6 – M16 |
|
|
|||
|
|
Werkzeugaufnahme |
|
|
½" |
|
½" |
½" |
½" |
|
|
|||
|
|
Gewicht entsprechend EPTA- |
|
|
|
|
|
|
|
|
|
|
|
|
|
|
Procedure 01/2003 |
kg |
1,5 |
1,3 |
1,6 |
1,4 |
|
|
|||||
|
|
|
|
|
|
|
|
|
|
|
|
|
|
|
|
|
2 609 140 921 | (3.2.14) |
|
|
|
|
|
|
|
Bosch Power Tools |
|
|
||
|
|
|
|
|
|
|
|
|
|
|
|
|
|
|
|
|
|
|
|
|
|
|
|
|
|
|
|
|
|
|
|
|
|
|
|
|
|
|
|
|
|
|
|
|
OBJ_BUCH-2047-001.book Page 9 Monday, February 3, 2014 11:18 AM
|
|
|
|
|
|
Deutsch | 9 |
|
|
|
|
|||
Akku-Schlagschrauber |
|
GDX 14,4 V-EC |
GDX 18 V-EC |
|||
Sachnummer |
|
3 601 JB9 0.. |
3 601 JB9 0.. |
3 601 JB9 1.. |
3 601 JB9 1.. |
|
mit Akku |
|
„premium“ |
„compact“ |
„premium“ |
„compact“ |
|
Nennspannung |
V= |
14,4 |
14,4 |
18 |
18 |
|
Leerlaufdrehzahl |
min-1 |
|
|
|
|
|
– Einstellung 1 |
0 – 1300 |
0 – 1300 |
0 – 1300 |
0 – 1300 |
||
– Einstellung 2 |
min-1 |
0 – 2000 |
0 – 2000 |
0 – 2000 |
0 – 2000 |
|
– Einstellung 3 |
min-1 |
0 – 2800 |
0 – 2800 |
0 – 2800 |
0 – 2800 |
|
Schlagzahl |
min-1 |
0 – 1100 |
0 – 1100 |
0 – 1100 |
0 – 1100 |
|
– Einstellung 1 |
||||||
– Einstellung 2 |
min-1 |
0 – 2600 |
0 – 2600 |
0 – 2600 |
0 – 2600 |
|
– Einstellung 3 |
min-1 |
0 – 3200 |
0 – 3200 |
0 – 3200 |
0 – 3200 |
|
max. Drehmoment harter Schraubfall |
|
|
|
|
|
|
nach ISO 5393 |
Nm |
160 |
160 |
170 |
170 |
|
– ¼" Innensechskant |
||||||
– ½" |
Nm |
175 |
175 |
185 |
185 |
|
Maschinenschrauben-Ø |
mm |
M6 – M16 |
M6 – M16 |
M6 – M16 |
M6 – M16 |
|
Werkzeugaufnahme |
|
¼" Innen- |
¼" Innen- |
¼" Innen- |
¼" Innen- |
|
|
|
|
sechskant/ ½" |
sechskant/ ½" |
sechskant/ ½" |
sechskant/ ½" |
Gewicht entsprechend EPTA- |
kg |
1,6 |
1,4 |
1,7 |
1,5 |
|
Procedure 01/2003 |
||||||
|
|
|
|
|
|
|
Akku |
|
|
GDR 14,4 V-EC |
|
GDR 18 V-EC |
|
|
|
|
|
GDS 14,4 V-EC |
|
GDS 18 V-EC |
|
|
|
|
GDX 14,4 V-EC |
|
GDX 18 V-EC |
erlaubte Umgebungstemperatur |
°C |
|
0...+45 |
|
0...+45 |
|
– |
beim Laden |
|
|
|||
– |
beim Betrieb* |
°C |
|
–20...+50 |
|
– 20...+50 |
– |
bei Lagerung |
°C |
|
– 20...+60 |
|
– 20...+60 |
empfohlene Akkus |
|
GBA 14,4V x,xAh M–. |
GBA 18V x,xAh M–. |
|||
* eingeschränkte Leistung bei Temperaturen <0 °C |
|
|
|
|
||
Geräusch-/Vibrationsinformation
Messwerte für Geräusch ermittelt entsprechend EN 60745.
Der A-bewertete Geräuschpegel des Elektrowerkzeugs beträgt typischerweise: Schalldruckpegel 95 dB(A); Schallleistungspegel 106 dB(A). Unsicherheit K=3 dB.
Gehörschutz tragen!
Schwingungsgesamtwerte ah (Vektorsumme dreier Richtungen) und Unsicherheit K ermittelt entsprechend EN 60745: Anziehen von Schrauben und Muttern maximaler zulässiger Größe: ah =13,5 m/s2, K=1,5 m/s2.
Der in diesen Anweisungen angegebene Schwingungspegel ist entsprechend einem in EN 60745 genormten Messverfahren gemessen worden und kann für den Vergleich von Elektrowerkzeugen miteinander verwendet werden. Er eignet sich auch für eine vorläufige Einschätzung der Schwingungsbelastung.
Der angegebene Schwingungspegel repräsentiert die hauptsächlichen Anwendungen des Elektrowerkzeugs. Wenn allerdings das Elektrowerkzeug für andere Anwendungen, mit unterschiedlichen Zubehören, mit abweichenden Einsatzwerkzeugen oder ungenügender Wartung eingesetzt wird, kann der Schwingungspegel abweichen. Dies kann die Schwingungsbelastung über den gesamten Arbeitszeitraum deutlich erhöhen.
Für eine genaue Abschätzung der Schwingungsbelastung sollten auch die Zeiten berücksichtigt werden, in denen das Gerät abgeschaltet ist oder zwar läuft, aber nicht tatsächlich im Einsatz ist. Dies kann die Schwingungsbelastung über den gesamten Arbeitszeitraum deutlich reduzieren.
Legen Sie zusätzliche Sicherheitsmaßnahmen zum Schutz des Bedieners vor der Wirkung von Schwingungen fest wie zum Beispiel: Wartung von Elektrowerkzeug und Einsatzwerkzeugen, Warmhalten der Hände, Organisation der Arbeitsabläufe.
Konformitätserklärung
Wir erklären in alleiniger Verantwortung, dass das unter „Technische Daten“ beschriebene Produkt mit den folgenden Normen oder normativen Dokumenten übereinstimmt:
EN 60745 gemäß den Bestimmungen der Richtlinien 2009/125/EG (Verordnung 1194/2012), 2011/65/EU, 2004/108/EG, 2006/42/EG.
Technische Unterlagen (2006/42/EG) bei: Robert Bosch GmbH, PT/ETM9,
D-70745 Leinfelden-Echterdingen
|
Bosch Power Tools |
2 609 140 921 | (3.2.14) |
|
||||
|
|
|
|
|
|
|
|
|
|
|
|
|
|
|
|
|
|
|
|
|
|
|
|
OBJ_BUCH-2047-001.book Page 10 Monday, February 3, 2014 11:18 AM
10 | Deutsch
Henk Becker |
Helmut Heinzelmann |
Executive Vice President |
Head of Product Certification |
Engineering |
PT/ETM9 |
Robert Bosch GmbH, Power Tools Division D-70745 Leinfelden-Echterdingen 03.02.2014
Montage
Akku laden
Benutzen Sie nur die auf der Zubehörseite aufgeführten Ladegeräte. Nur diese Ladegeräte sind auf den bei Ihrem Elektrowerkzeug verwendeten Li-Ionen-Akku abgestimmt.
Hinweis: Der Akku wird teilgeladen ausgeliefert. Um die volle Leistung des Akkus zu gewährleisten, laden Sie vor dem ersten Einsatz den Akku vollständig im Ladegerät auf.
Der Li-Ionen-Akku kann jederzeit aufgeladen werden, ohne die Lebensdauer zu verkürzen. Eine Unterbrechung des Ladevorganges schädigt den Akku nicht.
Der Li-Ionen-Akku ist durch die „Electronic Cell Protection (ECP)“ gegen Tiefentladung geschützt. Bei entladenem Akku wird das Elektrowerkzeug durch eine Schutzschaltung abgeschaltet: Das Einsatzwerkzeug bewegt sich nicht mehr.
Drücken Sie nach dem automatischen Abschalten des Elektrowerkzeuges nicht weiter auf den Ein-/Ausschal- ter. Der Akku kann beschädigt werden.
Beachten Sie die Hinweise zur Entsorgung.
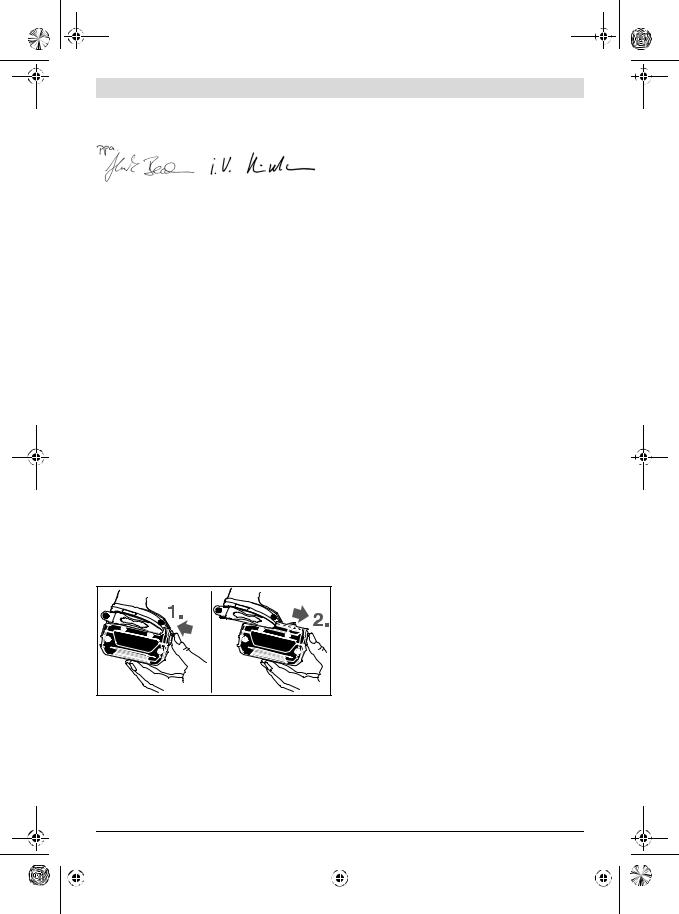
Akku entnehmen
Der Akku 4 verfügt über zwei Verriegelungsstufen, die verhindern sollen, dass der Akku beim unbeabsichtigten Drücken der Akku-Entriegelungstaste 5 herausfällt. Solange der Akku im Elektrowerkzeug eingesetzt ist, wird er durch eine Feder in Position gehalten.
Zur Entnahme des Akkus 4 drücken Sie die Entriegelungstaste 5 und ziehen den Akku nach vorn aus dem Elektrowerkzeug. Wenden Sie dabei keine Gewalt an.
Werkzeugwechsel
Nehmen Sie den Akku vor allen Arbeiten am Elektrowerkzeug (z.B. Wartung, Werkzeugwechsel etc.) sowie bei dessen Transport und Aufbewahrung aus dem Elektrowerkzeug. Bei unbeabsichtigtem Betätigen des Ein-/Ausschalters besteht Verletzungsgefahr.
Reinigen Sie regelmäßig die Lüftungsschlitze Ihres Elektrowerkzeugs. Das Motorgebläse zieht Staub in das Gehäuse, und eine starke Ansammlung von Metallstaub kann elektrische Gefahren verursachen.
GDR 14,4 V-EC/GDR 18 V-EC/GDX 14,4 V-EC/ GDX 18 V-EC:
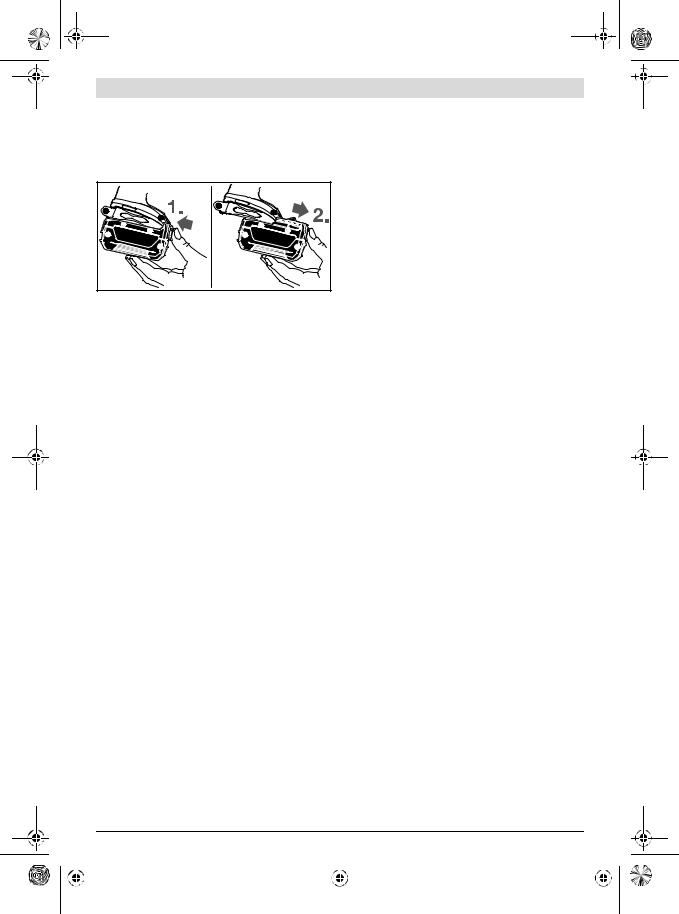
Einsatzwerkzeug einsetzen
Ziehen Sie die Verriegelungshülse 2 nach vorn, schieben das Einsatzwerkzeug bis zum Anschlag in die Werkzeugaufnahme 1 und lassen die Verriegelungshülse 2 wieder los, um das Einsatzwerkzeug zu arretieren.
Schrauberbits 16 können Sie über einen Universalbithalter mit Kugelrastung 15 einsetzen.
Einsatzwerkzeug entnehmen
Ziehen Sie die Verriegelungshülse 2 nach vorn und entnehmen Sie das Einsatzwerkzeug.
GDS 14,4 V-EC/GDS 18 V-EC/GDX 14,4 V-EC/ GDX 18 V-EC:
Achten Sie beim Einsetzen eines Einsatzwerkzeugs darauf, dass es sicher auf der Werkzeugaufnahme sitzt.
Wenn das Einsatzwerkzeug nicht sicher mit der Werkzeugaufnahme verbunden ist, kann es sich während des Schraubvorgangs lösen.
Schieben Sie das Einsatzwerkzeug 17 auf den Vierkant der Werkzeugaufnahme 1.
Systembedingt sitzt das Einsatzwerkzeug 17 mit etwas Spiel auf der Werkzeugaufnahme 1; dies hat keinen Einfluss auf die Funktion/Sicherheit.
GDX 14,4 V-EC/GDX 18 V-EC:
Einige Einsatzwerkzeuge (z. B. Doppelbits) können in der Werkzeugaufnahme nicht sicher befestigt werden.
Betrieb
Funktionsweise
Die Werkzeugaufnahme 1 mit dem Einsatzwerkzeug wird durch einen Elektromotor über Getriebe und Schlagwerk angetrieben.
Der Arbeitsvorgang gliedert sich in zwei Phasen: Schrauben und Festziehen (Schlagwerk in Aktion).
Das Schlagwerk setzt ein, sobald die Schraubverbindung festfährt und somit der Motor belastet wird. Das Schlagwerk wandelt damit die Kraft des Motors in gleichmäßige Drehschläge um. Beim Lösen von Schrauben oder Muttern läuft dieser Vorgang umgekehrt ab.
Inbetriebnahme
Akku einsetzen
Verwenden Sie nur original Bosch Li-Ionen-Akkus mit der auf dem Typenschild Ihres Elektrowerkzeugs angegebenen Spannung. Der Gebrauch von anderen Akkus kann zu Verletzungen und Brandgefahr führen.
Stellen Sie den Drehrichtungsumschalter 9 auf Mittelstellung, um das Elektrowerkzeug vor unbeabsichtigtem Einschalten zu schützen.
2 609 140 921 | (3.2.14) |
|
|
Bosch Power Tools |
||||
|
|
|
|
|
|
|
|
|
|
|
|
|
|
|
|
|
|
|
|
|
|
|
|
OBJ_BUCH-2047-001.book Page 11 Monday, February 3, 2014 11:18 AM
Schieben Sie den geladenen Akku 4 von vorn in den Fuß des Elektrowerkzeugs hinein, bis der Akku sicher verriegelt ist.
Drehrichtung einstellen (siehe Bild D)
Mit dem Drehrichtungsumschalter 9 können Sie die Drehrichtung des Elektrowerkzeuges ändern. Bei gedrücktem Ein-/Ausschalter 10 ist dies jedoch nicht möglich.
Rechtslauf: Zum Eindrehen von Schrauben und Anziehen von Muttern drücken Sie den Drehrichtungsumschalter 9 nach links bis zum Anschlag durch.
Linkslauf: Zum Lösen bzw. Herausdrehen von Schrauben und Muttern drücken Sie den Drehrichtungsumschalter 9 nach rechts bis zum Anschlag durch.
Ein-/Ausschalten
Drücken Sie zur Inbetriebnahme des Elektrowerkzeuges den Ein-/Ausschalter 10 und halten Sie ihn gedrückt.
Um das Elektrowerkzeug auszuschalten, lassen Sie den Ein-/Ausschalter 10 los.
Um Energie zu sparen, schalten Sie das Elektrowerkzeug nur ein, wenn Sie es benutzen.
Drehzahl einstellen
Sie können die Drehzahl des eingeschalteten Elektrowerkzeugs stufenlos regulieren, je nachdem, wie weit Sie den Ein-/Ausschalter 10 eindrücken.
Leichter Druck auf den Ein-/Ausschalter 10 bewirkt eine niedrige Drehzahl. Mit zunehmenden Druck erhöht sich die Drehzahl.
Drehzahl/Schlagzahl vorwählen
Mit der Taste 6 können Sie die benötigte Drehzahl/Schlagzahl in 3 Stufen vorwählen. Drücken Sie die Taste 6 so oft, bis die gewünschte Einstellung in der Drehzahlanzeige 7 signalisiert wird. Die gewählte Einstellung wird gespeichert.
Die erforderliche Drehzahl/Schlagzahl ist vom Werkstoff und den Arbeitsbedingungen abhängig und kann durch praktischen Versuch ermittelt werden.
Lampe „PowerLight“ ein-/ausschalten
Drücken Sie zur Inbetriebnahme der Lampe 11 die Taste 8. Um die Lampe 11 auszuschalten drücken Sie die Taste 8 erneut.
Richtwerte für maximale Schrauben-Anziehdrehmomente
Deutsch | 11
Arbeitshinweise
Setzen Sie das Elektrowerkzeug nur ausgeschaltet auf die Mutter/Schraube auf. Sich drehende Einsatzwerkzeuge können abrutschen.
Das Drehmoment ist abhängig von der Schlagdauer. Das maximal erzielte Drehmoment resultiert aus der Summe aller, durch Schläge erzielten, Einzeldrehmomente. Das maximale Drehmoment wird nach einer Schlagdauer von 6–10 Sekunden erreicht. Nach dieser Zeit erhöht sich das Anziehdrehmoment nur noch minimal.
Die Schlagdauer ist für jedes erforderliche Anziehdrehmoment zu ermitteln. Das tatsächlich erzielte Anziehdrehmoment ist stets mit einem Drehmomentschlüssel zu überprüfen.
Verschraubungen mit hartem, federndem oder weichem Sitz
Werden im Versuch die in einer Schlagfolge erzielten Drehmomente gemessen und in ein Diagramm übertragen, erhält man die Kurve eines Drehmomentverlaufes. Die Höhe der Kurve entspricht dem maximal erzielbaren Drehmoment, die Steilheit zeigt, in welcher Zeit dies erreicht wird.
Ein Drehmomentverlauf hängt ab von folgenden Faktoren:
–Festigkeit der Schrauben/Muttern
–Art der Unterlage (Scheibe, Tellerfeder, Dichtung)
–Festigkeit des zu verschraubenden Materials
–Schmierverhältnisse an der Schraubverbindung
Entsprechend ergeben sich folgende Anwendungsfälle:
–Harter Sitz ist gegeben bei Verschraubungen von Metall auf Metall bei Verwendung von Unterlegscheiben. Nach einer relativ kurzen Schlagzeit ist das maximale Drehmoment erreicht (steiler Kennlinienverlauf). Unnötig lange Schlagzeit schadet nur der Maschine.
–Federnder Sitz ist gegeben bei Verschraubungen von Metall auf Metall, jedoch bei Verwendung von Federringen, Tellerfedern, Stehbolzen oder Schrauben/Muttern mit konischem Sitz sowie bei Verwendung von Verlängerungen.
–Weicher Sitz ist gegeben bei Verschraubungen von z. B. Metall auf Holz, oder bei Verwendung von Bleioder Fiberscheiben als Unterlage.
Bei federndem bzw. weichem Sitz ist das maximale Anziehdrehmoment geringer als bei hartem Sitz. Ebenso ist eine deutlich längere Schlagzeit erforderlich.
Angaben in Nm, berechnet aus dem Spannungsquerschnitt; Ausnutzung der Streckgrenze 90 % (bei Reibungszahl μges = 0,12). Zur Kontrolle ist das Anziehdrehmoment stets mit einem Drehmomentschlüssel zu überprüfen.
|
|
Festigkeitsklassen nach |
Standard-Schrauben |
|
|
|
|
|
|
|
Hochfeste Schrauben |
|
|
||||||
|
|
DIN 267 |
3.6 |
4.6 |
5.6 |
4.8 |
|
6.6 |
|
5.8 |
6.8 |
6.9 |
8.8 |
10.9 |
12.9 |
|
|
||
|
|
M 6 |
2.71 |
3.61 |
4.52 |
4.8 |
|
5.42 |
6.02 |
7.22 |
8.13 |
9.7 |
13.6 |
16.2 |
|
|
|||
|
|
M 8 |
6.57 |
8.7 |
11 |
11.6 |
|
13.1 |
14.6 |
17.5 |
19.7 |
23 |
33 |
39 |
|
|
|||
|
|
M 10 |
13 |
17.5 |
22 |
23 |
|
26 |
|
29 |
35 |
39 |
47 |
65 |
78 |
|
|
||
|
|
M 12 |
22.6 |
30 |
37.6 |
40 |
|
45 |
|
50 |
60 |
67 |
80 |
113 |
135 |
|
|
||
|
|
M 14 |
36 |
48 |
60 |
65 |
|
72 |
|
79 |
95 |
107 |
130 |
180 |
215 |
|
|
||
|
|
M 16 |
55 |
73 |
92 |
98 |
|
110 |
|
122 |
147 |
165 |
196 |
275 |
330 |
|
|
||
|
|
|
|
|
|
|
|
|
|
|
|
|
|
|
|
|
|
|
|
|
|
Bosch Power Tools |
|
|
|
|
|
|
|
|
|
|
2 609 140 921 | (3.2.14) |
|
|
||||
|
|
|
|
|
|
|
|
|
|
|
|
|
|
|
|
|
|
|
|
|
|
|
|
|
|
|
|
|
|
|
|
|
|
|
|
|
|
|
|
|
|
|
|
|
|
|
|
|
|
|
|
|
|
|
|
|
|
|
|
OBJ_BUCH-2047-001.book Page 12 Monday, February 3, 2014 11:18 AM
12 | Deutsch
Tipps
Vor dem Eindrehen größerer, längerer Schrauben in harte Werkstoffe sollten Sie mit dem Kerndurchmesser des Gewindes auf etwa 2/3 der Schraubenlänge vorbohren.
Hinweis: Achten Sie darauf, dass keine metallischen Kleinteile in das Elektrowerkzeug eindringen.
Gurthalteclip
Mit dem Gurthalteclip 3 können Sie das Elektrowerkzeug z. B. an einem Gurt einhängen. Sie haben dann beide Hände frei und das Elektrowerkzeug ist jederzeit griffbereit.
Hinweise für den optimalen Umgang mit dem Akku
Schützen Sie den Akku vor Feuchtigkeit und Wasser.
Lagern Sie den Akku nur im Temperaturbereich von 0 °C bis 50 °C. Lassen Sie den Akku z.B. im Sommer nicht im Auto liegen.
Reinigen Sie gelegentlich die Lüftungsschlitze des Akkus mit einem weichen, sauberen und trockenen Pinsel.
Eine wesentlich verkürzte Betriebszeit nach der Aufladung zeigt an, dass der Akku verbraucht ist und ersetzt werden muss.
Beachten Sie die Hinweise zur Entsorgung.
Wartung und Service
Wartung und Reinigung
Nehmen Sie den Akku vor allen Arbeiten am Elektrowerkzeug (z.B. Wartung, Werkzeugwechsel etc.) sowie bei dessen Transport und Aufbewahrung aus dem Elektrowerkzeug. Bei unbeabsichtigtem Betätigen des Ein-/Ausschalters besteht Verletzungsgefahr.
Halten Sie das Elektrowerkzeug und die Lüftungsschlitze sauber, um gut und sicher zu arbeiten.
Kundendienst und Anwendungsberatung
Der Kundendienst beantwortet Ihre Fragen zu Reparatur und Wartung Ihres Produkts sowie zu Ersatzteilen. Explosionszeichnungen und Informationen zu Ersatzteilen finden Sie auch unter:
www.bosch-pt.com
Das Bosch-Anwendungsberatungs-Team hilft Ihnen gerne bei Fragen zu unseren Produkten und deren Zubehör.
www.powertool-portal.de, das Internetportal für Handwerker und Heimwerker.
Geben Sie bei allen Rückfragen und Ersatzteilbestellungen bitte unbedingt die 10-stellige Sachnummer laut Typenschild des Elektrowerkzeuges an.
Deutschland
Robert Bosch GmbH Servicezentrum Elektrowerkzeuge Zur Luhne 2
37589 Kalefeld – Willershausen
Unter www.bosch-pt.com können Sie online Ersatzteile bestellen oder Reparaturen anmelden.
Kundendienst: Tel.: (0711) 40040480
Fax: (0711) 40040481
E-Mail: Servicezentrum.Elektrowerkzeuge@de.bosch.com
Anwendungsberatung: Tel.: (0711) 40040480
Fax: (0711) 40040482
E-Mail: Anwendungsberatung.pt@de.bosch.com
Österreich
Unter www.bosch-pt.at können Sie online Ersatzteile bestellen.
Tel.: (01) 797222010
Fax: (01) 797222011
E-Mail: service.elektrowerkzeuge@at.bosch.com
Schweiz
Tel.: (044) 8471511
Fax: (044) 8471551
E-Mail: Aftersales.Service@de.bosch.com
Luxemburg
Tel.: +32 2 588 0589
Fax: +32 2 588 0595
E-Mail: outillage.gereedschap@be.bosch.com
Transport
Die enthaltenen Li-Ionen-Akkus unterliegen den Anforderungen des Gefahrgutrechts. Die Akkus können durch den Benutzer ohne weitere Auflagen auf der Straße transportiert werden.
Beim Versand durch Dritte (z.B.: Lufttransport oder Spedition) sind besondere Anforderungen an Verpackung und Kennzeichnung zu beachten. Hier muss bei der Vorbereitung des Versandstückes ein Gefahrgut-Experte hinzugezogen werden.
Versenden Sie Akkus nur, wenn das Gehäuse unbeschädigt ist. Kleben Sie offene Kontakte ab und verpacken Sie den Akku so, dass er sich nicht in der Verpackung bewegt.
Bitte beachten Sie auch eventuelle weiterführende nationale Vorschriften.
Entsorgung
Elektrowerkzeuge, Akkus, Zubehör und Verpackun-
gen sollen einer umweltgerechten Wiederverwertung zugeführt werden.
Werfen Sie Elektrowerkzeuge und Akkus/Batterien nicht in den Hausmüll!
Nur für EU-Länder:
Gemäß der europäischen Richtlinie 2012/19/EU müssen nicht mehr ge-
brauchsfähige Elektrowerkzeuge und gemäß der europäischen Richtlinie
2006/66/EG müssen defekte oder verbrauchte Akkus/Batterien getrennt gesam-
melt und einer umweltgerechten Wiederverwendung zugeführt werden.
2 609 140 921 | (3.2.14) |
|
|
Bosch Power Tools |
||||
|
|
|
|
|
|
|
|
|
|
|
|
|
|
|
|
|
|
|
|
|
|
|
|

OBJ_BUCH-2047-001.book Page 13 Monday, February 3, 2014 11:18 AM
Nicht mehr gebrauchsfähige Akkus/Batterien können direkt abgegeben werden bei:
Deutschland
Recyclingzentrum Elektrowerkzeuge Osteroder Landstraße 3
37589 Kalefeld
Schweiz
Batrec AG
3752 Wimmis BE
Akkus/Batterien:
Li-Ion:
Bitte beachten Sie die Hinweise im Abschnitt „Transport“, Seite 12.
Änderungen vorbehalten.
English
Safety Notes
General Power Tool Safety Warnings
WARNING |
Read all safety warnings and all in- |
|
structions. Failure to follow the warnings |
||
|
and instructions may result in electric shock, fire and/or serious injury.
Save all warnings and instructions for future reference.
The term “power tool” in the warnings refers to your mainsoperated (corded) power tool or battery-operated (cordless) power tool.
Work area safety
Keep work area clean and well lit. Cluttered or dark areas invite accidents.
Do not operate power tools in explosive atmospheres, such as in the presence of flammable liquids, gases or dust. Power tools create sparks which may ignite the dust or fumes.
Keep children and bystanders away while operating a power tool. Distractions can cause you to lose control.
Electrical safety
Power tool plugs must match the outlet. Never modify the plug in any way. Do not use any adapter plugs with earthed (grounded) power tools. Unmodified plugs and matching outlets will reduce risk of electric shock.
Avoid body contact with earthed or grounded surfaces, such as pipes, radiators, ranges and refrigerators.
There is an increased risk of electric shock if your body is earthed or grounded.
Do not expose power tools to rain or wet conditions.
Water entering a power tool will increase the risk of electric shock.
English | 13
Do not abuse the cord. Never use the cord for carrying, pulling or unplugging the power tool. Keep cord away from heat, oil, sharp edges and moving parts. Damaged or entangled cords increase the risk of electric shock.
When operating a power tool outdoors, use an extension cord suitable for outdoor use. Use of a cord suitable for outdoor use reduces the risk of electric shock.
If operating a power tool in a damp location is unavoidable, use a residual current device (RCD) protected supply. Use of an RCD reduces the risk of electric shock.
Personal safety
Stay alert, watch what you are doing and use common sense when operating a power tool. Do not use a power tool while you are tired or under the influence of drugs, alcohol or medication. A moment of inattention while operating power tools may result in serious personal injury.
Use personal protective equipment. Always wear eye protection. Protective equipment such as dust mask, non-skid safety shoes, hard hat, or hearing protection used for appropriate conditions will reduce personal injuries.
Prevent unintentional starting. Ensure the switch is in the off-position before connecting to power source and/or battery pack, picking up or carrying the tool.
Carrying power tools with your finger on the switch or energising power tools that have the switch on invites accidents.
Remove any adjusting key or wrench before turning the power tool on. A wrench or a key left attached to a rotating part of the power tool may result in personal injury.
Do not overreach. Keep proper footing and balance at all times. This enables better control of the power tool in unexpected situations.
Dress properly. Do not wear loose clothing or jewellery. Keep your hair, clothing and gloves away from moving parts. Loose clothes, jewellery or long hair can be caught in moving parts.
If devices are provided for the connection of dust extraction and collection facilities, ensure these are connected and properly used. Use of dust collection can reduce dust-related hazards.
Power tool use and care
Do not force the power tool. Use the correct power tool for your application. The correct power tool will do the job better and safer at the rate for which it was designed.
Do not use the power tool if the switch does not turn it on and off. Any power tool that cannot be controlled with the switch is dangerous and must be repaired.
Disconnect the plug from the power source and/or the battery pack from the power tool before making any adjustments, changing accessories, or storing power tools. Such preventive safety measures reduce the risk of starting the power tool accidentally.
|
Bosch Power Tools |
2 609 140 921 | (3.2.14) |
|
||||
|
|
|
|
|
|
|
|
|
|
|
|
|
|
|
|
|
|
|
|
|
|
|
|
OBJ_BUCH-2047-001.book Page 14 Monday, February 3, 2014 11:18 AM
14 | English
Store idle power tools out of the reach of children and do not allow persons unfamiliar with the power tool or these instructions to operate the power tool. Power tools are dangerous in the hands of untrained users.
Maintain power tools. Check for misalignment or binding of moving parts, breakage of parts and any other condition that may affect the power tool’s operation. If damaged, have the power tool repaired before use.
Many accidents are caused by poorly maintained power tools.
Keep cutting tools sharp and clean. Properly maintained cutting tools with sharp cutting edges are less likely to bind and are easier to control.
Use the power tool, accessories and tool bits etc. in accordance with these instructions, taking into account the working conditions and the work to be performed.
Use of the power tool for operations different from those intended could result in a hazardous situation.
Battery tool use and care
Recharge only with the charger specified by the manufacturer. A charger that is suitable for one type of battery pack may create a risk of fire when used with another battery pack.
Use power tools only with specifically designated battery packs. Use of any other battery packs may create a risk of injury and fire.
When battery pack is not in use, keep it away from other metal objects, like paper clips, coins, keys, nails, screws or other small metal objects, that can make a connection from one terminal to another. Shorting the battery terminals together may cause burns or a fire.
Under abusive conditions, liquid may be ejected from the battery; avoid contact. If contact accidentally occurs, flush with water. If liquid contacts eyes, additionally seek medical help. Liquid ejected from the battery may cause irritation or burns.
Service
Have your power tool serviced by a qualified repair person using only identical replacement parts. This will ensure that the safety of the power tool is maintained.
Safety Warnings for Impact Wrenches
Hold power tool by insulated gripping surfaces, when performing an operation where the fastener may contact hidden wiring. Fasteners contacting a “live” wire may make exposed metal parts of the power tool “live” and could give the operator an electric shock.
Secure the workpiece. A workpiece clamped with clamping devices or in a vice is held more secure than by hand.
Always wait until the machine has come to a complete stop before placing it down. The tool insert can jam and lead to loss of control over the power tool.
Do not open the battery. Danger of short-circuiting.
Protect the battery against heat, e. g., against continuous intense sunlight, fire, water, and moisture. Danger of explosion.
In case of damage and improper use of the battery, vapours may be emitted. Ventilate the area and seek medical help in case of complaints. The vapours can irritate the respiratory system.
Use the battery only in conjunction with your Bosch power tool. This measure alone protects the battery against dangerous overload.
The battery can be damaged by pointed objects such as nails or screwdrivers or by force applied externally. An internal short circuit can occur and the battery can burn, smoke, explode or overheat.
Product Description and Specifications
Read all safety warnings and all instructions. Failure to follow the warnings and instructions may result in electric shock, fire and/or serious injury.
While reading the operating instructions, unfold the graphics page for the machine and leave it open.
Intended Use
The machine is intended for driving in and loosening screws and bolts as well as for tightening and loosening nuts within the respective range of dimension.
The light of this power tool is intended to illuminate the power tool’s direct area of working operation and is not suitable for household room illumination.
Product Features
The numbering of the product features refers to the illustration of the machine on the graphics page.
1 Tool holder
2 Locking sleeve
3 Belt clip*
4 Battery pack*
5 Battery unlocking button*
6 Button for electronic speed preselection
7 Speed indication
8 “PowerLight” button
9 Rotational direction switch
10On/Off switch
11“PowerLight”
12Handle (insulated gripping surface)
13Carrying strap
14Double bit*
15Universal bit holder*
16Screwdriver bit*
17Application tool (e. g. an impact socket)*
*Accessories shown or described are not part of the standard delivery scope of the product. A complete overview of accessories can be found in our accessories program.
2 609 140 921 | (3.2.14) |
|
|
Bosch Power Tools |
||||
|
|
|
|
|
|
|
|
|
|
|
|
|
|
|
|
|
|
|
|
|
|
|
|
OBJ_BUCH-2047-001.book Page 15 Monday, February 3, 2014 11:18 AM
|
|
|
|
|
|
English | 15 |
Technical Data |
|
|
|
|
|
|
|
|
|
|
|
||
Cordless Impact Screwdriver |
|
GDR 14,4 V-EC |
|
GDR 18 V-EC |
||
Article number |
|
3 601 JB9 2.. |
3 601 JB9 2.. |
3 601 JB9 3.. |
3 601 JB9 3.. |
|
with battery |
|
“premium” |
“compact” |
“premium” |
“compact” |
|
Rated voltage |
V= |
14.4 |
|
14.4 |
18 |
18 |
No-load speed |
min-1 |
|
|
|
|
|
– Setting 1 |
0 – 1300 |
0 |
– 1300 |
0 – 1300 |
0 – 1300 |
|
– Setting 2 |
min-1 |
0 – 2000 |
0 |
– 2000 |
0 – 2000 |
0 – 2000 |
– Setting 3 |
min-1 |
0 – 2800 |
0 |
– 2800 |
0 – 2800 |
0 – 2800 |
Impact rate |
min-1 |
0 – 1100 |
0 – 1100 |
0 – 1100 |
0 – 1100 |
|
– Setting 1 |
||||||
– Setting 2 |
min-1 |
0 – 2600 |
0 – 2600 |
0 – 2600 |
0 – 2600 |
|
– Setting 3 |
min-1 |
0 – 3200 |
0 – 3200 |
0 – 3200 |
0 – 3200 |
|
Maximum torque, hard screwdriving |
Nm |
160 |
|
160 |
170 |
170 |
application according to ISO 5393 |
|
|||||
Bolt size |
mm |
M6 – M14 |
M6 – M14 |
M6 – M14 |
M6 – M14 |
|
Tool holder |
|
¼" hexagon socket |
¼" hexagon socket |
¼" hexagon socket |
¼" hexagon socket |
|
Weight according to EPTA-Procedure |
|
|
|
|
|
|
01/2003 |
kg |
1.5 |
|
1.3 |
1.6 |
1.4 |
|
|
|
|
|
|
|
Cordless Impact Screwdriver |
|
GDS 14,4 V-EC |
|
GDS 18 V-EC |
||
Article number |
|
3 601 JB9 5.. |
3 601 JB9 5.. |
3 601 JB9 5.. |
3 601 JB9 5.. |
|
with battery |
|
“premium” |
“compact” |
“premium” |
“compact” |
|
Rated voltage |
V= |
14.4 |
|
14.4 |
18 |
18 |
No-load speed |
min-1 |
|
|
|
|
|
– Setting 1 |
0 – 1300 |
0 – 1300 |
0 – 1300 |
0 – 1300 |
||
– Setting 2 |
min-1 |
0 – 2000 |
0 – 2000 |
0 – 2000 |
0 – 2000 |
|
– Setting 3 |
min-1 |
0 – 2800 |
0 – 2800 |
0 – 2800 |
0 – 2800 |
|
Impact rate |
min-1 |
0 – 1100 |
0 – 1100 |
0 – 1100 |
0 – 1100 |
|
– Setting 1 |
||||||
– Setting 2 |
min-1 |
0 – 2600 |
0 – 2600 |
0 – 2600 |
0 – 2600 |
|
– Setting 3 |
min-1 |
0 – 3200 |
0 – 3200 |
0 – 3200 |
0 – 3200 |
|
Maximum torque, hard screwdriving |
Nm |
175 |
|
175 |
185 |
185 |
application according to ISO 5393 |
|
|||||
Bolt size |
mm |
M6 – M16 |
M6 – M16 |
M6 – M16 |
M6 – M16 |
|
Tool holder |
|
½" |
|
½" |
½" |
½" |
Weight according to EPTA-Procedure |
|
|
|
|
|
|
01/2003 |
kg |
1.5 |
|
1.3 |
1.6 |
1.4 |
|
|
|
|
|
|
|
Cordless Impact Screwdriver |
|
GDX 14,4 V-EC |
|
GDX 18 V-EC |
||
Article number |
|
3 601 JB9 0.. |
3 601 JB9 0.. |
3 601 JB9 1.. |
3 601 JB9 1.. |
|
with battery |
|
“premium” |
“compact” |
“premium” |
“compact” |
|
Rated voltage |
V= |
14.4 |
|
14.4 |
18 |
18 |
No-load speed |
min-1 |
|
|
|
|
|
– Setting 1 |
0 – 1300 |
0 – 1300 |
0 – 1300 |
0 – 1300 |
||
– Setting 2 |
min-1 |
0 – 2000 |
0 – 2000 |
0 – 2000 |
0 – 2000 |
|
– Setting 3 |
min-1 |
0 – 2800 |
0 – 2800 |
0 – 2800 |
0 – 2800 |
|
Impact rate |
min-1 |
0 – 1100 |
0 – 1100 |
0 – 1100 |
0 – 1100 |
|
– Setting 1 |
||||||
– Setting 2 |
min-1 |
0 – 2600 |
0 – 2600 |
0 – 2600 |
0 – 2600 |
|
– Setting 3 |
min-1 |
0 – 3200 |
0 – 3200 |
0 – 3200 |
0 – 3200 |
|
|
Bosch Power Tools |
2 609 140 921 | (3.2.14) |
|
||||
|
|
|
|
|
|
|
|
|
|
|
|
|
|
|
|
|
|
|
|
|
|
|
|
OBJ_BUCH-2047-001.book Page 16 Monday, February 3, 2014 11:18 AM
16 | English
Cordless Impact Screwdriver |
|
GDX 14,4 V-EC |
GDX 18 V-EC |
||
Maximum torque, hard screwdriving |
|
|
|
|
|
application according to ISO 5393 |
Nm |
160 |
160 |
170 |
170 |
– ¼" hexagon socket |
|||||
– ½" |
Nm |
175 |
175 |
185 |
185 |
Bolt size |
mm |
M6 – M16 |
M6 – M16 |
M6 – M16 |
M6 – M16 |
Tool holder |
|
¼" hexagon |
¼" hexagon |
¼" hexagon |
¼" hexagon |
|
|
socket/ ½" |
socket/ ½" |
socket/ ½" |
socket/ ½" |
Weight according to EPTA-Procedure |
kg |
1.6 |
1.4 |
1.7 |
1.5 |
01/2003 |
|||||
Battery |
|
GDR 14,4 V-EC |
GDR 18 V-EC |
||||
|
|
|
|
GDS 14,4 V-EC |
GDS 18 V-EC |
||
|
|
|
|
GDX 14,4 V-EC |
GDX 18 V-EC |
||
Permitted ambient temperature |
|
°C |
0 |
...+45 |
0 |
...+45 |
|
– |
when charging |
|
|||||
– |
during operation* |
|
°C |
–20 |
...+50 |
– 20 |
...+50 |
– |
during storage |
|
°C |
– 20 |
...+60 |
– 20 |
...+60 |
Recommended batteries |
|
|
GBA 14,4V x,xAh M–. |
GBA 18V x,xAh M–. |
|||
* Limited performance at temperatures <0 °C |
|
|
|
|
|
|
|
Noise/Vibration Information
Measured sound values determined according to EN 60745.
Typically the A-weighted noise levels of the product are: Sound pressure level 95 dB(A); Sound power level 106 dB(A). Uncertainty K =3 dB.
Wear hearing protection!
Vibration total values ah (triax vector sum) and uncertainty K determined according to EN 60745:
Impact tightening of fasteners of the maximum capacity of the tool: ah =13.5 m/s2, K=1.5 m/s2.
The vibration level given in this information sheet has been measured in accordance with a standardised test given in EN 60745 and may be used to compare one tool with another. It may be used for a preliminary assessment of exposure. The declared vibration emission level represents the main applications of the tool. However if the tool is used for different applications, with different accessories or insertion tools or is poorly maintained, the vibration emission may differ. This may significantly increase the exposure level over the total working period.
An estimation of the level of exposure to vibration should also take into account the times when the tool is switched off or when it is running but not actually doing the job. This may significantly reduce the exposure level over the total working period.
Identify additional safety measures toprotect the operator from the effects of vibration such as: maintain the tool and the accessories, keep the hands warm, organisation of work patterns.
Declaration of Conformity
We declare under our sole responsibility that the product described under “Technical Data” is in conformity with the following standards or standardisation documents: EN 60745 according to the provisions of the directives 2009/125/EC (Regulation 1194/2012), 2011/65/EU, 2004/108/EC, 2006/42/EC.
Technical file (2006/42/EC) at:
Robert Bosch GmbH, PT/ETM9,
D-70745 Leinfelden-Echterdingen
Henk Becker |
Helmut Heinzelmann |
Executive Vice President |
Head of Product Certification |
Engineering |
PT/ETM9 |
Robert Bosch GmbH, Power Tools Division D-70745 Leinfelden-Echterdingen 03.02.2014
Assembly
Battery Charging
Use only the battery chargers listed on the accessories page. Only these battery chargers are matched to the lithium ion battery of your power tool.
Note: The battery is supplied partially charged. To ensure full capacity of the battery, completely charge the battery in the battery charger before using your power tool for the first time.
The lithium-ion battery can be charged at any time without reducing its service life. Interrupting the charging procedure does not damage the battery.
The lithium ion battery is protected against deep discharging by the “Electronic Cell Protection (ECP)”. When the battery is empty, the machine is switched off by means of a protective circuit: The inserted tool no longer rotates.
Do not continue to press the On/Off switch after the machine has been automatically switched off. The battery can be damaged.
Observe the notes for disposal.
2 609 140 921 | (3.2.14) |
|
|
Bosch Power Tools |
||||
|
|
|
|
|
|
|
|
|
|
|
|
|
|
|
|
|
|
|
|
|
|
|
|
OBJ_BUCH-2047-001.book Page 17 Monday, February 3, 2014 11:18 AM
Removing the battery
The battery 4 is equipped with two locking levels that should prevent the battery from falling out when pushing the battery unlocking button 5 unintentionally. As long as the battery is inserted in the power tool, it is held in position by means of a spring.
To remove the battery 4, press the unlocking button 5 and pull out the battery toward the front. Do not exert any force.
Changing the Tool
Before any work on the machine itself (e. g. maintenance, tool change, etc.) as well as during transport and storage, remove the battery from the power tool.
There is danger of injury when unintentionally actuating the On/Off switch.
Regularly clean the power tool’s air vents. The motor’s fan will draw the dust inside the housing and excessive accumulation of powdered metal may cause electrical hazards.
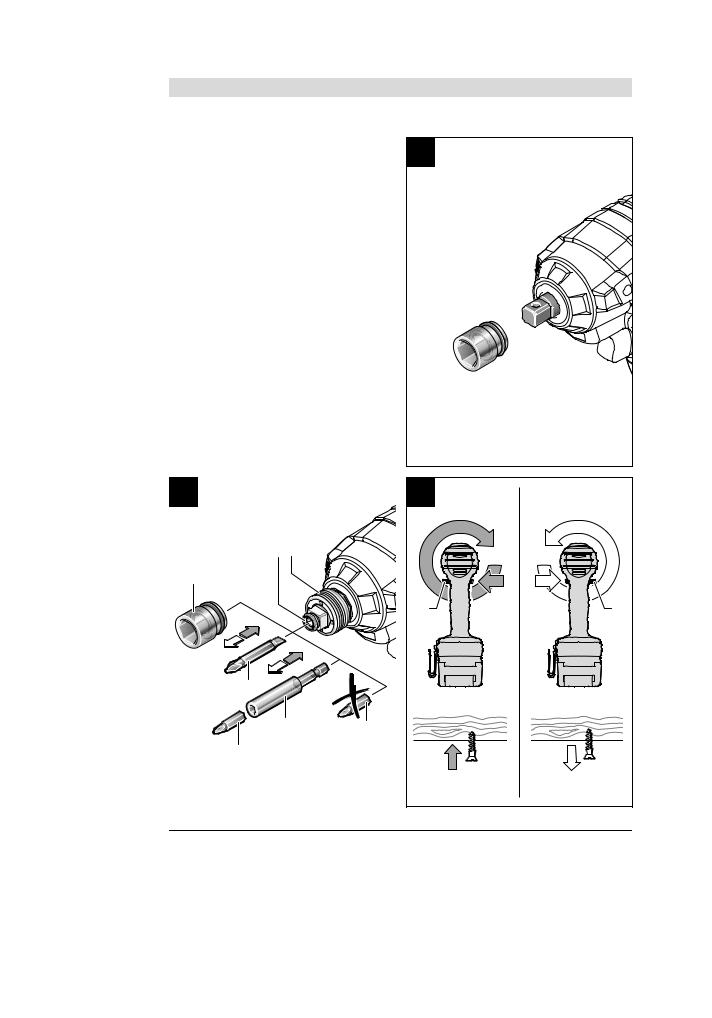
GDR 14,4 V-EC/GDR 18 V-EC/GDX 14,4 V-EC/ GDX 18 V-EC:
Inserting
Pull the locking sleeve 2 forward, push the insert tool to the stop into the tool holder 1 and release the locking sleeve 2 to lock the insert tool.
Screwdriver bits 16 can be inserted using a universal bit holder with ball lock 15.
Removing
Pull the locking sleeve 2 forward and remove the insert tool.
GDS 14,4 V-EC/GDS 18 V-EC/GDX 14,4 V-EC/ GDX 18 V-EC:
When working with an application tool, pay attention that the application tool is connected securely on the tool holder. When the application tool is not securely connected with the tool holder, it can come off during application.
Slide the application tool 17 onto the square drive of the tool holder 1.
However based on the system, if the application tool 17 appears wobbly after connecting securely on the tool holder 1; this has no influence on the function/safety.
GDX 14,4 V-EC/GDX 18 V-EC:
Some application tools (e. g. double bits) cannot be safely secured in the tool holder.
English | 17
Operation
Method of Operation
The tool holder 1 with the tool is driven by an electric motor via a gear and impact mechanism.
The working procedure is divided into two phases: Screwing in and tightening (impact mechanism in action).
The impact mechanism is activated as soon as the screwed connection runs tight and thus load is put on the motor. In this instance, the impact mechanism converts the power of the motor to steady rotary impacts. When loosening screws or nuts, the process is reversed.
Starting Operation
Inserting the battery
Use only original Bosch lithium ion batteries with the voltage listed on the nameplate of your power tool. Using other batteries can lead to injuries and pose a fire hazard.
Set the rotational direction switch 9 to the centre position to protect the power tool against accidental starting.
Insert the charged battery 4 from the front into the base of the power tool until the battery is securely locked.
Reversing the rotational direction (see figure D)
The rotational direction switch 9 is used to reverse the rotational direction of the machine. However, this is not possible with the On/Off switch 10 actuated.
Right rotation: For driving in screws and tightening nuts, press the rotational direction switch 9 through to the left stop.
Left Rotation: For loosening and unscrewing screws and nuts, press the rotational direction switch 9 through to the right stop.
Switching On and Off
To start the machine, press the On/Off switch 10 and keep it pressed.
To switch off the machine, release the On/Off switch 10. To save energy, only switch the power tool on when using it.
Adjusting the Speed
The speed of the switched on power tool can be variably adjusted, depending on how far the On/Off switch 10 is pressed.
Light pressure on the On/Off switch 10 results in a low rotational speed. Further pressure on the switch results in an increase in speed.
Preselecting the Speed/Impact Frequency
With the button 6 you can preselect the required speed/impact rate in three stages. Press the button 6 repeatedly until the desired setting appears in the speed indicator 7. The selected setting will be saved.
The required speed/impact frequency depends on the material and the working conditions, and can be determined through practical testing.
|
Bosch Power Tools |
2 609 140 921 | (3.2.14) |
|
||||
|
|
|
|
|
|
|
|
|
|
|
|
|
|
|
|
|
|
|
|
|
|
|
|

OBJ_BUCH-2047-001.book Page 18 Monday, February 3, 2014 11:18 AM
18 | English
Switching the “PowerLight” On/Off
To switch the “PowerLight” 11 on, press button 8. To switch the “PowerLight” 11 off, press button 8 again.
Working Advice
Apply the power tool to the screw/nut only when it is switched off. Rotating tool inserts can slip off.
The torque depends on the impact duration. The maximum achieved torque results from the sum of all individual torques achieved through impact. The maximum torque is achieved after an impact duration of 6–10 seconds. After this duration, the tightening torque is increased only minimally.
The impact duration is to be determined for each required tightening torque. The actually achieved tightening torque is always to be checked with a torque wrench.
Screw Applications with Hard, Spring-loaded or Soft Seat
When in a test, the achieved torques in an impact series are measured and transferred into a diagram, resulting in the curve of a torque characteristic. The height of the curve corresponds with the maximum reachable torque, and the steepness indicates the duration in which this is achieved.
A torque gradient depends on the following factors:
–Strength properties of the screws/nuts
–Type of backing (washer, disc spring, seal)
–Strength properties of the material being screwed/bolted together
–Lubrication conditions at the screw/bolt connection
The following application cases result accordingly:
–A hard seat is given for metal-to-metal screw applications with the use of washers. After a relatively short impact duration, the maximum torque is reached (steep characteristic curve). Unnecessary long impact duration only causes damage to the machine.
–A spring-loaded seat is given for metal-to-metal screw applications, however with the use of spring washers, disc springs, studs or screws/nuts with conical seat as well as when using extensions.
–A soft seat is given for screw applications, e. g., metal on wood or when using lead washers or fibre washers as backing.
For a spring-loaded seat as well as for a soft seat, the maximum tightening torque is lower than for a hard seat. Also, a clearly longer impact duration is required.
Reference Values for Maximum Screw/Bolt Tightening Torques
Calculated from the tensional cross-section; utilization of the yield point 90 % (with friction coefficient μtotal = 0.12). As a control measure, always check the tightening torque with a torque wrench.
Property Classes accord- |
Standard Screws/Bolts |
|
|
|
|
|
High-strength Bolts |
||||
ing to DIN 267 |
3.6 |
4.6 |
5.6 |
4.8 |
6.6 |
5.8 |
6.8 |
6.9 |
8.8 |
10.9 |
12.9 |
M 6 |
2.71 |
3.61 |
4.52 |
4.8 |
5.42 |
6.02 |
7.22 |
8.13 |
9.7 |
13.6 |
16.2 |
M 8 |
6.57 |
8.7 |
11 |
11.6 |
13.1 |
14.6 |
17.5 |
19.7 |
23 |
33 |
39 |
M 10 |
13 |
17.5 |
22 |
23 |
26 |
29 |
35 |
39 |
47 |
65 |
78 |
M 12 |
22.6 |
30 |
37.6 |
40 |
45 |
50 |
60 |
67 |
80 |
113 |
135 |
M 14 |
36 |
48 |
60 |
65 |
72 |
79 |
95 |
107 |
130 |
180 |
215 |
M 16 |
55 |
73 |
92 |
98 |
110 |
122 |
147 |
165 |
196 |
275 |
330 |
Tips
Before screwing larger, longer screws into hard materials, it is advisable to predrill a pilot hole with the core diameter of the thread to approx. 2/3 of the screw length.
Note: Pay attention that no metal particles enter the power tool.
Belt Clip
With the belt clip 3, the machine can be hung onto a belt. The user has both hands free and the machine is always at hand.
Recommendations for Optimal Handling of the Battery
Protect the battery against moisture and water.
Store the battery only within a temperature range between 0 °C and 50 °C. As an example, do not leave the battery in the car in summer.
Occasionally clean the venting slots of the battery using a soft, clean and dry brush.
A significantly reduced working period after charging indicates that the battery is used and must be replaced.
Observe the notes for disposal.
Maintenance and Service
Maintenance and Cleaning
Before any work on the machine itself (e. g. maintenance, tool change, etc.) as well as during transport and storage, remove the battery from the power tool.
There is danger of injury when unintentionally actuating the On/Off switch.
For safe and proper working, always keep the machine and ventilation slots clean.
After-sales Service and Application Service
Our after-sales service responds to your questions concerning maintenance and repair of your product as well as spare parts. Exploded views and information on spare parts can also be found under:
www.bosch-pt.com
Bosch’s application service team will gladly answer questions concerning our products and their accessories.
2 609 140 921 | (3.2.14) |
|
|
Bosch Power Tools |
||||
|
|
|
|
|
|
|
|
|
|
|
|
|
|
|
|
|
|
|
|
|
|
|
|

OBJ_BUCH-2047-001.book Page 19 Monday, February 3, 2014 11:18 AM
In all correspondence and spare parts order, please always include the 10-digit article number given on the type plate of the machine.
Great Britain
Robert Bosch Ltd. (B.S.C.) P.O. Box 98
Broadwater Park
North Orbital Road Denham
Uxbridge
UB 9 5HJ
At www.bosch-pt.co.uk you can order spare parts or arrange the collection of a product in need of servicing or repair. Tel. Service: (0844) 7360109
E-Mail: boschservicecentre@bosch.com
Ireland
Origo Ltd.
Unit 23 Magna Drive
Magna Business Park
City West
Dublin 24
Tel. Service: (01) 4666700
Fax: (01) 4666888
Australia, New Zealand and Pacific Islands
Robert Bosch Australia Pty. Ltd.
Power Tools
Locked Bag 66
Clayton South VIC 3169
Customer Contact Center
Inside Australia:
Phone: (01300) 307044
Fax: (01300) 307045
Inside New Zealand:
Phone: (0800) 543353
Fax: (0800) 428570
Outside AU and NZ:
Phone: +61 3 95415555
www.bosch.com.au
Republic of South Africa
Customer service
Hotline: (011) 6519600
Gauteng – BSC Service Centre
35 Roper Street, New Centre Johannesburg
Tel.: (011) 4939375
Fax: (011) 4930126 E-Mail: bsctools@icon.co.za
KZN – BSC Service Centre
Unit E, Almar Centre
143 Crompton Street Pinetown
Tel.: (031) 7012120
Fax: (031) 7012446
E-Mail: bsc.dur@za.bosch.com
English | 19
Western Cape – BSC Service Centre
Democracy Way, Prosperity Park
Milnerton
Tel.: (021) 5512577
Fax: (021) 5513223
E-Mail: bsc@zsd.co.za
Bosch Headquarters
Midrand, Gauteng
Tel.: (011) 6519600
Fax: (011) 6519880
E-Mail: rbsa-hq.pts@za.bosch.com
Transport
The contained lithium-ion batteries are subject to the Dangerous Goods Legislation requirements. The user can transport the batteries by road without further requirements.
When being transported by third parties (e.g.: air transport or forwarding agency), special requirements on packaging and labelling must be observed. For preparation of the item being shipped, consulting an expert for hazardous material is required.
Dispatch batteries only when the housing is undamaged. Tape or mask off open contacts and pack up the battery in such a manner that it cannot move around in the packaging. Please also observe possibly more detailed national regulations.
Disposal
The machine, rechargeable batteries, accessories
and packaging should be sorted for environmentalfriendly recycling.
Do not dispose of power tools and batteries/rechargeable batteries into household waste!
Only for EC countries:
According to the European Guideline
2012/19/EU, power tools that are no long-
er usable, and according to the European Guideline 2006/66/EC, defective or used battery packs/batteries, must be collected
separately and disposed of in an environmentally correct manner.
Batteries no longer suitable for use can be directly returned at:
Great Britain
Robert Bosch Ltd. (B.S.C.) P.O. Box 98
Broadwater Park
North Orbital Road Denham
Uxbridge
UB 9 5HJ
At www.bosch-pt.co.uk you can order spare parts or arrange the collection of a product in need of servicing or repair. Tel. Service: (0844) 7360109
E-Mail: boschservicecentre@bosch.com
|
Bosch Power Tools |
2 609 140 921 | (3.2.14) |
|
||||
|
|
|
|
|
|
|
|
|
|
|
|
|
|
|
|
|
|
|
|
|
|
|
|
OBJ_BUCH-2047-001.book Page 20 Monday, February 3, 2014 11:18 AM
20 | Français
Battery packs/batteries:
Li-ion:
Please observe the instructions in section “Transport”, page 19.
Subject to change without notice.
Français
Avertissements de sécurité
Avertissements de sécurité généraux pour l’outil
AVERTISSEMENT |
Lire tous les avertissements |
|
de sécurité et toutes les ins- |
||
|
tructions. Ne pas suivre les avertissements et instructions peut donner lieu à un choc électrique, un incendie et/ou une blessure sérieuse.
Conserver tous les avertissements et toutes les instructions pour pouvoir s’y reporter ultérieurement.
Le terme « outil » dans les avertissements fait référence à votre outil électrique alimenté par le secteur (avec cordon d’alimentation) ou votre outil fonctionnant sur batterie (sans cordon d’alimentation).
Sécurité de la zone de travail
Conserver la zone de travail propre et bien éclairée. Les zones en désordre ou sombres sont propices aux accidents.
Ne pas faire fonctionner les outils électriques en atmosphère explosive, par exemple en présence de liquides inflammables, de gaz ou de poussières. Les outils électriques produisent des étincelles qui peuvent enflammer les poussières ou les fumées.
Maintenir les enfants et les personnes présentes à l’écart pendant l’utilisation de l’outil. Les distractions peuvent vous faire perdre le contrôle de l’outil.
Sécurité électrique
Il faut que les fiches de l’outil électrique soient adaptées au socle. Ne jamais modifier la fiche de quelque façon que ce soit. Ne pas utiliser d’adaptateurs avec des outils à branchement de terre. Des fiches non modifiées et des socles adaptés réduiront le risque de choc électrique.
Eviter tout contact du corps avec des surfaces reliées à la terre telles que les tuyaux, les radiateurs, les cuisinières et les réfrigérateurs. Il existe un risque accru de choc électrique si votre corps est relié à la terre.
Ne pas exposer les outils à la pluie ou à des conditions humides. La pénétration d’eau à l’intérieur d’un outil augmentera le risque de choc électrique.
Ne pas maltraiter le cordon. Ne jamais utiliser le cordon pour porter, tirer ou débrancher l’outil. Maintenir le cordon à l’écart de la chaleur, du lubrifiant, des arêtes ou des parties en mouvement. Les cordons endommagés ou emmêlés augmentent le risque de choc électrique.
Lorsqu’on utilise un outil à l’extérieur, utiliser un prolongateur adapté à l’utilisation extérieure. L’utilisation d’un cordon adapté à l’utilisation extérieure réduit le risque de choc électrique.
Si l’usage d’un outil dans un emplacement humide est inévitable, utiliser une alimentation protégée par un dispositif à courant différentiel résiduel (RCD). L’usage d’un RCD réduit le risque de choc électrique.
Sécurité des personnes
Rester vigilant, regarder ce que vous êtes en train de faire et faire preuve de bon sens dans l’utilisation de l’outil. Ne pas utiliser un outil lorsque vous êtes fatigué ou sous l’emprise de drogues, d’alcool ou de médicaments. Un moment d’inattention en cours d’utilisation d’un outil peut entraîner des blessures graves des personnes.
Utiliser un équipement de sécurité. Toujours porter une protection pour les yeux. Les équipements de sécurité tels que les masques contre les poussières, les chaussures de sécurité antidérapantes, les casques ou les protections acoustiques utilisés pour les conditions appropriées réduiront les blessures des personnes.
Eviter tout démarrage intempestif. S’assurer que l’interrupteur est en position arrêt avant de brancher l’outil au secteur et/ou au bloc de batteries, de le ramasser ou de le porter. Porter les outils en ayant le doigt sur l’interrupteur ou brancher des outils dont l’interrupteur est en position marche est source d’accidents.
Retirer toute clé de réglage avant de mettre l’outil en marche. Une clé laissée fixée sur une partie tournante de l’outil peut donner lieu à des blessures de personnes.
Ne pas se précipiter. Garder une position et un équilibre adaptés à tout moment. Cela permet un meilleur contrôle de l’outil dans des situations inattendues.
S’habiller de manière adaptée. Ne pas porter de vêtements amples ou de bijoux. Garder les cheveux, les vêtements et les gants à distance des parties en mouvement. Des vêtements amples, des bijoux ou les cheveux longs peuvent être pris dans des parties en mouvement.
Si des dispositifs sont fournis pour le raccordement d’équipements pour l’extraction et la récupération des poussières, s’assurer qu’ils sont connectés et correctement utilisés. Utiliser des collecteurs de poussière peut réduire les risques dus aux poussières.
Utilisation et entretien de l’outil
Ne pas forcer l’outil. Utiliser l’outil adapté à votre application. L’outil adapté réalisera mieux le travail et de manière plus sûre au régime pour lequel il a été construit.
2 609 140 921 | (3.2.14) |
|
|
Bosch Power Tools |
||||
|
|
|
|
|
|
|
|
|
|
|
|
|
|
|
|
|
|
|
|
|
|
|
|
OBJ_BUCH-2047-001.book Page 21 Monday, February 3, 2014 11:18 AM
Ne pas utiliser l’outil si l’interrupteur ne permet pas de passer de l’état de marche à arrêt et vice versa. Tout outil qui ne peut pas être commandé par l’interrupteur est dangereux et il faut le faire réparer.
Débrancher la fiche de la source d’alimentation en courant et/ou le bloc de batteries de l’outil avant tout réglage, changement d’accessoires ou avant de ranger l’outil. De telles mesures de sécurité préventives réduisent le risque de démarrage accidentel de l’outil.
Conserver les outils à l’arrêt hors de la portée des enfants et ne pas permettre à des personnes ne connaissant pas l’outil ou les présentes instructions de le faire fonctionner. Les outils sont dangereux entre les mains d’utilisateurs novices.
Observer la maintenance de l’outil. Vérifier qu’il n’y a pas de mauvais alignement ou de blocage des parties mobiles, des pièces cassées ou toute autre condition pouvant affecter le fonctionnement de l’outil. En cas de dommages, faire réparer l’outil avant de l’utiliser. De nombreux accidents sont dus à des outils mal entretenus.
Garder affûtés et propres les outils permettant de couper. Des outils destinés à couper correctement entretenus avec des pièces coupantes tranchantes sont moins susceptibles de bloquer et sont plus faciles à contrôler.
Utiliser l’outil, les accessoires et les lames etc., conformément à ces instructions, en tenant compte des conditions de travail et du travail à réaliser. L’utilisation de l’outil pour des opérations différentes de celles prévues pourrait donner lieu à des situations dangereuses.
Utilisation des outils fonctionnant sur batteries et précautions d’emploi
Ne recharger qu’avec le chargeur spécifié par le fabricant. Un chargeur qui est adapté à un type de bloc de batteries peut créer un risque de feu lorsqu’il est utilisé avec un autre type de bloc de batteries.
N’utiliser les outils qu’avec des blocs de batteries spécifiquement désignés. L’utilisation de tout autre bloc de batteries peut créer un risque de blessure et de feu.
Lorsqu’un bloc de batteries n’est pas utilisé, le maintenir à l’écart de tout autre objet métallique, par exemple trombones, pièces de monnaie, clés, clous, vis ou autres objets de petite taille qui peuvent donner lieu à une connexion d’une borne à une autre. Le court-circui- tage des bornes d’une batterie entre elles peut causer des brûlures ou un feu.
Dans de mauvaises conditions, du liquide peut être éjecté de la batterie ; éviter tout contact. En cas de contact accidentel, nettoyer à l’eau. Si le liquide entre en contact avec les yeux, rechercher en plus une aide médicale. Le liquide éjecté des batteries peut causer des irritations ou des brûlures.
Maintenance et entretien
Faire entretenir l’outil par un réparateur qualifié utilisant uniquement des pièces de rechange identiques.
Cela assurera que la sécurité de l’outil est maintenue.
Français | 21
Avertissements de sécurité pour visseuses à percussion
Tenir l’outil par les surfaces de préhension isolées, lors de la réalisation d’une opération au cours de laquelle le dispositif de serrage peut entrer en contact avec un câblage non apparent. Le contact avec un fil « sous tension » peut également mettre « sous tension » les parties métalliques exposées de l’outil électrique et provoquer un choc électrique sur l’opérateur.
Bloquer la pièce à travailler. Une pièce à travailler serrée par des dispositifs de serrage appropriés ou dans un étau est fixée de manière plus sûre que tenue dans les mains.
Avant de déposer l’outil électroportatif, attendre que celui-ci soit complètement à l’arrêt. L’outil risque de se coincer, ce qui entraînerait une perte de contrôle de l’outil électroportatif.
Ne pas ouvrir l’accu. Risque de court-circuit.
Protéger l’accu de toute source de chaleur, comme p. ex. l’exposition directe au soleil, au feu, à l’eau et à l’humidité. Il y a risque d’explosion.
En cas d’endommagement et d’utilisation non conforme de l’accu, des vapeurs peuvent s’échapper. Ventiler le lieu de travail et, en cas de malaises, consulter un médecin. Les vapeurs peuvent entraîner des irritations des voies respiratoires.
N’utiliser l’accu qu’avec votre outil électroportatif Bosch. Seulement ainsi l’accu est protégé contre une surcharge dangereuse.
Les objets pointus comme un clou ou un tournevis et le fait d’exercer une force extérieure sur le boîtier risque d’endommager l’accu. Il peut en résulter un court-circuit interne et l’accu risque de s’enflammer, de dégager des fumées, d’exploser ou de surchauffer.
Description et performances du produit
Il est impératif de lire toutes les consignes de sécurité et toutes les instructions. Le
non-respect des avertissements et instruc-
tions indiqués ci-après peut conduire à une électrocution, un incendie et/ou de graves blessures.
Dépliez le volet sur lequel l’appareil est représenté de manière graphique. Laissez le volet déplié pendant la lecture de la présente notice d’utilisation.
Utilisation conforme
L’outil électroportatif est conçu pour le vissage et le dévissage des vis ainsi que pour le serrage et le desserrage des écrous dans les plages de dimensions indiquées.
L’éclairage de cet outil électroportatif est destiné à éclairer l’espace de travail de l’outil. Il n’est pas conçu pour servir de source d’éclairage ambiant dans une pièce.
|
Bosch Power Tools |
2 609 140 921 | (3.2.14) |
|
||||
|
|
|
|
|
|
|
|
|
|
|
|
|
|
|
|
|
|
|
|
|
|
|
|

OBJ_BUCH-2047-001.book Page 22 Monday, February 3, 2014 11:18 AM
22 | Français
|
|
Eléments de l’appareil |
|
|
|
|
|
|
9 Commutateur du sens de rotation |
|
|
|
|
|||
|
|
La numérotation des éléments de l’appareil se réfère à la re- |
|
10 Interrupteur Marche/Arrêt |
|
|
|
|
||||||||
|
|
présentation de l’outil électroportatif sur la page graphique. |
|
11 Lampe « Power Light » |
|
|
|
|
||||||||
|
|
1 Porte-outil |
|
|
|
|
|
12 Poignée (surface de préhension isolante) |
|
|
||||||
|
|
2 Bague de verrouillage |
|
|
|
|
|
13 Dragonne |
|
|
|
|
|
|||
|
|
3 Clip de ceinture* |
|
|
|
|
|
14 Embout double* |
|
|
|
|
|
|||
|
|
4 Accu* |
|
|
|
|
|
15 Porte-embout universel* |
|
|
|
|
||||
|
|
5 Touche de déverrouillage de l’accumulateur* |
|
|
|
16 Embout de réglage* |
|
|
|
|
||||||
|
|
6 Touche de préréglage électronique de la vitesse de |
|
17 Outil de travail (p. ex. noix de visseuse)* |
|
|
||||||||||
|
|
|
rotation |
|
|
|
|
|
*Les accessoires décrits ou illustrés ne sont pas tous compris dans |
|
|
|||||
|
|
7 Afficheur de vitesse |
|
|
|
|
|
la fourniture. Vous trouverez les accessoires complets dans notre |
|
|
||||||
|
|
8 Touche d’activation de l’éclairage « Power Light » |
|
programme d’accessoires. |
|
|
|
|
||||||||
|
|
|
|
|
|
|
|
|
|
|
||||||
|
|
Caractéristiques techniques |
|
|
|
|
|
|
|
|
|
|
|
|
|
|
|
|
|
|
|
|
|
|
|
|
|
|
|
|
|
||
|
|
Visseuse à choc sans fil |
|
|
|
|
GDR 14,4 V-EC |
GDR 18 V-EC |
|
|
||||||
|
|
N° d’article |
|
|
3 601 JB9 2.. |
|
3 601 JB9 2.. |
3 601 JB9 3.. |
3 601 JB9 3.. |
|
|
|||||
|
|
avec accu |
|
|
|
« premium » |
|
« compact » |
« premium » |
« compact » |
|
|
||||
|
|
Tension nominale |
V= |
|
|
|
14,4 |
14,4 |
18 |
18 |
|
|
||||
|
|
Vitesse à vide |
|
|
|
|
|
|
|
|
|
|
|
|
|
|
|
|
– Réglage 1 |
tr/min |
|
|
0 – 1300 |
|
0 – 1300 |
0 – 1300 |
0 – 1300 |
|
|
||||
|
|
– Réglage 2 |
tr/min |
|
|
0 – 2000 |
|
0 – 2000 |
0 – 2000 |
0 – 2000 |
|
|
||||
|
|
– Réglage 3 |
tr/min |
|
|
0 – 2800 |
|
0 – 2800 |
0 – 2800 |
0 – 2800 |
|
|
||||
|
|
Nombre de chocs |
tr/min |
|
|
0 – 1100 |
|
0 – 1100 |
0 – 1100 |
0 – 1100 |
|
|
||||
|
|
– Réglage 1 |
|
|
|
|
|
|||||||||
|
|
– Réglage 2 |
tr/min |
|
|
0 – 2600 |
|
0 – 2600 |
0 – 2600 |
0 – 2600 |
|
|
||||
|
|
– Réglage 3 |
tr/min |
|
|
0 – 3200 |
|
0 – 3200 |
0 – 3200 |
0 – 3200 |
|
|
||||
|
|
Couple max. vissage dur suivant |
Nm |
|
|
|
160 |
160 |
170 |
170 |
|
|
||||
|
|
ISO 5393 |
|
|
|
|
|
|||||||||
|
|
Ø vis d’assemblage |
mm |
|
|
M6 – M14 |
|
M6 – M14 |
M6 – M14 |
M6 – M14 |
|
|
||||
|
|
Porte-outil |
|
|
¼" Six pans creux |
¼" Six pans creux |
¼" Six pans creux |
¼" Six pans creux |
|
|
||||||
|
|
Poids suivant EPTA-Procedure |
|
|
|
|
|
|
|
|
|
|
|
|
|
|
|
|
01/2003 |
kg |
|
|
|
1,5 |
1,3 |
1,6 |
1,4 |
|
|
||||
|
|
|
|
|
|
|
|
|
|
|
|
|
|
|
|
|
|
|
Visseuse à choc sans fil |
|
|
|
|
GDS 14,4 V-EC |
GDS 18 V-EC |
|
|
||||||
|
|
N° d’article |
|
|
3 601 JB9 5.. |
|
3 601 JB9 5.. |
3 601 JB9 5.. |
3 601 JB9 5.. |
|
|
|||||
|
|
avec accu |
|
|
|
« premium » |
|
« compact » |
« premium » |
« compact » |
|
|
||||
|
|
Tension nominale |
V= |
|
|
|
14,4 |
14,4 |
18 |
18 |
|
|
||||
|
|
Vitesse à vide |
tr/min |
|
|
0 – 1300 |
|
0 – 1300 |
0 – 1300 |
0 – 1300 |
|
|
||||
|
|
– Réglage 1 |
|
|
|
|
|
|||||||||
|
|
– Réglage 2 |
tr/min |
|
|
0 – 2000 |
|
0 – 2000 |
0 – 2000 |
0 – 2000 |
|
|
||||
|
|
– Réglage 3 |
tr/min |
|
|
0 – 2800 |
|
0 – 2800 |
0 – 2800 |
0 – 2800 |
|
|
||||
|
|
Nombre de chocs |
tr/min |
|
|
0 – 1100 |
|
0 – 1100 |
0 – 1100 |
0 – 1100 |
|
|
||||
|
|
– Réglage 1 |
|
|
|
|
|
|||||||||
|
|
– Réglage 2 |
tr/min |
|
|
0 – 2600 |
|
0 – 2600 |
0 – 2600 |
0 – 2600 |
|
|
||||
|
|
– Réglage 3 |
tr/min |
|
|
0 – 3200 |
|
0 – 3200 |
0 – 3200 |
0 – 3200 |
|
|
||||
|
|
Couple max. vissage dur suivant |
Nm |
|
|
|
175 |
175 |
185 |
185 |
|
|
||||
|
|
ISO 5393 |
|
|
|
|
|
|||||||||
|
|
Ø vis d’assemblage |
mm |
|
|
M6 – M16 |
|
M6 – M16 |
M6 – M16 |
M6 – M16 |
|
|
||||
|
|
Porte-outil |
|
|
|
|
½" |
|
½" |
½" |
½" |
|
|
|||
|
|
Poids suivant EPTA-Procedure |
|
|
|
|
|
|
|
|
|
|
|
|
|
|
|
|
01/2003 |
kg |
|
|
|
1,5 |
1,3 |
1,6 |
1,4 |
|
|
||||
|
|
|
|
|
|
|
|
|
|
|
|
|
|
|
|
|
|
|
2 609 140 921 | (3.2.14) |
|
|
|
|
|
|
|
|
|
Bosch Power Tools |
|
|
||
|
|
|
|
|
|
|
|
|
|
|
|
|
|
|
|
|
|
|
|
|
|
|
|
|
|
|
|
|
|
|
|
|
|
|
|
|
|
|
|
|
|
|
|
|
|
|
|
|
|
|
OBJ_BUCH-2047-001.book Page 23 Monday, February 3, 2014 11:18 AM
|
|
|
|
|
|
Français | 23 |
|
|
|
|
|||
Visseuse à choc sans fil |
|
GDX 14,4 V-EC |
GDX 18 V-EC |
|||
N° d’article |
|
3 601 JB9 0.. |
3 601 JB9 0.. |
3 601 JB9 1.. |
3 601 JB9 1.. |
|
avec accu |
|
« premium » |
« compact » |
« premium » |
« compact » |
|
Tension nominale |
V= |
14,4 |
14,4 |
18 |
18 |
|
Vitesse à vide |
|
|
|
|
|
|
– Réglage 1 |
tr/min |
0 – 1300 |
0 – 1300 |
0 – 1300 |
0 – 1300 |
|
– Réglage 2 |
tr/min |
0 – 2000 |
0 – 2000 |
0 – 2000 |
0 – 2000 |
|
– Réglage 3 |
tr/min |
0 – 2800 |
0 – 2800 |
0 – 2800 |
0 – 2800 |
|
Nombre de chocs |
tr/min |
0 – 1100 |
0 – 1100 |
0 – 1100 |
0 – 1100 |
|
– Réglage 1 |
||||||
– Réglage 2 |
tr/min |
0 – 2600 |
0 – 2600 |
0 – 2600 |
0 – 2600 |
|
– Réglage 3 |
tr/min |
0 – 3200 |
0 – 3200 |
0 – 3200 |
0 – 3200 |
|
Couple max. vissage dur suivant |
|
|
|
|
|
|
ISO 5393 |
Nm |
160 |
160 |
170 |
170 |
|
– ¼" Six pans creux |
||||||
– ½" |
Nm |
175 |
175 |
185 |
185 |
|
Ø vis d’assemblage |
mm |
M6 – M16 |
M6 – M16 |
M6 – M16 |
M6 – M16 |
|
Porte-outil |
|
Six pans creux |
Six pans creux |
Six pans creux |
Six pans creux |
|
|
|
|
¼"/ ½" |
¼"/ ½" |
¼"/ ½" |
¼"/ ½" |
Poids suivant EPTA-Procedure |
kg |
1,6 |
1,4 |
1,7 |
1,5 |
|
01/2003 |
||||||
|
|
|
|
|
|
|
Accumulateur |
|
|
GDR 14,4 V-EC |
|
GDR 18 V-EC |
|
|
|
|
|
GDS 14,4 V-EC |
|
GDS 18 V-EC |
|
|
|
|
GDX 14,4 V-EC |
|
GDX 18 V-EC |
Plage de températures autorisées |
°C |
|
0...+45 |
|
0...+45 |
|
– |
pendant la charge |
|
|
|||
– |
pendant le fonctionnement* |
°C |
|
–20...+50 |
|
– 20...+50 |
– |
pour le stockage |
°C |
|
– 20...+60 |
|
– 20...+60 |
Accus recommandés |
|
GBA 14,4V x,xAh M–. |
GBA 18V x,xAh M–. |
|||
* Performances réduites à des températures <à 0 °C |
|
|
|
|
||
Niveau sonore et vibrations
Valeurs de mesure du niveau sonore relevées conformément à la norme EN 60745.
Les mesures réelles (A) des niveaux sonores de l’appareil sont : niveau de pression acoustique 95 dB(A) ; niveau d’intensité acoustique 106 dB(A). Incertitude K=3 dB.
Porter une protection acoustique !
Valeurs totales des vibrations ah (somme vectorielle des trois axes directionnels) et incertitude K relevées conformément à la norme EN 60745 :
Serrage des vis et des écrous de la dimension maximale admissible : ah =13,5 m/s2, K=1,5 m/s2.
Le niveau d’oscillation indiqué dans ces instructions d’utilisation a été mesuré conformément à la norme EN 60745 et peut être utilisé pour une comparaison d’outils électroportatifs. Il est également approprié pour une estimation préliminaire de la charge vibratoire.
Le niveau d’oscillation correspond aux utilisations principales de l’outil électroportatif. Si l’outil électrique est néanmoins utilisé pour d’autres applications, avec différents accessoires ou d’autres outils de travail ou s’il est mal entretenu, le niveau d’oscillation peut être différent. Ceci peut augmenter considérablement la charge vibratoire pendant toute la durée de travail.
Pour une estimation précise de la charge vibratoire, il est recommandé de prendre aussi en considération les périodes pendant lesquelles l’appareil est éteint ou en fonctionnement, mais pas vraiment utilisé. Ceci peut réduire considérablement la charge vibratoire pendant toute la durée de travail. Déterminez des mesures de protection supplémentaires pour protéger l’utilisateur des effets des vibrations, telles que par exemple : Entretien de l’outil électrique et des outils de travail, maintenir les mains chaudes, organisation des opérations de travail.
Déclaration de conformité
Nous déclarons sous notre propre responsabilité que le produit décrit sous « Caractéristiques techniques » est en conformité avec les normes ou documents normatifs suivants :
EN 60745 conformément aux termes des directives 2009/125/CE (règlement 1194/2012), 2011/65/UE, 2004/108/CE, 2006/42/CE.
Dossier technique (2006/42/CE) auprès de : Robert Bosch GmbH, PT/ETM9,
D-70745 Leinfelden-Echterdingen
|
Bosch Power Tools |
2 609 140 921 | (3.2.14) |
|
||||
|
|
|
|
|
|
|
|
|
|
|
|
|
|
|
|
|
|
|
|
|
|
|
|

OBJ_BUCH-2047-001.book Page 24 Monday, February 3, 2014 11:18 AM
24 | Français
Henk Becker |
Helmut Heinzelmann |
Executive Vice President |
Head of Product Certification |
Engineering |
PT/ETM9 |
Robert Bosch GmbH, Power Tools Division D-70745 Leinfelden-Echterdingen 03.02.2014
Montage
Chargement de l’accu
N’utilisez que les chargeurs indiqués sur la page des accessoires. Seuls ces chargeurs sont adaptés à l’accu à ions lithium utilisé dans votre outil électroportatif.
Note : L’accu est fourni en état de charge faible. Afin de garantir la puissance complète de l’accu, chargez complètement l’accu dans le chargeur avant la première mise en service.
La batterie Lithium-ion peut être rechargée à tout moment, sans que sa durée de vie n’en soit réduite. Le fait d’interrompre le processus de charge n’endommage pas la batterie.
Grâce à la Protection Electronique des Cellules « Electronic Cell Protection (ECP) », l’accu à ions lithium est protégé contre une décharge profonde. Lorsque l’accumulateur est déchargé, l’outil électroportatif s’arrête grâce à un dispositif d’arrêt de protection : L’outil de travail ne tourne plus.
Après la mise hors fonctionnement automatique de l’outil électroportatif, n’appuyez plus sur l’interrupteur Marche/Arrêt. Ceci pourrait endommager l’accu.
Respectez les indications concernant l’élimination.
Retirer l’accu
L’accu 4 dispose de 2 positions de verrouillage qui doivent éviter que l’accu puisse sortir si l’on appuie sur la touche de déverrouillage de l’accu 5 par mégarde. Tant que l’accu reste en place dans l’outil électroportatif, un ressort le maintient en position.
Pour sortir l’accu 4, appuyez sur la touche de déverrouillage 5 et sortez l’accu par l’avant de l’outil électroportatif. Ne forcez pas.
Changement d’outil
Avant d’effectuer des travaux sur l’appareil (p.ex. travaux d’entretien, changement d’outils, etc.) et pour le transporter ou le stocker, retirez l’accu de l’appareil électroportatif. Il y a risque de blessure lorsqu’on appuie par mégarde sur l’interrupteur Marche/Arrêt.
Nettoyer régulièrement les orifices d’aération de l’outil électrique. Le ventilateur du moteur attirera la poussière à l’intérieur du boîtier et une accumulation excessive de poudre de métal peut provoquer des dangers électriques.
GDR 14,4 V-EC/GDR 18 V-EC/GDX 14,4 V-EC/ GDX 18 V-EC:
Montage des outils de travail
Tirez la douille de verrouillage 2 vers l’avant, enfoncez l’outil de travail à fond dans le porte-outil 1 et relâchez la douille de verrouillage 2 afin de bloquer l’outil de travail.
Pour monter des embouts de vissage 16, utilisez un porteembout universel avec loqueteau à billes 15.
Sortir l’outil de travail
Tirez la douille de verrouillage 2 vers l’avant et sortez l’outil de travail.
GDS 14,4 V-EC/GDS 18 V-EC/GDX 14,4 V-EC/ GDX 18 V-EC:
Lors du montage de l’outil de travail, veillez à ce qu’il soit bien monté sur le porte-outil. Si l’outil de travail n’est pas fermement monté sur le porte-outil, il peut se détacher lors de l’opération de vissage.
Poussez l’outil de travail 1 sur le quatre-pans du porte-outil 17.
De par sa conception, une fois monté sur le porte-outil 1, l’outil de travail 17 présente un peu de jeu ; ceci n’exerce aucun impact sur la fonctionnalité/sécurité.
GDX 14,4 V-EC/GDX 18 V-EC:
Certains accessoires de travail (par ex. les embouts doubles) ne peuvent pas être fixés correctement dans le porte-outil.
Mise en marche
Fonctionnement
Le porte-outil 1 et l’outil de travail sont entraînés par un moteur électrique par l’intermédiaire d’un engrenage et d’un mécanisme de frappe.
L’opération se divise en deux phases :
Vissage et Serrage (mécanisme de frappe étant en action).
Le mécanisme de frappe entre en action dès que la vis est serrée et que le moteur est sollicité. Le mécanisme de frappe transforme ainsi la puissance du moteur en coups de rotation réguliers. Lors du desserrage des vis ou des écrous, l’opération se déroule dans l’ordre inverse.
Mise en service
Montage de l’accu
N’utilisez que des accus à ions lithium d’origine Bosch dont la tension correspond à celle indiquée sur la plaque signalétique de l’outil électroportatif. L’utilisation de tout autre accumulateur peut entraîner des blessures et des risques d’incendie.
Mettez le commutateur du sens de rotation 9 en position médiane pour éviter toute mise en marche accidentelle de l’outil électroportatif.
Introduisez l’accu chargé 4 par l’avant dans le pied de l’outil électroportatif jusqu’à ce que l’accu soit bien verrouillé.
2 609 140 921 | (3.2.14) |
|
|
Bosch Power Tools |
||||
|
|
|
|
|
|
|
|
|
|
|
|
|
|
|
|
|
|
|
|
|
|
|
|

OBJ_BUCH-2047-001.book Page 25 Monday, February 3, 2014 11:18 AM
Sélection du sens de rotation (voir figure D)
Le commutateur de sens de rotation 9 permet d’inverser le sens de rotation de l’outil électroportatif. Ceci n’est cependant pas possible, quand l’interrupteur Marche/Arrêt 10 est en fonction.
Rotation vers la droite : Pour serrer des vis et des écrous, tournez le commutateur du sens de rotation 9 à fond vers la gauche.
Rotation gauche : Pour desserrer ou dévisser des vis et des écrous, tournez le commutateur du sens de rotation 9 à fond vers la droite.
Mise en Marche/Arrêt
Pour mettre l’outil électroportatif en marche, appuyez sur l’interrupteur Marche/Arrêt 10 et maintenez-le appuyé.
Pour arrêter l’outil électroportatif, relâchez l’interrupteur Marche/Arrêt 10.
Afin d’économiser l’énergie, ne mettez l’outil électroportatif en marche que quand vous l’utilisez.
Réglage de la vitesse de rotation
Il est possible de régler en continu la vitesse de rotation de l’outil électroportatif en fonction de la pression exercée sur l’interrupteur Marche/Arrêt 10.
Une pression légère sur l’interrupteur Marche/Arrêt 10 entraîne une faible vitesse de rotation. Plus la pression augmente, plus la vitesse de rotation est élevée.
Préréglage de la vitesse de rotation/de la fréquence de frappe
La touche 6 permet de prérégler la vitesse de rotation/la fréquence de frappe souhaitée dans 3 positions. Actionnez la touche 6 de façon répétée jusqu’à ce qu’il apparaisse le réglage souhaité sur l’afficheur de vitesse 7. La position de réglage est mémorisée.
La vitesse de rotation/la fréquence de frappe dépend du matériau à travailler et des conditions de travail et peut être déterminée par des essais pratiques.
Allumage/extinction de la lampe « PowerLight »
Pour allumer la lampe 11, actionnez la touche 8. Pour éteindre la lampe 11, actionnez à nouveau la touche 8.
Valeurs de référence pour les couples de serrage max. des vis
Français | 25
Instructions d’utilisation
Posez l’outil électroportatif sur la vis/sur l’écrou seulement lorsque l’appareil est arrêté. Les outils de travail en rotation peuvent glisser.
Le couple dépend de la durée de frappe. Le couple maximal atteint résulte de la somme des différents couples atteints par frappe. Le couple maximal est atteint au bout d’une durée de frappe de 6–10 secondes. Ensuite, le couple de serrage n’augmente plus que faiblement.
Il est nécessaire de déterminer la durée de frappe pour chaque couple de serrage. Toujours contrôler le couple réellement atteint à l’aide d’une clé dynamométrique.
Vissage avec pose dure, élastique ou douce
Si, lors d’un essai, les couples atteints dans une série de frappe sont mesurés et transmis sur un diagramme, on obtient la courbe caractéristique du couple. Le sommet de courbe indique le couple maximum que l’on peut atteindre, la pente indique le temps pendant lequel ce couple est atteint.
La courbe dépend des facteurs suivants :
–résistance des vis/écrous
–nature du support (rondelle, rondelle élastique, joint)
–résistance du matériau à visser
–conditions de graissage à l’endroit de vissage
En conséquence, il en résulte les applications suivantes :
–Une pose dure se fait dans des vissages de métal sur du métal avec utilisation de rondelles. Le couple maximal est atteint au bout d’un temps de frappe relativement court (pente raide de la courbe caractéristique). Une prolongation inutile du temps de frappe ne fait que nuire à l’appareil.
–Une pose élastique se fait dans des vissages de métal sur du métal, cependant avec utilisation d’anneaux élastiques, de rondelles élastiques, de goujons ou de vis/écrous coniques ainsi qu’avec utilisation de rallonges.
–Une pose douce se fait dans des vissages de métal sur du bois p. ex. ou avec utilisation de rondelles en plomb ou en fibre comme support.
Dans une pose élastique ou douce, le couple de serrage maximal est plus faible que dans une pose dure. De même, un temps de frappe beaucoup plus long est nécessaire.
Indiquées en Nm, calculées à partir de la section de résistance ; utilisation de la limite d’élasticité 90 % (pour un coéfficient de frottement μtot = 0,12). Toujours contrôler le couple à l’aide d’une clé dynamométrique.
|
|
Classes de résistance |
Vis standard |
|
|
|
|
|
|
|
|
Vis à rigidité élevée |
|
|
|||||
|
|
selon DIN 267 |
3.6 |
4.6 |
5.6 |
4.8 |
|
6.6 |
|
5.8 |
6.8 |
6.9 |
8.8 |
10.9 |
12.9 |
|
|
||
|
|
M 6 |
2.71 |
3.61 |
4.52 |
4.8 |
|
5.42 |
6.02 |
7.22 |
8.13 |
9.7 |
13.6 |
16.2 |
|
|
|||
|
|
M 8 |
6.57 |
8.7 |
11 |
11.6 |
|
13.1 |
14.6 |
17.5 |
19.7 |
23 |
33 |
39 |
|
|
|||
|
|
M 10 |
13 |
17.5 |
22 |
23 |
|
26 |
|
29 |
35 |
39 |
47 |
65 |
78 |
|
|
||
|
|
M 12 |
22.6 |
30 |
37.6 |
40 |
|
45 |
|
50 |
60 |
67 |
80 |
113 |
135 |
|
|
||
|
|
M 14 |
36 |
48 |
60 |
65 |
|
72 |
|
79 |
95 |
107 |
130 |
180 |
215 |
|
|
||
|
|
M 16 |
55 |
73 |
92 |
98 |
|
110 |
|
122 |
147 |
165 |
196 |
275 |
330 |
|
|
||
|
|
|
|
|
|
|
|
|
|
|
|
|
|
|
|
|
|
|
|
|
|
Bosch Power Tools |
|
|
|
|
|
|
|
|
|
|
2 609 140 921 | (3.2.14) |
|
|
||||
|
|
|
|
|
|
|
|
|
|
|
|
|
|
|
|
|
|
|
|
|
|
|
|
|
|
|
|
|
|
|
|
|
|
|
|
|
|
|
|
|
|
|
|
|
|
|
|
|
|
|
|
|
|
|
|
|
|
|
|

OBJ_BUCH-2047-001.book Page 26 Monday, February 3, 2014 11:18 AM
26 | Français
Conseil
Avant de visser des vis d’un gros diamètre ou très longues dans des matériaux durs, il est recommandé d’effectuer un préperçage du diamètre du filet de la vis sur approximativement 2/3 de la longueur de la vis.
Note : Veillez à ce que des petites pièces métalliques ne pénètrent dans l’outil électroportatif.
Clip pour fixation sur ceinture
Avec le clip de ceinture 3, l’appareil électroportatif peut être accroché à une ceinture par ex. Vous avez donc les deux mains libres et l’appareil électroportatif est à tout temps à portée de main.
Indications pour le maniement optimal de l’accu
Protégez l’accu de l’humidité et de l’eau.
Ne stockez l’accu que dans la plage de température de 0 °C à 50 °C. Ne stockez pas l’accu trop longtemps dans une voiture par ex. en été.
Nettoyez de temps en temps les orifices de ventilation de l’accu à l’aide d’un pinceau doux, propre et sec.
Si l’autonomie de l’accu diminue considérablement après les recharges effectuées, cela signifie que l’accu est usagé et qu’il doit être remplacé.
Respectez les indications concernant l’élimination.
Entretien et Service Après-Vente
Nettoyage et entretien
Avant d’effectuer des travaux sur l’appareil (p.ex. travaux d’entretien, changement d’outils, etc.) et pour le transporter ou le stocker, retirez l’accu de l’appareil électroportatif. Il y a risque de blessure lorsqu’on appuie par mégarde sur l’interrupteur Marche/Arrêt.
Veillez à ce que l’outil électroportatif ainsi que les ouïes de ventilation soient toujours propres afin d’obtenir un travail impeccable et sûr.
Service Après-Vente et Assistance
Notre Service Après-Vente répond à vos questions concernant la réparation et l’entretien de votre produit et les pièces de rechange. Vous trouverez des vues éclatées ainsi que des informations concernant les pièces de rechange également sous :
www.bosch-pt.com
Les conseillers techniques et assistants Bosch sont à votre disposition pour répondre à vos questions concernant nos produits et leurs accessoires.
Pour toute demande de renseignement ou commande de pièces de rechange, précisez-nous impérativement le numéro d’article à dix chiffres de l’outil électroportatif indiqué sur la plaque signalétique.
France
Passez votre commande de pièces détachées directement en ligne sur notre site www.bosch-pt.fr.
Vous êtes un utilisateur, contactez :
Le Service Clientèle Bosch Outillage Electroportatif Tel. : 0811 360122
(coût d’une communication locale) Fax : (01) 49454767
E-Mail : contact.outillage-electroportatif@fr.bosch.com
Vous êtes un revendeur, contactez : Robert Bosch (France) S.A.S. Service Après-Vente Electroportatif 126, rue de Stalingrad
93705 DRANCY Cédex
Tel. : (01) 43119006
Fax : (01) 43119033
E-Mail : sav.outillage-electroportatif@fr.bosch.com
Belgique, Luxembourg
Tel. : +32 2 588 0589
Fax : +32 2 588 0595
E-Mail : outillage.gereedschap@be.bosch.com
Suisse
Tel. : (044) 8471512
Fax : (044) 8471552
E-Mail: Aftersales.Service@de.bosch.com
Transport
Les batteries Lithium-ion sont soumises aux règlements de transport des matières dangereuses. L’utilisateur peut transporter les batteries par voie routière sans mesures supplémentaires.
Lors d’une expédition par tiers (par ex. : transport aérien ou entreprise de transport), les mesures à prendre spécifiques à l’emballage et au marquage doivent être observées. Dans un tel cas, lors de la préparation de l’envoi, il est impératif de faire appel à un expert en transport des matières dangereuses.
N’expédiez les accus que si le carter n’est pas endommagé. Recouvrez les contacts non protégés et emballez l’accu de manière à ce qu’il ne puisse pas se déplacer dans l’emballage. Veuillez également respecter les règlementations supplémentaires éventuellement en vigueur.
Elimination des déchets
Les outils électroportatifs et les accus, ainsi que leurs
accessoires et emballages, doivent pouvoir suivre chacun une voie de recyclage appropriée.
Ne jetez pas les outils électroportatifs et les accus/piles avec les ordures ménagères !
Seulement pour les pays de l’Union Européenne :
Conformément à la directive européenne 2012/19/UE, les équipements électriques dont on ne peut plus se servir, et conformément à la directive européenne 2006/66/CE, les accus/piles usés ou défectueux doivent être isolés et suivre une voie de recyclage appropriée.
2 609 140 921 | (3.2.14) |
|
|
Bosch Power Tools |
||||
|
|
|
|
|
|
|
|
|
|
|
|
|
|
|
|
|
|
|
|
|
|
|
|
OBJ_BUCH-2047-001.book Page 27 Monday, February 3, 2014 11:18 AM
Les batteries/piles dont on ne peut plus se servir peuvent être déposées directement auprès de :
Suisse
Batrec AG
3752 Wimmis BE
Batteries/piles :
Lithium ion :
Respectez les indications données dans le chapitre « Transport », page 26.
Sous réserve de modifications.
Español
Instrucciones de seguridad
Advertencias de peligro generales para herramientas eléctricas
ADVERTENCIA |
Lea íntegramente estas adverten- |
|
cias de peligro e instrucciones. En |
||
|
caso de no atenerse a las advertencias de peligro e instrucciones siguientes, ello puede ocasionar una descarga eléctrica, un incendio y/o lesión grave.
Guardar todas las advertencias de peligro e instrucciones para futuras consultas.
El término herramienta eléctrica empleado en las siguientes advertencias de peligro se refiere a herramientas eléctricas de conexión a la red (con cable de red) y a herramientas eléctricas accionadas por acumulador (o sea, sin cable de red).
Seguridad del puesto de trabajo
Mantenga limpio y bien iluminado su puesto de trabajo.
El desorden o una iluminación deficiente en las áreas de trabajo pueden provocar accidentes.
No utilice la herramienta eléctrica en un entorno con peligro de explosión, en el que se encuentren combustibles líquidos, gases o material en polvo. Las herramientas eléctricas producen chispas que pueden llegar a inflamar los materiales en polvo o vapores.
Mantenga alejados a los niños y otras personas de su puesto de trabajo al emplear la herramienta eléctrica.
Una distracción le puede hacer perder el control sobre la herramienta eléctrica.
Seguridad eléctrica
El enchufe de la herramienta eléctrica debe corresponder a la toma de corriente utilizada. No es admisible modificar el enchufe en forma alguna. No emplear adaptadores en herramientas eléctricas dotadas con una toma de tierra. Los enchufes sin modificar adecuados a las respectivas tomas de corriente reducen el riesgo de una descarga eléctrica.
Español | 27
Evite que su cuerpo toque partes conectadas a tierra como tuberías, radiadores, cocinas y refrigeradores. El riesgo a quedar expuesto a una sacudida eléctrica es mayor si su cuerpo tiene contacto con tierra.
No exponga la herramienta eléctrica a la lluvia y evite que penetren líquidos en su interior. Existe el peligro de recibir una descarga eléctrica si penetran ciertos líquidos en la herramienta eléctrica.
No utilice el cable de red para transportar o colgar la herramienta eléctrica, ni tire de él para sacar el enchufe de la toma de corriente. Mantenga el cable de red alejado del calor, aceite, esquinas cortantes o piezas móviles. Los cables de red dañados o enredados pueden provocar una descarga eléctrica.
Al trabajar con la herramienta eléctrica a la intemperie utilice solamente cables de prolongación apropiados para su uso en exteriores. La utilización de un cable de prolongación adecuado para su uso en exteriores reduce el riesgo de una descarga eléctrica.
Si fuese imprescindible utilizar la herramienta eléctrica en un entorno húmedo, es necesario conectarla a través de un fusible diferencial. La aplicación de un fusible diferencial reduce el riesgo a exponerse a una descarga eléctrica.
Seguridad de personas
Esté atento a lo que hace y emplee la herramienta eléctrica con prudencia. No utilice la herramienta eléctrica si estuviese cansado, ni tampoco después de haber consumido alcohol, drogas o medicamentos. El no estar atento durante el uso de la herramienta eléctrica puede provocarle serias lesiones.
Utilice un equipo de protección personal y en todo caso unas gafas de protección. El riesgo a lesionarse se reduce considerablemente si, dependiendo del tipo y la aplicación de la herramienta eléctrica empleada, se utiliza un equipo de protección adecuado como una mascarilla antipolvo, zapatos de seguridad con suela antideslizante, casco, o protectores auditivos.
Evite una puesta en marcha fortuita. Asegurarse de que la herramienta eléctrica esté desconectada antes de conectarla a la toma de corriente y/o al montar el acumulador, al recogerla, y al transportarla. Si transporta la herramienta eléctrica sujetándola por el interruptor de conexión/desconexión, o si alimenta la herramienta eléctrica estando ésta conectada, ello puede dar lugar a un accidente.
Retire las herramientas de ajuste o llaves fijas antes de conectar la herramienta eléctrica. Una herramienta de ajuste o llave fija colocada en una pieza rotante puede producir lesiones al poner a funcionar la herramienta eléctrica.
Evite posturas arriesgadas. Trabaje sobre una base firme y mantenga el equilibrio en todo momento. Ello le permitirá controlar mejor la herramienta eléctrica en caso de presentarse una situación inesperada.
|
Bosch Power Tools |
2 609 140 921 | (3.2.14) |
|
||||
|
|
|
|
|
|
|
|
|
|
|
|
|
|
|
|
|
|
|
|
|
|
|
|
OBJ_BUCH-2047-001.book Page 28 Monday, February 3, 2014 11:18 AM
28 | Español
Lleve puesta una vestimenta de trabajo adecuada. No utilice vestimenta amplia ni joyas. Mantenga su pelo, vestimenta y guantes alejados de las piezas móviles. La vestimenta suelta, el pelo largo y las joyas se pueden enganchar con las piezas en movimiento.
Siempre que sea posible utilizar unos equipos de aspiración o captación de polvo, asegúrese que éstos estén montados y que sean utilizados correctamente. El empleo de estos equipos reduce los riesgos derivados del polvo.
Uso y trato cuidadoso de herramientas eléctricas
No sobrecargue la herramienta eléctrica. Use la herramienta eléctrica prevista para el trabajo a realizar. Con la herramienta adecuada podrá trabajar mejor y más seguro dentro del margen de potencia indicado.
No utilice herramientas eléctricas con un interruptor defectuoso. Las herramientas eléctricas que no se puedan conectar o desconectar son peligrosas y deben hacerse reparar.
Saque el enchufe de la red y/o desmonte el acumulador antes de realizar un ajuste en la herramienta eléctrica, cambiar de accesorio o al guardar la herramienta eléctrica. Esta medida preventiva reduce el riesgo a conectar accidentalmente la herramienta eléctrica.
Guarde las herramientas eléctricas fuera del alcance de los niños. No permita la utilización de la herramienta eléctrica a aquellas personas que no estén familiarizadas con su uso o que no hayan leído estas instrucciones. Las herramientas eléctricas utilizadas por personas inexpertas son peligrosas.
Cuide la herramienta eléctrica con esmero. Controle si funcionan correctamente, sin atascarse, las partes móviles de la herramienta eléctrica, y si existen partes rotas o deterioradas que pudieran afectar al funcionamiento de la herramienta eléctrica. Haga reparar estas piezas defectuosas antes de volver a utilizar la herramienta eléctrica. Muchos de los accidentes se deben a herramientas eléctricas con un mantenimiento deficiente.
Mantenga los útiles limpios y afilados. Los útiles mantenidos correctamente se dejan guiar y controlar mejor.
Utilice la herramienta eléctrica, accesorios, útiles, etc. de acuerdo a estas instrucciones, considerando en ello las condiciones de trabajo y la tarea a realizar. El uso de herramientas eléctricas para trabajos diferentes de aquellos para los que han sido concebidas puede resultar peligroso.
Trato y uso cuidadoso de herramientas accionadas por acumulador
Solamente cargar los acumuladores con los cargadores recomendados por el fabricante. Existe un riesgo de incendio al intentar cargar acumuladores de un tipo diferente al previsto para el cargador.
Solamente emplee los acumuladores previstos para la herramienta eléctrica. El uso de otro tipo de acumuladores puede provocar daños e incluso un incendio.
Si no utiliza el acumulador, guárdelo separado de clips, monedas, llaves, clavos, tornillos o demás objetos metálicos que pudieran puentear sus contactos. El cortocircuito de los contactos del acumulador puede causar quemaduras o un incendio.
La utilización inadecuada del acumulador puede provocar fugas de líquido. Evite el contacto con él. En caso de un contacto accidental enjuagar el área afectada con abundante agua. En caso de un contacto con los ojos recurra además inmediatamente a un médico. El líquido del acumulador puede irritar la piel o producir quemaduras.
Servicio
Únicamente haga reparar su herramienta eléctrica por un profesional, empleando exclusivamente piezas de repuesto originales. Solamente así se mantiene la seguridad de la herramienta eléctrica.
Instrucciones de seguridad para atornilladoras de impacto
Sujete la herramienta eléctrica por las superficies de agarre aisladas al realizar trabajos en los que el tornillo pueda llegar a tocar conductores eléctricos ocultos. El contacto del tornillo con conductores bajo tensión puede hacer que las partes metálicas de la herramienta eléctrica le provoquen una descarga eléctrica.
Asegure la pieza de trabajo. Una pieza de trabajo fijada con unos dispositivos de sujeción, o en un tornillo de banco, se mantiene sujeta de forma mucho más segura que con la mano.
Antes de depositarla, esperar a que se haya detenido la herramienta eléctrica. El útil puede engancharse y hacerle perder el control sobre la herramienta eléctrica.
No intente abrir el acumulador. Podría provocar un cortocircuito.
Proteja el acumulador del calor excesivo como, p. ej., de una exposición prolongada al sol, del fuego, del agua y de la humedad. Existe el riesgo de explosión.
Si el acumulador se daña o usa de forma inapropiada puede que éste emane vapores. Ventile con aire fresco el recinto y acuda a un médico si nota alguna molestia.
Los vapores pueden llegar a irritar las vías respiratorias.
Únicamente utilice el acumulador en combinación con su herramienta eléctrica Bosch. Solamente así queda protegido el acumulador contra una sobrecarga peligrosa.
Mediante objetos puntiagudos, como p. ej. clavos o destornilladores, o por influjo de fuerza exterior se puede dañar el acumulador. Se puede generar un cortocircuito interno y el acumulador puede arder, humear, explotar o sobrecalentarse.
2 609 140 921 | (3.2.14) |
|
|
Bosch Power Tools |
||||
|
|
|
|
|
|
|
|
|
|
|
|
|
|
|
|
|
|
|
|
|
|
|
|
OBJ_BUCH-2047-001.book Page 29 Monday, February 3, 2014 11:18 AM
Descripción y prestaciones del producto
Lea íntegramente estas advertencias de peligro e instrucciones. En caso de no atenerse a las advertencias de peligro e instrucciones siguientes, ello puede ocasionar una descarga eléctrica, un incendio y/o lesión gra-
ve.
Despliegue y mantenga abierta la solapa con la imagen del aparato mientras lee las instrucciones de manejo.
Utilización reglamentaria
La herramienta eléctrica ha sido diseñada para enroscar y aflojar tornillos, y para apretar y aflojar tuercas del tamaño especificado.
La luz de esta herramienta eléctrica está concebida para iluminar directamente el área de alcance de la herramienta y no para iluminar las habitaciones de una casa.
Componentes principales
La numeración de los componentes está referida a la imagen de la herramienta eléctrica en la página ilustrada.
Español | 29
1 Alojamiento del útil
2 Casquillo de enclavamiento
3 Clip de sujeción al cinturón*
4 Acumulador*
5 Botón de extracción del acumulador*
6Tecla para la preselección electrónica del número de revoluciones
7 Indicador del número de revoluciones
8 Tecla para la bombilla “Power Light”
9 Selector de sentido de giro
10Interruptor de conexión/desconexión
11Bombilla “Power Light”
12Empuñadura (zona de agarre aislada)
13Asa de transporte
14Punta de atornillar doble*
15Soporte universal de puntas de atornillar*
16Punta de atornillar*
17Útil (p. ej. llave de vaso)*
*Los accesorios descritos e ilustrados no corresponden al material que se adjunta de serie. La gama completa de accesorios opcionales se detalla en nuestro programa de accesorios.
Datos técnicos
Atornilladora de impacto accionada por |
GDR 14,4 V-EC |
GDR 18 V-EC |
|||
acumulador |
|
|
|
|
|
Nº de artículo |
|
3 601 JB9 2.. |
3 601 JB9 2.. |
3 601 JB9 3.. |
3 601 JB9 3.. |
con accu |
|
“premium” |
“compact” |
“premium” |
“compact” |
Tensión nominal |
V= |
14,4 |
14,4 |
18 |
18 |
Revoluciones en vacío |
min-1 |
|
|
|
|
– Ajuste 1 |
0 – 1300 |
0 – 1300 |
0 – 1300 |
0 – 1300 |
|
– Ajuste 2 |
min-1 |
0 – 2000 |
0 – 2000 |
0 – 2000 |
0 – 2000 |
– Ajuste 3 |
min-1 |
0 – 2800 |
0 – 2800 |
0 – 2800 |
0 – 2800 |
Frecuencia de percusión |
min-1 |
0 – 1100 |
0 – 1100 |
0 – 1100 |
0 – 1100 |
– Ajuste 1 |
|||||
– Ajuste 2 |
min-1 |
0 – 2600 |
0 – 2600 |
0 – 2600 |
0 – 2600 |
– Ajuste 3 |
min-1 |
0 – 3200 |
0 – 3200 |
0 – 3200 |
0 – 3200 |
Par máx. en unión rígida según |
Nm |
160 |
160 |
170 |
170 |
ISO 5393 |
|||||
Ø de tornillos de máquina |
mm |
M6 – M14 |
M6 – M14 |
M6 – M14 |
M6 – M14 |
Alojamiento del útil |
|
¼" Hexágono |
¼" Hexágono |
¼" Hexágono |
¼" Hexágono |
|
|
interior |
interior |
interior |
interior |
Peso según EPTA-Procedure |
kg |
1,5 |
1,3 |
1,6 |
1,4 |
01/2003 |
|||||
|
|
Atornilladora de impacto accionada por |
|
GDS 14,4 V-EC |
GDS 18 V-EC |
|
|
|||||||
|
|
acumulador |
|
|
|
|
|
|
|
|
|
|
|
|
|
|
Nº de artículo |
|
3 601 JB9 5.. |
|
3 601 JB9 5.. |
3 601 JB9 5.. |
3 601 JB9 5.. |
|
|
||||
|
|
con accu |
|
|
“premium” |
|
“compact” |
“premium” |
“compact” |
|
|
|||
|
|
Tensión nominal |
V= |
14,4 |
14,4 |
18 |
18 |
|
|
|||||
|
|
Revoluciones en vacío |
min-1 |
|
|
|
|
|
|
|
|
|
|
|
|
|
– Ajuste 1 |
|
0 – 1300 |
|
0 – 1300 |
0 – 1300 |
0 – 1300 |
|
|
||||
|
|
– Ajuste 2 |
min-1 |
|
0 – 2000 |
|
0 – 2000 |
0 – 2000 |
0 – 2000 |
|
|
|||
|
|
– Ajuste 3 |
min-1 |
|
0 – 2800 |
|
0 – 2800 |
0 – 2800 |
0 – 2800 |
|
|
|||
|
|
|
|
|
|
|
|
|
|
|
|
|
|
|
|
|
Bosch Power Tools |
|
|
|
|
|
|
2 609 140 921 | (3.2.14) |
|
|
|||
|
|
|
|
|
|
|
|
|
|
|
|
|
|
|
|
|
|
|
|
|
|
|
|
|
|
|
|
|
|
|
|
|
|
|
|
|
|
|
|
|
|
|
|
|

OBJ_BUCH-2047-001.book Page 30 Monday, February 3, 2014 11:18 AM
30 | Español
Atornilladora de impacto accionada por |
GDS 14,4 V-EC |
|
GDS 18 V-EC |
|
|||
acumulador |
|
|
|
|
|
|
|
Frecuencia de percusión |
min-1 |
0 – 1100 |
|
0 – 1100 |
0 – 1100 |
|
0 – 1100 |
– Ajuste 1 |
|
|
|||||
– Ajuste 2 |
min-1 |
0 – 2600 |
|
0 – 2600 |
0 – 2600 |
|
0 – 2600 |
– Ajuste 3 |
min-1 |
0 – 3200 |
|
0 – 3200 |
0 – 3200 |
|
0 – 3200 |
Par máx. en unión rígida según |
Nm |
175 |
|
175 |
185 |
|
185 |
ISO 5393 |
|
|
|||||
Ø de tornillos de máquina |
mm |
M6 – M16 |
|
M6 – M16 |
M6 – M16 |
|
M6 – M16 |
Alojamiento del útil |
|
½" |
|
½" |
½" |
|
½" |
Peso según EPTA-Procedure |
|
|
|
|
|
|
|
01/2003 |
kg |
1,5 |
|
1,3 |
1,6 |
|
1,4 |
Atornilladora de impacto accionada por |
GDX 14,4 V-EC |
GDX 18 V-EC |
|||
acumulador |
|
|
|
|
|
Nº de artículo |
|
3 601 JB9 0.. |
3 601 JB9 0.. |
3 601 JB9 1.. |
3 601 JB9 1.. |
con accu |
|
“premium” |
“compact” |
“premium” |
“compact” |
Tensión nominal |
V= |
14,4 |
14,4 |
18 |
18 |
Revoluciones en vacío |
min-1 |
|
|
|
|
– Ajuste 1 |
0 – 1300 |
0 – 1300 |
0 – 1300 |
0 – 1300 |
|
– Ajuste 2 |
min-1 |
0 – 2000 |
0 – 2000 |
0 – 2000 |
0 – 2000 |
– Ajuste 3 |
min-1 |
0 – 2800 |
0 – 2800 |
0 – 2800 |
0 – 2800 |
Frecuencia de percusión |
min-1 |
0 – 1100 |
0 – 1100 |
0 – 1100 |
0 – 1100 |
– Ajuste 1 |
|||||
– Ajuste 2 |
min-1 |
0 – 2600 |
0 – 2600 |
0 – 2600 |
0 – 2600 |
– Ajuste 3 |
min-1 |
0 – 3200 |
0 – 3200 |
0 – 3200 |
0 – 3200 |
Par máx. en unión rígida según |
|
|
|
|
|
ISO 5393 |
Nm |
160 |
160 |
170 |
170 |
– ¼" Hexágono interior |
|||||
– ½" |
Nm |
175 |
175 |
185 |
185 |
Ø de tornillos de máquina |
mm |
M6 – M16 |
M6 – M16 |
M6 – M16 |
M6 – M16 |
Alojamiento del útil |
|
Hexágono interior |
Hexágono interior |
Hexágono interior |
Hexágono interior |
|
|
¼"/ ½" |
¼"/ ½" |
¼"/ ½" |
¼"/ ½" |
Peso según EPTA-Procedure |
kg |
1,6 |
1,4 |
1,7 |
1,5 |
01/2003 |
|||||
Acumulador |
|
GDR 14,4 V-EC |
GDR 18 V-EC |
|||
|
|
|
GDS 14,4 V-EC |
GDS 18 V-EC |
||
|
|
|
GDX 14,4 V-EC |
GDX 18 V-EC |
||
Temperatura ambiente permitida |
°C |
0 |
...+45 |
0 |
...+45 |
|
– |
durante la carga |
|||||
– |
durante el servicio* |
°C |
–20 |
...+50 |
– 20 |
...+50 |
– |
durante el almacenamiento |
°C |
– 20 |
...+60 |
– 20 |
...+60 |
acumuladores recomendados |
|
GBA 14,4V x,xAh M–. |
GBA 18V x,xAh M–. |
|||
* potencia limitada a temperaturas <0 °C |
|
|
|
|
|
|
Información sobre ruidos y vibraciones
Ruido determinado según EN 60745.
El nivel de presión sonora típico del aparato, determinado con un filtro A, asciende a: Nivel de presión sonora 95 dB(A); nivel de potencia acústica 106 dB(A). Tolerancia K=3 dB.
¡Usar unos protectores auditivos!
Nivel total de vibraciones ah (suma vectorial de tres direcciones) y tolerancia K determinados según EN 60745:
Apriete de tornillos y tuercas del tamaño máximo admisible: ah =13,5 m/s2, K=1,5 m/s2.
El nivel de vibraciones indicado en estas instrucciones ha sido determinado según el procedimiento de medición fijado en la norma EN 60745 y puede servir como base de comparación con otras herramientas eléctricas. También es adecuado para estimar provisionalmente la solicitación experimentada por las vibraciones.
El nivel de vibraciones indicado ha sido determinado para las aplicaciones principales de la herramienta eléctrica. Por ello, el nivel de vibraciones puede ser diferente si la herramienta eléctrica se utiliza para otras aplicaciones, con accesorios
2 609 140 921 | (3.2.14) |
|
|
Bosch Power Tools |
||||
|
|
|
|
|
|
|
|
|
|
|
|
|
|
|
|
|
|
|
|
|
|
|
|
 Loading...