


www.blaupunkt.com
Navigation Radio MP3
TravelPilot Rome Europe NAV56E
Operating and Installation Instructions

Contents
Contents |
|
About these instructions................ |
3 |
For your safety ............................... |
3 |
Scope of delivery............................ |
5 |
Device Overview............................. |
6 |
Controls .......................................... |
6 |
The most important display |
|
symbols........................................ |
7 |
The basic functions ........................ |
8 |
Theft protection ........................... |
8 |
Detaching/attaching the control |
|
panel ............................................ |
8 |
Switching the device on and off .. |
9 |
Entering the code number ........... |
9 |
Inserting a CD ............................ |
10 |
Adjusting the volume ................. |
11 |
Muting the device....................... |
11 |
Operation with car phone .......... |
11 |
Operating the settings menu ....... |
12 |
Operation of the menu button ... |
12 |
Example of a menu operation .... |
12 |
Basic settings before the trip ...... |
15 |
Adjusting sound and balance ..... |
15 |
Adjusting the equalizer .............. |
17 |
Basic settings in the "System" |
|
menu .......................................... |
18 |
Setting the basic settings of |
|
the radio .................................... |
22 |
Setting the basic settings of |
|
the navigation system ................ |
24 |
While driving ................................ |
26 |
Selecting an audio source.......... |
26 |
Playing music ............................. |
29 |
Traffic announcements............... |
31 |
Operating the radio ...................... |
35 |
Selecting the waveband/ |
|
memory bank ............................. |
35 |
Tuning into a station .................. |
36 |
Scanning receivable stations |
|
(SCAN) ....................................... |
37 |
Storing stations.......................... |
38 |
Playing stored stations............... |
39 |
Operating the CD/MP3 player...... |
40 |
Playing CDs ................................ |
41 |
Selecting a track from a list........ |
42 |
Scanning tracks (SCAN) ............. |
43 |
Changing MP3 settings............... |
44 |
Operating the navigation system .45 |
|
The operating principle .............. |
45 |
Installing the navigation |
|
software ..................................... |
46 |
The navigation display ................ |
47 |
The three menus of |
|
the navigation system................. |
48 |
Starting the navigation system ... |
51 |
Overview of the destination |
|
entry ........................................... |
51 |
Entering an address.................... |
53 |
Entering points of interest.......... |
58 |
Saving destinations .................... |
59 |
Deleting/renaming destinations .60 |
|
Calling a destination from the |
|
memory ...................................... |
62 |
Destination guidance.................. |
62 |
Route calculation........................ |
63 |
Displaying the calculated route .. |
66 |
Changing a route (Traffic ahead) .. |
67 |
Specifying Route Options........... |
68 |
Displaying the current position .. |
71 |
Installation instructions ............... |
72 |
For your safety............................ |
72 |
Connection assignments ............ |
73 |
Connecting the device................ |
74 |
Installing the device ................... |
77 |
Entering the code number.......... |
78 |
Switching the speedometer |
|
signal on/off ............................... |
78 |
Antenna test .............................. |
78 |
Performing a sensor test ............ |
79 |
Calibrating the device ............... |
79 |
Cleaning the device .................... |
81 |
Uninstalling the device ............... |
81 |
Warranty ....................................... |
81 |
Specifications ............................... |
82 |
Glossary ........................................ |
83 |
Index ............................................. |
85 |
2

For your safety
Blaupunkt stands for technical know-how in mobile radio reception, for precise navigation systems and first-class sound. The blue dot made its debut in 1923 as a seal of quality that was assigned after rigourous functional – and it still applies today. At that time as well as today, the blue dot identifies products of extraordinary quality.
About these instructions
Please read these instructions and, in particular, the chapter entitled "For your safety" (next section) in their entirety before using the device!
Additional documentation
•CD changer instructions
•Instructions for the optional steering wheel remote control
For your safety
The device was manufactured according to the state of the art and established safety guidelines. Even so, dangers may occur if you do not observe the safety information:
Read these instructions carefully and completely before using the device.
Keep the instructions at a location so that they are always accessible to all users.
Always pass on the device to third parties together with these instructions.
Use as directed
The device is designed for use in automobiles. Special information about the navigation of campers, busses and trucks, such as altitude limitations or maximum permissible road load, is not included on the navigation CD.
Navigation off the roads (offroad) is not possible with the ROME NAV56E.
If you are installing device yourself
You may only install the device yourself if you are experienced in installing car sound systems and navigation systems and are very familiar with the electrical system of the vehicle.
3

For your safety
Observe the following!
General
•Do not open the device! The device contains a Class 1 laser that emits invisible laser radiation which can cause injuries to your eyes. Accessing the inside of the device voids the warranty.
•Immediately remove the device card from the packaging and store it separate from the device outside of the vehicle!
In operation
•Operate the device only if traffic situation permits it! Stop at a suitable location before entering a new navigation destination or changing basic settings!
•Always listen at a moderate volume so that you can always acoustic warning signals (e.g. police)! This will also help to protect your hearing.
•The navigation system outputs turn-by-turn directions during the destination guidance. Follow them only if you do not violate any traffic regulations!
•Carry the control panel with you in the supplied bag whenever you leave the vehicle.
•Some CDs with copy protection cannot be played.
•Do not insert any mini CDs (8 cm diameter) and shape CDs since they destroy the drive!
•Similar to printed material, the digital map material on the navigation CD is no longer up to date after some time. For this reason, update your navigation CD as soon as a new version is released (see www.blaupunkt.com).
For cleaning
•Clean the device with a dry or slightly moistened cloth. Do not use any solvents, cleaning agents or cleansers and no cockpit spray or care product for plastic materials.
Disposal of old unit
(EU countries only)
Do not dispose of your old device in the household trash!
Use the return and collection systems available to dispose of the old device.
4

Scope of delivery
Scope of delivery
1Rome NAV56E
1Cloth bag for the control panel
• Navigation CDs
1Document CD
1GPS antenna
1Device card with four-digit code number
1Operating instructions (short version)
1Support frame
2Disassembly bar
2Connecting cables for speedometer signal and reversing signal
1Guide pin
1Screwdriver
2 Adhesive labels (security)
5
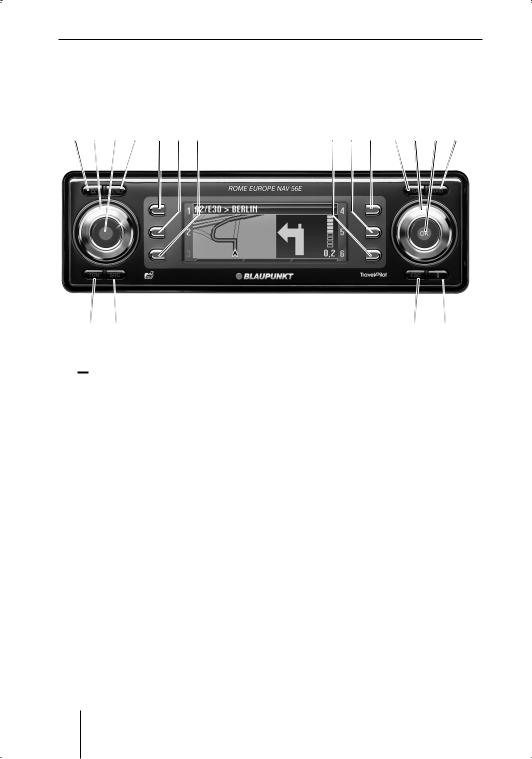
Device Overview
Device Overview
Controls
1 2 3 4 5 6 7
?@
1 
 button (Open)
Open the control panel and remove the CD
2 Volume control
3 On/Off button
Short press: Switch on/mute traffic announcement/fading out the turn- by-turn direction
Press long: Switch off
4 MENU button
Calling the settings menu
5 Function button 1
6 Function button 2
7 Function button 3
8 Function button 4
9 Function button 5
:Function button 6
Functions that are assigned to the function buttons 5 to : are shown on the display A
8 9 : ; < = >
A B
;TRAF button
Press short: Call up traffic information settings
Press long: Display TMC messages
<Menu button
Select a menu item/character
=OK button
Press short: Confirm selection Press long: Start scan/station seek tuning
>NAVI button
Press short: Switch to navigation system
Press long: Call up route options
?TUN button
Press short: Switch to radio
Press repeatedly: Select the waveband (FM1, FM2, FMT, MW, LW) Press long: Start Travelstore
6
Device Overview
@SRC button
Toggle between CD/MP3/WMA player and optional CD changer
A ESC button
Press short in the menu: Change to the previous menu level
Press long in the menu: Change to the top menu level
Text input: Delete last character Navigation: Cancel destination guidance
Scan: Cancel
Travelstore: Cancel
B button (Info)
Display current location, display complete list
Press short during destination guidance: Show current location and repeat last voice-prompted turn- by-turn direction
Press long during destination guidance: Display route list
C
C CD drive
A B |
C |
D |
E |
|
F A |
||
1 |
TMC |
|
|
16:13 |
FMT 4 |
||
|
|
|
|
|
|
||
2 |
BBC |
|
|
|
|
92,8 |
5 |
3 |
Tune |
Band |
|
Options |
6 |
||
|
|
|
G |
|
|
|
|
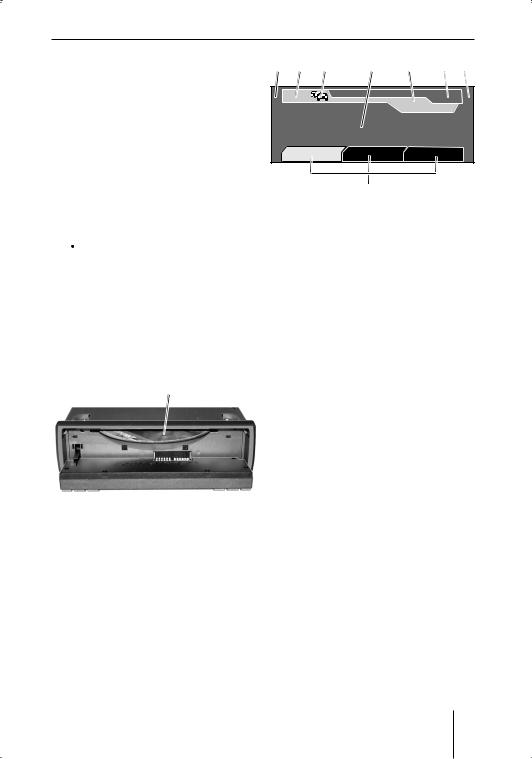
The most important display symbols
AFunctions assigned to the function buttons (5 to :).
You can also control the currently active audio source with the function buttons (5 to :) if these functions are not displayed.
B TMC symbol
C TA symbol
D Display area
E Time
F Current audio source
G Menus
7

The basic functions
The basic functions
Theft protection
To provide protection against theft, the device features
•a four-digit code number (printed on the device card)
•a detachable control panel (see below)
CAUTION!
Danger of theft!
Without the code number and the control panel, the device is useless to a thief.
Never keep the control panel and device card in the vehicle, not even in a hidden place; instead, carry the control panel with you in its bag when you leave the vehicle!
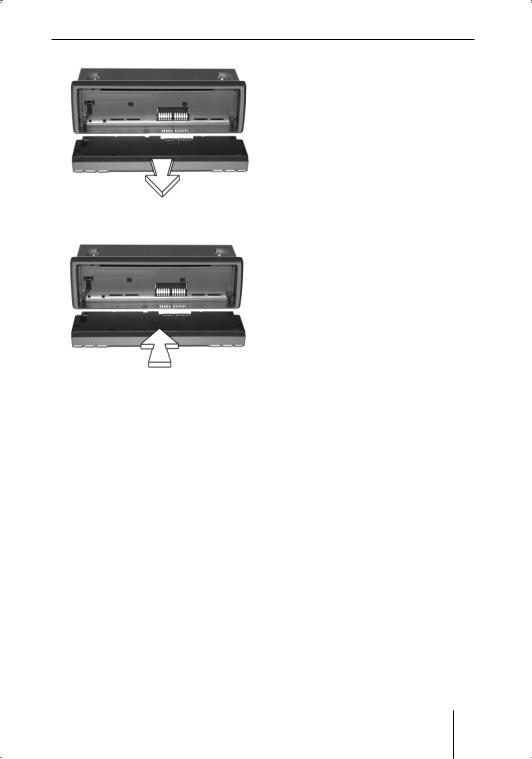
Detaching/attaching the control panel
You can detach the control panel to protect against theft.
CAUTION!
Danger of injuries!
If the control panel is open, it may lead to personal injuries in case of an accident.
Close the control panel before you start driving!
CAUTION!
Damage to the control panel!
The control panel can be damaged or malfunction if the following is not observed:
Never drop the control panel.
Transport it only in its supplied bag.
Never expose it to direct sunlight or another heat source.
Never touch the contacts on the rear side.
If necessary, clean the contacts with lint-free cloth moistened with alcohol.
To detach the control panel:Press the 
 button 1.
The control panel opens to the front.
Note:
If the device is switched on and a CD is in the drive, it is ejected after 2 seconds. If you do not remove this CD, it is automatically pulled in again after approx. 10 seconds. The device automatically switches off after approx. 30 seconds (Standby).
8
The basic functions
Pull the control panel straight out of its hinges.
To attach the control panel:
Push the control panel into its hinges from the front.
The control panel engages in the hinges.
Fold up the control panel.
The control panel engages. The device can now be switched on.
Switching the device on and off
To switch on the device:
Press the On/Off button 3. The device plays the previously active audio source at the previously selected volume.
Notes:
•You can limit the power-on volume to a maximum value (see p. 18).
•If you switch on the device without first switching on the vehicle ignition, the device automatically switches off after one hour to save the vehicle battery.
To switch off the device:
Hold the On/Off button 3 pressed until the display disappears.
The device remains in standby mode for 30 minutes before completely switching itself off.
Note:
The device is automatically switched off as soon as you switch of the vehicle ignition. If you switch on the ignition again, it also automatically switches on the device again.
Entering the code number
The code number is used for theft protection. You must enter it if the device was disconnected from the battery power, e.g. after a repair of the vehicle. The code number is printed on the device card.
Note:
Memorise the code number or take it with you before you use the vehicle for a longer trip.
9
The basic functions
If the code entry appears on the display, the first digit is selected.
|
|
|
|
Code |
0 |
0 |
0 |
0 |
0K |
Turn the menu button < until the selected position shows the correct number.
Press the OK button = to confirm the number.
The next digit of the code number is selected.
Repeat the two steps for the remaining digits of the code number.
If you entered an incorrect number:
Press the ESC BUTTON A.
The number entered last is deleted.
If the correct complete code number is displayed:
Press the OK button =. The device is operational.
If you entered the wrong code number
If you inadvertently entered and confirmed a wrong code number, you can repeat the entry. To prevent thieves from obtaining the code number through trial-and-error, the device is blocked for one hour after the third incorrect entry. Leave the device switched on during this time, because if you switch off the device during the waiting time, the waiting time is reset and is once again one hour long.
You can also deactivate the Code query (see p. 21).
Inserting a CD
To insert the navigation CD or an MP3, WMA or audio CD, the device must be switched on:
Press the 
 button 1.
The control panel opens to the front. If a CD is in the drive, it is ejected. If you do not remove this CD, it is automatically pulled in again after approx. 10 seconds.
Insert the CD with its printed side uppermost into the CD drive C until you feel some resistance.
The drive automatically draws in the CD and checks it.
Fold up the control panel.
The DVD starts playing. The corresponding menu displays.
Note:
The device remembers the track and playing time of the audio or MP3 or WMA-CD played last and starts again at the same point at which the playback was interrupted. This is extremely helpful if the navigation CD had to be briefly inserted during the audio playback.
10
The basic functions
Adjusting the volume
To change the volume of the currently playing source:
Turn the volume control 2. The volume changes. The current volume is shown on the volume display and stored.
1 |
TMC |
Volume |
16:13 |
FMT |
4 |
|
NDR 2 |
4 |
92,8 |
|
|
2 |
|
|
5 |
||
3 |
Tune |
Band |
Optionen |
6 |
|
Note: |
|
|
|
|
|
The device handles the volume of the different sources (music, voice output or phone) independent of each other. You only control the volume of the currently active audio source at any given time. The volume of the other audio sources does not change.
Muting the device
You can mute the currently playing audio source as follows:
Briefly press the On/Off button 3.
MUTE briefly appears on the display.
Note:
In each case, you only mute the currently playing audio source (music, traffic announcement, voice-prompted turn-by-turn direction or phone). As soon as you activate a different audio source, it is played back with the previously selected volume.
Diving recommendation announcements of the navigation system can also be switched off (see p. 24).
To cancel the mute function:
Briefly press the On/Off button 3 again or turn the volume control 2.
Operation with car phone
If the device is connected to a car phone:
•If the device is switched off, it automatically switches on when you receive a call or make a call,
•the phone symbol appears during the phone call or the "PHONE" text appears on the display during the destination guidance,
•the audio source which is currently playing is muted as long as you are making a phone call,
•the voice of the person calling you is played back via the loudspeakers of the vehicle,
•the access to many menus (see p.
12)is blocked during the phone call.
11

Operating the settings menu
Operating the settings menu
The settings menu allows you to adjust basic device functions, such as sound, power-on volume or display brightness and language, to your specific needs.
This chapter provides information about:
•The buttons used for navigation in the settings menu (see below),
•An example to illustrate how to reach a specific menu item (see below),
•The location of menu items in the settings menu (see p. 13).
Example of a menu operation
The following example (Changing the reception sensitivity of the radio) shows how to operate the settings menu in general.
Calling the settings menu
Press the MENU button 4. The settings menu is displayed. The first menu item, "Navigation", is highlighted.
|
Menu |
Navigation |
Audio |
Tuner |
Equalizer |
System |
Installation |
Operation of the menu button
The menu button < together with the OK button = is the central control unit of the device.
•The MENU button 4 is used to call up the settings menu.
•Turning the menu button < to the left or the right allows you tom select menu items, characters or settings.
•Use the OK button = to confirm the selection and reach new menu levels and the menu items which can be adjusted.
•The OK button = is also used to activate/deactivate the selected menu item.
•The ESC button A returns you to the next higher menu level.
Selecting a menu item in the settings menu
Turn the menu button < until the "Tuner" menu item is highlighted.
|
Menu |
Navigation |
Audio |
Tuner |
Equalizer |
System |
Installation |
Confirming a selection
Press the OK button = to confirm your selection.
Note
In some operating situations, you cannot select certain menu
items. If you press the OK button =, you will instead hear a warning beep.
12

Operating the settings menu
The "Tuner" menu can be selected only if the radio is currently set to an FM station.
The "Tuner" menu is displayed. The first menu item, "RDS", is highlighted.
|
|
|
Tuner |
RDS |
VAR |
Sensitivity |
|
Alternat. freq. |
HighCut |
0 |
|
Regional |
|
|
|
Selecting a menu item
Turn the menu button < until the "Sensitivity" menu item is highlighted.
|
|
|
Tuner |
RDS |
VAR |
Sensitivity |
|
Alternat. freq. |
HighCut |
0 |
|
Regional |
|
|
|
Changing and saving the setting of the menu item
Press the OK button =.
The check mark behind "Sensitivity" disappears. This reduces the reception sensitivity of the radio so that the station seek tuning finds only strong stations and ignores weak, noise-degraded stations.
|
|
|
Tuner |
RDS |
VAR |
Sensitivity |
|
Alternat. freq. |
HighCut |
0 |
|
Regional |
|
|
|
Exiting the settings menu
Press the ESC button A repeatedly until the settings menu is displayed.
If you briefly press the ESC button A, you return to one higher
menu level. If you press on the ESC button A for a longer time, you are immediately returned to the top level of the settings menu.
Note:
The top left corner of the display shows three boxes which display the menu level on which the corresponding menu is located.
First menu level
All subsequent menu levels
Last menu level
Overview of the settings menu
The following overview represents the settings menu which is called via the MENU button 4.
13

14 |
|
|
|
|
|
|
MENU |
|
|
|
Basic |
|
|
|
|
|
|
|
|
|
|
settings |
|
|
Speech output |
|
Map |
ON |
JUNCT |
|
|
Bass |
Balance |
|
|
|
|
|
Navigation |
ON |
|
|
|
Audio |
|
|
|
|
|
|
|
|
OFF |
|
|
|
|
|
before |
|
TMC voice |
|
Time |
TRAVEL |
|
|
7 |
Treble |
Fader |
|
|
|
|
|
|
|
|
||||||
|
Speed Profile |
|
|
|
TRAVEL |
|
Loudness |
|
|
|
|
|
|
|
|
|
|
|
|
|
|||
|
|
|
|
|
|
|
|
|
|
|
|
see p. 26 |
|
|
|
|
ARRIVAL |
|
|
|
|
|
the |
|
|
|
|
|
|
|
|
|
|
||
|
|
|
|
|
|
|
|
|
|
trip |
|
FREQ |
|
|
|
|
|
|
|
|
|
|
|
VAR |
|
|
|
|
|
|
|
|
|
|
|
FIX |
|
|
Tuner |
|
|
|
Menu |
|
Equalizer |
Sub low |
|
RDS |
VAR |
Sensitivity |
|
Navigation |
Audio |
|
Sub Low |
|
Low |
||
|
|
32 Hz |
-10 |
Mid |
|||||||
Alternat. freq. |
HighCut |
0 |
|
Tuner |
|
Equalizer |
|
||||
|
|
|
Mid high |
||||||||
Regional |
|
|
|
System |
|
Installation |
|
High |
|||
|
|
|
|
|
|
|
|||||
|
|
|
|
0 |
|
|
|
|
|
|
|
|
|
|
|
1 |
|
|
|
|
|
|
|
On max. |
|
|
|
2 |
|
|
|
|
|
|
|
|
|
|
|
|
|
|
|
|
|
|
|
Nav difference |
|
|
|
|
|
|
see p. 78 |
|
Installation |
|
|
Traffic min |
|
|
|
|
12 |
05 |
|
|
|
||
Gala |
|
|
|
|
|
|
|
|
|
||
|
|
|
|
|
|
|
|
|
|
|
|
Phone min. |
|
|
|
System |
|
|
GPS Sat: 8 |
Antenna test |
Speed sig. |
|
|
|
Vol.settings |
|
Clock |
|
|
|
Strength: 39 |
Sensor test |
Auto calib. |
|
|
|
|
|
|
|
Direction: Forward |
|
Manual calib. |
|
|
||
|
Display |
|
Code |
|
|
|
|
|
|
||
|
|
|
|
|
Ignition: On |
|
|
|
|
||
Language |
|
Speed Pulse: 5528 |
|
|
On |
Off |
|
|
Please drive 5-15km |
|
Display off |
|
|
|
|
||
CESKY, DANSK, |
Distance |
Distance |
Please drive |
with GPS reception |
||
Mode |
||||||
DEUTSCH, ENGL.IMP, |
200 metre |
200 metre |
200 metre |
|
||
(Day, Night, Auto) |
|
|||||
Brightness day |
ENGL. MET, ESPAÑOL, |
|
|
|
|
|
Brightness night |
FRANÇAIS, ITALIANO, NEDERLANDS, |
|
|
|
|
|
NORSK, PORTUGUÊS, SUOMI, |
|
|
|
|
||
|
|
|
|
|
||
|
SVENSKA, TÜRKÇE |
|
|
|
|
Basic settings before the trip
Basic settings before the trip
DANGER!
Risk of an accident through distraction from traffic!
If you change the settings while driving, you may be distracted from the traffic and cause an accident.
Stop at a suitable location before changing the settings!
Adjusting sound and balance
Sound and balance are adjusted in the "Audio" menu.
If the device is muted, the muting is automatically cancelled as soon as you select a menu item in the "Audio" menu.
Adjusting bass and treble
You can affect the sound with the bass and treble setting.
Note:
The bass and treble settings of the different sources (radio, CD player, MP3/WMA player) are independent of each other. You only control the sound of the currently active source at any given time. The sound of the other sources does not change.
During a traffic announcement or a telephone call, you cannot change bass and treble.
To change bass or treble:
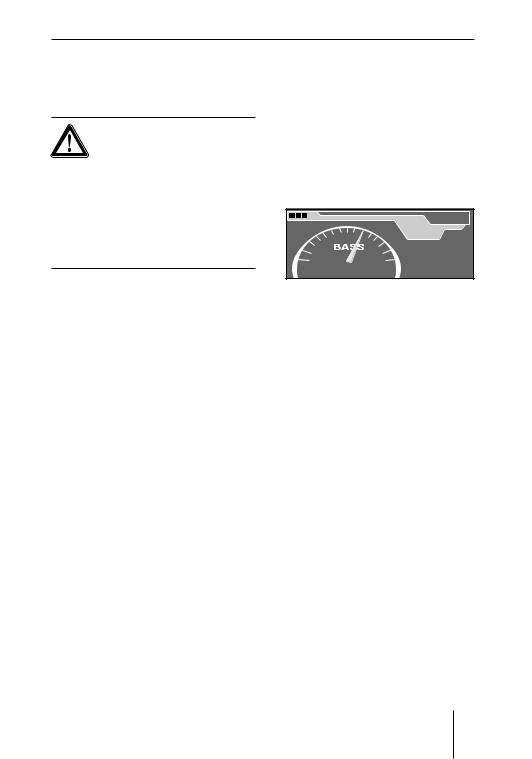
In the "Audio" menu, select and confirm the desired menu item ("Bass" or "Treble").
The corresponding sound control is displayed.
|
Bass |
|
2 |
7 |
7 |
Change the sound by turning the menu button < to the left or right.
The sound changes. The sound control illustrates the change.
Press the OK button = to store
this sound or press the ESC button A to return to the previous sound setting.
Adjusting the loudness
Loudness is a volume-dependent automatic rise in bass which ensures that the sound also appears natural at a low volume setting.
Note:
The loudness setting applies to all sources. During a traffic announcement or a telephone call, you cannot change the loudness.
15

Basic settings before the trip
To change the loudness:
In the "Audio" menu, select and confirm the "Loudness" menu item.
The loudness control is displayed.
Loudn. |
4 |
7 |
Change the loudness by turning the menu button < to the left or right. Try out different loudness settings at high and low volume until you find the desired sound.
At low loudness, the sound appears to have less bass at a low volume than at a high volume. A high loudness attempts to compensate for this effect.
Press the OK button = to store
this sound or press the ESC button A to return to the previous sound setting.
Adjusting the balance
The balance controls the volume distribution between left and right.
Note:
The balance setting applies to all sources.
To change the balance:
In the "Audio" menu, select and confirm the "Balance" menu item.
The volume distribution is displayed.
7 |
Balance |
Change the balance by turning the menu button < to the left or right.
The left-right volume distribution changes. The display shows the volume distribution.
Press the OK button = to store
this balance setting or press the ESC button A to return to the previous balance setting.
Adjusting the fader
The fader controls the volume distribution between front and rear.
Note:
The fader setting applies to all sources.
To change the fader:
In the "Audio" menu, select and confirm the "Fader" menu item. The volume distribution is displayed.
16

Basic settings before the trip
Fader |
7 |
Change the fader by turning the menu button < to the left or right.
The front-rear volume distribution changes. The display shows the volume distribution.
Press the OK button = to store
this fader setting or press the ESC button A to return to the previous fader setting.
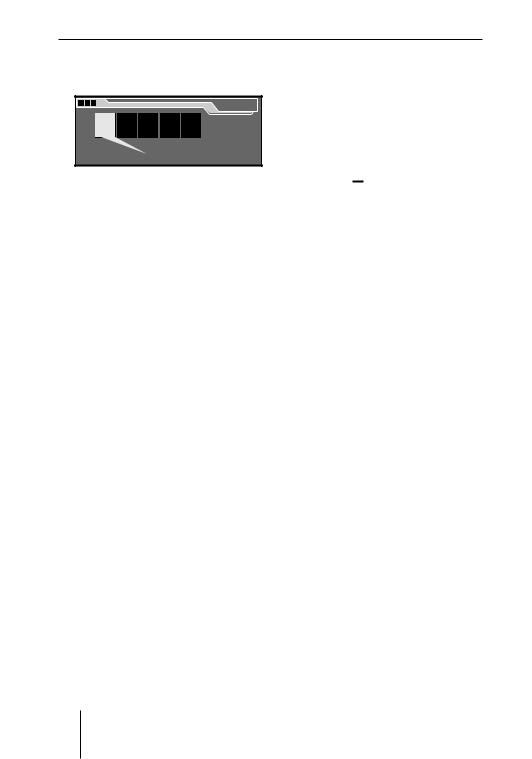
Adjusting the equalizer
Your device features a digital 5-band equalizer. In each of the 5 frequency bands, you can purposefully raise or lower a single centre frequency. This allows you to adjust the sound to your vehicle and remedy problems, such as droning or poor speech articulation.
How to operate the equalizer
To change the equalizer settings:
Insert a CD which you know very well (see p. 10).
Adjust the bass and treble, loudness, balance and fader to zero (see p. 15).
In the "Audio" menu, select and confirm the "Equalizer" menu item.
Note:
The equalizer setting applies to all sources.
The Equalizer is displayed.
Equalizer |
Sub low |
32 Hz -10 |
First, select and confirm the frequency band to be changed.
• Sub Low: 32-50 Hz
• Low: |
63-250 Hz |
• Mid: |
315-1250 Hz |
• Mid High: |
1600-6300 Hz |
• High: |
8000-12500 Hz |
A centre frequency from the selected frequency band is displayed.
+ 0 |
40 |
|
Equalizer |
Hz |
Sub low |
||
|
|||
|
32 |
40 |
50 |
Select the centre frequency to be changed from the frequency band.
• Sub Low: 32, 40, 50 Hz
• |
Low: |
63, 80, 100, 125, |
|
|
160, 200, 250 Hz |
• |
Mid: |
315, 400, 500, |
|
|
630, 800, 1000, |
|
|
1250 Hz |
17

Basic settings before the trip
• |
Mid High: |
1600, 2000, 2500, |
|
|
3200, 4000, 5000, |
|
|
6300 Hz |
• |
High: |
8000, 10000, |
|
|
12500 Hz |
The selected frequency band and the corresponding setting are displayed.
Change the setting by turning the menu button < to the left or right. You can raise or lower the selected frequency in ten increments.
The volume of the selected frequency is changed. The bar on the left side of the display shows the change.
Press the OK button = to store
this equalizer setting or press the ESC button A to return to the previous equalizer setting.
As soon as you store this equalizer setting, the equalizer setting of another centre frequency of the same frequency band is automatically deleted because you can change only a single centre frequency for each frequency band!
Which setting is the correct one?
First, change the settings of the mid-frequencies, followed by those for the treble and finally the bass.
|
Sound impression |
Measure |
|
|
or problem |
Frequency |
Setting |
|
|
Hz |
|
1. |
Distorted bass, |
125–400 |
approx. |
|
droning, |
|
–4 |
|
uncomfortable |
|
|
|
pressure |
|
|
2. |
Very transparent, |
1000– |
approx. |
|
aggressive sound, |
2500 |
–4 to –6 |
|
no stereo effect |
|
|
3. |
Muffled sound, |
8000– |
approx. |
|
low transparency, |
12500 |
+4 to +6 |
|
instruments do not |
|
|
|
excel |
|
|
4. |
Insufficient bass |
50–100 |
approx. |
|
|
|
+4 to +6 |
Basic settings in the "System" menu
You define the following in the "System" menu:
•The volume control (see below),
•the control of the display brightness (see p. 20),
•the language of the display texts and the voice-prompted turn-by- turn directions of the navigation system (see p. 20),
•whether the device queries the code after being disconnected from the battery power (see p. 21),
•the time (see p. 21).
Adjusting the volume control
You perform the following volume adjustments in the "Vol. settings" menu:
•Maximum switch-on volume (On max.):
18

Basic settings before the trip
When you switch on the device, it plays at the previously selected volume. However, if you adjusted the volume before switch-off to be higher than maximum poweron volume, the volume is automatically limited to the switchon volume when you switch it on again.
•Automatic low-volume switching (Nav difference):
While the navigation system announces a turn-by-turn direction, the volume of the currently playing audio source is reduced so that you can clearly understand the turn-by-turn direction. You can adjust the volume decrease from 0 (low decrease) to 6 (high decrease).
•Minimum volume for traffic announcements (TA min.):
If the volume is set to a low value, it is automatically raised to this value during a traffic announcement.
•Minimum volume of car phone (Phone min.):
In order to clearly understand a phone call even if the volume is set to very low, the volume of the phone call is automatically raised to this value.
•Speed-dependent volume adjustment (Gala):
When you are driving faster, the volume is automatically increased to compensate for the driving noise. Under "Gala", you can adjust how much the volume
will be adjusted. You can adjust the volume increase from 0 (low increase) to 9 (high increase).
Note:
You cannot change the volume setting as long as you are receiving a traffic announcement.
To change the volume settings:
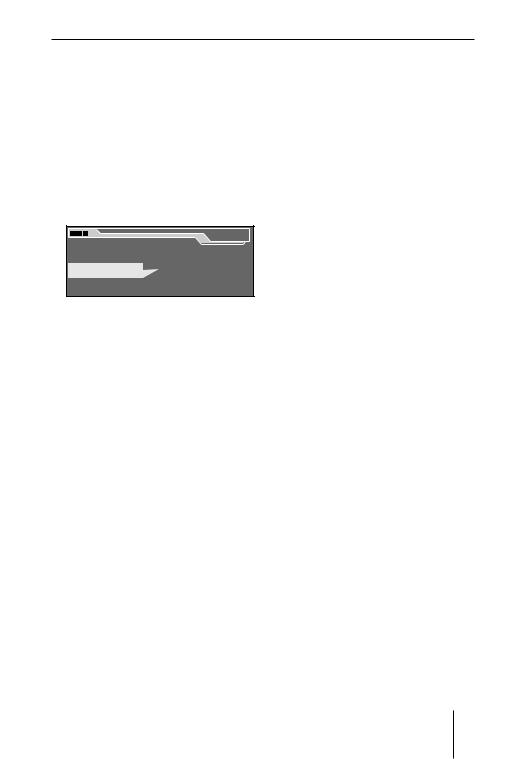
In the "System" menu, select and confirm the "Vol.settings" menu item.
The volume menu appears.
|
Vol.settings |
On max |
GALA |
Nav difference |
Phone min |
TA min |
|
In the volume menu, select and confirm the desired menu item. The corresponding volume control appears.
On max. |
13 |
WARNING!
Risk of injuries from high power-on volume!
If you adjust the switch-on volume too high, the volume can be so high when you switch on the device that you may experience a hearing defect.
19

Basic settings before the trip
Adjust the switch-on volume to a low value!
Change the volume by turning the menu button < to the left
or right and press the OK button =.
The currently playing source is played with the selected volume. The volume control displays the volume.
Adjusting the control of the display brightness
You adjust the following in the "Display" menu:
•Whether the display automatically switches off when you are not operating the device (Display off),
•whether the display brightness is automatically adjusted (Auto/ Day/Night mode),
•the brightness with switched-off headlights (Brightness day),
•the brightness with switched-on headlights (Brightness night).
To adjust the setting of the display brightness:
In the "System" menu, select and confirm the "Display" menu item.
The display menu appears.
|
Display |
Display off |
Brightness day |
Mode AUTO |
Brightness night |
Select and confirm the desired menu item in the display menu ("Display off", "Mode", "Brightness day" or "Brightness night").
The corresponding setting appears.
•If you activate "Display off" with the OK button =, the display automatically switches off 10 seconds after the last push of a button. To switch it back on again, press any button.
•If you select "Mode", you can use the OK button = to select among "Auto" (automatically changing the brightness), "Day" and "Night".
•You use the menus "Brightness day" and "Brightness night" to adjust the desired display brightness with headlights
switched on or off by using the menu button <.
Note:
If your vehicle features a control for instrument lighting, you can also use it to toggle the display brightness between "Brightness day" and "Brightness night".
For the device to recognise that the headlights are switched on, the corresponding signal must be connected.
Setting the Language
You adjust the following in the "Language" menu:
•The language of the texts on the display,
20
Basic settings before the trip
•the language of the voice-prompt- ed turn-by-turn directions of the navigation system.
Note:
To change the language, the navigation CD must be in the drive.
To change the language:
In the "System" menu, select and confirm the "Language" menu item.
The language menu appears.
Language |
DEUTSCH |
ENGL. IMP |
ENGL. MET |
ESPANOL |
In the language menu, select and confirm the desired language. The language is changed.
Note:
The voice output of the navigation system is dependent upon the data on the navigation CD. It is, therefore, possible that the display texts appear in the selected language, but the turn- by-turn directions are spoken in English.
Activating/deactivating the code query
To protect against theft, the device features a code query, which is activated/deactivated as follows:
In the "System" menu, select and confirm the "Code" menu item. The code menu appears.
|
Code |
On |
Off |
CAUTION!
Danger of theft!
If you deactivate the code query, a thief can put the stolen device into operation.
You should avoid deactivating the code query!
Select and confirm the desired menu item in the code menu and enter the four-digit code number (see p. 9).
•On: After every disconnect from battery power, the code must be re-entered.
•Off: After a disconnect from battery power, the code does not have to be re-entered.
Setting the clock
The local time is set in the "Clock" menu.
Note:
The clock is automatically set using the GPS satellite signals. You only have to the clock after installation and when changing to and from daylight savings time.
21

Basic settings before the trip
To set the clock:
In the "System" menu, select and confirm the "Clock" menu item. The clock menu appears. The hours are highlighted.
|
Set time |
12 |
05 |
Change the hours by turning the menu button < and press the OK button =.
Change the minutes by turning the menu button < and press the OK button =.
Setting the basic settings of the radio
Your device features an RDS radio. RDS means "Radio Data System". The radio can receive data which are transmitted without being heard parallel to the music. This allows for displaying the station name on the display and automatically switching ti an alternative frequency if your vehicle is leaving the frequency range of a station.
Basic settings and comfort functions of the radio are defined in the "Tuner" menu.
Note:
Before you can change to the "Tuner" menu, the radio must be set to an FM station!
Displaying the station name
Some FM radio stations use the RDS signal to transmit advertisement or other information instead of the station name. You can define which of this information is shown on the display as follows:
In the settings menu, select and confirm the "Tuner" menu item. The "Tuner" menu appears.
|
Menu |
Navigation |
Audio |
Tuner |
Equalizer |
System |
Installation |
In the "Tuner" menu, select the "RDS" menu item.
Use the OK button = to toggle the RDS functions between "VAR", "FREQ" and "FIX".
•"VAR": All information is displayed as soon as it is received, including advertisement.
•"FREQ": Neither station name nor advertisement is displayed, only the reception frequency.
•"FIX": Only the information received first is displayed, which can be the station name or advertisement or any other piece of information.
22
Basic settings before the trip
Enabling/disabling automatic changing to alternative frequencies (AF)
The radio can automatically tune to the best receivable frequency of the selected station.
To activate/deactivate this function:
In the settings menu, select and confirm the "Tuner" menu item. The "Tuner" menu appears.
|
|
|
Tuner |
RDS |
VAR |
Sensitivity |
|
Alternat. freq. |
HighCut |
0 |
|
Regional |
|
|
|
In the "Tuner" menu, select the "Alternat. freq." menu item.
You can activate the automatic selection of an alternative frequency (check mark) or deacti-
vate it (no check mark) with the OK button =.
Enable/disable automatic changing to other regional programmes
Some stations divide their programmes into regional programmes with different contents at certain times. You can use the Regional function to prevent or allow the device from switching to alternative frequencies that are transmitting a different programme content.
In the settings menu, select and confirm the "Tuner" menu item.
The "Tuner" menu appears.
|
|
|
Tuner |
RDS |
VAR |
Sensitivity |
|
Alternat. freq. |
HighCut |
0 |
|
Regional |
|
|
|
In the menu of the tuner basic settings, select the "Regional" menu item.
Use the OK button = to prevent the automatic switching to other regional programmes (check mark) or allow it (no check mark).
Activating/deactivating improved reception (HighCut)
The HighCut function results in an improved reception in case of weak radio reception (FM only). If the reception is weak, the interference level is automatically decreased. The response sensitivity of the HighCut function can be adjusted as follows:
In the settings menu, select and confirm the "Tuner" menu item. The "Tuner" menu appears.
|
|
|
Tuner |
RDS |
VAR |
Sensitivity |
|
Alternat. freq. |
HighCut |
0 |
|
Regional |
|
|
|
In the menu of the tuner basic settings, select the "HighCut" menu item.
23

Basic settings before the trip
Use the OK button = to change the response sensitivity of the HighCut function between "0", "1" and "2".
•"0" means: The HighCut function is deactivated,
•"1" means: The response sensitivity is low.
•"2" means: The response sensitivity is high.
Changing the seek tuning sensitivity
The seek tuning sensitivity determines whether the automatic station seek tuning locates only strong stations or also weaker stations, which may be degraded by a high noise level.
To change the seek tuning sensitivity:
In the settings menu, select and confirm the "Tuner" menu item. The "Tuner" menu appears.
|
|
|
Tuner |
RDS |
VAR |
Sensitivity |
|
Alternat. freq. |
HighCut |
0 |
|
Regional |
|
|
|
In the "Tuner" menu, select the "Sensitivity" menu item.
Use the OK button = to select the seek tuning sensitivity:
•A check mark means that the seek tuning also stops at weaker stations,
•If no check mark is shown, the seek tuning stops only at strong stations.
Setting the basic settings of the navigation system
You define the following in the "Navigation" menu:
•Whether the navigation system announces turn-by-turn directions (see below),
•whether the remaining travel time or the estimated arrival time is displayed during destination guidance (see p. 25),
•whether map details are shown during destination guidance before you have to make a turn (see p. 25),
•whether TMC traffic announcements are also announced during inactive destination guidance (see p. 25).
Activating/deactivating voice output of the navigation system
The navigation system can announce turn-by-turn directions during destination guidance (see p. 65). This voice output can be activated or deactivated as follows:
In the settings menu, select and confirm the "Navigation" menu item.
The menu of the basic settings of navigation appears.
In the menu of the navigation basic settings, select the "Speech output" menu item.
You can activate the speech output (check mark) or deactivate
it (no check mark) with the OK button =.
24

Basic settings before the trip
Adjusting the time display
During destination guidance, the remaining travel time or the estimated arrival time can be displayed.
To toggle between the times:
In the settings menu, select and confirm the "Navigation" menu item.
The menu of the basic settings of navigation appears.
In the menu of the navigation basic settings, select the "Time" menu item.
Use the OK button = to toggle between "Travel" (remaining travel time) and "Arrival" (estimated arrival time).
Activating/deactivating the voice output of TMC traffic announcements
If you tuned into a TMC station, the device receives TMC traffic announcements (see p. 32). They are analysed during the dynamic destination guidance so that you can avoid traffic jams and arrive at your destination as quickly as possible (see p. 70).
You can enable/disable the announcement of TMC traffic announcements as follows during inactive destination guidance:
In the settings menu, select and confirm the "Navigation" menu item.
The menu of the basic settings of navigation appears.
In the menu of the navigation basic settings, select the "TMC speech output" menu item.
You can activate the speech output (check mark) or deactivate
it (no check mark) with the OK button =.
Switching map display on/off
During the destination guidance, the navigation system can display map details permanently or temporarily (junction zoom).
To switch map display on/off,
s e l e c t a n d c o n f i r m th e "Navigation" menu item in the Settings menu.
The menu of the basic settings of navigation appears.
In the menu of the navigation basic settings, select the "Map" menu item.
You can use the OK button = to select among permanent map display ("ON"), junction zoom ("JUNCT") and map display "OFF".
Speed profile
You can define different speed profiles. These profiles are considered for calculating the remaining travel time.
In the settings menu, select and confirm the "Navigation" menu item.
The menu of the basic settings of navigation appears.
25

While driving
In the menu of the navigation basic settings, select the "Speed Profile" menu item.
Select among "Default", "Fast" and "Slow".
Adjusting the speed profile
You can adjust the profiles "Fast" and "Slow" to your usual speed.
Select the profile to be adjusted (you can only adjust the profiles "Fast" and "Slow").
Select "Modify".
A list with types of streets appears. You can adjust the setting of your speed on motorways as well as for local streets and streets outside of a town.
For example, to adjust your average speed on motorways,
in the profile to be adjusted, select the "Motorways" menu item
and confirm the selection with the OK button =.
A display appears that resembles a speedometer.
Change the defined speed by turning the menu button < to
the left or the right and pressing the OK button =.
After adjusting the profile, exit
the menu with the ESC button
A.
While driving
This chapter describes how to:
•Select a certain audio source (see below),
•play music (radio, CD, MP3 or CD changer, see p. 29),
•putting through traffic announcements (TA) (see p. 31).
Selecting an audio source
You can select the following audio sources:
With the TUN button ?:
• the radio (see p.27).
With the SRC button @:
•the CD player (see p. 27), if an audio CD is in the drive,
•the MP3/WMA player (see p. 28, if an MP3 or WMA-CD is in the drive,
•a CD changer or a similar device, if such a device is connected and at least one CD is in the magazine (see p. 28).
Note:
If a car phone is connected, it is automatically put through as soon as you make a phone call (see p. 11).
Selecting the radio as audio source
To select the radio as the audio source:
Press the TUN button ?.
26

While driving
The previously selected radio station is played. The radio display is shown.
The radio display
|
A B C |
D |
|
E F |
|
1 |
TMC |
16:13 |
FMT |
4 |
|
|
|
|
|
||
2 |
BBC |
|
92,8 |
5 |
|
3 |
Tune |
Band |
Options |
6 |
|
F G H |
J |
K |
L |
|
|
A TMC symbol B Listen symbol
C Traffic information symbol (TA) D Time
E Memory bank
FMemory location for radio stations
G Station name H Tuning menu
I Frequency band menu
K Option menu of the radio L Reception frequency
To tune, store and call up radio stations, see p. 35.
Selecting the CD player, MP3 player or CD changer as audio source
To select the CD/MP3 player or an optional CD changer as the audio source:
Press the SRC button @.
The previously active audio source is played, if a CD is inserted.
To change the audio source:
Press the SRC button @ again. The device toggles between the installed CD/MP3 player and an optional CD changer, if a CD is inserted.
As soon as you switch on an audio source, the playback of this audio source continues at the point where it was interrupted. The corresponding display is shown.
The CD display
A B C |
|
D |
E F |
||
TMC |
|
|
14:01 |
CD |
|
|
|
|
|
|
|
Track 01/11 |
|
00:22 |
|
||
|
|
|
|||
MIX |
Tracks |
|
Options |
RPT |
|
G |
H |
J |
L |
O |
P |
A TMC symbol B Listen symbol
C Traffic information symbol (TA) D Time
E"Reverse/Track backward" symbol
F"Forward/Track forward" symbol
G "MIX" symbol H Tracks menu
I Track info display
L Options menu of the CD player O Playing time display
P "RPT" symbol
27
 Loading...