


Quick Start Guide
Indoor IP Camera | TrackCam VIO-HP20
Enjoy it.
Home Security IP Camera

EN |
Quick Start Guide |
4 |
|
Indoor IP Camera VIO-HP20 |
|
DE |
Schnellstart-Anleitung |
14 |
|
Indoor IP Kamera VIO-HP20 |
|
FR |
Mode d’emploi |
24 |
|
Caméra IP intérieure VIO-HP20 |
|
ES |
Manual de usuario |
34 |
|
Cámara IP para interiores VIO-HP20 |
|
NL |
Snelstartgids |
44 |
|
Binnen IP Camera VIO-HP20 |
|

English
English | Manual
1. Kit Content
VIO-HP20 IP Camera |
Power adapter EU type and |
|
2m USB cable |
3x wall screws / 3x plastic anchors |
Mounting plate and sticker |
Safety Information:
Please read this manual carefully before using it for the first time and keep it for future reference to look up.
The safety precautions contained herein reduce the risk of fire, electric shock and injury, if they are followed correctly.
•The device is not a toy. Never leave unsupervised children with electrical appliances. Do not leave packaging material behind. Children can swallow small parts and choke on it
•Before use, make sure that the existing mains voltage matches the required operating voltage of the article (see“Technical data”).
•Do not use the product if it is damaged. All the examination and repair work should be done by qualified service engineers. We are not liable for any problems caused by unauthorized modifications or attempted repair.
•Avoid contact of the item with water or other liquids.
•The IP camera must be attached to a power outlet near the device and easily accessible. Always lay cables in such a way that they do not endanger people or pet.
•• Please turn off the power and unplug the power cable, if there is any smoke, upleasant smell, or noise. Please contact your local retailer or customer service center for help
•• No liability is accepted for damage to property or personal injury caused by improper handling or failure to observe the hazard information. In such cases all warranty claims are void! No liability is assumed for consequential damage
4

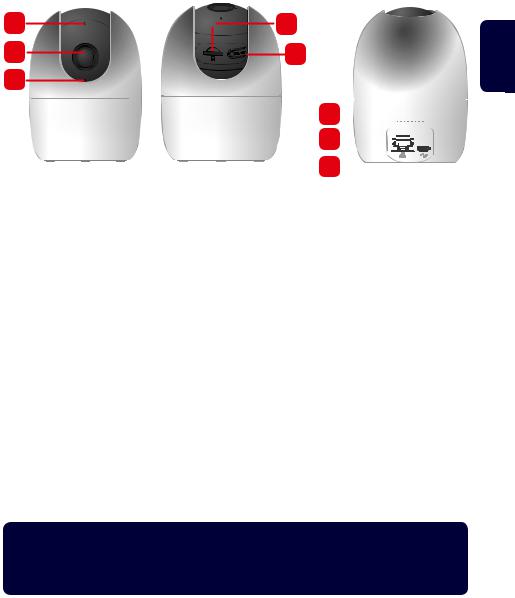
2. Product Description
1 
 2
2 

3
1.Indicator LED
2.Camera Lens
3.Built-in microphone

 4
4  5
5
6 |
7 |
8 |
4. Micro SD-Card slot |
6. Speaker |
5. Reset Button |
7. Ethernet port |
|
8. USB power port |
Indicator LED status: |
Camera status: |
Off |
- Powered off/LED turned off |
|
- Rebooting after reset |
Red light on |
- Booting |
|
- Device malfunction |
Green light flashing |
Booting completed, waiting for WiFi |
|
configuration |
Green light on |
Wifi connection succeeded, operate normally. |
Red and green lights flash |
Camera firmware upgrade |
alternately |
|
Red light flashing |
Network connection failure or disconnected from |
|
the network |
NOTE:
This quickstart guide explains the installation and registration of the VIO camera. If you want to learn more about the camera or the Cam4Home Plus app please check chapter 6.
English
5

English
3. Learn in a Camera
Step 1: Download and install the“Cam4Home Plus”APP to your smartphone from the App Stores.
Step 2: Connect your smartphone to your Wi-Fi network.
NOTE: If you are using a dual-band router, make sure that your smartphone is connected to a 2.4 GHz WiFi Network and not to a 5GHz Wifi Network. To learn more about this please check your router manual.
Step 3: Open the“Cam4Home Plus”APP. Create a user account by pressing the “sign up”button located at the bottom left hand side.
Step 4: To add a new camera tap the“+”button at the top right of the screen and scan the QR code of the camera. Then follow the insturctions on the App to complete the camera registation.
NOTE: If you encounter any problem during the registration, check Chapter 6
4. Cam4Home Plus Management
Camera dashboard:
After setup, select your camera in the “Device”menu, this will bring you to the camera dashboard, where you can see the camera live stream video and access
various features as take a snapshot |
, |
|||
start a video recording |
, fullscreen |
|||
mode |
speak |
or listen |
. Tap |
|
the |
icon to open the PTZ menu to |
|||
move the camera up and down and right to left.
Tap to change the stream video quality between Standard Definition (SD) and High Definition (HD).
6

Camera settings:
To access the camera settings go to the camera dasboard and tap the |
settings icon |
at the top right. |
|
Share your camera with others:
A camera can be shared to other Cam4Home Plus accounts for live streaming only. To modify the camera settings please use the account where the camera was registered. On the account where the camera was registered go to the camera dashboard and tap on the icon. Select device share and tap on“Add user to Share”. Type the email of the Cam4Home Plus account you want to share the camera with and tap the save button at the top right of the screen.
To stop sharing the camera with an user go to the camera dashboard --> settings --> Device sharing and tap“Cancel”.
Playback video recordings
On the camera dashboard tap on “View history record” and select Cloud
or SDcard storage . Tap on date and select a day on the calendar. Use the timeline bar to watch video recordings from the selected day. Video recordings are marked in orange.
Push notifications
On the device menu tap the 3 dot  icon and select“Alarm Notifications” . Then tap the “Alarm Notification”button to turn activate / deactivate the push notifications.
Important: Ensure that you give the app the permission to show pop up notifications on the home screen.
Motion detection
To enable / disable motion detection go to: Camera dashboard --> settings icon --> Arm Setting --> Motion detection. Note: Motion detection its enable by default.
NOTE: To receive push notifications“motion detection”must be enabled.
English
7
English
Smart Human detection
To enable / disable this feature go to: Camera dashboard --> settings icon --> Arm Setting --> Human Shape Detection. Once enabled, the camera will trigger push notifications only if the detected object has a human shape, decreasing the false alarms from cars or animals.
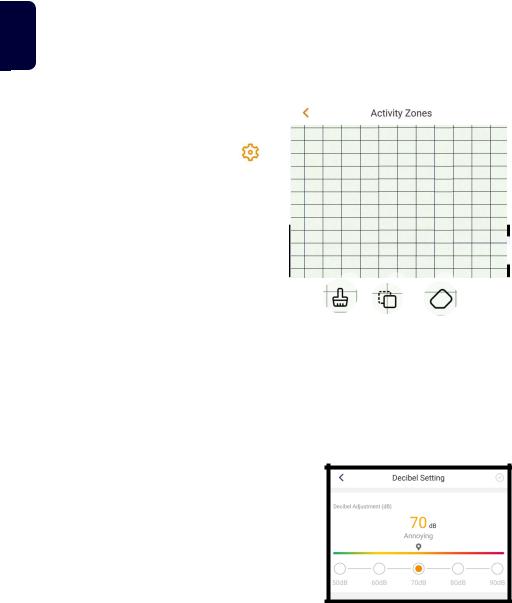
Motion detection zones |
|
|
|
|
|
To adjust the detection area which is |
|
|
enabled for motion detection go to: |
|
|
Camera dashboard --> settings icon |
--> |
|
Arm Setting --> Detection region setting |
|
|
By default the motion zone covers the |
|
|
camera vision field completely. |
|
|
To delete all the previously selected |
|
|
detection zones, tap on the“Clear”icon. To |
|
|
delete specific areas tap the“Eraser”icon |
|
|
and slide your finger through the screen. |
|
|
Tap again the“Eraser” icon to exit eraser |
|
|
mode. To create a new detection zone tap |
|
|
on the screen and draw a motion detection |
Clear Invert Eraser |
|
zone. Create as many motion zones as |
|
|
|
|
|
needed, then tap“Save”to save the motion |
|
|
zones. |
|
|
Smart tracking
To enable / disable this feature go to: Camera dashboard --> settings icon --> Arm Setting --> Smart tracking. Once enabled, the camera will automatically follow the moving object.
Audio detection alarm
To enable / disable motion detection go to: Camera dashboard --> settings icon --> Abnormal Sound Alarm. Then tap on“decibel settings”to set the noise threshold to trigger the audio detection alarm.
Note: Audio detection alarm detection its disabled by default.
8

Motion sensitivity
To adjust the motion sensitivity go to: Camera dashboard --> settings icon |
--> Arm |
setting --> Detection Sensitivity. |
|
Adjust the motion sensitivity according to your needs between 1 (min) and 5 (max). Please keep in mind that setting to high sensitivity could trigger false alarms and at the same time low sensitivity could ignore alarms on low light environment.
Tap the icon to save the changes
NOTE: Motion detection is triggered based on a certain percentage of pixel change. Low sensitivity:The camera will alert, if many pixels in the picture have changed. High sensitivity:The camera will alert when few pixels in the picture have changed.
Privacy mode
On the“Device” tap the“Camera Shielding” button located at the top right of the VIOHP20 camera to activate the privacy mode.
When the privacy mode is activated the camera lens will be hidden and the microphone deactivated avoiding any
audio or video recording. Additionally video live streaming, listening, speaking, taking snapshots or video recordings trhought the app will be disabled until the privacy mode is deactivated.
To deactivate the privacy mode tap again on the“Camera Shielding”button located in the device menu or tap“Cancel hiding”on the camera dashboard.
NOTE:
The Cam4Home Plus App is designed mainly for smartphones, full compatibility on tablets cannot be assured.
English
9

English
5. Installation
•• Check your WiFi signal strength and make sure that the WiFi signal is strong at the location of your camera. For best performance, the smartphone needs to be connected to a WiFi network.
5.1. Micro SD installation (optional)
Step 1: Pull the camera lens up and locate the Micro SD-Card compartment (refer to chapter 2 point 4 )
Step 2: Install the Micro SD-Card into the indicated MicroSD-card slot.
NOTE: The Micro SD-Card is mandatory for local recording. Please make sure the Micro SD-Card is CLASS10 rated. Supported are Micro SD-Cards from 8GB to 256GB.
5.2. Installation
1 Mounting Surface
2 Positioning Map

 3 Plastic Anchors
4 Mounting Plate
5 Screw
6 Camera
Step 1: Stick the mounting map sticker on the wall or ceiling, then use it as a template to mark the three drilling points.
Step 2: Drill through the marked points and install the plastic anchors on the three holes.
Place the mounting bracket on the ceiling and drive the screws into the plastic anchors until they are flush with the mounting bracket and the bracket is flat against the wall.
Install the camera on the mounting bracket and turn it clockwise to lock it.
10
6. Help
6.1 FAQ
If you experience any issue or have questions go to the FAQ in the app at:
“Me”menu -> Settings --> FAQ
6.2 Cam4Home Plus Manual
If you want to learn more details of the Cam4Home Plus APP, download the Main APP manual, with the following steps:
Visit: https://www.blaupunkt.com/service
1.On the 1st dropdown menu select your language
2.On the 2nd dropdown menu select“VIO-Series”
3.On the 3rd dropdown menu select“Manual”
4.Click“Submit”
5.Locate and click on“VIO-- Cam4Home Plus - Manual”
3
1 |
2 |
4 |
6.3 How to Videos
For“How-to-Videos”on the installation and registration please visit our youtube channel by scanning the QR code. And then select your language from the playlist.
6.4 Customer Support
For additional help, contact our technical support. To find your country customer support service, visit: http://security.blaupunkt-service.com
Returns: If you wish to return your camera, we strongly advise that you first delete any camera paired to your account before sending the camera back.
6.5 Factory Reset
Step 1: |
Plug in the camera and wait 1 minute until it boots up. |
Step 2: |
Pull the camera lens up and press the reset button (refer to chapter 2 for |
|
15 seconds until the greend Indicator light turns off and the camera beeps |
|
once. |
Step 3: |
Wait until the green indicator light flashes slowly. |
Step 4: |
Now the camera is reverted to default settings. |
English
11

English
7. Technical Specifications
Description |
FULL HD indoor IP Camera |
Image sensor: |
1/2.7” 2Megapixel progressive CMOS |
Resolution |
Full HD (1920 x 1080) |
Video Compression |
H.265 / H.264 |
Angle of View |
93°(H), 48°(V), 115°(D) |
Pan & Tilt |
355°Pan & -5~80°Tilt |
Night Vision |
10m distance |
Minimum illumination |
0.9Lux(Color), 0Lux(B/W) |
Motion detection method |
Digital Motion detection with configurable |
|
zones and human detection |
Storage |
Micro-SD card up to 256GB (not included) |
Power Input |
DC 5V1A Power supply |
Mains voltage |
220-240V |
Mains frequency |
50/60 Hz |
Max. Power Consumption |
<3.5W |
Standby Power Consumption |
1.6 W |
Audio communication |
Two-Way audio communication |
Auxiliary Interface |
Built-in Mic & Speaker |
Internet connection |
Wi-Fi: IEEE802.11b/g/n, 50m open field |
Frequency band of wireless |
2.4Ghz |
RF mode |
|
Max. transmission power |
20 dbm |
Wireless Module Model |
Realtek RTL8188FTV |
Radio range (free field) |
50m (Open space, straight line distance) |
Security Encryption |
TLS encryption |
Weight |
238g |
Operating conditions |
-10°C~+45°C, Less than 95%RH |
Temperature (storage) |
20°C to 60°C |
Operating Humidity |
Up to 95% non-condensing |
Dimensions (W x H ) |
106.1 × 77.4 × 77.4mm |
12

Declaration of conformity:
Hereby Security Brand Pro GmbH declares that the radio equipment type“Blaupunkt VIO-HP20”complies with the directive 2014/53 / EU. The full text of the EU Declaration of Conformity is available at the following Internet address: https://www.blaupunkt. com/eu-declarations/
Dispose:
Old appliances must not be disposed of with normal household waste. In accordance with Directive 2012/19/EU, the device must be disposed of
properly at the end of its service life. The recyclable materials contained in the device are recycled and pollution of the environment is avoided. Return the old device free of charge to a collection point for electrical waste or a recycling yard.
Dispose of the packaging materials in an environmentally friendly manner by placing them in the collection containers provided.
General recycling symbol Further information can be found under: www.mueller-licht.de/recycle/
English
NOTE:
•• This manual is for reference only. Slight difference may be found in the user interface.
•• All the designs and software here are subject to change without prior written notice.
•• All trademarks and registered trademarks mentioned are the properties of their respective owners.
•• Please visit our website or contact your local service engineer for more information at: http://security.blaupunkt-service.com
13

Deutsch
Deutsch | Schnellstart-Anleitung
1. Lieferumfang
VIO-HP20 IP-Kamera |
Netzteil EU Typ und |
|
2 m USB-Kabel |
3x Wandschrauben / |
Montageplatte und |
3x Kunststoffdübel |
Montage-Schablone |
Sicherheitsinformation:
Bitte lesen Sie dieses Handbuch sorgfältig durch, bevor Sie die IP Kamera zum ersten Mal verwenden, und bewahren Sie es zum späteren Nachschlagen auf.
Die hier beschriebenen Sicherheitsvorkehrungen verringern die Gefahr von Feuer, einem Stromschlag und Verletzungen, wenn sie ordnungsgemäß befolgt werden.
•Das Gerät ist kein Spielzeug. Kinder dürfen nicht mit dem Artikel spielen. Lassen Sie niemals unbeaufsichtigte Kinder mit Elektrogeräten zurück. Halten Sie Kinder von Verpackungsmaterial fern. Bei Verschlucken besteht Erstickungsgefahr.
•Stellen Sie vor dem Gebrauch sicher, dass die vorhandene Netzspannung mit der erforderlichen Betriebsspannung des Artikels übereinstimmt (siehe„Technische Daten“).
•Verwenden Sie das Produkt nicht, wenn es beschädigt ist. Alle Überprüfungsund Reparaturarbeiten sollten von qualifizierten Servicetechnikern durchgeführt werden. Wir haften nicht für Probleme, die durch nicht autorisierte Änderungen oder Reparaturversuche verursacht wurden.
•Vermeiden Sie den Kontakt des Gegenstandes mit Wasser oder anderen Flüssigkeiten.
•Die IP-Kamera muss an eine Steckdose in der Nähe des Geräts angeschlossen und leicht zugänglich sein. Verlegen Sie die Kabel immer so, dass keine Personen oder Haustiere gefährdet werden.
•• Schalten Sie das Gerät aus und ziehen Sie das Netzkabel ab, wenn Rauch, unangenehmer Geruch oder Geräusche auftreten. Bitte wenden Sie sich an Ihren Händler oder den lokalen Kundenservice.
•• Für Sachoder Personenschäden, die durch unsachgemäße Handhabung oder Nichtbeachtung der Gefahrenhinweise verursacht werden, wird keine Haftung übernommen. In diesen Fällen erlöschen alle Gewährleistungsansprüche! Für Folgeschäden wird keine Haftung übernommen.
14
2. Geräteübersicht |
|
1 |
4 |
2 |
5 |
3 |
|
6 


 7
7 


 8
8 


1. Status LED |
4. Micro-SD-Kartensteckplatz |
6. Lautsprecher |
2. Kamera |
5. Reset-Taste |
7. Ethernet Anschluss |
3. Eingebautes Mikrofon |
|
8. USB-Stromanschluss |
Deutsch
LED-Statusanzeige: |
Kamerastatus: |
Aus |
- Ausgeschaltet / LED ausgeschaltet |
|
- Neustart nach dem Zurücksetzen |
Rote LED an |
- Kamera wird hochgefahren |
|
- Gerätestörung |
Grüne LED blinkt |
Startvorgang abgeschlossen, Warten auf WLAN |
|
Konfiguration |
Grüne LED an |
WLAN-Verbindung erfolgreich, normale |
|
Funktionsweise. |
Rote und grüne LED blinken |
Firmware-Aktualisierung der Kamera |
abwechselnd |
|
Rote LED blinkt |
Netzwerkverbindungsfehler oder Verbindung |
|
zum Netzwerk getrennt |
HINWEIS:
Diese Kurzanleitung erklärt die Installation und Registrierung der VIO-Kamera. Wenn Sie mehr über die Kamera oder die Cam4Home Plus-App erfahren möchten, lesen Sie bitte Kapitel 6.
15

Deutsch
3. Einlernen der Kamera
Schritt1: Laden Sie die„Cam4Home Plus“ App aus dem App
Smartphone herunter und installieren Sie diese.
Schritt2: Verbinden Sie Ihr Smartphone mit Ihrem WLAN
HINWEIS: Wenn Sie einen Dualband-Router verwenden, stellen Sie sicher, dass Ihr Smartphone mit einem 2,4-GHz-WLAN-Netzwerk und nicht mit einem 5-GHz-WLAN-Netzwerk verbunden ist. Um mehr darüber zu erfahren, lesen Sie bitte die Anleitung Ihres Routers.
Schritt3: Öffnen Sie die„Cam4Home Plus“ App und klicken Sie auf die Schaltfläche “Registrieren”und erstellen Sie ein Benutzerkonto.
Schritt4: Um eine neue Kamera hinzuzufügen, tippen Sie auf die Schaltfläche„+“ auf dem Bildschirm und scannen Sie den QR-Code der Kamera. Folgen Sie
dann den Anweisungen in der App, um die Kamera-Registrierung abzuschließen.
HINWEIS: Wenn Sie während der Registrierung auf ein Problem stoßen, lesen Sie Kapitel 6.
4. Cam4Home Plus App Funktionen
Kamera-Instrumententafel:
Wählen Sie nach dem Setup Ihre Kamera im“Geräte Menü”aus. Sie gelangen nun zur Instrumententafel der Kamera, hier sehen Sie das Live-Stream-Video der Kamera und können nun auf verschiedene Funktionen
zugreifen , z. B. Schnappschüsse |
. |
||
Starten Sie eine |
Videoaufnahme, |
||
sprechen oder |
hören Sie. Oder |
||
wechseln Sie in den Vollbildmodus |
. |
||
Tippen Sie auf das Symbol |
, um das PT- |
||
Menü zu öffnen und die Kamera nach oben und unten sowie von rechts nach links zu bewegen.
Tippen Sie hier , um die StreamVideoqualität zwischen Standard Auflösung (SD) und HD Auflösung (HD) zu ändern.
16

Kameraeinstellungen:
Um auf die Kameraeinstellungen zuzugreifen, gehen Sie zur Kamera-Instumententafel und tippen Sie auf das Einstellungssymbol  oben rechts.
Teilen Sie Ihre Kamera mit anderen:
Eine Kamera kann für das Live-Streaming mit anderen Cam4Home Plus-Konten geteilt werden. Um die Kameraeinstellungen zu ändern, verwenden Sie das Konto, unter dem die Kamera registriert wurde. Gehen Sie auf dem Konto, auf dem die Kamera registriert wurde, zur Kamera-Instrumententafel und tippen Sie auf das Symbol . Tippen Sie auf “Gerät teilen”-> “Nutzer zu geteilten Nutzer hinzufügen”. Geben Sie die E-Mail- Adresse des Cam4Home Plus-Kontos ein, mit dem Sie die Kamera teilen möchten, und tippen Sie auf die Schaltfläche“Speichern”oben rechts auf dem Bildschirm.
Um die Freigabe der Kamera für einen Benutzer zu beenden, gehen Sie zu KameraInstrumententafel -> Einstellungen -> Gerät teilen und tippen Sie auf“Abbrechen”.
Wiedergabe von Videoaufnahmen
Tippen Sie in der Kamera-Instrumententafel auf“Alarmaufnahmenverlauf”und wählen Sie “Cloud” oder “SD-Karten-Speicher”. Tippen Sie auf das Datum und wählen Sie einen
Tag im Kalender aus. Verwenden Sie die Zeitleiste, um Videoaufnahmen vom ausgewählten Tag anzusehen. Videoaufnahmen sind orange markiert.
Push-Benachrichtigungen
Tippen Sie im“Geräte Menü”auf das Symbol und wählen Sie“Alarmbenachrichtigung” . Tippen Sie dann auf die Schaltfläche“Alarmbenachrichtigung”, um die PushBenachrichtigungen zu aktivieren / deaktivieren.
Wichtig: Stellen Sie sicher, dass Sie der App die Berechtigung erteilen, PopupBenachrichtigungen auf dem Startbildschirm anzuzeigen.
Bewegungserkennung
Um die Bewegungserkennung zu aktivieren / deaktivieren, gehen Sie zu: KameraInstrumententafel -> Einstellungssymbol -> Bewegungserkennungs Einstellungen -> Bewegungserkennung. Hinweis: Die Bewegungserkennung ist standardmäßig aktiviert.
HINWEIS: Um Push-Benachrichtigungen zu erhalten, muss“Bewegungserkennung” aktiviert sein.
Deutsch
17
 Loading...