


TravelPilot 200
Table of contents
 Loading...
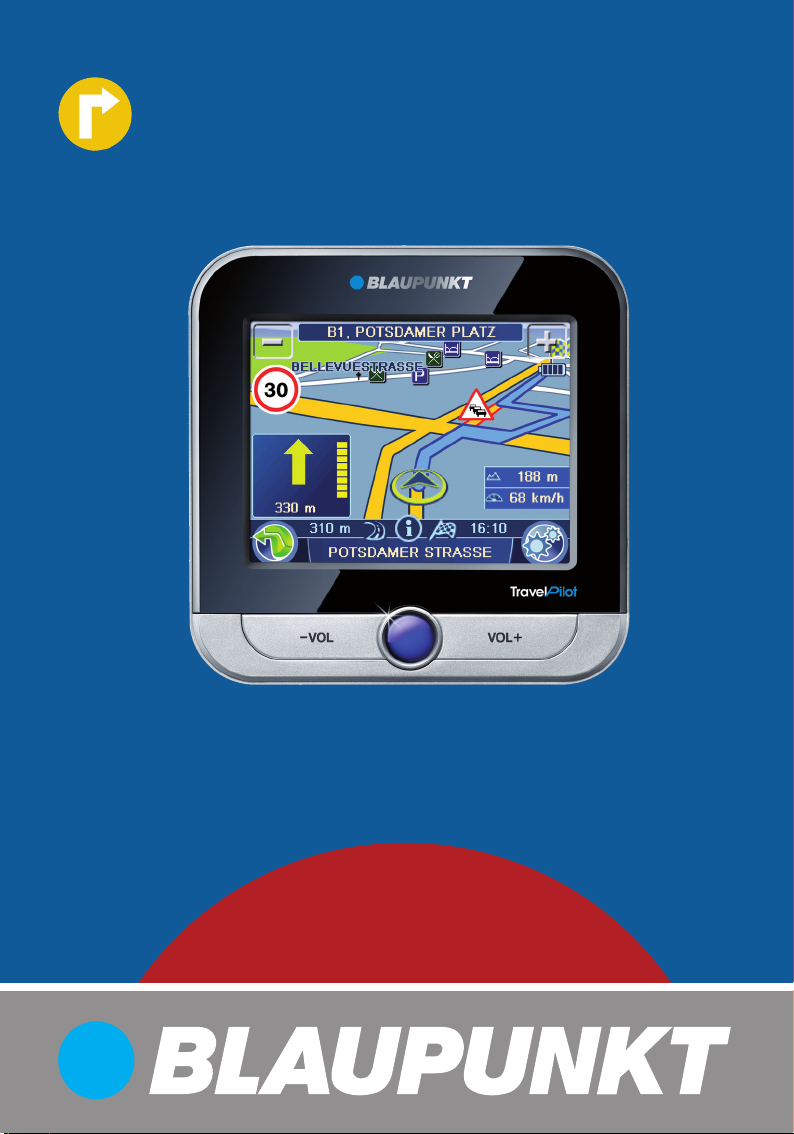
Mobile Navigation
TravelPilot 200
www.blaupunkt.com
Operating and installation instructions
(Long version)
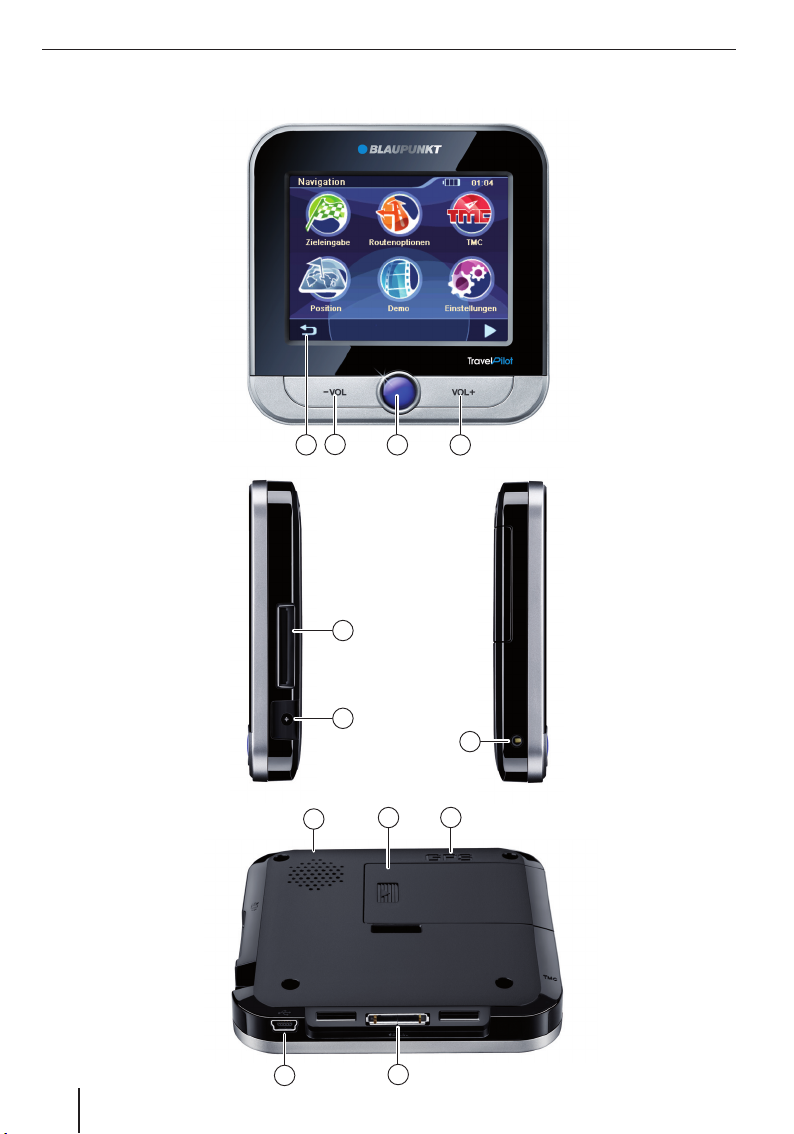
Device overview
Device overview
2
1
10
3
6
7
9
4
5
8
11
12
2

1 Display (touchscreen): Simple and intuitive
operation by touching the buttons on the display.
2 VOL -: Decreases the volume
3 On/Off switch:
Long press (longer than 3 seconds):
•
Switches the device on or off.
Short press: Opens the main menu.
•
4 VOL +: Increases the volume
5 Socket for additional external TMC antenna
(internal TMC antenna is present)
6 Memory card slot
7 Socket for power supply (battery charger or
charger cable for the cigarette lighter)
8 Socket for additional external GPS antenna
(internal GPS antenna is present)
9 Battery compartment cover
: Light sensor for automatic switching of day
and night display (top side)
; USB port for data transfer
< Serial port
(for future expansions)
Device overview
3

Contents
Device overview ..................................2
Safety notes ........................................6
Warning symbols used ...........................6
Use as directed .....................................6
Road safety ..........................................6
General safety notes ..............................6
Notes about handling the CD/DVD ...........7
Cleaning notes ......................................7
Disposal notes ......................................7
First use ..............................................7
Scope of delivery ..................................7
Protective screen fi lm ............................7
Charging the battery ..............................7
Switching on the device..........................8
Setting the language ..............................8
Installation in the vehicle .....................8
Attaching the suction cup holder .............8
Attaching the mounting cup ....................8
Inserting the device in the mounting cup ...9
Removing the device ..............................9
Removing the suction cup holder .............9
Switching on/off ..................................9
Switch-on ............................................9
Switch-off ............................................9
Reset ...................................................9
Operating the menus .........................10
Main menu .........................................10
Buttons ..............................................10
Keyboard ...........................................10
Intelligent auto-completion function ....10
Error-tolerant entry ..........................10
Lists ..................................................10
Information about GPS .......................11
GPS mode of operation ........................11
Displaying GPS info .............................11
Performing basic settings ..................12
Setting the time zone ..........................12
Entering the home address ...................12
Activating the PIN query .......................12
Confi guring the PIN query ..................13
Locking/unlocking the device .............13
Changing the PIN .............................13
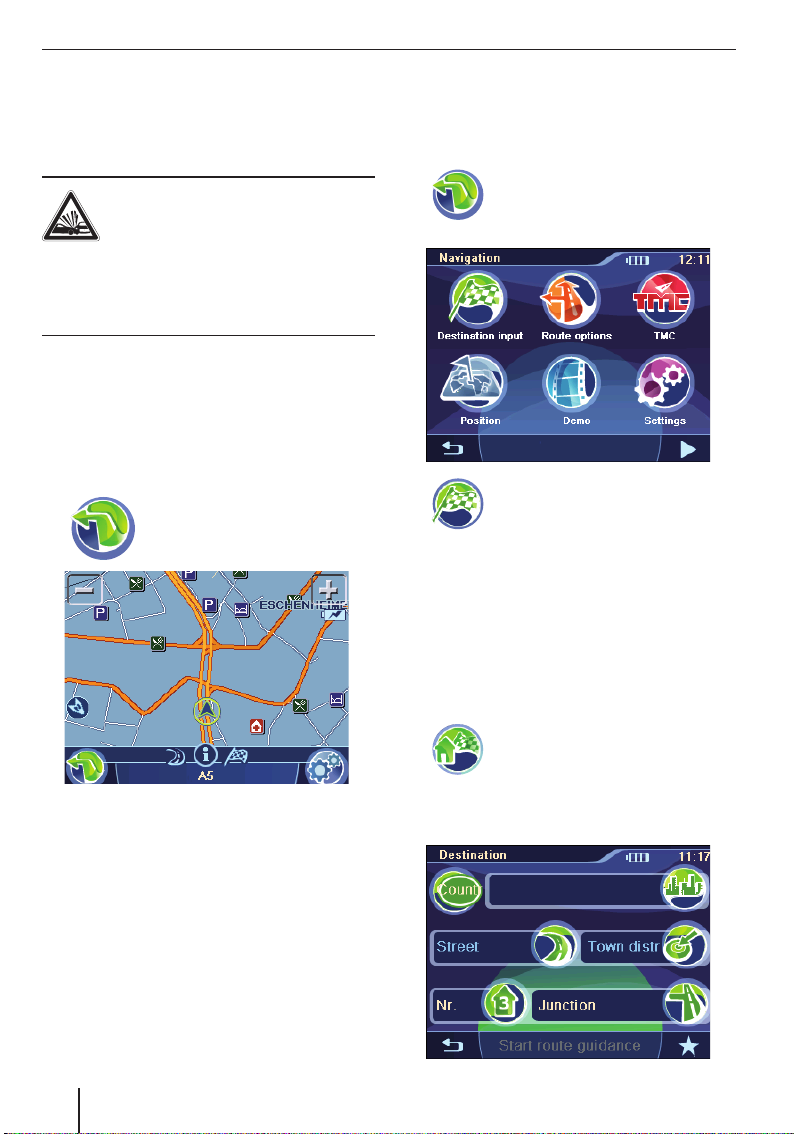
Navigation ........................................14
Starting the navigation .........................14
Destination entry...............................14
Entering an address .............................14
Using the home address as destination ...15
Copying a destination from
the favourites......................................15
Copying one of the last destinations .......15
Entering coordinates ............................15
Copying a destination from the map .......15
Points of interest ...............................16
User-POIs ...........................................16
Selecting a point of interest at
a specifi c location................................16
Selecting a point of interest nearby,
in the destination area or at home ..........16
Selecting a point of interest on the map ..16
Selecting a supraregional
point of interest ..................................17
Tour planning ....................................17
Entering the tour .................................17
Editing a tour ......................................17
Loading a tour from the favourites ..........18
Starting route guidance from here ..........18
Calculating the route from here ..............18
Additional functions
after the tour planning ..........................18
Exiting the tour planning .......................18
Additional functions
after the destination entry .................19
4

Contents
Demo ................................................19
Starting the demo ...............................19
Demo settings .....................................19
Storing the position ...........................20
Managing destinations .......................20
Saving destinations .............................20
Storing a destination entered .............20
Saving one of the last destinations ......20
Renaming a destination (favourites only) ..21
Deleting a destination ..........................21
Delete all destinations ..........................21
Calculating a route .............................22
Starting the route calculation ................22
Additional functions
after the route calculation .....................22
Specifying route options ....................22
Route guidance..................................23
Start route guidance ............................23
Reaching the place of destination ..........24
Quitting the route guidance ...................24
Offroad route guidance ........................24
Disturbed GPS reception ......................24
Working with the map ........................25
Showing a Map ...................................25
Moving and scaling the map ..................25
Touching the map ................................25
Buttons ..............................................25
Performing map settings ......................25
Voice output during route guidance.....26
Map display
during destination guidance ...............27
Navigation tools ..................................27
Route information ...............................27
Speed limit .........................................27
Additional functions
during the route guidance ..................28
Entering a blocking ..............................28
Cancelling route guidance .....................28
Skipping the next destination ................28
Display information
about the destination ...........................28
Display route list .................................29
TMC function .....................................29
Establishing TMC reception ..................29
Connecting the TMC antenna .............29
Searching for TMC stations ................29
Showing traffi c reports ........................29
Switch on automatic traffi c jam detours ..30
Traffi c obstructions on the map display ...30
Data transfer .....................................30
Copying data to the memory card ..........30
Using road maps from memory card .......31
Settings ............................................31
Performing settings for the navigation ....31
Home address .................................31
Continuing the tour automatically .......32
Selecting a dataset ...........................32
POI note .........................................32
Voice instructions.............................32
Units ..............................................32
Performing device settings ...................32
Display ...........................................32
Button sound ...................................33
Language ........................................33
Time...............................................33
Product information .........................33
Theft protection ...............................33
Factory settings ...............................33
Calibrating the touchscreen ...............33
Software ...........................................34
Reinstalling navigation software ............34
Updating the navigation software ...........34
Service .............................................34
Warranty ...........................................34
Technical data ...................................34
Troubleshooting table ........................35
FCC Information (USA) ......................37
5

Safety notes
Safety notes
For your personal benefi t, carefully read the following safety notes before operating the device
for the fi rst time.
Warning symbols used
In the chapters, warning symbols refer to important notes for you and the device.
DANGER!
Warns about injuries or life-threatening
danger
DANGER!
Warns about accidents
Use as directed
The device is designed for mobile use in vehicles.
Special information about the navigation of trucks,
busses and campers, such as altitude and width
limitations or maximum permissible road load, is
not included in the navigation data!
Navigation off the roads (offroad route guidance)
is not possible with this navigation device.
Road safety
The navigation device does not release you from
your responsibility as a driver for correct and prudent behaviour in traffi c. Always observe the applicable traffi c rules.
Use your device in such a way that you can always
safely control your vehicle. If in doubt, stop and
operate the device while the vehicle is standing.
General safety notes
Observe the following notes to protect the device
against defects and yourself against injuries and
life-threatening dangers from an ignition or explosion:
Protect the device against moisture since it
•
is not waterproof and not splashproof.
Do not modify or open the device. Other-
•
wise, it could be damaged and then ignite or
explode. Or acidic, fl ammable liquid could
run out of the battery.
Do not expose the device to very low (below
•
-20 °C) and very high temperatures (above
60 °C), e.g. close to fi re, heating devices or in
a parked car with direct exposure to the sun.
Moisture could form inside the device or the
device could overheat. The device or battery
could deform and even ignite or explode. Or
acidic, fl ammable liquid could run out of the
battery.
If battery liquid comes into contact with
•
your eyes or skin, immediately fl ush with water and consult a doctor.
Remove the device from the power supply
•
when you park your vehicle since it contin-
ues to use battery power and could deplete
the vehicle battery. Do not unplug the connector of the power supply by pulling on the
wire. The wire could be damaged and cause
electrical shock.
6
Safety notes | Before starting
Notes about handling the CD/DVD
The device is supplied with a CD/DVD that contains navigation software and map material. To
protect the CD/DVD against dirt and damage, observe the following notes:
Store the CD/DVD in its case. Hold the
CD/DVD only at the edge.
Do not expose the CD/DVD and the case
to direct sunlight.
Use only a clean CD/DVD. If necessary,
clean the CD/DVD with a soft, lint-free
cloth from inside to outside.
Never clean the CD/DVD in a circular
motion.
Do not use any solvents, including on the
printed side of the CD/DVD.
Cleaning notes
Clean the display with a dry, soft cloth.
Water and other liquids could damage the
display.
Do not use strong detergents for cleaning
the housing. Use only a moistened, lintfree cloth.
Disposal notes
Use the return and collection systems available to dispose of the old device.
Do not discard any batteries in the household trash; instead, return them to the corresponding collection sites.
First use
Scope of delivery
The scope of delivery contains the following components:
Navigation device
•
Suction cup bracket
•
Charger cable for cigarette lighter
•
TMC line antenna
•
Operating instructions (short version)
•
Backup DVD
•
Note:
We recommend the use of original Blaupunkt
accessories (www.blaupunkt.com).
Protective screen fi lm
Prior to the initial use, carefully remove the
protective fi lm from the display.
Charging the battery
Upon purchasing the navigation device, the
battery could be discharged. Please charge the
battery before using the device.
CAUTION!
Unapproved chargers could damage batteries
Use only the original chargers from Blaupunkt for
operating and charging to correctly charge the
battery and protect it against overvoltage.
Depending on the type of use, you can operate the
device up to 3 hours with the built-in battery. The
charging time is 5 to 6 hours. The charge state indicator is located on the top display bar:
•
•
•
The device is supplied by an external
power source.
The device is supplied by its internal
battery. The charge state of the battery
is suffi cient.
The device is supplied by its internal
battery. The charge state of the battery
is low.
7
Before starting | Installation in the vehicle
A
If the charge state of the battery becomes weak,
the navigation device warns you about it.
Connect the battery charger or the charger
쏅
cable for the cigarette lighter to the charging
socket.
Note:
The battery is equipped with a protection
against overheating from excessive current
fl ow. The protection prevents charging the
battery starting at an ambient temperature
above 45 °C.
Switching on the device
A
Press and hold the On/Off switch for longer
쏅
than 3 seconds.
Setting the language
The device uses English as the standard language
for the menus and voice output. When you switch
on the device for the fi rst time, a dialogue menu
appears in which you can select another language:
쏅
Select your preferred language in the dialogue menu.
Please follow the instructions.
쏅
The language is loaded and the main menu is
displayed.
Installation in the vehicle
For temporary installation in a vehicle, the navigation device features a holder to attach it to the
windshield.
DANGER!
The installation at an unsuitable
location can cause accidents
Install the navigation device so that it does not
block your view and does not distract from the
traffi c.
Do not install the device in the airbag deployment
area.
Ensure that the device does not pose a threat to
passengers in the vehicle in case of emergency
braking.
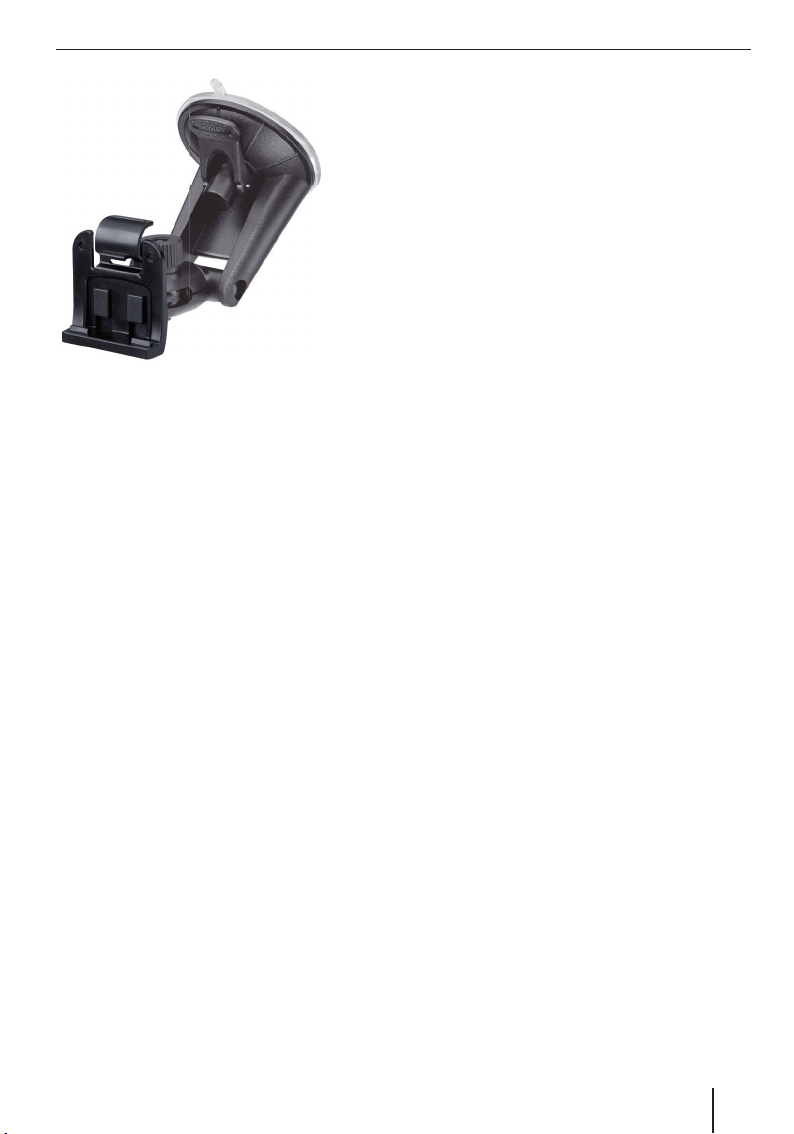
Attaching the suction cup holder
Locate a suitable place inside the vehicle for
쏅
the installation.
To ensure a perfect hold, the glass must be
free of dust and oil. If necessary, clean the
glass using a lens cleaning tissue.
Press the suction cup of the holder against
쏅
the windshield.
Push the lever on the support towards the
쏅
glass.
Attaching the mounting cup
The suction cup holder features two mounts for
the mounting cup.
Push the mounting cup onto the mount until
쏅
it engages.
8
Inserting the device in the mounting
cup
The device features 2 recesses on the underside
and one recess on the rear side for the mounting
cup.
Place the device onto mounting cup with the
쏅
underside fi rst and push it to the back.
The clamping holder of the mounting cup
must engage in the rear side of the housing
with a click.
쏅
Align the bracket.
Removing the device
Push the clamping holder down.
쏅
The device disengages from the bracket.
Remove the device.
쏅
Installation in the vehicle | Switching on/off
Switching on/off
The On/Off switch is used to switch the device on
and off and to open the main menu.
Switch-on
Press and hold the On/Off switch for longer
쏅
than 3 seconds.
Switch-off
Press and hold the On/Off switch for longer
쏅
than 3 seconds.
The device is fi rst placed in idle state and
remains ready for operation. All functions will
be completely switched off after 20 minutes.
Note:
The device continues to use a small amount of
energy even if it is switched off. If you use the
device again after an extended period of time,
it may be necessary to recharge the battery.
Reset
If the device does not work properly, a simple
reset may help.
Press and hold the On/Off switch for longer
쏅
than 14 seconds.
The device is switched off and restarted.
Removing the suction cup holder
If you change vehicles, you can simply remove the
support.
Push the lever on the support away from the
쏅
glass.
Carefully loosen the suction cup at the edge
쏅
from the glass so that air can enter between
suction cup and glass.
쏅
Carefully pull the suction cup off of the glass.
9
Operating the menus
Operating the menus
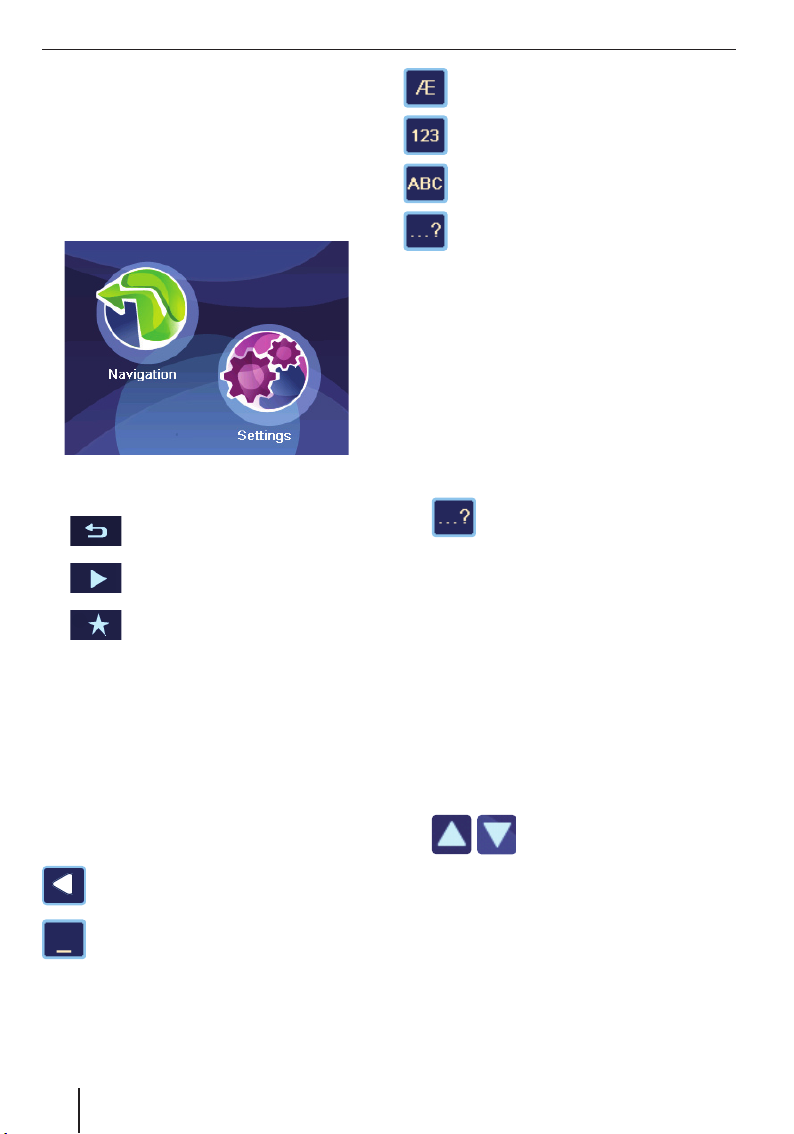
Main menu
The main menu provides access to the navigation
and the settings.
쏅
Briefl y press the On/Off switch to reach the
main menu from any other menu.
Buttons
•
•
•
•
Keyboard
If text entries are required (e.g. for the destination
entry), a virtual keyboard appears on the display.
You can perform all entries using your fi nger. Only
capital letters can be entered.
These buttons are located on the keyboard:
Touch this button to return to the
previous menu.
Touch this button to change to the
next page in the menu.
Touch this button to obtain access
to additional functions.
OK: Touch this button to confi rm an entry or
a setting.
Call up alternate character keyboard
(incl. special characters, umlauts)
Call up numeric keypad, e.g. to enter the
house number
Call up character keyboard
Call up error-tolerant entry
Intelligent auto-completion function
During the entry, the device auto-completes characters as far as possible and offers only those
characters on the keyboard that are logically possible.
Error-tolerant entry
The error-tolerant entry helps if you do not know
the exact spelling of a city. After your entry, a list
with city names spelled in a similar way appears.
쏅
쏅
Touch the symbol in the text entry.
The error-tolerant entry is displayed.
Enter a city name and touch OK.
A list with alternate city names is displayed.
Lists
You can frequently display lists form which you can
select an entry (e.g. a destination). For example, if
you do not enter the complete name of a location,
a list with possible results is displayed.
To display a list with additional matching entries,
touch the List button. Longer lists require a longer
loading time.
쏅
Touch one of the buttons to
scroll through the list.
Delete last character
Entering blank spaces
10
Touch an entry directly to accept it.
쏅
Touch the Expand button to display abbrevi-
쏅
ated entries in their entirety.
Information about GPS
The GPS (Global Positioning System) allows
worldwide navigation and locating via satellites to
determine a position.
GPS mode of operation
The navigation device measures the current position of your vehicle via GPS and compares these
coordinates with its map material. The map material contains the geographic coordinates of points
of interest, streets and cities that you can view on
the display of the navigation device. The device
uses this information to calculate the route to the
destination you entered.
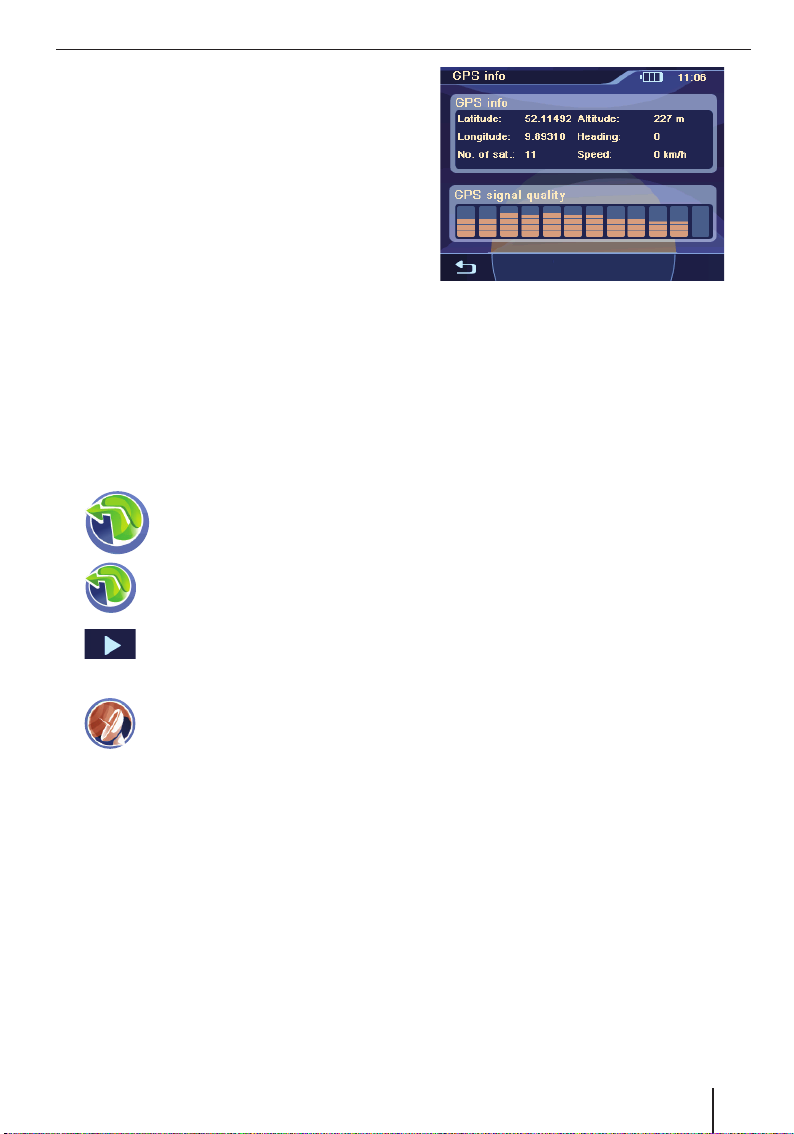
Displaying GPS info
Information about the GPS reception of the device, your current position and your speed can be
found in the GPS Info menu.
쏅
쏅
쏅
쏅
Touch the symbol in the main
menu.
The map is displayed.
Touch the symbol.
The Navigation menu is displayed.
Touch the button.
The display shows the second page
of the menu.
Touch the symbol.
The GPS Info menu is displayed.
Information about GPS
This menu contains this information:
Latitude/Longitude: Current position in
–
longitude and latitude
Altitude: Current height above mean sea
–
level
Speed: Indicates the current speed of the
–
vehicle
Heading: Driving direction (reliable infor-
–
mation after approx. 5 km/h)
Satellites: Number of GPS satellites
–
received
GPS Signal Quality: Signal strength of
–
the visible GPS satellites. The navigation
requires signals from at least 3 satellites.
Note:
External infl uences can interfere with the view
to the sky and, therefore, the GPS reception
of the navigation device. For this purpose,
please read the chapter "Route guidance",
"Disturbed GPS reception".
11
Performing basic settings
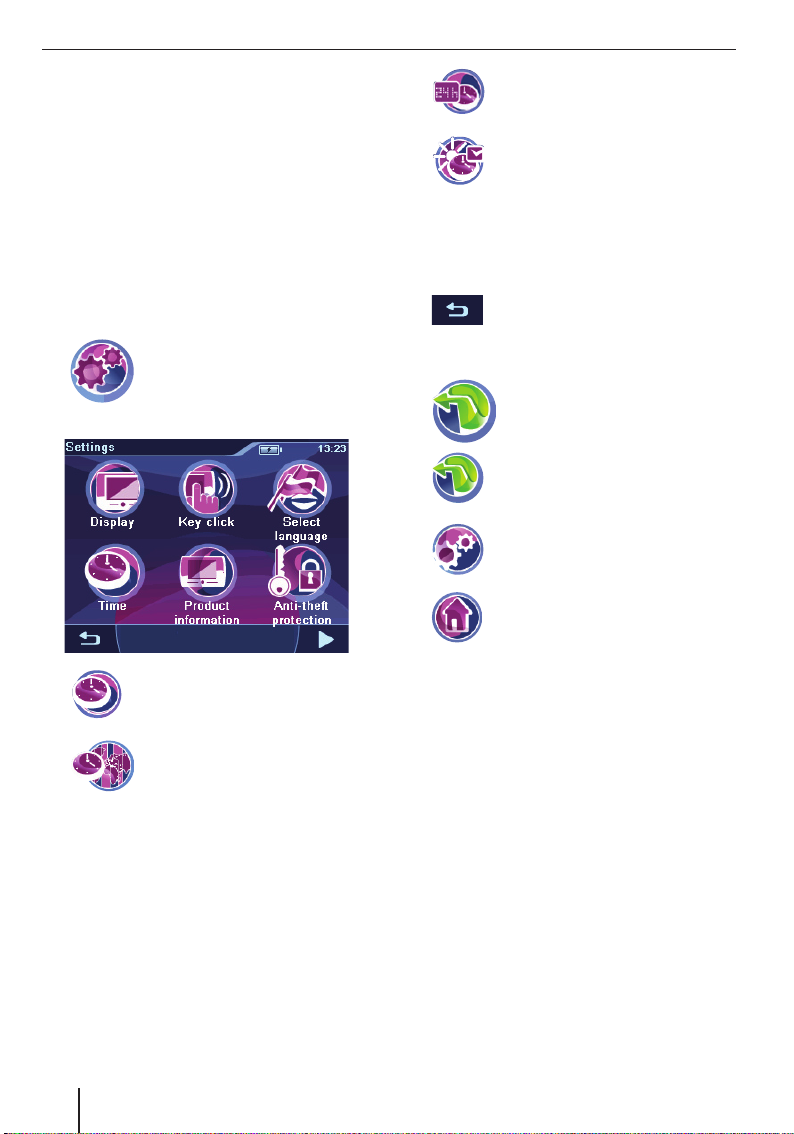
Performing basic settings
Before starting a route guidance, perform these
basic settings:
Set the time zone of your position so that the
•
correct arrival times are displayed during the
navigation.
You should enter your home address to quick-
•
ly navigate home from any location.
Activate the PIN query to lock out unauthor-
•
ised persons from using the device.
Setting the time zone
쏅
쏅
쏅
Touch the time zone in the list that applies to
쏅
your location.
Note:
The selection is facilitated by the display
of the capitols in the respective time zone.
"GMT" stands for Greenwich Mean Time, the
mean solar time at the Greenwich meridian
without considering daylight savings time.
쏅
Touch the OK button.
Touch the symbol in the main
menu.
The Settings menu is displayed.
Touch the symbol.
The Time menu is displayed.
Touch the symbol.
A list with available time zones is
displayed.
쏅
쏅
Note:
If the time is changed at your position or if
you drive into a different time zone, you must
adjust the settings.
쏅
Touch the symbol to toggle between
24-hour and 12-hour display.
Touch the symbol to activate (check
mark) or deactivate (no check mark)
daylight savings time.
Touch the button to exit the menu
again.
Entering the home address
쏅
쏅
쏅
쏅
Enter the address as described in the chapter
쏅
"Destination entry", "Entering an address".
Touch the OK button.
쏅
The home address is saved.
Touch the symbol in the main
menu.
The map is displayed.
Touch the symbol.
The Navigation menu is displayed.
Touch the symbol.
The Navigation Settings menu is dis-
played.
Touch the symbol.
The Destination Input menu is dis-
played.
Activating the PIN query
The PIN query allows you to lock out unauthorised
persons from using the device. Hence, every time
you switch on the device, the PIN (Personal Identity Code) you confi gured for yourself is requested.
The PIN can be changed at any time. If you should
forget the PIN, you can unblock the device again
with the PUK (Personal Unblocking Key) which
you defi ne yourself. The PUK cannot be changed.
12

Performing basic settings
Note:
During the PIN entry, you have only 3 attempts
to enter the correct PIN or subsequently 3 attempts to enter the correct PUK. If you enter
an incorrect PUK for the 3rd time, your device
is permanently blocked and the device must
be returned via the Blaupunkt service.
Confi guring the PIN query
쏅
Touch the symbol in the main
menu.
The Settings menu is displayed.
쏅
Touch the symbol.
The Anti Theft Protection menu is
displayed.
Touch the Protection Setup button.
쏅
Touch the OK button.
쏅
The PIN query is displayed.
Follow the instructions and enter a self-se-
쏅
lected PIN.
Touch the OK button.
쏅
The initial confi guration of the PIN is followed by a
request to enter a PUK. The PUK is used to unlock
the device if you should forget the PIN.
Follow the instructions and enter a self-se-
쏅
lected PUK.
쏅
Touch the OK button.
To secure your PUK:
Register under http://puk.blaupunkt.com
쏅
and follow the instructions.
Locking/unlocking the device
Prerequisite:
You confi gured the PIN query.
•
In the Anti Theft Protection menu, touch the
쏅
Protection Setup button to lock the device
(check mark) or to unlock it (no check mark).
The PIN query is displayed.
Enter your PIN.
쏅
Touch the OK button.
쏅
Changing the PIN
In the Anti Theft Protection menu, touch
쏅
the Change PIN Code button.
The PIN query is displayed.
Follow the instructions and enter a new self-
쏅
selected PIN.
Touch the OK button.
쏅
13
Navigation | Destination entry
Navigation
The navigation device does not release you from
your responsibility as a driver for correct and prudent behaviour in traffi c.
DANGER!
Distraction from the traffi c can cause
accidents
Do not operate the device while driving.
View the display only during safe traffi c situa-
tions.
Notes:
Routes are best planned before starting
•
your trip.
•
Perform the basic settings fi rst.
Starting the navigation
쏅
Touch the symbol in the main
menu.
The map is displayed.
Destination entry
In the destination entry, you can enter an address,
select a destination from memory, or select a
point of interest.
쏅
쏅
Touch the symbol.
The Navigation menu is displayed.
Touch the symbol in the Navigation
menu.
The Destination Input menu is displayed.
Note:
You can only select places of destination
(countries, cities, streets, house numbers,
points of interest) that are contained in the
map material.
From the map, you can directly change to the
navigation menu or to the map settings (Ch.
"Working with the map").
14
Entering an address
쏅
쏅
Touch the symbol.
For the initial destination entry, a list
with countries is displayed.
Select your destination country.
The Destination menu is displayed.
Destination entry
Note:
You do not have to repeat entering the country,
city and street information every time. Only if
your destination is at a different location than
the previous one will you have to re-enter the
destination address.
쏅
쏅
쏅
- or -
쏅
쏅
- or -
쏅
Touch the Start Route Guidance button to
쏅
start the route guidance.
The route is calculated and the route guidance
started.
Note:
After the destination entry, you can start the
route guidance or store the destination. For
further details, read the chapter "Additional
functions after the destination entry".
Touch the symbol to select a different country.
Touch the symbol and enter the city
or postal code.
Touch the symbol and enter the part
of town.
Touch the symbol and enter the
street.
Touch the symbol and enter the
house number.
Touch the symbol and enter the
street that intersects the previously
entered street.
Using the home address as
destination
If your home address is saved, you can quickly
navigate home from any location. The stored address can be viewed in the settings and changed,
if necessary (Ch. "Settings").
쏅
Touch the symbol in the Navigation
menu.
Copying a destination from the
favourites
쏅
쏅
Touch the desired destination.
The address of the destination is displayed.
Touch the Start Route Guidance button.
쏅
Touch the symbol.
The Favourites menu is displayed.
Copying one of the last destinations
쏅
쏅
쏅
Touch the symbol.
The Last destinations menu is dis-
played.
Touch the desired destination.
The address of the destination is displayed.
Touch the Start Route Guidance button.
Entering coordinates
쏅
쏅
쏅
쏅
쏅
쏅
Touch the button.
The display shows the second page
of the menu.
Touch the symbol.
The Destination Coordinates menu
displays.
Touch the symbol and enter the latitude.
Touch the symbol and enter the longitude.
Always select the cardinal point fi rst and
then enter the values with the corresponding
units.
Touch the OK button.
Touch the Start Route Guidance button.
Copying a destination from the map
쏅
쏅
Touch the button.
The display shows the second page
of the menu.
Touch the symbol.
The map is displayed.
15
Destination entry | Points of interest
쏅
Move and scale the map as described in the
chapter "Working with the map".
쏅
Touch a location of your choice.
The city is selected and its name appears
in the lower display bar.
쏅
Touch the OK button.
The coordinates to the selected location are
displayed.
쏅
Touch the Start Route Guidance button.
Points of interest
Points of interest (POI) are specifi c locations,
such as parking facilities and petrol stations, that
are stored in the map material.
쏅
User-POIs
Besides petrol stations & companies, the points of
interest also provide the User-POIs category. This
allows you to expand the navigation using individual points of interest, e.g. to add the addresses of
friends or your favourite restaurant.
The enclosed CD/DVD contains an installation
programme with instructions to create your own
POI lists at computer or to load existing POI lists.
Selecting a point of interest at a
specifi c location
쏅
쏅
쏅
Touch the OK button.
쏅
The Town District menu is displayed.
For large cities, enter the part of the city.
쏅
Touch the symbol in the Destination
Input menu.
The Points of Interest menu is dis-
played.
In the Points Of Interest menu, touch
the symbol.
The Points Of Interest In Town menu is
displayed.
Touch the symbol to select a different country.
Touch the symbol to enter a different
city.
Touch one of the symbols to select a point of
쏅
interest category.
The keyboard is displayed.
Enter the name of the point of interest.
쏅
- or Touch the List button.
쏅
A result list is displayed.
Touch an entry of your choice.
쏅
The address of the destination is displayed.
Touch the Start Route Guidance button.
쏅
Selecting a point of interest nearby,
in the destination area or at home
쏅
- or -
쏅
쏅
쏅
Select the point of interest category.
쏅
Select the point of interest.
쏅
Touch the Start Route Guidance button.
In the Points Of Interest menu, touch
the symbol to select a point of interest nearby.
In the Points Of Interest menu, touch
the symbol to select a point of interest in the destination area.
Note:
The destination to which you started
a route guidance last is taken as the
destination area.
- or In the Points Of Interest menu, touch
the symbol to select a point of interest at the home address.
Selecting a point of interest on the
map
쏅
Move and scale the map as described in the
쏅
chapter "Working with the map".
Touch a location of your choice.
쏅
Touch the OK button.
쏅
In the Points Of Interest menu, touch
the symbol.
The map is displayed.
The city is selected and its name appears
in the lower display bar.
16
Loading...