

Page 1

1 Introducing the Apple Remote Access
MultiPort Server
This chapter provides a basic introduction to the Apple Remote Access
MultiPort Server, including all hardware, software, and network requirements.
This chapter also describes the role of a remote access server on your network.
Page 2

About the Remote Access MultiPort Server and Remote Access Manager
The Remote Access MultiPort Server is a product that turns a computer
running the Mac OS into a remote access server supporting up to 16 lines for
remote connection by users. Remote Access Manager is the application for
configuring ports and controlling user access to the server.
Remote Access allows users to use network services, such as f ile sharing, electronic
mail, and print servers, that are available on an AppleTalk local area network.
Users can print on a remote printer, send data to or retrie v e data from file
servers, or access remote computers and network-based host systems. In
practical terms, users can access their offices from home or on the road.
The remote access server administrator uses Remote Access Manager software
to set up and administer the server. These tasks include the following:
m setting server preferences
m registering users
m configuring ports for dial-in and callback access
m establishing server security
Note: There are a number of ways to establish server security. Refer to
Chapter 3 for more information about the types of security available for a
Remote Access MultiPort Server.
2 Chapter 1 / Introducing the Apple Remote Access MultiPort Server
Page 3
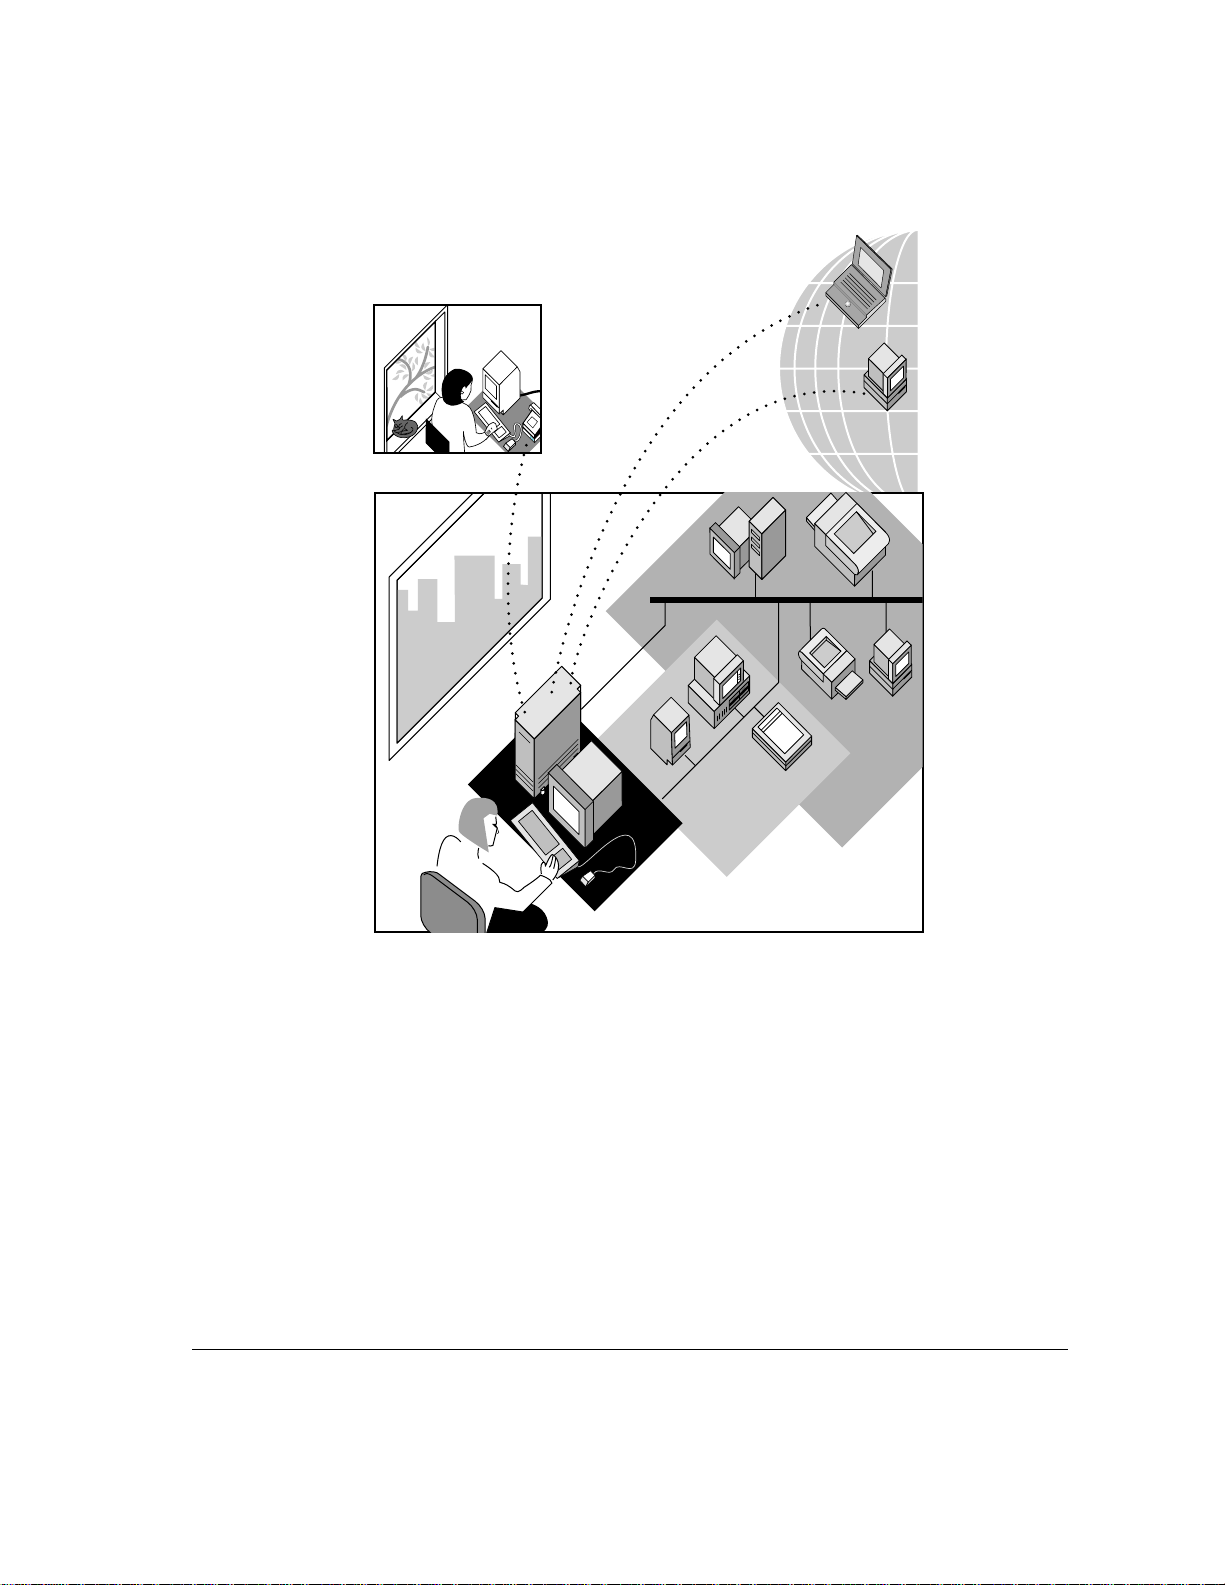
Users can access their offices
from home or on the road.
The administrator uses Remote Access Manager software to set up
and administer the server.
About the Remote Access MultiPort Server and Remote Access Manager 3
Page 4

Requirements for using the Remote Access MultiPort Server
The following sections list the minimum hardware, software, and network
requirements for using the server. You will need additional RAM to run
other applications or services. Also, the more powerful the computer, the
better the performance.
Hardware requirements
The following are the minimum hardware requirements for setting up and
running a Remote Access MultiPort Server:
m a PowerPC™-based computer with one or more PCI slots, running the
Mac OS
m 8 megabytes (MB) of RAM
m a hard disk
n a CD-ROM drive
m a Smart Serial 6 expansion card and a Smart Serial 6 cable, included with
your Remote Access MultiPort Server
m one or more high-speed asynchronous serial devices, such as a modem or an
ISDN adapter
m a telephone line for each device
Software requirements
Your Remote Access MultiPort Server CD-ROM disc contains all the software
you need to run the Remote Access MultiPort Server and Remote Access
Manager application, including the software for the Smart Serial 6 PCI card.
Additionally, you must be using system software version 7.5.2 or later on your
server computer. If your server is an Apple Network Server, a Power
Macintosh 7500, 8500, or 9500, or equivalent, you must use Macintosh system
software 7.5.3 or later.
IMPORTANT
installing the Remote Access Server. If you don’t have this software, contact
your Apple-authorized reseller or representative before proceeding.
4 Chapter 1 / Introducing the Apple Remote Access MultiPort Server
Install the correct system software on the server computer before
Page 5

Network requirements
Connect your Remote Access MultiPort Server to an AppleTalk network using
the same type of networking software and cable as used with other devices on
your network. Any AppleTalk network is capable of supporting a Remote
Access MultiPort Server. The most common network choices are LocalTalk,
Ethernet, and token ring.
IMPORTANT
Server to an existing network. If not, consult the documentation that came with
the network materials you plan to use before continuing with this guide.
This guide assumes that you are adding the Remote Access MultiPort
Client software requirements
Users can access the Remote Access MultiPort Server using any version of the
Remote Access Client software, but upgrading to the current version is
recommended. Remote Access Client version 2.1 is included on the MultiPort
Server installation CD-ROM disc, and one copy of the client user manual is
included in the MultiPort Server package. For information on volume
licensing, contact your Apple-authorized reseller or representative. Once you
have the correct licensing, users can upgrade over the network from the CDROM disc, or the administrator can use Disk Copy to make an installation
floppy disk from the image file on the disc.
Using the Remote Access MultiPort Server
with other networking software
The MultiPort Server is compatible with many but not all additional
networking programs.
Apple Internet Router
The Apple Remote Access MultiPort Server and the Apple Internet Router
version 3.0.1 or later can run concurrently on the same computer. If you have
Apple Internet Router 3.0 installed, you need to upgrade to v. 3.0.1 before
installing the MultiPort Server.
Requirements for using the Remote Access MultiPort Server 5
Page 6

SNMP AppleTalk Transport v.1.0 is not compatible with the MultiPort Server.
If you have SNMP AppleTalk Transport v.1.0 installed, remove it. If you
intend to use SNMP network management with either the Internet Router or
the MultiPort Server, install SNMP AppleTalk Transport v. 1.1 after installing
the Internet Router and before installing the MultiPort Server.
AppleShare
The Apple Remote Access MultiPort Server and AppleShare v. 4.0.1 or later
can run concurrently on the same Mac OS computer. They will share the same
Users & Groups Data File.
Macintosh file sharing
The Apple Remote Access MultiPort Server cannot run concurrently with
Macintosh file sharing. If you install the MultiPort Server on a Mac OS
computer on which file sharing is enabled, you will be asked to convert the
Users & Groups Data File. After conversion, only the MultiPort Server and
AppleShare 4.0.1 or later can access the Users & Groups Data File.
6 Chapter 1 / Introducing the Apple Remote Access MultiPort Server
Page 7

2 Getting Started
This chapter provides step-by-step instructions for getting your Apple Remote
Access MultiPort Server ready to work, from preparing the server computer to
installing the Remote Access Manager software.
During the setup process you may need to consult the manuals that came with
your computer, expansion cards, and serial communications devices for general
information, installation instructions, and troubleshooting.
Page 8

Preparing the server computer
Set up the server computer exactly as you would any other computer running
the Mac OS, giving extra consideration to the server’s physical security. If you
have any concerns about physical security, you should consider putting the
server computer in a separate room with controlled access. Physical security is
your first line of defense for server security. For information about other types
of security, refer to Chapter 3.
The following instructions assume that you have chosen to use a new computer
for the server.
Note: You can set up the server on a computer that you are currently using for
other network services. If you plan to use a computer that is already in use,
some of the steps will not apply to you.
To prepare the server computer:
1 Set up the server computer.
Follow the unpacking and setup instructions that came with the computer.
2 If necessary, install a network communications card.
You may need to do this if you plan to connect your computer to a token ring or
Ethernet network. Follow the directions in the user’s guide supplied with the card.
3 Connect the server computer to your AppleTalk network.
Follow the directions in the user’s guide for your cable system.
4 Make sure that the AppleTalk option is active.
The AppleTalk Active option should be selected. If it isn’t, open the Chooser and
click the AppleT alk Acti v e b utton in the lo wer -right corner of the Chooser windo w.
8 Chapter 2 / Getting Started
Page 9

Installing expansion cards
The number of expansion cards that you can install in the server computer
depends upon the number of slots available in the computer. For example, if
you are using an Apple Workgroup Server 8150 as the server computer, you
can install a maximum of three 6-port serial cards, resulting in sixteen possible
ports, with two left over.
Make sure the
AppleTalk Active
button is selected.
IMPORTANT
Each Remote Access MultiPort Server package contains a Smart
Serial 6 six-port expansion card and six-ended connector cable. You must
purchase an Apple Remote Access MultiPort Server package for each
additional six ports you wish to use, up to the sixteen-port maximum.
You can use an Apple Remote Access MultiPort Server package to expand an
Apple Remote Access version 2.1 server, or to upgrade and expand an existing
Remote Access version 2.0 server. The expansion card must be compatible
with the system you are upgrading or expanding.
Instructions for installing the expansion card are provided in the card
installation guide that accompanies the product.
Installing expansion cards 9
Page 10

Attaching the serial devices
Use the Smart Serial 6 cable included with your expansion card to attach all
serial devices. Attach a telephone line to each device, following the installation
instructions provided with the device.
Installing the software
The CD-ROM disc included in your Remote Access MultiPort Serv er package
contains all the software you need to run the Remote Access Manager
application and the server.
To install the software:
1 Insert the
the server computer.
2 Double-click the Installer icon.
The Installer screen appears.
Apple Remote Access MultiPort Server
CD-ROM disc into the CD-ROM drive of
10 Chapter 2 / Getting Started
Page 11
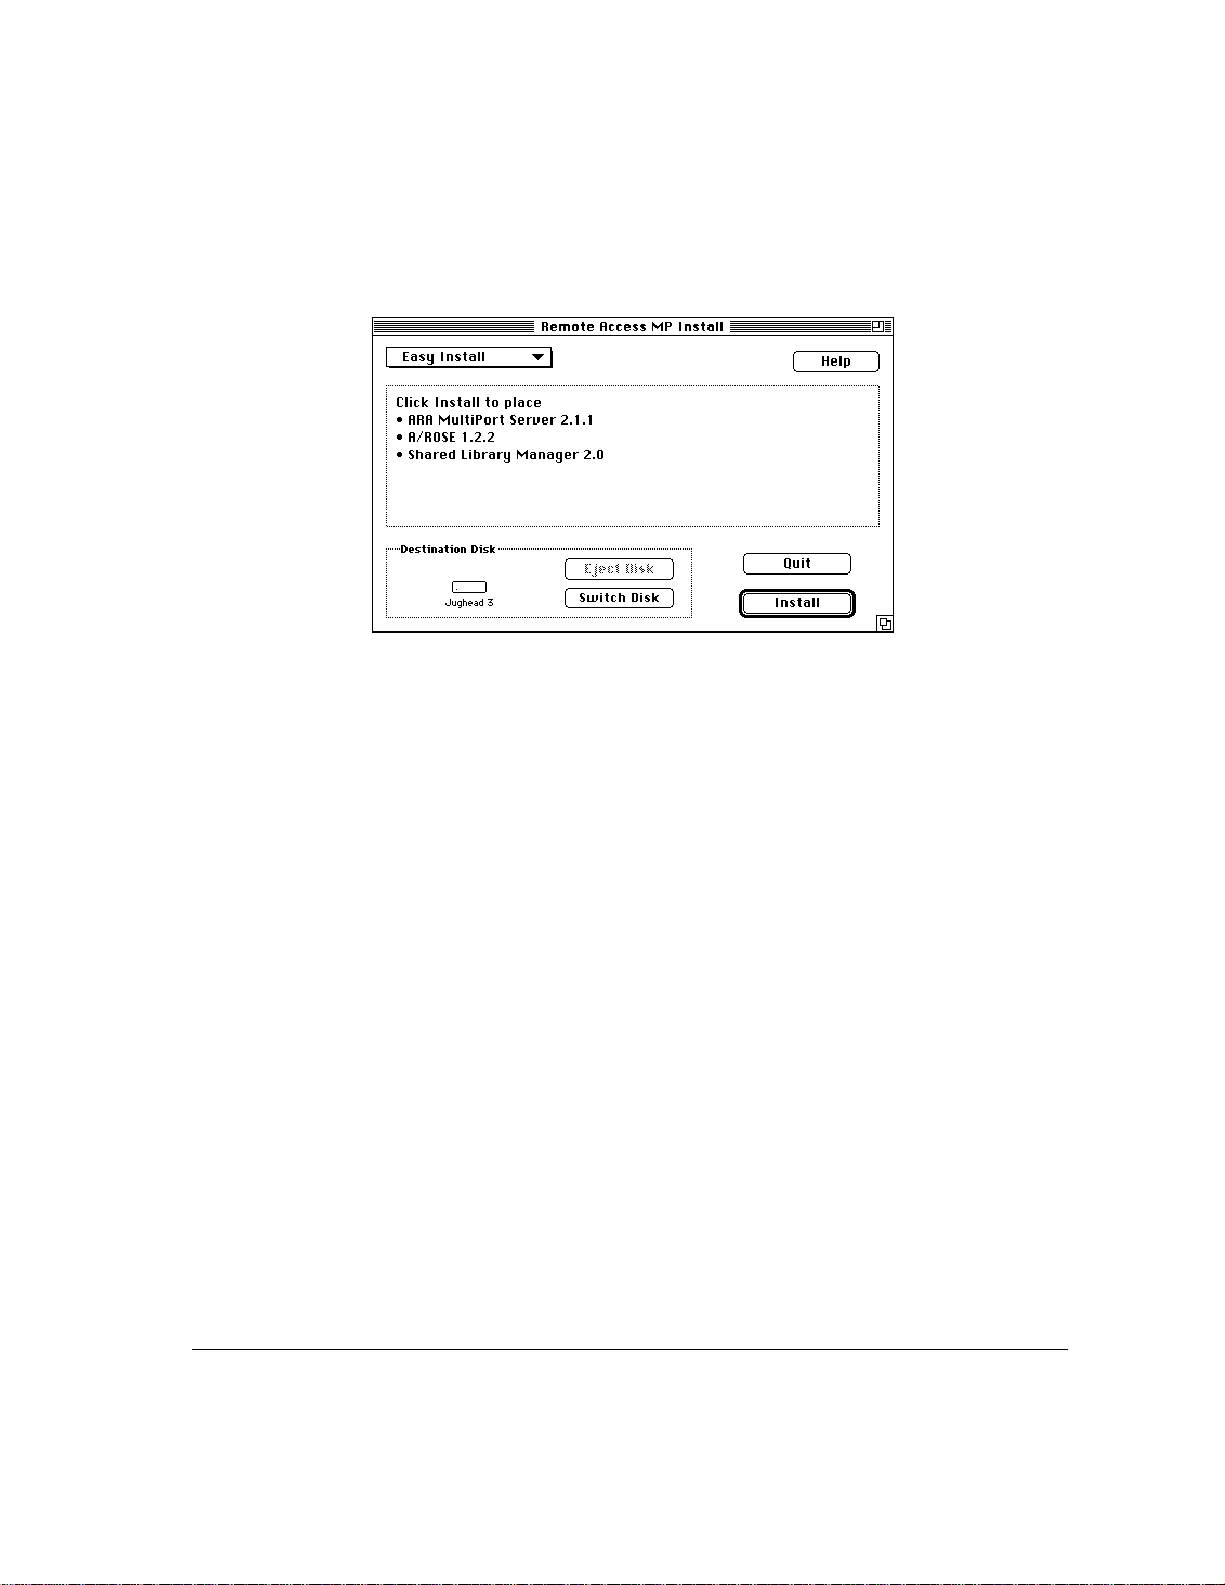
3 Click OK.
The Easy Install screen appears.
4 Click Install.
Note: Be sure to use Easy Install. Clicking Customize allows you to install the
software elements individually. However, all the software elements are
required for successful installation, so use of the Customize option is not
recommended. After installation is complete, a dialog box appears informing
you that installation was successful.
5 Click Restart.
The computer ejects the installation disc, the computer restarts, and you’re
back in the Finder, ready to set up the server.
6 Check the clock.
The server computer’ s internal clock is the source for all time entries in the Remote
Access Manager’s records, such as the serv er activity log. Before you set up
remote access service, make sure that the computer’ s clock is accurate.
Installing the software 11
Page 12

Page 13

3 Setting Up the Server
This chapter provides information about and instructions for setting up basic
remote access service—including setting server preferences, configuring the
ports, and registering users.
This chapter also provides information about the different types of security
you can establish for the server using the Remote Access Manager application.
Page 14

About server security
You can establish and control server security through a number of features in
the Remote Access Manager software:
m user registration
m password and callback options
m zone access
m Security Zone
m external security
Guests and registered users
Guest user is a generic account for guest users of remote access service. Anyone
on the network can be a guest; a guest is not assigned a password and generally
has limited network access. In the interest of security, you should limit the
amount of access that guests have on your network.
A registered user is anyone for whom you ha v e assigned a user name, passw ord,
and security options.
The user database, or User List, contains the names of all users and guests who
can access the server. Information about each user, such as user name and
password, appears in a User information window.
Password and callback security
You can increase the security of your network by requiring that each registered
user enter a password to access the server. You should provide registered users
with a unique password the first time they log in and require that they change
the password at that time. Select the Require New Password on Next Login
option in the User information window to ensure that all users must change
their passwords after the first time they log in. For more information about this
and other password options, refer to “Registering Users,” later in this chapter.
14 Chapter 3 / Setting Up the Server
Page 15

Requiring a callback number for users further ensures security because users
can only connect to the server using a telephone number that they have
provided to you. When a user successfully logs in, he or she is immediately
disconnected from the server. The server then attempts to make a connection at
the callback number listed for that user. If the telephone number is valid, a
connection is made.
To maintain a high level of security for your network, you should require all
users to supply callback numbers. For users who require “roving access”—
that is, users who need to access the server remotely but aren’t always in the
same location—you should implement external security software. For more
information about this option, refer to “External Security,” later in this chapter.
IMPORTANT
to improve communications reliability. Because cellular phones vary in the
way they receive incoming calls, cellular phones equipped with MNP 10
modems generally cannot receive callbacks. Use a security method other than
callback for cellular clients.
Many cellular modems use the MNP 10 error-correction protocol
Zone access
Zones are logical subdivisions of a network in which services such as file
servers, printers, and other individual computers reside. Zones appear in the
Chooser window. You can use zones to organize services into logical groups.
Groupings can be by type of resource, along organizational boundaries, or in
any manner the network administrator decides. The Apple Remote Access
MultiPort Server administrator can assign each user access to specified zones
on the network.
Note: Although zone access cannot be considered “true” security when compared
with password and external security, it does provide a way for you to control
access to the network.
Including a large number of zones in users’ zone access privileges can slow
down server performance. If you want to exclude a user from a large number
of zones, choose “All Zones Except Listed,” or “Only Zones Listed” instead of
naming the zones specifically. See “Creating a New User,” later in this chapter,
for more information. For best performance, always try to minimize the
number of zones per zone list.
About server security 15
Page 16

Security Zone
The Security Zone feature prevents indi viduals from setting up an Apple Remote
Access MultiPort Server or Apple Remote Access Personal Server without an
authorizing password. Security Zone software is provided in the Apple Remote
Access MultiPort Server Toolkit folder included on the installation CD-ROM
disc. For instructions on how to implement this feature, see the Read Me file
provided with the software in the Apple Remote Access Security folder.
IMPORTANT
is available when the Remote Access MuliPort Server ports are configured and
turned on. Otherwise users will be disconnected and the port turned off when
they attempt to dial in. See the Read Me file provided with the Security Zone
software for more information.
If a router advertises a security zone, make sure the security zone
External security
You can provide an additional level of security by implementing third-party,
external security. For example, additional security would be appropriate for
those who need roving access. Two types of external security are available:
line-level security and protocol-level security.
Line-level security provides security at the telephone-line level and usually
consists of hardware that is connected to the server and a security software
module that is placed on the clients’ workstations.
Protocol-level security provides security at the software level and usually
consists of security software modules that are placed on both the server and
the clients’ workstations. You can install more than one security module on an
Apple Remote Access MultiPort Server computer and client workstations, but
you can activate only one security module at a time.
Once you install the security module, you can decide if all users or only selected
users must be validated by this type of security when they dial in to the server.
16 Chapter 3 / Setting Up the Server
Page 17

Note: Example screens throughout this manual display “Third-Party Security”
as the security module. This name does not refer to a specific product, but is
intended for illustration purposes only. See your Apple-authorized reseller or
representative for specific product recommendations.
Starting the Remote Access Manager software
The Remote Access Manager application does not have to be running for the
server to be active; however, you must run Remote Access Manager once to
start up the server. After that, you can quit Remote Access Manager and the
server will keep running.
IMPORTANT
the server to restart after a power failure, place an alias of the Remote Access
Manager application in the Startup Items folder, located in the System Folder.
Starting the Remote Access Manager application also starts the server, if it is
not already running. The first time you start the application, you will be prompted
to enter information about the server.
To start the server and the Remote Access Manager application:
1 Double-click the Remote Access Manager icon.
If you have installed Remote Access Manager on a computer on which
AppleShare is not installed, the following message appears:
If you want the server to start up automatically, or if you want
Starting the Remote Access Manager software 17
Page 18
2 Click Continue.
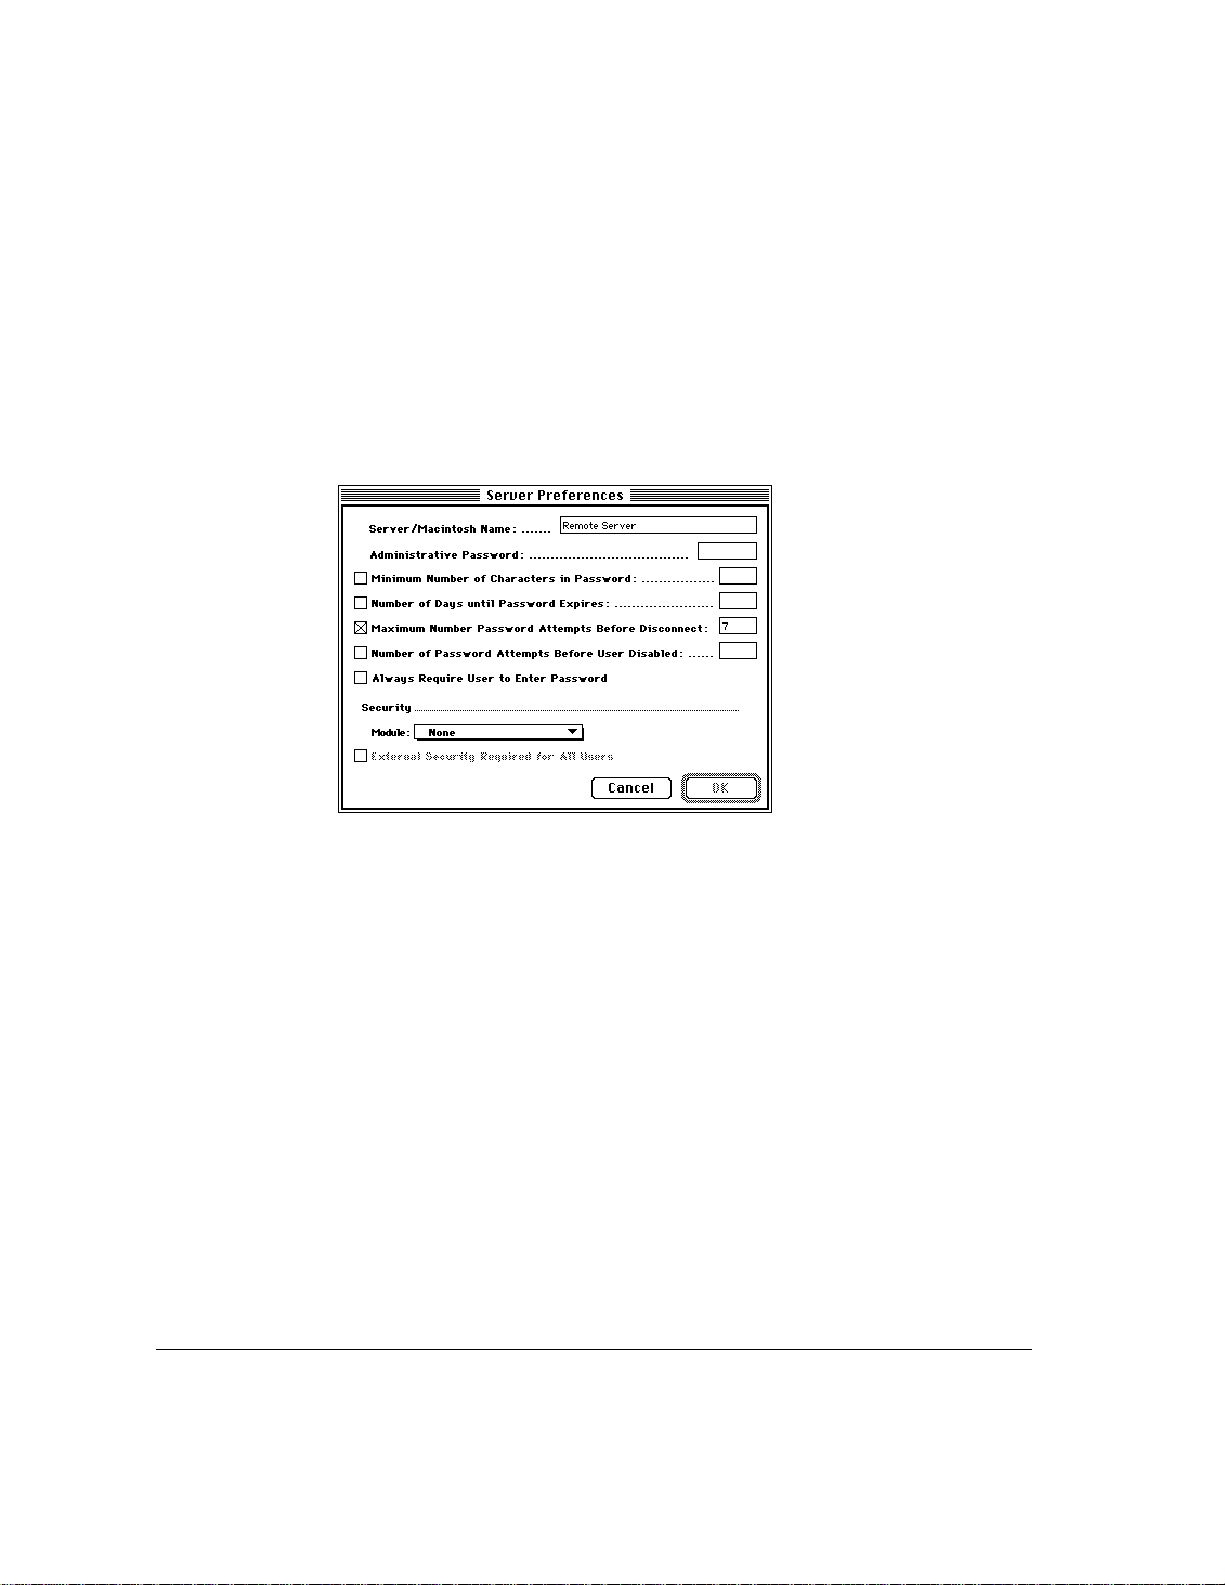
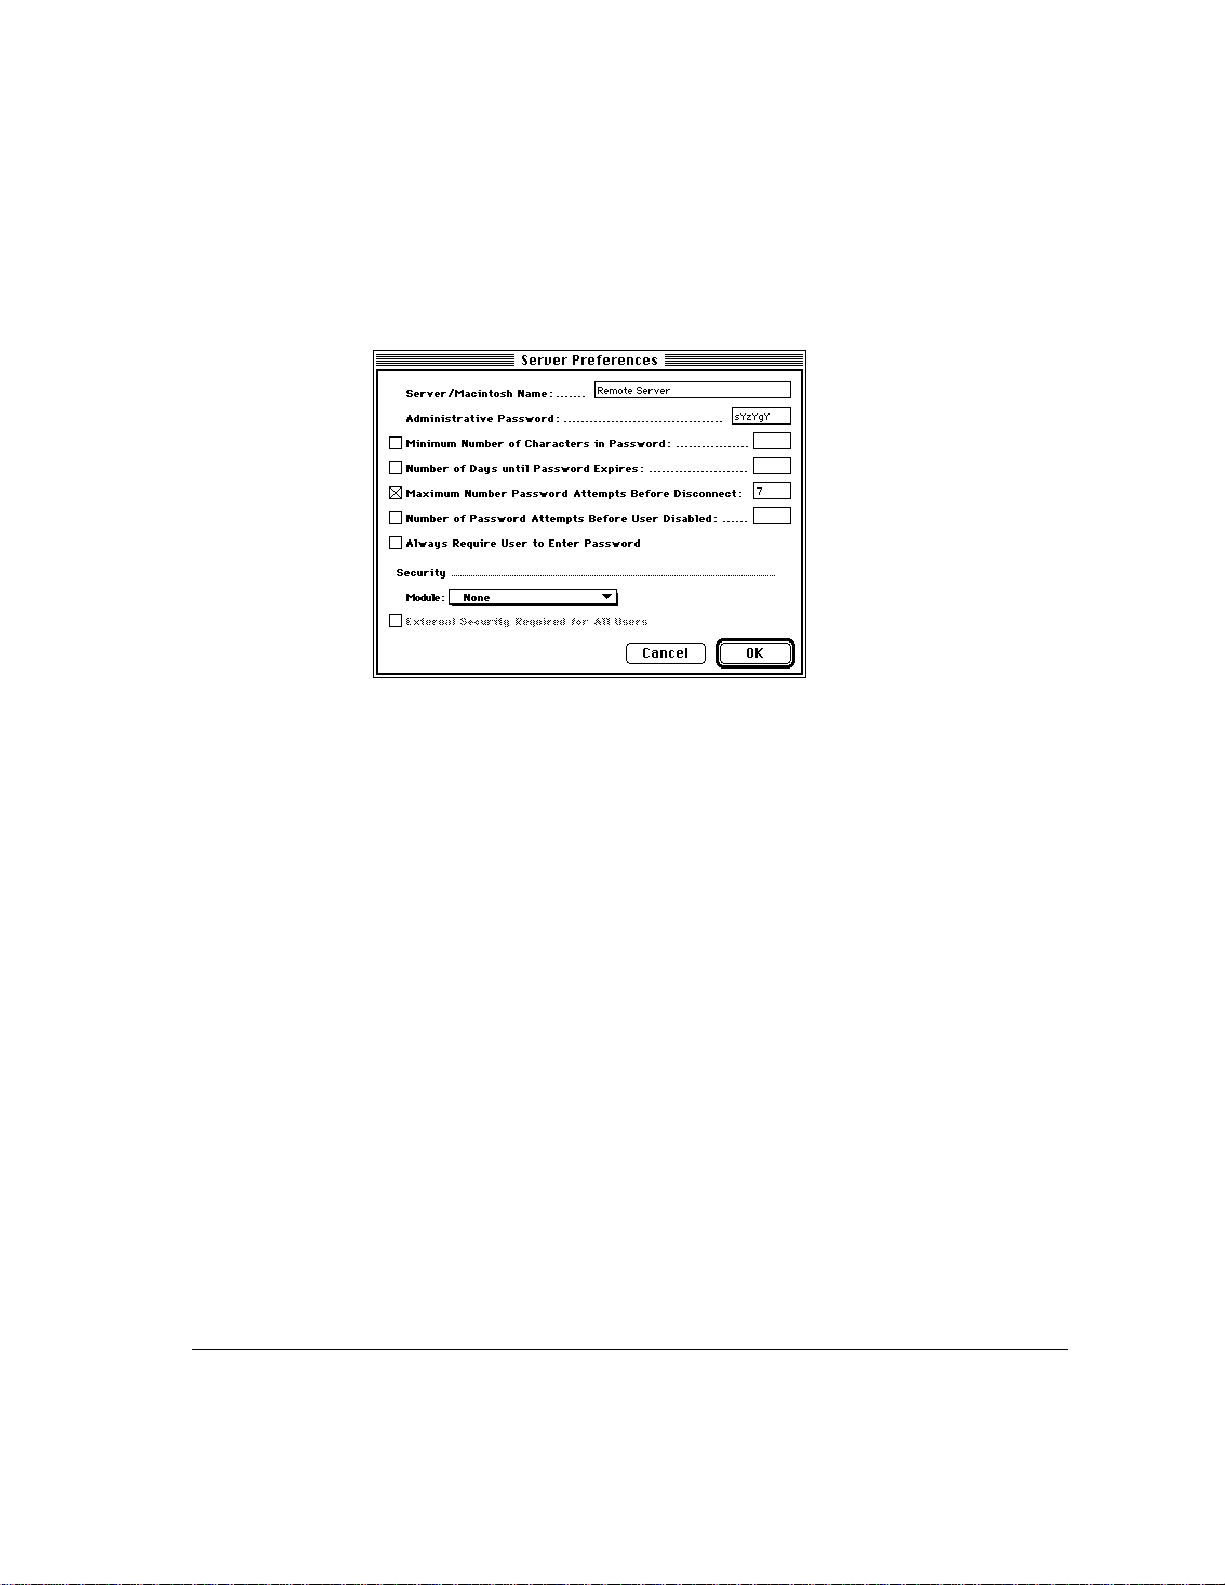
The Server Preferences dialog box appears. If you have installed the Remote
Access manager software on the same computer as an AppleShare server, or if
you have named your computer, the server or computer name appears in the
Server/Macintosh Name text box. If these circumstances do not apply, “Apple
Remote Access Server” appears in the name box. If AppleShare is installed,
bullets appear in the Administrative Password text box; each bullet indicates a
character in the Admin Key for your AppleShare server.
3 If necessary, enter a new name for the server and an Administrative Password.
The Administrative Password helps prevent unauthorized use of the server and
some features of Remote Access Manager . The password can be any combination
of up to eight characters and can include uppercase and lowercase letters.
IMPORTANT
Any changes you make to either of these items are also applied to
the AppleShare server.
18 Chapter 3 / Setting Up the Server
Page 19
IMPORTANT
Replacing an Administrative Passw ord is difficult. If you record
your administrative password, guard it carefully. If you lose or forget it, see “The
Administrative Passw ord Has Been Lost” in the Appendix, “Troubleshooting.”
4 Select password options by clicking the appropriate checkboxes and entering a value
when required in the text box.
The password options in the Server Preferences dialog box allo w you to control
server security at the password lev el. The following options apply to user passw ords:
m Minimum Number of Characters in Password The minimum number of
characters for a user password. The minimum is one; the maximum is
eight. As a general rule, the longer the password, the safer. Encourage
users to choose passwords that combine letters and numbers and that are
not actual words.
m Number of Days until Password Expires The range of days is 1–1000.
Select this option to require users to change their passwords regularly.
m Maximum Number Password Attempts Before Disconnect The maximum
number of times a user can enter an incorrect password before being
disconnected. Each incorrect attempt is also applied to the Number of
Password Attempts Before User Disabled option if you have selected it
and entered a value. The default is seven attempts.
Starting the Remote Access Manager software 19
Page 20
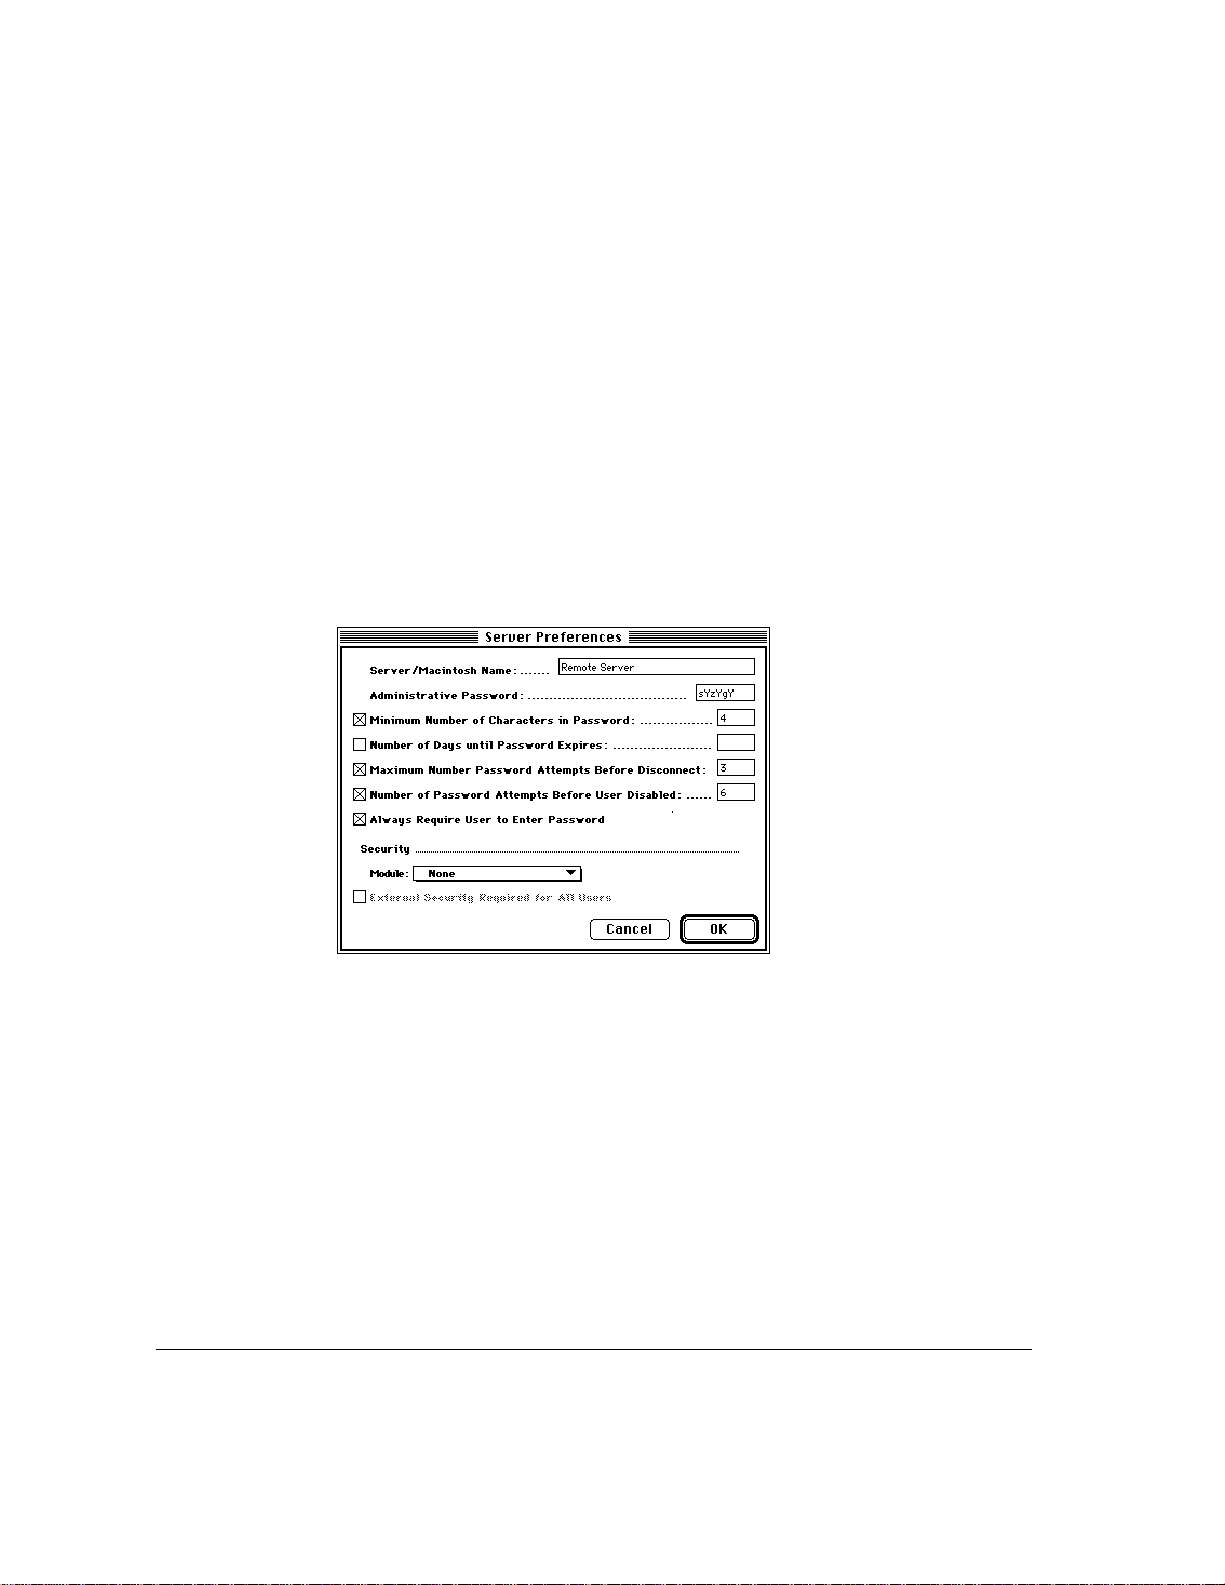
m Number of Password Attempts Before User Disabled The number of times
a user can attempt to log in to the server without success before the user’s
account is disabled. This number should be greater than the Maximum Number
Password Attempts Before Disconnect. A count of consecutive bad password
attempts is kept. When it equals the Number of Password Attempts Before
User Disabled, the user’s access is disabled. Access must be reenabled by
the administrator before the user can connect again. The count is reset to
zero each time the user successfully connects with the correct password.
m Always Require User to Enter Password This option requires all users to
enter their passwords when logging in, even if they have selected the Save My
Password option in their Remote Access connection documents. Selecting
this option prevents anyone from using a “stolen” connection document in
which the password has been saved.
20 Chapter 3 / Setting Up the Server
Page 21
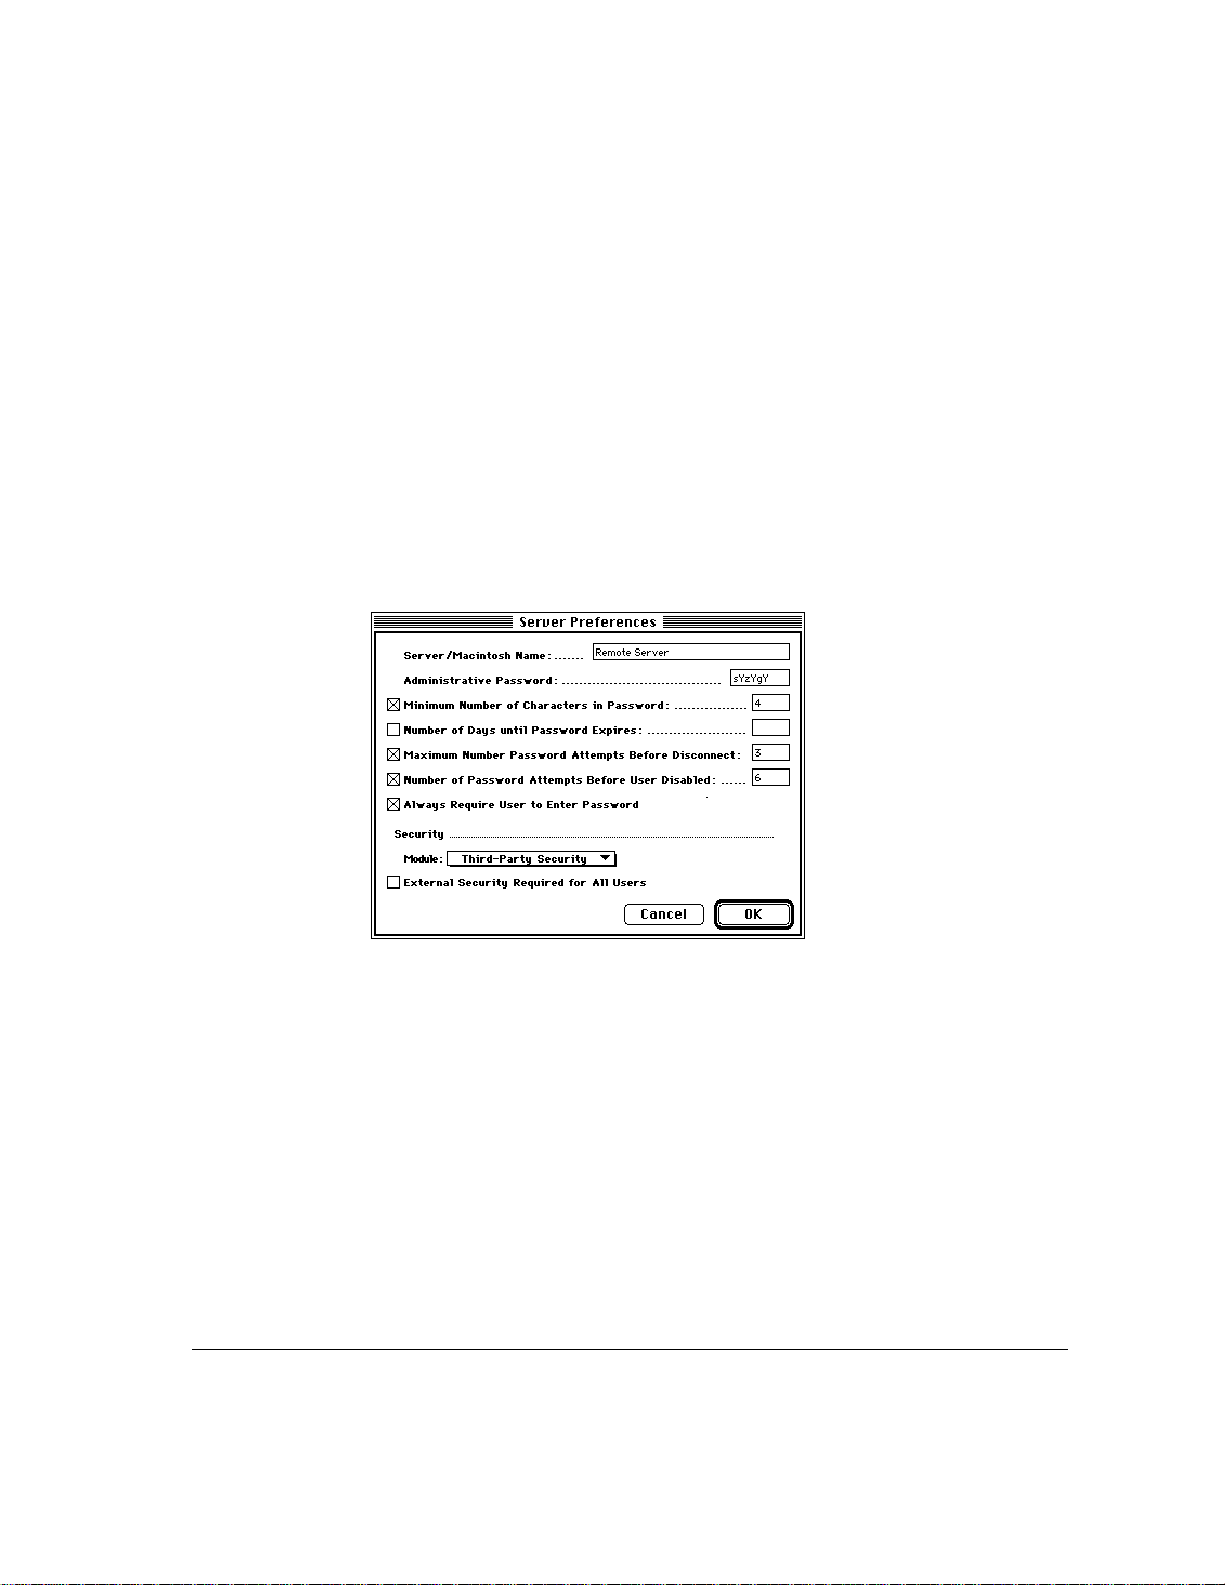
5 If you have installed a third-party external security module and want to implement it,
choose its name from the Module pop-up menu.
External security provides an additional layer of security for your server and is
applicable for current users and users you register in the future. You can determine
whether this type of security is required for all users or only for selected users.
Regardless of your choice, a checkbox with the name of the security module
will appear in each User information window. (For more information about the
User information window, refer to “Creating a New User,” later in this chapter.)
See the documentation that came with your third-party security product for more
information on installation and use.
Note: You cannot select more than one security module from the Module popup menu.
6 Click the External Security Required for All Users checkbox if you want to implement
external security for all users.
Depending on the external security module you selected, you may need to
configure settings for each user. For more information, refer to “Creating a
New User,” later in this chapter.
When you register new users, this option is automatically selected in the User
information window.
Starting the Remote Access Manager software 21
Page 22
7 Click OK when you have finished entering information and selecting security options.
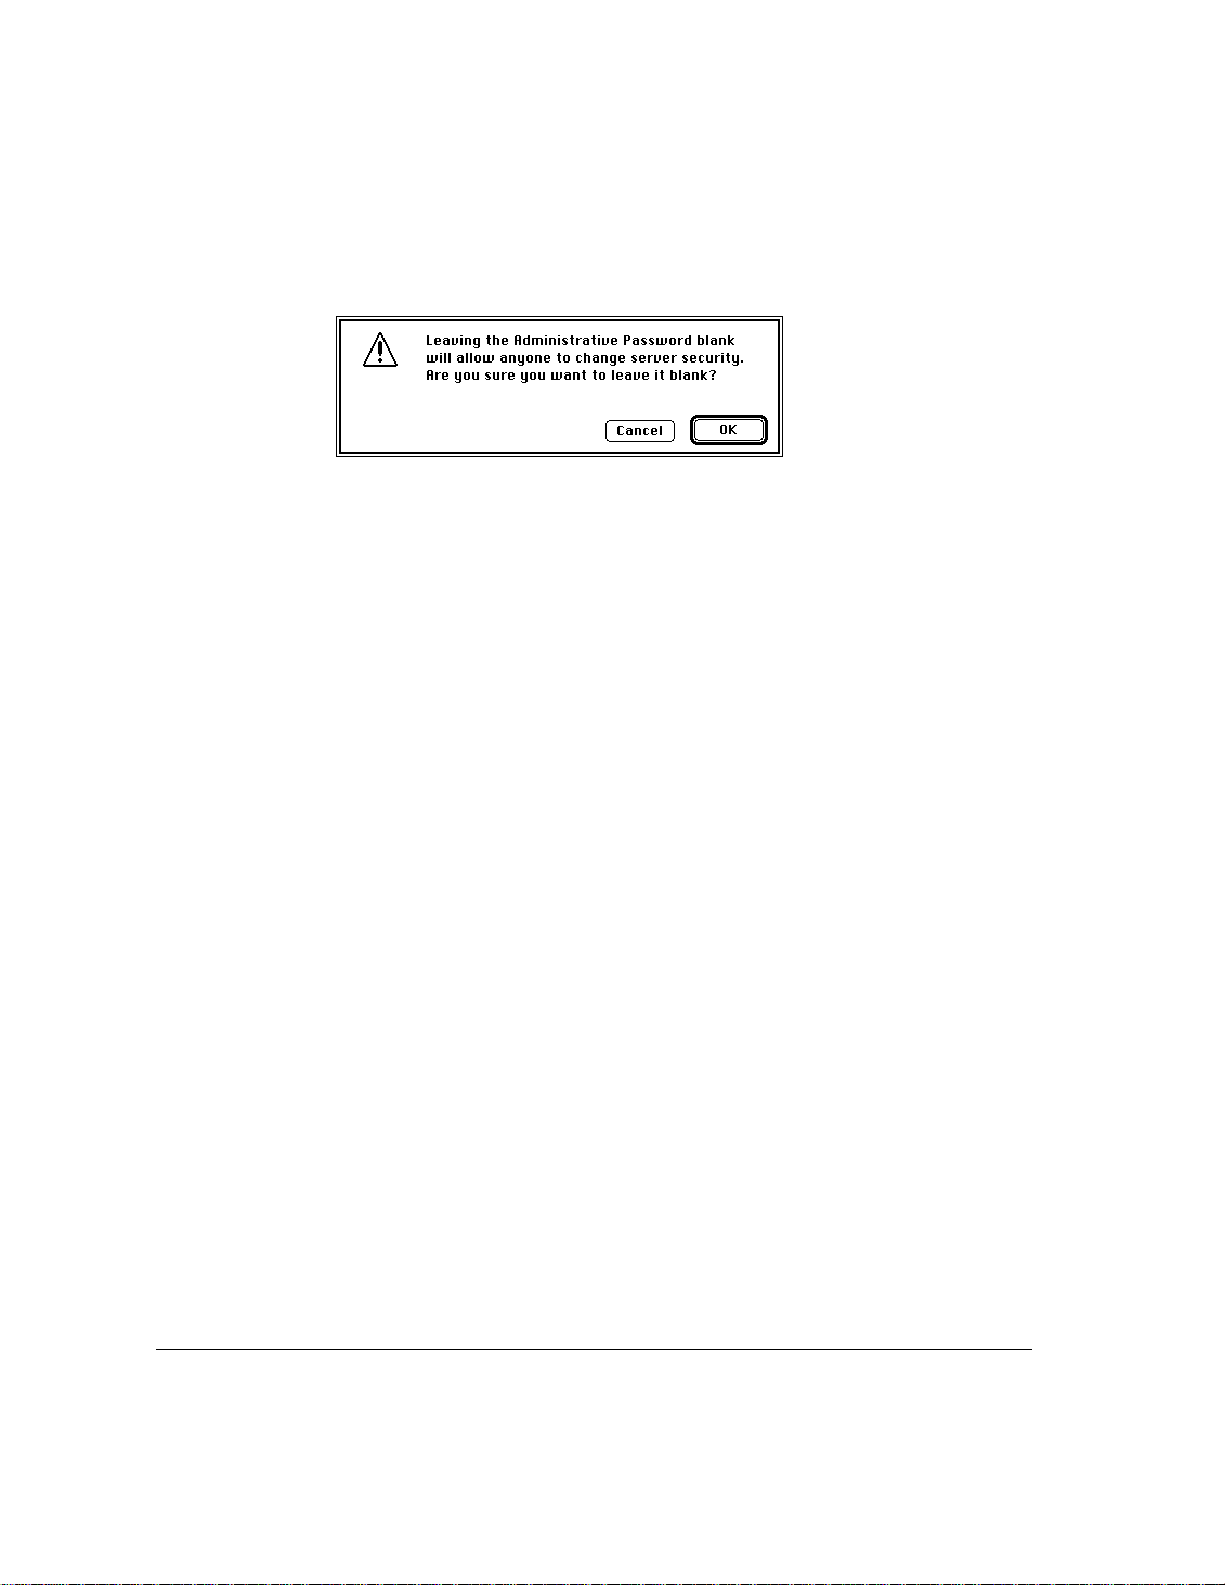
If you do not enter an Administrative Password, the following warning appears:
8 Click OK to confirm that you do not want to enter an Administrative Password, or click
Cancel to enter an Administrative Password.
Note: To change the Server Preferences at any time, choose Set Server
Preferences from the Server menu.
Configuring the modem ports
IMPORTANT
You cannot use the built-in serial ports on the computer for
Apple Remote Access. Use only the ports provided on the installed serial
card or cards.
This section describes how to configure the modem por ts for dial-in and callback
access. Before continuing, make sure that you’ve installed all expansion cards
and attached all serial communications devices correctly.
There are three basic ways to configure the modem ports: Dial-in Access, Dial-in
and Transfer, and Callback Only.
Note: Users cannot access a configured port until it has been turned on in the
Port Configuration window, as described later in this chapter.
22 Chapter 3 / Setting Up the Server
Page 23
Dial-in Access allows dial-in and callback access on the same port. With this
method, a user who does not have callback enabled is able to dial in and
remain connected. This is useful if you have a number of users who are on the
road and cannot provide you with a callback number. If the user has callback
enabled, when the user dials in, the server checks that the user name and
password are correct. If they are correct, the user is disconnected, and the
server calls him or her back on the same port.
Ports set to Dial-in and Transfer are intended only for users who have callback
enabled. When such a user dials in, the server checks that the user name and
password are correct. If they are correct, the user is disconnected, and the
server calls him or her back through a different, callback-only port. Users for
whom you have not set up callback can dial in to Dial-in and Transfer ports,
but they will be disconnected. Users who do not have callback enabled must
use Dial-in Access ports.
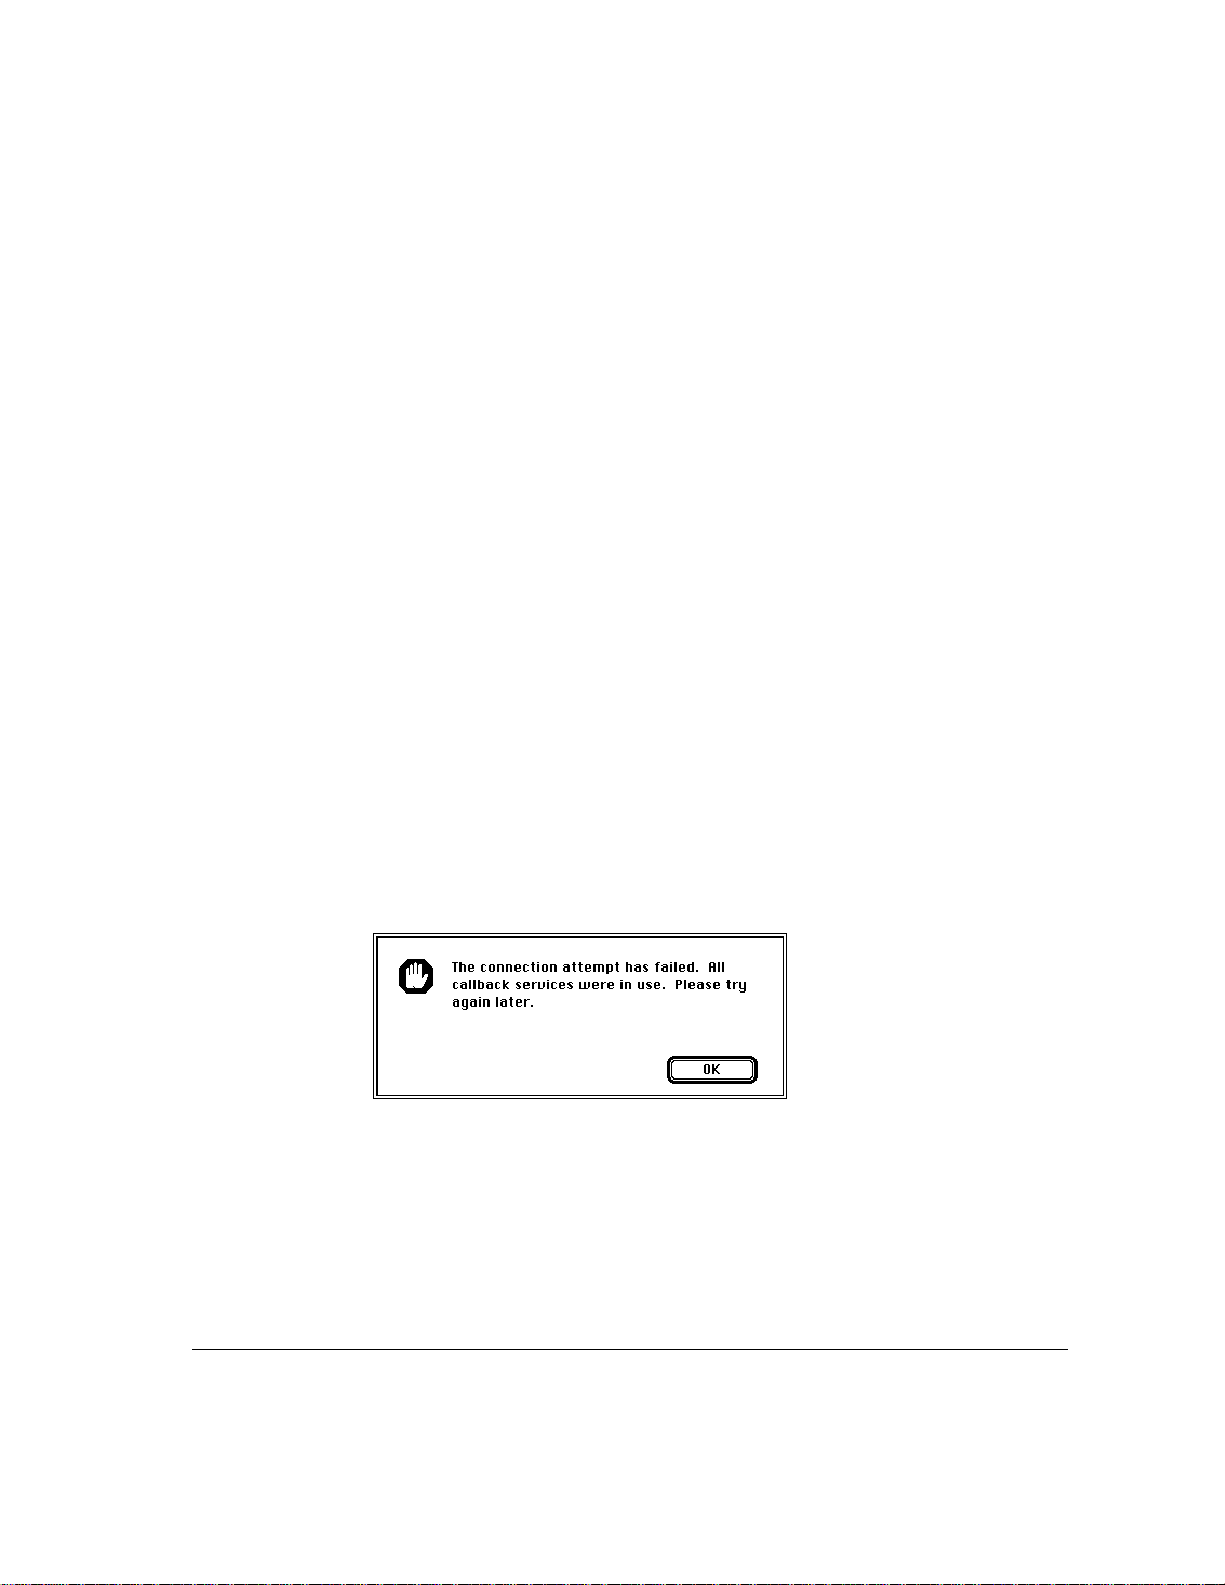
Callback Only ports cannot receive calls. They are used only in conjunction
with ports that have been configured for Dial-in and Transfer. For example, you
can set up one port for Dial-in and Transfer and the rest for Callback Only.
Thus, you can have a maximum of 15 callback lines, depending on the number
of expansion cards installed and modems or other serial communications
devices connected to the ports. This method allows you to provide only one
telephone number to your remote access users.
Note: If you configure one port as Dial-in and Transfer and the rest as Callback
Only , the user will see the following alert box when all callback lines are in use:
Configuring the modem ports 23
Page 24
To configure the serial ports:
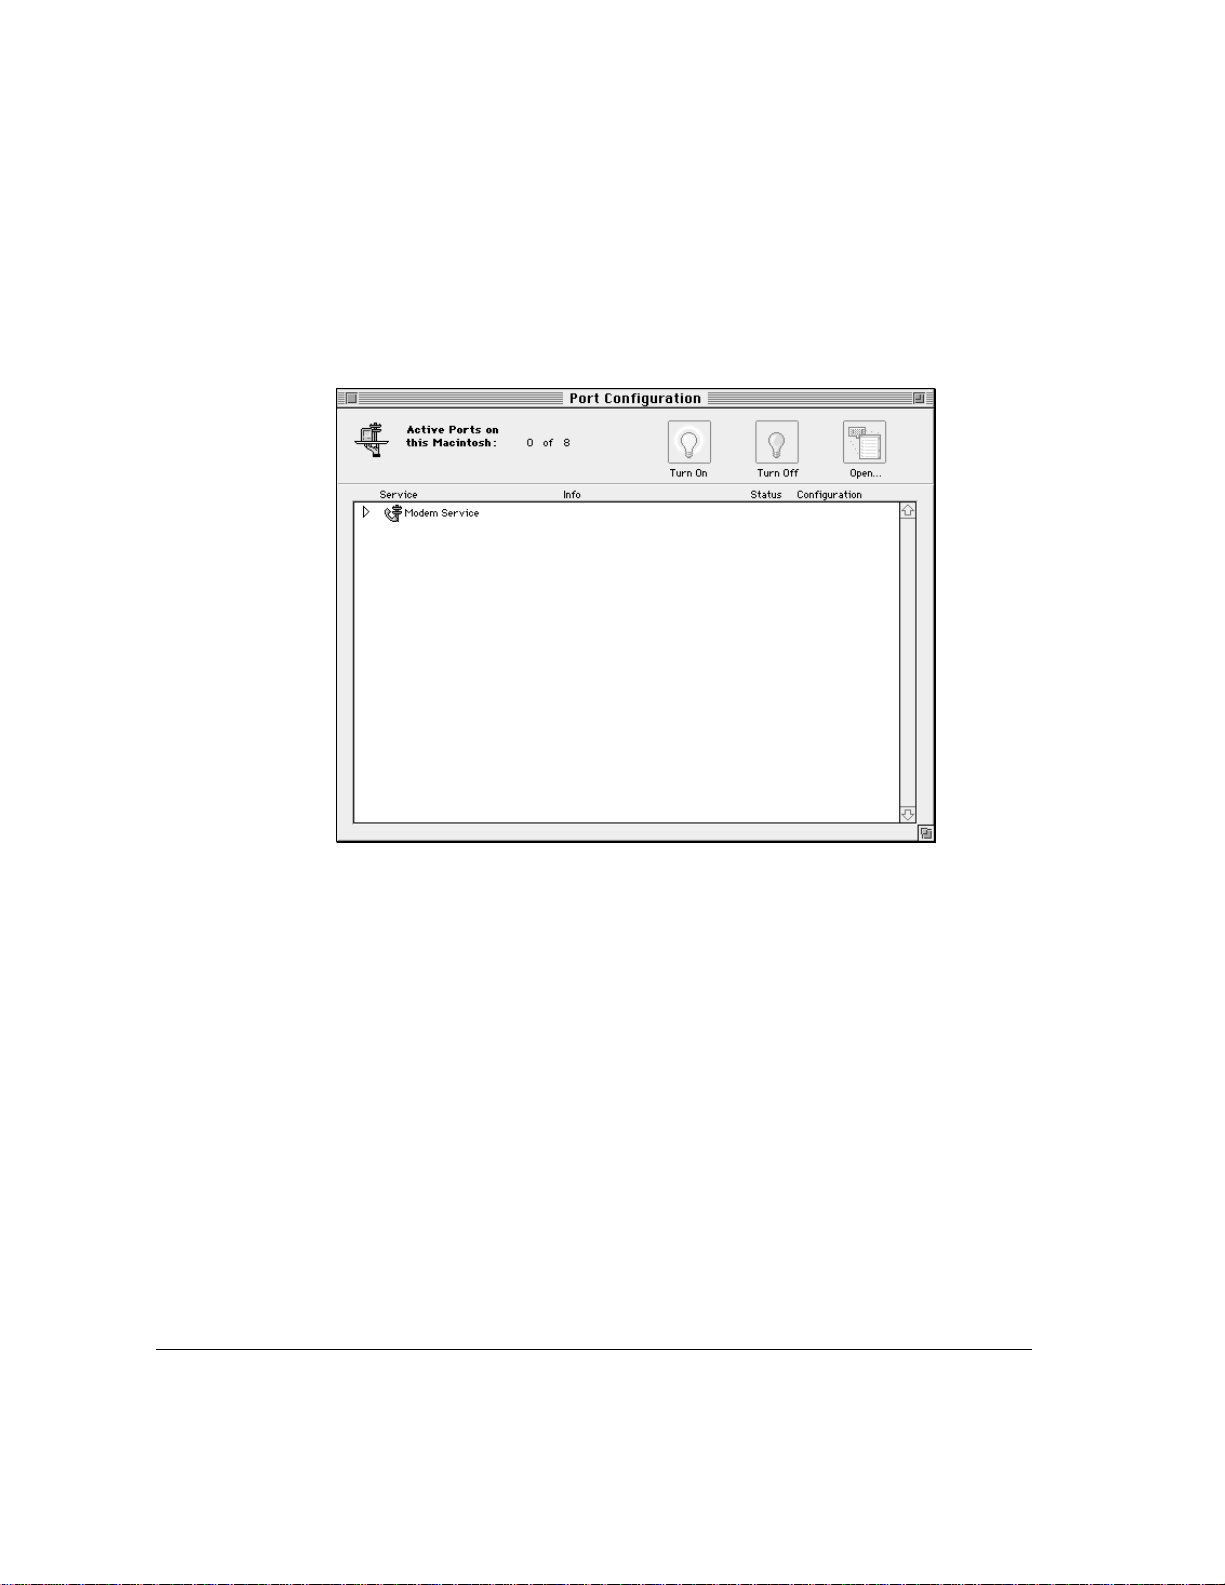
1 Choose Configure Ports from the Server menu.
The Port Configuration window appears. This windo w contains information about
services installed on the server computer and the configuration of each port.
24 Chapter 3 / Setting Up the Server
Page 25
2 Click the triangle next to Modem Service (or double-click the line) to display
all port groupings.
The two types of grouping are the ports on an expansion card or the
computer’s internal ports themselves.
Configuring the modem ports 25
Page 26
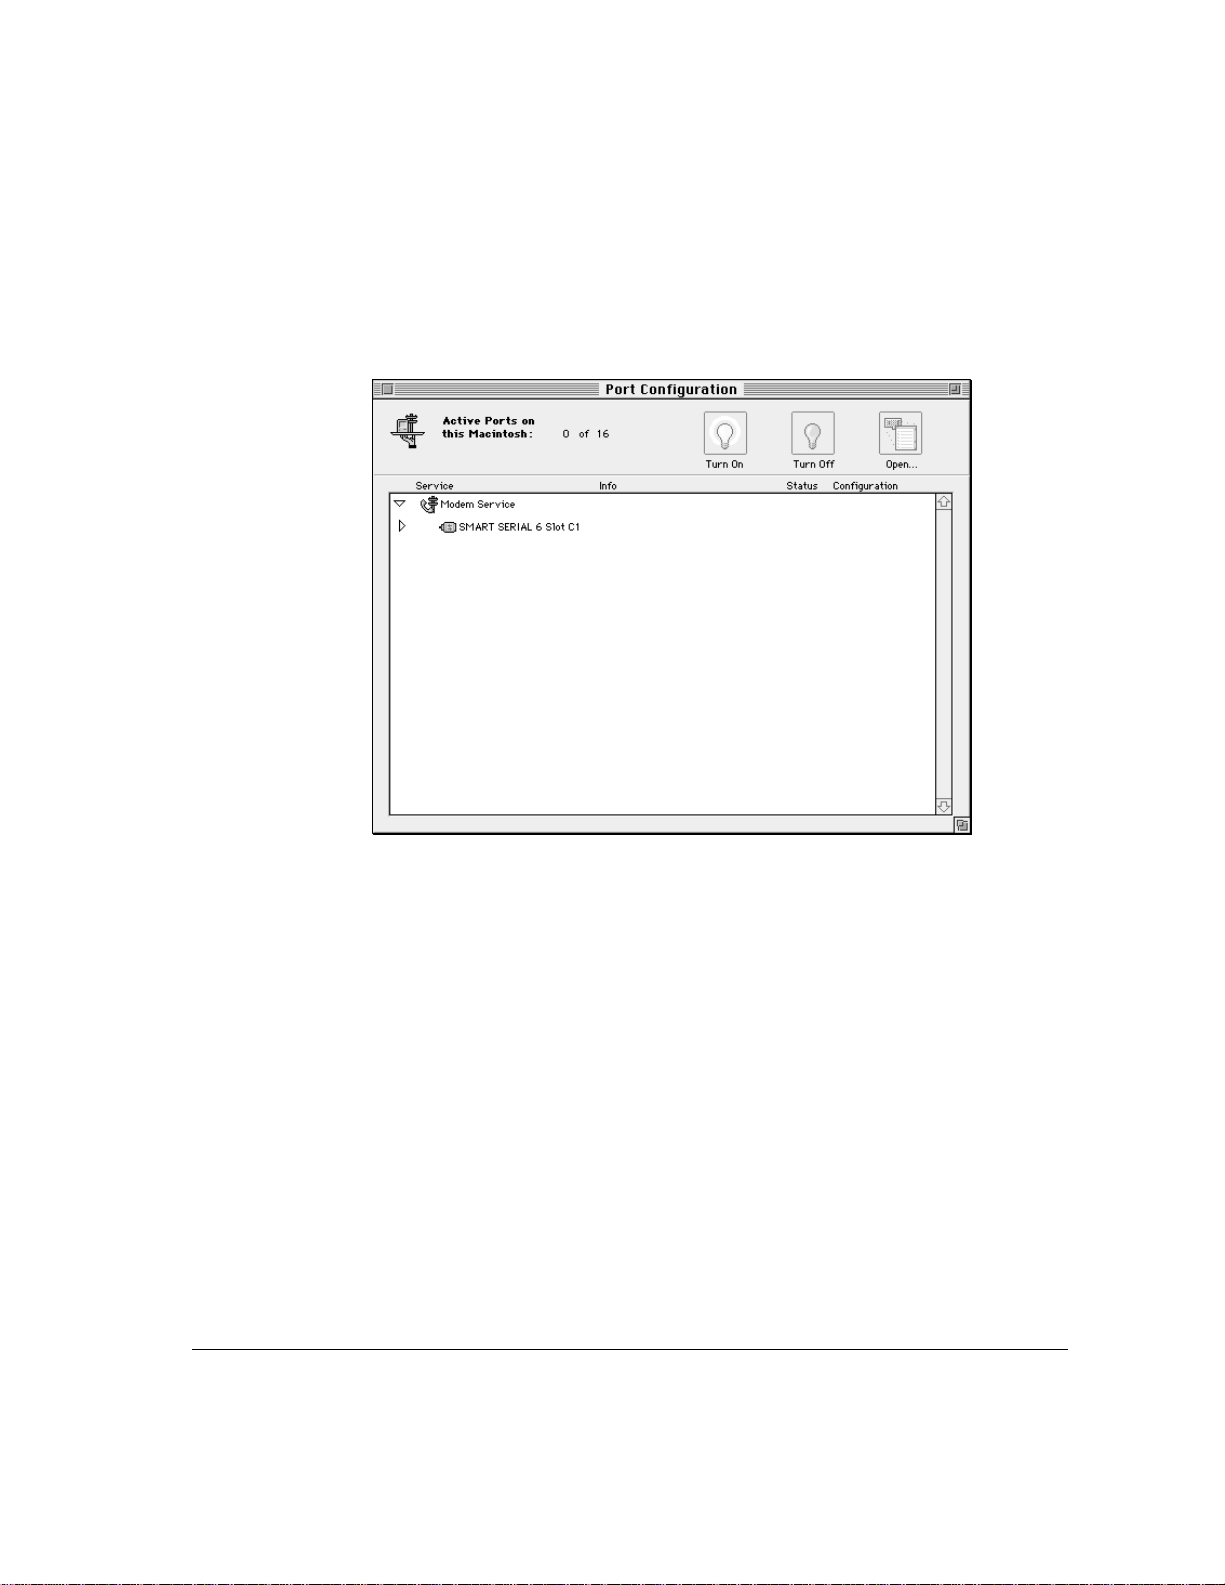
3 Click the triangle next to the port grouping (or double-click the line) to display the name,
status, and configuration of each port.
The port name is determined by the slot in the computer in which the card is
installed and the number of the port on the card. For example, SS6 C1 Port #1
means that a Smart Serial 6 card is installed in Slot 1 in the server computer
and that Port 1 on the card is selected.
26 Chapter 3 / Setting Up the Server
Page 27
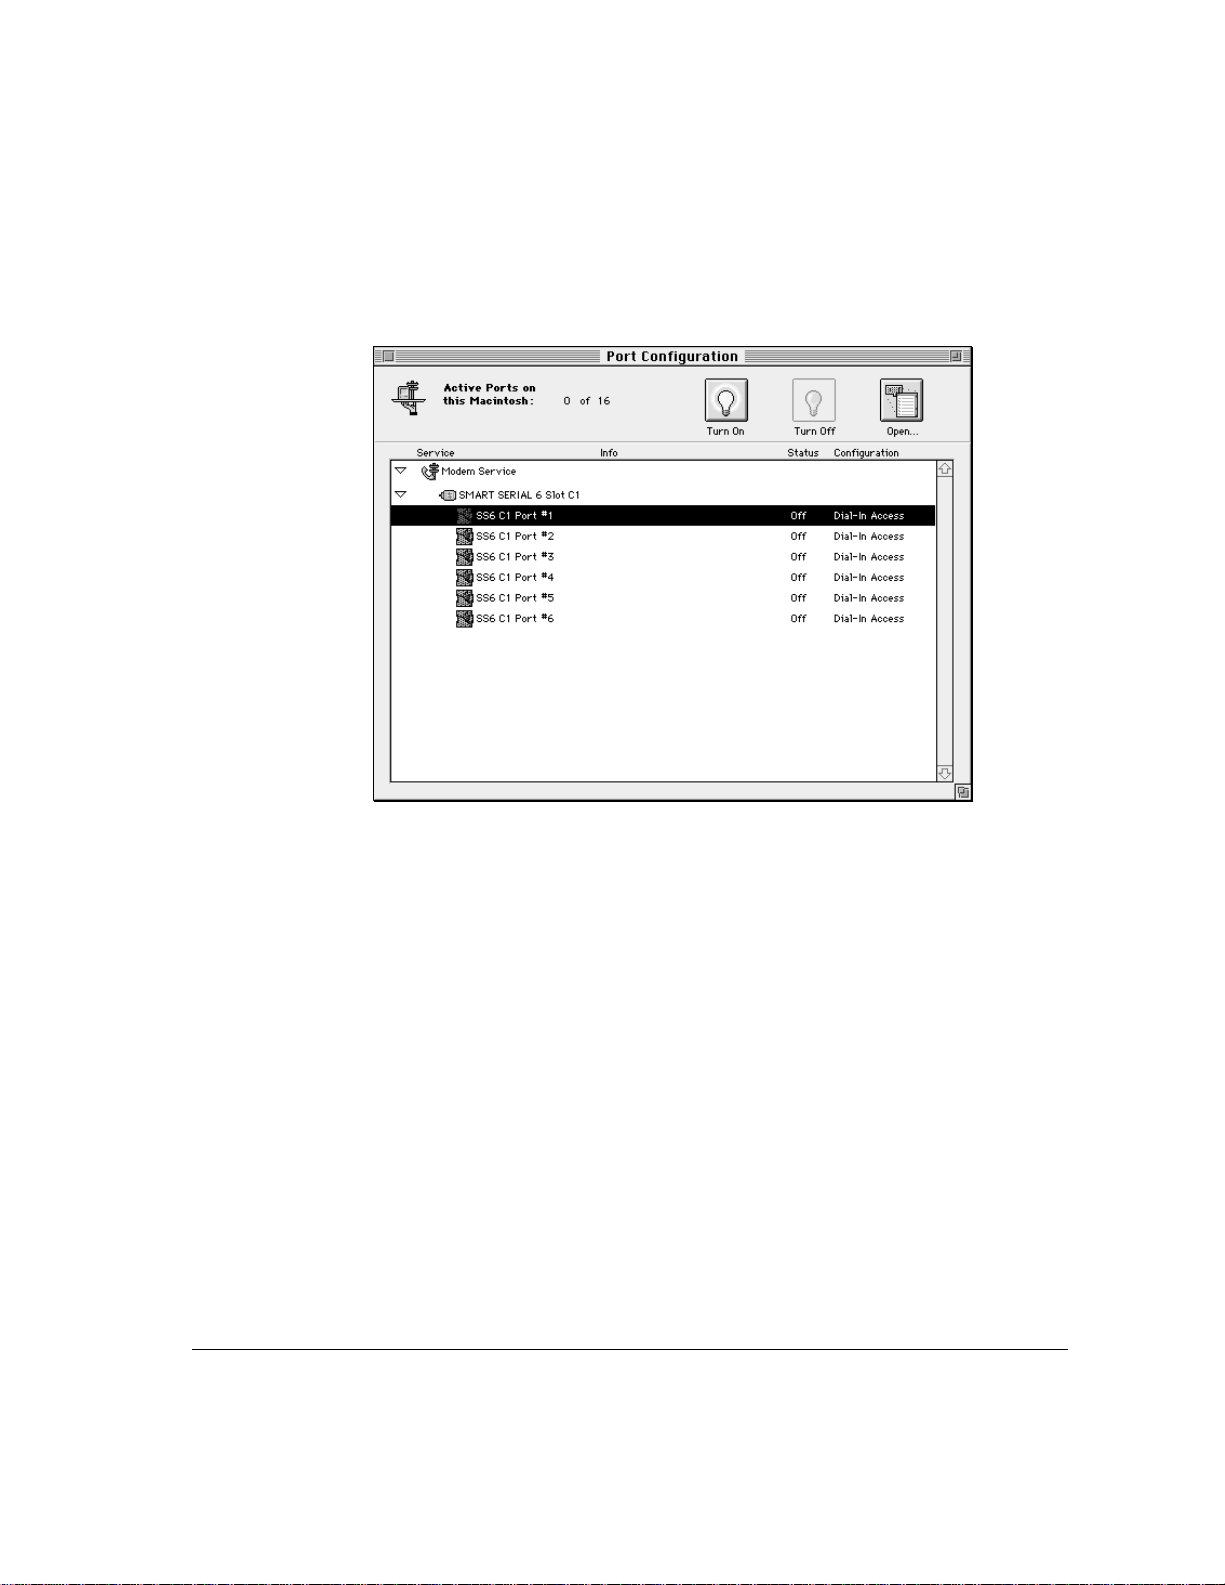
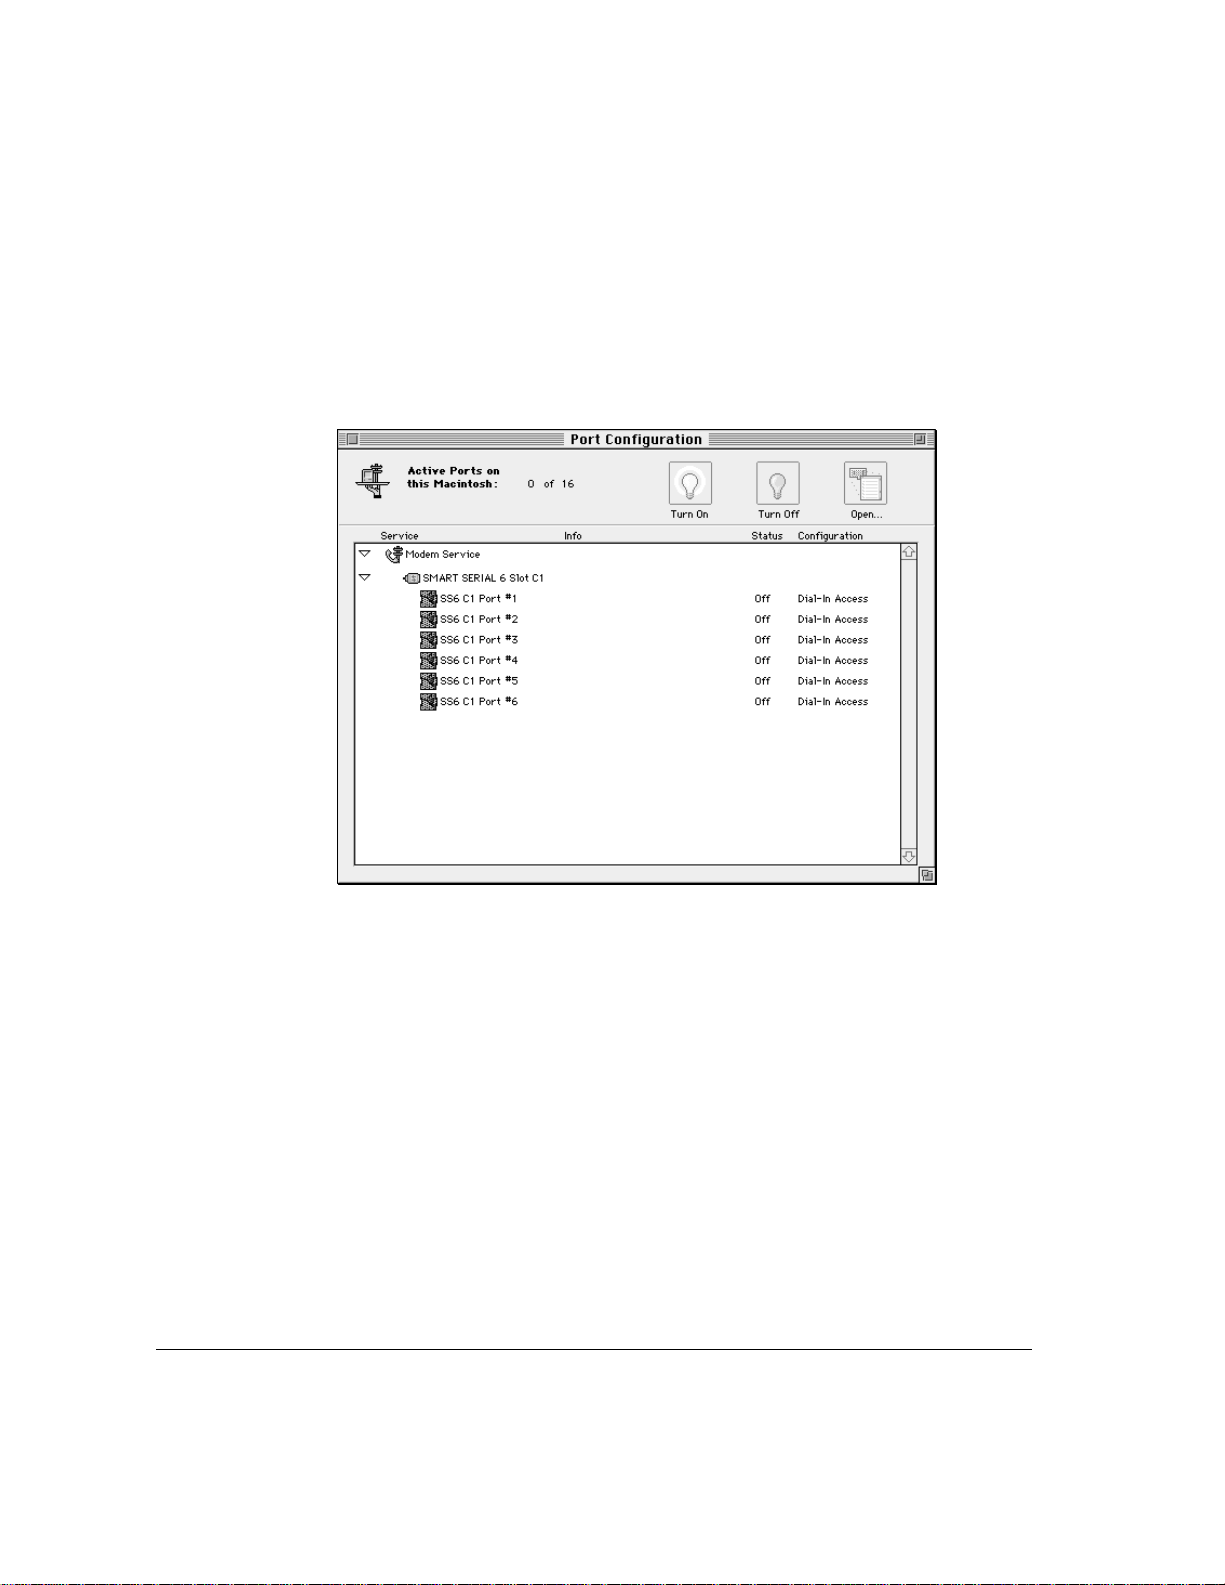
4 Select the port you want to configure by clicking it.
The Open button becomes active. Initially ports are turned off; that is, they are
inactive. Once you configure a port, you can turn it on to make it active.
Configuring the modem ports 27
Page 28
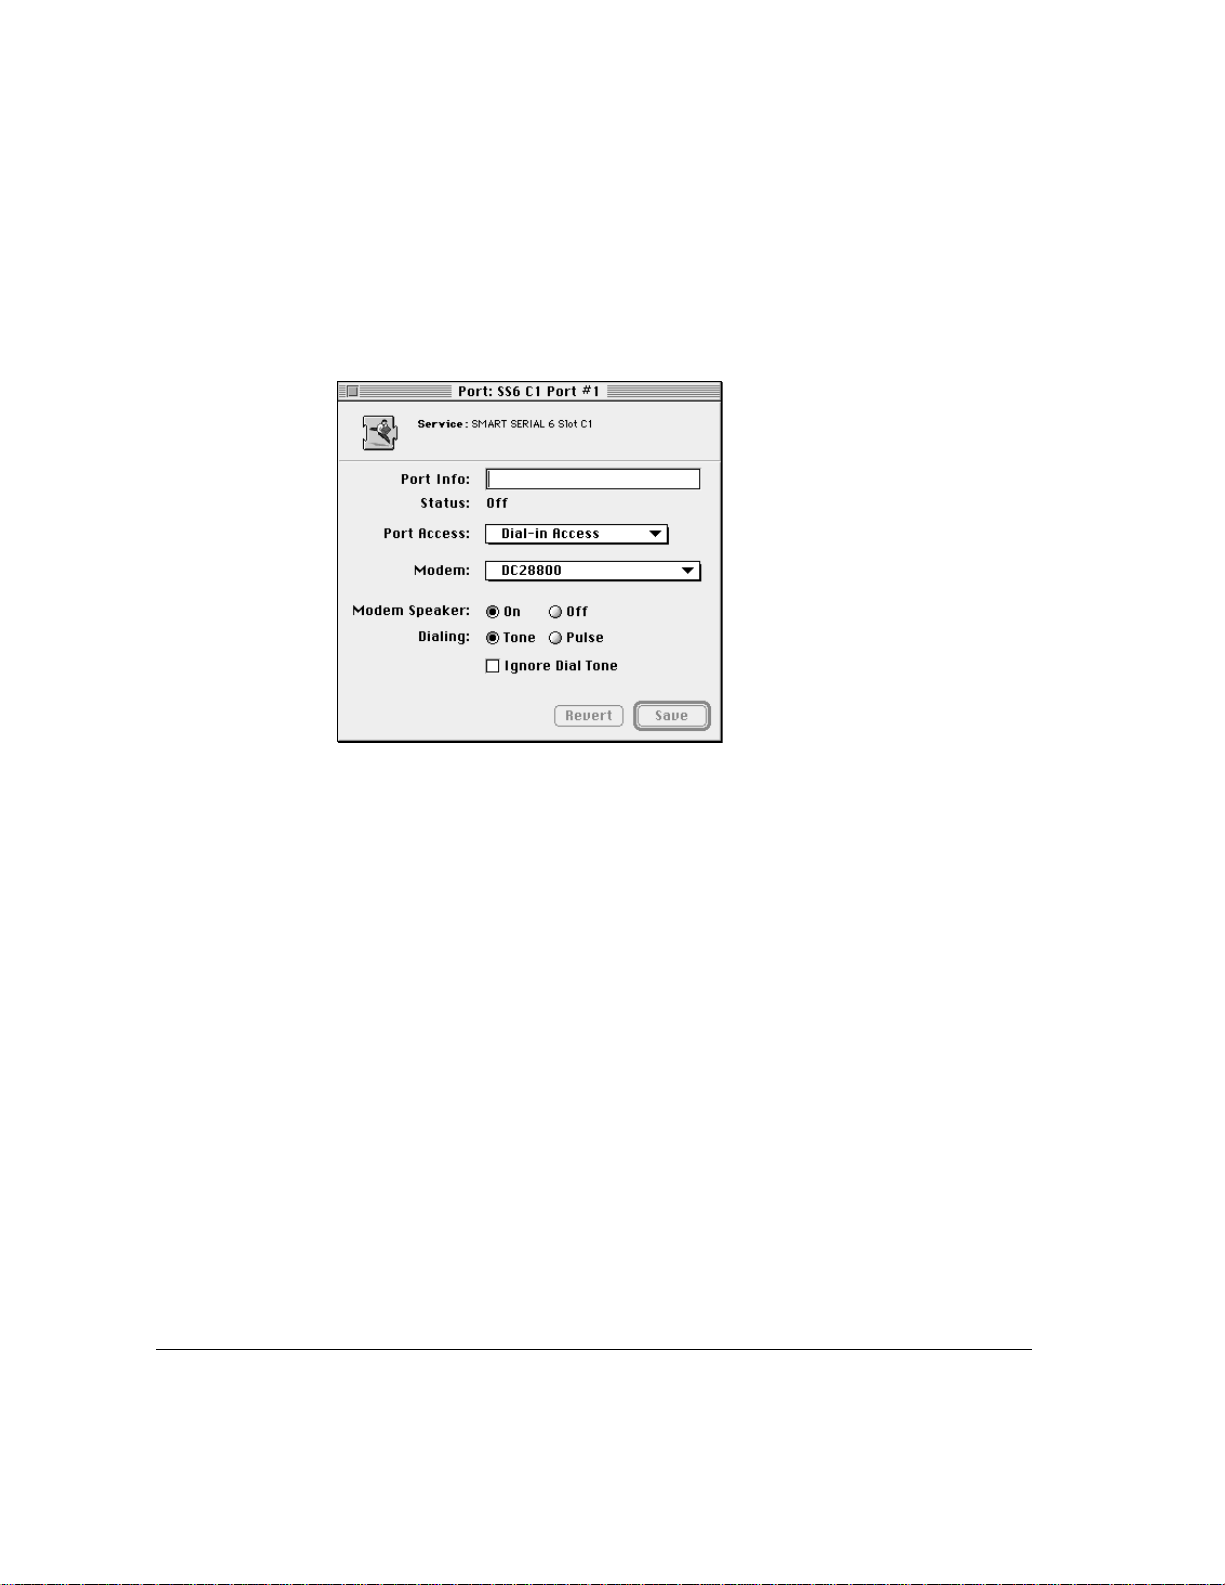
5 Click the Open button.
The Port window appears for the port you selected. The name of the port
appears in the title bar.
Note: You can also double-click the port name to open the Port window.
6 Enter text in the Port Info text box, such as the name of the modem connected to the port
and the telephone number of the line connected to the modem.
7 From the Port Access pop-up menu, select one of the following options: Dial-in Access,
Dial-in and Transfer, or Callback Only.
8 From the Modem pop-up menu, select the modem script for the modem you’ve attached
to the port.
See the Read Me file in the Apple Remote Access MP Folder for a list of
supported modems. If your modem does not appear on that list, check with
your modem vendor or consult the support information available on Apple’s
World Wide Web site at
programmer and want to write your own script, complete documentation and
prototyping software are included in the Apple Remote Access MultiPort
Server Toolkit folder on the installation CD-ROM disc.
28 Chapter 3 / Setting Up the Server
www.info.apple.com. If you are an experienced
Page 29

9 Turn the modem speaker on or off by clicking the On or Off button.
When the modem speaker is on, you can hear when the modem is making a
connection with another modem. However, if modem noise is a concern, you
can turn off the modem speaker.
10 Select Tone or Pulse for the dialing capability of your telephone line.
Select Tone if the telephone line to which the modem is connected supports
touch-tone dialing. Select Pulse if the telephone line to which the modem is
connected supports pulse or rotary dialing.
11 Click the Ignore Dial Tone checkbox if you always want the modem to dial, regardless of
its ability to recognize the tone provided on the telephone line.
12 Click Save to save these settings for the port.
If you click Revert, the contents of the window are not saved.
Configuring the modem ports 29
Page 30
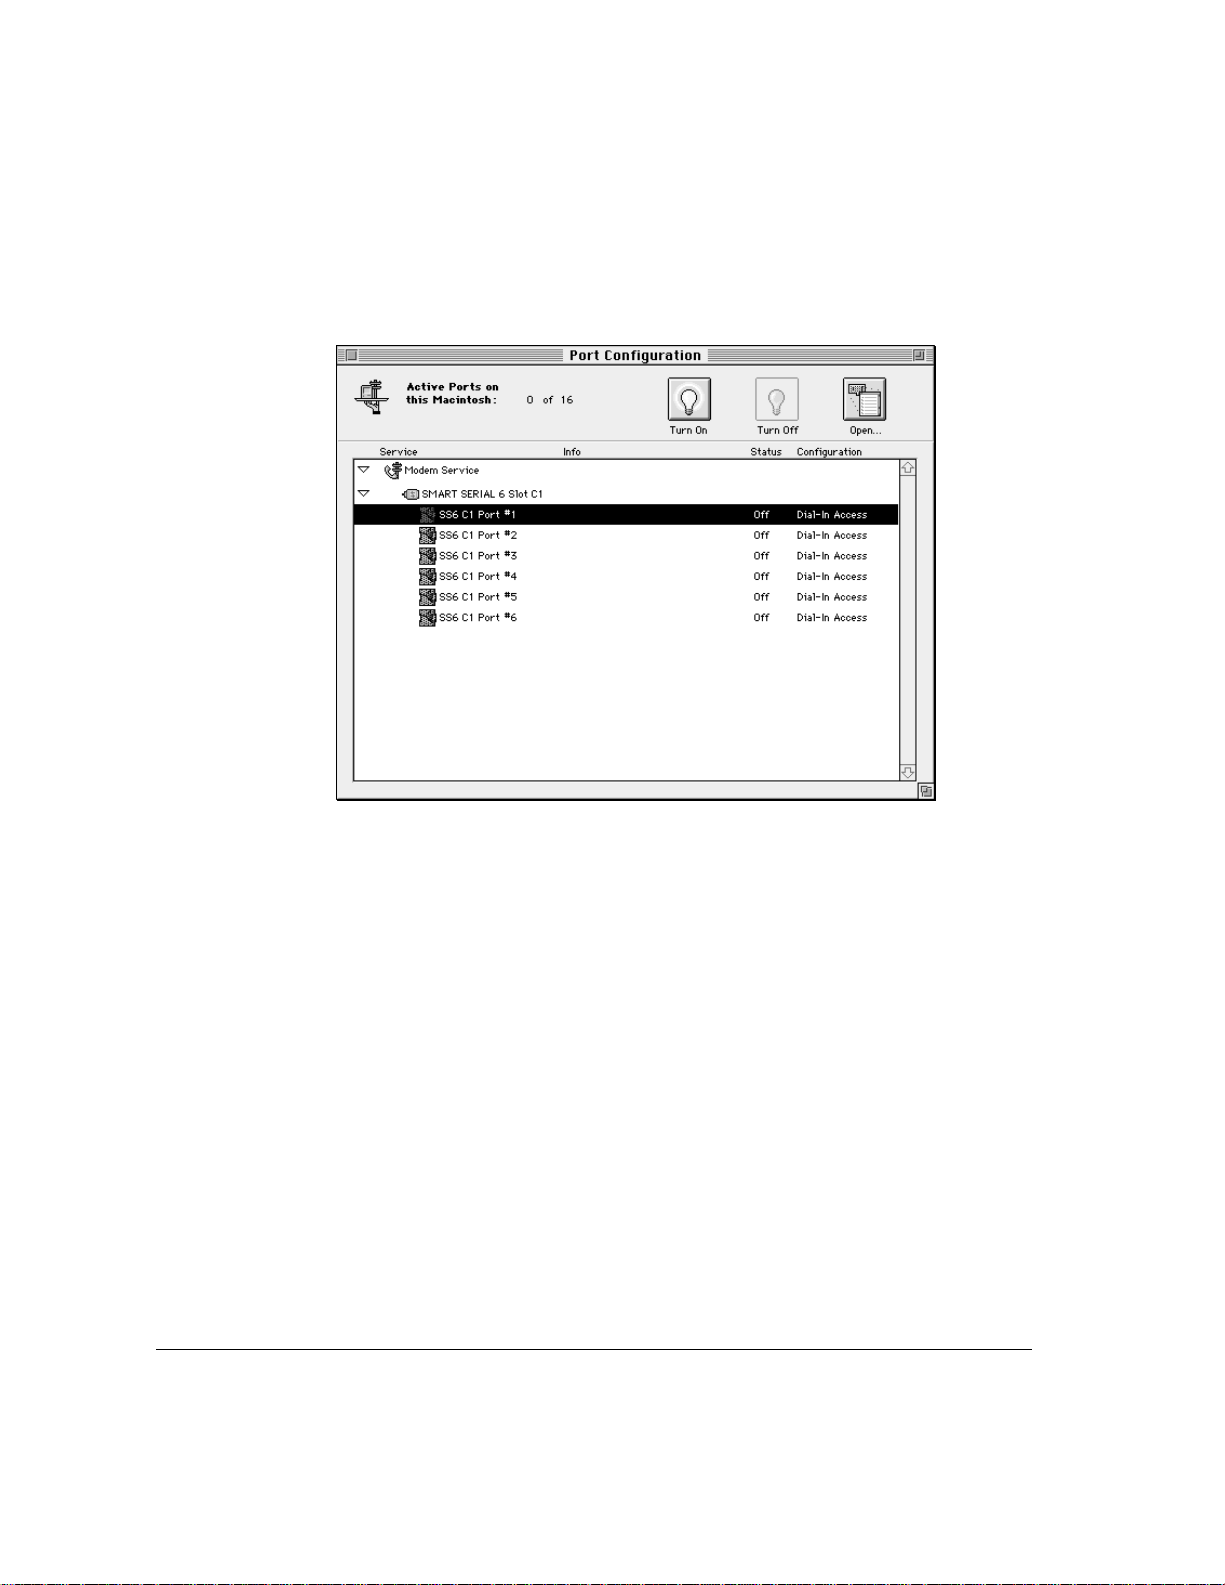
13 Click the close box to close the Port window.
The Port Configuration window is still visible. Now that you’ve configured the
port, you must turn it on to make it active for receiving and making calls.
14 Select the port and click the Turn On button to turn on the port.
Note: If you are using the Security Zone software, you will be required to
enter a password at this point. You will only be required to enter this password
the first time you turn on a port.
Following is a sample Port Configuration window in which all ports on an
expansion card have been configured.
30 Chapter 3 / Setting Up the Server
Page 31

The status of each port is indicated as On, Off, or Error. If Error appears, a
configuration problem exists, and you should refer to the server activity log for
a description of the error. For more information about the server activity log,
refer to Chapter 5.
The Info column contains the text from the Port Info text box in the Port
window. The Configuration column contains the access selected in the Port
Access pop-up menu in the Port window. The status is determined by clicking
the Turn On or Turn Off button.
Configuring the modem ports 31
Page 32

Registering users
Once you have configured the ports, you should re gister users and select dial-in
and callback options for them. There are several ways in which you can
register users. You can
m use the Users & Groups Data File from AppleShare if you have installed the
Apple Remote Access MultiPort Server on the same computer as your
AppleShare server
m create a new User List using the Remote Access Manager software
m create or amend a User List by importing data from another application (for
more information about this process, refer to Chapter 4)
Sharing user database information with AppleShare
If you have installed the Apple Remote Access MultiPort Server on the same
computer as your AppleShare server, the user database is shared between
Apple Remote Access and AppleShare. The user database is called the User
List in Apple Remote Access and the Users & Groups Data File in AppleShare.
All users from the AppleShare Users & Groups Data File appear in the Remote
Access Manager User List as registered users, but you must select login and
callback options for them. Remote Access Manager does not support the
AppleShare Groups feature; any groups that you have created with AppleShare
do not appear in the User List.
IMPORTANT
users, will affect the AppleShare Users & Groups Data File.
Any changes that you make to a User information window, such as changing
the login name or password, also affects the AppleShare Users & Groups Data
File. For more information about changing users’ settings, refer to “Creating a
New User,” later in this chapter, and Chapter 4.
32 Chapter 3 / Setting Up the Server
Any changes you make to the User List, such as adding or deleting
Page 33

IMPORTANT
Since AppleShare Admin and Remote Access Manager use the
same user database, you cannot run both applications at the same time. Howev er,
if you lock Remote Access Manager, you can run the AppleShare Admin
application. To lock Remote Access Manager, choose Lock Server Manager
from the Server menu.
Displaying the User List
The User List displays all users you’ve registered for using the server. Through
the User List window, you can also create new users, delete users, and display
information about users.
To display the User List:
m
Choose Show User List from the Users menu.
If AppleShare is installed or Macintosh file sharing was previously enabled,
registered users appear in the User List. Otherwise only the Guest User
appears. The following User List is a user database shared with AppleShare
for which no remote access privileges have been set yet. Note that the Guest
User is the first user on the list.
Registering users 33
Page 34

The following table shows the meanings of the icons tha t appear on the User List.
Icon Meaning
A new user created in Apple Remote Access
User converted from Users & Groups Data File who has never been modified
Guest access (Guest User only)
Access only to a server running the Mac OS
Access to a selected group of zones
Access to the entire network
Note: A dimmed icon indicates that dial-in access has not been set for that user.
Creating a new user
To create a new user:
1 If the User List is displayed, click the New button; otherwise, choose Create User from
the Users menu.
A New User information window appears. Require New Password on Next
Login and Maximum connection time set to 60 minutes are selected by default.
34 Chapter 3 / Setting Up the Server
Page 35

2 Enter the user’s name.
For sorting to work properly, enter user names first name first (for example,
Joe User).
3 Type a password in the Password text box.
The user must enter this password when calling the server. Make sure to inform
the user of the exact password, including capitalization.
Note: You determine the minimum length of a password in the Server Preferences
dialog box.
4 Use the Remarks text box to enter information about the user, such as a department or
project name.
This information is included in the server activity log when the user connects
to the server and can be useful for call accounting or chargeback applications.
5 Click the Dial-In Access Enabled checkbox so that the user can log in to the server.
If you want to revoke the user’s dial-in access at a later time, you can click the
checkbox again to deselect this option.
6 Click the Change Password Enabled checkbox if you want to allow the user to change
his or her password after logging in.
This allows the user to make user-initiated passw ord changes. The administrator
can also change the password for any user in the User information window.
7 Click the Require New Password on Next Login checkbox to force the user to create a
new password at the next login time.
This option is deselected once the user changes his or her password. This option
works even if the Change Password Enabled option is not selected.
8 If necessary, click the Maximum connection time checkbox and enter a time in minutes if
you want to limit the amount of time for which the user can connect to the server.
The default connection time is 60 minutes. Deselecting this option will give
the user unlimited access time.
Registering users 35
Page 36

9 If you want to require callbacks, click the Call Back at # checkbox and type in the
callback number.
The callback number is the telephone number provided to you by a user for
remote access. Selecting this option means that when the user calls the server,
the server computer will temporarily disconnect the user, then immediately
call the user at the number you’ve entered. The callback feature is optional; it
provides an extra level of security, because the user must call from a specific
phone number.
You enter the phone number as if you were dialing directly . Type in any dialing
prefixes, such as “1” for long-distance calling in the United States and an area
code. If the server needs to dial an outside line (as in many business phone
systems), type the outside line number, followed by a comma. For example,
type 9, 1-415-555-1234. The comma in this example indicates a pause during
dialing so that the modem can connect to an outside telephone line from a PBX.
The hyphens are included for readability but are not required.
Note: If you deselect the callback option, the phone number is saved, but
is unused.
36 Chapter 3 / Setting Up the Server
Page 37

10 If you selected an external security module in the Server Preferences dialog box, the
name of the module appears in this dialog box with a checkbox next to it. Click the
checkbox to enable the security feature for this user.
Note: If you selected the External Security Required for All Users option in
the Server Preferences dialog box, the security option will already be selected.
The name of the module will be dimmed, and you will not be able to deselect
this option.
11 Click the Configure button to configure external security.
A dialog box appears in which you can set security parameters. Click OK
when you have finished.
12 Enable access to one or more zones by making a selection from the “Allow Access to”
pop-up menu in the Zones area.
You can determine which, if any, zones on your network a user can access by
selecting an option from the “Allow Access to” pop-up menu.
There are four options for user zone access:
m This Macintosh Only The user has access only to the services available on
the server running the Mac OS.
m Only Zones Listed The user has access to the zones listed in the Zone List
in the User information window. The server zone is always part of the list
and cannot be deleted.
m Entire Network The user has access to all the zones on the network.
m All Zones Except Listed The user has access to all the zones on the network
except the ones listed in the Zone List in the User information window. The
zone the server is in cannot be put on this list because the user always has
access to the server zone.
Registering users 37
Page 38

If you want to limit zone access, select Only Zones Listed or All Zones
Except Listed.
If you choose Only Zones Listed or All Zones Except Listed, a dialog box
appears from which you select which zones will appear on the user’ s Zone List.
The zone in which the server computer is located appears in italics.
38 Chapter 3 / Setting Up the Server
Page 39

13 Select one or more zones and click Add to add these zones to the Zone List in the User
information window.
You can change the contents of a user’s Zone List by adding or removing zones.
For more information, refer to Chapter 4.
14 Click Save.
Saving the information you entered in the New User information window
registers the user; the user’s name appears in the User List. For information
about changing user settings, refer to Chapter 4.
Registering users 39
Page 40

Creating a user with another user’s settings
To save time, you can create one or more users with the same settings, based
on a user that you have previously created. For example, if you want to create
five users, all with the same settings, you can create the first one, save the
settings, and then create the others based on the first user.
To create a user with another user’s settings:
1 Select the user in the User List that you want to use as a model.
2 Choose Create User As ‘User Name’ from the Users menu, where ‘User Name’ is actually
the name of the user you selected in the User List—for example, Create User as ‘Joe User’.
A New User information window appears. Note that options ar e already selected.
3 Enter the new user’s name.
4 Type a password in the Password text box.
5 Change the callback number if necessary.
6 Click Save.
The user is registered, and the user’s name appears in the User List.
Setting Guest access options
The Guest User always appears in the User List. You should first decide
whether you want to allow guest access, and if so, what access privileges you
want to provide. Guest access allows anyone to access the network without a
password or a user name. Guest access is useful for some network servers but
can be a security risk.
40 Chapter 3 / Setting Up the Server
Page 41

To set Guest User access options:
1 Display the User List by choosing Show User List from the Users menu.
2 Select Guest User in the User List and click the Open button.
The Guest User information window appears.
Registering users 41
Page 42

3 Click the Dial-In Access Enabled checkbox.
If you want to revoke Guest access at a later time, you can deselect this option.
Note: If you want to provide AppleShare access, make sure that you select the
Login Enabled option in the AppleShare Guest User information window.
4 Click the “Maximum connection time” checkbox and enter a time in minutes if you want
to limit the amount of time for which a Guest User can connect to the server.
The default time is 60 minutes.
5 Enable access to a selected zone by making a selection from the “Allow Access to”
pop-up menu.
You can allow access to This Macintosh Only (the server computer), one selected
zone in addition to the zone the server is in, or the entire network. You can
also, if necessary, allow access to all zones but one by choosing All Zones
Except Listed from the “Allow Access to” pop-up menu and selecting a zone
from which you want to exclude guests. You cannot exclude the zone in which
the server computer is located.
42 Chapter 3 / Setting Up the Server
Page 43

If you choose the Only Zones Listed option, a dialog box appears from which
you can select the one zone to which guests will have access.
6 If necessary, select a zone and click Add.
The zone you selected is added to the Zone List. Note that the zone in which
the server is located is also included in the Zone List in italics; this zone
cannot be removed.
Registering users 43
Page 44

7 Click Save.
The guest account now includes basic security attributes. For information about
changing zone access, refer to Chapter 4.
8 Click the close box to close the Guest User information window.
Getting users ready to use the Remote Access MultiPort Server
Make sure that you provide Apple Remote Access Client version 2.0 (or later)
software and documentation to all registered Remote Access users. Installation
instructions are provided with the Apple Remote Access Client User’s Guide.
A license and documentation for four clients is included with each Apple Remote
Access MultiPort Server you purchase. Additional copies may be purchased
individually or in volume through Apple’s volume licensing program. Contact
your local Apple-authorized reseller or representative for more information.
Before users can log in to the server, you must tell them their login names and
passwords; you should also briefly explain what they can expect during the
first login. Make sure that the Dial-In Access Enabled option is selected for all
users to whom you want to provide dial-in access, and that you have provided
them with the dial-in number for the server.
Finally, if your server is using external security, as discussed in “About Server
Security,” earlier in this chapter, make sure that this software has also been
provided to users, and that you have explained how to use it.
44 Chapter 3 / Setting Up the Server
Page 45

4 Managing the User List
This chapter provides all the information you need for managing the User List.
The topics covered include exporting and importing a User List, displaying
and changing settings for a single user, changing settings for multiple users,
and deleting users from the User List.
Page 46

Exporting a User List
You can export the User List into a tab-delimited text file, which you can then
import to another server.
To export the User List:
1 Make sure that the User List window is active.
2 Choose Export User List from the Users menu.
A directory dialog box appears in which you can name the exported User List
and save it.
3 Enter a name and click Save.
The exported list is saved. You can view the list in any application that accepts
tab-delimited data.
The following SimpleText file is a sample exported list. The headers for each
column are taken from the contents of the User information window.
IMPORTANT
Although a Password header appears in the document, passwords
are not exported.
46 Chapter 4 / Managing the User List
Page 47

The following is a list of the headers included in the export file and
their meanings.
Header Meaning
Name User name.
Password User password. Not exported.
Remark Remarks from the User information window.
Enabled Indicates whether dial-in access is enabled. The default value is True.
Connect The number of minutes for maximum connection time. A -1 indicates
unlimited connection time. The default value is 60 minutes.
ChangePW Indicates whether the Change Password option is enabled. The default
value is True.
NewPW Indicates whether the Require New Password on Next Login option is
enabled. The default value is True.
Callback Indicates whether the “Call Back at #” option is enabled. The default
value is False.
CallbackNum The callback telephone number.
Security Indicates whether a security module has been enabled. The default
value is False.
Zone The type of zone access:
1 indicates only this computer running the Mac OS.
2 indicates Only Zones Listed.
3 indicates entire network.
4 indicates All Zones Except Listed.
Exporting a user list 47
Page 48

Importing User List information
You can create a tab-delimited text file containing user information, such as
names, passwords, and login access, and then import the information into
Remote Access Manager to create a new User List or to add users to the
current User List.
Note: You cannot import zone information or external security settings.
The first record in the imported file is a header record that contains the names of
the fields that are to be imported. The only mandatory field is the Name field,
which must be the first field specified. It is used as the key for matching the
records in the imported file with the users existing in the User List. All fields
in the header record must have corresponding values in the imported file, or
processing will stop at the record with the missing data.
The following is a sample user database created with a spreadsheet application.
48 Chapter 4 / Managing the User List
Page 49

To import the information in this sample file to the current User List, use the
Import User List command from the File menu. Once you begin the import
operation, a dialog box appears containing the following four options: Merge,
Replace, Ignore, Cancel. Select one of these options to determine how the
information will be imported.
If new records exist in the imported file but do not exist in the User List, they
are added to the User List. Fields in new records that do not contain information
are filled with the default values (refer to “Creating a New User” in Chapter 3
for information about the default values). However, if a user name appears in
both the file you are importing and in the current User List, the results of the
import operation differ depending on the option you select.
Merge Select Merge to combine the records from the imported file with the
records from the User List. Fields in the existing User List are replaced by the
fields from the imported file. Any fields that are not specified in the header
record remain unchanged and retain the values from the existing User List.
Use the Merge option to add data to an existing User List while retaining some
of the existing values. For example, you could change the callback numbers
for a set of users without changing their passwords or zone access.
Replace Select Replace to replace matching records in the existing User List
with matching records from the imported file. Fields that are not present in the
header record are filled with the default values.
Use Replace if you need to make changes that affect every field in matching
records. For example, you can quickly change maximum connection times to
the default value.
WARNING
Using the Replace option can cause you to lose information. For
example, if the imported file does not specify passwords and you select
Replace, the passwords for the matching records in the User List are lost.
Importing User List information 49
Page 50

Ignore When Ignore is selected, any record in the imported file that matches
an existing record in the User List is skipped, and import continues with the
next record in the file. No values in the existing record are changed.
Cancel Cancels the operation.
IMPORTANT
When you import User List information, you change your current
Users & Groups Data File. Make sure that you back up this file by duplicating
and renaming it in the Preferences folder.
To import information to a User List:
1 Create the user database file and save it.
For information about determining the header for each column of information,
refer to “Exporting a User List,” earlier in this chapter.
2 Choose Import User List from the Users menu.
A directory dialog box appears from which you can choose a document to import.
3 Select a file from the directory dialog box and click Open.
A dialog box appears containing four options: Merge, Replace, Ignore, and Cancel.
4 Select an option to continue.
Once the information is imported, the current User List is updated. Any errors
that occur during the import process are written to the server activity log. For
more information about the server activity log, refer to Chapter 5.
You should display the User information window for each imported user so
that you can select zone access and security options.
Note: If you want to create a completely new User List, first delete all users in
the User List window, then import the user database file.
50 Chapter 4 / Managing the User List
Page 51

Opening a User information window
You can access a User information window from the User List window or by
using the Open User command in the Users menu. You can also display multiple
User information windows at one time.
To open a User information window:
1 Select the user name from the User List.
Opening a User information window 51
Page 52

2 Click the Open button in the User List window or choose Open User from the Users menu.
The User information window appears.
Note: You can also double-click on a user’s name in the User List to open the
User information window.
Changing settings for a single user
The previous chapter described the process of creating users and setting basic
security options. The following sections describe how to change settings for a user.
Changing login options
The login options for a user include Dial-In Access Enabled, Change Password
Enabled, Require New Password on Next Login, and Maximum connection
time. You can enable or disable these options at any time to change a user’s
access to the server.
52 Chapter 4 / Managing the User List
Page 53

To change login options:
1 Select a user from the User List.
2 Click the Open button in the User List window or choose Open User from the Users menu.
The User information window appears.
3 Enable or disable any of the following login options by clicking the option’s checkbox.
m Dial-In Access Enabled Enabling this option allows the user to dial in to
the Remote Access server. Disabling this option revokes dial-in access.
m Change Password Enabled Enabling this option allows the user to change
his or her password at any time. Disabling this option means that the user
cannot change the password.
m Require New Password on Next Login Enabling this option requires the user
to enter a new password at the next login time. Once the user enters a new
password and logs in successfully, this option is automatically deselected.
Changing settings for a single user 53
Page 54

m Maximum connection time Enabling this option allows you to enter a
maximum time (in minutes) for which the user can be connected to the server .
The default connection time is 60 minutes. You can enter a maximum of
99,999 minutes (do not enter the comma). Disabling this option provides
the user with access to the server for an unlimited amount of time.
4 Click Save to save these changes.
If you attempt to close the User information window without saving your
changes, a dialog box appears asking you to save your changes.
54 Chapter 4 / Managing the User List
Page 55

Changing security options
Security options include a callback number and an external security module.
Recall that users must have a client security module installed on their computer
to use external security.
To change security options for a single user:
1 Select a user from the User List.
2 Click the Open button in the User List window or choose Open User from the Users menu.
The User information window appears.
3 You can enable or disable either of the following options by clicking the option’s checkbox.
m Call Back at # Enabling this option allows you to enter a telephone number
for callback access. Disabling the option means that a user who dials in to
the server with the correct user name and password is given immediate
access. When the option is disabled, the phone number is saved in the text
box, in case you want to enable this option again in the future.
Changing settings for a single user 55
Page 56

m Third-Party Security Enabling external, third-party security requires that
the user be validated by the security module on the server each time he or
she tries to log in. Once this option is enabled, the Configure button
becomes active.
4 If you selected Third-Party Security and want to configure the security settings, click the
Configure button.
A dialog box appears in which you can enter configuration information. Refer
to the security provider’s documentation for more information.
5 Click Save to save these changes.
If you attempt to close the User information window without saving your
changes, a dialog box appears asking you to save your changes.
56 Chapter 4 / Managing the User List
Page 57

Changing zone access
The section “Creating a New User” in Chapter 3 describes the different types
of zone access you can select for users. Zone access determines which zones
on your network a user can access.
This section describes how to change a user’s zone access by removing zones
from the Zone List in the User information window. If you have selected This
Macintosh Only or Entire Network for a user, you must change the option in
the “Allow Access to” pop-up menu in the User information window before
you can change the user’s zone access.
Note: If you choose the All Zones Except Listed option, you cannot add the
zone in which the server computer is located to the user’s Zone List.
To change zone access for a user:
1 Select a user from the User List.
2 Click the Open button in the User List window or choose Open User from the Users menu.
The User information window appears.
Changing settings for a single user 57
Page 58

3 Select one or more zones in the Zone List.
4 Click the Remove button.
The zone is removed from the user’s zone list.
5 Click Save.
58 Chapter 4 / Managing the User List
Page 59

Changing settings for multiple users
The previous sections describe how to change settings for a single user by
opening the User information window and changing the options directly. You
can easily change settings for multiple users by selecting users in the User List
and choosing a command from the Users menu.
Changing dial-in access
By changing the dial-in access, you can immediately enable or disable the
Dial-In Access option for any number of users, without accessing each User
information window individually.
To change the dial-in access for multiple users:
1 Select the users from the User List.
2 Choose Set Dial-In Access from the Users menu.
A dialog box appears in which you can enable or disable dial-in access for the
selected users. Allow Dial-In Access is selected by default.
3 To remove dial-in access for the selected users, click the Don’t Allow Dial-In Access button.
4 If you want to display the contents of each User information window after setting dial-in
access, click the “Open selected users” checkbox.
5 Click OK to save the new setting for the selected users.
If you selected the “Open selected users” option, each selected User
information window is opened. The Dial-In Access option reflects the
setting you selected.
Changing settings for multiple users 59
Page 60

Allowing users to change their passwords
You can decide whether or not selected users can change their passwords for
accessing the server.
To enable or disable users changing passwords:
1 Select the users from the User List.
2 Choose Set Password Change from the Users menu.
A dialog box appears in which you can enable or disable the option allowing
users to change their passwords. Allow User to Change Password is selected
by default.
3 Click the Don’t Allow User to Change Password button if you don’t want to allow the
selected users to change their passwords.
4 If you want to display the contents of each User information window after changing
password access, click the “Open selected users” checkbox.
5 Click OK to save the new setting for the selected users.
If you selected the “Open selected users” option, each selected User information
window is opened. The Change Password Enabled option reflects the setting
you selected.
60 Chapter 4 / Managing the User List
Page 61

Requiring a new password at login time
As an added security measure, you may want to require that some users change
their passwords at the time they log in to the server. The Set New Password on
Login command enables you to change the setting of the Require New Password
on Next Login option. Make sure that you have selected the Change Password
Enabled option in each user’s information window.
To change the requirement for entering a new password at login time:
1 Select the users from the User List.
2 Choose Set New Password on Login from the Users menu.
A dialog box appears in which you can enable or disable this option. Require
New Password on Next Login is selected by default.
3 If you don’t want to require users to enter a new password at the next login, click the
Don’t Require New Password on Next Login button.
4 If you want to display the contents of each User information window after setting the New
Password on Login option, click the “Open selected users” checkbox.
5 Click OK to save the new setting for the selected users.
If you selected the “Open selected users” option, each selected User information
window is opened. The Require New Password on Next Login option reflects
the setting you selected.
Changing settings for multiple users 61
Page 62

Changing the maximum connection time
Using the Set Max Connection Time command, you can change the setting of
the Maximum Connection Time option in the User information window.
To set the amount of connection time for multiple users:
1 Select the users from the User List.
2 Choose Set Max Connection Time from the Users menu.
A dialog box appears in which you can use the already set limits, select a new
maximum connection time, or provide the selected users with unlimited
connection time. The Use Maximum Connection Time option is selected by
default. This option retains the time selected in the User information window.
3 If you want to set a maximum connection time for the selected users, click the Maximum
Time checkbox and enter the time in minutes in the text box. If you want the selected
users to have unlimited connection time, click the Unlimited Connection Time button.
The default maximum time is 60 minutes; the maximum amount that you can
enter is 99,999 minutes (do not enter the comma). The maximum time for all
selected users is changed to the value entered in the text box.
4 If you want to display the contents of each User information window after setting the
maximum connection time, click the “Open selected users” checkbox.
5 Click OK to save the new setting for the selected users.
If you selected the “Open selected users” option, each selected User information
window is opened. The maximum connection time option reflects the setting
you selected.
62 Chapter 4 / Managing the User List
Page 63

Changing callback access
Setting callback options allows you to provide an additional layer of security.
The server must be able to access the telephone number listed in each User
information window. If you have already entered a callback telephone number
for selected users, you can easily enable or disable the Callback option.
To change callback access for multiple users:
1 Select the users from the User List.
2 Choose Set Callback from the Users menu.
The Set Callback dialog box appears in which you can select to use or not use the
callback feature for selected users. The Use Callback option is selected by default.
3 Click the Don’t Use Callback button if you want to disable callback for the selected users.
4 If you want to display the contents of each User information window after setting the
Callback option, click the “Open selected users” checkbox.
5 Click OK to save the new setting for the selected users.
The option you selected is applied to all selected users. If you have not entered
callback numbers for one or more users, a message appears providing this
information. If you selected the “Open selected users” option, each selected
User information window is opened.
Changing settings for multiple users 63
Page 64

Enabling or disabling external security
You determine the type of external security by selecting the module in the
Server Preferences dialog box. You can quickly enable or disable external
security for multiple users by selecting the users and choosing the Set External
Security command.
To enable or disable external security for multiple users:
1 Select the users from the User List.
2 Choose Set External Security from the Users menu.
A dialog box appears in which you can enable or disable external security for the
selected users. The Enable Third-Party Security option is selected by default.
3 Click the Disable Third-Party Security button to disable security for the selected users.
Note: “Third-Party Security” does not refer to a specific product, but is intended
for illustration purposes only . See your Apple-authorized reseller or representati v e
for specific product recommendations.
4 If you want to display the contents of each User information window after changing the
external security option, click the “Open selected users” checkbox.
You may need to open the User information windows to configure external
security for the selected users. If you have previously configured external
security options, you may not need to do so again.
64 Chapter 4 / Managing the User List
Page 65

5 Click OK to save the new external security setting for the selected users.
If you selected the “Open selected users” option, each selected User
information window is opened. The Third-Party Security option reflects
the setting you selected.
Adding zone access
You can give a set of users access to a specified zone or set of zones using the
Add Zone Access command in the Users menu.
To add zone access for multiple users:
1 Select the users from the User List.
2 Choose Add Zone Access from the Users menu.
The Zones dialog box appears.
3 Select the zones and click Add.
Access to the selected zones is added for each user you selected in the User List.
Changing settings for multiple users 65
Page 66

Removing zone access
You can remove access to a zone or set of zones for a set of users with the
Remove Zone Access command in the Users menu.
To remove zone access for multiple users:
1 Select the users from the User List.
2 Choose Remove Zone Access from the Users menu.
The Remove Selected Zones dialog box appears.
3 Select the zones and click Remove.
Access to the selected zones is removed for each user you selected in the
User List.
Note: The server zone in the Remove Selected Zones dialog box is in italics.
You cannot remove access to the server zone.
66 Chapter 4 / Managing the User List
Page 67

Deleting users from the User List
You can delete users either through the User List window or by using the Delete
User command in the Users menu.
To delete users from the User List:
1 Select the users you want to remove from the User List.
2 Click the Delete button in the User List window or choose Delete User from the Users menu.
A dialog box appears, asking you to confirm your choice.
3 Click Delete.
The users are deleted from the User List.
Deleting users from the User List 67
Page 68

Page 69

5 Managing the Server
This chapter provides all the information you need for managing the server.
The following topics are covered: working with the server activity log,
displaying port activity, working with the Zone List, sending information to
users, locking the server, disconnecting users from the server, and shutting
down the server.
Page 70

Working with the server activity log
The server activity log records all activity on the server. You can use this log to
document the users who connect to the server, the date and time of the activity,
and any pertinent information regarding the activity, such as the type of
activity and errors.
The server activity log can also be used for accounting purposes, for example
to charge connection costs back to departments or projects. It can be exported
to a tab-delimited text file.
Setting server activity log preferences
You can set server activity log preferences through the Log Preferences dialog
box. Log preferences include the following:
m export log name
m option to shut down the server if the hard disk is full (the default)
m interval at which the log file is archived (daily, weekly, or monthly)
To set server activity log preferences:
1 Choose Set Log Preferences from the Server menu.
The Log Preferences dialog box appears.
70 Chapter 5 / Managing the Server
Page 71

2 Click the Destination button to enter a name for the log and a location in which to archive
the log.
The default filename is Remote Access Log, but you can enter another f ilename,
for example, Dial-in Server Log. The maximum length of the filename is 20
characters, because the export date is added to the end of the filename when
the log file is created.
3 Click Set.
The dialog box disappears, returning you to the Log Preferences dialog box.
The name for the log file appears in the Log Preferences dialog box.
4 Click the New Log File Every checkbox if you want Remote Access Manager to
automatically archive the current log file at a specified time interval.
The pop-up menu becomes active.
Working with the server activity log 71
Page 72

5 Choose a time interval from the pop-up menu: Day, Week, or Month.
At the interval you select, the contents of the server activity log are exported
to a text file and saved on the hard disk. At the time of export, the activity log
is cleared.
If you select Day, the contents of the server activity log are exported each day
at midnight. If you select Week, the contents of the log are exported at midnight
on Sunday . If you select Month, the contents of the log are exported at midnight
on the first day of each month.
6 Click OK to save the changes and close the dialog box.
Displaying the server activity log
The server activity log contains the following information:
m date and time of activity
m port information (from the Setup Port window)
m user name
m activity, such as connecting, calling back, or error message
72 Chapter 5 / Managing the Server
Page 73

To display the server activity log:
1 Choose Show Server Log from the Server menu.
The server log appears in its own window. Errors are indicated by an
exclamation point (!).
2 Click the close box to close the window.
Copying the server activity log
To make a copy of the server activity log without affecting the current archi ving
schedule, choose Copy Log File As from the File menu. Use this option if you
want to print a copy of the server activity log.
Displaying the archived log file
The log file contains the information that is exported from the server activity
log at an interval that you specify in the Log Preferences dialog box. Once
this file is saved on a disk, you can view it using SimpleText or most wordprocessing programs.
Working with the server activity log 73
Page 74

Printing the archived log file
Follow these instructions for best results when printing a log file that you have
saved on a disk.
1 Open the file using SimpleText or a word-processing application.
2Choose Page Setup from the File menu.
3Click the Landscape icon (the icon indicating horizontal format) in the Orientation
section of the dialog box.
4Enter 70 in the Enlarge or Reduce box.
5Click OK.
Displaying port activity
Once you have configured ports, set up the user database, and allowed login
access, you can display the following information for each port:
m port information (from the Setup Port window)
m user name (if a user is connected to the port)
m the amount of time the user has been connected to the port
m the amount of connection time remaining to the user
m the status of the port (determined by the options selected in the Setup
Port window)
74 Chapter 5 / Managing the Server
Page 75

To display port activity:
1 Choose Show Port Activity from the Server menu.
The Port Activity window appears. This window contains a list of all ports, the
status of each port, port information, and the users who are connected to each
port. Using the buttons in the window, you can open User information windows,
send a message to users, and disconnect users.
Displaying port activity 75
Page 76

2 Select a port for which you want to display information.
The buttons at the top of the window become active. If you select a port to
which no users are connected, only the Open Port button becomes activ e. If you
select a port to which a user is connected, all the buttons become active.
3 To display the Setup Port dialog box, click the Open Port button.
You can make changes to the port information at this time; howe v er, any changes
you make may affect the connected user.
4 To display a User information window for the user connected to the port you selected,
click the Open User button.
This button is active only if a user is connected to the port you select. You can
make changes to the user information at this time. Any changes you make will
affect the user’s next login.
For information about sending a message to users and disconnecting users, refer
to later sections in this chapter.
76 Chapter 5 / Managing the Server
Page 77

Working with the Zone List
In Chapters 3 and 4 you learned how to add and remove zone access using the
User information window, the User List, and the Add Zones and Remove
Zones commands in the Users menu. This section describes how to work with
zones using the Zone List and Zones menu commands.
Displaying Zone and User Lists
The Zone List displays all zones that are available on your network. Once you
display the Zone List, you can “open” a zone to display a list of all users who
have access to that zone. When the User List for a zone is displayed, you can
add users to and remove users from the zone.
To display the list of users who have access to a zone:
1 Choose Show Zone List from the Zones menu.
The Zone List appears. The server zone is in italics.
Working with the Zone List 77
Page 78

2 Select a zone from the Zone List.
The Open button becomes active.
3 Click the Open button in the Zone List window, double-click the zone name, or choose
Open Zone from the Zones menu.
The User List for the zone appears.
4 Click the close box to close the window.
78 Chapter 5 / Managing the Server
Page 79

Adding users to a zone
To provide users with access to a zone on your network, you must add them to
the User List for that zone. This method is an alternative to adding zones to the
user’s Zone List in the User information window.
To add users to a zone:
1 Choose Zone List from the Zones menu.
The Zone List appears.
Working with the Zone List 79
Page 80

2 Select the zone to which you want to add users and click Open.
The Zone window appears.
3 Click the Add button in the Zone list or choose Add Users from the Zones menu.
The User List appears.
4 Select the users you want to add to the selected zone.
You can select any users on the list, regardless of their zone access. The Add
button becomes active.
80 Chapter 5 / Managing the Server
Page 81

Note: If you add users who have This Macintosh Only selected in their User
information windows to the list, their zone access automatically changes to Only
Zones Listed.
5 Click the Add button.
The window disappears, returning you to the Zone window. The users you
selected now appear in the User List for the zone.
The Save and Revert buttons become active in the Zone window.
6 Click Save to save the User List for the zone.
Note: When the Zone window is displayed, you can add users to it directly
from the main User List. Choose User List from the Users menu to display the
list. Select the users and drag them from the User List into the Zone window.
Working with the Zone List 81
Page 82

Removing users from a zone
To remove users from a zone on your network, you must remove the users’
names from the zone’s User List. This method is an alternative to removing
zones from the user’s Zone List in the User information window.
To remove users from a zone:
1 Choose Show Zone List from the Zones menu.
The Zone List appears.
82 Chapter 5 / Managing the Server
Page 83

2 Select the zone from which you want to remove users and click Open or choose Open
Zone from the Zones menu.
The User List for the zone appears.
3 Select the users you want to remove from the zone.
The Remove button becomes active.
Working with the Zone List 83
Page 84

4 Click the Remove button or choose Remove Users from the Zones menu.
The users are deleted from the User List for the zone.
The Save and Revert buttons become active in the Zone window.
5 Click Save to save the revised User List for the zone.
84 Chapter 5 / Managing the Server
Page 85

Sending information to users
You can send information to users in two ways: using the server’s greeting or
sending a message directly to connected users. The server’s greeting usually
provides general information and appears only at login time. Sending a message
to connected users through the Port Activity window allo ws you to send a specif ic
message to selected users at any time while they are connected to the server.
Setting the server’s greeting
The server’s greeting appears to users at the time they log in to the server. You
might want to enter the following types of information as a greeting:
m “Welcome to the Remote Access Server.”
m “Welcome to the Remote Access Server. Service will be unavailable on
February 12 between 4 a.m. and 7 a.m.”
To set the server’s greeting:
1 Choose Set Greeting from the Server menu.
The Server Greeting dialog box appears.
2 Enter a greeting and click OK.
Sending information to users 85
Page 86

Sending a message to connected users
When displaying the Port Activity window, you can send a message to
selected users.
To send a message to connected users:
1 Choose Show Port Activity from the Server menu.
The Port Activity window appears.
86 Chapter 5 / Managing the Server
Page 87

2 Select a port that has users connected.
The buttons at the top of the window become active.
3 Click the Send Message button.
A dialog box appears in which you can enter and send a message.
4 Enter the message and click OK.
The message appears on the monitors of users connected to the ports you selected.
Sending information to users 87
Page 88

Locking the server
Locking the server prevents unauthor ized individuals from accessing most server
windows or menus by closing all windows but leaving the server running.
IMPORTANT
Password. You will be required to enter this information before you can unlock
the server. For more information about the Administrative Password, refer to
Chapter 3.
To lock the server:
1 Choose Lock Server Admin from the Server menu.
An alert box appears, asking you to confirm that you want to lock the server.
2 Click Lock.
The server is locked. To unlock the server, choose Unlock Server Manager
from the Server menu.
Before locking the server, you must know the Administrative
88 Chapter 5 / Managing the Server
Page 89

Disconnecting users from the server
You can disconnect users through the Port Activity window only. To
disconnect users from the server:
1 Choose Show Port Activity from the Server menu.
The Port Activity window appears.
Disconnecting users from the server 89
Page 90

2 Select the ports from which you want to disconnect users.
The buttons at the top of the window become active.
3 Click the Disconnect User button.
The Disconnect Users dialog box appears in which you can enter the amount of
time until the users will be disconnected and send a message to the users.
90 Chapter 5 / Managing the Server
Page 91

4 Enter the number of minutes until the users will be disconnected.
If you do not enter a number, but leave the default value, 0, and click OK, the
selected users are disconnected immediately.
5 Enter any message to the users, such as when the server will again be available.
6 Click OK to send the message and begin the countdown for disconnection.
The message appears on the users’ monitors. The following status display
appears on your monitor:
Disconnecting users from the server 91
Page 92

Shutting down the server
You can easily notify users of a shutdown and then shut down the server using
the Shut Down Server command.
Note: If possible, you should give users ample time to finish their work and
close their connections to the server.
To shut down the server:
1 Choose Shut Down Server from the Server menu.
If no users are connected, a message appears asking you to confirm that you
want to shut down the server immediately. Click OK to shut down the server.
If users are connected, the Shut Down Server dialog box appears.
2 Enter the number of minutes until the server will shut down.
92 Chapter 5 / Managing the Server
Page 93
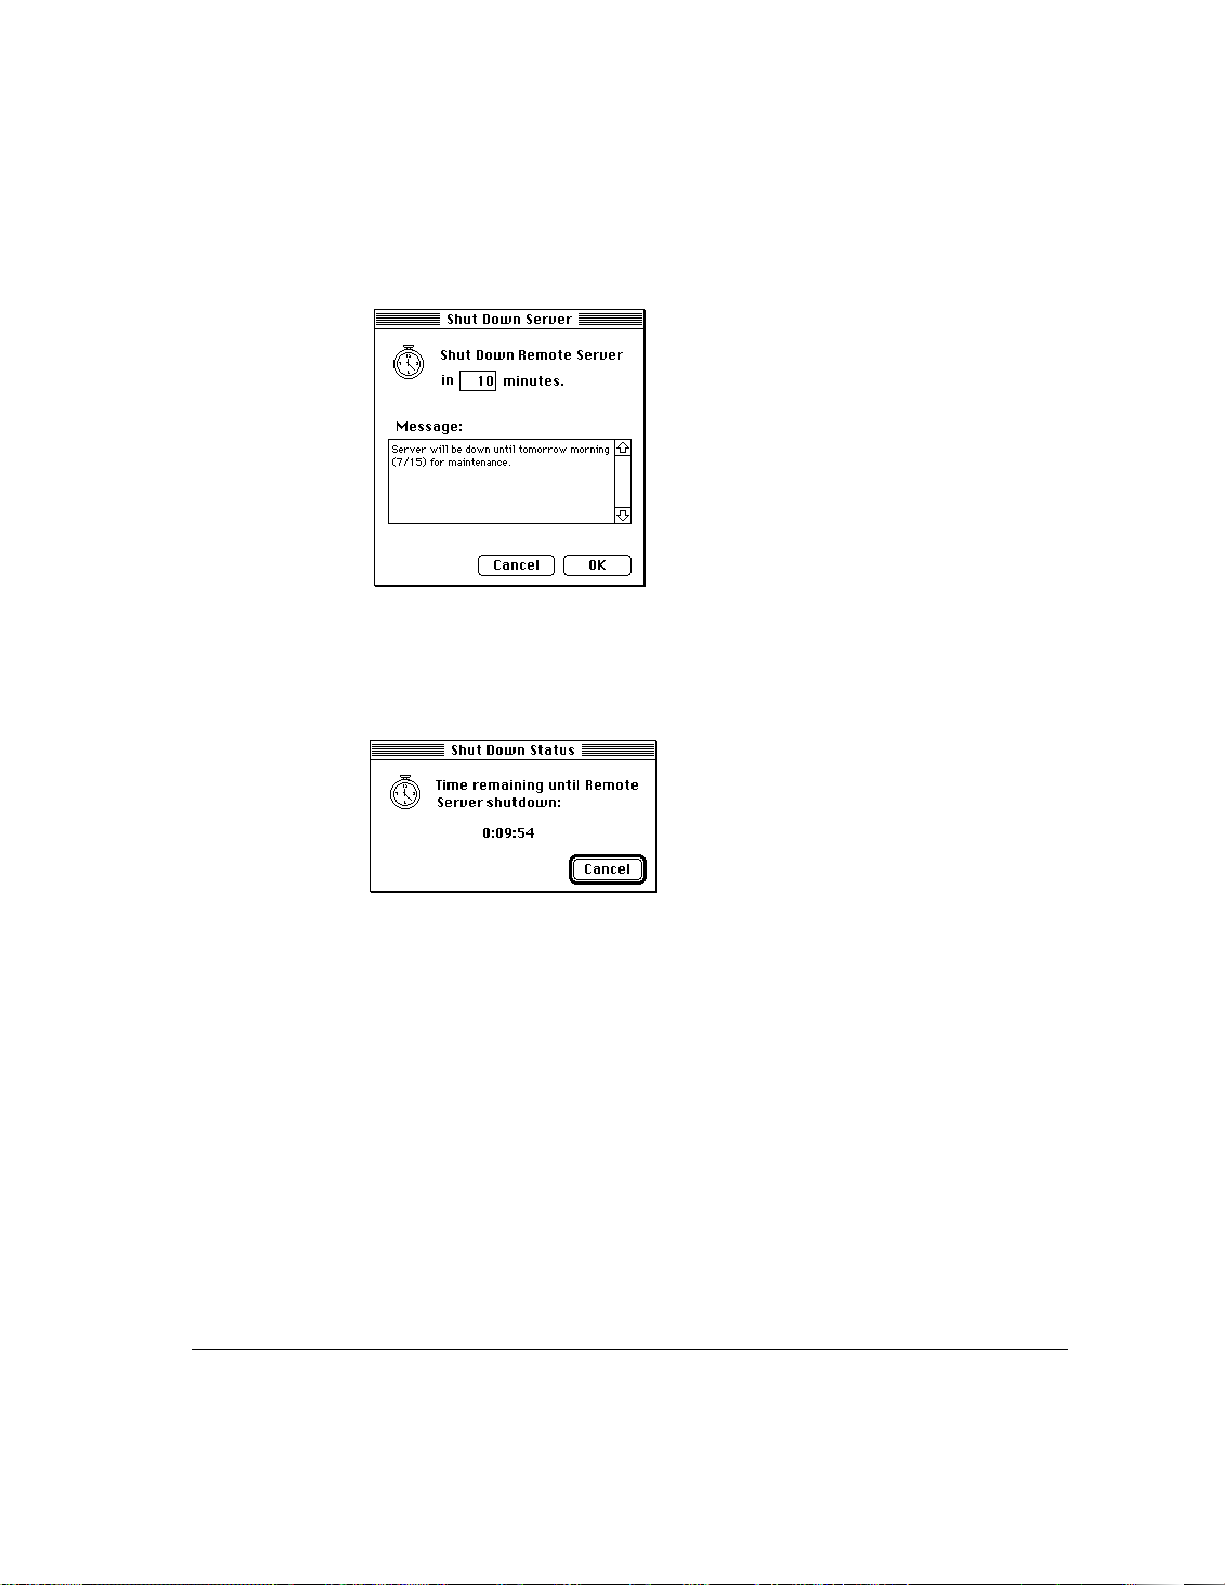
3 Enter a message to users, such as when the server will again be available or the reason
for the shutdown.
4 Click OK.
The message is sent to all connected users, and the server is shut do wn after the
time limit you specified. The following status display appears on your monitor:
Note: The Shut Down Server command becomes the Start Server command
after the server shuts down. To restart the server, simply choose the Start
Server command from the Server menu.
Shutting down the server 93
Page 94

Page 95

Appendix Troubleshooting
This appendix discusses problems you may encounter while using the
Apple Remote Access MultiPort Server and offers suggestions for solving
these problems.
Note: If you think you are having trouble with your expansion card, see the
troubleshooting section of the card guide that accompanies the product.
You may find additional helpful information on Apple’s World Wide Web site
www.info.apple.com.
at
Page 96

Server activity log error messages
Whenever you’re troubleshooting, check the server activity log for errors, which
are indicated by an exclamation point (
most significant events that occur on the server, including errors. This section
presents the most common errors that may appear in the server activity log.
Callback attempt failed: phone number is busy.
The client’s phone was busy when the server tried to call the client back. There
may be a timing problem between the modems (either the server tried to call
back too quickly or the client answered the phone too slowly). Consult your
modem manufacturer or try a different modem.
Callback attempt failed: modems could not connect.
The server tried to call the client back but a connection could not be established.
The client may not be at the callback number specified, or there may be a
modem incompatibility problem.
Callback attempt failed: no dial tone detected.
The server tried to call the client back, but the modem used for the callback
failed to detect a dial tone. There may be no phone line plugged into it, or the
phone line is dead.
!). The server activity log records the
Callback attempt failed: client not answering.
The server tried to call the client back but a connection could not be established.
The callback number may be wrong, or another application on the client
computer may be using the callback line.
Connection attempt failed: unregistered user.
The name specified by the client is not a registered user of the serv er being called.
Connection attempt failed: this port reserved for callback
accounts only.
A user who does not have callback enabled tried to call a Dial-In and Transfer port.
96 Appendix / Troubleshooting
Page 97

Connection attempt failed: incorrect password.
After a number of attempts, the user making the call did not enter a
correct password.
Listen error occurred on this port.
The modem could not be made to listen for an incoming phone call. First check
to see if the modem is on. If it is on, try switching the modem off and then on
again. Then turn the port off and then on again in the Port Configuration
window. Check the modem cable; it may be loose. If none of these measures
solves the problem, the modem script may be defective. Contact the modem
manufacturer for the latest Apple Remote Access modem script.
No available callback client was found.
The server received a connection request from a client but all the ports on the
server that can be used for calling back the client are in use. Check to make
sure all the ports are on.
General troubleshooting
A correctly registered user can’t connect to the server.
m Be sure that the port the user is dialing in to is configured correctly and is
turned on. Check the Port Configuration window to determine the status of
the port.
m Be sure the modem connected to the port is on, and that the cabling between
the port and the modem is correct.
m Another application, such as a terminal emulation program, may be using
the port the user is trying to dial in to. Check to make sure that no other
program is configured to use the port.
General troubleshooting 97
Page 98

Information displayed by Remote Access Manager appears to be incorrect. For instance, a
User information window shows that the user has access but he or she does not.
m Close and reopen the Remote Access Manager window to be sure it is up
to date.
A user you previously registered has disappeared, and you are running AppleShare File
Server software on the same machine as the Remote Access MultiPort Server.
m The AppleShare Admin application and Remote Access Manager both use
the same user list. Therefore, changes made to the list affect users of both
applications. For example, if you delete an AppleShare user, that user will
be unable to use Remote Access.
A port is selected in the Port Configuration window but the Turn On button is disabled.
m If the port configuration displayed in the Port Configuration windo w indicates
“No Access,” open the port and change that access.
A modem script installed in the Extensions Folder on a client machine does not appear
in the Modem pop-up menu in the Remote Access Setup window.
m Contact the modem manufacturer to make sure the modem script is compatible
with Apple Remote Access. Modem scripts for other applications will not
work with Remote Access.
Some features of a modem, such as manual dialing, do not work.
m Contact the modem manufacturer to be sure the modem script has been
upgraded to support the new features available with Apple Remote Access
version 2.
On server startup, the server reports that the server log is corrupted.
m This can happen if the server is shut down unexpectedly. To solve the
problem, drag the Remote Access Log file from the Preferences folder to
the Trash. Restart the computer. This creates a new log file. Note that the
Trash cannot be emptied until after restart.
98 Appendix / Troubleshooting
Page 99

Clients are unexpectedly disconnected.
m Contact the device manufacturer to be sure that the most current scripts are
being used by both client and server. If the serial device supports firmware
upgrades, contact the device manufacturer to be sure that the most current
firmware is installed. Check that a proper high-speed modem cable is
being used.
The Administrative Password has been lost.
m The Administrative Password is equivalent to the AppleShare Admin Key.
The password is stored in the Users & Groups Data File. If it is lost:
1. Shut down the Apple Remote Access MultiPort Server.
2. Drag the Users & Groups Data File from the Preferences folder to the
System Folder.
3. Restart the server.
4. When prompted, enter a new Administrative Password but retain the
same server name.
5. Drag the Users & Groups Data File to the Trash.
This procedure creates a new Users & Groups Data File in the Preferences
folder, with all information retained.
General troubleshooting 99
Page 100

 Loading...