

Page 1

User Guide
English
Manual Version 1.0
Page 2

Table of Contents
Introduction................................................................................................................................................. 9
System Requirements and Product Support ..................................................................................... 9
About This User Guide ....................................................................................................................... 10
Important Notes .................................................................................................................................. 11
Setup .................................................................................................................................................... 11
1. Installation ................................................................................................................................... 11
2. Connection .................................................................................................................................. 12
3. Getting Started ............................................................................................................................ 13
Unlocking Your MPC Software ....................................................................................................................... 14
Features .................................................................................................................................................... 15
Top Panel ............................................................................................................................................. 15
Display ............................................................................................................................................. 18
Rear Panel ........................................................................................................................................... 20
2
Page 3

Quick Start / Tutorial ................................................................................................................................ 22
Starting Up ........................................................................................................................................... 22
Creating a Drum Kit ............................................................................................................................ 23
Recording a Drum Sequence ............................................................................................................. 25
Organizing Samples ............................................................................................................................ 26
Editing Note Events ............................................................................................................................ 28
Making Basic Sound Edits ................................................................................................................. 31
Recording a Bass Track ..................................................................................................................... 33
Creating a Song .................................................................................................................................. 38
Exporting the Song ............................................................................................................................. 39
3
Page 4

Other Features Explained .................................................................................................................. 40
Step Sequencer ............................................................................................................................... 40
Drum Loops and Chop Mode .......................................................................................................... 42
Pad Muting and Track Muting ......................................................................................................... 45
Sample Recording ........................................................................................................................... 47
Sample Editing ................................................................................................................................ 49
Recording Automation with the XY Pad .......................................................................................... 51
Using MPC as a Plugin .................................................................................................................... 52
Operation .................................................................................................................................................. 53
General Features................................................................................................................................. 54
Control Types .................................................................................................................................. 54
Programs ......................................................................................................................................... 60
About Programs ............................................................................................................................................. 60
Drum Programs .............................................................................................................................................. 61
Keygroup Programs ....................................................................................................................................... 64
Plugin Programs ............................................................................................................................................. 66
MIDI Programs ............................................................................................................................................... 68
Menu ................................................................................................................................................ 70
16 Level ........................................................................................................................................... 71
4
Page 5

Effects .............................................................................................................................................. 72
Overview ........................................................................................................................................................ 72
Insert Effects .................................................................................................................................................. 77
Send/Return Effects ....................................................................................................................................... 84
Differences Between Plugin and Standalone Usage ....................................................................... 88
Modes .................................................................................................................................................. 89
Main Mode ....................................................................................................................................... 90
Grid View ....................................................................................................................................... 118
Track View ..................................................................................................................................... 126
Step Sequencer ............................................................................................................................. 130
XYFX Mode .................................................................................................................................... 136
Sample Edit Mode ......................................................................................................................... 140
Trim Mode ................................................................................................................................................... 143
Chop Mode .................................................................................................................................................. 155
Program Mode ............................................................................................................................................. 168
Settings ....................................................................................................................................................... 177
Sampler ......................................................................................................................................... 179
Pad Mute Mode ............................................................................................................................. 185
Pad Mute ..................................................................................................................................................... 186
Pad Group ................................................................................................................................................... 187
5
Page 6
Pad Mixer ...................................................................................................................................... 188
Levels .......................................................................................................................................................... 191
Panning ....................................................................................................................................................... 191
Mute ............................................................................................................................................................ 192
Send Effects ................................................................................................................................................ 192
Insert Effects ................................................................................................................................................ 193
Routing ........................................................................................................................................................ 194
Next Sequence Mode .................................................................................................................... 195
Program Edit Mode ....................................................................................................................... 198
Drum Programs ............................................................................................................................................ 199
Keygroup Programs ..................................................................................................................................... 216
Plugin Programs ........................................................................................................................................... 230
MIDI Programs ............................................................................................................................................. 231
Anatomy of an Envelope ............................................................................................................................... 232
Looper ........................................................................................................................................... 234
Track Mute Mode .......................................................................................................................... 240
Track Mute ................................................................................................................................................... 241
Track Group ................................................................................................................................................. 242
Channel Mixer ................................................................................................................................ 243
Track Mixer .................................................................................................................................................. 247
Program Mixer ............................................................................................................................................. 248
Return Mixer ................................................................................................................................................ 250
Submixer ..................................................................................................................................................... 251
Master Mixer ................................................................................................................................................ 252
6
Page 7

Song Mode .................................................................................................................................... 253
Browser ......................................................................................................................................... 256
Pad Perform Mode ........................................................................................................................ 260
Pad Color Mode ............................................................................................................................ 264
Appendix ................................................................................................................................................. 266
Effects and Parameters .................................................................................................................... 266
Reverbs .......................................................................................................................................... 266
Delays ............................................................................................................................................ 270
Flangers ......................................................................................................................................... 275
Chorus ........................................................................................................................................... 276
Autopans ....................................................................................................................................... 277
Tremolos ........................................................................................................................................ 278
Phasers .......................................................................................................................................... 279
HP (High-Pass) Filters .................................................................................................................... 280
LP (Low-Pass) Filters ..................................................................................................................... 282
Parametric EQs .............................................................................................................................. 284
Distortions ..................................................................................................................................... 286
Compressors ................................................................................................................................. 289
Bit Reducers .................................................................................................................................. 291
Other .............................................................................................................................................. 292
7
Page 8

Glossary ............................................................................................................................................. 294
Trademarks and Licenses ................................................................................................................ 300
8
Page 9

Introduction
Thanks for choosing the MPC Touch. Fusing Akai Professional’s legendary MPC layout and workflow
with the power of your computer, MPC software is an unrivaled instrument for music production.
Introducing a new approach to music production with an ultra-fast and super-intuitive workflow, the
Touch is powered by a radiant 7” color multi-touch display. Literally grab and pinch waveforms, draw
midi events, adjust envelopes, chop samples, add effects and precisely set your controls using your
fingertips. Combined with the classic MPC feel, sound and vastly improved pads, the MPC Touch
embodies the best elements of our past while taking music production tech into the future.
Welcome to the MPC family.
Akai Professional
System Requirements and Product Support
For the latest information about this product (system requirements, compatibility information, etc.) and
product registration, visit akaipro.com.
For additional support, visit akaipro.com/support.
9
Page 10
About This User Guide
This manual should help you get familiar with using the MPC Touch to control your MPC software.
For consistency, the terminology throughout is based on the MPC parameter names.
We also used specific formatting to indicate particular topics of significance:
Important / Note / Tip: Important or helpful information on a given topic.
Names of buttons, controls, parameters, settings, and other options are written in bold characters
throughout the manual.
Examples: Press the Play Start button.
Turn Q-Link Knob 4.
Tap the Mute button.
The Velocity ranges from 0 to 127.
Set the Sample Play selector to One-Shot.
Click BPM, and then use the numeric keypad to enter a 120 as the tempo.
Some parts of this manual refer to other relevant chapters or sections, which are cited in bold, italic
blue characters. Click the text to skip immediately to that section.
Examples: Read the Important Notes section before proceeding.
For more information about installing the necessary drivers and software, please see
the Installation section.
To learn more about using send effects, please see General Features > Effects >
Send/Return Effects.
10
Page 11
Important Notes
• Read the included Safety & Warranty Manual before using the MPC hardware.
• Before getting started and connecting devices to the MPC hardware or turning the hardware on/off,
make sure all devices are switched off.
• Before installing the MPC software, make sure your computer meets the system requirements
described at akaipro.com. This applies whether you’ll use MPC software as your host software or
as a plugin.
• Before connecting the MPC hardware to your computer, install the drivers and software. Visit
akaipro.com to download the latest versions. Refer to the Installation section for more information.
Setup
1. Installation
To download and install the required drivers and MPC software:
1. Go to akaipro.com and register your product. If you don’t have an Akai Professional account yet,
you will be prompted to create one.
2. Download the MPC Software Package.
3. Open the file and double-click the installer application.
4. Follow the on-screen instructions to complete the installation.
Note: By default, the MPC software will be installed in [your hard drive] \ Program Files \ Akai Pro \
MPC (Windows®) or Applications (Mac® OS X®). A shortcut will be created on your Desktop, as well.
11
Page 12

2. Connection
Here is just an example of how to use MPC Touch in your setup. Items not listed under Introduction >
Box Contents of your included Quickstart Guide are sold separately.
Power
Computer
Drum Machine
Powered Monitors
12
Page 13
3. Getting Started
1. Power on MPC Touch.
2. On your computer, open the MPC software.
3. Follow the on-screen instructions to authorize your version of MPC. For more specific instructions,
see the following section, Unlocking Your MPC Software.
4. In the MPC software, click the Edit menu, and select Preferences. Click the Audio tab and select
the sound card you want to use. Click OK when you are done.
5. Remove the protective film from the MPC Touch display, and start making music!
Important: To view the MPC software User Guide click the Help menu and select MPC Help.
Important Note for Mac OS X Users:
If you want to be able to use other apps on your computer as you are using the MPC Touch display,
please do the following:
1. On your computer, open the System Preferences.
2. Select Mission Control.
3. Check Displays have separate Spaces.
4. Close the System Preferences.
13
Page 14
Unlocking Your MPC Software
To unlock the MPC software:
1. Connect your MPC Touch to a USB port on your computer and to a power source.
2. Power on the MPC Touch.
3. Open the MPC software.
4. In the dialogue box that appears, click Unlock Now.
5. Enter your information in the window that appears.
6. If your computer is connected to the Internet, click Unlock Now, and enjoy your MPC!
If your computer is not connected to the Internet, follow these additional steps:
7. Click Use Web Form.
8. The window that appears will have your name, serial number, and software ID number. Click Save
Details to save this information as a .txt file, or copy the information from each field into another file
of your choosing.
9. On a computer connected to the Internet, go to authorizations.akaipro.com/MPC, enter the copied
information, and click Unlock My MPC.
10. Copy the unlock code from the window that appears.
11. In your MPC software, go to the window from Step 5 and click Enter Code.
12. Enter your name and the unlock code generated by the webpage.
13. Click Unlock, and enjoy your MPC!
14
Page 15
Features
This chapter explains the features and functions of your MPC hardware.
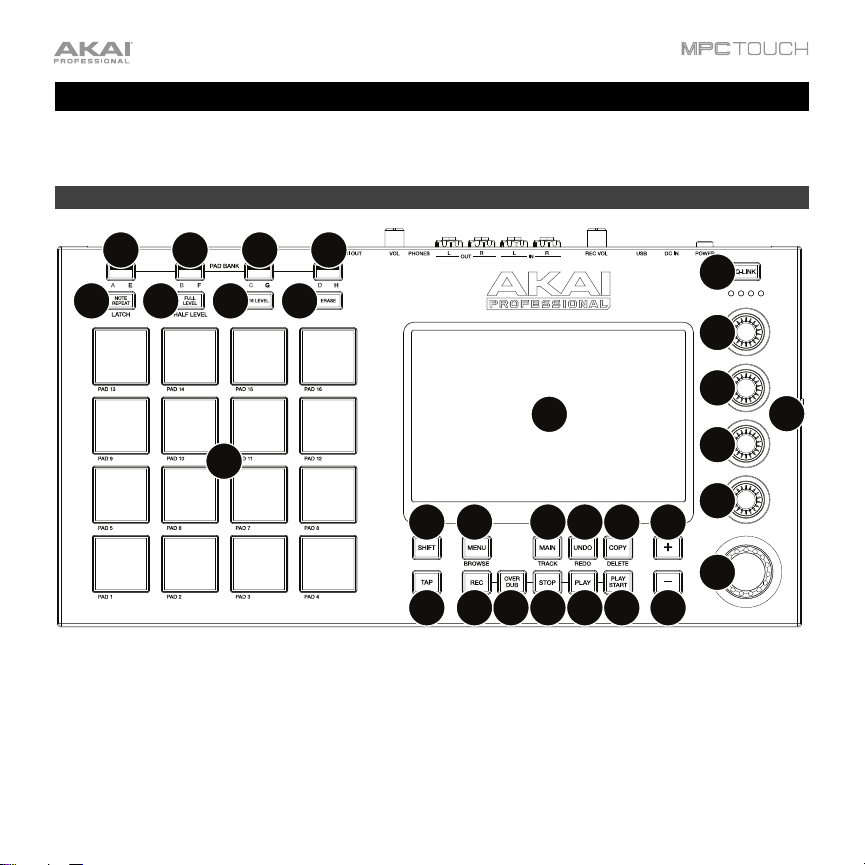
Top Panel
7777
5
8
9
1110
4
4
1
2
4
6
4
12 13 14 15 16 17
3
21 2223
1. Display: This full-color multi-touch display shows information relevant to MPC Touch’s current
operation. Touch the display (and use the hardware controls) to control the MPC software. See the
later Display section to learn how to use some basic functions.
2. Display Brightness +/–: Use these buttons to increase/decrease the brightness of the display.
3. Data Dial: Use this dial to scroll through the available menu options or adjust the parameter values
of the selected field in the display.
17191820
15
Page 16
4. Q-Link Knobs: Use these touch-sensitive knobs to adjust various parameters and settings. The
knobs can control one column of parameters at a time. The lights above the Q-Link Knobs indicate
the currently selected column. Press the Q-Link button above them to change which column of
parameters they currently control.
5. Q-Link Button: Press this button to change which column of parameters the Q-Link Knobs currently
control (indicated by the lights above the Q-Link Knobs). Each press will select the next column.
Press and hold Shift and then press this button to select the previous column instead.
6. Pads: Use these pads to trigger drum hits or other samples in your software. The pads are velocitysensitive and pressure-sensitive, which makes them very responsive and intuitive to play. The pads
will light up different colors, depending on how hard you play them (ranging from yellow at a low
velocity to red at the highest velocity). You can also customize their colors.
7. Pad Bank Buttons: Press any of these buttons to access Pad Banks A–D. Press and hold Shift
while pressing any of these buttons to access Pad Banks E–H. Alternatively, double-press one of
these buttons.
8. Note Repeat/Latch: Press and hold this button, and then press a pad to trigger that pad’s sample
repeatedly. The rate is based on the current tempo and Time Correct settings.
Press and hold Shift and then press this button to “latch” the Note Repeat feature. When latched,
you do not have to hold the Note Repeat button for it to be activated. Press Note Repeat once more
to unlatch it.
9. Full Level/Half Level: Press this button to activate/deactivate Full Level. When activated, the pads will
always trigger their samples at the maximum velocity (127), regardless of the amount of force you use.
Press and hold Shift and then press this button to activate/deactivate Half Level. When activated,
the pads will always trigger their samples at half-velocity (64).
10. 16 Level: Press this button to activate/deactivate 16 Level. When activated, the last pad that was hit
will be temporarily copied to all 16 pads. The pads will now output the same note number as the
initial pad, but a selectable parameter will be fixed at values that increase as the pad numbers
increase (e.g., Pad 1 is the minimum, Pad 16 is the maximum), regardless of how hard you press
them. In the window that appears, use the Type selector to choose the parameter: Velocity, Tune,
Filter, Layer, Attack, or Decay. See Operation > General Features
> 16 Level to learn more.
11. Erase: As a sequence is playing, press and hold this button and then press a pad to delete the note
event for that pad at the current playback position. This is a quick way to delete note events from
your Sequence without having to stop playback.
16
Page 17
12. Shift: Press and hold this button to access some buttons’ secondary functions (indicated by gray
writing). Alternatively, double-press the desired button.
Double-press this button to see which buttons have secondary functions—the buttons will flash for a
few seconds.
13. Menu/Browse: Press this button to open the Mode Menu. You can tap an option on the Menu
screen to enter that mode, view, etc.
Press and hold Shift and then press this button to view the Browser. You can use the Browser to locate
and select programs, samples, sequences, etc. on your computer as well as in the current project.
14. Main/Track: Press this button to enter Main Mode in the display and software.
Press and hold Shift and then press this button to enter Track View Mode in the display and software.
15. Undo/Redo: Press this button to undo your last action. Hold down Shift and press this button to
redo the last action you undid.
16. Copy/Delete: Press this button to copy one pad to another. When the From Pad field is selected,
press the “source” pad (the pad you want to copy). When the To Pad graphic (of all pads) is
selected, press the “destination” pad. You can select multiple destination pads, and you can select
pads in different pad banks. Tap Do It to continue or Cancel to return to the previous screen.
Press and hold Shift and press this button to delete.
17. –/+: Press these buttons to decrease/increase the value of the selected field in the display.
18. Play: Press this button to play the sequence from the audio pointer’s current position.
19. Play Start: Press this button to play the sequence from its start point.
20. Stop: Press this button to stop playback. You can double-press this button to silence audio that is
still sounding once a note stops playing. Quickly pressing this button three times will act as a “MIDI
panic” and shut off all voices and stop all audio processing. You can also press this button to abort
the loading any files that are being loaded (e.g., if you select a project or program by accident).
21. Rec: Press this button to record-arm the sequence. Press Play or Play Start to start recording.
Recording in this way (as opposed to using Overdub) erases the events of the current sequence.
After the sequence plays through once while recording, Overdub will be enabled.
22. Overdub:
Press this button to enable Overdub. When enabl
ed, you can record events in a sequence
without overwriting any previously recorded events. You can enable Overdub before or during recording.
23. Tap Tempo: Press this button in time with the desired tempo to enter a new tempo (in BPM) in the
software.
Press and hold Shift and press this button to switch between the sequence tempo and master tempo.
17
Page 18
Display
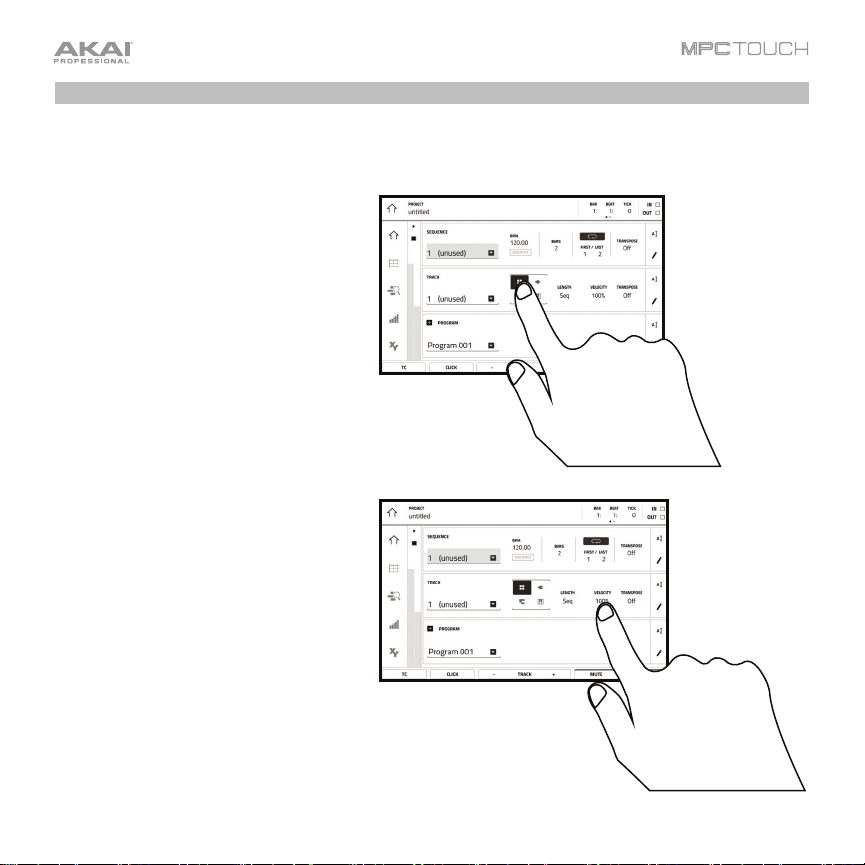
Here is some general information about how to use the MPC Touch display:
Tap a button or option to select it. Use the
Data Dial or –/+ buttons to change its
setting or value.
Double-tap a button to access advanced
editing options. In some cases, this will
show a numeric keypad that you can use
to enter a value (an alternative to the Data
Dial or –/+ buttons). Tap the upper-left
part of the display to return to the
previous view.
x2
18
Page 19
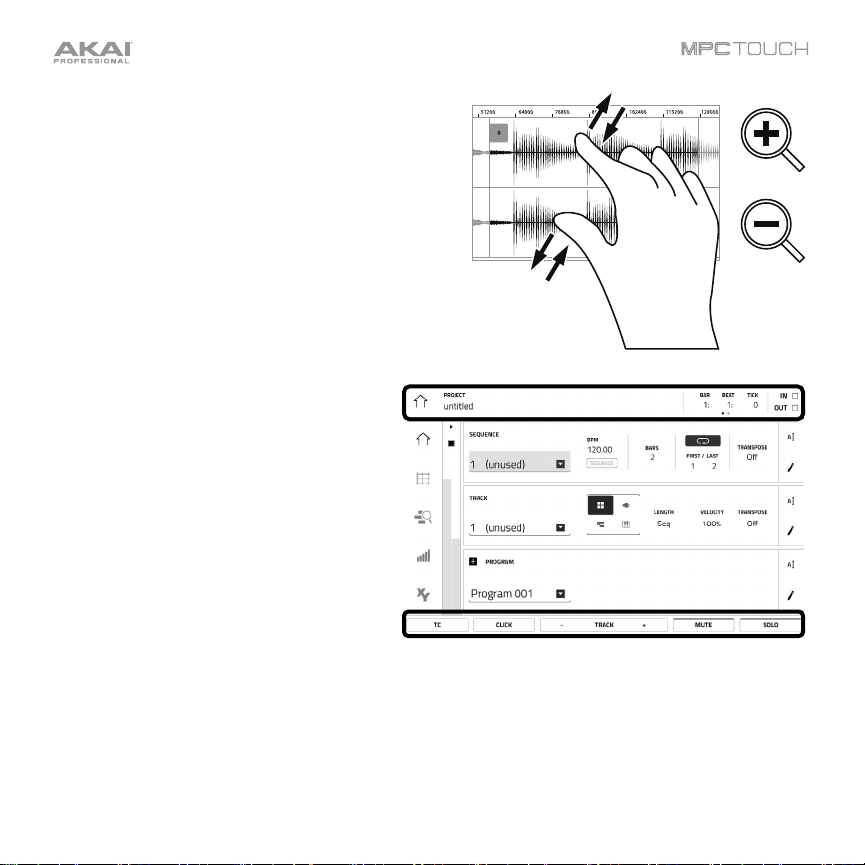
Spread two fingers to zoom in (into a section of a
waveform, for example). Pinch two fingers to zoom out.
The upper edge of the display shows the
toolbar, which contains information about the
current view (often the name of the current
track, sequence, audio pointer position, etc.).
Tap an item to select it.
The lower edge of the display shows various
buttons that you can use in the current view.
Tap a button to press it.
To return to a previous view, either tap outside
of the window currently in the display or tap
the left arrow () in the upper-left part of the
display.
When the left-most button at the bottom of
the touchscreen shows an upward arrow (),
it means there are additional buttons you can
use when you press and hold Shift. Press and
hold Shift to show the secondary buttons, and
any of them, if desired. Release Shift to return
to the previous buttons.
19
Page 20
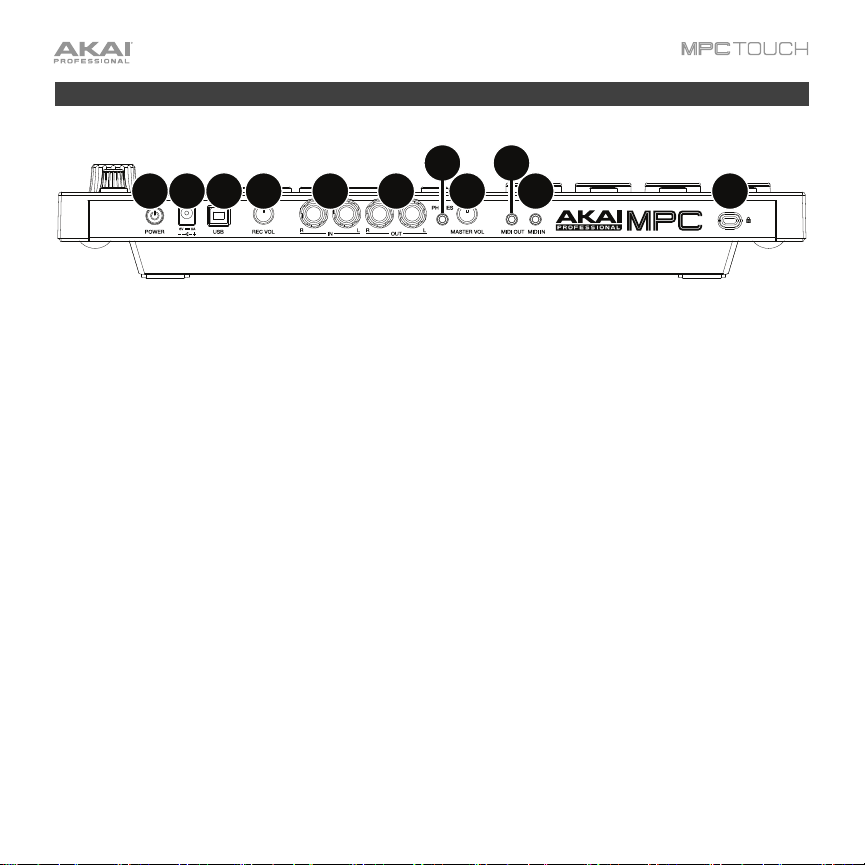
Rear Panel
2
34 56
1
89
7
10 11
1. Power Input: Use the included power adapter to connect MPC Touch to a power outlet.
Alternatively, you can power MPC Touch via the USB port only, but the display will be disabled.
2. Power Switch: Turns MPC Touch’s power on/off.
3. USB Port: Use the included USB cable to connect this high-retention-force USB port to an available
USB port on your computer. This connection allows MPC Touch to send/receive MIDI and audio
data to/from the MPC software.
You can power MPC Touch via the USB port only, but the display will be disabled.
4. Rec Vol: Turn this knob to adjust the volume of the inputs.
5. Master Vol: Turn this knob to adjust the volume of the outputs and phones output.
6. Inputs: Use standard 1/4” (6.35 mm) TRS cables to connect these inputs to an audio source (mixer,
synthesizer, drum machine, etc.). In the software, you can select whether you want to record either
channel or both channels in stereo or in mono.
7. Outputs: Use standard 1/4” (6.35 mm) TRS cables to connect these outputs to your monitors, mixer,
etc.). In the software, you can select whether you want to record either channel or both channels in
stereo or in mono.
8. Phones: Connect standard 1/8” (3.5 mm) stereo headphones to this output.
20
Page 21
9. MIDI Out: Use the included 1/8”-to-5-pin adapter and a five-pin MIDI cable to connect this output to
the MIDI input of an external MIDI device (synthesizer, drum machine, etc.).
Important: Do not connect audio devices (e.g., headphones, monitors, etc.) to the MIDI Out. Use
the included 1/8”-to-5-pin adapters to connect MIDI devices only.
10. MIDI In: Use the included 1/8”-to-5-pin adapter and a five-pin MIDI cable to connect this input to
the MIDI output of an external MIDI device (synthesizer, drum machine, etc.).
Important: Do not connect audio devices (e.g., headphones, monitors, etc.) to the MIDI In. Use the
included 1/8”-to-5-pin adapters to connect MIDI devices only.
®
11. Kensington
Lock Slot: You can use this slot to secure your MPC Touch to a table or other surface.
21
Page 22
Quick Start / Tutorial
This chapter should help you to familiarize yourself with some basic MPC features. To get the most out
of this tutorial, we recommend reproducing each of the described steps.
The display on your MPC Touch reflects what it is controlling in the software, but due to space and
character limitations, the hardware display is slightly different (e.g., parameter names may be
abbreviated, the layout may be different or spread across multiple tabs, etc.).
Important: MPC Touch’s Q-Link Knobs control one column of parameters at a time. Whenever this
manual instructs you to use the Q-Link Knobs to adjust parameters, you can use the Scroll Knob
(above the Q-Link Knobs) to move through the different columns.
On the following pages we will create a short song to show you important aspects of using the MPC
software in conjunction with the MPC Touch.
Starting Up
Make sure you have completed all of the steps described in Introduction > Setup. This includes:
• Installing the necessary drivers and software.
• Connecting your MPC Touch to a power source using the included power adapter and powering it on.
• Connecting your MPC Touch to your computer with a standard USB cable.
• Open and unlocking your MPC software.
22
Page 23
Creating a Drum Kit
Let’s start by making a simple drum kit.
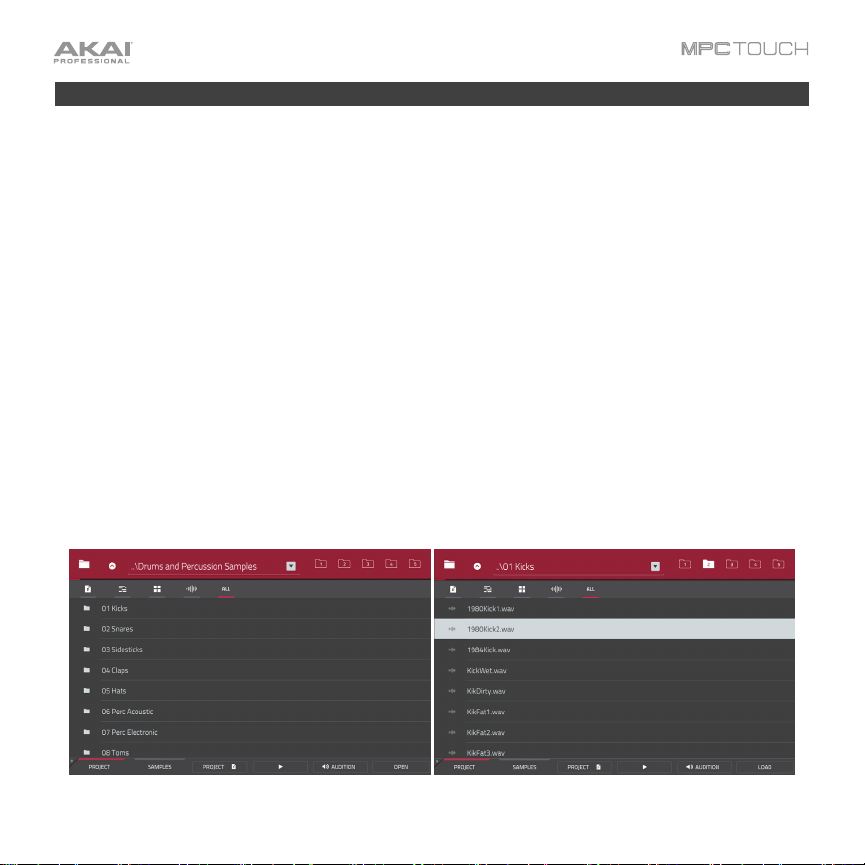
Press Shift+Menu/Browse to show the Browser. Then, use the touchscreen to navigate to where your
drum sounds are located:
• To view the files and folders on your computer, tap Project in the lower-left corner.
• To view the pads and the project’s sample pool, tap Samples in the lower-left corner.
• To move to the previous folder, tap the up (∧) button in the upper-left corner.
• To move through a list, swipe up or down. To move more quickly, use two or three fingers.
• To skip to the top or bottom of the list, swipe left or right (respectively) with two fingers.
• To select a file or folder, tap it.
• To enter a selected folder, tap it once more or tap Open.
• To load a selected sample file, tap it once more or tap Load. This will load it to the currently
selected pad (lit green) and the project’s sample pool.
• To load an entire folder of samples, press and hold Shift, and then press Load All. This will load
all samples in the selected folder to the project’s sample pool.
• To preview a selected sound, tap Play () at the bottom of the touchscreen.
Viewing folders in the Browser. Viewing files in the Browser.
23
Page 24
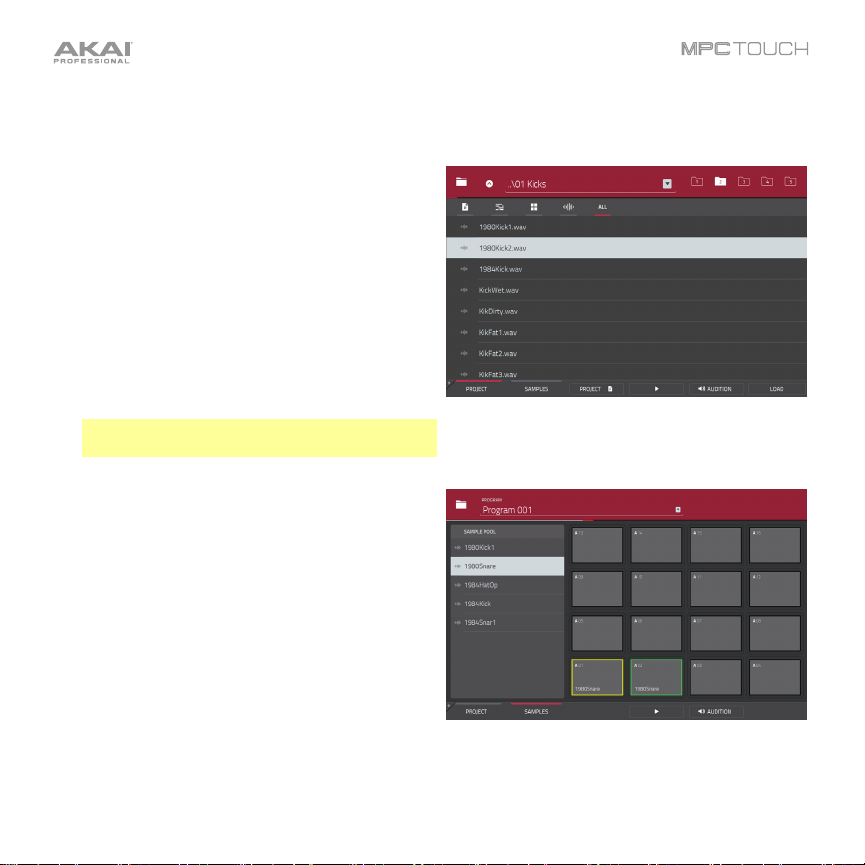
There are two ways to load samples in this mode: using the Project tab or the Samples tab. Let’s try
each of them.
First, load a bass drum using the Project tab:
1. Make sure the Project button in the lower-left
corner of the touchscreen is marked red. If it
isn’t, tap it.
2. Press Pad 1 or tap Pad 1 in the touchscreen to
select it. The pad will be lit green.
3. Use the techniques listed above to find a bass
drum sample you like.
4. To load it to the selected pad (Pad 1, in this
case), either double-tap it, or tap the Load
button in the lower-right corner. Now, you can
press Pad 1 to play the bass drum sample.
The Project tab in the Browser
Tip: To load an entire folder of samples, press
and hold Shift, and then press Load All.
Next, load a snare drum using the Samples tab:
1. Tap Samples at the bottom of the touchscreen.
This lets you view the pads and project’s sample
pool.
2. Press Pad 2 or tap Pad 2 in the touchscreen to
select it. The pad will be lit green.
3. Use the techniques listed above to find a snare
drum sample you like.
4. To load it to the selected pad (Pad 2, in this
case) double-tap it. Now, you can press Pad 2 to
play the snare drum sample.
The Samples tab in the Browser.
To create a simple drum set, repeat the above steps for other pads. We recommend loading a closed hihat and an open hi-hat.
24
Page 25
Recording a Drum Sequence
Now that your drum kit is set up, let’s record a drum sequence.
1. Press the Rec button to activate Record Mode.
2. To start the actual recording, press the Play button. The pre-count will count one measure before
the software starts to record. We recommend recording only one sound (pad) at a time, especially if
you are not familiar with playing drums on the pads.
3. Play a simple bass drum pattern. The note events you just recorded will automatically be placed in
the grid (in this case, on 16
recording will enter Overdub Mode automatically; the sequence plays again from the beginning and
keeps looping, allowing you to record further notes. Don’t stop the recording!
4. Play the snare drum part, then a hi-hat part.
5. When you’re done recording, press the Stop button.
If you start recording again on this sequence, keep in mind that the pads you play in your new recording
will automatically replace existing notes played with the same pads. To prevent this, you can start again
from Step 1 but press the Overdub button instead of the Rec button. Overdub lets you record additional
note events over the existing Sequence.
The Undo button functions differently while in Record Mode. Normally, pressing Undo will undo just the
last event. When there is an event to undo, the Undo button will be lit solid. While recording, the Undo
button will flash. In this case, pressing Undo will erase all events from that recording (i.e., since Play or
Play Start was pressed).
th
notes). The initial measure length is two bars. After the two bars, the
25
Page 26
Organizing Samples
We recommend doing some renaming of your programs and samples before going further.
The collection of drum samples you loaded earlier (and their respective pad assignments) are arranged
into a program. When you load this program in the future, you will be able to use all of the samples that
belong to it.
Let’s rename the exisiting program as we’ll want to create more programs later on.
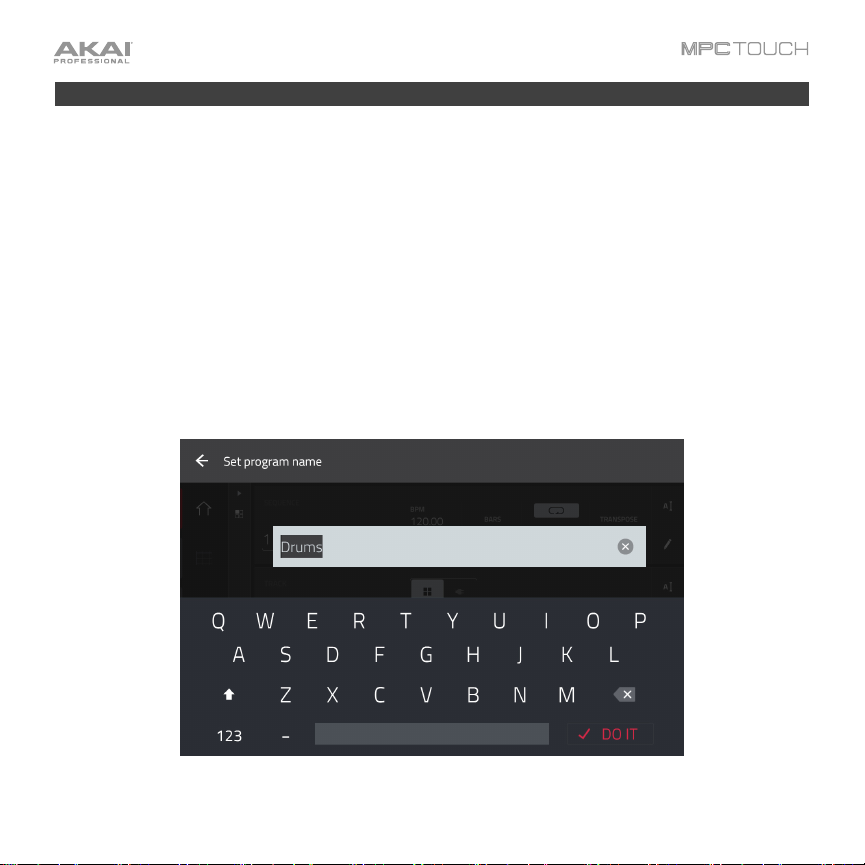
To rename a program:
1. Press Main to enter Main Mode.
2. In the Program section in the lower part of the touchscreen, tap the cursor icon on the right edge.
3. Use the virtual keyboard that appears to enter a new name (e.g., “Drums”), and then tap Do It.
Renaming a program in Main Mode.
26
Page 27
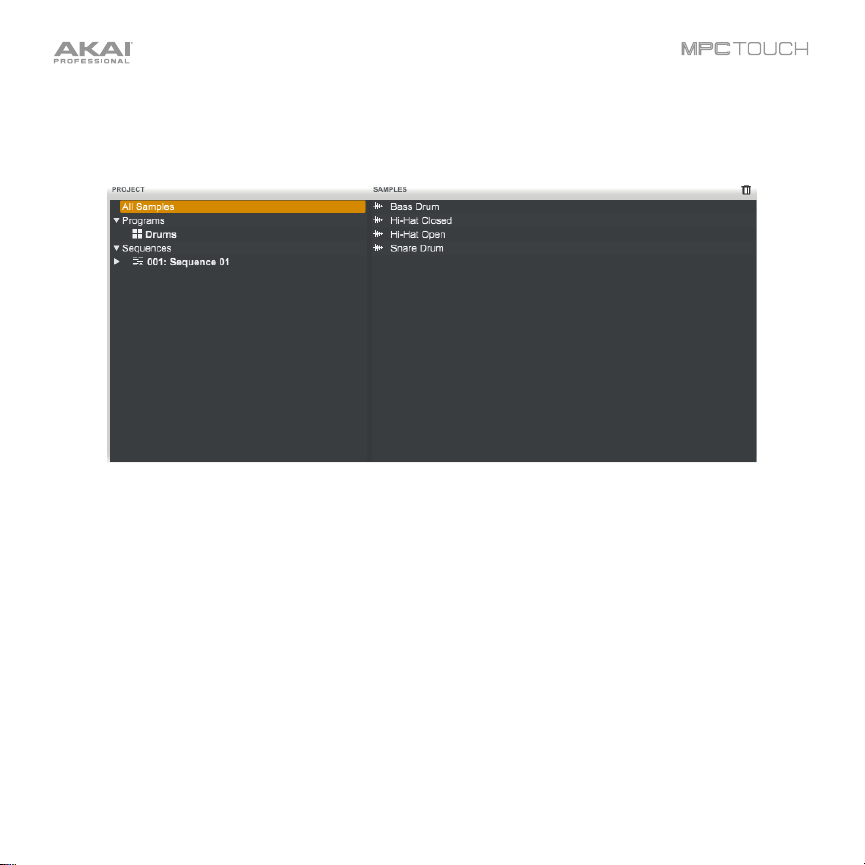
To rename your samples, let’s use your computer. In the Project Information panel, right-click a sample
name a sample (e.g., “1980Kick1”) and select Rename. Use your computer keyboard to rename the
sample (e.g., “Bass Drum”). Repeat this for the other samples in the program. This will help keep your
program organized as you add more samples to it.
The Project Information panel in the software.
Now would be a good time to save your project.
To save your project, using your computer, click the File menu and select Save Project. Alternatively,
press Ctrl+S (Windows) or +S (Mac OS X).
27
Page 28
Editing Note Events
In the grid, you can see your recorded notes (or note events) as a sequence.
To enter Grid View, press Main, and then tap the grid icon on the left side of the touchscreen.
In the Grid View, you can do any of the following:
• To zoom in or out, tap the magnifying-glass icon in the upper-right corner. Then, in the grid, spread
two fingers apart or pinch two fingers together. You can do this for each axis, horizontal or vertical.
• To select all notes for a pad, press the desired pad.
• To select a single note, tap the select box in the upper-right corner. Then, in the grid, tap the note.
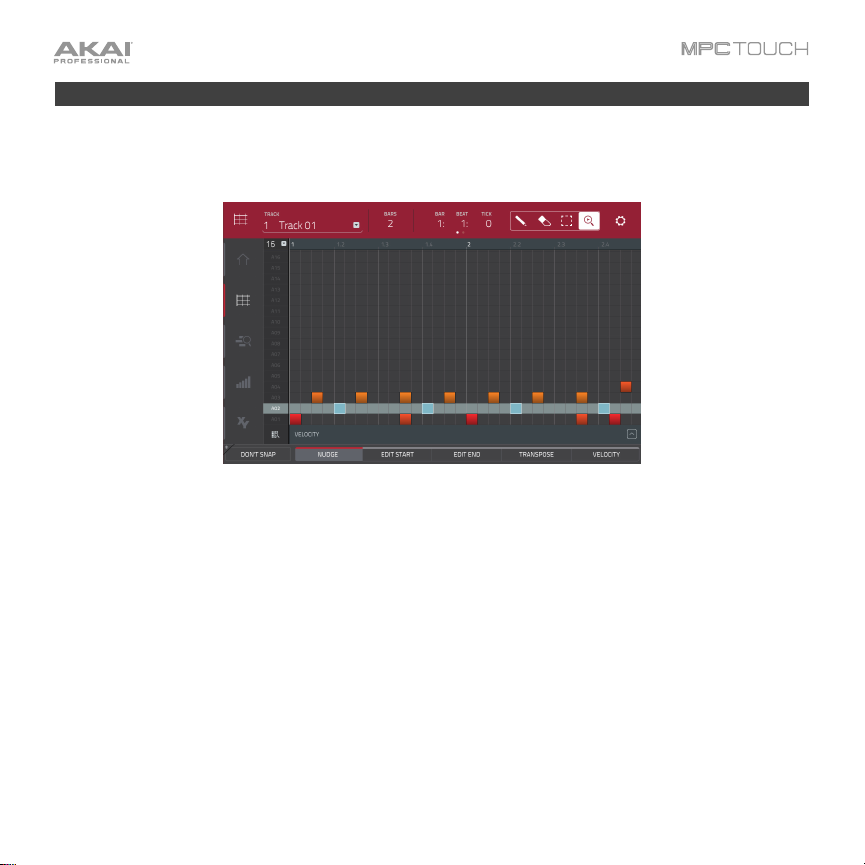
• To move the selected notes, tap Nudge at the bottom of the touchscreen, and then use the Data
Dial or –/+ buttons to shift the notes left or right.
By default, you can position notes only by quantization values, defined by the Time Correct value
(see below).
To change the position of notes without restricting (“snapping”) them to the grid, tap and hold
Don’t Snap in the lower-left corner of the touchscreen, and then use the Data Dial or –/+ buttons
to shift the notes. In this case, each nudge is equivalent to 4 ticks.
The Grid View with Pad A02 selected.
28
Page 29
• To adjust the start point or end point of the selected notes (without changing their position), tap
Edit Start or Edit End at the bottom of the touchscreen, and then use the Data Dial or –/+ buttons.
• To transpose the selected notes up or down, tap Transpose at the bottom of the touchscreen,
and then use the Data Dial or –/+ buttons.
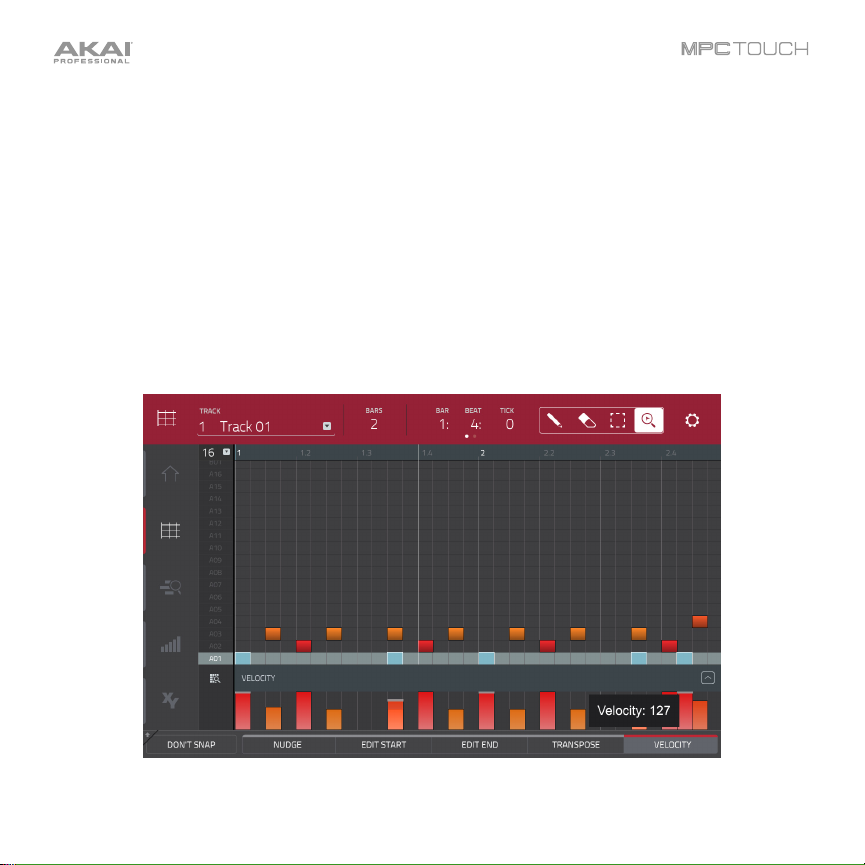
• To adjust the velocity of the selected notes, tap Velocity at the bottom of the touchscreen, and
then use the Data Dial or –/+ buttons.
• To show or hide the velocity lane, tap the up (∧) button in the lower-right corner of the
touchscreen to show the velocity lane below the grid. Each note’s velocity is represented by a
vertical bar. The higher and more red the bar is, the higher the velocity is.
Tap the up (∧) button once more to show a taller version of the velocity lane after which it will turn
into a down (∨) button, which you can then tap to hide the velocity lane.
Adjusting velocities in the Grid View.
29
Page 30

• To open the Timing Correct settings, press and hold Shift, and then tap TC at the bottom of the
touchscreen. See Operation > Modes > Main Mode to learn about these settings.
• To open the metronome settings, press and hold Shift, and then tap Click at the bottom of the
touchscreen. See Operation > Modes > Main Mode to learn about these settings.
• To switch to the previous or next track, press and hold Shift, and then tap Track – or Track +
(respectively) at the bottom of the touchscreen.
• To mute or solo the track, press and hold Shift, and then tap Mute or Solo (respectively) at the
bottom of the touchscreen.
30
Page 31

Making Basic Sound Edits
Let’s make sure the samples are properly tuned and have good levels.
Press Menu, and then tap Program Edit to enter Program Edit Mode.
Press a pad to show its parameters in the touchscreen.
• To adjust its volume, tap and drag the Volume knob up or down. Alternatively, use the Data Dial
or –/+ buttons. To make finer adjustments, double-tap the knob and adjust the larger version that
appears. Tap anywhere else to return to the previous screen.
• To adjust its stereo panning, tap and drag the Pan knob up or down. Alternatively, use the Data
Dial or –/+ buttons. To make finer adjustments, double-tap the knob and adjust the larger version
that appears. Tap anywhere else to return to the previous screen.
Adjust the level of each pad to suit your taste. We recommend spreading the panning of the bright
sounds (e.g., cymbals, snare drum) a little. Additionally, you can tune the bass drum by adjusting the
Semi and Tune knobs in the same way you adjusted the Volume and Pan knobs.
Adjusting Pad A01’s parameters in Program Edit Mode.
31
Page 32

The snare drum may need some reverb to give it a more spatial sound.
Tap Effects at bottom of the touchscreen to view the Insert Effects tab. Press the pad with your snare
drum sound to select it.
Adding insert effects to Pad A02 in Program Edit Mode.
To add an effect:
1. Double-tap the desired slot. A list of effects will appear.
2. Swipe up or down to move through the list.
3. To load an effect, double-tap it. Alternatively, tap it once and then tap Select or push the Data Dial.
Let’s try Reverb Medium.
4. To close the list, tap Close.
To adjust the effect’s parameters, tap the pencil icon. To empty the effect slot, tap the trash can icon.
Switch the effect on or off by tapping the On/Off button for the slot.
32
Page 33

Recording a Bass Track
Let’s try recording a bass line. Unlike a drum kit, it’s important to be able to play and record a bass
sound chromatically, so this will be slightly different than setting up the drum kit.
Adding a bass line over the drum part means we need to work on a new track. A track is simply a layer
of a sequence. You can work with multiple tracks in a single sequence (e.g., a drum track, a bass track,
a piano track, etc.). when you play the sequence, all of them will play simultaneously.
First, we’ll select a new track.
To select a new track:
1. Press Main to go back to Main Mode.
2. Double-tap the Track field in the center-left part of the touchscreen, and then tap Track 2 (unused)
in the list of tracks that appears.
Alternatively, simply tap the Track + button at the bottom of the touchscreen until (unused) appears
in the Track field.
Selecting a new track in Main Mode.
33
Page 34

Let’s create a new program to assign to this empty track.
To create a new program:
1. In the Program section in the lower part of the touchscreen, tap the + button next to Program.
2. On the right side of the touchscreen, tap the cursor icon.
3. Use the virtual keyboard that appears to enter a new name, and then tap Do It.
4. Back in the Track section in the middle of the touchscreen, tap the piano icon. This makes the program
a keygroup program, which is necessary to play the bass sound chromatically with the pads.
Creating a new program in Main Mode.
34
Page 35

To load and edit a bass sound, let’s use the software window instead of MPC Touch:
1. If the Browser panel is not visible on the left side of the window, click the triangle () in the lower-left
corner to show it.
2. In the Browser, locate and select a bass sample.
3. Double-click a sample to add it to the project. Keep in mind that the sample isn’t assigned to a pad yet.
Let’s continue to set up the keygroup program:
1. Click the Program Edit icon in the upper-left corner of the window to enter Program Edit Mode.
Alternatively, press Ctrl+2 (Windows) or +2 (Mac OS X) on your computer.
2. In the Layer section, click the Layer 1 drop-down menu and
select the bass sample you just loaded (you’ll see your drum
samples in this list, as well). Because you’re working with a
keygroup program instead of a drum Program, this sample is
now playable across all pads.
Tip: On your MPC Touch, press the Pad Bank D button to switch to Pad Bank D and press Pad 13.
You should hear the bass sample played back with its original pitch. You can use the other pads to
play your sample chromatically.
35
Page 36

Let’s add a second layer and set the layers’ velocity ranges so the bass will sound different when played
at a higher velocity (as a real bass would):
1. Go back to the Browser and select a different bass sample that sounds similar but a little bit brighter.
2. Double-click a sample to add it to the project.
3. Back in the Layer section, click the Layer 2 drop-down menu and select the new bass sample.
Press a pad—both samples will sound at once. Maybe this new sound is interesting as it is, but let’s
make some quick edits to get as close as we can to a real-life bass sound.
4. Set Layer 1’s Velocity slider to cover the velocity
range from 0 to 80, and set Layer 2’s Velocity
slider to cover the range from 81 to 127.
Now when you press a pad, the lower velocities will
trigger the Layer 1 sample only, while higher
velocities will trigger the Layer 2 sample only.
Let’s record that bass line now. Prepare your recording as described earlier, and record some bass
notes. You can edit your recording just like we’ve done earlier.
A sequence using a keygroup program in the software window.
36
Page 37

Once you’ve recorded it, let’s tweak the sound a bit in the Filter section:
1. Click the Type drop-down menu, and select a filter. Let’s try working with
the Low 4 type.
2. Click and drag the Cutoff and Reso (resonance) knobs up or down until
your bass sample sounds good to you.
3. Click and drag the Amp Atk (amp envelope attack) and Amp Rel (amp
envelope release) knobs up or down. These control the overall level
characteristics of the sound.
Do you want to add an effect? Do this in the Keygroup Inserts section at
the end:
1. Click the downward triangle () in the Insert 1 drop-down menu to
show a list of effects.
2. Click the Internal Effects group to expand it.
3. Select an effect type for your bass line (e.g., Chorus 2-
Voice).
4. Click Select to confirm your choice, or click Close to
cancel.
5. To adjust the settings of the effect, click its name in the
insert slot to open a window that shows its parrameters.
6. To activate or deactivate all keygroup insert effects, click
the On/Off button in the upper-rigth corner of the section.
So far, we’ve created a simple drum sequence and a bass
line to go with it. Repeat this process to create a second
sequence.
37
Page 38

Creating a Song
This section explains how to make a song out of your sequences. Before starting, make sure that you
have recorded some sequences (which we described earlier in this chapter).
To enter Song Mode, press Menu, and then tap Song. You’ll see each of the sequences you’ve
created in this project assigned to a pad. The sequence playlist is to the left of the pads.
As a song plays, it moves through each step of the sequence playlist. Each step contains a sequence
you assigned.
Each step can be repeated, determined by the value in the Repeat column (the repeat icon). A Repeat
value of 1 means the sequence will play through only once. The Bars column on the right indicates the
length of that step: [the number of bars in the sequence] x [the number of times it repeats].
Each step can be set to play its sequence at an independent tempo, determined by the value in the BPM
column.
Song Mode.
38
Page 39

To insert a step at the current position, tap Insert.
To delete the currently selected step, tap Delete.
To set which sequence plays for a step, tap the step’s Sequence field, and then turn the Data Dial to
select a sequence.
To set how many times a sequence repeats, tap the step’s Repeat field (under the repeat icon), and
then turn the Data Dial to select a number.
To name the song, in the software window, double-click the Song
drop-down menu (where is shows the song number and (unnamed)),
enter a name using the computer keyboard, and then press Enter.
Exporting the Song
Want to share your new song? Just export it first.
While in Song Mode, in the software window, click the File menu, select Export, and select As Audio
Mixdown. Alternatively, press Ctrl+Shift+E (Windows) or +Shift+E (Mac OS X) on your computer
keyboard.
In the Audio Mixdown window that appears, do the following:
• Set the Start field to 1, and set the End field to the last bar of your song.
• As you’ll likely share the song online, select the mp3 file format option.
Click Export. Choose where you want to save it, and then click Save to start exporting.
To learn more about audio mixdown options, please see the MPC software’s User Guide: click the Help
menu and select MPC Help.
39
Page 40

Other Features Explained
This chapter describes various advanced features. For a fuller explanation of these features, please refer
to their corresponding sections in the Operation chapter.
Step Sequencer
You’ve already learned how to record note events on a track, but you can quickly enter note events in
the Step Sequencer by using the pads as “step buttons,” simulating the experience of a traditional stepsequencer-style drum machine.
To enter the Step Sequencer, press Menu, and then tap Step Sequencer. Alternatively, in some
modes, you can tap the steps icon on the left side of the touchscreen.
1. Let’s create a sequence on a new track. Tap the Track field in the upper-left corner, and then use
the Data Dial or –/+ buttons to select an (unused) track. Alternatively, double-tap the Track field,
and then tap a track to select it.
2. To set a length for the track, tap the Track Length field at the top of the touchscreen, and then use
the Data Dial or the –/+ buttons to select a length. If you select the minimum value, Sequence, the
track will be however long your sequence it.
Tip: This lets you maintain tracks of different lengths. For instance, you could play a 1-bar drum
sequence repeatedly under a 4-bar bass line.
3. To return to the previous screen without changing anything, tap the grey area in the upper-left corner
of the touchscreen.
4. Tap the Bar –/+ buttons at the bottom of the touchscreen to select the bar whose steps you want to
create or edit. The bar number will appear in the Bar field in the upper-left corner.
5. Tap the Pad –/+ buttons at the bottom of the touchscreen to select the pad whose steps want to
create or edit. The pad number will appear in the Pad field in the upper-left corner.
6. Press the Play button to start your sequence.
40
Page 41

7. Each pad represents a step in the bar. If the pad already has note events on the selected track, the
corresponding pads (steps) will be lit with colors corresponding to their velocities.
To enter a note at a step, press an unlit pad. The pad will light up with a color corresponding to its
velocity.
8. To delete the note from a step, press a lit pad. The pad will become unlit.
To delete all notes from the entire bar, press and hold Shift, and then tap Clear Bar in the lowerright corner.
The Step Sequencer.
See Operation > Modes > Step Sequencer to learn more about this feature.
41
Page 42

Drum Loops and Chop Mode
Modern music producers often use drum loops to add grit and nuance to programmed beats. This
section explains how to use Sample Edit Mode to work with drum loops.
Use the Browser to locate a drum loop on your computer, and then double-tap it to add it to the current
program. The loop does not have to match the tempo of anything in the project.
To enter Sample Edit Mode, press Menu, and then tap Sample Edit.
1. Tap the Sample field at the top of the touchscreen, and then use the Data Dial or –/+ buttons to
select the loaded drum loop. You can scroll through all loaded samples in the project. Alternatively,
double-tap the Sample field, and then tap a sample to select it.
2. Tap the Trim/Chop button at the bottom of the touchscreen to switch between Trim Mode and
Chop Mode. Select Chop Mode, which will let us cut the drum loop into slices.
3. Tap the Threshold button, and then tap the Threshold field to the right of it. Use the Data Dial or –
/+ buttons select a value. Alternatively, double-tap the Threshold field and use the numeric keypad
that appears to enter a value. The higher the threshold, the more slices will be created. Be sure to
select a value so that every transient peak of the drum loop has a corresponding a slice marker.
Tip: Each slice will be automatically assigned to a pad: Pad A01 plays Slice 1, Pad A02 plays Slice
2, etc. Press each pad to play the slice with the same number.
Using Chop Mode while in Sample Edit Mode.
42
Page 43

Now, let’s create a new program containing all of these slices as individual samples. It will also
automatically create corresponding note events to play back these slices sequentially.
1. Press and hold Shift and then tap Convert at the bottom of the touchscreen to enter the Convert or
Assign Slices window.
2. Tap the Convert To field, and then use the Data Dial or –/+ buttons to select New Program with
New Samples.
3. Make sure Crop Samples is checked. If it is not, tap it.
4. Make sure Create New Program is checked. If it is not, tap it.
5. Make sure Create Events is checked. If it is not, tap it.
6. Tap the Bars field, and then use the Data Dial or –/+ buttons to select how many bars the entire
sample should use in your program.
7. Tap Do It to proceed. Each slice will be assigned to a pad, and each pad will have a recorded note
event in the track. When you play that tack, it will play each pad (each slice) in the original order.
Press Menu and then tap Grid View to see how the sample appears in your sequence.
8. Press Play and listen to how the drum loop matches your song tempo now.
Grid View with a sliced sample assigned to pads with notes.
43
Page 44

You can also edit the note events of the drum loop slices—enter Main Mode to do this. A new track with
the note events playing their corresponding slices has been automatically created. Tap the TC button at
the bottom of the touchscreen to use Time Correct to quantize the note events so they fall on exact,
even time intervals.
You can also rearrange the note events, thus creating a new playback order for the slices. You can also
edit each slice or sample in Program Edit Mode. You can add effects for slices or use the filter function
to change the frequency range of a selected slice. There are almost no limits to what you can do.
See Operation > Modes > Sample Edit Mode > Chop Mode to learn more about this feature.
44
Page 45

Pad Muting and Track Muting
Pad Mute Mode and Track Mute Mode let you silence different pads and tracks to see what the
sequence sounds like without those samples or parts.
To enter Pad Mute Mode, press Menu and then tap Pad Mute.
Pad Mute Mode.
1. Press Play to play the sequence.
2. Tap the Program field at the top of the touchscreen, and then use the Data Dial or –/+ buttons to
select your drum program. Alternatively, double-tap the Program field, and then tap a program to
select it.
3. Mute a pad by pressing it once or tapping it on the touchscreen. The muted pad will be lit red. You
can mute multiple pads at the same time.
4. To mute pads on another program, repeat Steps 3–4.
45
Page 46

You can also mute entire tracks by using the similar Track Mute function.
To enter Track Mute Mode, press Menu and then tap Track Mute.
Track Mute Mode.
1. Press Play to play the sequence.
2. Tap the Sequence field at the top of the touchscreen, and then use the Data Dial or –/+ buttons to
select the desired sequence. Alternatively, double-tap the Sequence field, and then tap a sequence
to select it.
3. Each pad is assigned to a track. Mute a track by pressing the corresponding pad or tapping it on the
touchscreen. The pad will be lit red. You can mute multiple tracks at the same time.
4. To mute pads on another program, repeat Steps 3–4.
Tip: To mute a track only at precise note intervals (“quantizing” your mutes, essentially), tap Time
Division to set a musical timing value. Tap the desired musical value (e.g., 1 Bar). Alternatively, use the
Data Dial or –/+ buttons. Tap Close to close the page. Now, when you press a pad in Track Mute Mode,
the mute will occur precisely at the beginning of the following time division (in this example, 1 bar). This
lets you test musical combinations of patterns—the preliminary stage to building a song structure.
See Operation > Modes > Track Mute Mode to learn more about track mutes.
46
Page 47

Sample Recording
This section describes recording new samples of your own, which you can use in your projects.
Important: To record any audio, you need to connect an audio source to your MPC Touch or to your
computer’s audio interface.
To open the Sampler, press Menu and then tap Sampler.
Recording using the Sampler.
1. Connect a microphone to the input(s) of your MPC Touch.
2. Turn the Rec Gain knob to set the input level while speaking into the microphone. You should now
see the level in the meter. Make sure it does not exceed the maximum level (the meter should not be
“peaking” constantly).
3. To set the threshold, tap and drag Threshold slider. Alternatively, use the Data Dial or –/+ buttons.
Set it to a fairly low level (e.g., -50 dB).
4. Tap the Arm button to record-arm the Sampler.
5. Sing or say something into the microphone. The sampler will start recording immediately when the input
level reaches the threshold value. Alternatively, tap the round Record button to manually start recording.
6. To stop recording, tap the round Stop button. The Keep or Discard Sample window will appear.
47
Page 48

In the Keep or Discard Sample window:
• To name the new sample, tap the Edit Name field and use the virtual keyboard to enter a name.
• To assign the new sample to a program, tap the Program field, and then use the Data Dial or –/+
buttons to select the desired program. Alternatively, double-tap the Program field, and then tap a
program to select it.
• To assign the sample to a pad in the program, tap the Assign to Pad field, and then press the
desired pad. Alternatively, use the Data Dial or –/+ buttons to select the desired pad number, or
double-tap the Program field, and then tap a pad number.
• To confirm your selections, tap the Keep button at the bottom of the touchscreen.
• To discard the recording and return to the previous screen, tap the Discard button.
• To play the recording, tap the Play button at the bottom of the touchscreen.
Keeping or discarding the recorded sample.
See Operation > Modes > Sampler to learn more about this feature.
48
Page 49
Sample Editing
You may need to edit your newly recorded samples using Sample Edit Mode.
To enter Sample Edit Mode, press Menu and then tap Sample Edit.
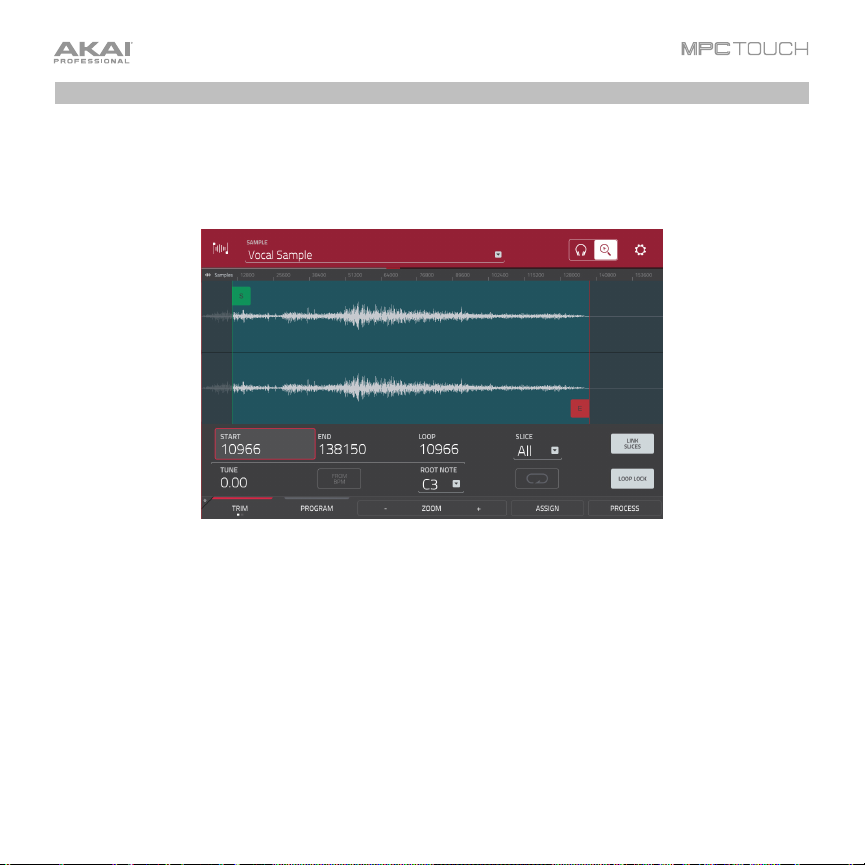
Using Trim Mode while in Sample Edit Mode.
In Sample Edit Mode:
• To switch between Trim Mode and Chop Mode, tap the Trim/Chop button at the bottom of the
touchscreen. (In this example, use Trim Mode.)
• To set the sample’s start point, press Q-Link to select the first bank: Q1, Q5, Q9, and Q13. Use the
Q-Link Knobs to adjust the start point with varying degrees of resolution. Alternatively, tap and
drag the S marker in the waveform.
• To set the sample’s end point, press Q-Link to select the second bank: Q2, Q6, Q10, and Q14.
Use the Q-Link Knobs to adjust the end point with varying degrees of resolution. Alternatively, tap
and drag the E marker in the waveform.
• To hear your edits, press Pad 10 to play the sample from the start point to the end point.
49
Page 50

Let’s apply some processing to the sample.
To open the Process Sample window, tap the Process button at the bottom of the touchscreen.
The Process Sample window in Sample Edit Mode.
1. To select the desired process in the Function field, use the Data Dial or –/+ buttons. Alternatively,
tap the Function button or double-tap the Function field, and then tap the desired process. Let’s
select Pitch Shift to change the overall pitch of your sample. This will transpose the sample without
affecting its length.
2. Tap the knob in the center of the window up or down. Alternatively, use the Data Dial or –/+ buttons.
To make finer adjustments, double-tap the knob and adjust the larger version that appears. Tap
anywhere else to return to the previous screen.
3. To confirm your selections, tap Do It.
To cancel the process, tap Cancel.
See Operation > Modes > Sample Edit Mode to learn more.
50
Page 51
Recording Automation with the XY Pad
Automating various parameters is a good way to add some motion and dynamism to your sequences.
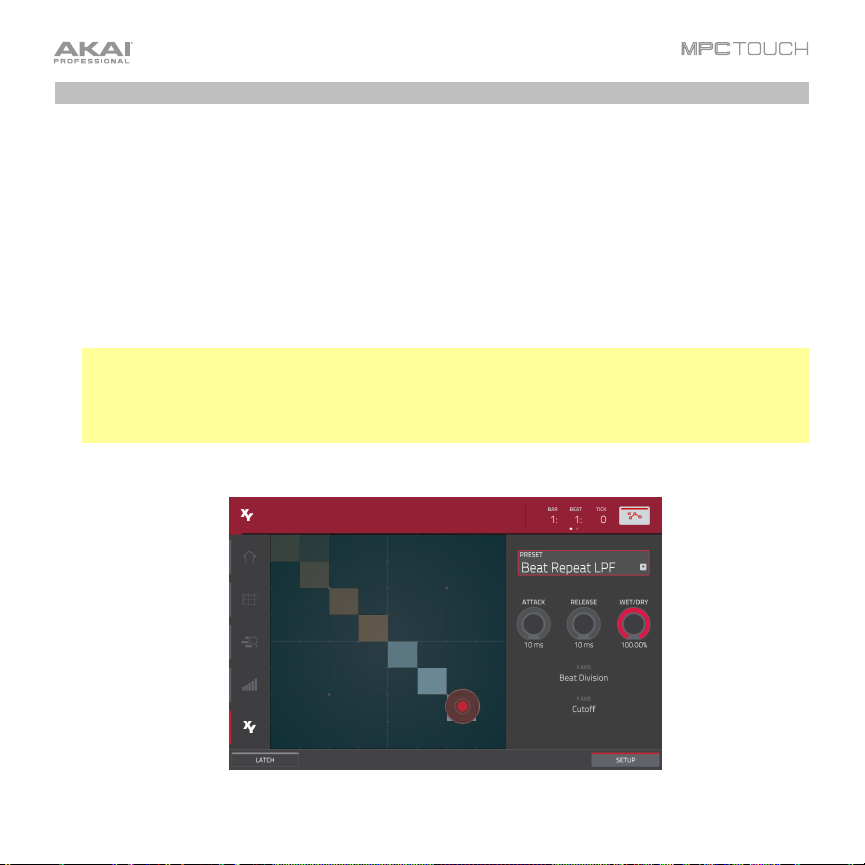
1. Press Menu to open the menu, and then tap XYFX to enter XYFX Mode.
2. When you first enter this mode in a project, you will be prompted to “load” XYFX to the program. Tap
Insert XYFX to do this.
3. Tap Setup to show the Setup panel, which controls how the XY pad behaves.
4. Double-tap the Preset field, and tap an effect to select it. (These are just the effects available in
XYFX Mode, not all MPC effects.) Swipe up or down to view the entire list.
5. Tap and drag any of the knobs (Attack, Release, or Wet/Dry) up or down to set their values as
desired. Below them, you can see parameter what the X axis and Y axis control.
Note: XYFX uses an envelope to control how quickly the effect crossfades between the dry signal
and wet signal. The Attack knob determines how long it takes the completely dry signal to reach the
wet signal (determined by the Wet/Dry knob) after you touch the XY pad. The Release knob
determines how long it takes the wet signal (determined by the Wet/Dry knob) to return to the
completely dry signal after you touch the XY pad.
6. Tap the automation button in the upper-right corner to cycle through the available automation
modes. Make sure it shows the red Write (W) option.
XYFX Mode.
51
Page 52

7. Press Play Start to start recording.
8. As you record, move your finger over the XY pad on the touchscreen. The changes in the sound are
being recorded as automation of both the X axis and Y axis parameters.
9. When you are done recording, press Stop.
10. Tap the automation button in the upper-right corner to select the green Read (R) option. This
ensures your track uses the automation you just recorded when you play it back.
See Operation > Modes > XYFX Mode to learn more about using this feature.
Using MPC as a Plugin
If you are using another digital audio workstation (DAW), you can use the MPC software as an
instrument plugin (VST, AU, RTAS, or AAX format) within your DAW, which will act as the host software.
The MPC plugin offers the same features and functionality as the standalone software version but with
some notable differences, which are discussed in the Operation > General Features > Differences
Between Plugin and Standalone Usage chapter.
Note: To learn how to load and use an instrument plugin in a host application, please refer to the
corresponding chapter of your host application’s manual.
52
Page 53

Operation
This chapter explains the complete features and functions of your MPC Touch with the MPC software.
Important:
• When using the MPC software as a plugin, its features and functions are very similar to how it is
described in this chapter but with some notable differences, discussed in the Operation > General
Features > Differences Between Plugin and Standalone Usage chapter.
• The MPC Touch display/touchscreen reflects what it is controlling in the software, but due to space
and character limitations, the hardware’s display and your computer’s display may show different
things (e.g., parameter names may be abbreviated, the layout may be different or spread across
multiple tabs, etc.).
• When accessing the secondary functions of buttons on your MPC Touch, you can do this one of two
ways: (1) pressing and holding Shift and then pressing the desired button or (2) double-pressing the
desired button. This manual describes these operations using only the first option, but both are
acceptable.
• Almost every mode shown in the touchscreen has 1–6 buttons at the bottom edge. Each of these
buttons select a different tab in that mode or perform a specific function in that mode.
• When the left-most button at the bottom of the touchscreen shows an upward arrow
(), it means there are additional buttons you can use when you press and hold Shift.
Press and hold Shift to show the secondary buttons, and any of them, if desired.
Release Shift to return to the previous buttons.
• When a parameter is highlighted and has a red outline, this means that it is selected.
You can then change it by turning the hardware’s Data Dial or using the –/+ buttons. If
the parameter is a number, try double-tapping it to show a numeric keypad in the
touchscreen, and use that to enter a specific value.
• When the touchscreen shows a group of four parameters with an orange outline and
a Q in the upper-left corner, this means that the current bank of Q-Link Knobs will
control those parameters or settings. Turn a Q-Link Knob to adjust its corresponding
parameter value or setting in that group. You can also press the Q-Link button to
select another group of four parameters.
53
Page 54

General Features
Control Types
The MPC Touch uses the following types of control elements:
Knobs
To set the value for a knob, do any of the following :
• Tap and drag the knob up or down.
• Tap the knob to select it, and then use the Data Dial or –/+
buttons to adjust the value.
• Double-tap the knob, and then tap and drag the larger version
that appears, or use the Data Dial or –/+ buttons to adjust the
value. Tap anywhere else to return to the previous screen.
Parameter Values
To set the value for a parameter, do either of
the following:
• Tap the field to select it, and then use the
Data Dial or –/+ buttons to adjust the value.
• Double-tap the field or hold your finger on it for a second. In the window that appears, use the
numeric keypad, the Data Dial, or the –/+ buttons to adjust the value. Alternatively, tap and drag
the value up or down.
You can also tap /2 to halve the value or x2 to double it.
To confirm the value and return to the previous screen, tap Do It.
To return to the previous screen without changing anything, tap the grey area in the upper-left
corner of the touchscreen.
54
Page 55

Drop-Down Menus / Lists
To select an option for a drop-down menu, do any of the following:
• Tap the field to select it, and then use the Data Dial or –/+ buttons to select an option.
• Double-tap the field. In the list that appears (examples below), tap the desired option. Alternatively,
use the Data Dial or the –/+ buttons to select an option.
In some windows, tap the relevant button at the bottom of the touchscreen to confirm your
selection or to cancel without changing anything.
55
Page 56

Selectors
Selectors show all available options. One of them is always selected.
The selected option is highlighted while the others are dark.
To select an option, tap it.
Buttons
Buttons usually have two states: selected and deselected (active or inactive,
respectively).
To select or deselect a button, do either of the following:
• Tap it.
• If it is outlined in red (and is not a mute button), use the Data Dial or –/+
buttons to switch it to its opposite state.
56
Page 57

Tabs
Some modes have buttons at the bottom edge of the touchscreen that let you cycle
through several similar tabs. For instance, you could view the send level that is routed
to each of 4 returns—each level is shown on a separate tab. With each tap, you will
move to the next tab, indicated by the squares below it.
To select a tab, tap it. Each time you tap it, it will select the next tab.
Sliders
To adjust the position of a slider, do any of the following:
• Tap and drag the slider to the desired position.
• Tap the desired position (this works only on some sliders).
• Tap the slider to select it, and then use the Data Dial or –/+ buttons to adjust the position (this
works only on some sliders).
• Double-tap the slider, and then tap and drag the larger version that appears, or use the Data Dial
or –/+ buttons to adjust the value. Tap anywhere else to return to the previous screen.
57
Page 58

Envelopes
To set the stages of an envelope, do either of the following:
Tip: Tap the rectangular icon above the envelope to show a closeup view.
• Tap and drag a “handle” of an envelope stage in the desired direction.
• Set the numeric value of an envelope stage by adjusting or entering it as a parameter value
(described earlier).
The Filter Envelope tab in Program Edit Mode.
Closeup of an AD-type filter envelope. Closeup of an AHDS-type amp envelope.
58
Page 59

Grid View Tools
In Grid View, these four icons enable you to use different functions
in the grid. Tap one to select its mode:
Pencil: Draw Mode:
• To enter a note in an empty grid square, tap the square.
• To select a note, tap it.
• To move a note, tap and drag it to another grid square.
• To erase a note, double-tap it.
Eraser: Erase Mode:
• To erase a note, tap it.
Select Box: Select Mode:
• To select a note, tap it.
• To select multiple notes, tap and drag across the grid to create a box around them.
• To move a note, tap and drag it to another grid square.
• To move multiple notes, select them as described above, and tap and drag them.
Magnifying Glass: Navigation Mode:
• To move to another part of the grid, tap and drag it.
• To zoom in or out, spread or pinch your fingers (respectively) on the grid. You can do this
vertically, horizontally, or both at the same time.
59
Page 60

Programs
About Programs
A program is a file that contains (1) a list of all samples used and (2) the settings for
each sample (i.e., pad assignments, loop points, pitch tuning, effects, etc.)
Program Edit Mode lets you edit and assign samples. A single project can hold up
to 128 programs.
There are two kinds of programs that use samples as their sound source: drum
programs (used mostly for creating drum parts and quickly and easily assigning
samples to pads) and keygroup programs (in which you can assign one or more
samples to one or more keys and play them chromatically with a MIDI keyboard or
the MPC hardware pads).
Two other kinds of programs use MIDI data only: plugin programs and MIDI
programs. This section covers how to create each program type. To learn about
editing your programs to your preference, see the Modes > Program Edit Mode
chapter.
60
Page 61

Drum Programs
To create a drum program:
1. Press Main to enter Main Mode.
2. Next to the Track field, tap the four-squares icon, which
indicates a drum program.
3. If the project does not contain a drum program yet, a new
drum program will automatically be added to the project
and appear in the Program field below.
If the project already contains a drum program, it will be
selected automatically and appear in the Program field
below. To create another drum program, tap the + icon
above the Program field. A new drum program will be
created and given a number (e.g., Program 002).
4. To name your program, tap the cursor icon on the right
edge of the Program section. Use the virtual keyboard that
appears to enter a new name, and then tap Do It.
61
Page 62

To load a sample into a drum program:
1. Tap Shift+Menu/Browse to show the Browser. Find and select a sample, and then tap Load to load
it to the program. (See Modes > Browser to learn more about using the Browser specifically.)
2. Tap Samples at the bottom of the touchscreen. This lets you view the pads and project’s sample pool.
3. Tap a pad to select it. The pad will be lit green.
4. In the Sample Pool list, double-tap a sample to assign it to the pad. Alternatively, use the Data Dial
or –/+ buttons to assign a sample and/or change the assigned sample.
To clear the assigned sample from a selected pad, press the Data Dial.
To assign samples to additional pads, repeat Steps 3–4.
Viewing files in the Browser. The Samples tab in the Browser.
Tip: Remember that a drum program has 128 pads total—16 pads across 8 banks.
62
Page 63

Alternatively, load samples into a drum program this way:
1. Press Menu and then tap Program Edit to enter Program Edit Mode.
2. Tap Samples at the bottom of the touchscreen. This lets you view the samples assigned to all four
layers of the current pad as well as tuning and level parameters for each layer.
3. Tap a pad to select it. The pad will be lit green.
4. Tap the field for a layer, and then use the Data Dial or –/+ buttons to select a sample. Alternatively,
double-tap the field for a layer, and then tap a sample to select it.
Tip: Press Q-Link to select the first bank, and then use the Q-Link Knobs to quickly select a sample
for each layer of the selected pad.
Tip: Remember that a drum program has 128 pads total—16 pads across 8 banks.
The Samples tab in Program Edit Mode.
63
Page 64

Keygroup Programs
To create a keygroup program:
1. Press Main to enter Main Mode.
2. Next to the Track field, tap the piano-keys icon, which
indicates a keygroup program.
3. If the project does not contain a keygroup program yet, a
new keygroup program will automatically be added to the
project and appear in the Program field below.
If the project already contains a keygroup program, it will
be selected automatically and appear in the Program field
below. To create another keygroup program, tap the +
icon above the Program field. A new keygroup program
will be created and given a number (e.g., Program 002).
4. To name your program, tap the cursor icon on the right
edge of the Program section. Use the virtual keyboard
that appears to enter a new name, and then tap Do It.
64
Page 65

To load a sample into a keygroup program:
1. In the software window, if the Browser panel is not visible on the left side, click the triangle () in the
lower-left corner to show it.
2. In the Browser, find and select a sample, and then double-click it to add it to the project. Keep in
mind that the sample isn’t assigned to a pad yet.
3. Click the Program Edit icon in the upper-left corner of the window to enter Program Edit Mode.
Alternatively, press Ctrl+2 (Windows) or +2 (Mac OS X) on your computer.
4. In the Layer section, click the Layer 1 drop-down menu and
select the sample you loaded earlier. This sample is now
playable across all pads.
Tip: On your MPC Touch, press the Pad Bank D button to switch to Pad Bank D and press Pad 13.
You should hear the bass sample played back with its original pitch. You can use the other pads to
play your sample chromatically.
To create complex keygroup programs, you can add more keygroups (up to 128). This is useful when
working with multi-samples (e.g., when programming a real piano).
Tip: Remember that a keygroup program offers up to 128 keygroups, and each keygroup can hold up to
four samples (Layers 1–4). This is a total of 512 samples.
65
Page 66

Plugin Programs
A plugin program lets you send your
track’s MIDI data to a loaded plugin. This
lets you set multiple tracks to use the
same plugin instead of loading an instance
of a plugin on every track (which can be
cumbersome and CPU-intensive).
To create a plugin program:
1. Press Main to enter Main Mode.
2. Next to the Track field, tap the plug icon, which indicates a plugin program.
3. If the project does not contain a plugin program yet, a new plugin program will automatically be
added to the project and appear in the Program field below.
If the project already contains a plugin program, it will be selected automatically and appear in the
Program field below. To create another plugin program, tap the + icon above the Program field. A
new plugin program will be created and given a number (e.g., Program 002).
4. Double-tap the Plugin field. In the list that appears, tap the desired plugin. Alternatively, use the
Data Dial or the –/+ buttons to select a plugin.
You can tap the Type or Manufacturer button at the bottom of the touchscreen to enable or disable
sorting of your plugins by type or maker.
Tap Select to select the plugin, or tap Close to cancel.
Note: You have to specify the disk directory where your plugins are located. This can be done in the
software’s Preferences (in the Edit Menu). See the User Guide in the MPC software to learn more:
click the Help menu and select MPC Help.
66
Page 67

5. To select the MIDI channel the program will use, double-tap the MIDI Ch field. In the list that appears,
tap the desired channel. Alternatively, use the Data Dial or the –/+ buttons to select a channel. Use
this setting when you are working with a virtual instrument plugin that supports multi-mode.
6. To select a preset in your plugin (if any), double-tap the Preset field. In the list that appears, tap the
desired preset. Alternatively, use the Data Dial or the –/+ buttons to select a preset.
7. To name your program, tap the cursor icon on the right edge of the Program section. Use the virtual
keyboard that appears to enter a new name, and then tap Do It.
By default, the volume and pan values will initially appear in the software window as ?,
indicating the program is not sending any volume or pan changes. These values will
appear as normal in the touchscreen, though (in Channel Mixer Mode).
To adjust the volume and panning of a track using the plugin program:
1. Press Menu and then tap Channel Mixer to enter Channel Mixer Mode.
2. Double-tap the Mixer field in the upper-left corner, and then tap Tracks.
3. Tap the square that represents the track with the plugin program to select it.
4. Tap and drag the volume slider or pan knob up or down to adjust it. After you do this
once, you can adjust the volume and panning of the plugin program normally.
Important:
If you copy a sequence, the volume and pan values will be copied with that sequence. If
you move to a new sequence and put the same plugin program on a new track, though,
these values will appear in the software window as ?, as described above.
By default, some plugins do not support MIDI volume and pan. In this case, adjust volume
levels and panning on the track.
67
Page 68

MIDI Programs
A MIDI program lets you send your track’s
MIDI data to an external MIDI device like a
synth or drum machine.
To create a MIDI program:
1. Press Main to enter Main Mode.
2. Next to the Track field, tap the bars icon, which indicates a MIDI program.
3. If the project does not contain a MIDI program yet, a new MIDI program will automatically be added
to the project and appear in the Program field below.
If the project already contains a MIDI program, it will be selected automatically and appear in the
Program field below. To create another MIDI program, tap the + icon above the Program field. A
new MIDI program will be created and given a number (e.g., Midi 002).
4. There are 5 additional settings to configure for a MIDI program: the MIDI Port, program change
message (Prog Ch), MIDI channel (MIDI Ch), Bank MSB (Most Significant Byte), and Bank LSB
(Least Significant Byte). See Modes > Main Mode > MIDI Programs to learn more.
For each one, double-tap its field. In the list that appears, tap the desired option. Alternatively, use
the Data Dial or the –/+ buttons to select an option.
Note: You also have to configure the MIDI ports in the software’s Preferences (in the Edit Menu).
See the User Guide in the MPC software to learn more: click the Help menu and select MPC Help.
5. To name your program, tap the cursor icon on the right edge of the Program section. Use the virtual
keyboard that appears to enter a new name, and then tap Do It.
68
Page 69

By default, the volume and pan values will initially appear in the software window as ?,
indicating the program is not sending any volume or pan changes. These values will
appear as normal in the touchscreen, though (in Channel Mixer Mode).
To adjust the volume and panning of a track using the MIDI program:
1. Press Menu and then tap Channel Mixer to enter Channel Mixer Mode.
2. Double-tap the Mixer field in the upper-left corner, and then tap Tracks.
3. Tap the square that represents the track with the MIDI program to select it.
4. Tap and drag the volume slider or pan knob up or down to adjust it. After you do this
once, you can adjust the volume and panning of the MIDI program normally.
Important: If you copy a sequence, the volume and pan values will be copied with that
sequence. If you move to a new sequence and put the same MIDI program on a new
track, though, these values will appear in the software window as ?, as described above.
69
Page 70

Menu
The Menu lets you select any of the 20 modes on MPC Touch that control the MPC software.
To open the Menu, press Menu, or tap the icon in the upper-left corner of the touchscreen while on the
normal page of your current mode.
When viewing the Menu, do any of the following:
• To enter a mode, tap it.
• To return to the previous mode, tap the gray area in the upper-left corner, or press Menu again.
The Menu.
Each mode shown above is described in the following Modes chapter. Click a button above to skip
directly to that chapter.
70
Page 71

16 Level
Press the 16 Level button on your MPC Touch to activate or deactivate 16 Level.
When activated, the last pad that was pressed will be temporarily copied to all 16 pads. The pads will
now output the same note number as the initial pad, but a selectable parameter will be fixed at values
that increase as the pad numbers increase (e.g., Pad 1 is the minimum, Pad 16 is the maximum),
regardless of how hard you press them.
In the 16 Levels window that appears, use the Type selector to choose the parameter: Velocity, Tune,
Filter, Layer, Attack, or Decay.
To select the pad, do any of the following:
• Press it.
• Tap the Pad field, and use the Data Dial or –/+ buttons.
• Double-tap the Pad field, and tap the desired pad in the list that appears.
71
Page 72

Effects
The MPC software offers various effects that you can apply to the pads, keygroups, programs,
submixes, and master outputs, using insert and send/return effects. This chapter can help you get a
good overall understanding of how the effects work.
See Appendix > Effects and Parameters for a list of all available effects (with a brief description of
each) and their editable parameters.
Overview
In a program, each pad or keygroup can have up to 4 insert effects applied to it. See Insert Effects >
Pads or Insert Effects > Keygroups to learn more about this.
An entire program can also have up to 4 insert effects applied to it, as well. See Insert Effects >
Programs to learn more about this.
Additionally, pads, keygroups, programs, and submixes can each be sent to up to 4 send channels.
Their audio will be routed through effects on the send channels, and the processed audio will be
returned to their original channel. See Send/Return Effects to learn more about this.
For even further flexibility, each of the 8 submixes can have up to 4 insert effects applied to it. You can
route pads/keygroups and programs to a submix, which is then routed to a master output. See Insert
Effects > Submixes to learn more about this.
Finally, you can apply up to 4 insert effects to each master output (a stereo pair of channels: Outputs
1/2, Outputs 3/4, etc.). See Insert Effects > Masters to learn more about this.
72
Page 73

There are three other parts of the software that handle effects differently:
• The Sampler can use up to 4 insert effects, which are applied to the audio as you record it. This
means that the effects cannot be “removed” from the sound later. Learn more about the Sampler in
the Modes > Sampler chapter.
• Similarly, the Looper can use up to 4 insert effects, which are applied to the audio as you record
it. This means that the effects cannot be “removed” from the sound later. Learn more about the
Looper in the Modes > Looper chapter.
• In XYFX Mode, the effects act like a single insert effect on that program. In fact, XYFX is the name
of the insert effect you have to load to the program before you can use this mode. Learn more
about XYFX Mode in the Modes > XYFX Mode chapter.
To view, load, edit, or clear effects, tap the pencil icon in the upper-right corner
of the Inserts field. This usually appears in a channel strip (next to a level slider
and pan knob).
73
Page 74

When viewing loaded effects, you will see this window:
In this window:
• To select an effect, use the field for each insert slot. A window (described below) will appear.
• To edit the parameters of a loaded effect, tap the pencil icon next to the insert slot.
• To clear the insert slot, tap the trash can icon next to it.
• To enable or disable an effect slot, tap the On/Off button next to it.
• To enable or disable all 4 effect slots, tap the All On/All Off button in the upper-right corner.
74
Page 75

When selecting an effect, you will see this window:
In this window:
• To move through the list, swipe up or down. Alternatively, use the Data Dial or –/+ buttons.
• To sort or unsort the effects by type or manufacturer, tap Type or Manufacturer in the lower-
left corner.
• To load an effect, double-tap it. Alternatively, tap Select, or press the Data Dial.
• To cancel, tap Close or anywhere outside of the list.
75
Page 76

When you edit an effect, you will see this window:
In this window:
• To adjust a parameter, tap and drag its slider. Alternatively, use the Data Dial or –/+ buttons. To
make finer adjustments, double-tap the pad and adjust the larger version of the slider that appears.
Tip: Turn the Q-Link Knobs to quickly adjust the corresponding 4 parameters. Use the Q-Link
button to select another set of 4 parameters the Q-Link Knobs control.
• To select another page of parameters, tap the Parameters –/+ buttons at the top of the
touchscreen.
• To enable or disable the effect, tap the On/Off button in the upper-right corner.
• To edit parameters for another insert effect on the same pad, program, etc., tap a different
Insert tab at the bottom edge of the touchscreen to select it.
• To close the window, tap Close or the upper part of the touchscreen.
76
Page 77

Insert Effects
Pads
You can load up to 4 insert effects to each pad. You can do this in Main Mode, the Pad Mixer, or
Program Edit Mode.
Tip: When using pad insert effects, they will be applied to the selected pad only. This means that you
could apply unique combinations of effects to each pad within a program. If you want to apply the same
effect to all pads, do this with a program insert effect (see Insert Effects > Programs).
To load a pad insert effect in Main Mode:
1. Use the Track field to select the track that uses the program with the desired pad—the program it
uses will be selected automatically.
2. If the channel strip is not already shown, tap the small triangle () icon below the Project field to show it.
3. Tap the first (pad) icon at the top of the channel strip. The channel strip will now show settings for
the current pad.
4. Press the desired pad to select it. Alternatively, use the Pad field at the top of the program channel strip.
5. Tap the pencil icon next to Inserts, and then use the window that appears to load or edit effects.
To load a pad insert effect in the Pad Mixer:
1. Use the Program field at the top of the touchscreen to select the desired program. Alternatively, use
the Track field at the top of the touchscreen to select the desired track—the program it uses will be
selected automatically.
2. Press the desired pad to select it, or tap it in the touchscreen. Alternatively, double-tap the Pad field
below the Program field.
3. Tap the pencil icon next to Inserts, and then use the window that appears to load or edit effects.
Alternatively, tap the Insert tab at the bottom of the touchscreen (tap it multiple times to select a
different insert slot), and then double-tap the desired pad in the touchscreen. You could also use the
Data Dial or –/+ buttons to select an effect immediately.
77
Page 78

To load a keygroup insert effect in Program Edit Mode:
1. While using the desired program, press the desired pad to select it.
2. Tap the Effects tab in the lower-right corner, and use it to load or edit effects.
Keygroups
You can load up to 4 insert effects to each keygroup. You can do this in Main Mode, the Pad Mixer, or
Program Edit Mode in the software.
Important: When using keygroup insert effects, they will be applied to the entire keygroup program. This
is because a keygroup program uses the same sound across all pads, as opposed to drum programs
where each pad can have its own insert effect. You can still load up to four insert effects per keygroup,
but all of them will affect the entire program.
To load a keygroup insert effect in Main Mode:
1. Use the Track field to select the track that uses the program with the desired pad—the program it
uses will be selected automatically.
2. If the channel strip is not already shown, tap the small triangle () icon below the Project field to show it.
3. Tap the first (pad) icon at the top of the channel strip. The channel strip will now show settings for
the current keygroup.
4. Press a pad to select its corresponding keygroup, or tap it in the touchscreen. Alternatively, use the
Keygroup field below the Program field.
Important: Remember that regardless of the keygroup, the effect will be applied to the entire
keygroup program. You can still load up to four insert effects per keygroup, but all of them will affect
the entire program.
5. Tap the pencil icon next to Inserts, and then use the window that appears to load or edit effects.
78
Page 79

To load a keygroup insert effect in the Pad Mixer:
1. Use the Program field at the top of the touchscreen to select the desired program. Alternatively, use
the Track field at the top of the touchscreen to select the desired track—the program it uses will be
selected automatically.
2. Press a pad to select its corresponding keygroup, or tap it in the touchscreen. Alternatively, doubletap the Keygroup field below the Program field.
Important: Remember that regardless of the keygroup, the effect will be applied to the entire
keygroup program. You can still load up to four insert effects per keygroup, but all of them will affect
the entire program.
3. Tap the pencil icon next to Inserts, and then use the window that appears to load or edit effects.
Alternatively, double-tap the desired pad in the touchscreen. You could also select one of the four
Insert tabs at the bottom of the touchscreen, and then use the Data Dial or –/+ buttons to select an
effect immediately.
To load a keygroup insert effect in Program Edit Mode:
1. In the software window, click the Program Edit tab at the top of the screen. Alternatively, press
Ctrl+2 (Windows) or +2 (Mac OS X) on your computer keyboard.
2. In the Keygroup section in the lower-left corner of the window, use the KG Select menu to select the
desired keygroup.
Important: Remember that regardless of the keygroup, the effect will be applied to the entire
keygroup program. You can still load up to four insert effects per keygroup, but all of them will affect
the entire program.
3. If the button above the Keygroup Inserts slots is set to Off, click it
so it changes to On.
4. Click the downward arrow () of one of the insert slots, and then
use the window that appears to load effects.
To edit an effect’s parameters, double-click its name in the insert
slot, and then use the window that appears to edit it.
79
Page 80

Programs
You can load up to 4 insert effects to each program. You can do this in Main Mode, XYFX Mode,
Program Edit Mode, and the Channel Mixer.
Note: In XYFX Mode, the effects act like a single insert effect on that program. In fact, XYFX is the name
of the insert effect that is loaded when use this mode.
To load a program insert effect in Main Mode:
1. Use the Track field to select the track that uses the program with the desired pad—the program it
uses will be selected automatically.
2. If the channel strip is not already shown, tap the small triangle () icon below the Project field to
show it.
3. Tap the second (four-squares) icon at the top of the channel strip. The channel strip will now show
settings for the current program.
4. Tap the pencil icon next to Inserts, and then use the window that appears to load or edit effects.
To load XYFX for a program in XYFX Mode:
1. Select the desired program in another mode, and then enter XYFX Mode.
2. If you have not yet used XYFX Mode for this program, tap Insert XYFX on the touchscreen to load it
and show the XY pad.
Note: If you already have 4 insert effects loaded, you will need to clear one of the insert effect slots
before doing this.
If you have already used XYFX Mode for this program, the XY pad will appear.
3. If the Setup panel is not shown, tap Setup in the lower-right corner to show it.
4. Use the Preset field to load an effect. Use the controls below the Preset field to edit the effect.
80
Page 81

To load an insert effect in Program Edit Mode:
1. In the software window, click the Program Edit tab at the top of the
screen. Alternatively, press Ctrl+2 (Windows) or +2 (Mac OS X) on
your computer keyboard.
2. If the button above the Program Inserts slots is set to Off, click it so
it changes to On.
3. Click the downward arrow () of one of the insert slots, and then use
the window that appears to load effects.
To edit an effect’s parameters, double-click its name in the insert slot,
and then use the window that appears to edit it.
Important:
For drum programs, if the Pad Audio Route menu is set to anything other than Program, then the
effect will not be applied to that pad.
For keygroup programs, if the Keygroup Audio Route menu is set to anything other than Program,
then the effect will not be applied to that entire keygroup program.
To load a program insert effect in the Channel Mixer:
1. Set the Mixer field in the upper-left corner to Programs.
2. In the touchscreen, tap the pad that corresponds to the desired program. Alternatively, double-tap
the Program field below the Mixer field.
3. Tap the pencil icon next to Inserts, and then use the window that appears to load or edit effects.
Alternatively, tap the Insert tab at the bottom of the touchscreen (tap it multiple times to select a
different insert slot), and then double-tap the desired pad in the touchscreen. You could also use the
Data Dial or –/+ buttons to select an effect immediately.
81
Page 82

Submixes
You can load up to 4 insert effects to each submix. You can do this in the Channel Mixer only.
To load a submix insert effect:
1. Set the Mixer field in the upper-left corner to Submixes.
2. In the touchscreen, tap the pad that corresponds to the desired program. Alternatively, double-tap
the Submix field below the Mixer field.
3. Tap the pencil icon next to Inserts, and then use the window that appears to load or edit effects.
Alternatively, tap the Insert tab at the bottom of the touchscreen (tap it multiple times to select a
different insert slot), and then double-tap the desired pad in the touchscreen. You could also use the
Data Dial or –/+ buttons to select an effect immediately.
Masters
You can load up to 4 insert effects to each master output (a stereo pair of channels: Outputs 1/2,
Outputs 3/4, etc.). You can do this in Main Mode or the Channel Mixer.
To load a master insert effect in Main Mode:
1. If the channel strip is not already shown, tap the small triangle () icon below the Project field to
show it.
2. Tap the fourth (crown) icon at the top of the channel strip. The channel strip will now show settings
for the current master output.
3. Use the Outputs field at the top of the channel strip to select the desired master output (Outputs
1/2, Outputs 3/4, etc.).
4. Tap the pencil icon next to Inserts, and then use the window that appears to load or edit effects.
82
Page 83

To load a master insert effect in the Channel Mixer:
1. Set the Mixer field in the upper-left corner to Masters.
2. In the touchscreen, tap the pad that corresponds to the desired master output (Outputs 1/2,
Outputs 3/4, etc.). Alternatively, double-tap the Outputs field below the Mixer field.
3. Tap the pencil icon next to Inserts, and then use the window that appears to load or edit effects.
Alternatively, tap the Insert tab at the bottom of the touchscreen (tap it multiple times to select a
different insert slot), and then double-tap the desired pad in the touchscreen. You could also use the
Data Dial or –/+ buttons to select an effect immediately.
83
Page 84

Send/Return Effects
Send/return effects work in the following way:
1. A pad, keygroup, program, or submix sends its audio to up to 4 returns at its designated send level.
2. That audio is processed by the effect(s) on the return. Each return can have up to 4 effects loaded.
3. The processed audio is sent back to its pad, keygroup, program, or submix at a designated return level.
You can load send/return effects and set return levels only in the Channel Mixer, described below. The
rest of this section describes the different ways to set the desired send levels for pads, keygroups,
programs, or submixes.
To load a send/return effect to a return:
1. In the Channel Mixer, set the Mixer field in the upper-left corner to Returns.
2. In the touchscreen, tap the pad that corresponds to the desired return. Alternatively, double-tap the
Return field below the Mixer field.
3. Tap the pencil icon next to Inserts, and then use the window that appears to load or edit effects.
Alternatively, tap the Insert tab at the bottom of the touchscreen (tap it multiple times to select a
different insert slot), and then double-tap the desired pad in the touchscreen. You could also use the
Data Dial or –/+ buttons to select an effect immediately.
To set the return level:
1. In the Channel Mixer, set the Mixer field in the upper-left corner to Returns.
2. Tap the Level tab in the lower-left corner.
3. In the touchscreen, tap the pad that corresponds to the desired return. Alternatively, double-tap the
Return field below the Mixer field.
4. Use the Data Dial or –/+ buttons to adjust the level of the currently selected return. Alternatively, use
the Level slider in the channel strip, or turn the corresponding Q-Link Knob. To make finer
adjustments, double-tap the pad and adjust the larger version of the slider that appears.
84
Page 85
Pads
You can set the send levels for pads in Program Edit Mode or the Pad Mixer.
To set the send levels for a pad in Program Edit Mode:
1. While editing the desired program in Program Edit Mode, press the desired pad to select it.
2. Tap the Effects tab in the lower-right corner.
3. Use the Send knobs to set the send level for each return.
To set the send levels for a pad in the Pad Mixer:
1. Use the Program field at the top of the touchscreen to select the desired program. Alternatively, use
the Track field at the top of the touchscreen to select the desired track—the program it uses will be
selected automatically.
2. Tap the Send tab at the bottom of the touchscreen (tap it multiple times to select a different send
level).
3. Press the desired pad to select it, or tap it in the touchscreen. Alternatively, double-tap the Pad field
below the Program field.
4. Use the Data Dial or –/+ buttons to set the send level. To make finer adjustments, double-tap the
pad and adjust the larger version of the slider that appears.
85
Page 86

Keygroups
You can set the send levels for keygroups in Program Edit Mode or the Pad Mixer.
To set the send levels for a keygroup in Program Edit Mode:
1. In the software window, click the Program Edit tab at the top of the screen.
Alternatively, press Ctrl+2 (Windows) or +2 (Mac OS X) on your computer keyboard.
2. If the Send button above the desired keygroup’s channel strip is not already selected,
click it.
3. Click and drag the knob that corresponds to each return up or down.
To set the send levels for a keygroup in the Pad Mixer:
1. Use the Program field at the top of the touchscreen to select the desired program. Alternatively, use
the Track field at the top of the touchscreen to select the desired track—the program it uses will be
selected automatically.
2. Tap the Send tab at the bottom of the touchscreen (tap it multiple times to select a different send
level).
3. Press the desired pad to select its corresponding keygroup, or tap it in the touchscreen.
Alternatively, double-tap the Keygroup field below the Program field.
4. Use the Data Dial or –/+ buttons to set the send level. To make finer adjustments, double-tap the
pad and adjust the larger version of the slider that appears.
86
Page 87

Programs
You can set the send levels for programs in the Channel Mixer only.
To set the send levels for a program:
1. In the Channel Mixer, set the Mixer field in the upper-left corner to Programs.
2. Tap the Send tab at the bottom of the touchscreen (tap it multiple times to select a different send level).
3. In the touchscreen, tap the pad that corresponds to the desired program. Alternatively, double-tap
the Program field below the Mixer field.
4. Use the Data Dial or –/+ buttons to set the send level. To make finer adjustments, double-tap the
pad and adjust the larger version of the slider that appears.
Submixes
You can set the send levels for submxies in the Channel Mixer only.
To set the send levels for a submix:
1. In the Channel Mixer, set the Mixer field in the upper-left corner to Submixes.
2. Tap the Send tab at the bottom of the touchscreen (tap it multiple times to select a different send level).
3. In the touchscreen, tap the pad that corresponds to the desired submix. Alternatively, double-tap the
Submix field below the Mixer field.
4. Use the Data Dial or –/+ buttons to set the send level. To make finer adjustments, double-tap the
pad and adjust the larger version of the slider that appears.
87
Page 88

Differences Between Plugin and Standalone Usage
When using the MPC software as a VST, AU, RTAS, or AAX plugin, its features and functions are very
similar to its operation as your host software but with some notable differences discussed here.
Important: This Operation chapter contains information about using the MPC software as a standalone
software program. This section describes the differences.
Note: To learn how to load and use an instrument plugin in a host application, please refer to the
corresponding chapter of your host application’s manual.
Saving: Make sure to save your work in the MPC software plugin as well as saving all of your work in
your host application. For ease of use, we recommend saving your host application projects and their
associated MPC projects in the same folder.
Software Menus: The MPC plugin doesn’t offer a top menu like in the standalone application.
The menu button is located to the left of the Main Mode tab.
Audio Input and Output: Your audio input and output are set in your host application rather than in
MPC. MPC’s Preferences will not have the Audio tab.
MIDI Ports: All MIDI Out ports will be assigned to your digital audio workstation (DAW). In MPC’s
Preferences, the MIDI tab will display DAW as the only available MIDI Out port assignment.
DAW Projects Folder: In MPC’s Preferences, the Plugin tab will let you select a DAW Projects Folder
location.
Tempo and Sync: The MPC plugin is automatically synchronized to the tempo of your host application.
MPC’s Preferences will not have the Sync tab, and the BPM in the Transport Section will be greyed out.
Playback Controls: The Stop, Play, and Play Start buttons will be greyed out. You must start and stop
playback using your host application’s playback controls.
Playback Start and Stop: The start and stop commands are always synchronized to the host application.
When the playback of the host application is started, the MPC plugin playback starts simultaneously.
88
Page 89

Modes
MPC Touch has a Menu page that lets you select any of the 20 modes on MPC Touch that control the
MPC software. This chapter describes the various features and functions of each mode.
The 20 modes as shown in the Menu.
Click a button above to skip directly to that chapter.
89
Page 90

Main Mode
Main Mode gives you an overview of the most-used functions.
To enter Main Mode, do one of the following:
• Press Main.
• Press Menu, and then tap Main.
Main Mode.
90
Page 91

The upper edge shows the project name and transport information.
The Project field shows the name of the current project.
To view the project information, tap the Project field. A list will appear of the available programs,
sequences, and samples in the project.
In the Project window, in additional to typical functions you can perform in lists, you can do any of the
following:
• To expand or collapse the list of programs or sequences, tap the arrow (∨ or >) to its left.
• To immediately select a sample and enter Sample Edit Mode, double-tap it.
• To save the project, tap Save.
• To return to the previous screen, tap Close, the X in the upper-right corner, or anywhere outside
the window.
• To delete samples from the project, tap Purge. In the screen that appears, tap Unused Samples
to delete all unused samples from the project, tap All Samples to delete all samples from the
project, or tap Cancel to return to the previous screen.
The counter indicates the current playhead position.
To adjust the position, tap it, and then use the use the Data Dial or the –/+ buttons.
To switch the time increments, double-tap it. You can view it in Bars, Beats, and
Ticks or in hours (HH), minutes (MM), seconds (SS), and frames (FF).
The In and Out boxes indicate the software is receiving or sending (respectively) MIDI messages from or
to your computer.
91
Page 92

The left edge contains icons to quickly enter one of five modes. Using this strip of icons, you
can easily jump between them:
• To enter Main Mode, tap the house icon.
• To enter Grid View, tap the grid icon.
• To enter Track View, tap the bars-and-magnifying-glass icon.
• To enter the Step Sequencer, tap the vertical-bars icon.
• To enter XYFX Mode, tap the XY icon.
There are also two small icons to the right of these that control the channel strip.
To show or hide the channel strip, tap the triangle ( or ) icon.
The channel strip contains some important settings for the current pad, program, track, or master
output, depending on the currently selected icon:
• To view the pad channel strip, tap the square icon.
• To view the program channel strip, tap the four-squares icon.
• To view the track channel strip, tap the bars icon.
• To view the master strip, tap the crown icon.
92
Page 93

When viewing the pad channel strip:
• The first field shows the current pad number. Press a pad or tap
the field to select a different pad.
Tip: This is useful for mixing your pads without having to enter the
Pad Mixer.
• The second field shows where the pad is routed, which you can
change. Usually, this is set to Program.
• The Inserts field shows any enabled or disabled effects for that
pad. Tap the pencil icon to open a window where you can change
and enable or disable the effects.
• To solo or mute the pad, tap Solo or Mute (respectively).
• To change the panning or level of the pad, adjust the pan knob or
Level slider.
When viewing the program channel strip:
• The first field shows the current program number and name, which
you can change.
• The second field shows where the program is routed, which you
can change.
• The Inserts field shows any enabled or disabled effects for that
program. Tap the pencil icon to open a window where you can
change and enable or disable the effects.
• To solo or mute the program, tap Solo or Mute (respectively).
93
Page 94

• To change the program’s automation, tap the automation button to cycle through its three states:.
When off, the program will ignore automation data. If you have already recorded
or entered automation, tapping this will switch between Read (R) and Write (W)
only, but you can override this and turn it off by pressing and holding Shift while
tapping the button.
Important: If you have already recorded automation and turn it off, the track will
still use the effect and its parameter values at the point where you turned it off.
When set to Read (R), the program will read automation data but will not record
any additional automation over it. You can still manually edit and enter
automation. (Think of this as a protective feature to prevent accidental changes to
your automation while recording.)
When set to Write (W), the program can record automation. (If you have any Q-
Link Knobs assigned to automatable parameters, make sure not to touch any
accidentally while you are recording.)
Tip: You can quickly set all programs to the same automation in XYFX Mode. See
the XYFX Mode chapter to learn how to do this.
• To change the panning or level of the program, adjust the pan knob or Level slider.
94
Page 95

When viewing the track channel strip:
• The first field shows the current track number, which you can
change, and its name.
• The second field shows the name of the program the track is
using.
• To solo or mute the track, tap Solo or Mute (respectively).
• To change the panning of velocity of the track, adjust the pan
knob or Velocity slider.
Note: If the track is using a plugin program, then the slider will
send CC #7 (Volume) and the knob will send CC #10 (Pan) to your
instrument plugin. The plugin will then handle these messages as it
normally would.
When viewing the master strip:
• The first field shows the current master output as a stereo pair,
which you can change.
• The Inserts field shows any enabled or disabled effects for that
master output. Tap the pencil icon to open a window where you
can change and enable or disable the effects.
• To mute the master output, tap Mute.
• To change the panning or level of the master output, adjust the
pan knob or Level slider.
95
Page 96

The Sequence section shows the current sequence and its information.
Use Sequence field to select a sequence.
To edit the name of the sequence, tap the cursor icon on the right edge of the section, and use the
virtual keyboard that appears.
Use the BPM field to adjust the tempo of the sequence.
To set whether the sequence follows its own tempo or a master
tempo, tap the Sequence/Master button under the BPM field.
Alternatively, press and hold Shift+Tap Tempo.
Use the Bars field to adjust the length of the sequence in bars.
The Loop button shows whether the sequence (or a part of it) will loop or not.
To enable or disable looping, tap the button.
To set the start point and end point of loop, tap the First or Last field (respectively) and then use the
Data Dial or the –/+ buttons, or double-tap the field and use the numeric keyboard that appears. (Keep
in mind that the Last Bar value depends on the total length of the sequence.)
Use the Transpose field to set the transposition (in semitones) of the entire sequence.
96
Page 97
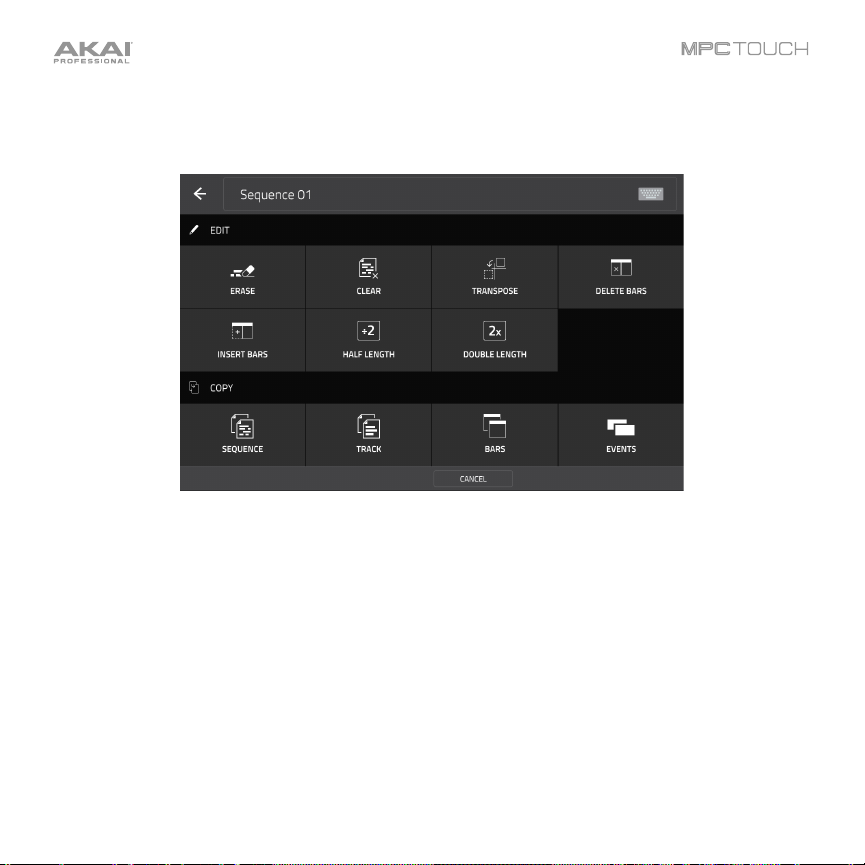
To edit the sequence, tap the pencil icon on the right edge of the section. The Sequence Edit/Copy
window will open.
The Sequence Edit/Copy window.
You can use any of these functions as described below.
To return to Main Mode, tap Cancel or the left arrow () in the upper-left corner of the touchscreen.
Alternatively, press Main.
To edit the name of the sequence, tap the top edge of the touchscreen and use the virtual keyboard
that appears.
97
Page 98

Erase
This function erases all or part of a track in a specific sequence.
To select the sequence you want to erase, use the Sequence field.
To select the track you want to erase within the sequence, use the Track field.
To set the time range of the sequence you want to erase, use the Bar, Beat, and Tick fields. The left
fields set the start of the time range, and the right fields set the end of the time range.
To select what types of events you erase, select one of the Erase options:
• All erases all pad events from the designated time range and reset all of its settings.
• Automation erases only automation from the designated time range.
• Note erases only specific pad events from the designated time range. In the diagram of the eight
pad banks that appears, press each pad in each bank to select or deselect its notes.
• Except Note erases everything except pad events from the designated time range.
To confirm your choice, tap Do It.
To return to the previous screen, tap Function or anywhere outside the Erase window.
To cancel and return to Main Mode, tap Cancel.
98
Page 99

Clear
This function erases all events from the sequence and resets all of its settings.
To confirm your choice, tap Clear.
To return to the previous screen, tap Cancel.
Transpose
This function transposes a range of events on a track in a sequence. (The events within that range will
shift accordingly in the Grid View.)
To select the sequence you want to transpose, use the Sequence field.
To select the track you want to transpose within the sequence, use the Track field.
To set the time range of the sequence you want to transpose, use the Bar, Beat, and Tick fields.
The left fields set the start of the time range, and the right fields set the end of the time range.
For drum programs, select the source and destination pads. Tap the left and right fields (respectively)
and press the desired pad. (The “source” pad is the pad whose events you want to move. The
“destination” pad is the pad where the events will be placed.)
99
Page 100

For keygroup programs, plugin programs, and MIDI
programs, set the range and amount of transposition
using the MPC software window:
• Range: Click and drag these fields up or down to set
the range of notes of the events you want to
transpose. Events within this note range will be
transposed while events outside of this range will
remain unchanged.
• Transpose: Click and drag this field up or down to
set how many semitones up or down you want to
transpose the events.
To confirm your choice, tap Do It.
To return to the previous screen, tap Function or anywhere outside the Transpose window.
To cancel and return to Main Mode, tap Cancel.
100
 Loading...