


|
|
|
Instruction Manual |
|
|
GB |
Music Center |
Instrukcja obsługi/Gwarancja |
31 |
|
PL |
Centrum Muzyczne |
Használati utasítás |
36 |
|
H |
Zenei központ |
Інструкція з експлуатації |
42 |
|
UA |
Музичний Центр |
Руководство по эксплуатации |
47 |
|
RUS |
Музыкальный центр |
|
53 |
|
|
|
|
|
|
|
|
|
|
MUSIC CENTER
MC 4464 CD/MP3

2 Inhalt
English
Contents
Overview of the Components.......................................... |
Page |
3 |
Instruction Manual.............................................................. |
Page 31 |
|
Technical Data..................................................................... |
Page 35 |
|
Disposal................................................................................ |
Page |
35 |
Język polski
Spis treści
Przegląd elementów obłsugi |
.........................................Strona |
3 |
Instrukcja obsługi.............................................................. |
Strona 36 |
|
Dane techniczne............................................................... |
Strona 40 |
|
Warunki gwarancji............................................................. |
Strona 40 |
|
Usuwanie............................................................................ |
Strona |
41 |
Magyarul
Tartalom
A kezelőelemek áttekintése............................................ |
Oldal |
3 |
Használati utasítás ............................................................. |
Oldal 42 |
|
Műszaki adatok.................................................................. |
Oldal 46 |
|
Hulladékkezelés................................................................. |
Oldal |
46 |
Українська
Зміст
Огляд елементів управління....................................... |
стор. |
3 |
Інструкція з експлуатації.............................................. |
стор. 47 |
|
Технічні параметри....................................................... |
стор. |
51 |
Русский
Содержание
Обзор деталей прибора................................................ |
стр. 3 |
Руководство по эксплуатации...................................... |
стр. 53 |
Технические данные...................................................... |
стр. 58 |

3 Übersicht der Bedienelemente
Overzicht van de bedieningselementen |
Przegląd elementów obłsugi |
Liste des différents éléments de commande |
A kezelőelemek áttekintése |
Indicación de los elementos de manejo |
Огляд елементів управління |
Elementi di comando |
Обзор деталей прибора |
Overview of the Components |
|
Abb. 1 / Afb. 1 / Fig. 1 / Rys. 1 / 1. ábra / Рис. 1
Abb. 2 / Afb. 2 / Fig. 2 / Rys. 2 / 2. ábra / Рис. 2
Instruction Manual
Thank you for choosing our product. We hope you will enjoy using the appliance.
Before using this device, carefully read this user manual and keep it together with the Warranty Certificate, cashier receipt and if possible, the original package inclusive its interior packing. If you hand on the device to any third person, include the user manual as well.
Safety Instructions
Caution!
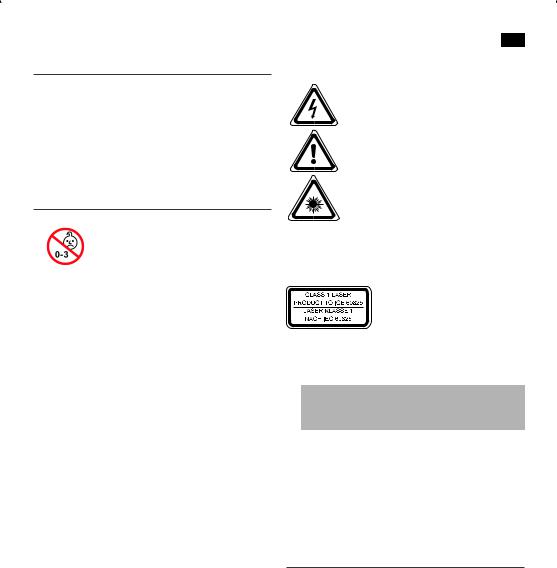
•Not suitable for children under 3. Small parts may break off and be swallowed.
•Toavoidtheriskoffire orelectricshock,youshouldnot exposethedevicetorainorhumidity.Donotusethe device near water (e.g. bathroom, swimming pool, humid cellars).
•Donotusetheunitinextremelyhot,cold,dusty,ordamp places.
•Theunitisdesignedsolelyforprivateuseanditsintended purpose. This unit is not designed for commercial use.
•Makesurethatthepowercableisnotbent,pinched,or comes into contact with heat sources.
•Makesurethatthepowercableisnotatrippinghazard.
•Thepowersupplyunitisonlysuitableforuseindry rooms.
•Nevertouchthepowersupplyunitorthecablewithwet hands.
•Onlyconnectthepowersupplyunittoaproperlyinstalled wall outlet. Ensure that the listed voltage matches the voltage of the wall outlet. Also ensure that the output current, voltage and the polarity of the power supply unit match the information on the connected device.
•Alwaysinstallbatteriesinthecorrectdirection.
•Avoidcoveringthedevice’sventopenings.
•Nevercovertheventholeswithobjects,suchasmagazines, tablecloths, curtains etc.
•Thisapplianceshallnotbeexposedtodrippingor splashing water and that no object filled with liquids such as vases shall be placed on apparatus.
•Opensourcesoffire, suchase.g.burningcandlesmay not be placed onto the unit.
•Neveropenthedevice’scase.Improperrepairscancause severe danger to the user. If the device or particularly the power cord is damaged, don’t use the device any further and have it repaired by a qualified specialist. Check the power cord regularly for damage.
•Ifyoudonotusethedeviceforalongperiodoftime, pull the power supply unit from the wall socket and/or remove the batteries.
English 31
These symbols may be found on the device and shall indicate the following:
The lightning symbol warns the user of dangerously high voltages inside the case.
Theexclamationmarksymbolpointsto important instruction or maintenance remarks in the accompanying guidelines.
Devices bearing this symbol work with a “class 1 laser” for tracing the CD. The built-in
safety switches should prevent the user being exposedtodangerouslaserlight,whichis invisible to the human eye, when the CD compartment is opened.
These safety switches must not be bypassed or altered; otherwisethereisariskofbeingexposedtothelaserbeam.
Caution: This product features a class 1 laser.
Children and disabled persons
•Forthesafetyofyourchildren,keepanypackingparts
(plastic bags, cartilage, Styrofoam etc.) out of their reach.
CAUTION:
Don’t let small children play with foils for danger of suffocation!
•Thisdeviceisnotintendedforusebypersons(including children) with reduced physical, sensory or mental capabilities,orlackofexperienceand/orknowledge unless they have been given supervision or instructions concerning the use of the device by a person responsible for their safety.
•Supervisechildrentoensuretheydonotplaywiththe device.
Overview of the Components
1Tab for opening CD compartment
2CD tray
3
 button(nexttitle)
4 button (stop)
5

 button (playback/ pause)
6STANDBY button (on/ operational readiness)
7FUNCTION button (Select source)
8ALARM SET button (Alarm time)
9Stand
10Display
11VOL+/VOLbuttons (volume)
12M+/M- buttons (10 music titles forward or backward / preset station location)
13PROG/TIME SET button (memory/ time)
14 button (previous title)

32 English
15 headphone jack
16AUX jack
Back
Dipole antenna
Battery compartment (power reserve)
Suspension eyes for wall mounting
Power adapter socket (DC 6 V


 )
)
First Use of the Device/Introduction
•Selectaproperplaceforthedevice.Adry,levelandslip proof surface is suitable.
•Makesurethedeviceisventedsufficiently!
•Removetheprotectivefilm fromthedevice,ifpresent.
Mounting the stand
If you do not want to mount the device to the wall, place the device onto the supplied stand.
Wall mounting (Mounting material not included)
You can also mount the device to the wall.
CAUTION:
Make sure beforehand whether there are cables in the wall which could be damaged!
NOTE: Check the reach of the cable!
To mount the device, make sure that an easily accessible plug outlet is available within reach of the power cable.
The distance between the mountings for wall mounting is 120 mm.
1.Drill two holes horizontally at that distance.
2.Fit dowels and screws into the holes.
3.Hang the device onto the screws. Check that it is secure.
Power supply
•Makesurethegridvoltagecorrespondstothefigures on the rating plate.
•Plugthepowersupplyunitintoaproperlyinstalled protective contact socket.
•Connectthedevicewiththepowersupplyunitbyplugging the jack of the power supply unit into the “DC 6 V


 ”jack.TheDCsocketislocatednearthefixture for installing the stand (see figure 2 on page 3).
CAUTION:
•Thisdeviceshouldonlybeusedwiththemainssupply unit (included). Do not use it for other devices.
•Onlyusea6Vpowersupplyunit(


 ). A different supply unit may damage the device.
NOTE:
•Disconnectfrommainspowersupplyduringlonger periods of non-use.
•Ifyouhavenotinsertedanybackupbatteries,the storage of the time and the radio station will be lost as soon as the power supply has been interrupted.
Inserting the backup battery
(Batteries not included)
If there should be a power outage or if the mains plug were to be disconnected from the electrical outlet, then the settings will be maintained with inserted backup batteries.
1.Open the battery compartment on the back.
2.Insert 2 batteries of the type AAA/R03 1.5 V into the battery compartment. Ensure the correct polarity (see battery compartment).
3.Close the battery compartment again.
CAUTION:
•Donotexposethebatteriestohightemperaturesordirect sunlight. Never throw batteries into the fire. There is a danger of explosion!
•Batteriesmayleakandlosebatteryacid.Ifthedeviceis out of use for long periods, remove the battery.
•Non-rechargeablebatteriesmaynotbecharged.
•Chargeablebatteriesmayonlybechargedunderadult supervision.
•Chargeablebatteriesmustberemovedfromthetoy before they are charged.
•Differentbatterytypesornewandusedbatteriesmust not be used together.
•Batteriesmustbeinsertedwiththecorrectpolarity.
•Spentbatteriesmustberemovedfromthetoy.
•Batteriesarenottobedisposedoftogetherwith domestic wastes. Dispose of the used batteries at the relevant collection bin or at your dealer’s.
•Theterminalsmaynotbeshort-circuited.
Setting the time
1.Switch the device to standby with the STANDBY button.
2.Keep the PROG/TIME SET button (13) pressed for about
2seconds.Thetimestartsflashing inthedisplay.
3.Use the  button (14) to adjust the hours and the
 button (3) to adjust the minutes.
4.Press the PROG/TIME SET button again to store the time.
NOTE:
If you do not press any button within 4 seconds, all settings will be saved automatically.

General Operation
Switch device on/off
With the STANDBY button (6), you can switch the unit between standby and operating mode.
NOTE: In CD mode
After about 10 minutes without signal, or if the signal is too weak, the device will automatically switch to standby.
Volume
By pressing the VOL+/VOLbuttons (11) you can adjust the desired volume.
FUNCTION (7)
Press the FUNCTION button until the desired operating mode is shown on the display.
Radio mode
1.Fully uncoil the wire antenna.
2.Searching radio stations:
Briefly pressthe
 /
/
 buttons (3/14), until you have found the radio station which you are looking for. If you keep one of the buttons pressed down, the device will search totheprevious,respectivelynextradiostation.
Preset station:
1.Search for the desired radio station with the
 /
/
 buttons (11).
2.To store the radio stations, press the PROG/TIME SET button (13). The notification “P 01” will blink in the display.
3.Select the desired preset location with the M+/M- buttons (12).
4.Press the PROG/TIME SET button to store the station.
3.If the reception is too weak and there is interference on the received station, try to improve the reception by altering the position and uncoiling or coiling the antenna. The message “ ” is shown on the display for stereo reception.
Select the preset radio station
The preset radio stations can be selected by repeatedly pressing the M+/M- button (12).
Playing CDs/MP3
1.Select the CD mode with the FUNCTION button (7). The following will appear in the display “- -”.
2.OpentheCDcompartment(2)usingthetab(1)toflipthe cover of the CD compartment open to the front.
3.Place a CD with the label on top onto the spindle so that the CD clicks in mechanically.
4.Close the CD compartment.
English 33
5.The CD will play from the first title.
6.In order to remove a CD, press the  button (4), open the CD compartment and lift the CD out carefully.
Always keep the CD deck closed.
NOTE:
•Ifadiscisinsertedthewrongwayaround,respectivelyif no disc is inserted, then the message “- -” will blink and “ ” appears on the display.
•PlaybackofCDsproducedbytheusercannotbe guaranteed due to the large variety of software and CD media available.
Description of the control buttons

 (5)
(5)
Youcanbriefly interruptandresumeplaybackusingthis button. The fade-in in the display will blink. Pressing again continues playback.

 /
/ (3/14)
With
 youcanjumptothenextorprevioustracketc.
•Ifthebuttoniskeptpresseddown,themachinestartsto search through the tracks. (The sound is muted.)
The button can be used as follows:
Pressonce= |
Thisstartsthecurrenttrackagainfrom |
|
the beginning. |
Presstwice= |
Thisjumpsbacktotheprevioustrack. |
Pressthreetimes= Thisplaysthesongbeforeetc.Ifthe button is kept pressed down, the machine starts to search through the tracks. (The sound is muted.)
 (4)
(4)
The playback is stopped.
PROG/TIME SET (13)
During the playback of an audio CD:
Pressonce= thecurrenttrackisrepeatedcontinuously. The notification “ ” will appear
in the display.
Presstwice= thewholeCDisplayedcontinuously.
The notification “ ALL” will appear in the display.
Pressthreetimes= Thenotification “RAND” will appear in the display. All the titles will be played back successively in a random sequence.
Pressfourtimes= allfunctionsarecancelled.Thenormal play mode is resumed.

34 English
During playback of MP3 music:
Pressonce= |
thecurrenttrackisrepeatedcontinu- |
|
ously. The notification “ ” will appear |
|
in the display. |
Presstwice= |
theselectedfolderisrepeatedcon- |
|
tinuously ( FOLDER appears in the |
|
display). |
Pressthreetimes= |
allmusictitlesarerepeatedcontinuous- |
|
ly. The notification “ ALL” will appear |
|
in the display. |
Pressfourtimes= |
Thenotification “RAND” will appear |
|
in the display. All the titles will be |
|
played back successively in a random |
|
sequence. |
Pressfive times= |
allthefunctionsaredeactivated.Play- |
|
back is continued normally. |
M+/M- (12)
•Duringthemusicplayback,pressoneofthebuttonsto skip 10 titles forward or back (if more than 10 titles are on the storage medium).
•Inradiomodeforconnectingtothepresetradiostations.
Programmed Play
This can be used to program any desired sequence of tracks.
1.Press the  button (4).
2.Press the PROG/TIME SET button (13). “P01” (Storage space) and the notification “PROGRAM” will appear
in the display. Use the
 /
/ buttons (3/14) to select the desired track and then press the PROG/TIME SET button again. The display changes to memory slot P02.
3.Selectthenexttrackwiththe
 /
/ buttons and press the
PROG/TIME SET button again. Repeat the procedure until all the desired tracks are selected.
4.Press the

 button (5). The playback starts. The notification “PROGRAM” will appear additionally in the display.
The device stops automatically after all programmed titles have been played. The notification PROGRAM will switch off and the programmed sequence will be deleted from the memory.
Deleting the programming
Press the  button. The programmed sequence will be deleted from the memory.
Playing back Music in MP3 Format
With this device it is possible to play back pieces of music in MP3 format. The device also supports all standard CD types: CD, CD-RW, CD-R.
This machine of is able to play MP3 CDs. Up to 200 tracks can be compressed and stored on these CDs. Your machine
detects an MP3 CD automatically (the total number of tracks and MP3s appears in the display). If you would like to play one of these CDs, proceed as described under “Playing CDs/MP3”. Tracks can be programmed as described under “Playing Back Programmed Tracks”.
Please note:
There are a number of different recording and compression methods, as well as quality differences between CDs and selfrecorded CDs.
Furthermore,themusicindustrydoesnotadheretofixed standards (copy protection).
For these reasons it is possible that in rare cases there are problems with the playback of CDs and MP3 CDs. This is not a malfunction of the device.
AUX socket
To connect analogue replay devices. Via this socket you can also hear the sound of other playback devices such as MP3 players, CD players etc. through the loudspeakers.
1.Pleaseconnecttheexternaldevicewitha3.5mmstereo jack plug to the AUX socket.
2.Repeatedly press the FUNCTION button (7), until “AUX” is shown in the display.
3.Youwillhearthesoundplaybackfromtheexternaldevice through the loudspeakers. You may adjust the volume with VOL+/VOL- (11). The CD buttons are not functional.
4.For the remaining procedure please see the operating instructionsoftheexternalsoundsource.
NOTE:
Adjustthevolumeoftheexternaldevicetoacomfortable level.
Alarm function
Setting the alarm time
1.Switch the device to standby with the STANDBY button.
2.Use the ALARM SET button (8) to select the alarm time to be adjusted:
•Pressonce=The“ ”symbolstartsflashing inthe display. The first alarm time is activated and can be adjusted.
•Presstwice=The“ ”symbolstartsflashing inthe display. The second alarm time is activated and can be adjusted.
•Pressthreetimes=The“ ” and “
 ” symbols light up. Both alarm times are activated and can be adjusted one after another.
•Pressfourtimes=The“ ” and “
 ” symbols disappear. The alarm times are deactivated.
3.Press the ALARM SET button for about 2 seconds. The timestartsflashing inthedisplay.
4.Use the  button (14) to adjust the hours and the
 button (3) to adjust the minutes.
5.Use the FUNCTION button (7) to select radio (FM), CD or buzzer as wake-up mode.
6.Press the ALARM SET button again to store the alarm time.
When the pre-set alarm time has been reached, the device turns on activating the selected wake-up mode. The volume increases gradually.
NOTE:
If no CD has been inserted, the device will activate the buzzer instead.
Switching off the alarm signal
Press the STANDBY button (6) to switch off the alarm signal until the following day.
NOTE:
Thealarmfunctionwillturnoffautomaticallyafterapprox.
60 minutes.
Deactivating the alarm function
Press the ALARM SET button (8) repeatedly until the “ ” and “
 ” icons disappear from the display.
|
English |
|
|
|
|
|
|
|
|||
|
35 |
|
|||||||||
Technical Data |
|
|
|
|
|
|
|
|
|
|
|
|
|
|
|
|
|
|
|
|
|
|
|
Model:................................................................. |
MC 4464 CD/MP3 |
||||||||||
Power supply:............................................... |
DC 6 V, 1 A, |
|
|
|
|
|
|
|
|
|
|
|
|
|
|
|
|
|
|
|
|
||
Power consumption:............................................. |
8W(maximum) |
||||||||||
Battery power reserve:...................................... |
2x1.5V,AAA,R03 |
||||||||||
Radio component: |
|
|
|
|
|
|
|
|
|
|
|
Frequency range:..................................... |
FM 87.5 ~ 108 MHz |
||||||||||
Net weight:............................................................... |
approx.0.99kg |
||||||||||
Power supply unit |
|
|
|
|
|
|
|
|
|
|
|
Protection class:................................................................................. |
|
|
|
|
|
|
|
|
II |
||
Input:........................................................ |
AC 100-240 V~ 50/60 Hz |
||||||||||
Output:.............................................................................. |
DC 6 V, 1 A |
||||||||||
The right to make technical and design modifications in the course of continuous product development remains reserved.
This device has been tested according to all relevant current CE guidelines, such as electromagnetic compatibility and low voltage directives, and has been constructed in accordance with the latest safety regulations.
Cleaning and Maintenance
CAUTION:
Do not immerse the device in water.
•Alwaysremovethemainsplugbeforecleaningthe machine.
•Anymarksonthesurfacecanbewipedoffwithaslightly damp cloth without any additives.
Troubleshooting
Symptoms |
Course |
Solution |
CD can not be |
CD is not inserted or |
Ensure that the disc is |
played back. |
inserted incorrectly. |
inserted with the label |
|
|
facing upwards. |
CD jumps dur- |
Check the disc for |
Check the disc for |
ing playback. |
fingerprints, dirt or |
fingerprints, dirt or |
|
scratches. |
scratches. |
Device cannot |
Device crashes and |
Disconnect the power |
be operated. |
“hangs”. |
supply for 5 sec. Then |
|
|
switch the device on |
|
|
again. |
Disposal
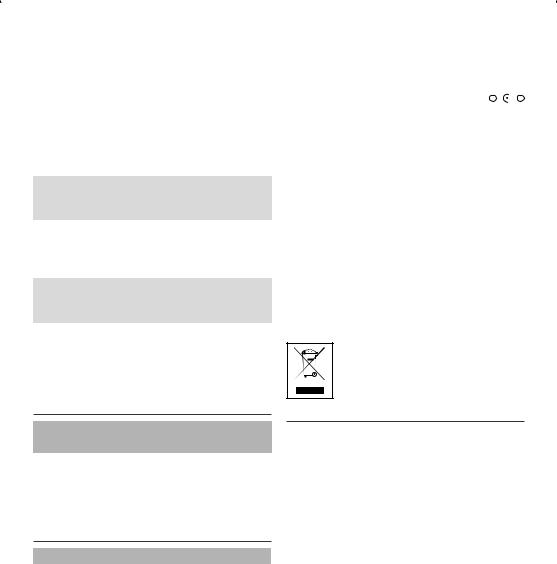
Meaning of the “Wheelie Bin” Symbol
Take care of our environment, do not dispose of electrical applicances via the household waste.
Dispose of obsolete or defective electrical appliances via municipal collection points.
Please help to avoid potential environmental and health impacts through improper waste disposal.
You contribute to recycling and other forms of utilization of old electric and electronic appliances.
Your municipality provides you with information about collecting points.

36 Język polski
Instrukcja obsługi
Dziękujemy za wybór naszego produktu. Mamy nadzieję, że korzystanie z urządzenia sprawi Państwu radość.
Przed użyciem urządzenia, należy dokładnie przeczytać podręcznik użytkowania i zachować go wraz z gwarancją, paragonem oraz w razie możliwości wraz z oryginalnym opakowaniem zawierającym wewnętrzne elementy. W razie przekazania urządzenia osobom trzecim, należy dołączyć podręcznik użytkowania.
Instrukcje dotyczące bezpieczeństwa
Uwaga!
• |
Nie odpowiednie dla dzieci poniżej 3 roku |
|
życia. Małe części mogą się odłamać i zostać |
połknięte.
• Abyuniknąćryzykaporażeniaprądem,niewolnonarażać urządzenia na działanie deszczu ani wilgoci. Nie korzystać z urządzenia w pobliżu wody (np. w łazience, na basenie, w wilgotnych piwnicach)
• Urządzenianienależyużywaćwbardzogorących,zimnych, zakurzonych ani wilgotnych miejscach.
• Zurządzenianależykorzystaćwyłączniedocelówprywatnych i zgodnie z przeznaczeniem. Urządzenie to nie jest przeznaczone do użytku komercyjnego.
• Sprawdzić,czykabelzasilającyniejestskręcony,zaczepiony lub nie styka się ze źródłami gorąca.
• Sprawdzić,czykabelzasilanianiepowodujeryzykapotknięcia.
• Zasilaczmożebyćużywanywyłączniewsuchychpomieszczeniach.
• Zasilaczaanikablanienależynigdydotykaćmokrymi rękoma.
• Zasilacznależypodłączaćwyłączniedoodpowiednio zamontowanego gniazda elektrycznego. Należy upewnić się, że wskazane napięcie jest zgodne z napięciem gniazda elektrycznego. Należy także sprawdzić, czy prąd wyjściowy, napięcie i biegunowość zasilacza są zgodne z danymi podłączonego urządzenia.
• Zawszeinstalowaćbaterięwewłaściwymkierunku.
• Nieprzykrywaćotworówwentylacyjnychurządzenia.
• Nienależynigdyzasłaniaćotworówwentylacyjnych przedmiotami, takimi jak czasopisma, obrusy, firanki itp.
• Urządzenianienależywystawiaćnadziałaniekapiącejani rozchlapującej się wody, a także nie należy na nim stawiać naczyń wypełnionych wodą, takich jak wazony z kwiatami.
• Naurządzeniunienależystawiaćźródełotwartegoognia, takich jak zapalone świeczki.
• Nieotwieraćobudowyurządzenia.Nieprawidłowowykonane naprawy mogą stwarzać niebezpieczeństwo dla użytkownika. Jeśli samo urządzenie lub, w szczególności, kabel zasilający, są uszkodzone, nie korzystać z urządzenia i zlecić jego naprawę specjaliście z odpowiednimi kwalifikacjami. Regularnie sprawdzać kabel pod kątem uszkodzeń.
•Jeśliurządzenieniebędzieużywaneprzezdłuższyczas, należy odłączyć zasilacz od gniazda elektrycznego i/lub wyjąć baterie.
Poniższe symbole znajdują się na urządzeniu i oznaczają:
Symbol błyskawicy ostrzega użytkownika przed niebezpiecznie wysokimi napięciami wewnątrz.
Symbol wykrzyknika wskazuje ważne instrukcje lub uwagi dotyczące konserwacji w dołączonych instrukcjach.
Urządzenia z tym symbolem używają do odczytywania dźwięku z płyty kompaktowej
„Lasera klasy A“. Wbudowany wyłącznik bezpieczeństwa ma zapobiec temu, żeby użytkownik w czasie otwierania kieszeni odtwarzacza płyt kompaktowych został poddany niebezpiecznemu dla ludzkich oczu oddziaływaniu niewidocznego światła lasera.
Wyłączników bezpieczeństwa nie wolno obchodzić i zmieniać; w przeciwnym razie występuje ryzyko wystawienia na promień lasera.
Uwaga: Ten produkt jest wyposażony w laser 1 klasy.
Dzieci i osoby niepełnosprawne
•Zewzględunabezpieczeństwodzieci,trzymaćczęści opakowania (torby plastikowe, kartony, styropian, itp.) poza ich zasięgiem.
UWAGA:
Małe dzieci nie mogą bawić się folią ze względu na niebezpieczeństwo uduszenia!
•Urządzenianiepowinnyużywaćosoby(takżedzieci),które mają ograniczone możliwości fizyczne, sensoryczne lub umysłowe, którym brakuje doświadczenia i/lub wiedzy, chyba, że znajdują się pod nadzorem osoby odpowiedzialnej za ich bezpieczeństwo albo osoba ta przedstawiła im instrukcje dotyczące używania urządzenia.
•Należydopilnować,abydzieciniebawiłysięurządzeniem.
Przegląd elementów obłsugi
1Występ do otwierania kieszeni na CD
2Tacka CD
3Przycisk
 (kolejny tytuł)
4Przycisk  (zatrzymanie)
5Przycisk

 (odtwarzanie/pauza)
6Przycisk STANDBY (wł./gotowość do pracy)
7Przycisk FUNCTION (wybierz źródło)
8Przycisk ALARM SET (czas alarmu)
9Stojak

10Wyświetlacz
11Przyciski VOL+/VOL- (głośność)
12Przyciski M+/M- (10 muzycznych tytułów do przodu lub do tyłu / wstępne ustawienie lokalizacji stacji)
13Przycisk PROG/TIME SET (pamięć/czas)
14Przycisk  (poprzedni tytuł)
15Gniazdko słuchawek typu jack
16Gniazdko AUX typu jack
Tył
Antena dipolowa
Komora baterii (rezerwa zasilania)
Haczyki do zawieszenia na ścianie
Gniazdko zasilacza (DC 6 V


 )
)
Pierwsze użycie urządzenia/ wprowadzenie
•Wybraćodpowiedniemiejscedlaurządzenia.Odpowiednia będzie sucha, pozioma i nieśliska powierzchnia.
•Sprawdzić,czyurządzeniejestodpowiednioodpowietrzone.
•Zdjąćwarstwęochronnązurządzenia,oilejest.
Montaż stojaka
Jeśli nie chcemy montować urządzenia na ścianie, należy ustawić je na dostarczonym stojaku.
Montaż ścienny (Brak w zestawie materiałów do montażu)
Urządzenie można także zamocować na ścianie.
UWAGA:
Przed przystąpieniem do montażu należy upewnić się, że w danym miejscu w ścianie nie ma kabli, które mogłyby zostać uszkodzone!
WSKAZÓWKA: Należy sprawdzić zasięg kabla!
Przed zamocowaniem urządzenia należy sprawdzić, czy w zasięgu jego kabla zasilającego znajduje się łatwo dostępne gniazdo elektryczne.
Odległość między wspornikami w przypadku montażu ściennego wynosi 120 mm.
1.Wywiercić w tej odległości poziomo dwa otwory.
2.W otworach zamocować kołki oraz wkręty.
3.Zawiesić urządzenie na śrubach. Sprawdzić, czy jest dobrze zamontowane.
Zasilanie
•Upewnijsię,żenapięciezasilaniaodpowiadawartościom na tabliczce znamionowej.
•Podłączzasilaczdoodpowiedniozamontowanegoi zabezpieczonego gniazda elektrycznego.
Język polski 37
•Podłączurządzeniedozasilacza,wkładającwtyczkętypu
jack zasilacza do gniazda „DC 6 V


 “. Gniazdko zasilacza DC znajduje się obok uchwytu do mocowania stojaka (patrz Rysunek 2 na stronie 3).
UWAGA:
•Urządzenietomożebyćużywanewyłączniezzasilaczem (dostarczony). Nie należy go używać z innymi urządzeniami.
•Możnaużywaćwyłączniezasilacza6V(


 ). Zasilacz innego typu może uszkodzić urządzenie.
WSKAZÓWKA:
•Wprzypadkudłuższychokresównieużywaniaurządzenie należy odłączyć od zasilania.
•Jeśliniewłożyliśmyżadnychbateriirezerwowych,zapisany czas oraz stacja radiowa zostaną utracone zawsze w czasie przerw w zasilaniu.
Wkładanie baterii rezerwowych
(Brak baterii w zestawie)
Jeśli pojawi się przerwa w dostawie prądu lub jeśli wyjmiemy wtyczkę z gniazdka, to wszelkie ustawienia zostaną utrzymane dzięki rezerwowym bateriom.
1.Otworzyć komorę baterii w tylnej części.
2.Włożyć 2 baterie typu AAA/R03 1,5 V do obu komór baterii. Sprawdzić prawidłowe położenie biegunów (patrz komora baterii).
3.Zamknąć ponownie komorę baterii.
UWAGA:
•Nienarażajbateriinabezpośredniedziałanieciepłalub promieniowania słonecznego. Nigdy nie wrzucaj baterii do ognia. Niebezpieczeństwo wybuchu!
•Zbateriimożewyciecelektrolit.Jeśliurządzeniebędzie nieużywane przez dłuższy czas, wyjmij z niego baterie.
•Zwykłebaterieniemogąbyćładowane.
•Akumulatorkimożnaładowaćtylkopodnadzorem osób dorosłych.
•Akumulatorkinależywyjąćzzabawkiprzedichładowaniem.
•Niemożnaużywaćrazembateriiróżnegorodzajuani nowych i użytych baterii.
•Baterienależywłożyćzgodniezprawidłowąorientacją ich biegunów.
•Zużytebaterienależyusunąćzzabawki.
•Bateriinienależywrzucaćdozwykłychdomowych
śmieci. Zużyte baterie proszę oddać do punktu zbiórki odpadów specjalnych lub do punktu sprzedaży.
•Stykibateriiniemogąbyćnarażonenaspięcie.
Ustawienie czasu
1.Przełączyć urządzenie do trybu czuwania za pomocą przycisku STANDBY.
38Język polski
2.Trzymać przycisk PROG/TIME SET (13) wciśnięty przez około 2 sekundy. Wskazanie czasu na wyświetlaczu zaczyna migać.
3.Przyciskiem  (14) ustawić wartość godziny, a przyciskiem

 (3) uregulować minutę.
4.Nacisnąć ponownie przycisk PROG/TIME SET, aby zapisać czas.
WSKAZÓWKA:
Jeśli żaden przycisk nie zostanie wciśnięty w ciągu 4 sekund, wszystkie ustawienia zostaną zapisane automatycznie.
Ogólne funkcjonowanie
Włączanie/wyłączanie urządzenia
Za pomocą STANDBY (6), można przełączać urządzenie między trybem czuwania a roboczym.
WSKAZÓWKA: W trybie CD
Po upływie około 10 minut bez sygnału lub w przypadku zbyt słabego sygnału, urządzenie zostanie automatycznie przełączone do trybu gotowości.
Głośność
Poprzez naciskanie przycisków regulacji głośności VOL+/ VOL- (11), możliwe jest jej ustawienie na wybranym poziomie.
FUNCTION (7)
Naciskaj przycisk FUNCTION, aż na wyświetlaczu pojawi się żądany tryb działania.
Tryb radia
1.Rozwiń całkowicie antenę drutową.
2.Wyszukiwanie stacji radiowych:
Naciśnij na krótko przycisk
 /
/ (3/14), do momentu znalezienia żądanej stacji radiowej. Jeśli jeden z tych przycisków zostanie przytrzymany, urządzenie będzie wyszukiwać odpowiednio poprzednie lub kolejne stacje radiowe.
Zapisywanie stacji:
1.Wyszukać żądanej stacji za pomocą przycisków
 /
/ (11).
(11).
2.Aby zapisać stacje radiowe, nacisnąć przycisk PROG/ TIME SET (13). Komunikat „P 01” będzie migać na wyświetlaczu.
3.Wybrać żądaną wstępnie ustawioną lokalizację za pomocą przycisków M+/M- (12).
4.Nacisnąć przycisk PROG/TIME SET, aby zapisać stację.
3.Jeśli odbiór jest zbyt słaby i odtwarzana stacja jest zakłócona, spróbuj poprawić odbiór poprzez zmianę położenia anteny oraz jej zwinięcie lub rozwinięcie. W przypadku odbioru stereo na wyświetlaczu pokazany jest komunikat „ “.
“.
Wybór ustawionych stacji radiowych
Ustawione stacje radiowe można wybrać, naciskając kilkakrotnie przycisk M+/M- (12).
Odtwarzanie płyt kompaktowych/MP3
1.Wybierz tryb CD za pomocą przycisku FUNCTION (7). Na wyświetlaczu pojawi się wskazanie „- -”.
2.Otworzyć kieszeń na płytę CD (2), używając wypustu (1), by otworzyć kieszeń na płytę CD ku przodowi.
3.Umieścić CD z etykietą ustawioną ku górze na wałku, aby CD mechanicznie się zatrzasnął.
4.Zamknąć kieszeń na płytę CD.
5.Płyta kompaktowa odtwarzana będzie od pierwszego tytułu.
6.By wyjąć CD, proszę wcisnąć przycisk  (4), otworzyć pojemnik na płytę kompaktową i ostrożnie wyjąć CD.
Pokrywę odtwarzacza należy trzymać stale zamkniętą.
WSKAZÓWKA:
•Jeślipłytazostaniewłożonaodwrotnielubjeślinie zostanie włożona wcale, na wyświetlaczu będzie migać wskazanie „- -” oraz widoczny będzie komunikat „ ”.
”.
•Zewzględunadużąilośćdostępnegooprogramowania i rodzajów nośników, nie gwarantujemy prawidłowego odtwarzania płyty CD, nagranej przez użytkownika.
Opis przycisków kontrolnych


 (5)
(5)
Mogą Państwo na krótko przerwać odtwarzanie a następnie ponownie je uruchomić. Zanikający wyświetlacz miga. Dla kontynuacji odtwarzania wcisnąć ten klawisz ponownie.

 /
/  (3/14)
Przy pomocy
 mogą Państwo przejść do następnego tytułu lub do jeszcze jednego dalej, itd.
•Powciśnięciuprzyciskurozpoczynasięprocesprzeszukiwania skali odbiornika. (Dźwięk jest wyciszony.)
Przycisk  mogą Państwo obsługiwać w sposób następujący:
Naciśnięcie1x= Aktualnyutwórodtwarzanyjestod początku.
Naciśnięcie2x= Przeskakujedopoprzedniegotytułu. Naciśnięcie3x= Odtwarzautwórpoprzedzającyitd.
Po wciśnięciu przycisku rozpoczyna się proces przeszukiwania skali odbiornika. (Dźwięk jest wyciszony.)
 (4)
(4)
Odtwarzanie jest zatrzymane.
 Loading...