


KM8403001M
Table of contents
 Loading...
KM8403001 EN User Manual

2 www.aeg.com
CONTENTS
1. SAFETY INFORMATION.................................................................................................3
2. CONDITIONS OF USE....................................................................................................5
3. SAFETY INSTRUCTIONS................................................................................................ 5
4. PRODUCT DESCRIPTION.............................................................................................. 7
5. CONTROL PANEL...........................................................................................................8
6. BEFORE FIRST USE.......................................................................................................10
7. DAILY USE......................................................................................................................10
8. MICROWAVE MODE.................................................................................................... 13
9. CLOCK FUNCTIONS.................................................................................................... 18
10. AUTOMATIC PROGRAMMES....................................................................................19
11. USING THE ACCESSORIES........................................................................................20
12. ADDITIONAL FUNCTIONS........................................................................................20
13. HINTS AND TIPS.........................................................................................................22
14. CARE AND CLEANING.............................................................................................. 40
15. TROUBLESHOOTING.................................................................................................41
16. INSTALLATION........................................................................................................... 42
17. WARRANTY ................................................................................................................ 44
FOR PERFECT RESULTS
Thank you for choosing this AEG product. We have created it to give you impeccable
performance for many years, with innovative technologies that help make life simpler
features you might not find on ordinary appliances. Please spend a few minutes
reading to get the very best from it.
Visit our website for:
Get usage advice, brochures, trouble shooter, service information:
www.aeg.com
Register your product for better service:
www.registeraeg.com
CUSTOMER CARE AND SERVICE
Always use original spare parts.
When contacting our Authorised Service Centre, ensure that you have the following
data available: Model, PNC, Serial Number.
The information can be found on the rating plate.
Warning / Caution-Safety information
General information and tips
Environmental information
Subject to change without notice.

1. SAFETY INFORMATION
Before the installation and use of the appliance,
carefully read the supplied instructions. The
manufacturer is not responsible if an incorrect
installation and use causes injuries and damages. Always
keep the instructions with the appliance for future
reference.
1.1 Children and vulnerable people safety
• This appliance can be used by children aged from 8
years and above and persons with reduced physical,
sensory or mental capabilities or lack of experience
and knowledge if they have been given supervision or
instruction concerning use of the appliance in a safe
way and understand the hazards involved.
• Do not let children play with the appliance.
• Keep all packaging away from children.
Keep children and pets away from the appliance when
•
it operates or when it cools down. Accessible parts are
hot.
• If the appliance has a child safety device, we
recommend you activate it.
• Cleaning and user maintenance shall not be made by
children without supervision.
• Children of less than 3 years should be kept away
unless continuously supervised.
ENGLISH
3
1.2
General Safety
•
Only a qualified person must install this appliance and
replace the cable.
• Internally the appliance becomes hot when in
operation. Do not touch the heating elements that are
in the appliance. Always use oven gloves to remove or
put in accessories or ovenware.
• Before maintenance cut the power supply.

4
www.aeg.com
• Ensure that the appliance is switched off before
replacing the lamp to avoid the possibility of electric
shock.
• Do not use a steam cleaner to clean the appliance.
• Do not use harsh abrasive cleaners or sharp metal
scrapers to clean the glass door since they can scratch
the surface, which may result in shattering of the glass.
• If the supply cord is damaged, it must be replaced by
the manufacturer, its Authorised Service Centre or
similarly qualified persons in order to avoid a hazard.
• Do not activate the appliance when it is empty. Metal
parts inside the cavity can create electric arcing.
• If the door or door seals are damaged, the appliance
must not be operated until it has been repaired by a
qualified person.
• Only a qualified person can carry out any service or
repair operation that involves the removal of a cover
which gives protection against exposure to microwave
energy.
• Do not heat liquids and other foods in sealed
containers. They are liable to explode.
• Only use utensils that are suitable for use in
microwave ovens.
• When heating food in plastic or paper containers,
keep an eye on the appliance due to the possibility of
ignition.
• The appliance is intended for heating food and
beverages. Drying of food or clothing and heating of
warming pads, slippers, sponges, damp cloth and
similar may lead to risk of injury, ignition or fire.
• If smoke is emitted, switch off or unplug the appliance
and keep the door closed in order to stifle any flames.
• Microwave heating of beverages can result in delayed
eruptive boiling. Care must be taken when handling
the container.
• The contents of feeding bottles and baby food jars
shall be stirred or shaken and the temperature
checked before consumption, in order to avoid burns.

• Eggs in their shell and whole hard-boiled eggs should
not be heated in the appliance since they may
explode, even after microwave heating has ended.
• The appliance should be cleaned regularly and any
food deposits removed.
• Failure to maintain the appliance in a clean condition
could lead to deterioration of the surface that could
adversely affect the life of the appliance and possibly
result in a hazardous situation.
2. CONDITIONS OF USE
ENGLISH
5
This appliance is intended to be used in
household and similar applications such
as:
• Farm houses
3. SAFETY INSTRUCTIONS
3.1 Installation
WARNING!
Only a qualified person must
install this appliance.
• Remove all the packaging.
• Do not install or use a damaged
appliance.
• Obey the installation instruction
supplied with the appliance.
• Always be careful when you move the
appliance because it is heavy. Always
wear safety gloves.
• Do not pull the appliance by the
handle.
• Keep the minimum distance from the
other appliances and units.
• Make sure that the appliance is
installed below and adjacent safe
structures.
• The sides of the appliance must stay
adjacent to appliances or to units with
the same height.
3.2 Electrical connection
WARNING!
Risk of fire and electrical
shock.
• By clients in serviced apartments,
holiday apartments and other
residential type environments
• All electrical connections should be
made by a qualified electrician.
• The appliance must be earthed.
• Make sure that the electrical
information on the rating plate agrees
with the power supply. If not contact
an electrician.
• Always use a correctly installed
shockproof socket.
• Do not use multi-plug adapters and
extension cables.
• Make sure not to cause damage to
the mains plug and to the mains
cable. Should the mains cable need
to be replaced, this must be carried
out by our Authorised Service Centre.
• Do not let mains cables to come in
touch with the appliance door,
specially when the door is hot.
• The shock protection of live and
insulated parts must be fastened in
such a way that it cannot be removed
without tools.
• Connect the mains plug to the mains
socket only at the end of the
installation. Make sure that there is
access to the mains plug after the
installation.
• If the mains socket is loose, do not
connect the mains plug.

6
www.aeg.com
• Do not pull the mains cable to
disconnect the appliance. Always pull
the mains plug.
• Use only correct isolation devices: line
protecting cut-outs, fuses (screw type
fuses removed from the holder), earth
leakage trips and contactors.
• The electrical installation must have
an isolation device which lets you
disconnect the appliance from the
mains at all poles. The isolation
device must have a contact opening
width of minimum 3 mm.
• This appliance complies with the
E.E.C. Directives.
3.3 Use
WARNING!
Risk of injury, burns and
electrical shock or explosion.
• Use this appliance in a household
only.
• Do not change the specification of
this appliance.
• Make sure that the ventilation
openings are not blocked.
• Do not let the appliance stay
unattended during operation.
• Deactivate the appliance after each
use.
• Be careful when you open the
appliance door while the appliance is
in operation. Hot air can release.
• Do not operate the appliance with
wet hands or when it has contact with
water.
• Do not apply pressure on the open
door.
• Do not use the appliance as a work
surface or as a storage surface.
• Open the appliance door carefully.
The use of ingredients with alcohol
can cause a mixture of alcohol and air.
• Do not let sparks or open flames to
come in contact with the appliance
when you open the door.
• Do not put flammable products or
items that are wet with flammable
products in, near or on the appliance.
WARNING!
Risk of damage to the
appliance.
• To prevent damage or discoloration
to the enamel:
– do not put ovenware or other
objects in the appliance directly
on the bottom.
– do not put aluminium foil directly
on the bottom of the appliance.
– do not put water directly into the
hot appliance.
– do not keep moist dishes and
food in the appliance after you
finish the cooking.
– be careful when you remove or
install the accessories.
• Discoloration of the enamel has no
effect on the performance of the
appliance. It is not a defect in the
sense of the warranty law.
• Use a deep pan for moist cakes. Fruit
juices cause stains that can be
permanent.
• This appliance is for cooking
purposes only. It must not be used for
other purposes, for example room
heating.
• Always cook with the oven door
closed.
3.4 Care and cleaning
WARNING!
Risk of injury, fire, or damage
to the appliance.
• Before maintenance, deactivate the
appliance and disconnect the mains
plug from the mains socket.
• Make sure the appliance is cold.
There is the risk that the glass panels
can break.
• Replace immediately the door glass
panels when they are damaged.
Contact the Service.
• Make sure the cavity and the door are
wiped dry after each use. Steam
produced during the operation of the
appliance condensates on cavity walls
and can cause corrosion.
• Clean regularly the appliance to
prevent the deterioration of the
surface material.
• Remaining fat or food in the
appliance can cause fire.
• Clean the appliance with a moist soft
cloth. Only use neutral detergents. Do
not use abrasive products, abrasive
1 2
8
4
3
1
2
3
6
4
5
7
ENGLISH
7
cleaning pads, solvents or metal
objects.
• If you use an oven spray, obey the
safety instructions on the packaging.
• Do not clean the catalytic enamel (if
applicable) with any kind of
detergent.
3.5 Internal light
• The type of light bulb or halogen
lamp used for this appliance is only
for household appliances. Do not use
it for house lighting.
WARNING!
Risk of electrical shock.
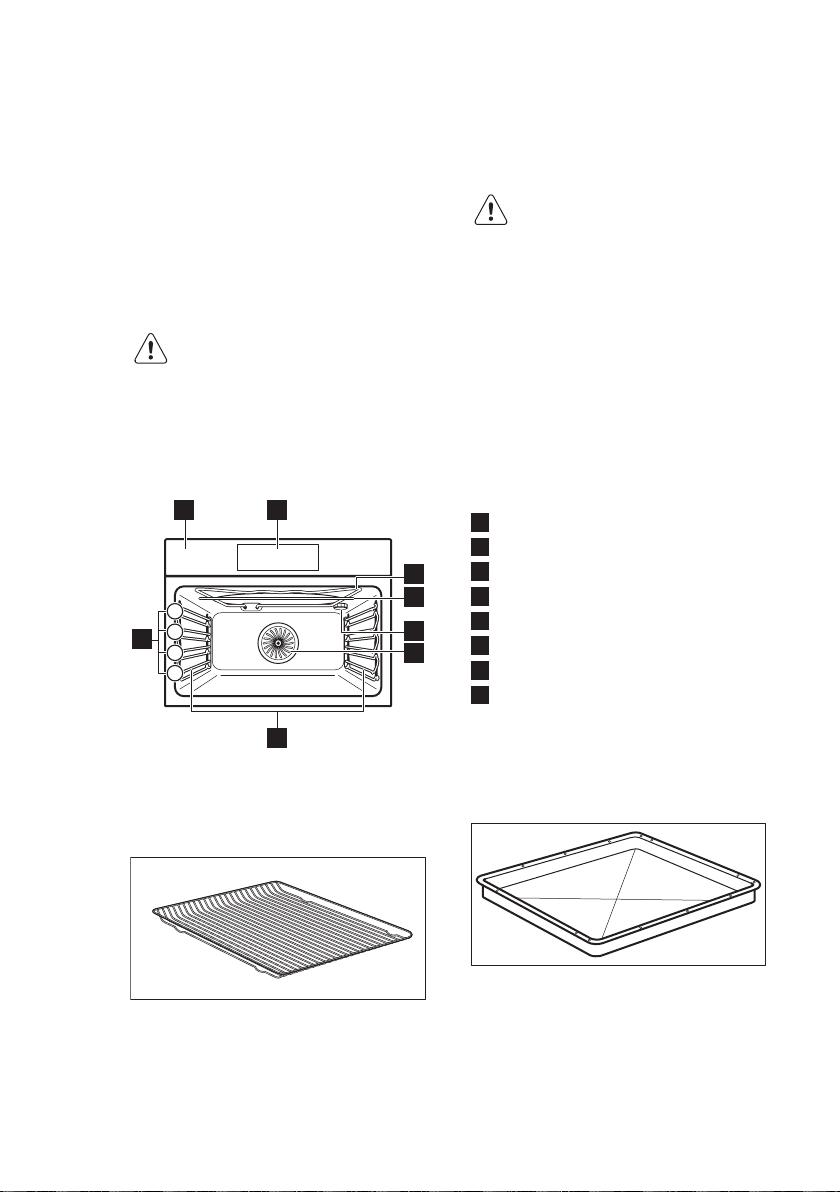
4. PRODUCT DESCRIPTION
4.1 General overview
• Before replacing the lamp, disconnect
the appliance from the power supply.
• Only use lamps with the same
specifications.
3.6 Disposal
WARNING!
Risk of injury or suffocation.
• Disconnect the appliance from the
mains supply.
• Cut off the mains cable and discard it.
• Remove the door catch to prevent
children and pets to get closed in the
appliance.
Control panel
1
Electronic programmer
2
Heating element
3
Microwave generator
4
Lamp
5
Fan
6
Shelf support, removable
7
Shelf positions
8
4.2 Accessories
Wire shelf
For cookware, cake tins, roasts.
Baking tray
For cakes and biscuits.
21 3 4 5 76 8 9 10 11
www.aeg.com8
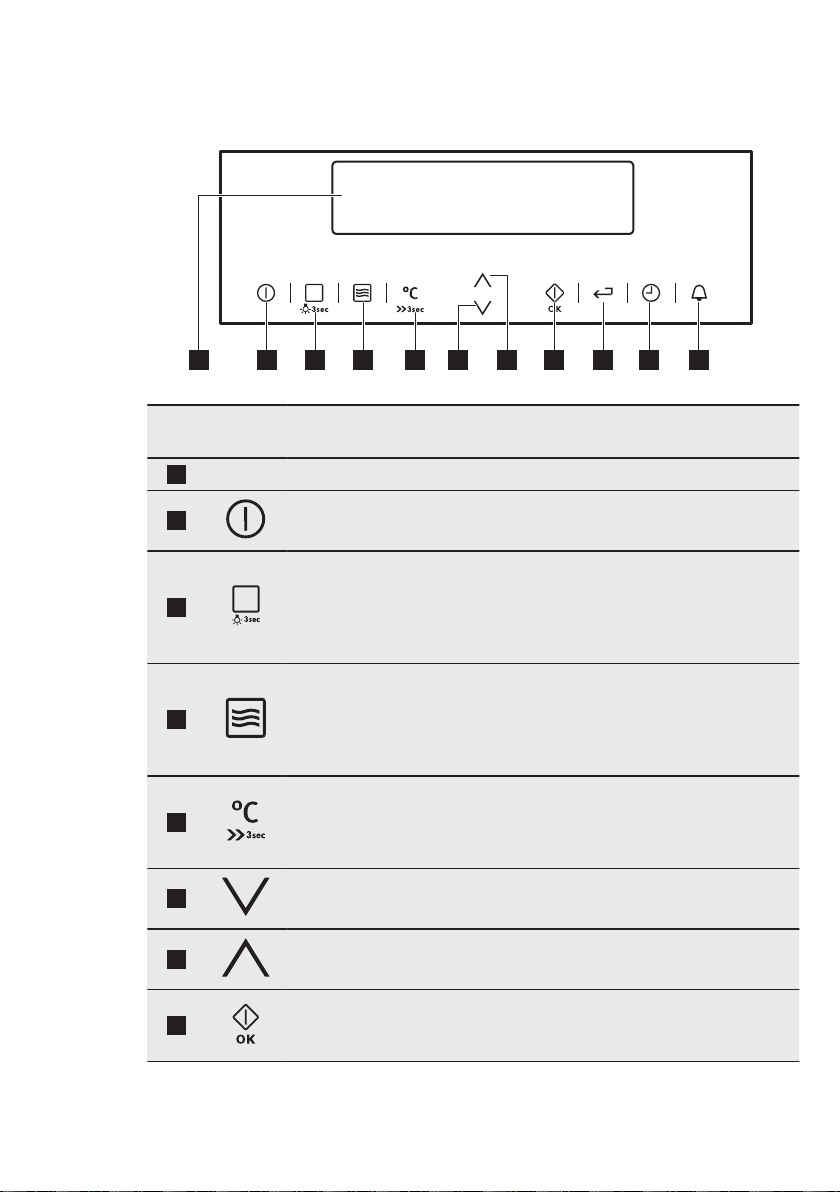
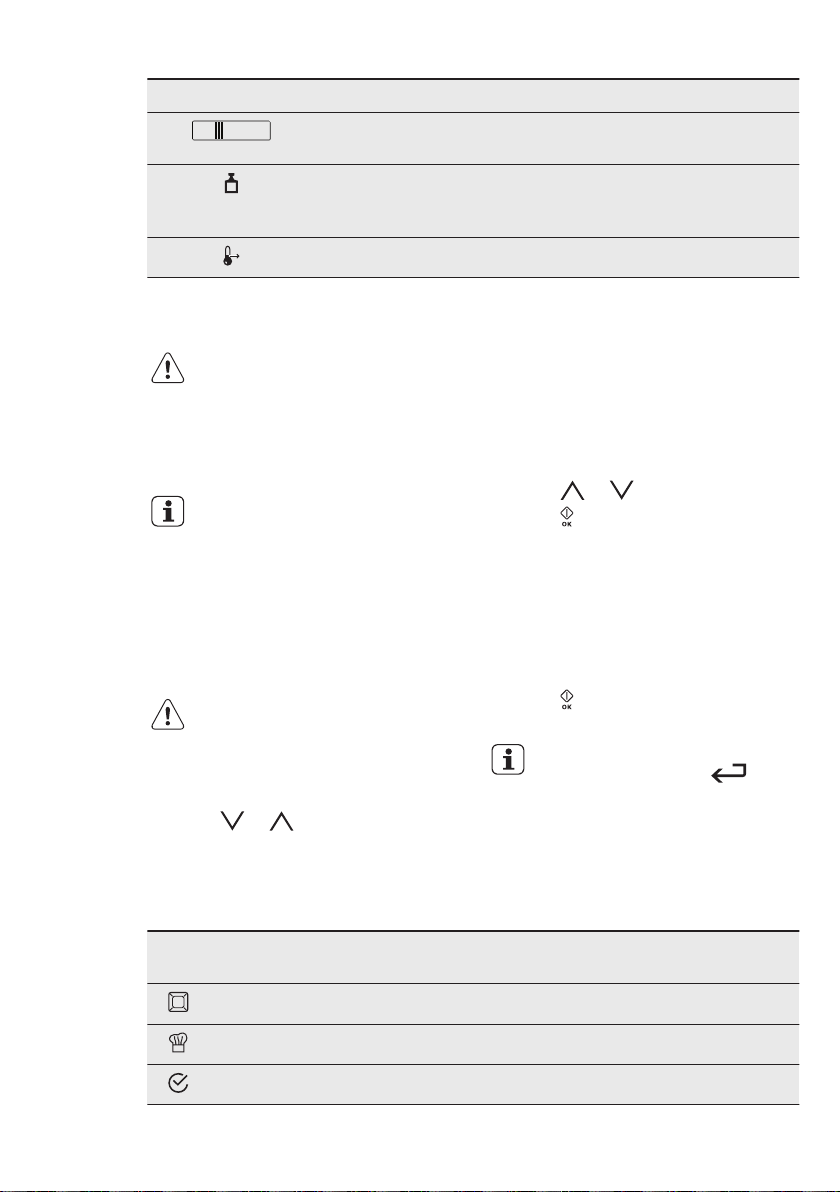
5. CONTROL PANEL
5.1 Electronic programmer
Use the sensor fields to operate the appliance.
Sensor
field
1
2
Function Comment
- Display Shows the current settings of the appliance.
ON / OFF To activate and deactivate the appliance.
Heating Functions
or Assisted Cook-
3
ing
Microwave function
4
Temperature se-
5
6
7
8
lection
Down key To move down in the menu.
Up key To move up in the menu.
OK / Microwave
Quick Start
To choose a heating function or a menu: Assisted
Cooking. To access the necessary function, touch
the field once or twice after you activate the appliance. To activate or deactivate the light, touch the
field for 3 seconds.
To activate the Microwave function. You can use it
when the appliance is deactivated. When you use
the Microwave function with the function: Duration
for more than 7 minutes and in Combi mode, the
Microwave power cannot be more than 600 W.
To set the temperature or show the current temperature in the appliance. Touch the field for 3
seconds to activate or deactivate the function:
Fast heat up.
To confirm the selection or settings. To activate
the Microwave function. You can use it when the
appliance is deactivated.
A
DE
B C
ENGLISH
9
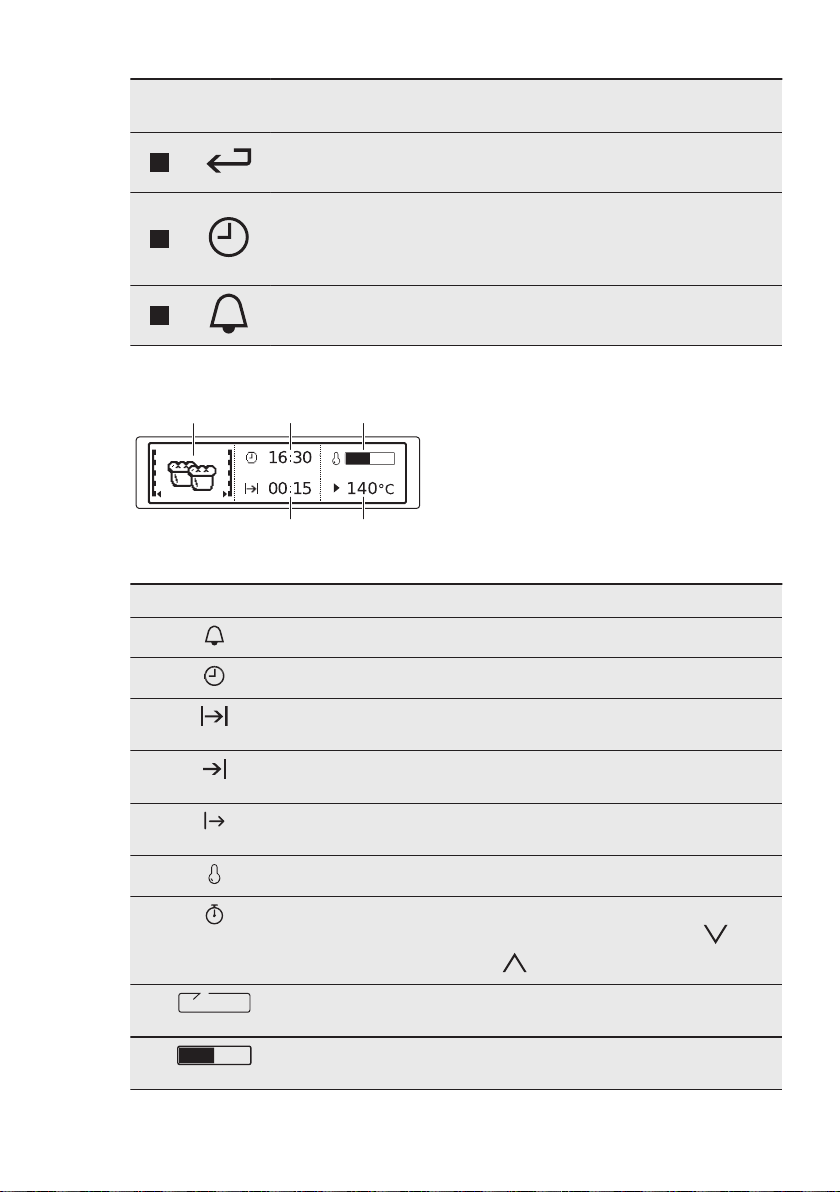
Sensor
field
9
10
11
Function Comment
Home key To go back one level in the menu. To show the
main menu, touch the field for 3 seconds.
Time and additional functions
Minute Minder To set the function: Minute Minder.
To set different functions. When a heating function operates, touch the sensor field to set the
timer or the functions: Function Lock, Favourite
Programme, Heat + Hold, Set + Go.
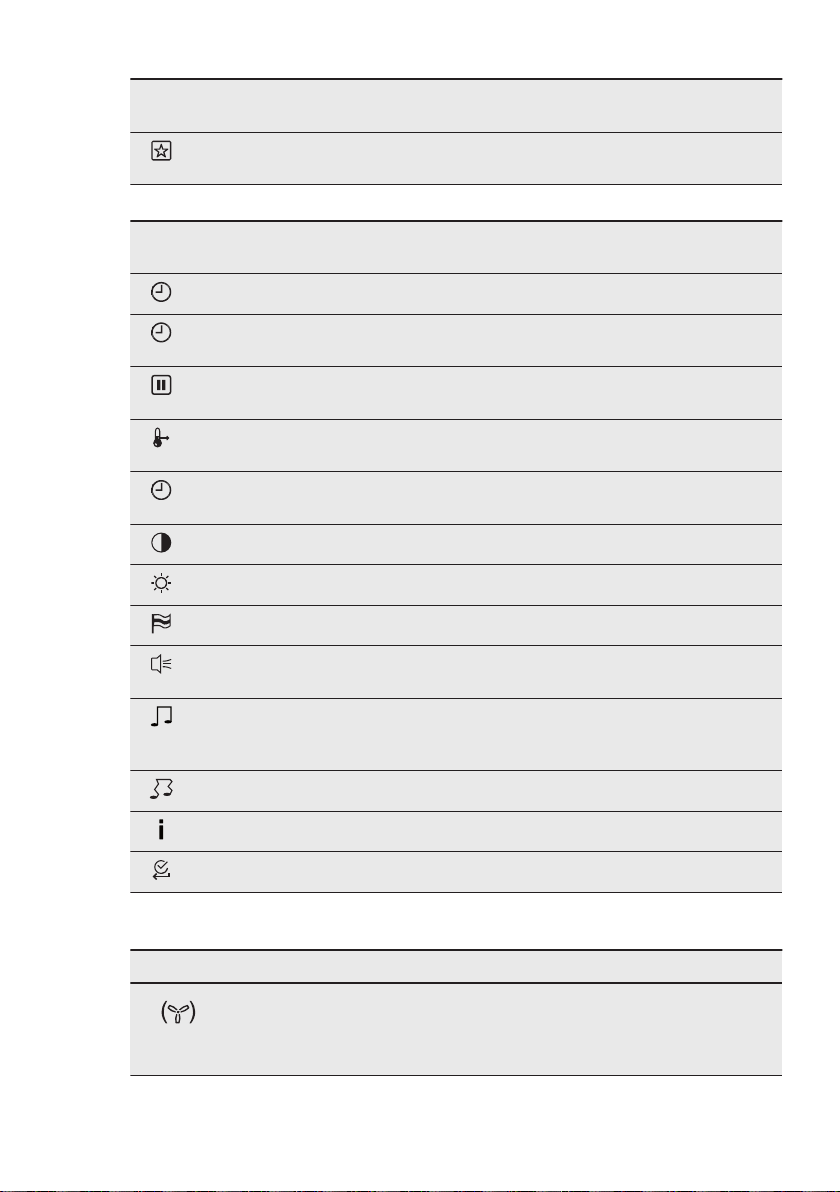
5.2 Display
Other indicators of the display:
Symbol Function
Minute Minder The function operates.
Time of day The display shows the current time.
A) Heating function or Microwave function
B) Time of day
C) Heat-up indicator
D) Temperature or power of the microwave
E) Duration time or end time of a function
Duration The display shows the necessary time
for cooking.
End Time The display shows when the cooking
time is complete.
Start Time The display shows when the heating
function must start.
Temperature The display shows the temperature.
Time Indication The display shows how long the heat-
ing function operates. Press and
at the same time to reset the time.
Calculation The appliance calculates the time for
cooking.
Heat-up Indicator The display shows the temperature in
the appliance.
www.aeg.com10
Symbol Function
Fast Heat Up Indicator The function is active. It decreases the
Weight Automatic The display shows that the automatic
Heat + Hold The function is active.
6. BEFORE FIRST USE
heat up time.
weight system is active or that weight
can be changed.
WARNING!
Refer to Safety chapters.
6.1 Initial Cleaning
Remove all accessories and removable
shelf supports from the appliance.
Refer to "Care and cleaning"
chapter.
Clean the appliance before first use.
Put the accessories and the removable
shelf supports back to their initial
position.
7. DAILY USE
WARNING!
Refer to Safety chapters.
7.1 Navigating the menus
1. Activate the appliance.
2. Press
option.
7.2 The menus in overview
Main menu
Symbol
6.2 First Connection
When you connect the appliance to the
mains or after the power cut, you have to
set the language, the display contrast,
the display brightness and the time of
the day.
1. Press
2. Press to confirm.
3. Press to move to the submenu or
accept the setting.
or to select the menu
Menu item Application
Heating Functions Contains a list of heating functions.
or to set the value.
At each point you can go back
to the main menu with .
Assisted Cooking Contains a list of automatic programmes.
Basic Settings You can use it to set other settings.
ENGLISH
11
Symbol
Menu item Application
Favourite Programme Contains a list of favourite cooking programmes
Submenu for: Basic Settings
Symbol
Submenu Description
Set Time of Day Sets the current time on the clock.
Time Indication When ON, the display shows the current time
Set + Go When ON, in the Select Options window you can
Heat + Hold When ON, in the Select Options window you can
Extra Time Activates and deactivates the time extension
Display Contrast Adjusts the display contrast by degrees.
Display Brightness Adjusts the display brightness by degrees.
Set Language Sets the language for the display.
Buzzer Volume Adjusts the volume of press-tones and signals by
Key Tones Activates and deactivates the tone of the touch
Alarm/Error Tones Activates and deactivates the alarm tones.
created by the user.
when you deactivate the appliance.
choose the function: Set + Go.
choose the function: Heat + Hold.
function.
degrees.
fields. It is not possible to deactivate the tone of
the ON / OFF touch field.
Service Shows the software version and configuration.
Factory Settings Resets all settings to factory settings.
7.3 Heating Functions
Heating function Application
True Fan Cooking To bake on up to 2 shelf positions at the same
time and to dry food. Set the temperature 20 - 40
°C lower than for the function: Conventional
Cooking.
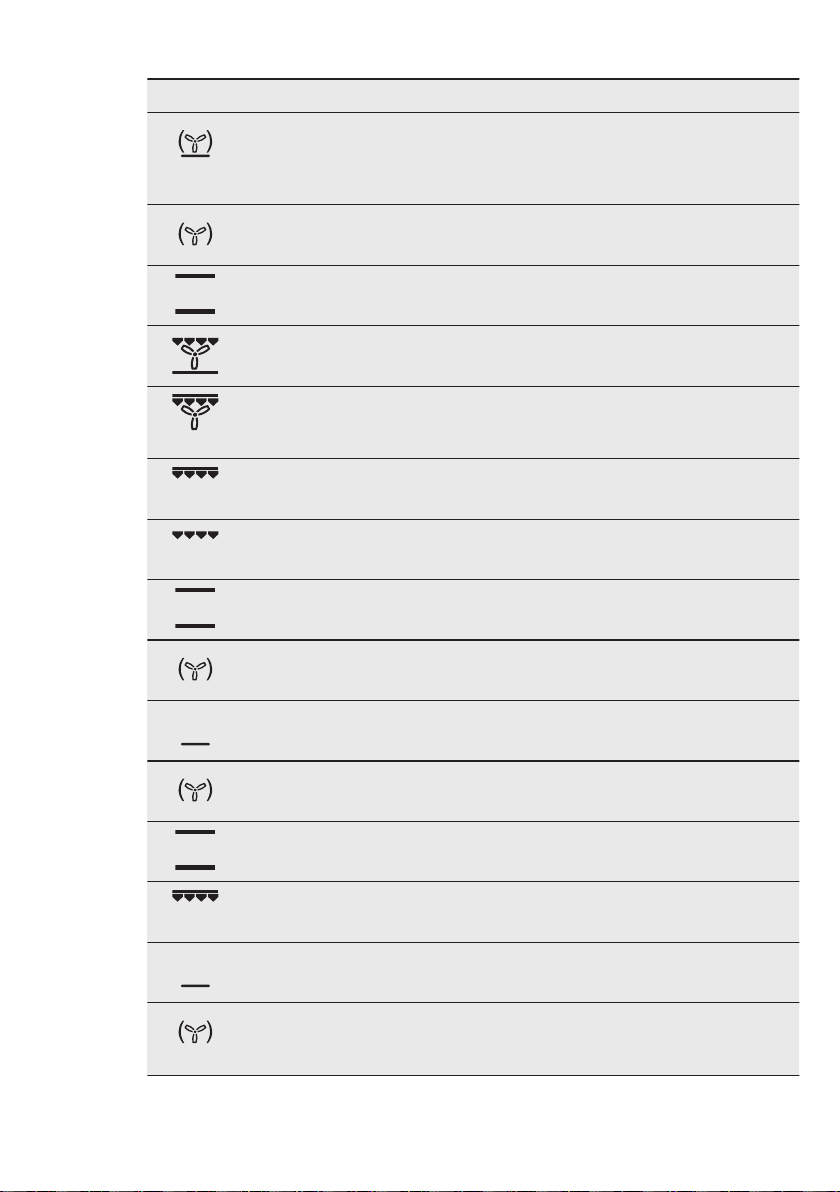
www.aeg.com12
Heating function Application
Pizza Setting To bake food on 1 shelf position for a more inten-
Slow Cooking To prepare tender, succulent roasts.
Conventional Cooking To bake and roast food on 1 shelf position.
Frozen Foods To make your convenience food like e.g. French
Turbo Grilling To roast larger meat joints or poultry with bones
Fast Grilling To grill flat food in large quantities and to toast
Grilling To grill flat food and to toast bread.
Keep Warm To keep food warm.
sive browning and a crispy bottom. Set the temperature 20 - 40 °C lower than for the function:
Conventional Cooking.
Fries, Wedges, spring rolls crispy.
on 1 shelf position. Also to make gratins and to
brown.
bread.
Defrost To defrost frozen food.
Bottom Heat To bake cakes with crispy bottom and to preserve
food.
Dough Proving For controlled rising of yeast dough before bak-
ing.
Bread Baking To bake bread.
Au Gratin For dishes such as lasagna or potato gratin. Also
to gratinate and brown.
Preserving To make vegetable preserves such as pickles.
Drying To dry sliced fruit (e.g. apples, plums, peaches)
and vegetables (e.g. tomatoes, zucchini, mushrooms).
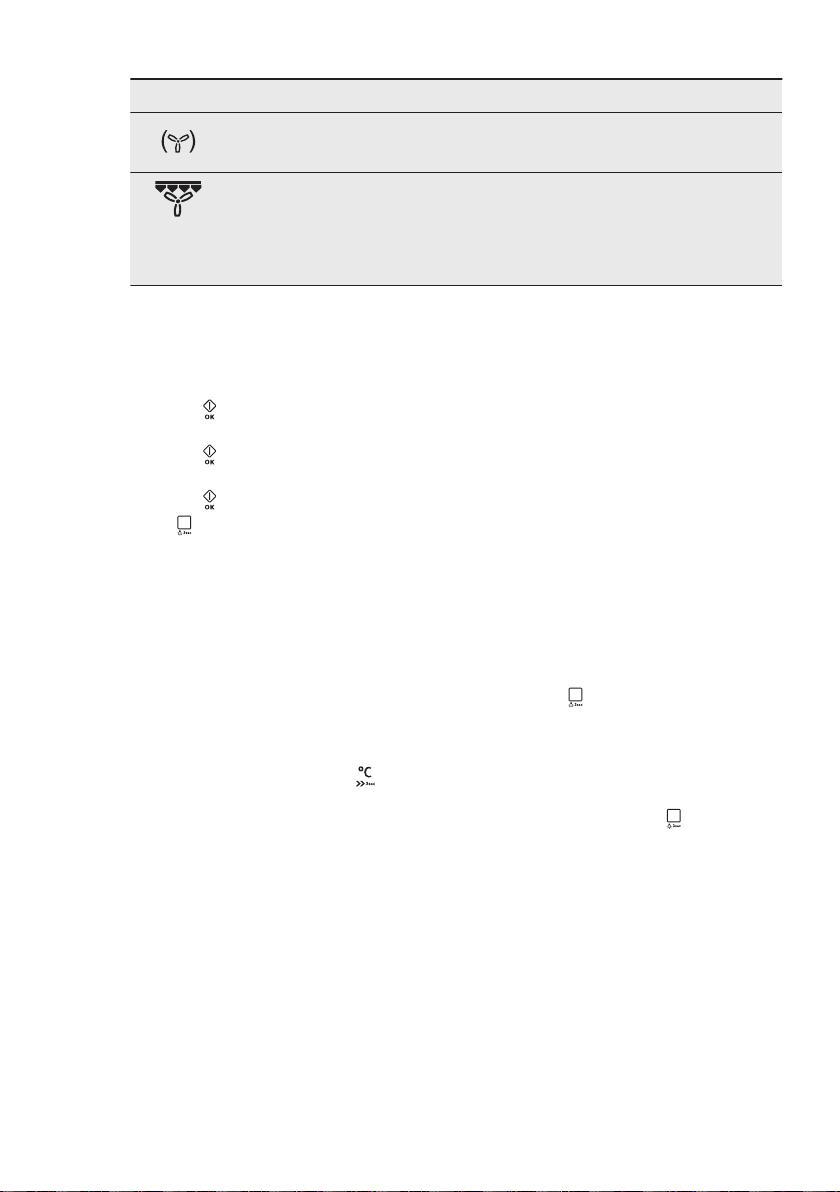
Heating function Application
Plate Warming To preheat your plate for serving.
ECO Roasting The ECO functions let you optimize the energy
consumption during cooking. It is necessary to set
the cooking time first. To get more information
about the recommended settings, refer to the
cooking tables with the equivalent function.
ENGLISH
13
7.4 Activating a heating
function
1. Activate the appliance.
2. Select the menu: Heating Functions.
3. Press to confirm.
4. Set a heating function.
5. Press to confirm.
6. Set the temperature.
7. Press to confirm.
Press once or twice to go directly to
the menus: Heating Functions, Assisted
Cooking.
7.5 Heat-up indicator
When you activate a heating function,
the bar on the display comes on. The bar
shows that the temperature increases.
7.6 Fast Heat Up Indicator
This function decreases the heat-up time.
To activate the function, hold for 3
seconds. The heat-up indicator
alternates.
7.7 Residual heat
When you deactivate the appliance, the
display shows the residual heat. You can
use the heat to keep the food warm.
7.8 Energy saving
The appliance contains features which
help you save energy during everyday
cooking:
• Residual heat
– When the heating function or
programme operates, the heating
elements are deactivated 10%
earlier (the lamp and fan continue
to operate). For this feature to
operate, the cooking time must
be longer than 30 minutes or you
must use the clock functions
(Duration, End Time).
– When the appliance is off, you
can use the heat to keep food
warm. The display shows the
remaining temperature.
• Cooking with the lamp off - touch
and hold
deactivate the lamp during cooking.
• Eco functions - refer to "Heating
Functions".
• When you use the Eco functions, the
lamp deactivates. The lamp activates
again when you touch for 3
seconds or when you open the
appliance door.
for 3 seconds to
MICROWAVE MODE
8.
8.1 Microwave
Information about operation
General:
• After you deactivate the appliance, let
the food stand for some minutes.
Refer to the microwave cooking
tables: standing time.
• Remove the aluminium foil packaging,
metal containers, etc. before you
prepare the food.
Cooking:

www.aeg.com14
• If possible, cook food covered with
material suitable for use in the
microwave. Only cook food without a
cover if you want to keep a crust.
• Do not overcook the dishes by setting
the power and time too high. The
food can dry out, burn or catch fire in
some places.
• Do not use the appliance to cook
eggs in their shells and snails,
because they can burst. With fried
eggs, pierce the yolks first.
• Prick food with "skin" or "peel", such
as potatoes, tomatoes, sausages, with
a fork several times before cooking so
that the food does not burst.
• For chilled or frozen food, set a
longer cooking time.
• Dishes which contain sauce must be
stirred from time to time.
• Vegetables that have a firm structure,
such as carrots, peas or cauliflower,
must be cooked in water.
• Turn larger pieces after half the
cooking time.
• If possible, cut vegetables into similarsized pieces.
• Use flat, wide dishes.
• Do not use cookware made of
porcelain, ceramic or earthenware
with small holes, e. g. on handles or
unglazed bottoms. Moisture going
into the holes can cause the cookware
to crack when it is heated.
Defrosting meat, poultry, fish:
• Put the frozen, unwrapped food on a
small upturned plate with a container
below it, or on a defrosting rack or
plastic sieve so that the defrosting
liquid can run off.
• Turn the food after half the defrosting
time. If possible, divide and then
remove the pieces that have started
to defrost.
Defrosting butter, portions of gateau,
quark:
• Do not fully defrost in the appliance,
but let them defrost at room
temperature. This gives a more even
result. Fully remove all metal or
aluminium packaging or parts before
defrosting.
Defrosting fruit, vegetables:
• Do not fully defrost fruit and
vegetables, which are to be further
prepared while raw, in the appliance.
Let them defrost at room
temperature.
• You can use a higher microwave
power to cook fruit and vegetables
without defrosting them first.
Ready meals:
• Ready meals in metal packaging or
plastic trays with metal covers can
only be defrosted or heated in the
microwave if they are expressively
designated as suitable for use in the
microwave.
• You must follow the manufacturer's
instructions printed on the packaging
(e. g. remove the metal cover and
pierce the plastic film).
Tips for the microwave
Result Remedy
You cannot find details for the amount
of food prepared.
The food has got too dry. Set shorter cooking time or select lower micro-
The food is still not defrosted, hot or
cooked after the time has elapsed.
Look for similar food. Increase or shorten the
length of the cooking times according to the following rule: double the amount = almost double
the time, half the amount = half the time.
wave power.
Set longer cooking time or select higher microwave power. Please note that taller dishes need
longer.
ENGLISH
Result Remedy
After the cooking time has elapsed,
the food is overheated at the edge
Next time select a lower power and a longer
time. Stir liquids, e.g. soup, halfway through.
but is still not ready in the middle.
Suitable cookware and materials
Cookware / Material Microwave Grilling
Defrost-
Heating Cooking
ing
Ovenproof glass and porcelain (with
X X X X
no metal components, e. g. Pyrex,
heat-proof glass)
1)
Non-ovenproof glass and porcelain
Glass and glass ceramic made of
X -- -- --
X X X X
ovenproof / frost-proof material (e. g.
Arcoflam), grill shelf
Ceramic2), earthenware
2)
Heat-resistant plastic up to 200 °C
X X X --
3)
X X X --
Cardboard, paper X -- -- --
Clingfilm X -- -- --
Roasting film with microwave safe clo-
3)
sure
Roasting dishes made of metal, e. g.
X X X --
-- -- -- X
enamel, cast iron
Baking tins, black lacquer or silicon-
3)
coated
-- -- -- X
Baking tray X X X X
Browning cookware, e. g. crisp pan or
-- X X --
crunch plate
Ready meals in packaging
1)
With no silver, gold, platinum or metal plating / decorations
2)
Without quartz or metal components, or glazes which contain metals
3)
You must follow the manufacturer’s instructions about the maximum temperatures.
3)
X X X X
15
X suitable
-- not suitable
Other things to think about…
• Food items have different shapes and
qualities. They are prepared in
different quantities. Because of this,
the necessary time and power for
defrosting, heating or cooking can
Loading...