


Deutsch
Wir freuen uns, dass Sie sich für den AEG UltraOneStaubsauger entschieden haben. Diese Bedienungsanleitung gilt für alle UltraOne-Modelle. Das bedeutet, dass Ihr Modell bestimmte Zubehörteile und/oder Funktionen möglicherweise nicht enthält. Um bestmögliche Ergebnisse zu erzielen, sollten Sie ausschließlich das original AEG-Zubehör verwenden, das speziell für Ihren Staubsauger entwickelt wurde.
English
Thank you for choosing an AEG UltraOne vacuum cleaner. These Operating Instructions cover all UltraOne models. This means that with your specific model, some accessories/ features may not be included. In order to ensure the best results, always use original AEG accessories. They have been designed especially for your vacuum cleaner.
Ελληνικά
Σας ευχαριστούμε που επιλέξατε την ηλεκτρική σκούπα UltraOne της AEG. Αυτές οι Οδηγίες Λειτουργίας καλύπτουν όλα τα μοντέλα UltraOne. Αυτό σημαίνει ότι στο συγκεκριμένο μοντέλο, είναι πιθανό ορισμένα εξαρτήματα ή λειτουργίες να μην συμπεριλαμβάνονται. Για να έχετε τα καλύτερα δυνατά αποτελέσματα, χρησιμοποιείτε πάντα τα γνήσια εξαρτήματα AEG. Έχουν σχεδιαστεί αποκλειστικά για τη δική σας ηλεκτρική σκούπα.
4
14
12
|
13 |
|
15 |
1 |
2 |
|
||
|
|
|
11 |
|
3 |
10 |
|
4 |
|
|
5
16
9 8 7 6 4
17 |
18 |
19 |
20 |
25 |
21 |
22 |
23 |
24 |
26 |

|
|
|
|
|
|
|
|
|
|
|
|
|
|
|
|
|
|
|
|
|
|
|
|
|
|
|
|
|
|
|
|
|
|
|
|
|
|
|
|
|
|
|
|
|
|
|
|
|
|
|
|
|
|
|
|
|
|
|
|
|
|
|
|
|
|
|
|
|
|
|
|
|
|
|
|
|
|
|
|
|
|
|
|
|
|
|
|
|
|
|
|
|
|
|
|
|
|
|
|
|
|
|
|
|
|
|
|
|
|
|
|
|
|
|
|
|
|
|
|
|
|
|
|
|
|
|
|
|
|
|
|
|
|
|
|
|
|
|
|
|
|
|
|
|
|
|
|
|
|
|
|
|
|
|
|
|
|
|
|
|
|
|
|
|
|
|
|
|
|
|
|
|
|
|
|
|
|
|
|
|
|
|
|
|
|
|
|
|
|
|
|
|
|
|
|
|
|
|
|
|
|
|
|
|
|
|
|
|
|
|
|
|
|
|
|
|
|
|
|
|
|
|
|
|
|
|
|
|
|
|
|
|
|
|
|
|
|
|
|
|
|
|
|
|
|
|
|
|
|
|
|
|
|
|
|
|
|
|
|
|
|
|
|
|
Inhalt |
|
|
|
Content |
5 |
|
|
|
|
|
|
|
|
|
|
||||||||||||||||||||
|
|
|
|
|
|
|
Deutsch |
|
|
|
English |
|
|
|
|
|
|
|
|
|
|
|
|
|
|
|||||||||||||||||
|
|
|
|
|
|
|
|
|
|
|
|
|
|
|
|
|
|
|
|
|||||||||||||||||||||||
|
|
|
|
|
|
|
Vorbereitungen |
|
|
|
Before starting |
|
|
|
|
|
|
|
|
|
|
|
|
|
|
|||||||||||||||||
|
|
|
|
|
|
|
|
|
|
|
|
|
|
|
|
|
|
|
|
|
|
|
|
|||||||||||||||||||
|
|
|
|
|
|
|
• Packen Sie Ihren UltraOne Staubsauger aus und prüfen Sie, ob alle Zubehörteile |
|
|
|
• Unpack your UltraOne model and the Aeropro system and check that all accessories are |
|
|
|
|
|
|
|
|
|
|
|||||||||||||||||||||
|
|
|
|
|
|
|
|
enthalten sind*. |
|
|
|
|
included*. |
|
|
|
|
|
de |
|
|
|
|
|
||||||||||||||||||
|
|
|
|
|
|
|
• Das Aeropro-System besteht aus Schlauch, Griff, Rohr und Düse. DieseTeile sind |
|
|
|
• The Aeropro system consists of a hose, handle, tube and nozzle specifically designed |
|
eng |
|
|
|
|
|
||||||||||||||||||||||||
|
|
|
|
|
|
|
|
speziell für Ihr UltraOne-Gerät konstruiert und können je nach Modell variieren. |
|
|
|
|
for your UltraOne and which may vary from model to model. |
|
|
|
|
|
|
|
|
|
|
|||||||||||||||||||
|
|
|
|
|
|
|
• Lesen Sie die Bedienungsanleitung. |
|
|
|
• Read the Operating Instructions. |
|
|
|
|
|
|
|
|
|
|
|
|
|
|
|||||||||||||||||
|
|
|
|
|
|
|
• Beachten Sie dabei besonders das Kapitel mit den Sicherheitshinweisen. |
|
|
|
• Pay special attention to the Safety advice chapter. |
|
|
|
|
|
|
|
|
|
|
|
|
|
|
|||||||||||||||||
|
|
|
|
|
|
|
Wir wünschen Ihnen viel Freude mit Ihrem AEG UltraOne! |
|
|
|
Enjoy your AEG UltraOne! |
|
|
|
|
|
|
|
|
|
|
|
|
|
|
|||||||||||||||||
|
|
|
|
|
|
|
|
|
|
|
|
|
|
|
|
|
|
|
|
|
|
|
|
|||||||||||||||||||
|
|
|
|
|
|
|
|
|
|
|
|
|
|
|
|
|
|
|
|
|||||||||||||||||||||||
|
|
|
|
|
|
|
Inhaltsverzeichnis: |
|
|
|
Table of contents: |
|
|
|
|
|
|
|
|
|
|
|
|
|
|
|||||||||||||||||
|
|
|
|
|
|
|
Verwendung des Staubsaugers. . . . . . . . . . . . . . . . . . . . . . . . . . . |
. 6-7 |
|
|
How to use the vacuum cleaner. . . . . . . . . . . . . . . . . . . . . |
. 6-7. . . . . . |
|
gre |
|
|
|
|
|
|||||||||||||||||||||||
|
|
|
|
|
|
|
Tipps für beste Ergebnisse. . . . . . . . . . . . . . . . . . . . . . . . . . . . . |
. 8-9 |
|
|
Tips on how to get the best results. . . . . . . . . . . . . . . . . . . . |
8-9. . . . . . |
|
|
|
|
|
|
||||||||||||||||||||||||
|
|
|
|
|
|
|
Austauschen der Filter. . . . . . . . . . . . . . . . . . . . . . . . . . . . . . . |
10-11 |
|
|
Replacing the filters. . . . . . . . . . . . . . . . . . . . . . . . . . . |
. 10-11. . . . |
|
|
|
|
|
|
|
|
|
|
||||||||||||||||||||
|
|
|
|
|
|
|
Reinigen der Aeropro-Düse und Batteriewechsel der Fernbedienung im Handgriff.. . 12-13 |
|
Cleaning the Aeropro nozzle and changing the battery in remote handle. |
. 12-13. . . . |
|
|
|
|
|
|
|
|
|
|
||||||||||||||||||||||
|
|
|
|
|
|
|
Fehlersuche. . . . . . . . . . . . . . . . . . . . . . . . . . . . . . . . . . . . . |
. 14 |
|
|
Troubleshooting. . . . . . . . . . . . . . . . . . . . . . . . . . . . . |
14. . . . . . |
|
|
|
|
|
|
|
|
|
|
||||||||||||||||||||
|
|
|
|
|
|
|
. . . . . . . . . . . . . . . . . . . . . . . . . . . . . . . . .Sicherheitshinweise |
. 15 |
|
|
. . . . . . . . . . . . . . . . . . . . . . . . . . . . . .Safety advice |
. . . . . . . 15 |
|
|
|
|
|
|
|
|
|
|
||||||||||||||||||||
|
|
|
|
|
|
|
Verbraucherinformationen und Nachhaltigkeitsgrundsätze. . . . . . . . . . . . . |
. 15 |
|
|
Consumer information and sustainability policy. . . . . . . . . . . . . . . . . . . . . . . . . . |
. 15. . . . . . . . . . . . |
|
|
|
|
|
|
|
|
|
|
||||||||||||||||||||
|
|
|
|
|
|
|
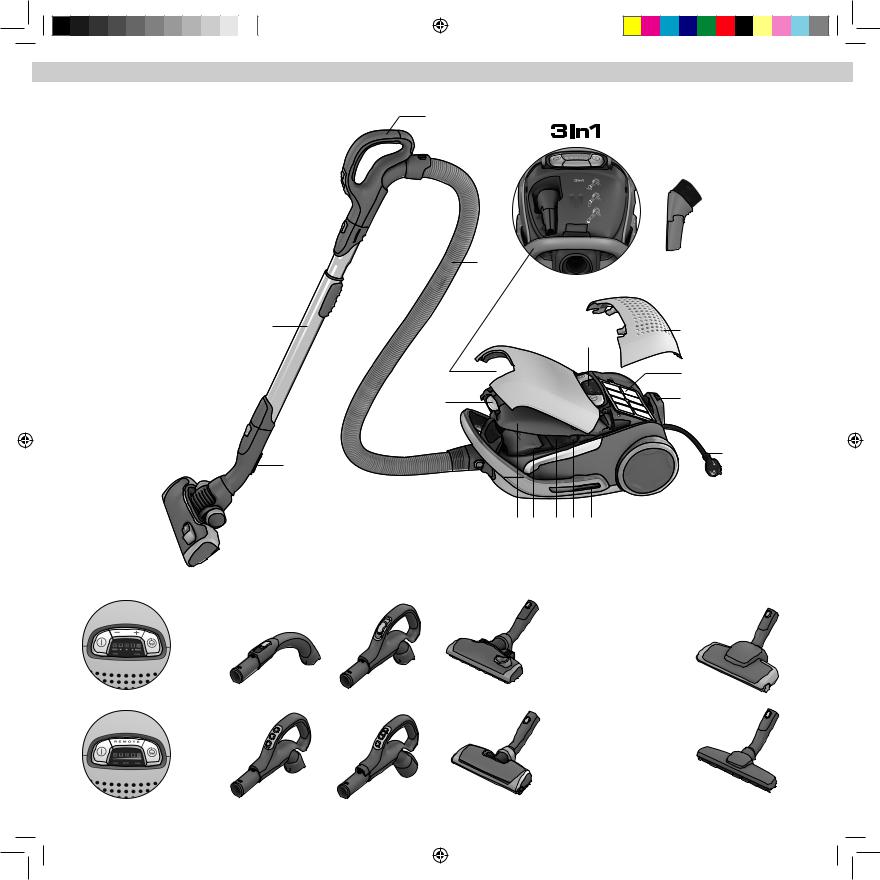
Beschreibung Ihres UltraOne: |
|
|
|
Description of your UltraOne: |
|
|
|
|
|
|
|
|
|
|
|
|
|
|
|||||||||||||||||
|
|
|
|
1 |
Anzeige |
|
|
1 |
Display |
|
|
|
|
|
|
|
|
|
|
|
|
|
|
|||||||||||||||||||
|
|
|
|
2 |
HEPA-Filterabdeckung |
|
|
2 |
Hepa filter cover |
|
|
|
|
|
|
|
|
|
|
|
|
|
|
|||||||||||||||||||
|
|
|
|
3 |
HEPA-Filter |
|
|
3 |
Hepa filter |
|
|
|
|
|
|
|
|
|
|
|
|
|
|
|||||||||||||||||||
|
|
|
|
4 |
Parkschiene |
|
|
4 |
Parking slot |
|
|
|
|
|
|
|
|
|
|
|
|
|
|
|||||||||||||||||||
|
|
|
|
5 |
Netzkabel |
|
|
5 |
Power cord |
|
|
|
|
|
|
|
|
|
|
|
|
|
|
|||||||||||||||||||
|
|
|
|
6 |
Motorfilter |
|
|
6 |
Motor filter |
|
|
|
|
|
|
|
|
|
|
|
|
|
|
|||||||||||||||||||
|
|
|
|
7 |
Motorfilterhalterung |
|
|
7 |
Motor filter holder |
|
|
|
|
|
|
|
|
|
|
|
|
|
|
|||||||||||||||||||
|
|
|
|
8 |
Staubbeutel S-bag® |
|
|
8 |
S-bag® |
|
|
|
|
|
|
|
|
|
|
|
|
|
|
|||||||||||||||||||
|
|
|
|
|
|
|
|
|
|
|
|
|
|
|
|
|
|
|
|
|||||||||||||||||||||||
|
|
|
|
9 |
Abdeckung für Staubbeutelfach |
|
|
9 |
Dust compartment cover |
|
|
|
|
|
|
|
|
|
|
|
|
|
|
|||||||||||||||||||
|
|
|
|
|
|
|
|
|
|
|
|
|
|
|
|
|
|
|
|
|||||||||||||||||||||||
|
|
|
|
10 |
Taste für Zubehörund Staubbeutelfach |
|
|
10 |
Button for Aeropro 3in1 compartment and dustbag comparment |
|
|
|
|
|
|
|
|
|
|
|
|
|
|
|||||||||||||||||||
|
|
|
|
11 |
Zubehörfach |
|
|
11 |
Aeropro 3in1 compartment |
|
|
|
|
|
|
|
|
|
|
|
|
|
|
|||||||||||||||||||
|
|
|
|
12 |
3in1 Zubehördüse |
|
|
12 |
Aeropro 3in1 nozzle |
|
|
|
|
|
|
|
|
|
|
|
|
|
|
|||||||||||||||||||
|
|
|
|
13 |
Aeropro-Schlauch |
|
|
13 |
Aeropro hose |
|
|
|
|
|
|
|
|
|
|
|
|
|
|
|||||||||||||||||||
|
|
|
|
14 |
Griff |
|
|
14 |
Handle |
|
|
|
|
|
|
|
|
|
|
|
|
|
|
|||||||||||||||||||
|
|
|
|
15 |
Aeropro-Teleskoprohr |
|
|
15 |
Aeropro telescopic tube |
|
|
|
|
|
|
|
|
|
|
|
|
|
|
|||||||||||||||||||
|
|
|
|
16 |
Park-Clip |
|
|
16 |
Parking clip |
|
|
|
|
|
|
|
|
|
|
|
|
|
|
|||||||||||||||||||
|
|
|
|
17 |
Display bei Modellen mit manueller Bedienung |
|
|
17 |
Display for models with manual control |
|
|
|
|
|
|
|
|
|
|
|
|
|
|
|||||||||||||||||||
|
|
|
|
18 |
Aeropro Classic-Griff |
|
|
18 |
Aeropro classic handle |
|
|
|
|
|
|
|
|
|
|
|
|
|
|
|||||||||||||||||||
|
|
|
|
19 |
Aeropro Ergo-Griff |
|
|
19 |
Aeropro ergo handle |
|
|
|
|
|
|
|
|
|
|
|
|
|
|
|||||||||||||||||||
|
|
|
|
20 |
Umschaltbare Aeropro-Bodendüse |
|
|
20 |
Aeropro nozzle |
|
|
|
|
|
|
|
|
|
|
|
|
|
|
|||||||||||||||||||
|
|
|
|
21 |
Display nur bei Modellen mit Fernbedienung |
|
|
21 |
Display for models with remote control |
|
|
|
|
|
|
|
|
|
|
|
|
|
|
|||||||||||||||||||
|
|
|
|
22 |
Aeropro-Fernbedienungsgriff |
|
|
22 |
Aeropro remote control handle |
|
|
|
|
|
|
|
|
|
|
|
|
|
|
|||||||||||||||||||
|
|
|
|
23 |
Aeropro-Fernbediengriff für Elektrodüse |
|
|
23 |
Aeropro remote control handle for motorized nozzle |
|
|
|
|
|
|
|
|
|
|
|
|
|
|
|||||||||||||||||||
|
|
|
|
24 |
Aeropro-Elektrodüse |
|
|
24 |
Aeropro motorized nozzle |
|
|
|
|
|
|
|
|
|
|
|
|
|
|
|||||||||||||||||||
|
|
|
|
25 |
Aeropro-Turbodüse* |
|
|
25 |
Aeropro turbo nozzle* |
|
|
|
|
|
|
|
|
|
|
|
|
|
|
|||||||||||||||||||
|
|
|
|
26 |
Aeropro-Hartbodendüse* |
|
|
26 |
Aeropro parketto nozzle* |
|
|
|
|
|
|
|
|
|
|
|
|
|
|
|||||||||||||||||||
|
|
|
|
|
|
|
* Zubehör kann je nach Modell variieren. |
|
|
|
* Accessories may vary from model to model. |
|
|
|
|
|
|
|
|
|
|
|
|
|
|
|||||||||||||||||
|
|
|
|
|
|
|
|
|
|
|
|
|
|
|
|
|
|
|
|
|
|
|
|
|
|
|
|
|
|
|
|
|
|
|
|
|
|
|
|
|
|
|
|
|
|
|
|
|
|
|
|
|
|
|
|
|
|
|
|
|
|
|
|
|
|
|
|
|
|
|
|
|
|
|
|
|
|
|
|
|
|
|
|
|
|
|
|
|
|
|
|
|
|
|
|
|
|
|
|
|
|
|
|
|
|
|
|
|
|
|
|
|
|
|
|
|
|
|
|
|
|
|
|
|
|
|
|
|
|
|
|
|
|
|
|
|
|
|
|
|
|
|
|
|
|
|
|
|
|
|
|
|
|
|
|
|
|
|
|
|
|
|
|
|
|
|
|
|
|
|
|
|
|
|
|
|
|
|
|
|
|
|
|
|
|
|
|
|
|
|
|
|
|
|
|
|
|
|
|
|
|
|
|
|
|
|
|
|
|
|
|
|
|
|
|
|
|
|
|
|
|
|
|
|
|
|
|
|
|
|
|
|
|
|
|
|
|
|
|
|
|
|
|
|
|
|
|
|
|
|
|
|
|
|
|
|
|
|
|
|
|
|
|
|
|
|
|
|
|
|
|
|
|
|
|
|
|
|
|
|
|
|
|
|
|
|
|
|
|
|
|
|
|
|
|
|
|
|
|
|
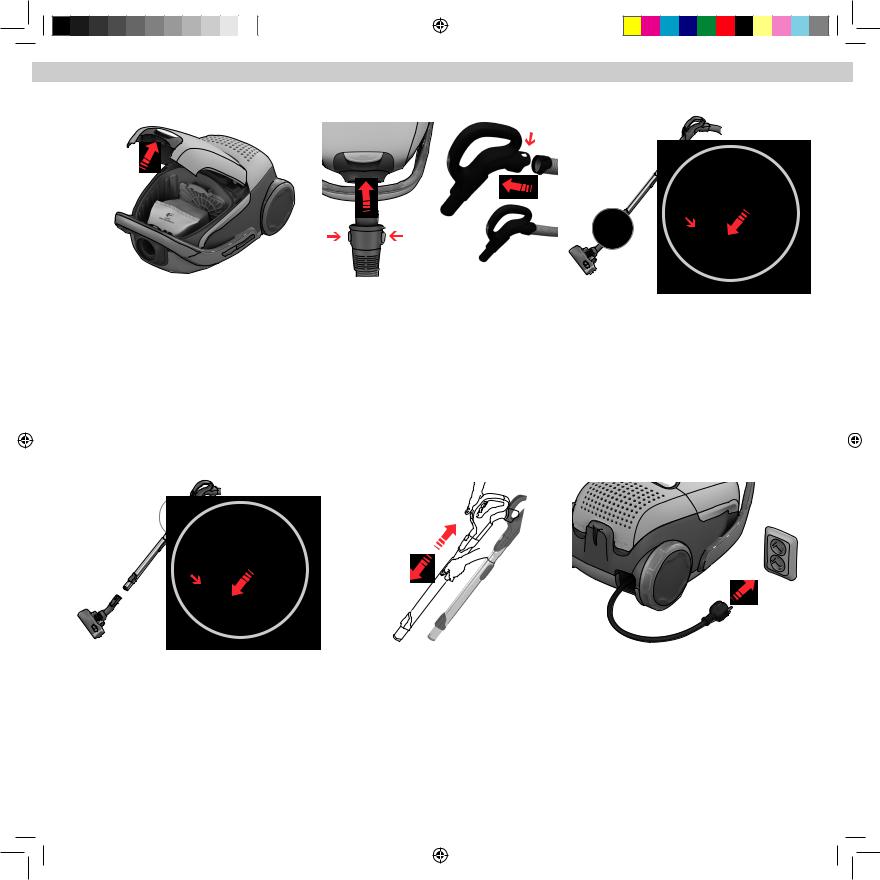
6Verwendung des Staubsaugers / How to use the vacuum cleaner
Click! |
Click! |
1. Abdeckung durch Ziehen der 3in1Taste öffnen.
Prüfen, ob der Staubbeutel s-bag® richtig eingesetzt ist.
2. Schlauch einsetzen (zum Abnehmen Verriegelungsknöpfe drücken und Schlauch herausziehen).
Schlauch in den Schlauchgriff einführen, bis Verriegelung einrastet. Zur Freigabe des Schlauches Verriegelung drücken.
3. Teleskoprohr in Bodendüse einsetzen (zum AbnehmenVerriegelungsknopf drücken und Düse abnehmen).
1. Open the cover by pulling the button. Check that the |
2. Insert the hose (to remove it, press the lock buttons |
3. Attach the telescopic tube to the floor nozzle (to |
|
|
|||||
s-bag® is in place. |
and pull the hose out). |
remove it, press the lock button and pull the nozzle off). |
|
|
|||||
|
|
|
Insert the hose into the hose handle until the catches |
|
|
|
|
||
|
|
|
click to engage (press the catches to release the hose). |
|
|
|
|
||
|
|
|
|
|
|
|
|||
|
|
|
|
|
|
|
|
|
|
|
|
|
|
|
|
|
|
|
|
|
|
|
|
|
|
|
|
|
|
|
|
|
|
|
|
|
|
|
|
|
|
|
|
|
|
|
|
|
|
|
|
|
|
|
|
|
|
|
|
Click!
4. Teleskoprohr in Schlauchgriff stecken (zum AbnehmenVerriegelungsknopf drücken und Schlauchgriff herausziehen).
4. Attach the telescopic tube to the hose handle (to remove it, press the lock button and pull the hose handle out).
5. Teleskoprohr individuell in der Länge anpassen, indem Sie mit einer Hand denVerriegelungsknopf drücken und mit der anderen Hand am Griff ziehen.
5. Adjust the telescopic tube by holding the lock with one hand and pulling the handle with the other hand.
6. Stromkabel herausziehen und den Stecker in die Steckdose stecken.
6. Pull out the power cord and plug it into the mains.
|
|
|
|
|
|
|
|
|
|
|
|
|
|
|
|
|
|
|
|
|
|
|
|
|
|
|
|
|
|
|
|
|
|
|
|
|
|
|
|
|
|
|
|
|
|
|
|
|
|
|
|
|
|
|
|
|
|
|
|
|
|
|
|
|
|
|
|
|
|
|
|
|
|
|
|
|
|
|
|
|
|
|
|
|
|
|
|
|
|
|
|
|
|
|
|
|
|
|
|
|
|
|
|
|
|
|
|
|
|
|
|
|
|
|
|
|
|
|
|
|
|
|
|
|
|
|
|
|
|
|
|
|
|
|
|
|
|
|
|
|
|
|
|
|
|
|
|
|
|
|
|
|
|
|
|
|
|
|
|
|
|
|
|
|
|
|
|
|
|
|
|
|
|
|
|
|
|
|
|
|
|
|
|
|
|
|
|
|
|
|
|
|
|
|
|
|
|
|
|
|
|
|
|
|
|
|
|
|
|
|
|
|
|
|
|
|
|
|
|
|
|
|
|
|
|
|
|
|
|
|
|
|
|
|
Verwendung des Staubsaugers / How to use the vacuum cleaner |
7 |
|
|
|
|
|
|
|
||||||||||||||||||||||
|
|
|
|
|
|
|
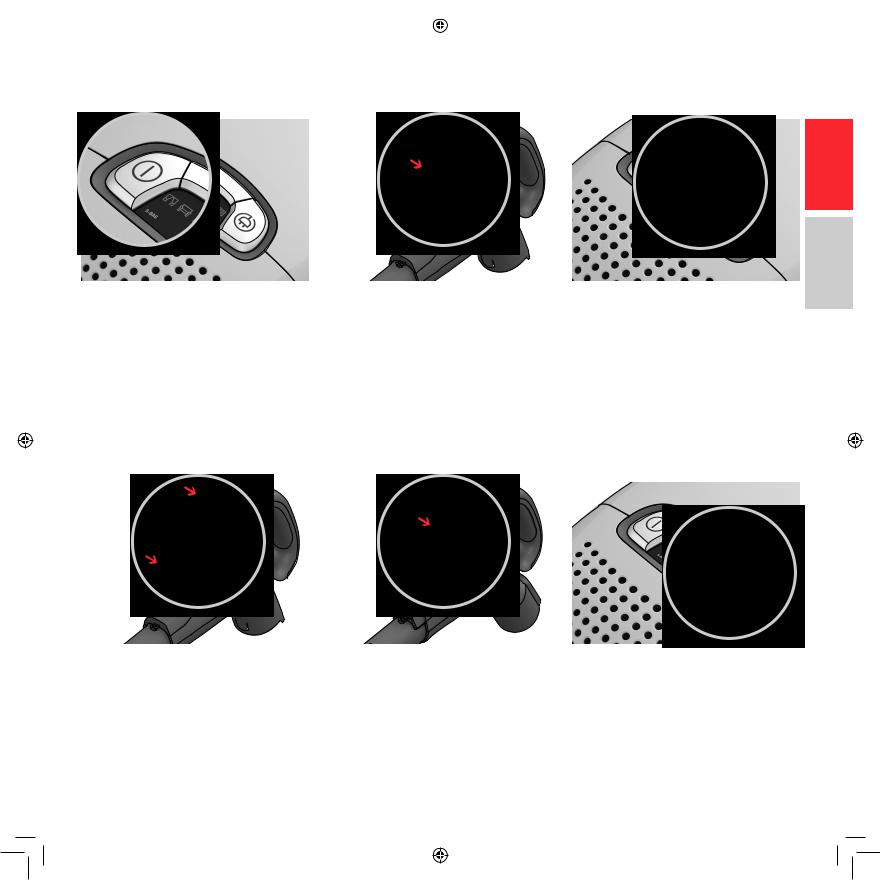
Ein-/Ausschalten des Staubsaugers und Saugleistungsregulierung |
Start/stop the vacuum cleaner and adjust suction power |
|
|
|
|
|||||||||||||||||||||||||
de eng
gre
7. |
Zum Einund Ausschalten des Staubsaugers den |
8. Modell mit Fernbedienung können auch mit dem |
9. |
Saugleistung einstellen. Modelle mit manueller |
EIN/AUS-Schalter drücken. |
EIN-/AUS-Knopf des Griffs einund ausgeschaltet werden. |
Regelung. +/- Knopf mit der Hand drücken, um |
||
|
|
|
gewünschte Saugleistung einzustellen. |
|
7. |
Switch on/off the vacuum cleaner by pushing the |
8. Models with remote control can also be operated by |
9. |
Adjust suction power. Models with manual |
ON/OFF button. |
the ON/OFF button on the handle. |
regulation. Push +/- button with your hand to adjust |
||
|
|
|
suction power. |
|
10. Saugleistung einstellen. Modell mit Fernbedienung.
BeimEinschaltenarbeitetderStaubsaugerimAutomatikmodus(automatischeEinstellungderSaugleistung).ZummanuellenEinstellendenSchalterMIN/MAXdrücken.Zumerneuten WechselindenAutomatik-ModusdenSchalterAUTOdrücken.
10.Adjust suction power. Models with remote control.
The cleaner starts in auto-function (automatic suction power regulation).To regulate manually press MIN/MAX button.To go back to auto-function, press AUTO button.
11. Modelle mit Fernsteuerung und Aeropro- |
12. Nach dem Staubsaugen das Kabel durch Betätigen |
Elektrodüse. Zum Einund Ausschalten der Elektrodüse |
der AUFROLL-Taste aufwickeln. |
dieTaste BRUSH am Griff drücken. |
|
11.Models with remote control and Aeropro motorized |
12.After vacuuming rewind the cable by pushing the |
nozzle. To turn the motorized nozzle on and off, press |
REWIND button. |
BRUSH button on the handle. |
|
8Tipps für beste Ergebnisse /Tips on how to get the best results
Modelle mit manueller Regelung: Beachten Sie die |
|
|
|
|
1. |
|
3. |
|
|
Symbole zur Erzielung der optimalen Saugleistung. |
|
|
|
|
|
|
|
|
|
Modelle mit Automatikfunktion:* Automatische |
|
|
|
|
|
|
|
|
|
|
|
|
|
|
|
|
|
|
|
Anpassung der Saugleistung für optimale |
|
|
|
|
|
|
|
|
|
Reinigungsleistung und Komfort auf allen Oberflächen. |
|
|
|
|
|
|
|
|
|
|
|
|
|
|
|
|
|
3. |
|
* Nur bestimmte Modelle. |
|
|
|
|
|
|
|||
|
|
2. |
|
|
|||||
|
|
|
|
|
|
|
|
||
|
|
|
|
|
|
|
|
|
|
|
|
|
|
|
|
|
|
|
|
Models with manual regulation: follow graphics for |
5. |
|
|
|
|
|
|
|
|
|
|
|
|
|
|
|
|||
|
|
|
|
|
|
|
|
|
|
optimal performance. |
|
|
|
|
|
|
|
|
|
Models with autofunction:* automatically adjust the |
|
|
|
|
|
6. |
|
||
suction power in order to give an optimal cleaning |
|
|
|
|
|
|
|||
performance and comfort on every surface. |
|
* Certain models only. |
4. |
|
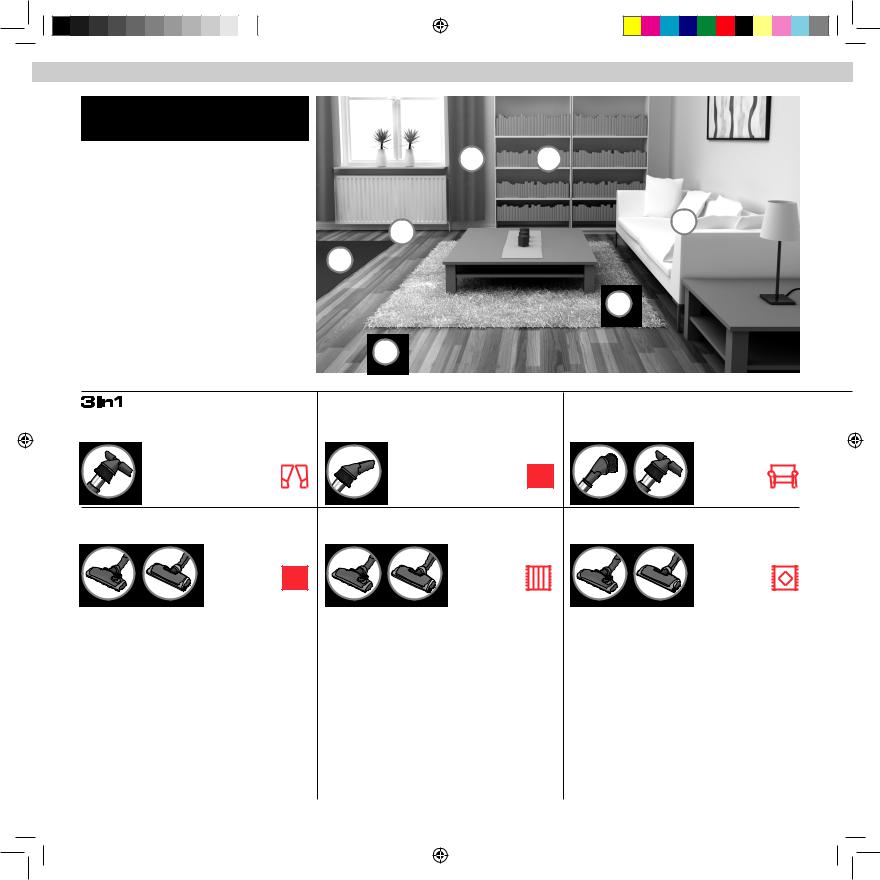
1. |
Vorhänge |
2. |
Fugen, Ecken |
3. |
Bücherregale, Polster |
1. |
Curtains |
2. |
Crevices, corners |
3. |
Bookshelves, upholstery |
|
Leistungseinstellung |
|
Leistungseinstellung |
|
Leistungs |
|
|
|
einstellung |
||
|
Power setting |
|
Power setting |
|
Power setting |
|
|
|
|
|
4. |
Hartböden |
|
5. |
Vorleger |
|
6. |
Empfindliche Teppiche |
||
4. |
Hard floors |
|
5. |
Rugs |
|
6. |
Delicate carpets |
||
|
|
Leistungs |
|
|
Leistungs |
|
|
Leistungs |
|
|
|
einstellung |
|
|
|
|
einstellung |
||
|
|
|
|
einstellung |
|
|
|||
|
|
Power setting |
|
|
|
|
|
||
|
|
|
|
Power setting |
|
|
Power setting |
||
|
|
|
|
|
|
|
|||
Borsten |
Bürstenrolle je nachWunsch einoder |
Borsten |
Die Elektrodüse gewährleistet dank |
Borsten |
Achtung: fürTeppiche mit langen |
||||
ausgefahren. |
ausschalten. |
eingezogen. |
der mechanischen Bewegung durch |
eingezogen. |
Fransen oder Florhöhen über |
||||
Brushes down. |
Brush roller on or off as preferred. |
Brushes up. |
die rotierende Bürstenrolle die |
Brushes up. |
15 mm sollte die Elektrodüse mit |
||||
bestmögliche Staubaufnahme und |
abgeschalteter Bürstenrolle verwendet |
||||||||
|
|
|
|
|
|
|
|||
|
|
|
|
|
Tiefenreinigung vonTeppichen. Lassen |
|
|
werden. Zum Einund Ausschalten der |
|
|
|
|
|
|
Sie die Elektrodüse nicht an einer |
|
|
Bürstenrolle den BRUSH-Knopf drücken. |
|
|
|
|
|
|
Stelle stehen, wenn die Bürstenrolle in |
|
|
|
|
|
|
|
|
|
Betrieb ist. |
|
|
Attention: on fur rugs, rugs with long |
|
|
|
|
|
|
Motorized nozzle gives the best dust |
|
|
fringes or deep pile exceeding 15 mm |
|
|
|
|
|
|
|
|
the motorized nozzle should have the |
||
|
|
|
|
|
pick-up and deep cleaning of carpets |
|
|
||
|
|
|
|
|
|
|
brush roller off. Press BRUSH button to |
||
|
|
|
|
|
through the rotating brush roller |
|
|
||
|
|
|
|
|
|
|
turn the brush roller off. |
||
|
|
|
|
|
agitating the carpet. Do not leave the |
|
|
||
|
|
|
|
|
|
|
|
||
|
|
|
|
|
motorized nozzle stationary with brush |
|
|
|
|
|
|
|
|
|
roller on. |
|
|
|
|
Tipps für beste Ergebnisse / Tips on how to get the best results
Parkpositionen / Parking positions
Düsen-Parkclip in eine der seitlichen oder hinteren
Parkschiene einsetzen.
Insert the nozzle parking clip into one of the two parking slots on the side or on the back.
Nebenluftregler |
Aeropro 3in1 Zubehördüse |
|
|
|||
Air valve |
Aeropro 3in1 nozzle |
|
|
|||
|
|
|
|
|
|
|
|
|
|
|
|
|
|
|
|
|
|
|
|
|
|
|
|
|
|
|
|
|
|
|
|
|
|
|
|
|
|
|
|
|
|
Bei Modellen mit manueller Regelung lässt sich die |
Zubehörfach durch Drücken des 3in1-Knopfes öffnen. |
Saugleistung mit Hilfe des Nebenlufreglers einstellen. |
Zubehör nach Gebrauch wieder am vorgesehenen Platz |
|
unterbringen. |
On manually controlled models, the air valve can help |
Press the 3in1 button to open the compartment. After |
adjust the suction power. |
usage, put the accessory back in its place. |
9
de eng
gre
10 Austauschen des Staubbeutels, s-bag® / Replacing the dustbag, s-bag®
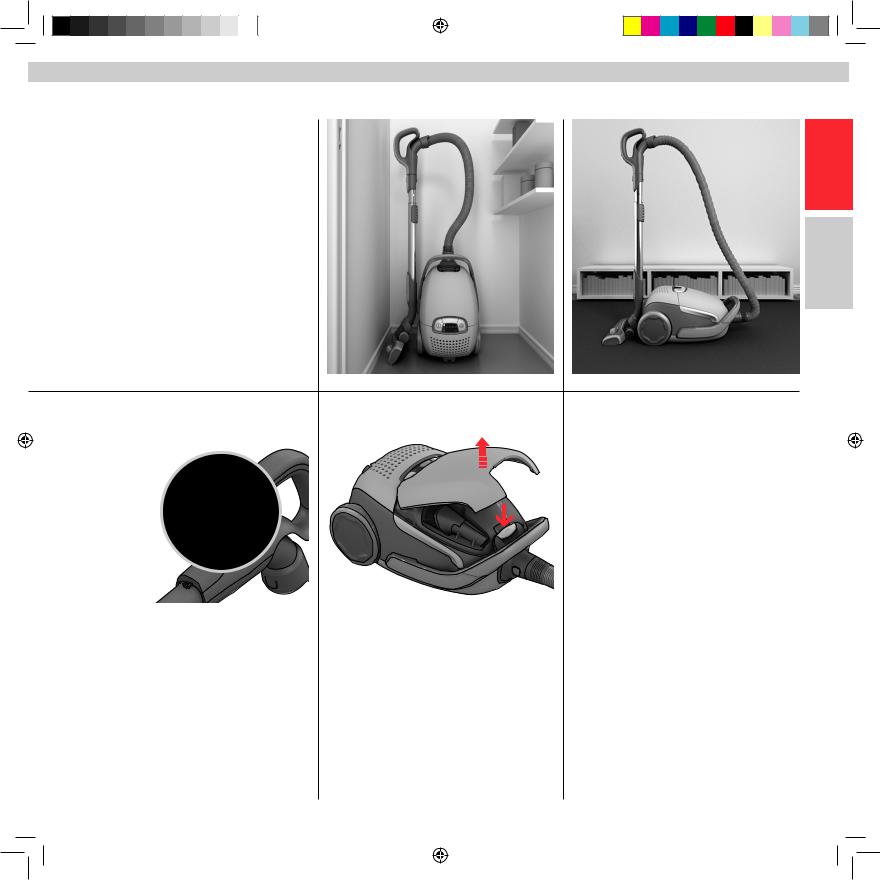
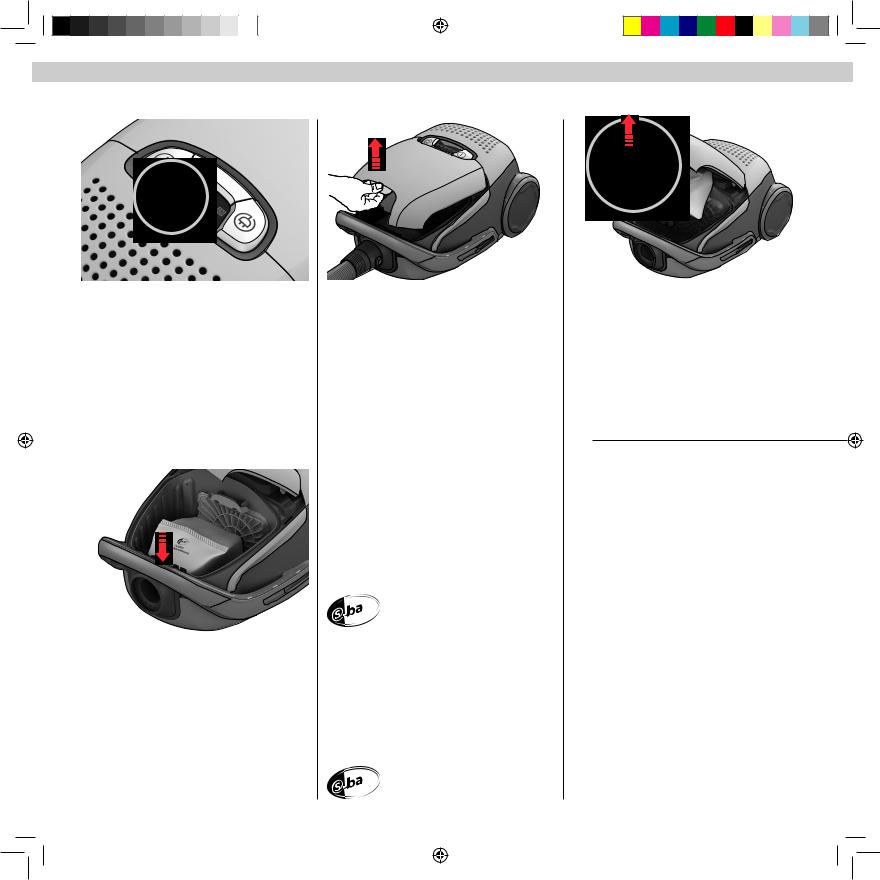
1. Den Staubbeutel wechseln, wenn die s-bag®- Anzeige leuchtet.
1. Change the dustbag when the s-bag® indicator is illuminated.
4. Neuen s-bag® einsetzen, indem der Karton in den Führungen direkt nach unten gedrückt wird. Den Deckel schließen. Bei falsch eingesetztem oder fehlendem s-bag® lässt sich der Deckel nicht schließen.
4. Insert a new s-bag® by pushing the cardboard straight down in its tracks. Close the lid. If the s-bag® is not properly placed or is missing, the lid will not close.
2. |
Zum Öffnen der Staubfachabdeckung den 3in1- |
3. |
Kartonstreifen ziehen, um den s-bag® zu |
Knopf ziehen |
schließen und herauszunehmen. |
||
2. |
Open the dust compartment cover by pulling the |
3. |
Pull the cardboard handle to close and remove the |
3in1 button. |
s-bag® |
||
Wichtig: Bei Aufleuchten der Anzeige den s-bag® auch austauschen, wenn er nicht voll erscheint (er ist möglicherweise mit Feinstaub zugesetzt). Nach dem Aufsaugen vonTeppichreinigungspulver den s-bag® immer austauschen. Bestmögliche Ergebnisse bietet der speziell für Ihren Ultra One entwickelte Ultra Long Performance-Staubbeutel oder alternativ jeder original AEG s-bag® aus Synthetikmaterial.
www.s-bag.com
 ®
®
NB: Always change the s-bag® when the indicator signal is illuminated even if the s-bag® is not full (it may be blocked) and after using carpet cleaning powder. For best performance use the Ultra Long Performance bag (E210B / E210) which has been developed specifically for your UltraOne or alternatively any AEG original synthetic s-bag®.
www.s-bag.com
 ®
®
 Loading...