


Perfekte Reinigungsergebnisse mit weniger Aufwand Perfect cleaning result with less effort


|
|
|
|
|
|
|
|
|
|
|
|
|
|
|
|
|
|
|
|
|
|
|
|
|
|
|
|
|
|
|
|
|
|
|
|
|
|
|
|
|
|
|
|
|
|
|
|
|
|
|
|
|
........................................................English |
2–13 |
|
|
|
|
|
|
|
|
|
|
|
||||||||||||
Thank you for choosing an AEG-Electrolux UltraActive vacuum cleaner. This User Manual describes all UltraActive models. Some of the accessories/features may not apply to your specific model. In order to ensure the best results, always use original AEG-Electrolux accessories. They have been designed especially for your vacuum cleaner.
Deutsch........................................................ |
2-13 |
Wir freuen uns, dass Sie sich für den AEG-Electrolux UltraActive-Staubsauger entschieden haben. Die vorliegende Bedienungsanleitung beschreibt alle UltraActiveModelle. Bestimmte Zubehörteile/Funktionen beziehen sich möglicherweise nicht auf Ihr Modell. Um bestmögliche Ergebnisse zu erzielen, sollten Sie ausschließlich das Original-AEG-Electrolux-Zubehör verwenden, das speziell für Ihren Staubsauger entwickelt wurde.

2
|
|
|
|
3. |
|
|
|
|
10. |
7. |
4. |
|
|
|
|
|
|
16. |
|
|
11. |
|
|
|
|
|
|
|
2. |
|
|
|
1. |
|
|
|
|
|
12. |
|
|
17. |
|
|
|
|
|
|
|
|
|
|
5. |
|
|
15. |
9. |
|
6. |
|
|
||||
18. |
|
|
8. |
|
|
|
|
|
|
|
|
|
|
|
13. |
19. |
|
|
|
|
|
14.
20.
21. |
22. |
23. |
24. |
25. |
26. |
|
|
|
|
|
|
|
|
|
|
|
|
|
|
|
|
|
|
|
|
|
|
|
|
|
|
|
|
|
|
|
|
|
|
|
|
|
|
|
|
|
|
|
|
|
|
|
|
|
|
|
|
|
|
|
|
|
|
|
|
|
|
|
|
|
|
|
|
|
|
|
|
|
|
|
|
|
|
|
|
|
|
|
|
|
|
|
|
|
|
|
|
|
|
|
|
|
|
|
|
|
|
|
|
|
|
|
|
|
|
|
|
|
|
|
|
|
|
|
|
|
|
|
|
|
|
|
|
|
|
|
|
|
|
|
|
|
|
|
|
|
|
|
|
|
|
|
|
|
|
|
|
|
|
|
|
|
|
|
|
|
|
|
|
|
|
|
|
|
|
|
|
|
|
|
|
|
|
|
|
|
|
|
|
|
|
|
|
|
|
|
|
|
|
|
|
|
|
|
|
|
|
|
|
|
|
|
|
|
|
|
Content |
|
|
|
Inhalt |
3 |
|
|
|
||||||||||||||||||
|
|
|
|
|
|
|
English |
|
|
|
Deutsch |
|
|
|
|
|
|
|
|
|
|
|
|
|
|||||||||
Before starting
•Unpack your UltraActive model and the accessory system and check that all accessories are included*.
•Read the Operation Instruction carefully.
•Pay special attention to the Safety advice chapter.
Enjoy your AEG-Electrolux UltraActive !
Table of contents:
How to use the vacuum cleaner. . . . . . . . . . . . . . . . . . . . . . . . . . 4-5 Tips on how to get the best results. . . . . . . . . . . . . . . . . . . . . . . . .6-7 Emptying and cleaning the dust container. . . . . . . . . . . . . . . . . . . . . .8 Replacing and cleaning the filters. . . . . . . . . . . . . . . . . . . . . . . . . . 9 Cleaning the nozzles. . . . . . . . . . . . . . . . . . . . . . . . . . . . . . . . . . . . . . . . . . . . . . . . . . . . . . . . . . . .10-11 Changing the battery in remote handle. . . . . . . . . . . . . . . . . . . . . . .11 Troubleshooting. . . . . . . . . . . . . . . . . . . . . . . . . . . . . . . . . . 12 Safety advice. . . . . . . . . . . . . . . . . . . . . . . . . . . . . . . . . . . .13 Consumer information and sustainability policy . . . . . . . . . . . . . . . . . . 13
Description of your UltraActive :
1Dust container
2Power adjustment
3Exhaust filter lid
4Exhaust filter
5Power cord
6Ergoshock
7Foam filter (Frame + Filter)
8Motor filter
9AeroPro hose *
10AeroPro classic handle*
11AeroPro 3in1 nozzle
12AeroPro 3in1 accessories clip
13AeroPro telescopic tube *
14AeroPro nozzle
15Standard hose
16Standard handle *
17Interlocked telescopic tube *
18Dust magnet nozzle *
19Power regulation button for models with manual control*
20Display for models with remote control*
21AeroPro ergo handle*
22AeroPro remote control handle *
23AeroPro remote control handle for motorized nozzle*
24AeroPro motorized nozzle*
25Turbo nozzle*
26Parketto nozzle*
Vorbereitungen
•Packen Sie Ihren UltraActive Staubsauger und das Zubehörsystem aus. Überprüfen Sie dann, ob alle Zubehörteile enthalten sind*.
•Lesen Sie die Bedienungsanleitung sorgfältig durch.
•Beachten Sie dabei besonders das Kapitel mit den Sicherheitshinweisen.
Wir wünschen Ihnen viel Freude mit Ihrem AEG-Electrolux UltraActive!
Inhaltsverzeichnis:
Verwendung des Staubsaugers. . . . . . . . . . . . . . . . . . . . . . . . . . 4-5 Tipps für beste Ergebnisse. . . . . . . . . . . . . . . . . . . . . . . . . . . . .6-7 Leeren und Reinigen des Staubbehälters . . . . . . . . . . . . . . . . . . . . . . 8 Austauschen und Reinigen der Filter. . . . . . . . . . . . . . . . . . . . . . . . .9 Reinigen der Düsen. . . . . . . . . . . . . . . . . . . . . . . . . . . . . . . 10-11 Auswechseln der Batterie im Fernbediengriff. . . . . . . . . . . . . . . . . . . .11 Fehlersuche. . . . . . . . . . . . . . . . . . . . . . . . . . . . . . . . . . . . 12 Sicherheitshinweise. . . . . . . . . . . . . . . . . . . . . . . . . . . . . . . . 13
Verbraucherinformationen und Nachhaltigkeitsgrundsätze. . . . . . . . . . . . .13
Beschreibung Ihres UltraActive Staubsaugers:
1Staubbehälter
2Leistungsregulierung
3Abdeckung des Luftaustrittfilters
4Luftaustrittfilter
5Netzkabel
6Ergoshock
7Schaumstofffilter (Rahmen + Filter)
8Motorfilter
9AeroPro-Schlauch *
10AeroPro Classic-Griff*
11AeroPro 3in1-Düse
12AeroPro 3in1-Zubehör-Clip
13AeroPro-Teleskoprohr *
14AeroPro-Düse
15Standardschlauch
16Standardgriff *
17Interlocking-Teleskoprohr *
18Dust-Magnet-Düse *
19Leistungsregulierungstaste für Modelle mit manueller Steuerung*
20Display bei Modellen mit Fernsteuerung *
21AeroPro Ergo-Griff*
22AeroPro-Fernbedienungsgriff *
23AeroPro-Fernbediengriff für Elektrodüse*
24AeroPro-Elektrodüse*
25Turbodüse*
26Parkettdüse*
* Accessories may vary from model to model. (see specification sticker on the packaging box)
* Zubehör kann je nach Modell variieren.
(siehe Datenaufkleber auf dem Verpackungskarton)
4 How to use the vacuum cleaner / Verwendung des Staubsaugers
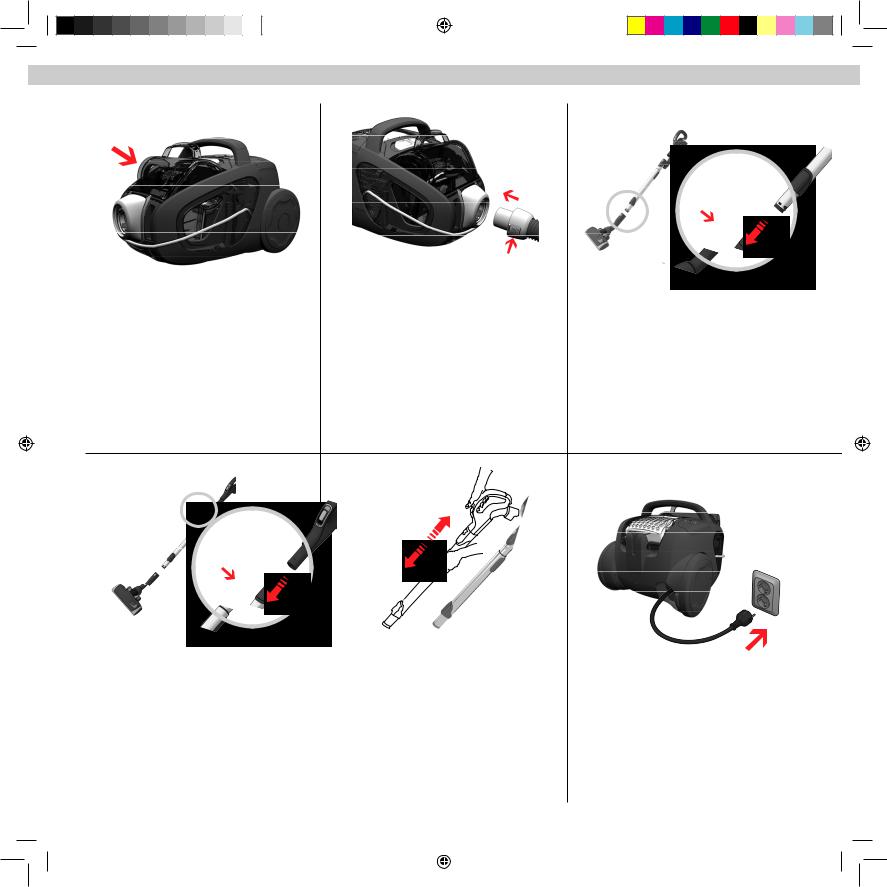
Click
Ensure that the dust container and foam filter are in |
Insert the hose (to remove it, press the release buttons |
Attach the telescopic tube to the floor nozzle (to re- |
place! |
and pull the hose out). |
move it, press the release button and pull the nozzle off). |
Sicherstellen, dass Staubbehälter und Schaumstoff- |
Schlauch einsetzen (zum Abnehmen die Verriegelungs- |
Teleskoprohr in Bodendüse einstecken (zum Abneh- |
||
filter eingesetzt sind! |
knöpfe drücken und den Schlauch herausziehen). |
men den Verriegelungsknopf drücken und die Düse |
||
|
|
|
|
herausziehen) |
|
|
|
|
|
|
|
|
|
|
Click
Attach the telescopic tube to the hose handle (to |
Adjust the telescopic tube by holding the lock and pull |
Pull out the power cord and plug it into the mains. |
|||
remove it, press the release button and pull the hose |
the handle with the other hand. |
|
|||
handle out). |
|
|
|
|
|
Teleskoprohr auf Schlauchgriff stecken (zum Abneh- |
Teleskoprohr auf passende Länge einstellen, indem |
Stromkabel herausziehen und Stecker in die Steck- |
|||
men den Verriegelungsknopf drücken und den Schlauch- |
Sie die Verriegelung festhalten und mit der anderen |
dose stecken. |
|||
griff herausziehen). |
Hand den Griff ziehen. |
|
|||
|
|
|
|
|
|
|
|
|
|
|
|
|
|
|
|
|
|
|
|
|
|
|
|
 Loading...