


3Com Megahertz
10/100 LAN CardBus
PC Card User Guide
http://www.3com.com/
Part No. 09-1345-001
June 1998
3Com Corporation ■ 5400 Bayfront Plaza ■ Santa Clara, California ■ 95052-8145
© 3Com Corporation, 1998. All rights reserved. No part of this documentation may be reproduced in any form or by any means or used to make any derivative work (such as translation, transformation, or adaptation) without permission from 3Com Corporation.
3Com Corporation reserves the right to revise this documentation and to make changes in content from time to time without obligation on the part of 3Com Corporation to provide notification of such revision or change.
3Com Corporation provides this documentation without warranty of any kind, either implied or expressed, including, but not limited to, the implied warranties of merchantability and fitness for a particular purpose. 3Com may make improvements or changes in the product(s) and/or the program(s) described in this documentation at any time.
UNITED STATES GOVERNMENT LEGENDS:
If you are a United States government agency, then this documentation and the software described herein are provided to you subject to the following restricted rights:
For units of the Department of Defense:
Restricted Rights Legend: Use, duplication or disclosure by the Government is subject to restrictions as set forth in subparagraph (c) (1) (ii) for restricted Rights in Technical Data and Computer Software clause at 48 C.F.R. 52.227-7013. 3Com Corporation, 5400 Bayfront Plaza, Santa Clara, California 95052-8145.
For civilian agencies:
Restricted Rights Legend: Use, reproduction or disclosure is subject to restrictions set forth in subparagraph (a) through (d) of the Commercial Computer Software - Restricted Rights Clause at 48 C.F.R. 52.227-19 and the limitations set forth in 3Com Corporation’s standard commercial agreement for the software. Unpublished rights reserved under the copyright laws of the United States.
The software described in this documentation is furnished under a license agreement included with the product either as a separate document or on the software distribution diskette in a root directory file named LICENSE.TXT. If you are unable to locate a copy, please contact 3Com and a copy will be provided to you.
Unless otherwise indicated, 3Com registered trademarks are registered in the United States and may or may not be registered in other countries.
3Com, DynamicAccess, Megahertz, XJACK and NetAge are registered trademarks of 3Com Corporation. 3TECH is a trademark of 3Com Corporation. 3ComFacts is a service mark of 3Com Corporation. AutoLink is a trademark of Data National and is licensed by 3Com Corporation.
Microsoft, Windows, and Windows NT are registered trademarks of Microsoft Corporation. Novell and NetWare are registered trademarks of Novell, Inc. IBM is a registered trademark of International Business Machine Corporation. CompuServe is a trademark of CompuServe, Inc. DEC and PATHWORKS are registered trademarks of Digital Equipment Corporation. Banyan and VINES are registered trademarks of Banyan Systems Incorporated. Artisoft and LANtastic are registered trademarks of Artisoft, Inc. Toshiba is a trademark of Toshiba Corporation.
Other brand and product names may be registered trademarks or trademarks of their respective holders.
Guide written by Jean Anderson. Edited by Chris Dresden. Technical illustration by Tim Buckreus. Production by Petra Armenta.
ii

CONTENTS
1 INSTALLING THE PC CARD
|
Before You Begin 1-2 |
|
|
|
|
|
Setting CardBus Mode |
1-2 |
|
|
|
|
Toshiba Notebooks 1-2 |
|
|
|
|
|
IBM ThinkPad Series 760 Notebooks |
1-3 |
|
|
|
|
Connecting the 3CCFE575BT CardBus PC Card |
1-4 |
|
||
|
Connecting the 3CXE589ET CardBus PC Card with XJACK |
||||
|
Connector 1-5 |
|
|
|
|
|
|
|
|
||
2 INSTALLING THE NETWORK DRIVER |
|
|
|||
|
Before You Install the Network Driver |
2-2 |
|
|
|
|
Which Driver Installation Instructions Should You Use? |
2-2 |
|||
|
Which Windows 95 Version Are You Running? |
2-2 |
|
||
|
Windows 95 Version 4.00.950B (OSR 2) |
2-3 |
|
|
|
|
Windows 95 (Versions 4.00.950 and 4.00.950A) |
2-4 |
|
||
|
Confirming Installation |
2-5 |
|
|
|
|
Windows NT Version 4.0 |
2-6 |
|
|
|
|
Windows NT 4.0 with Networking Installed 2-6 |
|
|||
|
Confirming Installation |
2-8 |
|
|
|
|
Windows NT 4.0 without Networking Installed |
2-8 |
|
||
|
Windows NT Version 3.51 |
2-11 |
|
|
|
|
Windows for Workgroups (WFW) 2-12 |
|
|
||
|
Installing the DOS Enhanced-Mode Driver for WFW |
2-13 |
|||
|
AutoLink for Windows 3.x, Windows for Workgroups, and |
||||
|
DOS 2-14 |
|
|
|
|
|
Supported Network Drivers |
2-15 |
|
|
|
iii

3 TROUBLESHOOTING |
|
|
LEDs 3-2 |
|
|
3Com PC Card Diagnostics Program |
3-3 |
|
Accessing the CardBus PC Card Help System 3-3 |
||
Displaying Release Notes, Frequently Asked Questions, and |
||
KnowledgeBase 3-4 |
|
|
Running the CardBus PC Card Self-Test 3-4 |
||
Running the Echo Test |
3-7 |
|
Troubleshooting Support Services |
3-9 |
|
Generating a Problem Report 3-11 |
||
DOS Diagnostics Program |
3-13 |
|
Removing the PC Card Diagnostics using Windows 95 and |
||
Windows NT 3-13 |
|
|
Resolving Hardware Resource Conflicts |
3-13 |
|
|
Changing the I/O, IRQ, or Memory Range 3-14 |
|
||
|
Disabling PC Card (PCMCIA) Support for Windows 95 |
3-14 |
||
|
Re-enabling PC Card Support for Windows 95 3-15 |
|||
|
Disabling PC Card (PCMCIA) Support for Windows NT |
3-16 |
||
|
Re-enabling PC Card (PCMCIA) Support for Windows |
|
||
|
NT 3-16 |
|
|
|
|
Frequently Asked Questions |
3-17 |
|
|
|
Troubleshooting Tips |
3-20 |
|
|
|
|
|
||
4 CHANGING CONFIGURATION |
|
|||
|
Configuration Settings |
4-1 |
|
|
|
Configuration Setting Descriptions 4-1 |
|
||
|
Displaying Configuration 4-2 |
|
||
|
Changing Configuration Settings 4-5 |
|
||
|
DOS Configuration Program |
4-5 |
|
|
iv

A |
SPECIFICATIONS |
B |
|
TECHNICAL SUPPORT |
|
|
Online Technical Services B-1 |
World Wide Web Site B-1 |
|
|
3Com Bulletin Board Service |
B-1 |
|
3ComFacts Automated Fax Service |
B-2 |
|
3ComForum on CompuServe Online Service B-3 |
||
Support from Your Network Supplier |
B-3 |
|
Returning Products for Repair |
B-4 |
|
INDEX
3COM CORPORATION LIMITED WARRANTY
FCC CLASS B STATEMENT
FCC DECLARATION OF CONFORMITY
INDUSTRY CANADA CLASS B EMMISSION COMPLIANCE
STATEMENT
AVIS DE CONFORMITÉ À LA RÉGLEMENTATION
D’INDUSTRIE CANADA
3COM END USER SOFTWARE LICENSE AGREEMENT
v
vi
1 |
INSTALLING THE PC CARD |
|
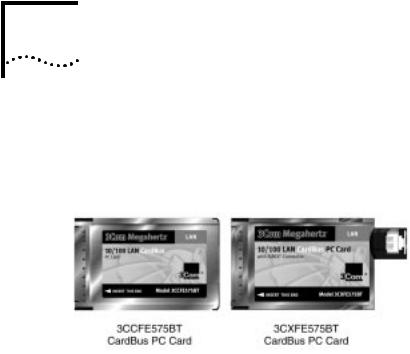
The 3Com Megahertz 10/100 LAN CardBus PC Cards (models 3CCFE575BT and 3CXFE575BT) connect your notebook to an Ethernet or Fast Ethernet network. The only difference between the two models is the connector.
Figure 1-1 3Com Megahertz 10/100 CardBus LAN PC Cards
These CardBus PC Cards automatically operate at 10 Mbps when connected to a 10BASE-T Ethernet hub and at
100 Mbps when connected to a hub supporting 100BASE-TX Fast Ethernet.
This chapter describes how to install the CardBus PC Cards in your notebook and connect them to the network.

1-2 CHAPTER 1: INSTALLING THE PC CARD
Before You Begin
Make sure that you have a CardBus notebook and these items:
■3Com Megahertz 10/100 LAN CardBus PC Card
■PC Card cable (6 inches) and network cable (six feet)
■3Com Megahertz 10/100 LAN CardBus PC Card User Guide
■LAN Installation Disk
If any of these items are missing from the CardBus PC Card package, contact your PC Card supplier.
Setting CardBus Mode
Before you install the CardBus PC Card, you must set CardBus mode for Toshiba®, IBM® ThinkPad series 760, and some NEC notebooks. For NEC notebooks see your NEC notebook documentation. If you have questions about setting CardBus mode, refer to your notebook documentation.
Before you install the PC Card in these notebooks, follow these steps to set the notebook to CardBus mode.
Toshiba Notebooks
1Hold down the Esc key (the button the upper left hand corner of your notebook keyboard) and turn the notebook on.
2Press F1 when the error message appears.
3On the Controller Mode line (this may be on the second page) choose CardBus mode.
4Press end to save changes.
5Type Y to reboot into Windows 95.

Before You Begin |
1-3 |
6Using the Start menu, select shutdown the computer and then click Yes to confirm.
7Turn the notebook back on.
The notebook is now set up to run in CardBus mode.
IBM ThinkPad Series 760 Notebooks
1Using the Start Menu, select Programs >Thinkpad >Thinkpad Configurations.
If this menu does not appear, contact your notebook manufacturer to get the latest BIOS and instructions for setting CardBus mode.
2Click the PC Card Slots picture.
The PC Card Slots window appears.
3Enable CardBus mode.
The IRQ Conflict warning appears asking if you want to disable the device in conflict.
4Click OK.
5Restart the notebook.
If New Hardware Detected appears, restart again. The notebook is now set up to run in CardBus mode.

1-4 CHAPTER 1: INSTALLING THE PC CARD
Connecting the 3CCFE575BT CardBus PC Card
1Remove all PC Cards from your notebook.
2Connect the PC Card cable to the CardBus PC Card , and to the network cable .
Figure 1-2 Connecting the CardBus PC Card
3Connect the RJ-45 connector to the network port .
4Turn the notebook on.
5When Windows is ready, insert the PC Card into the
CardBus PC Card slot. Slide it all the way in.
CAUTION: Do not force the CardBus PC Card into the slot or you may bend the pins inside the slot.
If the CardBus PC Card doesn’t fit into the slot, make sure that your notebook has a CardBus slot. Refer to your notebook documentation or contact your notebook manufacturer.
You may see Windows 95 prompts for driver installation.
The final installation step is to install the network driver that allows you to login to the network. For instructions on how to install the network driver, go to Chapter 2.
Connecting the 3CXE589ET CardBus PC Card with XJACK Connector |
1-5 |
Connecting the 3CXE589ET CardBus PC Card with XJACK Connector
1Remove all PC Cards from your notebook and turn it on.
2Connect the network cable to the CardBus PC Card
XJACK connector.
Figure 1-3 Connecting the CardBus PC Card
3Insert the RJ-45 connector into the network port .
4Insert the PC Card into the CardBus PC Card slot .
Slide it all the way in.
CAUTION: Do not force the CardBus PC Card into the slot or you may bend the pins inside the slot. If the CardBus PC Card doesn’t fit into the slot, make sure that your notebook has a CardBus slot. Refer to your notebook documentation and contact your notebook manufacturer for more information.
You may see Windows 95 prompts for driver installation.
The final installation step is to install the network driver that allows you to login to the network. For instructions on how to install the network driver, go to Chapter 2.

INSTALLING THE NETWORK
2 DRIVER
This chapter describes how to install the 3Com network driver that completes your notebook connection to the network.
Instructions are provided for Windows 95, Windows NT, Windows for Workgroups, and AutoLink NetWare network driver installation.
For information about Banyan Vines, Microsoft LAN Manager, IBM LAN Server, Artisoft LANtastic, and DEC PATHWORKS, see Table 2-1.
The latest network drivers are available on 3Com’s World Wide Web site. To download the latest drivers:
1Go to the 3Com web site. Type the 3Com URL into your browser:
http://www.3com.com/
2Scroll down to Software and Drivers and double-click.
3Scroll down to Network Interface Cards and click.
4Select the 3Com Megahertz 10/100 LAN CardBus PC Card.

2-2 CHAPTER 2: INSTALLING THE NETWORK DRIVER
Before You Install the Network Driver
Now that the CardBus PC Card is inserted in your notebook and the network cable is connected to the network port, the final installation step is to install the network driver. This section describes the requirements for a successful driver installation.
Which Driver Installation Instructions Should You Use?
Ask your MIS department which network driver instructions you should use. Instructions are provided in this chapter for each of the following environments:
■Windows 95 version 4.00.950 or 4.00.950a
■Windows 95 version 4.00.950b (OSR 2)
■Windows NT version 4.0
■Windows NT version 3.51
■Windows for Workgroups
For information about Banyan Vines, Microsoft LAN Manager, IBM LAN Server, Artisoft LANtastic, and DEC PATHWORKS, see Table 2-1.
Proceed to the driver installation section in this user guide that your MIS department recommends.
Which Windows 95 Version Are You Running?
You must determine if you are running Windows 95 OEM Service Release 2 (OSR 2) or the standard Windows 95 before you install the network driver.
Since standard Windows 95 does not support CardBus automatically, the driver installation instructions are different.
If you already know which version of Windows 95 you are running, go to the appropriate Windows 95 section to install the CardBus PC Card network driver on your notebook.
1Double-click My Computer and then Control Panel.
2In the Windows 95 Control Panel, double-click System to display the System Properties dialog box.
3Click the General tab to display the Windows 95 version information.
Windows 95 Version 4.00.950B (OSR 2) |
2-3 |
If your Windows 95 version is 4.00.950 or 4.00.950A, go to the appropriate section to install the network driver.
If your Windows 95 version is 4.00.950B (OSR 2), go to the following section to install the network driver.
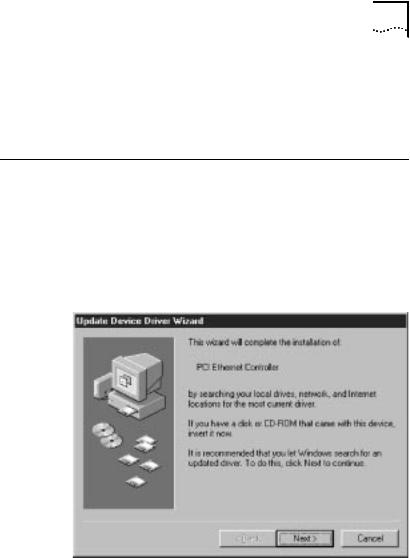
Windows 95 Version 4.00.950B (OSR 2)
Install the NDIS network driver when your notebook is running Windows 95 4.00.950B (also known as OSR 2). The 3Com software automatically detects which OS your notebook is running and installs the correct NDIS driver.
1Make sure the CardBus PC Card is installed and connected to the network, as described in Chapter 1.
The Update Device Driver Wizard window appears.
Figure 2-1 Update Device Driver Wizard Window
2In the Update Device Driver Wizard window, click Next.
If this window does not appear, click System, click Device Manager, and then click Refresh.
3Click Other Locations.
4Insert the LAN Installation Disk.
5Type a: and click OK.

2-4 CHAPTER 2: INSTALLING THE NETWORK DRIVER
6In the Update Device Driver Wizard, click Finish.
7In the Insert Disk window, click OK.
8In the copying files window, type a: and click OK.
9If prompted, insert the Windows 95 CD-ROM or type the directory path to the Windows 95 CAB files on your notebook and click OK.
10Remove the LAN Installation Disk and restart the notebook.
The network driver installation is complete. To confirm installation, see the section “Confirming Installation.” If you have problems, go to Chapter 3.
Windows 95 (Versions 4.00.950 and 4.00.950A)
You install the NDIS network driver when your notebook is running Windows 95. This driver can be used in Microsoft and NetWare environments.
1Make sure the CardBus PC Card is inserted and connected to the network, as described in Chapter 1.
2Double-click My Computer, Control Panel, and then double-click Add New Hardware.
3In the Add New Hardware Wizard window, click Next.
4Respond to the “Do you want Windows to search for your new hardware” prompt by clicking “No” and then click Next.
5Double-click on Network Adapters in the list that appears.
6In the Select Device window, click the Have Disk button.
7Insert the LAN Installation Disk in the floppy drive and click OK.
8Select 3Com Megahertz 10/100 LAN CardBus PC Card Manual Load and click OK to copy the CardBus PC Card files to your notebook.
9In the New Hardware Wizard Window, click Next.

Windows 95 (Versions 4.00.950 and 4.00.950A) |
2-5 |
10Click Finish to complete the driver installation and remove the LAN Installation Disk.
a If the software prompts for Computer Name and Work Group Name, type the names as supplied by your MIS department and click OK.
■The computer name is the name of your notebook. Give your notebook a unique name (up to 15 characters, no blank spaces).
■A workgroup is composed of the computers that you usually communicate with (like your department) and contains shared resources (like printers).
■If you use peer group networking, the workgroup name is your peer group. Peers can see each other when they look in the Network Neighborhood.
■Your computer description is visible to other members of your workgroup when they see your notebook in the Network Neighborhood.
11If you are prompted for Windows 95 files, enter the directory path for Windows 95 CAB files or insert the Windows 95 CD-ROM.
When installation is complete, Windows 95 prompts for restart.
12Remove the LAN Installation Disk and click Yes to restart the notebook to complete driver installation.
Confirming Installation
1Double-click the My Computer icon.
2Double-click the Control Panel icon.
3Double-click the System icon.
The System Properties box appears, detailing your notebook setup.
4Click the Device Manager tab.
A list of devices appears, arranged by type.
5Double-click the Network Adapters icon.
The name of the installed CardBus PC Card appears:
3Com Megahertz 10/100 LAN CardBus PC Card Manual Load

2-6 CHAPTER 2: INSTALLING THE NETWORK DRIVER
6Double-click 3Com Megahertz 10/100 LAN CardBus PC Card to display a description of the CardBus PC Card and its current status.
If the CardBus PC Card is not operational, go to Chapter 3 for troubleshooting information.
Windows NT Version 4.0
This section describes how to install the NDIS network driver for a notebook running Windows NT 4.0, with Windows NT networking installed and without Windows NT networking installed.
Before you begin, obtain the LAN Installation Disk and Windows NT installation files (on hard disk, floppy diskettes, or CD-ROM).
Windows NT 4.0 with Networking Installed
1Make sure the CardBus PC Card is installed and connected to the network, as described in Chapter 1.
2Using the Control Panel, double-click Network.
3Select the Adapters tab and click Add.
4The Select Network Adapter screen appears.
Figure 2-2 Select Network Adapter Window
Windows NT Version 4.0 |
2-7 |
5Click Have Disk.
6In the Insert Disk dialog box, type: a:
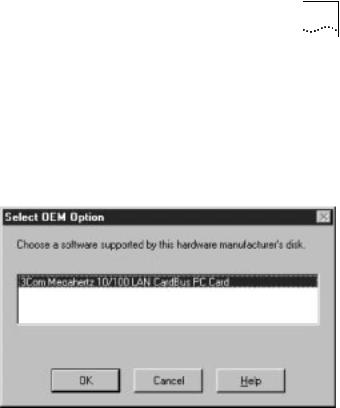
7Insert the LAN Installation Disk into the floppy drive and click OK.
8On the Select OEM Option screen, highlight
3Com Megahertz 10/100 LAN CardBus PC Card and click OK.
Figure 2-3 Select OEM Option Window
9Wait for the CardBus PC Card files to be copied.
The PC Card Setup Network Settings screen appears.
10Click OK to accept resource allocations or enter new values.
3Com Megahertz 10/100 LAN CardBus PC Card appears in the Network window.
11Click Close. If prompted, enter your IP address and click OK.
12Remove the LAN Installation Disk and click Yes to reboot your notebook.
Installation is complete.

2-8 CHAPTER 2: INSTALLING THE NETWORK DRIVER
Confirming Installation
To confirm successful installation, double-click the Network icon in the Control Panel. Click the Adapters tab. The 3Com Megahertz 10/100 LAN CardBus PC Card should appear on the list. If it doesn’t appear, see Chapter 3 for troubleshooting information.
Windows NT 4.0 without Networking Installed
If Windows NT networking is not installed, obtain the following information from your MIS department.
■Are you on a local area network or are you using a modem?
■Transport and network layer protocol used in the Microsoft Windows Network
■Name of the NT Server domain or workgroup you belong to
■IP address if you are not using DHCP
1Make sure the CardBus PC Card is installed and connected to the network, as described in Chapter 1.
If the CardBus PC Card is automatically detected by Windows NT, you may have Card Services installed. Refer to your Card Services documentation to see if it supports the CardBus PC Card. If it does not support it, consult your Card Services documentation to remove Card Services.
2Using the Control Panel, double-click Network.
When Windows NT networking is not installed, you are asked if you want to install Windows NT networking.
3Click Yes.
4Select Wired to the Network and click Next.
5Click Select from list.
6Click Have Disk.
7Insert the LAN Installation Disk.
8Type a: and click OK.
3Com Megahertz 10/100 LAN CardBus PC Card appears in the Select OEM Option window.
 Loading...