


 Loading...
NBX® Telephone Guide
Telephones
■NBX 1102 Business Telephone
■NBX 2102 Business Telephone
■NBX 2102-IR Business Telephone
■NBX 2101 Basic Telephone
Attendant Consoles
■NBX 1105 Attendant Console
■NBX Complement Attendant Software
http://www.3com.com/
Part No. 900-0079-01
Published: 09-2001
3Com Corporation |
Copyright © 2001, 3Com Corporation. All rights reserved. No part of this documentation may be reproduced |
5400 Bayfront Plaza |
in any form or by any means or used to make any derivative work (such as translation, transformation, or |
Santa Clara, California |
adaptation) without written permission from 3Com Corporation. |
95052-8145 |
3Com Corporation reserves the right to revise this documentation and to make changes in content from time |
|
|
|
to time without obligation on the part of 3Com Corporation to provide notification of such revision or change. |
|
3Com Corporation provides this documentation without warranty, term, or condition of any kind, either |
|
implied or expressed, including, but not limited to, the implied warranties, terms, or conditions of |
|
merchantability, satisfactory quality, and fitness for a particular purpose. 3Com may make improvements or |
|
changes in the product(s) and/or the program(s) described in this documentation at any time. |
|
If there is any software on removable media described in this documentation, it is furnished under a license |
|
agreement included with the product as a separate document, in the hardcopy documentation, or on the |
|
removable media in a directory file named LICENSE.TXT or !LICENSE.TXT. If you are unable to locate a copy, |
|
please contact 3Com and a copy will be provided to you. |
|
UNITED STATES GOVERNMENT LEGEND |
|
If you are a United States government agency, then this documentation and the software described herein are |
|
provided to you subject to the following: |
|
All technical data and computer software are commercial in nature and developed solely at private expense. |
|
Software is delivered as “Commercial Computer Software” as defined in DFARS 252.227-7014 (June 1995) or |
|
as a “commercial item” as defined in FAR 2.101(a) and as such is provided with only such rights as are |
|
provided in 3Com’s standard commercial license for the Software. Technical data is provided with limited rights |
|
only as provided in DFAR 252.227-7015 (Nov 1995) or FAR 52.227-14 (June 1987), whichever is applicable. |
|
You agree not to remove or deface any portion of any legend provided on any licensed program or |
|
documentation contained in, or delivered to you in conjunction with, this guide. |
|
3Com, NBX, and SuperStack are registered trademarks of 3Com Corporation. The 3Com logo, NetSet, and |
|
pcXset are trademarks of 3Com Corporation. |
|
Adobe and Acrobat Exchange are trademarks and Adobe Acrobat is a registered trademark of Adobe Systems |
|
Incorporated. Microsoft, Windows, Windows NT, and the Internet Explorer logo are registered trademarks of |
|
Microsoft Corporation. Netscape Navigator is a registered trademark of Netscape Communications. Palm is a |
|
trademark of Palm Computing Corporation. |
|
All other company and product names may be trademarks of the respective companies with which they are |
|
associated. |

CONTENTS
ABOUT THIS GUIDE
|
Conventions 8 |
|
|
|
|
Documentation |
9 |
|
|
1 |
|
|
|
|
GETTING STARTED |
|
|
||
|
Setting Up Your Voice Mail 12 |
|
||
|
The NetSet Utility |
13 |
|
|
|
Quick Reference Sheet |
15 |
|
|
2 |
|
|||
NBX BUSINESS TELEPHONES |
||||
|
Telephone Buttons and Controls |
18 |
||
|
Status Lights on the NBX Business Telephone 20 |
|||
|
Programmable Access Buttons |
21 |
||
3 |
|
|
||
NBX BASIC TELEPHONE |
|
|||
|
Telephone Buttons and Controls |
24 |
||
|
Status Icons on the NBX Basic Telephone 25 |
|||
|
Programmable Access Buttons |
26 |
||
4 |
|
|
|
|
VOICE MAIL |
|
|
|
|
|
Changing Your Password |
28 |
|
|
|
Listening to Messages |
29 |
|
|
|
Replying to a Message |
31 |
|
|
|
Forwarding a Message |
32 |
|
|
Creating and Sending a Message |
33 |
|
Creating Personal Voice Mail Lists |
34 |
|
Forwarding Calls Directly to Your Voice Mailbox |
35 |
|
Accessing Voice Mail Messages Through E-mail |
36 |
|
Greeting-Only Mailbox 36
|
Phantom Mailbox |
37 |
|
|
Group Mailbox |
37 |
|
|
|
||
5 STANDARD FEATURES |
|||
|
Setting the Volume |
40 |
|
|
Dialing a Call |
40 |
|
Calling Inside Your Organization 40
|
Dialing an External Call |
42 |
|
|||
|
Redialing a Call |
42 |
|
|
|
|
|
Answering a Call |
42 |
|
|
|
|
|
Creating Your Call Forward Path |
43 |
||||
|
Placing a Call on Hold |
44 |
|
|
||
|
Transferring a Call |
44 |
|
|
|
|
|
Establishing a Conference Call |
46 |
||||
|
|
|||||
6 PERSONALIZING YOUR TELEPHONE |
||||||
|
Label Makers for Telephones |
50 |
||||
|
Ringer Tone |
50 |
|
|
|
|
|
Speed Dials 51 |
|
|
|
|
|
|
Off-Site Notification 54 |
|
|
|||
|
Do Not Disturb |
55 |
|
|
|
|
|
Preventing Unauthorized Use of Your Telephone 56 |
|||||
|
Telephone Locking |
56 |
|
|
||
|
Call Permissions |
56 |
|
|
|
|
|
Class of Service Override |
57 |
|
|||
|
Palm Integration |
57 |
|
|
|
|
|
Using a Headset |
58 |
|
|
|
|

7 GETTING MORE FROM YOUR TELEPHONE SYSTEM
|
Account (Billing) Codes 62 |
|
||
|
Caller ID |
62 |
|
|
|
Internal and External Caller ID |
62 |
||
|
Calling Line Identity Restriction (CLIR) 62 |
|||
|
Call Pickup |
63 |
|
|
|
Hunt Groups and Calling Groups |
65 |
||
|
Call Park |
68 |
|
|
|
Paging 69 |
|
|
|
|
Dialing a Call to a Remote Office |
71 |
||
|
Bridged Extensions |
72 |
|
|
|
Delayed Ringing |
73 |
|
|
|
Pulse Dialing 73 |
|
|
|
|
|
|
||
8 ATTENDANT CONSOLES |
|
|||
|
NBX 1105 Attendant Console 76 |
|
||
|
Complement Attendant Software |
78 |
||
9TELEPHONE INSTALLATION, MAINTENANCE, AND TROUBLESHOOTING
Connecting the Telephone |
82 |
Moving Your Telephone |
85 |
Swapping Telephones 85 |
|
Cleaning Your Telephone |
85 |
Troubleshooting Possible Problems 85
A FEATURE CODES AND PAGING CODES
Feature Codes for General Use 89
Feature Codes for Outbound Calls |
90 |
Feature Codes for Incoming Calls |
91 |
Paging Codes 92 |
|
INDEX

ABOUT THIS GUIDE
This guide is intended for anyone using NBX Telephones, the NBX 1105 Attendant Console, or the NBX Complement Attendant Software. It includes information about using the NBX Voice Mail system and the NBX NetSet™ administration utility.
If the information in the release notes (readme.pdf) on the Resource Pack CD differs from the information in this guide, follow the instructions in the release notes.
How to Use |
Table 1 shows where to look for specific information in this guide. |
|
This Guide |
Table 1 Where to Find Information |
|
|
|
|
|
|
|
|
If you are looking for |
Turn to |
|
|
|
|
How to get started |
Chapter 1 |
|
|
|
|
A description of the NBX Business Telephones, their buttons, |
Chapter 2 |
|
and controls |
|
|
|
|
|
A description of the NBX Basic Telephone, its buttons, and |
Chapter 3 |
|
controls |
|
|
|
|
|
Information about NBX Voice Mail features |
Chapter 4 |
|
|
|
|
Information about using standard telephone features |
Chapter 5 |
|
|
|
|
Information about personalizing your telephone |
Chapter 6 |
|
|
|
|
A description of enhanced system features |
Chapter 7 |
|
|
|
|
A description of the Attendant Console and the Complement |
Chapter 8 |
|
Attendant Software |
|
|
|
|
|
Telephone maintenance and troubleshooting information |
Chapter 9 |
|
|
|
|
Feature codes and paging codes |
Appendix A |
|
|
|
|
References to all topics in this book |
Index |
|
|
|
8 ABOUT THIS GUIDE
Commonly Used Table 2 defines some commonly used words and phrases in this guide.
Terms
Table 2 Commonly Used Terms
Administrator |
The person who is responsible for maintaining your |
|
3Com Networked Telephony Solution. |
|
|
Receptionist |
In this guide, “receptionist” refers to the person who |
|
answers the majority of the incoming telephone calls for |
|
an organization. In some office environments, this |
|
person may be a switchboard operator. |
|
|
User |
In this guide, “user” refers to a person who has a single |
|
telephone. The telephone may be an NBX Business |
|
Telephone or an NBX Basic Telephone. |
|
|
NBX 25 |
The NBX 25 Communications System |
|
|
NBX 100 |
The NBX 100 Communications System |
|
|
SuperStack 3 NBX |
The 3Com SuperStack 3 NBX Networked Telephony |
|
Solution |
|
|
The examples of the NetSet utility in this guide show the screens as they appear on the SuperStack 3 NBX system. Unless otherwise indicated, the features also apply to the NBX 100 and NBX 25 systems.
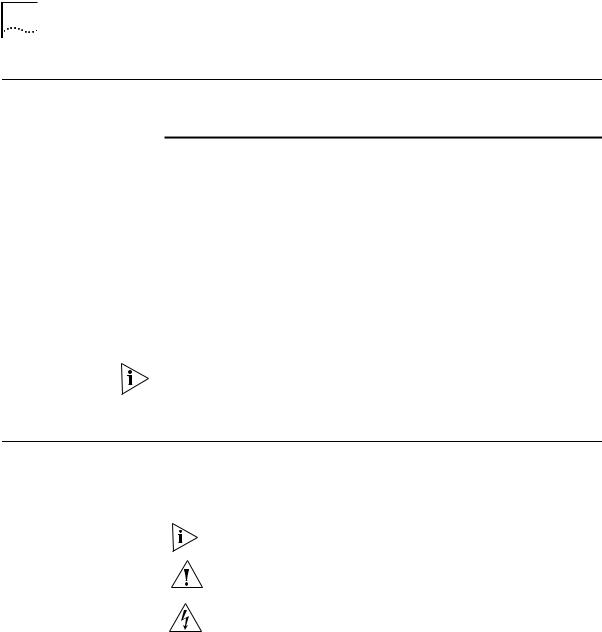
Conventions |
Table 3 and Table 4 list conventions that are used throughout this guide. |
||
|
Table 3 |
Icons |
|
|
|
|
|
|
Icon |
Type |
Description |
|
|
|
|
|
|
Information note |
Information that describes important features |
|
|
|
or instructions. |
|
|
|
|
|
|
Caution |
Information that alerts you to potential loss of |
|
|
|
data or potential damage to an application, |
|
|
|
system, device, or network. |
|
|
|
|
|
|
Warning |
Information that alerts you to potential |
|
|
|
personal injury. |
|
|
|
|

Documentation 9
Table 4 Text Conventions
|
Convention |
Description |
||
|
|
|
|
|
|
Screen display |
This typeface represents information as it appears on the |
||
|
|
display panel or on a computer screen. |
||
|
|
|
|
|
|
The words “enter” |
When you see the word ”enter” in this guide, you must |
||
|
and ”type“ |
type something, and press Return or Enter. Do not press |
||
|
|
Return or Enter when an instruction simply says ”type.“ |
||
|
|
|
|
|
|
Words in italics |
Italics are used to: |
||
|
|
■ |
Emphasize a point. |
|
|
|
■ Denote a new term at the place where it is defined in |
||
|
|
|
the text. |
|
|
|
■ Identify names of documents, software applications, |
||
|
|
|
and CDs. |
|
|
|
|
|
|
|
Words in bold |
The bold font is used to identify features, menu names |
||
|
|
and commands, software button names, and buttons that |
||
|
|
you press or dial on the telephone. For example: |
||
|
|
■ From the Help menu, select Contents. |
||
|
|
■ |
Click OK. |
|
|
|
■ Press Feature button and 444. |
||
|
|
|
||
|
|
|
|
|
Documentation |
The documentation for 3Com NBX Networked Telephony Solutions is |
|||
|
designed to help NBX phone users, installers, and administrators |
|||
|
maximize the full potential of the system. |
|||
Format The NBX books are available in these formats:
■Paper documents
One copy of the NBX Installation Guide is shipped with each NBX Call Processor. To order a set of paper copies of the NBX Administrator’s Guide, NBX Installation Guide, and NBX Telephone Guide, contact your 3Com authorized reseller.
■CD-ROM
The Resource Pack CD for each NBX product contains online versions of the paper documents, additional documentation, system software and the related Help files, and some additional 3Com applications.
■NetSet Utility
When you log in to the NetSet utility as a user, you can view the NBX Telephone Guide by clicking the phone guide icon at the bottom

10 ABOUT THIS GUIDE
of your screen. When you log in as an administrator, you can also see the NBX Administrator’s Guide.
Comments on the Your suggestions are important to us. They help us to make our Documentation documentation more useful to you.
Send e-mail comments about this guide or any of the 3Com NBX documentation and Help systems to:
NBX_Techpubs_comments@3com.com
Include the following information with your comments:
■Document title
■Document part number (found on the front or back page of each document)
■Page number
Example:
NBX Telephone Guide
Part Number 900-XXXX-XX
Page 25
GETTING STARTED
1
The first time that you use your NBX telephone, you are prompted to set up your voice mailbox.
After you have initialized your mailbox and password, you may want to browse through the NetSet utility, which is described later in this chapter.
This chapter covers these topics:
■Setting Up Your Voice Mail
■The NetSet Utility
■Quick Reference Sheet

12 GETTING STARTED
Setting Up Your |
Pick up the handset on your telephone and follow the voice prompts to |
Voice Mail |
set up these voice mail features: |
|
■ Your Password — When your telephone is first installed, your voice |
|
mailbox has no password. To prevent anyone else from listening to |
|
your messages, you must set a password. |
|
■ Your Name Announcement — Your name announcement identifies |
|
your mailbox to callers who use the internal telephone directory. |
|
■ Your Personal Greeting — Your personal greeting is heard by all |
|
callers when they reach your voice mail. Change your greeting as |
|
often as necessary to let callers know that you are away from your |
|
desk for an extended period of time, to say that you are on vacation, |
|
and so on. |
To set up voice mail:
1Pick up the handset and press MSG (Message) button. You are prompted to enter a personal password.
2Enter a 4-digit to 10-digit password, and press #.
3Press 1 to save the password or 2 to change the password. You are prompted to record your name announcement.
4Speak your name and extension number clearly into the handset’s receiver, and press #.
Example: John Smith, extension 200.
5Press 1 to save your name announcement or press 2 to re-record your name announcement. You are prompted to record your greeting.
6Record your greeting after the tone, and press #.
Example: Hello, you have reached __________(name)___________
of ___________(organization)__________ at ___(extension)____. I am unavailable to take your call at the moment.
Please leave your name, number, and a brief message after the tone, and I will return your call as soon as possible.
7Press 1 to save your greeting or 2 to re-record your greeting. The voice prompt verifies that you have set up your voice mail successfully:
Your account is active and ready to receive messages.
See Chapter 4 for information about changing your password and for details about voice mail features.

The NetSet Utility 13
The NetSet Utility Using the NetSet utility, which is part of the NBX system software, your administrator manages and configures system-wide telephone settings along with many of your personal telephone settings and permissions.
As a telephone user, you can use the NetSet utility to:
■View and change your telephone’s personal settings, such as speed dials, ringer tone, and where you want your calls to go when you cannot answer them (the call forwarding path).
■View the internal user directory to find the extensions of other users on your system.
To use the NetSet utility, you need a computer connected to your local area network (LAN) and a web browser, but you do not need Internet access.
The following browsers provide the best interface:
■Microsoft Internet Explorer version 4.0 or later
■Netscape Navigator version 4.x or 5.x
Starting the The examples of the NetSet utility in this guide show the screens as they NetSet Utility appear on the SuperStack 3 NBX system. Unless otherwise indicated, the features also apply to the NBX 100 and NBX 25 systems.
To start the NetSet utility:
1Ask your administrator for the IP (web) address for your NBX system.
2In the web browser on your computer, enter the IP address in the Address or Location field. The login screen appears.
3On the Login screen, click User to log in as a user. The password dialog box appears. See Figure 1.

14 GETTING STARTED
Figure 1 NBX NetSet Login Screen with Password Dialog Box
4Type your user name, which is always your 3-digit or 4-digit telephone extension.
5Type your voice mail password, and click OK.
6The Personal Settings window appears and displays the User Information tab.
The NetSet password is the same password that you use for accessing your voice mail. You can change your password using your telephone or in the NetSet utility.
NetSet Utility The buttons at the lower right of the Personal Settings window allow Navigation Buttons you or your administrator to navigate to the following features:
Action |
Description |
Icon |
|
|
|
Back The main NetSet login dialog box
Help Online Help for personal settings
Quick Reference Sheet |
15 |
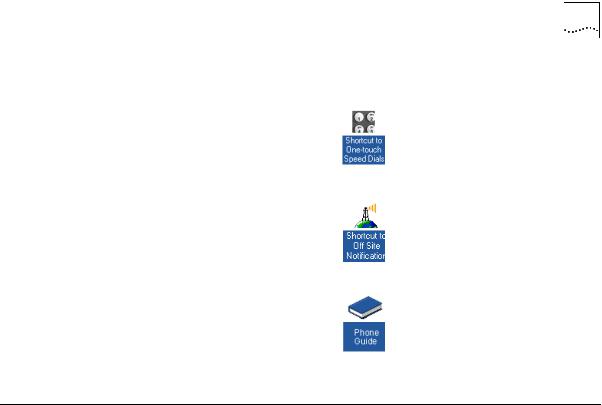
The shortcut icons on the lower left of the browser screen link you to the following features of the Personal Settings window:
One-touch Speed Dials
Off-Site Notification
Telephone Guide online
Quick Reference |
To open and print a copy of the Quick Reference Sheet for voice mail |
Sheet |
features and for your NBX Telephone: |
1Log in to the NetSet utility.
2Click Telephone Quick Reference.
You need to have Adobe Acrobat Reader 3.0 or 4.0 installed on your computer to use the template. Adobe Acrobat Reader is available free of charge on the NBX Resource Pack CD.

16 GETTING STARTED

NBX BUSINESS TELEPHONES
2
You can manage some of the features of your telephone on the telephone itself.
This chapter describes the buttons, controls, and features on the following telephones:
■NBX 1102 Business Telephone
■NBX 2102 Business Telephone
■NBX 2102-IR Business Telephone
Unless otherwise noted, the features discussed in this chapter apply to all NBX Business Telephones and to the SuperStack 3 NBX, NBX 100, and NBX 25 Networked Telephony Solutions.
For a description of the features on the NBX Basic Telephone, see
Chapter 3.

18 CHAPTER 2: NBX BUSINESS TELEPHONES
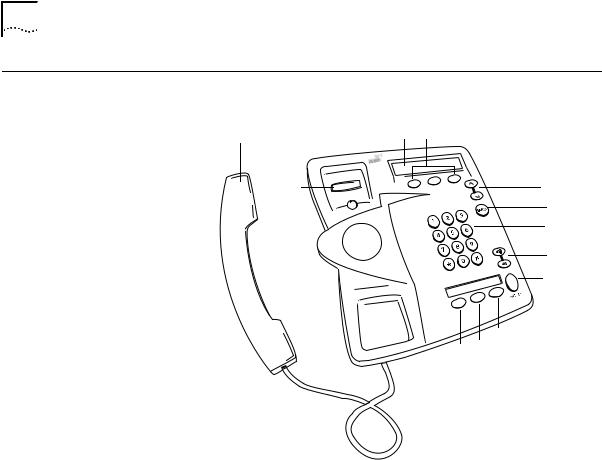
Telephone Buttons Figure 2 shows buttons and controls on the NBX Business Telephone.
and Controls
Figure 2 NBX Business Telephone (Model 2102-IR Shown)
1 |
2 |
3 |
4 |
5 |
6 |
7 8 |
9 |
10 a–f
20
11
12
13
14
15 16
19 |
|
17 |
|
||
18 |
|
|
The NBX Business Telephones have these features:
1Handset
2MSG (Message) button — Accesses your voice mail messages through the Voice Mail System. See “Listening to Messages” in Chapter 4.
3Display panel — Provides telephone status messages, Caller ID information (if enabled), and the number of messages that you have in your voice mail mailbox. You can also use it to view the directory of people’s names in your company.
4Forward to Voice Mail button — Directs all incoming calls to your voice mail after one ring. See “Forwarding a Message” in Chapter 4.

Telephone Buttons and Controls |
19 |
5Soft buttons —Allow you to select names from the internal user directory. “Calling Inside Your Organization” in Chapter 5. The buttons, from left to right, are:
■Slct (Select)
■Back (reserved for future use)
■Exit
6Telephone key pad
7Scroll buttons — Allow you to scroll through user names in the internal user directory. See “Calling Inside Your Organization” in Chapter 5.
8Program button — Reserved for future use.
9Programmable Access buttons with indicator lights — See
“Programmable Access Buttons” and “Status Lights on the NBX Business Telephone” later in this chapter.
10Programmable Access buttons without indicator lights — See
“Programmable Access Buttons” later in this chapter.
11Hold button — Places a caller on hold. See “Placing a Call on Hold” in Chapter 5.
12Microphone (located on the underside of the telephone) —
Activated when the telephone is in speaker phone mode, that is, after you press Speaker button or Hands Free button. For best results, keep the area around the microphone free of obstructions.
13Transfer button — Sends an incoming call to another telephone. See “Transferring a Call” in Chapter 5.
14Conference button — Establishes a single call with up to three additional internal parties, external parties, or both. See “Establishing a Conference Call” in Chapter 5.
15Redial button — Redials the last telephone number or extension that you called. See “Redialing a Call” in Chapter 5.
16Speaker button — Enables you to use the speaker phone feature. Press Speaker button before you dial the call, when your telephone is ringing, or while a call is in progress. To turn the speaker phone off and resume the conversation, pick up the handset.
17Volume control buttons — Adjust the volume of the ringer, the speaker, and the handset. See “Setting the Volume” in Chapter 5.

20 CHAPTER 2: NBX BUSINESS TELEPHONES
18Infrared Port (NBX 2102-IR Telephones only) — Receives infrared signals from a handheld device running the Palm Operating System. See “Palm Integration” in Chapter 6.
19Mute button — Enables you prevent callers from hearing what you are saying during a telephone call. Press Mute button to turn off the telephone’s microphone when you are using handset or when your telephone is in speaker phone mode. To deactivate the Mute feature, press Mute button again.
20Hands Free button — Allows you to answer internal (intercom) calls without picking up the handset. To activate this feature, press
Hands Free button before calls come in to your telephone. The indicator lights when the feature is enabled. When you receive an internal call, your telephone sounds a tone and activates the speaker phone.
When the Hands Free (intercom) feature is active, all internal calls come in to your telephone as intercom calls. External calls ring to your telephone as usual.
Status Lights on the The light for each Access button indicates the status of the button. NBX Business Table 5 shows the light pattern that is associated with each line status.
Telephone
Table 5 Status Indicator Lights
Light |
Status |
|
|
Off |
The line is available for use. |
|
|
Steady |
The line is in use. |
|
|
Fast blink |
The line is ringing. |
|
|
Slow blink |
The line is on hold. |
|
|
If another call comes in while you on a call, your telephone rings once, and the name and extension of internal callers appear briefly in the display panel. To retrieve the call while the line’s status light is still flashing, place the first call on hold and press the Access button for the second incoming call. For information about placing calls on hold, see “Placing a Call on Hold” in Chapter 5.
Programmable Access Buttons |
21 |
Programmable |
Figure 3 displays the 18 programmable Access buttons. The list below the |
Access Buttons |
figure gives the default features. The One-touch Speed Dials screen in |
|
the NetSet utility shows your telephone’s current button mappings. For |
|
details, see “One-touch Speed Dials” in Chapter 6. |
|
Figure 3 Access Buttons |
1 |
7 |
2 |
|
3 |
|
4 |
|
5 |
|
6 |
8 |
|
Access buttons 1 through 6 have these default settings, which can be changed by your administrator:
1Feature button — Allows you to access features that are not directly assigned to an Access button on your telephone. See Appendix A for a list of features and applicable codes.
2Direct Mail Transfer button — Sends a call directly to another user’s voice mailbox. See “Direct Mail Transfer” in Chapter 5.
3Call Park button — Allows you to place a call in a “holding pattern” so it can be retrieved from any other telephone on the system. See “Call Park” in Chapter 7.
4Flash button — Similar to pressing the switch hook on your telephone, this button activates certain features, such as Call Waiting, that may be available from your local telephone company.
5Unassigned — This button has no default assigned function.
6Release button — Disconnects calls. This feature is commonly used when you use a telephone headset. See “Using a Headset” in Chapter 6.
7Typically, these nine buttons are used for personal speed dial settings, although the administrator can use them for system-wide features. See “Speed Dials” in Chapter 6.
8In most circumstances, your administrator designates these three lines for incoming and outgoing calls.

22 CHAPTER 2: NBX BUSINESS TELEPHONES

NBX BASIC TELEPHONE
3
You can manage many of the features of your telephone on the telephone itself.
This chapter describes the buttons, controls, and features that are specific to the NBX 2101 Basic Telephone.
Unless otherwise noted, the features discussed in this chapter apply to the SuperStack 3 NBX, NBX 100, and NBX 25 Networked Telephony Solutions.
For a description of the features on the NBX Business Telephone, see
Chapter 2.
24 CHAPTER 3: NBX BASIC TELEPHONE
Telephone Buttons Figure 4 shows buttons and controls on the NBX Basic Telephone. and Controls
Figure 4 NBX Basic Telephone (Model 2101)
1 |
2 |
3 |
12 |
|
4 |
|
|
5 |
|
|
6 |
|
|
7 |
|
|
8 |
|
|
9 |
|
|
11 10 |
The NBX Basic Telephone has these features:
1Handset
2Display panel — Provides telephone status messages, Caller ID information (if enabled), and the number of messages in your voice mail mailbox. You can also use it to view the internal user directory.
When you are using two telephone lines at the same time, the telephone icons on the right side of the display indicate the status of the two lines. See Table 6 for details.
3Soft buttons — Allow you to select names from the internal user directory. “Calling Inside Your Organization” in Chapter 5. The buttons, from left to right, are:
■Slct (Select)
■Back (reserved for future use)
■Exit

Status Icons on the NBX Basic Telephone 25
4Scroll buttons — Allow you to scroll through user names in the internal user directory. See “Calling Inside Your Organization” in Chapter 5.
5MSG (Message) button — Accesses your voice mail messages through the Voice Mail System. See “Listening to Messages” in Chapter 4.
6Telephone key pad
7Volume control buttons — Adjust the volume of the ringer and the handset. See “Setting the Volume” in Chapter 5.
8Hold button — Places a caller on hold. See “Placing a Call on Hold” in Chapter 5.
9Transfer button — (factory default setting) See “Programmable Access Buttons” later in this chapter.
10Call Toggle button — (factory default setting) See “Programmable Access Buttons” later in this chapter.
11Feature button — (factory default setting) See “Programmable Access Buttons” later in this chapter.
12Switch hook (under the handset)— Pressing the switch hook gives you a dial tone. This feature is used with Call Park. See “Call Park” in Chapter 7.
Status Icons on the |
Your NBX Basic Telephone allows you to use two telephone lines at the |
||
NBX Basic |
same time. On the display panel, the telephone icon next to 1 (Line 1) or |
||
Telephone |
2 (Line 2) indicates the status of the lines. Table 6 shows the icon patterns |
||
|
that are associated with each line status. |
||
|
Table 6 Status Indicator Patterns |
||
|
|
|
|
|
Icon |
Status |
|
|
|
|
|
|
Steady |
The line is in use. |
|
|
|
|
|
|
Fast blink |
The line is ringing. |
|
|
|
|
|
|
Slow blink |
The line is on hold. |
|
|
|
|
|
If another call comes in while you are on a call, you can pick up the second call, or it will follow the Call Forward path that you have set in the NetSet utility. See “Creating Your Call Forward Path” in Chapter 5 for call forwarding details.

26 CHAPTER 3: NBX BASIC TELEPHONE
To pick up a second incoming call while you are using your telephone:
1Press Call Toggle button.
2Your first call is put on hold, and you are connected to the second call. a The telephone icon next to the 1 on your display panel blinks slowly. b The telephone icon next to the 2 on your display panel is steady.
To return to the first call:
1Press Call Toggle button again.
2Your second call is put on hold, and you are reconnected to the first call. a The telephone icon next to the 1 on your display panel is steady.
b The telephone icon next to the 2 on your display panel blinks slowly.
Programmable |
The NBX Basic Telephone has three programmable Access buttons. The |
|
Access Buttons |
factory default settings for these buttons are (from left to right): |
|
|
■ |
Feature |
|
■ |
Call Toggle |
|
■ |
Transfer |
Your administrator can program these buttons for commonly used functions. However, changing the settings for Feature or Call Toggle buttons reduces your ability to use some of the NBX system features. For guidance with programmable buttons, contact your administrator.
Feature
Press this button before you dial a feature code. See Appendix A for a list of feature codes.
Call Toggle
The Call Toggle button is available only on the NBX Basic Telephone. Using this button, you can manage two telephone calls at the same time. See “Status Icons on the NBX Basic Telephone” earlier in this chapter for details.
Transfer
Press this button to transfer the current call to another extension or telephone number. See “Transferring a Call” in Chapter 5 for details.
VOICE MAIL
4
A key component of the NBX Networked Telephony Solutions is the NBX Messaging System, which includes voice mail, off-site notification, and several administrative features.
Voice mail allows callers to leave voice messages in your voice mailbox when you are not able to answer your telephone. You can listen to, save, and forward those messages from any touch-tone telephone. In certain circumstances, you can also be notified about your voice mail messages through your email.
The NBX system provides several types of voice mailboxes. The most common type of mailbox is a personal voice mailbox, which is associated with a specific telephone and a specific user. Other types of voice mailboxes, which are described at the end of this chapter, include greeting-only mailbox, phantom mailbox, and group mailbox.
You use the Off-Site Notification feature if you want the NBX system to notify you when callers leave voice mail messages in your voice mailbox. See “Off-Site Notification” in Chapter 6.
The steps for setting up personal, phantom, and greeting-only voice mailboxes are the same. See “Setting Up Your Voice Mail” in Chapter 1 for details. Your administrator creates group mailboxes.
The default setting for maximum voice mail message length is 5 minutes. Your administrator can configure your organization’s NBX messaging system to receive and store voice mail messages that are up to 10 minutes long.
If your system uses a messaging application other than NBX Voice Messaging (such as third-party messaging), use the documentation for that messaging application instead of these instructions.

28 CHAPTER 4: VOICE MAIL
|
This chapter covers these topics: |
|
|
■ |
Changing Your Password |
|
■ |
Listening to Messages |
|
■ Replying to a Message |
|
|
■ |
Forwarding a Message |
|
■ Creating and Sending a Message |
|
|
■ Creating Personal Voice Mail Lists |
|
|
■ Forwarding Calls Directly to Your Voice Mailbox |
|
|
■ Accessing Voice Mail Messages Through E-mail |
|
|
■ Greeting-Only Mailbox |
|
|
■ |
Phantom Mailbox |
|
■ |
Group Mailbox |
|
|
|
Changing Your |
You use the same password to access your voice mail and to log in to the |
|
Password |
NetSet utility. You can change this password from your telephone or |
|
|
through the NetSet utility. |
|
To change your password using the telephone:
1Pick up the handset, and then press MSG button.
2At the prompt, dial your password and press #.
3Dial 9 for mailbox options.
4Dial 2 to select Change Password.
5Dial your new 4-digit to 10-digit password and press #.
6Dial 1 to save the new password, or dial 2 to change the password.
To change your password using the NetSet utility:
1Log in to the NetSet utility.
2Select NBX Messaging > Change Password.
3Type your current password.
Do not use the * or # symbols as part of your password.
4Type your new password, and then type it a second time to confirm.
5Click Apply, and then click Close.

Listening to Messages |
29 |
Security Tips |
■ Never tell your password to anyone. |
|
■ Do not use passwords that can easily identify you, such as your phone |
|
extension, birth date, and so on. |
|
■ Avoid simple passwords such as 1234, 0000, and so on. |
|
■ Longer passwords are more secure. |
|
■ Change your password often. |
|
|
Listening to |
You can listen to your voice mail messages from any touch-tone |
Messages |
telephone. After you listen to messages, you can save or delete them to |
|
clear them from the new messages queue. |
From Your NBX When you have messages in your mailbox:
Telephone ■ On an NBX Business Telephone — The indicator next to MSG button lights up, and the display panel shows the total number of messages, for example: 3 Msgs 2 New.
■On an NBX Basic Telephone — The display panel shows the total number of messages, for example: 3 Msgs 2 New.
To listen to your messages:
1Pick up the handset and press MSG button to access the mailbox.
2At the prompt, dial your password and press #.
3See Figure 5 for the list of codes that you use to manage your messages.
From Other Internal |
To listen to your messages from any NBX telephone within your NBX |
NBX Telephones |
system: |
1Pick up the handset and press MSG button.
2Press * and dial your extension. You hear your name announcement.
3Dial your password and press #.
4See Figure 5 for the list of codes that you use to manage your messages.
30 CHAPTER 4: VOICE MAIL
From a Remote To listen to your messages from other telephones:
Location
1If you call the main telephone number of your organization and
■The receptionist answers your call, ask to be forwarded to your voice mailbox, press *, and continue with step 3.
■The Automated Attendant greets your call, press * * to access the voice mail system, and continue with step 3.
2If you can call your telephone extension directly, during the time that you hear your greeting, press *, and continue with step 3.
3Dial your extension. You hear your name announcement.
4Dial your password and press #.
5See Figure 5 for the list of codes that you use to manage your messages.
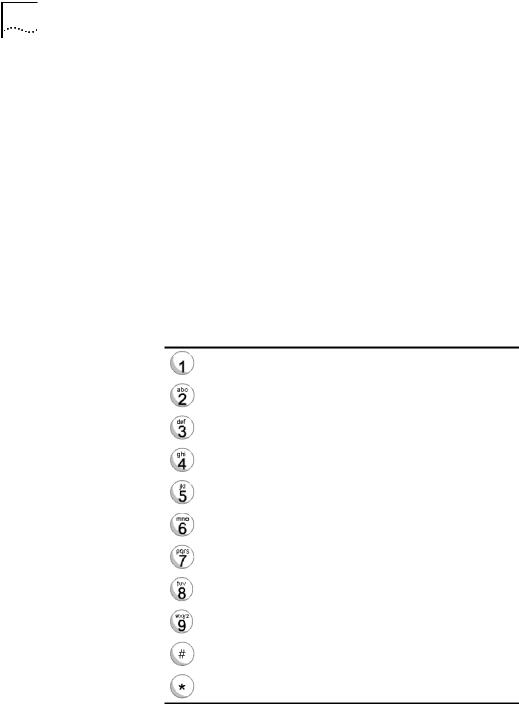
Figure 5 Managing Your Voice Mail Messages
Play or repeat a message.
Save the message.
Delete the message from your mailbox. You cannot retrieve messages once they have been deleted.
Reply to the message.
Forward the message.
Listen to date, time, and sender information about the message.
Back up 5 seconds in the current message.
Pause the current message for up to 20 seconds.
Move ahead 5 seconds in the current message.
Skip to the next message.
Return to the main menu.
Loading...