


 Loading...
®
http://www.3com.com/
Part No. 09-1551-001
Published May 1999
Upgrading Enterprise OS
Software
Software version 11.3
3Com Corporation |
© 3Com Corporation, 1999. All rights reserved. No part of this documentation may be reproduced in |
5400 Bayfront Plaza |
any form or by any means or used to make any derivative work (such as translation, transformation, or |
Santa Clara, California |
adaptation) without permission from 3Com Corporation. |
95052-8145 |
3Com Corporation reserves the right to revise this documentation and to make changes in content from |
|
|
|
time to time without obligation on the part of 3Com Corporation to provide notification of such revision |
|
or change. |
|
3Com Corporation provides this documentation without warranty of any kind, either implied or |
|
expressed, including, but not limited to, the implied warranties of merchantability and fitness for a |
|
particular purpose. 3Com may make improvements or changes in the product(s) and/or the program(s) |
|
described in this documentation at any time. |
|
UNITED STATES GOVERNMENT LEGENDS: |
|
If you are a United States government agency, then this documentation and the software described |
|
herein are provided to you subject to the following restricted rights: |
|
For units of the Department of Defense: |
|
Restricted Rights Legend: Use, duplication, or disclosure by the Government is subject to restrictions as |
|
set forth in subparagraph (c) (1) (ii) for Restricted Rights in Technical Data and Computer Software Clause |
|
at 48 C.F.R. 52.227-7013. 3Com Corporation, 5400 Bayfront Plaza, Santa Clara, California 95052-8145. |
|
For civilian agencies: |
|
Restricted Rights Legend: Use, reproduction, or disclosure is subject to restrictions set forth in |
|
subparagraph (a) through (d) of the Commercial Computer Software - Restricted Rights Clause at 48 |
|
C.F.R. 52.227-19 and the limitations set forth in 3Com Corporation’s standard commercial agreement for |
|
the software. Unpublished rights reserved under the copyright laws of the United States. |
|
If there is any software on removable media described in this documentation, it is furnished under a |
|
license agreement included with the product as a separate document, in the hard copy documentation, |
|
or on the removable media in a directory file named LICENSE.TXT. If you are unable to locate a copy, |
|
please contact 3Com and a copy will be provided to you. |
|
Unless otherwise indicated, 3Com registered trademarks are registered in the United States and may or |
|
may not be registered in other countries. |
|
3Com, Boundary Routing, Net Age, NETBuilder, NETBuilder II, OfficeConnect, SuperStack, and Transcend |
|
are registered trademarks of 3Com Corporation. 3TECH and PathBuilder are trademarks of 3Com |
|
Corporation. 3ComFacts is a service mark of 3Com Corporation. |
|
CompuServe is a registered trademark of CompuServe, Inc. Windows is a registered trademark of |
|
Microsoft Corporation. Solaris is a registered trademark of Sun Microsystems, Inc. SunOS is a trademark |
|
of Sun Microsystems, Inc. UNIX is a registered trademark of Xopen Company Limited. IBM, APPN, and |
|
SNA are registered trademarks of International Business Machines Corporation. HP is a registered |
|
trademark of Hewlett-Packard Company. Novell is a registered trademark of Novell, Inc. ProComm Plus |
|
for Windows is a registered trademark of DataStorm Corporation. Crosstalk for Windows is a registered |
|
trademark of Attachmate Corporation. |
|
Other brand and product names may be registered trademarks or trademarks of their respective holders. |
|
The software contained in this product may contain encrypted product which may not be |
|
exported or transferred from the U.S. or Canada without an approved U.S. Department of |
|
Commerce export license. |
|
Printed on recycled paper. |
ii

CONTENTS
ABOUT THIS GUIDE
|
Conventions 7 |
|
|
Year 2000 Compliance |
8 |
|
|
|
1 OVERVIEW |
|
|
|
Upgrade Tools and Process |
9 |
|
How the Utilities Work |
10 |
Primary, Secondary, and Test Boot Sources 10
Automatic or Manual Recovery 10
Rules and Support Limitations 11
Take Time to Plan 11
2 INSTALLING THE UTILITIES ON A NETWORK MANAGEMENT STATION
Installing the Utilities on a Windows System 13
Installing the Utilities on a UNIX System 14
Preparing for the Installation |
14 |
Procedure 14 |
|
Setting up for Auto Startup |
16 |
3 PLANNING AND PREPARING THE UPGRADE
Setting up for TFTP File Transfers |
17 |
|
Setting up for FTP File Transfers |
17 |
|
Automatic Recovery 18 |
|
|
Manual Recovery |
19 |
|
Checking DRAM |
20 |
|
Checking Flash Memory 20
Checking the Software Version 21
Planning Tables 21
4 UPGRADING USING THE NETBUILDER UPGRADE LINK APPLICATION
Status and Settings Pages |
27 |
Settings Page 28 |
|
Verifying for Upgrading |
29 |
Installing Software on the NMS 29
Procedure 30
Upgrading Software 31

5 UPGRADING A BRIDGE/ROUTER USING THE COMMAND-LINE UTILITIES
|
Preparing for the Upgrade |
35 |
|
|
|
|
|
|
|
Setting up for TFTP File Transfers |
36 |
|
|
||||
|
Setting up for FTP File Transfers |
|
36 |
|
|
|||
|
Prediagnosing System Problems |
37 |
|
|
|
|
||
|
Installing the Software on the NMS |
37 |
|
|
|
|||
|
Software Directories |
38 |
|
|
|
|
|
|
|
Using the Bcmsysupgrade Utility to Upgrade |
39 |
|
|||||
|
Filenames 40 |
|
|
|
|
|
|
|
|
NETBuilder II Bridge/Router |
40 |
|
|
|
|||
|
SuperStack II NETBuilder and OfficeConnect NETBuilder Bridge/Routers 41 |
|||||||
|
PathBuilder S5xx Series Switch |
41 |
|
|
||||
|
Upgrading Software Only |
41 |
|
|
|
|
|
|
|
Automatic Recovery |
41 |
|
|
|
|
|
|
|
Manual Recovery |
43 |
|
|
|
|
|
|
|
If the Bridge/Router or Switch Does Not Boot |
44 |
||||||
|
Upgrading Hardware and Software |
44 |
|
|
|
|||
|
Automatic Recovery |
44 |
|
|
|
|
|
|
|
Manual Recovery |
47 |
|
|
|
|
|
|
|
If the Bridge/Router or Switch Does Not Boot |
49 |
||||||
|
|
|
||||||
6 UPGRADING THE SOFTWARE IMAGE ONLY |
|
|||||||
|
Preparing for the Upgrade |
51 |
|
|
|
|
|
|
|
Setting up for TFTP File Transfers |
52 |
|
|
||||
|
Setting up for FTP File Transfers |
52 |
|
|
|
|||
|
Using Upgrade Link |
53 |
|
|
|
|
|
|
|
Verifying the Bridge/Router for Upgrading |
54 |
|
|||||
|
Upgrading the Image |
54 |
|
|
|
|
|
|
|
Using the Command-Line Utilities |
57 |
|
|
|
|||
|
Installing the NETBuilder Software |
57 |
|
|
||||
|
Prediagnosing System Problems |
57 |
|
|
|
|||
|
Upgrading Using Automatic Recovery |
57 |
|
|
||||
|
Upgrading Using Manual Recovery |
|
58 |
|
|
|||
|
Using the Enterprise OS User Interface |
|
59 |
|
|
|||
|
|
|
||||||
7 BACKING UP AND RESTORING SOFTWARE |
|
|||||||
|
Setting Up for TFTP File Transfers |
62 |
|
|
||||
|
Setting Up for FTP File Transfers |
62 |
|
|
|
|||
|
Backing Up the Software |
63 |
|
|
|
|
|
|
|
Using NETBuilder Upgrade Link |
63 |
|
|
|
|||
|
Using the Command Line Utilities |
63 |
|
|
||||
|
Verifying the Device for Backing Up |
63 |
|
|
||||
|
Backing Up the Software |
64 |
|
|
|
|
||
|
Using the Command-Line 64 |
|
|
|
|
|||
|
Prediagnosing System Problems |
64 |
|
|
||||
|
Backing Up the Software |
65 |
|
|
|
|
||
|
Directory Paths |
65 |
|
|
|
|
|
||
|
Restoring Software from a Backup |
66 |
|
|
|
||||
|
Configuring IP Routing 66 |
|
|
|
|
||||
|
Configuring SNMP 66 |
|
|
|
|
|
|||
|
Mapping Hostnames Using the etc/snmp.cfg File |
67 |
|||||||
|
Restoring the Software Using Upgrade Link |
68 |
|
||||||
|
Verifying the Device for Restoring |
68 |
|
|
|||||
|
Restoring the Software |
68 |
|
|
|
|
|||
|
Restoring the Software Using the Command-Line |
69 |
|||||||
|
Prediagnosing System Problems |
69 |
|
|
|||||
|
Restoring the Software |
69 |
|
|
|
|
|||
|
|
||||||||
8 REFERENCE FOR THE UPGRADE MANAGEMENT UTILITIES |
|||||||||
|
Accessing and Downloading the Utilities |
71 |
|
|
|||||
|
Downloading the Utilities |
71 |
|
|
|
|
|||
|
Downloading UNIX Files |
71 |
|
|
|
||||
|
Downloading Windows Files |
71 |
|
|
|
||||
|
Update Log File |
72 |
|
|
|
|
|
||
|
Utility Descriptions and Syntax |
72 |
|
|
|
|
|||
|
Overview |
|
72 |
|
|
|
|
|
|
|
Getting Help |
73 |
|
|
|
|
|
||
|
bcmbackup |
73 |
|
|
|
|
|
||
|
bcmconfig |
74 |
|
|
|
|
|
|
|
|
bcmctrl |
75 |
|
|
|
|
|
|
|
|
bcmdf |
76 |
|
|
|
|
|
|
|
|
bcmdiagnose |
77 |
|
|
|
|
|
||
|
bcminstall |
78 |
|
|
|
|
|
|
|
|
bcmloadconfig |
79 |
|
|
|
|
|
||
|
bcmnbrus |
80 |
|
|
|
|
|
|
|
|
bcmrestore |
80 |
|
|
|
|
|
||
|
bcmsetup |
81 |
|
|
|
|
|
|
|
|
bcmsysupgrade |
81 |
|
|
|
|
|
||
|
bcmuname |
82 |
|
|
|
|
|
||
|
bcmupdate |
83 |
|
|
|
|
|
||
|
UpgradeLink 84 |
|
|
|
|
|
|||
|
|
|
|
|
|
|
|||
A TROUBLESHOOTING |
|
|
|
|
|
||||
|
Getting Help |
|
85 |
|
|
|
|
|
|
|
Man Pages |
85 |
|
|
|
|
|
||
|
HTML Help |
85 |
|
|
|
|
|
||
|
General Troubleshooting Error Messages |
85 |
|
|
|||||
|
Return Codes from bcmdiagnose |
86 |
|
|
|
||||
|
Hardware-Related Messages |
87 |
|
|
|
|
|||
|
Installation Troubleshooting Messages |
87 |
|
|
|||||
|
Installing the Enterprise OS Upgrade Management Utilities 87 |
||||||||
|
Determining Connectivity |
88 |
|
|
|
|
|||
|
Validating the SNMP Service Configuration |
88 |
|
||||||

|
Testing the NMS/ TFTP Configuration |
89 |
|
|||||
|
Creating an Upgrade File |
89 |
|
|
|
|
||
|
Uploading an Upgrade File |
90 |
|
|
|
|
||
|
Downloading an Upgrade File |
91 |
|
|
||||
|
|
|
|
|||||
B CHOOSING A SOFTWARE PACKAGE |
|
|
||||||
|
NETBuilder II Upgrade Migration Path |
93 |
|
|
||||
|
SuperStack II NETBuilder Upgrade Migration Path |
96 |
||||||
|
SuperStack II NETBuilder SI Upgrade Migration Path |
98 |
||||||
|
OfficeConnect NETBuilder Upgrade Migration Path |
99 |
||||||
|
PathBuilder Upgrade Migration Path |
101 |
|
|
||||
|
|
|||||||
C MOUNTING THE CD-ROM ON A UNIX PLATFORM |
||||||||
|
Mounting the CD-ROM on Solaris 2.5.x |
|
103 |
|
||||
|
Mounting a Local CD-ROM Drive |
103 |
|
|
||||
|
Mounting from a Remote CD-ROM Drive |
103 |
|
|||||
|
Mounting the CD-ROM on HP-UX 10.x |
|
105 |
|
||||
|
Mounting from a Local CD-ROM Drive |
|
105 |
|
||||
|
Mounting from a Remote CD-ROM Drive |
105 |
|
|||||
|
Mounting the CD-ROM on IBM AIX 4.1.x Through 4.2.x 106 |
|||||||
|
Mounting from a Local CD-ROM Drive |
|
106 |
|
||||
|
Mounting from a Remote CD-ROM Drive |
106 |
|
|||||
|
Unmounting the CD-ROM |
107 |
|
|
|
|
|
|
|
|
|
|
|
|
|
|
|
D TECHNICAL SUPPORT |
|
|
|
|
|
|
||
|
Online Technical Services |
109 |
|
|
|
|
|
|
|
World Wide Web Site |
109 |
|
|
|
|
|
|
|
3Com Knowledgebase Web Services |
109 |
|
|||||
|
3Com FTP Site |
109 |
|
|
|
|
|
|
|
3Com Bulletin Board Service |
110 |
|
|
|
|
||
|
Access by Analog Modem |
110 |
|
|
|
|||
|
Access by Digital Modem |
110 |
|
|
|
|
||
|
3Com Facts Automated Fax Service |
|
110 |
|
||||
|
Support from Your Network Supplier |
110 |
|
|
||||
|
Support from 3Com |
111 |
|
|
|
|
|
|
Returning Products for Repair 112
GLOSSARY
INDEX
3COM CORPORATION LIMITED WARRANTY
ABOUT THIS GUIDE
This guide describes how to upgrade your NETBuilder® bridge/router to Enterprise OS software version 11.3. This guide also describes how to upgrade your PathBuilder™ S5xx series switch to Enterprise OS software version 11.3.
You can also use this guide to upgrade your NETBuilder bridge/router to previous software versions (8.0 through 11.2) by specifying the correct options.
You can upgrade your bridge/router from software version 8.0 through 11.2 to any software version after 8.0 through 11.3 on the following platforms:
■NETBuilder II® bridge/router with DPE
■NETBuilder II bridge/router with CEC — The CEC module is not supported after software version 10.1, but you can use the 11.2 utilities to upgrade a CEC module to a DPE module, or to upgrade the CEC module to software version 10.1 or earlier.
■SuperStack® II NETBuilder SI bridge/router
■SuperStack II NETBuilder Token Ring bridge/router
■OfficeConnect® NETBuilder bridge/router
You can upgrade your PathBuilder S5xx series switch to Enterprise OS software version 11.3 from version 11.1.1 and version 11.2.
This guide also describes how to complete an image-only upgrade for patches, new packages, or software recovery. It also describes how to backup and restore software on a network management station.
See the Enterprise OS Software Version 11.3 Release Notes for any changes or additions to the information in this guide.
Conventions |
Table 1 and Table 2 list conventions that are used throughout this guide. |
||
|
Table 1 |
Notice Icons |
|
|
|
|
|
|
Icon |
Notice Type |
Description |
|
|
|
|
|
|
Information note |
Important features or instructions |
|
|
Caution |
Information to alert you to potential damage to a |
|
|
|
program, system, or device |
|
|
Warning |
Information to alert you to potential personal injury |
|
|
|
|

8 ABOUT THIS GUIDE
Table 2 Text Conventions
Convention |
Description |
|||
|
|
|
|
|
Syntax |
The word “syntax” means you must evaluate the syntax provided and |
|||
|
|
|
|
supply the appropriate values. Placeholders for values you must supply |
|
|
|
|
appear in angle brackets. Example: |
|
|
|
|
Enable RIPIP using: |
|
|
|
|
SETDefault !<port> -RIPIP CONTrol = Listen |
|
|
|
|
In this example, you must supply a port number for <port>. |
|
|
|
|
|
Commands |
The word “command” means you must enter the command exactly as |
|||
|
|
|
|
shown in text and press the Return or Enter key. Example: |
|
|
|
|
To remove the IP address, enter: |
|
|
|
|
SETDefault !0 -IP NETaddr = 0.0.0.0 |
|
|
|
|
This guide always gives the full form of a command in uppercase and |
|
|
|
|
|
|
|
|
|
lowercase letters. However, you can abbreviate commands by entering |
|
|
|
|
only the uppercase letters and the appropriate value. Commands are |
|
|
|
|
|
|
|
|
|
|
|
|
|
|
not case-sensitive. |
|
|
|
|
|
Screen displays |
This typeface represents information as it appears on the screen. |
|||
|
|
|
|
|
The words “enter” |
When you see the word “enter” in this guide, you must type |
|||
and “type” |
something, and then press the Return or Enter key. Do not press the |
|||
|
|
|
|
Return or Enter key when an instruction simply says “type.” |
|
|
|
|
|
[Key] names |
Key names appear in text in one of two ways: |
|||
|
|
|
|
■ Referred to by their labels, such as “the Return key” or “the Escape |
|
|
|
|
key” |
|
|
|
|
■ Written with brackets, such as [Return] or [Esc]. |
|
|
|
|
If you must press two or more keys simultaneously, the key names are |
|
|
|
|
linked with a plus sign (+). Example: |
|
|
|
|
Press [Ctrl]+[Alt]+[Del]. |
|
|
|
|
|
Menu commands |
Menu commands or button names appear in italics. Example: |
|||
and buttons |
From the Help menu, select Contents. |
|||
|
|
|
|
|
|
|
|
|
|
Words in italicized |
Italics emphasize a point or denote new terms at the place where they |
|||
type |
are defined in the text. |
|||
|
|
|
|
|
Year 2000 Compliance For information on Year 2000 compliance and 3Com products, visit the 3Com Year 2000 Web page:
http://www.3com.com/products/yr2000.html

OVERVIEW
1
|
This chapter provides an overview of the upgrade tools, process, and support |
|
limitations. |
|
|
Upgrade Tools and |
The upgrade procedures in this guide use the Enterprise OS Upgrade Management |
Process |
Utilities on a UNIX or Windows network management station (NMS). |
Definition of network |
An NMS is a UNIX or Windows system that has a TFTP/FTP server running in |
management station |
addition to software, such as the Enterprise OS Upgrade Management Utilities, to |
|
manage your network. For Windows, the utilities include the 3Com® TFTP/FTP |
|
server. |
|
If you are upgrading multiple bridge/routers, you can install and use the Network |
|
Admin Tools utilities in the Transcend® Enterprise Manager or Transcend Network |
|
Control Services, available separately. See the Transcend user guide for more |
|
information. |
|
You can use the NETBuilder Upgrade Link application that comes with the utilities |
|
provides an easy to use graphical user interface (GUI) to upgrade one or more |
|
bridge/routers. Or you can access the utilities directly using the command-line. |
|
When upgrading multiple bridge/routers simultaneously using command line |
|
utilities, the topology of the network should be considered and the bridge/routers |
|
should be upgraded in a sequence that will not disrupt the network. |
|
If you are performing an image-only upgrade, you can use the utilities or |
|
applications, or you can copy the software manually using the Enterprise OS user |
|
interface. |
|
The utilities are shipped with your software package on a CD-ROM and must be |
|
installed on an NMS on the same network as the bridge/router. You can also |
|
download the utilities from the 3Com web, FTP, or BBS sites. |
The utilities run on the following operating systems:
■Solaris 2.x
■HP-UX 10.x
■IBM AIX 4.x or later
■Windows NT 4.x
■Windows 95/98
10 CHAPTER 1: OVERVIEW
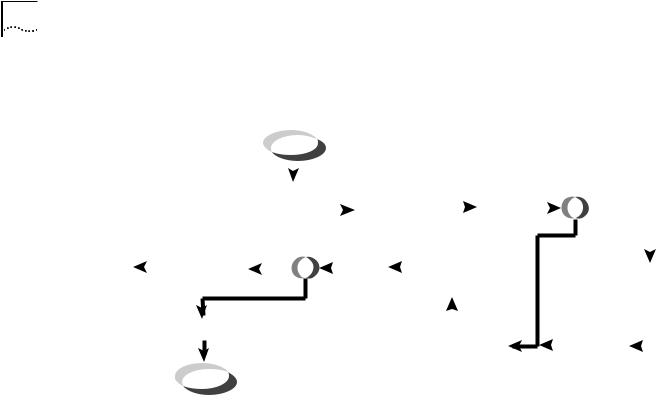
Figure 1 shows the typical upgrade process.
Figure 1 Upgrade Process
Begin
|
|
|
|
|
|
|
|
|
|
|
|
|
|
|
|
|
|
|
|
|
|
|
|
|
|
|
Is hardware |
|||||||||
|
|
|
|
|
|
|
|
|
|
|
|
|
Back up config |
|
|
|
|
|
|
|
upgrade |
|||||||||||||||
|
|
|
|
|
|
|
|
|
|
|
|
|
|
|
|
|
|
|
||||||||||||||||||
|
|
|
|
|
|
|
|
|
|
|
|
|
and boot files |
|
|
|
|
|
|
required? |
||||||||||||||||
|
|
|
|
|
|
|
Install software |
|
|
from bridge/router |
|
|
Update |
|
|
|
Yes |
|||||||||||||||||||
|
|
|
|
|
|
|
|
and utilities |
|
|
to NMS |
|
|
config files |
|
? |
|
|
|
|
|
|
||||||||||||||
|
|
|
|
|
|
|
|
|
|
|
|
|
|
|
|
|
|
|
||||||||||||||||||
|
|
|
|
|
|
|
|
on NMS* |
|
|
|
|
|
|
|
|
|
|
|
|
|
|
|
|
|
|
No |
|
||||||||
|
|
|
|
|
|
|
|
Accept |
|
|
|
|
|
|
|
|
|
|
|
|
|
|
|
|
|
|
|
|||||||||
|
|
|
|
|
|
|
|
|
|
|
|
|
|
|
|
|
|
|
|
|
|
|
|
|
|
|
|
|
|
|
|
|
|
|||
|
|
|
|
|
If hardware |
|
|
upgrade? |
|
|
|
|
|
|
|
|
|
|
|
|
|
|
|
|
|
|
|
|
|
|
|
|
|
|
||
|
Restore old |
|
|
upgrade, reinstall |
|
|
No |
? |
|
|
Verify |
|
|
|
Reboot bridge/router, |
|
|
|
|
|
|
|
|
|
|
|
||||||||||
|
software |
|
|
|
|
|
|
|
|
|
|
|
|
|
|
|
|
Perform |
||||||||||||||||||
|
|
|
old hardware |
|
|
Reject Yes |
|
upgrade |
|
|
|
test software images |
|
|
|
|
|
|
||||||||||||||||||
|
version |
|
|
|
|
|
|
|
|
|
|
|
|
|
and config files |
|
|
|
|
|
|
hardware |
||||||||||||||
|
|
|
|
|
|
|
|
|
|
|
|
|
|
|
|
|
|
|
|
|
|
|
|
|
|
|
|
|
|
|
|
upgrade |
||||
|
|
|
|
|
|
|
|
|
|
|
|
|
|
|
|
|
|
|
|
|
|
|
|
|
|
|
|
|
|
|
|
|
|
|||
|
|
|
|
|
Do final cleanup |
|
|
|
|
|
|
|
|
|
|
|
|
|
Copy config |
|
|
|
|
|
|
|
|
|
|
|
||||||
|
|
|
|
|
|
|
|
|
|
|
|
|
|
|
|
|
|
|
|
|
Reset IP |
|
|
|
||||||||||||
|
|
|
|
|
|
|
|
|
|
|
|
|
|
|
|
|
|
|
and boot files |
|
|
|
|
config and |
|
|
|
|||||||||
|
|
|
|
|
|
|
|
|
|
|
|
|
|
|
|
|
|
|
to bridge/router |
|
|
|
|
|
|
|
|
|
||||||||
|
|
|
|
|
|
|
|
|
|
|
|
|
|
|
|
|
|
|
|
|
|
|
SNMP |
|
|
|
||||||||||
|
|
|
|
|
Done! |
|
|
*NMS = network management station |
|
|
|
|
|
|
|
|
|
|
|
|
|
|
||||||||||||||
|
|
|
|
|
|
|
|
|
|
|
|
|
|
|
|
|
|
|
|
|
|
|||||||||||||||
How the Utilities Work The software on your bridge/router or switch consists of a bootable image file and configuration files that store all your settings. The Enterprise OS Upgrade Management Utilities update all your software files after copying them to a UNIX or Windows NMS. Because the upgrade occurs on a copy of the files on the NMS, the bridge/router remains operational during the upgrade. The utilities then copy the new image and updated files back to the bridge/router.
Primary, Secondary, and Test Boot Sources
The NETBuilder bridge/router or PathBuilder switch boots from a default directory, called the primary boot source, which can be set using the SysconF command in the Enterprise OS user interface. If you have more than one set of boot images, you can specify a backup directory, called the secondary boot source. There is also a test boot source, which the utilities use to test a new upgrade before making it the primary boot source. Because the boot sources are only pointers to particular directories, the utilities can dynamically change the boot sources without having to move any files.
Automatic or Manual Recovery
If your switch or bridge/router has enough flash memory, you can have both sets of software: the old version and the new version. After a successful test boot with the new software, the primary boot source is changed to the new version. If the test boot is not successful, the system automatically reboots with the old version. Dual-image support is described in the procedures for automatic recovery.
If you have only enough flash memory for the new version, you can still recover the old version from the NMS using the utilities. Single-image support is described in the procedures for manual recovery.
For memory requirements for automatic or manual recovery, see Chapter 3.
Rules and Support Limitations |
11 |
Rules and Support
Limitations
Before planning your upgrade, refer to the following rules and support limitations:
■The utilities do not support Remote Boot and Configuration Services (RBCS) or network booting.
■Upgrades from NETBuilder bridge/routers running version 7.x, or earlier, are not supported.
■You cannot upgrade to a different platform. For example, you can only upgrade an OfficeConnect® bridge/router to an OfficeConnect bridge/router. You cannot upgrade a SuperStack® II NETBuilder bridge/router to a SuperStack II NETBuilder SI bridge/router. The only exception is an upgrade from a NETBuilder II® CEC module to a DPE module.
Take Time to Plan |
Because networks today have become increasingly complex, upgrading your |
|
network requires a systematic approach. 3Com recommends that you plan your |
|
upgrade carefully before implementing it. See Chapter 3 to plan your upgrade. |

12 CHAPTER 1: OVERVIEW

INSTALLING THE UTILITIES ON A
2 NETWORK MANAGEMENT STATION
Before you start the upgrade process, you must install the Enterprise OS Upgrade Management Utilities on a network management station (NMS). If you are using Transcend Enterprise Manager or Transcend Network Control Services, which has the utilities bundled, you should install the latest utilities to take advantage of new features and version support.
This chapter describes how to install the Enterprise OS Upgrade Management
Utilities on the following platforms:
■Solaris 2.x
■HP-UX 10.x
■IBM AIX 4.x or later
■Windows NT 4.x
■Windows 95/98
Installing the Utilities You can install the utilities from a CD-ROM or from utilities that you have
on a Windows System downloaded to your hard disk. To install the utilities on a Windows system, follow these steps:
1If you have installed utilities before or have Transcend, check the version by entering:
bcmdiagnose
If the version is earlier than 11.3, continue to the next step. If you already have 11.3, you do not need to reinstall the utilities.
2Change to the utilities directory.
■ If you are using the CD-ROM:
aInsert the CD-ROM into the CD-ROM drive.
bOpen a command window.
cChange to the CD-ROM directory.
For example, if E is the drive letter for the CD-ROM, enter:
E:
3If you download the utilities to your hard disk (see Chapter 8 for information about downloading the utilities):
a Decompress the utilities.
b Open a command window.
c Change to the utilities directory using:
<drive>:\<path>\
14 CHAPTER 2: INSTALLING THE UTILITIES ON A NETWORK MANAGEMENT STATION
4 Run the setup program for Windows:
■To install all packages, including the utilities and package definitions for use with Transcend if required, use:
bcmsetup <drive>: all
Where <drive> is the drive you want to install the utilities on.
The packages install in the default directory \usr\3Com\bcm\, and the following paths are added to the autoexec.bat file:
<drive>:\usr\3com\bcm\bin\
<drive>:\usr\3com\common\bin\
5Reboot your system to use the path, which is required for all utility commands. Or, if you do not want to reboot, you can enter the path manually at the command prompt:
<drive>:\usr\3com\common\data\profile
6 Use the bcmdiagnose utility to ensure that your installation is correct by entering:
bcmdiagnose
Installing the Utilities on a UNIX System
Preparing for the
Installation
You can install the utilities from a CD-ROM or from utilities that you have downloaded to your hard disk.
Before installing the utilities, verify the following items:
■ Your NMS is running one of the supported operating systems.
Check the operating system you are running by entering:
uname -a
The version message may refer to Solaris 2.5 as SunOS 5.5.
■You need to upgrade utilities you have already installed. The utilities come bundled with Transcend. To check the version, enter:
bcmdiagnose
■Your root password on the NMS (UNIX only).
■Your NMS is running a TFTP/FTP server.
Procedure To install the utilities on a UNIX system, follow these steps:
1Log on as root.
2Change to the utilities directory.
■ If you are using the CD-ROM:
aMount the CD-ROM.
For more information on mounting instructions for each supported UNIX operating system, see Appendix C.
bChange to the appropriate directory on the CD-ROM for your operating system using:
cd /<cd-rom path>/<os>
Where <os> is the directory for your operating system:

Installing the Utilities on a UNIX System 15
Table 1 UNIX Directories
Operating System |
Directory Name |
|
|
Solaris 2.5.x |
sunos5 |
HP-UX 10.x |
HP_UX |
IBM AIX 4.1.x, 4.2x |
aix |
■If you download the utilities to your hard disk (see Chapter 8 for information about downloading the utilities):
aDecompress the utilities.
bChange to the utilities directory on your hard disk using:
cd /<path>/
3 Run the setup program.
■To install all packages from the CD-ROM, including the utilities and package definitions for use with Transcend, enter:
./bcmsetup all
■ To install only the upgrade utilities, enter:
./bcmsetup bcm
The utilities are installed in the default directory /usr/3Com/bcm/.
If you are working in an HP-UX operating system, the bcmsetup command must be uppercase, that is, BCMSETUP. The options that follow remain lowercase.
4Complete the following step for your UNIX shell:
■For a C-shell installation, add the contents of the following file to the .cshrc file for each user you want to have access to the utilities, including root:
/usr/3Com/common/data/.login-bcm
Or you can enter the path after every logon:
source /usr/3Com/common/data/.login-bcm
■For a Bourne shell installation, add the contents of the following file to the
.profile file for each user you want to have access to the utilities, including root: /usr/3Com/common/data/.profile-bcm
Or you can enter the path after every logon:
. /usr/3Com/common/data/.profile-bcm
5 Return to normal privilege by entering:
exit
6 Use the bcmdiagnose utility to ensure that your installation is correct by entering:
bcmdiagnose

16 CHAPTER 2: INSTALLING THE UTILITIES ON A NETWORK MANAGEMENT STATION
Setting up for Auto On a UNIX NMS, after you have completed the previous setup procedures you Startup need to set up the BootP server.
To set up the BootP server, enter:
bcmsteup -bootp
This command does not need to be used when you are operating on a
Windows 95/98/NT-based NMS.

PLANNING AND PREPARING THE
3 UPGRADE
This chapter describes setting up a file transfer method, choosing automatic or manual recovery, checking the required memory for each package, including instructions for checking the memory, and provides planning tables to copy and fill out for each bridge/router.
If you are upgrading multiple bridge/routers using Transcend Enterprise Manager or Transcend Network Control Services, or are using the command-line utilities, you should make sure each bridge/router has enough flash memory and DRAM for the software package you have chosen. The Upgrade Link application automatically checks the memory of the bridge/router.
For a list of all software packages and the recommended upgrade path for your version, see Appendix B.
Setting Up a File |
You can choose to transfer files using FTP or TFTP. |
Transfer Method |
|
Setting up for TFTP File To use TFTP, you need to set up your NMS in preparation for TFTP file transfers.
Transfers
Make sure your TFTP server is running. On a Windows workstation, 3Com’s 3CServer is shipped along with the utilities. Upgrade Link launches 3CServer during start up.
Specify the -tftp flag in all command line utilities which use file transfers (bcmsysupgrade, bcmbackup, bcmrestore) if you want to use TFTP file transfer. For example, to specify TFTP file transfer use:
bcmsysupgrade -s:from_nb -tftp <device>
If neither flag is used, TFTP is used by default for software release 11.0 and lower, but FTP is used by default for software release 11.1 and higher. If the -ftp flag is specified on a bridge/router running software version 11.0 or lower, the FTP password is overwritten with the following text string:
****
Setting up for FTP File To use FTP, you need to set up your NMS in preparation for FTP file transfers.
Transfers
For Upgrade Link, the user name and password is specified in the Setting Page, as shown on page 23.
18 CHAPTER 3: PLANNING AND PREPARING THE UPGRADE
On a UNIX NMS, follow these steps:
1Create a user on your system with /tftpboot as the home directory.
2When using the upgrade utilities via the command line or the Transcend Upgrade Manager, specify this user name and password in the BCMFTPUSER and BCMFTPPASS environment variables.
Specify the -ftp flag in all command line utilities that use file transfers (bcmsysupgrade, bcmbackup, bcmrestore) if you want to use FTP file transfer. For example, to specify FTP file transfer use:
bcmsysupgrade -s:from_nb -ftp <device>
If no flag is used, TFTP is used by default for software release 11.0 and lower, but FTP is used by default for software release 11.1 and higher. If the -ftp flag is specified on a bridge/router running software version 11.0 or lower, the FTP password is overwritten with the following text string:
****
On a Windows NMS, follow these steps:
1Create a user in 3Com’s 3CServer FTP settings.
2When using the upgrade utilities via command line or the Transcend Upgrade Manager, specify the ftp user name and password in the BCMFTPUSER and BCMFTPPASS environment variables.
You can specify the -ftp flag in the utilities (bcmsysupgrade, bcmbackup, bcmrestore) if you want to use FTP file transfer.
If no flag is used, TFTP is used by default for software release 11.0 and lower, but FTP is used by default for software release 11.1 and higher. If the -ftp flag is specified on a bridge/router running software version 11.0 or lower, the FTP password is overwritten with the following text string:
****
Choosing Automatic If you have enough flash memory for dual-image support, complete your upgrade Recovery or Manual using automatic recovery. If you have only enough memory for single-image Recovery support, complete the upgrade using manual recovery. The following sections
describe the difference between automatic and manual recovery and the memory requirements for each platform.
Automatic Recovery The default upgrade procedure uses automatic recovery. After backing up the current software to the network management station (NMS), the new software is copied into a test directory while the current software remains in the primary directory. If you accept the upgrade after booting from the test directory, the new software becomes the primary boot source, and the old software becomes the secondary boot source.
If you are upgrading your hardware as well as the software, the procedure for automatic recovery saves the software package that was originally on the new hardware as the secondary boot source.

19
Manual Recovery An upgrade with manual recovery (using the -m option with the bcmsysupgrade utility) formats the flash memory after backing up the current software, then copies the upgraded files to the bridge/router. If the upgrade is not successful, you must restore the software from the NMS.
If you are upgrading your hardware as well as the software, you can easily recover your old hardware if the upgrade is not successful. However, because you erased the flash memory on the new hardware, you will need to restore the original software from the NMS if you want to return the new hardware to its original state.
Table 2 lists the memory requirements for each software package on the platform you are upgrading to. If you are upgrading to an earlier version of software, see the guides that came with that version for the memory requirements.
Table 2 Version 11.2 Software Packages
|
|
|
Flash Memory Required for: |
||
Software Package |
Model |
DRAM Required |
Automatic Recovery |
Manual Recovery |
|
|
|
|
|
||
NETBuilder II with DPE: |
|
|
(The standard flash memory card from 3Com |
||
|
|
|
is 20 MB) |
|
|
(AC) - APPN/Connection Services |
DPE |
All DPE modules |
40 MB |
20 MB |
|
(DW) - Multiprotocol Router |
DPE |
ship with enough |
40 MB |
20 MB |
|
DRAM for all |
|||||
|
|
|
|
||
|
|
software packages. |
|
|
|
(DE) - Multiprotocol Router with |
DPE |
All DPE modules |
40 MB |
20 MB |
|
56-bit Encryption |
|
ship with enough |
|
|
|
|
|
DRAM. |
|
|
|
(DS) - Multiprotocol Router with |
DPE |
|
40 MB |
20 MB |
|
128-bit Encryption |
|
|
|
|
|
|
|
|
|
|
|
SuperStack II NETBuilder Token Ring: |
|
|
|
|
|
(TE) - Multiprotocol Router with |
327, 527 |
12 MB |
8 MB |
4 MB |
|
Encryption |
|
|
|
|
|
|
|
|
|
|
|
SuperStack II NETBuilder SI: |
|
|
|
|
|
(NW) - IP/IPX/AT Router |
432, 442, 452, 462 All SuperStack II NETBuilder SI bridge/routers ship with enough |
||||
|
532, 542, 552, 562 DRAM (16 MB) and flash memory (8 MB) for automatic recovery. |
||||
(BF) - Boundary Router |
433, 443, 453, 463 |
|
|
|
|
|
533, 543, 553, 563 |
|
|
|
|
(CF) - Multiprotocol Router |
437, 447, 457, 467 |
|
|
|
|
|
537, 547, 557, 567 |
|
|
|
|
(AX) - APPN/Connection Services |
438, 448, 458, 468 |
|
|
|
|
|
538, 548, 558, 568 |
|
|
|
|
(NE) - IP/IPX/AT Router with 56-bit |
432, 442, 452, 462 |
|
|
|
|
Encryption |
532, 542, 552, 562 |
|
|
|
|
(NS) - IP/IPX/AT Router with 128-bit |
432, 442, 452, 462 |
|
|
|
|
Encryption |
532, 542, 552, 562 |
|
|
|
|
(CE) - Multiprotocol Router with |
437, 447, 457, 467 |
|
|
|
|
56-bit Encryption |
537, 547, 557, 567 |
|
|
|
|
(CS) Multiprotocol Router with |
437, 447, 457, 467 |
|
|
|
|
128-bit Encryption |
537, 547, 557, 567 |
|
|
|
|
|
|
|
|
|
|

20 CHAPTER 3: PLANNING AND PREPARING THE UPGRADE
Table 2 Version 11.2 Software Packages (continued)
|
|
|
Flash Memory Required for: |
||
Software Package |
Model |
DRAM Required |
Automatic Recovery |
Manual Recovery |
|
|
|
|
|
|
|
OfficeConnect NETBuilder: |
|
|
|
|
|
(FD) - FRAD |
120 |
8 MB |
4 MB |
4 MB |
|
(NW) - IP/IPX/AT Router |
112, 122, 132, 142 |
8 MB |
4 MB |
4 |
MB for 132 |
|
|
|
|
2 |
MB for all others |
(BF) - Boundary Router |
113, 123, 143 |
8 MB |
8 MB |
4 |
MB |
(OF) - Multiprotocol Router |
117, 127, 137, 147 |
12 MB |
8 MB |
4 |
MB |
(AF) - APPN |
116, 126, 146 |
12 MB |
8 MB |
4 |
MB |
(NE) - IP/IPX/AT Router with 56-bit |
112, 122, 132, 142 |
8 MB |
4 MB |
4 |
MB for 132 |
Encryption |
|
|
|
2 |
MB for all others |
|
|
|
|
||
(NS) - IP/IPX/AT Router with 128-bit |
112, 122, 132, 142 |
8 MB |
4 MB |
4 |
MB for 132 |
Encryption |
|
|
|
2 |
MB for all others |
|
|
|
|
||
(VE) - VPN IP/IPX/AT Router with |
115, 125, 135, 145 |
8 MB |
8 MB |
4 |
MB |
Quick Step VPN and 56-bit |
|
|
|
|
|
Encryption |
|
|
|
|
|
(OE) - Multiprotocol Router with |
117, 127, 137, 147 |
12 MB |
8 MB |
4 |
MB |
56-bit Encryption |
|
|
|
|
|
(OS) - Multiprotocol Router with |
117, 127, 137, 147 |
12 MB |
8 MB |
4 |
MB |
128-bit Encryption |
|
|
|
|
|
(VW)- Multiprotocol Rou;r |
147 |
12 MB |
8 MB |
4MB |
|
|
|
|
|
|
|
PathBuilder S5xx Switch |
|
|
|
|
|
(PW) - Multiprotocol Router |
S500, S580, S593, |
160 MB |
16 MB |
4 |
MB |
|
S594 |
|
|
|
|
(PE) - Multiprotocol Router with |
S500, S580, S593, |
160 MB |
16 MB |
4 |
MB |
56-bit Encryption |
S594 |
|
|
|
|
(PS) - Multiprotocol Router with |
S500, S580, S593, |
160 MB |
16 MB |
4 |
MB |
128-bit Encryption |
S594 |
|
|
|
|
|
|
|
|
|
|
Checking DRAM To check how much DRAM you have installed on the switch or bridge/router, on the NMS use:
bcmuname -M <device>
Where <device> is the IP address or hostname of the switch or bridge/router.
Checking Flash Memory To check how much flash memory you have installed on the switch or bridge/router, on the NMS use:
bcmdf <device>[:<drive:>]
Where <device> is the hostname or the IP address of the switch or bridge/router.
Specify drive A for NETBuilder II bridge/routers or PathBuilder switches.
Do not specify a drive for SuperStack II or OfficeConnect bridge/routers.
|
Checking the Software Version 21 |
|
|
Checking the |
To display the current software version and package you are running, use the |
Software Version |
bcmuname utility on the NMS: |
|
bcmuname -R <device> |
|
Where <device> is the IP address or hostname of the bridge/router. |
|
To display the current software version and package using the Enterprise OS user |
|
interface, enter: |
|
SHow -SYS VERSion |
|
|
Planning Tables |
Photocopy the following planning tables, and fill out background information |
|
about your bridge/routers before starting the upgrade process. The NETBuilder II |
|
table is on page 22. The SuperStack II NETBuilder, SuperStack II NETBuilder SI, |
|
OfficeConnect NETBuilder, and PathBuilder switch table is on page 23. |
|
If you are upgrading both software and hardware, write down the information for |
|
the new hardware. For example, if you are replacing a CEC 20 with a DPE module, |
|
write down the information for the DPE module. |

NETBuilder II Planning Table
|
Flash |
IP Address or Name |
Memory |
|
|
10.1.3.24 |
20 |
|
MB |
|
|
|
|
|
|
|
|
|
|
|
|
|
|
|
|
|
|
|
|
Planning Tables |
22 |
|
|
|
|
|
Check each appropriate option to use with the command-line utilities: |
|||
forMemory Flash Enough Recovery?Automatic |
forMemory Flash Enough Recovery?Manual |
VersionFirmware Only: CEC only)upgrade 3.10-(pre |
VersionSoftware Current CodeLetter-Two and |
VersionSoftware New CodeLetter-Two and |
|
|
|
|
Recovery?Manual |
Upgrade?Hardware |
Upgrading to a Software |
Upgrading Unlike |
|||||
|
|
|
|
|
|
|
Version Other than 11.0? |
Packages? |
|
|
|
|
|
|
|
|
|
X |
X |
n/a |
11.0 CF |
11.1 CF |
-m |
-new_hw |
-V:<version you |
-k:<package you |
|
|
|
|
|
|
|
are upgrading to> |
are upgrading to> |
|
|
|
|
|
|
|
|
|
|
|
|
|
|
-m |
-new_hw |
-V:<version you |
-k:<package you |
|
|
|
|
|
|
|
are upgrading to> |
are upgrading to> |
|
|
|
|
|
|
|
|
|
|
|
|
|
|
-m |
-new_hw |
-V:<version you |
-k:<package you |
|
|
|
|
|
|
|
are upgrading to> |
are upgrading to> |
|
|
|
|
|
|
|
|
|
|
|
|
|
|
-m |
-new_hw |
-V:<version you |
-k:<package you |
|
|
|
|
|
|
|
are upgrading to> |
are upgrading to> |
|
|
|
|
|
|
|
|
|
|
|
|
|
|
-m |
-new_hw |
-V:<version you |
-k:<package you |
|
|
|
|
|
|
|
are upgrading to> |
are upgrading to> |
|
|
|
|
|
|
|
|
|
|
|
|
|
|
-m |
-new_hw |
-V:<version you |
-k:<package you |
|
|
|
|
|
|
|
are upgrading to> |
are upgrading to> |
|
|
|
|
|
|
|
|
|
|
|
|
|
|
-m |
-new_hw |
-V:<version you |
-k:<package you |
|
|
|
|
|
|
|
are upgrading to> |
are upgrading to> |
|
|
|
|
|
|
|
|
|
|
|
|
|
|
-m |
-new_hw |
-V:<version you |
-k:<package you |
|
|
|
|
|
|
|
are upgrading to> |
are upgrading to> |
|
|
|
|
|
|
|
|
|
|
|
|
|
|
-m |
-new_hw |
-V:<version you |
-k:<package you |
|
|
|
|
|
|
|
are upgrading to> |
are upgrading to> |
|
|
|
|
|
|
|
|
|
|
|
|
|
|
-m |
-new_hw |
-V:<version you |
-k:<package you |
|
|
|
|
|
|
|
are upgrading to> |
are upgrading to> |
|
|
|
|
|
|
|
|
|

Planning Tables |
23 |
SuperStack II NETBuilder, SuperStack II NETBuilder SI, and OfficeConnect NETBuilder Planning Table
|
Flash |
IP Address or Name |
Memory |
|
|
10.1.3.24 |
8 MB |
|
|
|
|
|
|
|
|
|
|
|
|
|
|
|
|
|
|
|
|
|
|
|
|
|
Check each appropriate option to use with the command-line utilities: |
|||
forMemory Flash Enough Recovery?Automatic |
forMemory Flash Enough Recovery?Manual |
|
VersionSoftware Current CodeLetter-Two and |
VersionSoftware New CodeLetter-Two and |
|
|
|
|
DRAM |
Recovery?Manual |
Upgrade?Hardware |
Upgrading to a Software |
Upgrading Unlike |
||||
|
|
|
|
|
|
|
Version Other than 11.0? |
Packages? |
|
|
|
|
|
|
|
|
|
X |
X |
8 |
9.3 BF |
11.0 BF |
-m |
-new_hw |
-V:<version you |
-k:<package you |
|
|
MB |
|
|
|
|
are upgrading to> |
are upgrading to> |
|
|
|
|
|
|
|
|
|
|
|
|
|
|
|
|
|
|
|
|
|
|
|
-m |
-new_hw |
-V:<version you |
-k:<package you |
|
|
|
|
|
|
|
are upgrading to> |
are upgrading to> |
|
|
|
|
|
|
|
|
|
|
|
|
|
|
-m |
-new_hw |
-V:<version you |
-k:<package you |
|
|
|
|
|
|
|
are upgrading to> |
are upgrading to> |
|
|
|
|
|
|
|
|
|
|
|
|
|
|
-m |
-new_hw |
-V:<version you |
-k:<package you |
|
|
|
|
|
|
|
are upgrading to> |
are upgrading to> |
|
|
|
|
|
|
|
|
|
|
|
|
|
|
-m |
-new_hw |
-V:<version you |
-k:<package you |
|
|
|
|
|
|
|
are upgrading to> |
are upgrading to> |
|
|
|
|
|
|
|
|
|
|
|
|
|
|
-m |
-new_hw |
-V:<version you |
-k:<package you |
|
|
|
|
|
|
|
are upgrading to> |
are upgrading to> |
|
|
|
|
|
|
|
|
|
|
|
|
|
|
-m |
-new_hw |
-V:<version you |
-k:<package you |
|
|
|
|
|
|
|
are upgrading to> |
are upgrading to> |
|
|
|
|
|
|
|
|
|
|
|
|
|
|
-m |
-new_hw |
-V:<version you |
-k:<package you |
|
|
|
|
|
|
|
are upgrading to> |
are upgrading to> |
|
|
|
|
|
|
|
|
|
|
|
|
|
|
-m |
-new_hw |
-V:<version you |
-k:<package you |
|
|
|
|
|
|
|
are upgrading to> |
are upgrading to> |
|
|
|
|
|
|
|
|
|
|
|
|
|
|
-m |
-new_hw |
-V:<version you |
-k:<package you |
|
|
|
|
|
|
|
are upgrading to> |
are upgrading to> |
|
|
|
|
|
|
|
|
|

24 CHAPTER 3: PLANNING AND PREPARING THE UPGRADE

UPGRADING USING THE NETBUILDER
4 UPGRADE LINK APPLICATION
This chapter describes how to upgrade the software on a NETBuilder bridge/router or a PathBuilder switch using the Upgrade Link application. Upgrade Link is an easy to use GUI for the upgrade utilities that runs in a web server. Access to the server is available via a web browser. If you are upgrading multiple bridge/routers, you should use Transcend Enterprise Manager or Transcend Network Control Services instead. Contact your network supplier for more information about Transcend. Or if you want to write scripts, you can use the command-line utilities as described in Chapter 5. Use the command-line utilities if you do not have a web browser on your network management station (NMS).
An NMS is a UNIX or Windows system that has a FTP/TFTP server running in addition to software, such as the Upgrade Management Utilities, to manage your network. For Windows, the utilities include the 3Com FTP/TFTP server called 3CServer.
Preparing for the Upgrade
Before upgrading your system, confirm the following items:
■You have installed the utilities according to Chapter 2.
■You have set the path for the utilities (UNIX only). If you have not set the path, complete the following step for your UNIX shell:
■For a C-shell installation, add the contents of the following file to the .cshrc file for each user you want to have access to the utilities, including root:
/usr/3Com/common/data/.login-bcm
Or you can enter the path after every logon:
source /usr/3Com/common/data/.login-bcm
■For a Bourne shell installation, add the contents of the following file to the
.profile file for each user you want to have access to the utilities, including root:
/usr/3Com/common/data/.profile-bcm
Or you can enter the path after every logon:
. /usr/3Com/common/data/.profile-bcm
■All configuration files are in the same directory as the boot image.
■You have booted your bridge/router from the primary boot source.
■You have a web browser installed with Java support, such as Netscape Navigator 4.5 or Internet Explorer 4.x, and you have it in your path (UNIX).
CAUTION: Only one client at a time should access the Upgrade Link Server.
■There is sufficient disk space on the NMS for the amount of software you are installing.

26 CHAPTER 4: UPGRADING USING THE NETBUILDER UPGRADE LINK APPLICATION
Minimal disk storage requirements depend on the number of different software versions that are stored on the disk drive. Calculate:
■6 MB for each version of the NETBuilder II bridge/router or PathBuilder switch image
■4 MB for each version of the SuperStack II, SuperStack II SI, or OfficeConnect NETBuilder bridge/router image
While you must purchase one copy of software for each device, you only need to install one copy of a version of software on the NMS.
Running Upgrade Link Upgrade Link contains its own web server. Client access to the web server is Locally available locally or remotely via a web browser. Running the Upgrade Link
application locally means that the web browser and the web server are running on the same NMS.
To run Upgrade Link locally on a UNIX NMS, use:
UpgradeLink [-NoAuthentication] [-NoSecurity]
This command starts the NETBuilder Upgrade Server and the default browser. Two command options are available.
■When NoAuthentication is specified, Upgrade Link will allow a remote client to access the server without user authentication, see “Settings Page” for a description of the available settings.
■When you specify NoSecurity, Upgrade Link starts and will accept connections from all IP addresses. Otherwise, only those client IP addresses listed in the /usr/3Com/common/data/allow file will be accepted by Upgrade Link.
For security, an administrator can enter the IP addresses of only those clients who will be allowed to upgrade devices. An allow file is an ASCII text file containing the IP addresses of clients to upgrade devices. The allow file looks like the following:
129.213.100.151
129.213.100.152
139.87.172.100
To run Upgrade Link locally on a Windows NMS, click the Start menu, then choose
Programs Remote Upgrade Utilities Upgrade Link.
Your default browser is launched. On Windows, the 3Com FTP/TFTP server is also launched.
When you exit Upgrade Link, you will also exit the browser and, for Windows, the
FTP/TFTP server.
Running Upgrade Link You can access the NETBuilder Upgrade Server remotely using a browser.
Remotely |
Start the NETBuilder Upgrade Server on the NMS using: |
■ |
bcmnbrus <port> [-NoSecurity | -NoAuthentication]
Status and Settings Pages |
27 |
where port is the TCP socket on which the client can communicate with the server. On UNIX systems, you can add this command to cron. On Windows 95/98/NT systems, this command can be run as a console application.
|
When NoSecurity is specified, the bcmnbrus command allows connections from all |
|
IP addresses. Otherwise, only those client IP addresses listed in |
|
the/usr/3Com/common/data/allow file will be accepted by Upgrade Link. |
|
For security, an administrator can enter the IP addresses of only those clients who |
|
will be allowed to upgrade devices. An allow file is an ASCII text file containing the |
|
IP addresses of clients to upgrade devices. The allowed file looks like the following: |
|
129.213.100.151 |
|
129.213.100.152 |
|
139.87.172.100 |
|
When NoAuthentication is specified, the bcmnbrus command allows the remote |
|
client to access the server without user authentication, see “Settings Page” on |
|
page 28 for a description of the available settings. |
|
■ Then, to access Upgrade Link from a web browser, enter the following URL: |
|
http://<server_nam>:<port>/ |
|
Do not resize the browser window while the Upgrade Link application is running. |
|
CAUTION: Only one client at a time should access the Upgrade Link Server. |
|
|
Status and Settings |
After each procedure described in this section, the Status or Settings page |
Pages |
appears. Table 3 describes the buttons on the bottom of the Status page. |
Table 3 Status page Buttons
Button |
Description |
|
|
History |
Shows the last 20 successful operations performed on the |
|
bridge/router or switch. |
Home |
Returns to the Console page. |
28 CHAPTER 4: UPGRADING USING THE NETBUILDER UPGRADE LINK APPLICATION
Table 3 Status page Buttons (continued)
Button |
Description |
|
|
Abort |
Exits Upgrade Link and aborts the process. Some processes may need |
|
to be completed even after clicking Abort. Upgrade Link displays a |
|
message about any ongoing processes. |
View Logs |
Opens a page listing the logs available for viewing. |
|
|
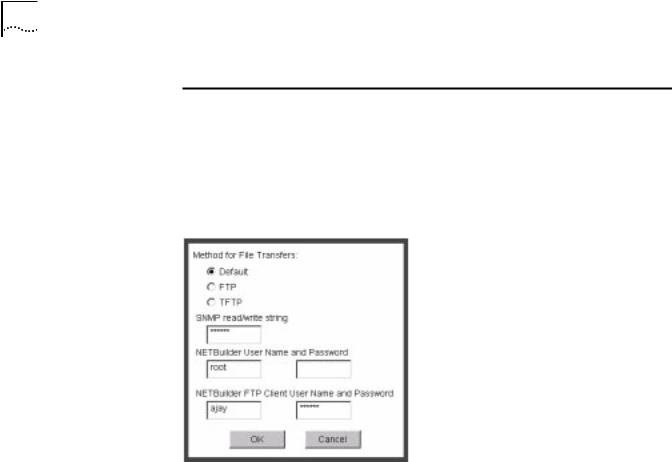
Settings Page The Setting Page lets you establish basic settings.
■You can choose the method of file transfers. TFTP is used by default for NETBuilder bridge/router software release 11.0 and lower while FTP is used by default for NETBuilder bridge/router software release 11.1 and higher and Enterprise OS version 11.3.
■Enter an SNMP read/write string and the NETBuilder bridge/router or PathBuilder switch user name and password.
■If -noAuthentication was not specified in Upgrade Link or on the bcmnbrus command line, authentication will be used and you must enter the NETBuilder or PathBuilder username and password.
■If -noAuthentication was specified in Upgrade Link or on the bcmnbrus command line, no authentication is required and any user name and password entries are ignored.
■If using FTP, enter the FTP client user name and password.
Verifying for Upgrading |
29 |
Verifying for |
Before upgrading, run the diagnostic utility in Upgrade Link to verify connectivity |
Upgrading |
to the switch or bridge/router by following these steps: |
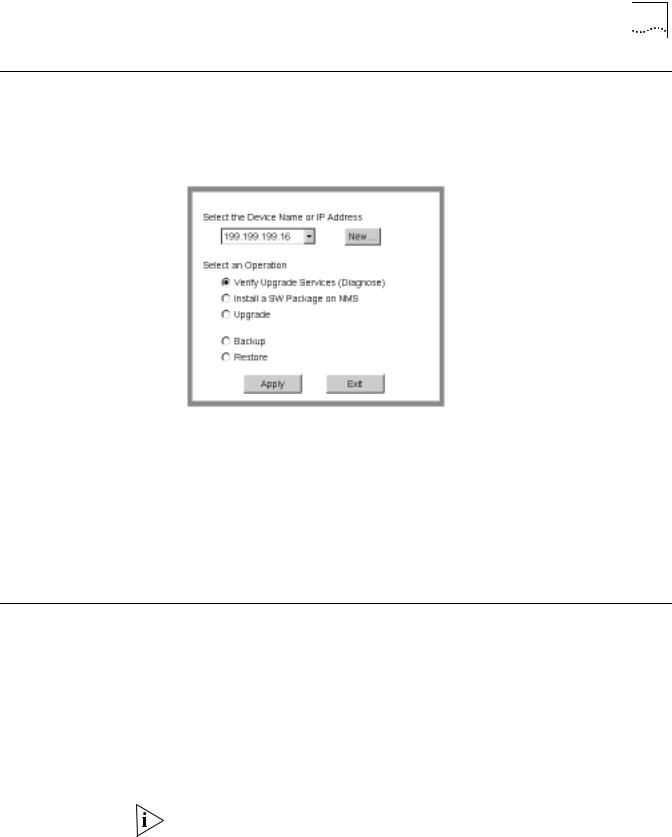
1Choose a switch or bridge/router from the pop-up list in the Console page, or click New to enter the IP address or hostname. The pop-up list contains devices that you have upgraded or backed-up before.
2Select Verify Upgrade Services (Diagnose) and click Apply.
The Settings Page appears. Select the appropriate settings as described in on “Settings Page” on page 28 and click OK to close that window.
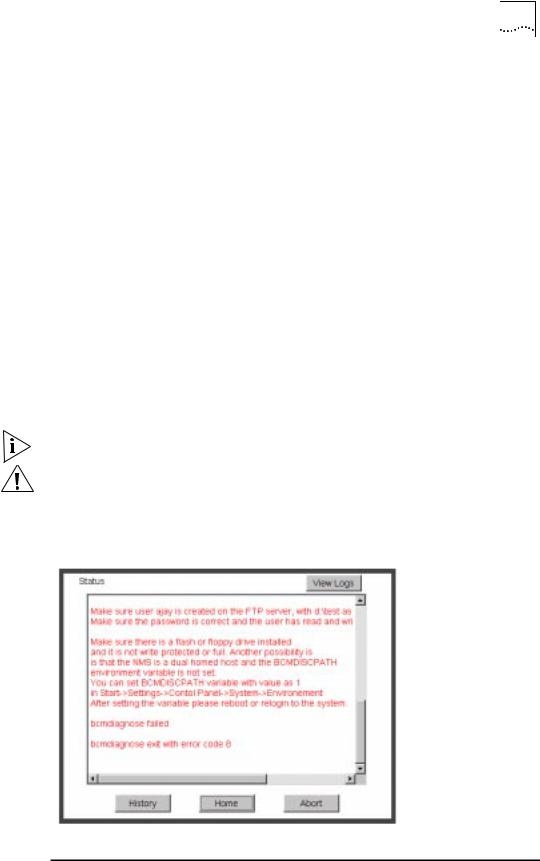
The Status page appears showing the results of the diagnostic tests.
3If the Status page shows a failure, check the SNMP read/write community string and FTP/TFTP server settings.
If the Status page shows a success, click Home to continue with the upgrade and return to the Console page.
Installing Software on Upgrade Link installs the software on the NMS in the following directory: the NMS
Windows:
\%tftpboot%\image\<platform>\SW|FW\<version>\<pkg>
UNIX:
/tftpboot/image/<platform>/SW|FW/<version>/<pkg>
For UNIX, if there is not enough space on the disk, you can link /tftpboot to another disk. For example, to link /tftpboot to the usr directory, enter:
ln -s /usr/tftpboot /tftpboot/
The utilities work only with the default directory names and structures.

30 CHAPTER 4: UPGRADING USING THE NETBUILDER UPGRADE LINK APPLICATION
Values
tftpboot |
For UNIX: Directory specified in inetd or tftpd for tftpd files. |
|
%tftpboot% |
For Windows (using the default 3Com TFTP server): Directory |
|
|
specified in the 3Server configuration. |
|
<platform> |
NETBuilder II with CEC Module: |
NBII |
|
NETBuilder II with DPE Module: |
NBDPE |
|
SuperStack II NETBuilder SI bridge/router: |
NBSI |
|
SuperStack II NETBuilder Ethernet |
NBRO |
|
bridge/router: |
|
|
SuperStack II NETBuilder Token Ring |
NBR2T |
|
bridge/router: |
|
|
SuperStack II NETBuilder Ethernet/ISDN |
NBRI |
|
bridge/router: |
|
|
SuperStack II NETBuilder Token Ring/ISDN |
NBR2TI |
|
bridge/router: |
|
|
OfficeConnect NETBuilder bridge/router: |
NBOCF |
|
PathBuilder S5xx switch: |
NBPB500 |
<package> |
Two letter designator shown on the CD-ROM label. |
|
[SW | FW] |
The software or firmware directory. |
|
<version> |
Software version 9.0 through 11.3. |
|
Procedure To install the new software on the NMS, follow these steps:
You must be logged in as root for this procedure (UNIX).
1You can install the software from a CD-ROM, a tar archive, or a boot image (image-only upgrade). If you are installing from a CD-ROM, mount the CD-ROM on the NMS.
See Appendix C for information on how to mount the CD-ROM on a UNIX system.
2For UNIX, log in as root.
3Run Upgrade Link if you have not already done so.
4Select Install a SW Package on NMS from the Console page.
Loading...