


 Loading...
3Com Wireless 11n
PCI Adapter
Quick Installation Guide
3CRPCIN175
Antes de usar este equipo por primera vez, lo invitamos a leer detenidamente las siguientes instrucciones. Guarde este manual para consultas futuras.
www.3com.com
M/N: WL-601
10016657 Rev AA
March 2008
3Com Corporation, 350 Campus Drive, Marlborough, MA USA 01752-3064
Copyright © 2005-2008, 3Com Corporation. All rights reserved. No part of this documentation may be reproduced in any form or by any means or used to make any derivative work (such as translation, transformation, or adaptation) without written permission from 3Com Corporation.
3Com Corporation reserves the right to revise this documentation and to make changes in content from time to time without obligation on the part of 3Com Corporation to provide notification of such revision or change.
3Com Corporation provides this documentation without warranty, term, or condition of any kind, either implied or expressed, including, but not limited to, the implied warranties, terms or conditions of merchantability, satisfactory quality, and fitness for a particular purpose. 3Com may make improvements or changes in the product(s) and/or the program(s) described in this documentation at any time.
If there is any software on removable media described in this documentation, it is furnished under a license agreement included with the product as a separate document, in the hard copy documentation, or on the removable media in a directory file named LICENSE.TXT or !LICENSE.TXT. If you are unable to locate a copy, please contact 3Com and a copy will be provided to you.
UNITED STATES GOVERNMENT LEGEND
If you are a United States government agency, then this documentation and the software described herein are provided to you subject to the following:
All technical data and computer software are commercial in nature and developed solely at private expense. Software is delivered as “Commercial Computer Software” as defined in DFARS 252.227-7014 (June 1995) or as a “commercial item” as defined in FAR 2.101(a) and as such is provided with only such rights as are provided in 3Com’s standard commercial license for the Software. Technical data is provided with limited rights only as provided in DFAR 252.227-7015 (Nov 1995) or FAR 52.227-14 (June 1987), whichever is applicable. You agree not to remove or deface any portion of any legend provided on any licensed program or documentation contained in, or delivered to you in conjunction with, this User Guide.
Unless otherwise indicated, 3Com registered trademarks are registered in the United States and may or may not be registered in other countries.
3Com and the 3Com logo are registered trademarks of 3Com Corporation.
Intel, Pentium, and Celeron are registered trademarks of Intel Corporation. Microsoft and Windows are registered trademarks of Microsoft Corporation.
All other company and product names may be trademarks of the respective companies with which they are associated.

Check the Package Contents
Before you start with the installation, verify that your PCI Adapter package includes the following items:
■One 3Com Wireless 11n PCI Adapter with standard PCI bracket
■Three remote antennas
■One low-profile PCI bracket
■One 3Com Installation CD-ROM, which contains the driver for the PCI Adapter
■This 3Com Wireless 11n PCI Adapter Quick Installation Guide
■One warranty flyer
If any of these items are damaged or missing, please contact your 3Com network supplier immediately.
Check the Minimum System Requirements
You can install the PCI Adapter on any desktop computer with Microsoft® Windows® XP, Windows 2000, or Windows Vista.
If using Windows 2000, please download the driver and utility from the 3Com web site.
Your computer must also have, at least, the following:
■Available PCI slot
■733 MHz Intel™ Pentium™ III or Celeron processor (or equivalent)
■256 MB of RAM

4Check the Package Contents
■7 MB of free disk space
■CD-ROM drive
Check the PCI Bracket
The standard PCI bracket to which the PCI Adapter is attached by default is for standard, full-height desktops. If you are using a low-profile desktop, you need to replace the standard bracket with the low-profile bracket for the PCI Adapter to fit.
To replace the PCI bracket:
1Remove the three nuts and washers attached to the three threaded antenna connectors.
2Remove the two screws that secure the PCI Adapter to the bracket. (Be careful not to let the shielding cover fall off, as these screws also hold that in place.) Save the screws.
3Replace the standard bracket with the low-profile bracket.
4Fasten the PCI Adapter to the low-profile bracket with the screws.
5Replace the three nuts and washers that you removed in step 1.

Installing the Wireless PCI Adapter |
5 |
Installing the Wireless PCI Adapter
Installing the PCI Adapter is a two-step process:
1Install the PCI Adapter hardware
2Install the 3Com PCI Adapter driver
Install the PCI Adapter Hardware
You will need:
■A Phillips screwdriver to remove the computer case and slot cover and to secure the PCI Adapter into the slot.
■Antistatic protection
Attach the antennas to the antenna connectors only after you secure the PCI Adapter into the slot.
To install the PCI Adapter into a PCI slot:
1Shut down your computer, and unplug the power cord from the power source.
2Using antistatic protection, remove the computer cover.
3Locate an empty PCI slot and remove the slot cover. See 1 in Figure 1. Save the screw.

6 |
Installing the Wireless PCI Adapter |
Figure 1 Inserting the PCI Adapter into a PCI Slot
1
2
4Insert the PCI Adapter into the slot, and then press it down gently until it seats snugly in the slot. See 2 in Figure 1.
5Secure the PCI Adapter into the slot using the screw that you removed earlier.
6Replace the computer cover.
7Attach the 3 antennas to the PCI Adapter’s antenna connectors, and then turn the threaded parts clockwise to secure them. Do not overtighten.
For optimal reception, position the antennas so that the center one is straight up and the two either side are at a 45 degree angle, as shown in Figure 2.

Install the 3Com Wireless PCI Adapter Driver |
7 |
Figure 2 Adjusting the Antennas for Best Reception
8Reconnect the power cord to the power source, and then turn on your computer.
If the Found New Hardware Wizard appears when Windows starts, click Cancel.
Install the 3Com Wireless PCI Adapter Driver
Your PCI Adapter includes a CD that contains the 3Com Wireless Driver. Running the PCI Adapter setup program installs the driver.
To install the 3Com PCI Adapter driver, follow the instructions in the next sections based on your operating system.
8 |
Install the 3Com Wireless PCI Adapter Driver |
Windows XP Installation
1With the computer on and Windows running, insert the 3Com Installation CD into the CD-ROM drive.
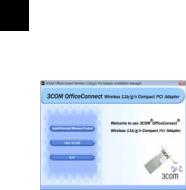
The 3Com Wireless 11n PCI Adapter Installation Manager setup menu appears.
If the setup menu does not appear, click Start > Run, and then type d:\AutoRun.exe (where d: is the drive letter assigned to your CD-ROM drive).
2On the setup menu, click Install/Uninstall Wireless Product. The wizard prepares for installation.
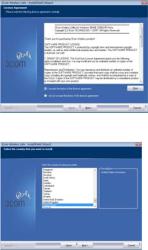
3The 3Com End User Software License Agreement appears. Read the agreement carefully, click I accept the terms of the license agreement to agree to all the terms and conditions, and click
Next.

Install the 3Com Wireless PCI Adapter Driver |
9 |
4 Choose your country and then click Next.
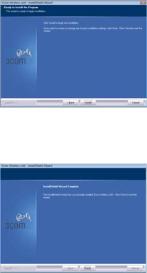
5 Click Install.

10 |
Install the 3Com Wireless PCI Adapter Driver |
6When the message InstallShield Wizard Complete appears, click Finish. You have completed installing the 3Com Wireless PCI Adapter driver.
7 On the setup menu, click Exit.
Install the 3Com Wireless PCI Adapter Driver |
11 |
Windows Vista Installation
1With the computer on and Windows running, insert the 3Com Installation CD into the CD-ROM drive.
The 3Com Wireless 11n PCI Adapter Installation Manager setup menu appears.
If the setup menu does not appear, click  > All Programs > Accessories > Run, and then type d:\AutoRun.exe (where d: is the drive letter assigned to your CD-ROM drive).
2On the setup menu, click Install/Uninstall Wireless Product. The wizard prepares for installation.
3The 3Com End User Software License Agreement appears. Read the agreement carefully, and then click I accept the terms of the license agreement to agree to all the terms and conditions. Now click Next.
12 |
Install the 3Com Wireless PCI Adapter Driver |
4 Choose your country and then click Next.
Install the 3Com Wireless PCI Adapter Driver |
13 |
5 Click Install.
6When the message InstallShield Wizard Complete appears, click Finish. You have completed installing the 3Com Wireless PCI Adapter driver.
7 On the setup menu, click Exit.
14 |
What to Do Next |
What to Do Next
This section first covers connecting on Windows XP and then connecting on the Windows Vista operating system.
Connecting on Windows XP
By default, the PCI Adapter now scans for access points in range.
To connect to a specific access point, you must configure your wireless connection using the Windows Zero Configuration (WZC) tool.
Ensure that you have Windows XP Service Pack 2 installed on your computer.
Ensure that the Use Windows to configure my wireless network settings check box is selected in the Wireless Network Connection Properties tab.
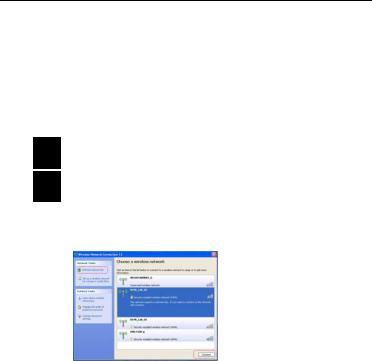
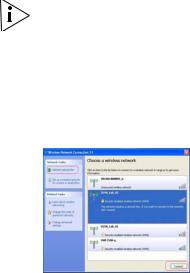
8Click the network icon in the system tray to view Wireless Networks.

What to Do Next |
15 |
9Click Refresh network list to reload and search for available wireless devices. Select a wireless network in the list and click Connect to join the selected wireless network.
10If wireless security is activated for the selected wireless network, the Wireless Network Connection Window appears. Input the Network key and click Connect.
11 If there is no security activated for the selected wireless network, a warning window appears. Click Connect Anyway.
.
12 Close the Wireless Network Connection list window.
16 |
What to Do Next |
Connecting on Windows Vista
Windows Vista WLAN AutoConfig
The PC will begin functioning in Station Mode (as a Client) with your Wireless LAN network as soon as the Network Key is set up.
If you do not have an existing wireless network, first set up your wireless router before you use your PC in Station Mode.
1Start your PC and connect with an existing WLAN AP.
2Have the Network Key (WEP Key or WPA Key) ready if your Wireless Network requires a security code.
3Right click on the Wireless Network icon in the system tray.
4Select Connect to a network from the Wireless Network icon menu. The Wireless Network Connection dialog box appears, as shown here:
What to Do Next |
17 |
5Select the Wireless Network of your choice by clicking on its name. The entire block is highlighted.
6Select Connect in the lower right corner.
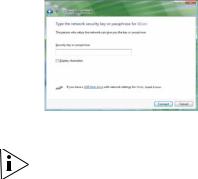
The next Wireless Network Connection dialog box appears, as shown here:
7Enter the Network Key (WEP Key or WPA Key) for your Wireless Network.
If your network is using WEP encryption, then a HEX or an ASCII format is necessary when entering your Network key:
■HEX — 10 Characters in HEX notation for 40 bit or 26 characters for 128 bit encryption.
■ASCII — 5 Characters for 40 bit or 13 characters for 128 bit encryption.
If your network is using WPA or WPA2 encryption, you must enter an 8 – 63 character alphanumeric key-phrase.
8 Select Connect.

18 |
What to Do Next |
The Wireless Network Connection dialog box appears again as you are being connected.
Once successfully connected to Generic1, as shown next, click the check box to Save this network. Verify that Start this connection automatically is also enabled.
9 Click Close.

Troubleshooting Installation |
19 |
Troubleshooting Installation
Refer to Table 1 for a list of issues that you may encounter during installation and some suggested solutions.
Table 1 Installation Issues and Possible Solutions
Problem |
Possible Solution |
Installation program does not finish or the driver fails to load
Windows shows the PCI Adapter as an unknown device
Power/Activity LED is off
Use the Device Manager to resolve resource conflicts that may exist. To start the Device Manager, go to the Control Panel, double-click System, and then click the Device Manager tab.
■If the hardware item for the PCI Adapter under Network adapters has a yellow exclamation point, right-click the item, and then click Update Driver. Follow the instructions on the Hardware Update Wizard to update the PCI Adapter driver.
■If the hardware item for the PCI Adapter does not appear under Network adapters, repeat the setup procedure.
■Verify that the PCI Adapter is inserted properly into the PCI slot.
■If the PCI Adapter is inserted properly into the slot and Windows still does not recognize it, use the Device Manager to remove the unknown device, and then repeat the setup procedure.
■Verify that the PCI Adapter is inserted properly into the PCI slot.
■Verify that the driver was installed successfully by checking the status of the device on the Device Manager. See “What to Do Next” on page 14.

20 |
Register Your Product for Services and Repair |
Register Your Product for Services and Repair
To obtain telephone support as part of your warranty and other service benefits, you must first register your product at:
http://eSupport.3com.com/
Telephone Technical Support and Repair
3Com offers telephone, e-mail, and Internet access to technical support and repair services. To access these services for your region, use the appropriate telephone number, URL, or e-mail address from the following URL:
http://csoweb4.3com.com/contactus/
Adaptateur PCI 11n sans fil de 3Com
Guide d'installation rapide
3CRPCIN175
www.3com.fr
M/N : WL-601
10016657 Rev AA
Mars 2008
3Com Corporation, 350 Campus Drive, Marlborough, MA USA 01752-3064
Copyright © 2005 -2008, 3Com Corporation. Tous droits réservés. Toute reproduction partielle ou totale de cette documentation est interdite, quel que soit le procédé utilisé. Tout travail dérivé (tel que traduction, transformation ou adaptation) est prohibé en l'absence d'une autorisation écrite de 3Com Corporation.
3Com Corporation se réserve le droit de revoir cette documentation et d'en modifier le contenu de temps à autre sans préavis.
3Com Corporation fournit cette documentation sans garantie, modalité ou condition quelconque implicite ou explicite, y compris, mais de manière non exhaustive, les garanties, modalités ou conditions implicites de qualité marchande et d'adéquation à un usage donné. 3Com peut améliorer ou modifier le ou les produits et/ou le ou les programmes décrits dans cette documentation.
Si un logiciel sur support amovible est décrit dans cette documentation, il est fourni aux termes d'un contrat de licence, inclus avec le produit sous forme d'un document séparé, dans la version sur papier de la documentation ou sur le support amovible dans un fichier nommé LICENSE.TXT ou !LICENSE.TXT. Si vous ne trouvez pas ce document, contactez 3Com qui vous en enverra une copie.
LÉGENDE DU GOUVERNEMENT DES ÉTATS-UNIS
Si vous êtes un service officiel du gouvernement des États-Unis, cette documentation et le logiciel qu'elle décrit sont fournis aux termes des conditions ci-dessous.
Toutes les données techniques et tous les logiciels informatiques sont de nature commerciale et développés uniquement avec des fonds privés. Le logiciel est livré en tant que « Logiciel informatique commercial », conformément aux dispositions DFARS 252.227-7014 (juin 1995), ou en tant qu'« article commercial » comme défini dans les dispositions FAR 2.101(a) et n'est fourni en tant que tel qu'avec les droits que procure la licence commerciale standard de 3Com pour le logiciel. Les données techniques sont fournies avec des droits limités uniquement, conformément aux dispositions DFAR 252.227-7015 (nov 1995) ou FAR 52.227-14 (juin 1987), suivant la loi applicable. Vous acceptez de ne pas enlever ni de dégrader toute ou partie de la légende figurant sur tout programme sous licence ou sur la documentation contenue dans ce guide d'utilisation, ou fournie avec celui-ci.
Sauf mention contraire, les marques 3Com sont déposées aux États-Unis et peuvent ou non être déposées dans d'autres pays.
3Com et le logo 3Com sont des marques déposées de 3Com Corporation.
Intel, Pentium et Celeron sont des marques déposées de Intel Corporation. Microsoft et Windows sont des marques déposées de Microsoft Corporation.
Tous les autres noms de produits ou de sociétés sont susceptibles de représenter les marques commerciales des sociétés respectives auxquelles ils sont associés.

Contenu du paquet
Avant de démarrer l'installation, veuillez vérifier que le paquet de l'adaptateur PCI contient bien ce qui suit:
■un adaptateur PCI 11n sans fil de 3Com avec bracket PCI standard
■trois antennes à distance
■un bracket PCI profil bas
■un CD-ROM d'installation de 3Com contenant le pilote de l'adaptateur PCI
■ce Guide d'installation rapide de l'adaptateur PCI 11n sans fil de 3Com
■un certificat de garantie
Si un élément manque ou est endommagé, prenez immédiatement contact avec votre fournisseur 3Com.
Configuration système minimale
Vous pouvez installer l'adaptateur PCI sur un ordinateur de bureau doté de Microsoft® Windows® XP, Windows 2000 ou Windows Vista.
Pour Windows 2000, veuillez télécharger le pilote et l'utilitaire se trouvant sur le site Web de 3Com.
Votre ordinateur doit être muni, au minimum, de ce qui suit :
■un emplacement PCI disponible
24Contenu du paquet
■un processeur Intel™ Pentium™ III ou Celeron 733 MHz (ou équivalent)
■256 Mo de RAM
■7 Mo d'espace libre sur le disque
■un lecteur CD-ROM
Vérification du bracket PCI
Le bracket PCI standard auquel est rattaché par défaut l'adaptateur PCI est destiné aux ordinateurs de bureau standard de hauteur normale. Si vous disposez d'un ordinateur de bureau profil bas, vous devez remplacer le bracket standard par un bracket profil bas pour pouvoir y monter l'adaptateur PC.
Pour remplacer le bracket :
1Retirez les trois écrous et rondelles se trouvant sur les trois connecteurs d'antenne filetés.
2Retirez les deux vis fixant l'adaptateur PCI au bracket. (Veillez à ce que le cache de protection ne tombe pas puisque les vis fixent également cet élément). Mettez les vis de côté.
3Remplacez le bracket standard par le bracket profil bas.
4Attachez l'adaptateur PCI au braquet profil bas au moyen des vis.
5Remplacez les trois écrous et rondelles que vous aviez enlevés à l'étape 1

Installation de l'adaptateur PSI sans fil |
25 |
Installation de l'adaptateur PSI sans fil
L'installation de l'adaptateur PCI se fait en deux étapes:
1Installation du matériel de l'adaptateur PCI
2Installation du pilote de l'adaptateur PCI de 3Com
Installation du matériel de l'adaptateur PCI
Vous aurez besoin :
■d'un tournevis cruciforme pour enlever le boîtier et le cache d'emplacement ainsi que pour fixer l'adaptateur PCI dans l'emplacement.
■une protection antistatique
N'attachez les antennes aux connecteurs qu'après avoir
immobilisé l'adaptateur PCI dans l'emplacement.

26 |
Installation de l'adaptateur PSI sans fil |
Pour installer l'adaptateur PCI dans un emplacement PCI :
1Éteignez l'ordinateur et débranchez le cordon de la prise de courant.
2Au moyen de la protection antistatique, retirez le boîtier.
3Repérez un emplacement PCI vide et enlevez le cache. Reportez-vous à 1 dans la Figure 1. Mettez la vis de côté.
Figure 1Insertion de l'adaptateur PCI dans un emplacement PCI
1
2
4Insérez l'adaptateur PCI dans l'emplacement. Appuyez légèrement dessus pour s'assurer qu'il est bien emboîté. Reportez-vous à 2 dans la Figure 1.
5Immobilisez l'adaptateur PCI dans l'emplacement au moyen de la vis retirée antérieurement.
6Replacez le boîtier.

Installation de l'adaptateur PSI sans fil |
27 |
7Attachez les 3 antennes aux connecteurs de l'adaptateur PCI puis faites tourner les portions filetées dans le sens des aiguilles d'une montre pour les fixer. Ne serrez pas trop.
Pour une réception optimale, positionnez les antennes de sorte à ce que celle du milieu soit à la verticale et que les deux autres soient à un angle de 45 degrés, comme illustré dans la Figure 2.
Figure 2Ajustement des antennes
8Rebranchez le cordon à la prise de courant puis allumez l'ordinateur.
Si l' Assistant de matériel détecté apparaît au démarrage de Windows, cliquez sur Annuler.

28 |
Installation du pilote de l'adaptateur PCI sans fil de 3Com |
Installation du pilote de l'adaptateur PCI sans fil de 3Com
Votre adaptateur PCI comprend un CD sur lequel se trouve le pilote sans fil de 3Com. L'exécution du programme de configuration permet d'installer l'adaptateur PCI.
Pour installer le pilote de l'adaptateur PCI de 3Com, suivez les consignes figurant dans la section suivante en fonction du système d'exploitation dont vous vous servez.
Installation sur Windows XP
1Insérez le CD-ROM d'installation de 3Com dans le lecteur CD-ROM de votre ordinateur (l'ordinateur et Windows doivent être en route).
Le menu de configuration du gestionnaire d'installation de l'adaptateur PCI 11n sans fil de 3Com apparaît.
Si le menu n'apparaît pas, cliquez sur Démarrer > Exécuter, puis tapez d:\AutoRun.exe (d: désignant la lettre attribuée au lecteur de CD-ROM).

Installation du pilote de l'adaptateur PCI sans fil de 3Com |
29 |
2Dans le menu de configuration, cliquez sur Install/Uninstall Wireless Product. L'assistant se prépare à l'installation.
3Le contrat de licence logicielle 3Com pour utilisateur final apparaît. Lisez le contrat attentivement, cliquez sur I accept the terms of the license agreement pour accepter les termes et les conditions puis cliquez sur Next.

30 |
Installation du pilote de l'adaptateur PCI sans fil de 3Com |
4 Choisissez votre pays puis cliquez sur Next.
5 Cliquez sur Install.
Loading...