


Operating instructions
Coffee System
CVA 610
To prevent accidents and |
UV |
machine damage, |
|
read these instructions |
|
before installation or use. |
M.-Nr. 05 766 570 |

Contents
IMPORTANT SAFETY INSTRUCTIONS . . . . . . . . . . . . . . . . . . . . . . . . . . . . . . . . . 4
Guide to the coffee system . . . . . . . . . . . . . . . . . . . . . . . . . . . . . . . . . . . . . . . . . . 7
Programming . . . . . . . . . . . . . . . . . . . . . . . . . . . . . . . . . . . . . . . . . . . . . . . . . . . . . 9 The program mode . . . . . . . . . . . . . . . . . . . . . . . . . . . . . . . . . . . . . . . . . . . . . . . . . 9 Choosing a language . . . . . . . . . . . . . . . . . . . . . . . . . . . . . . . . . . . . . . . . . . . . . . 10 Rinsing feature . . . . . . . . . . . . . . . . . . . . . . . . . . . . . . . . . . . . . . . . . . . . . . . . . . . . 11 Determining the water hardness . . . . . . . . . . . . . . . . . . . . . . . . . . . . . . . . . . . . . . 12 Setting the water hardness . . . . . . . . . . . . . . . . . . . . . . . . . . . . . . . . . . . . . . . . . . 13 Setting the drink temperatures. . . . . . . . . . . . . . . . . . . . . . . . . . . . . . . . . . . . . . . . 14 Pre-brewing feature . . . . . . . . . . . . . . . . . . . . . . . . . . . . . . . . . . . . . . . . . . . . . . . . 15 Pre-grinding feature . . . . . . . . . . . . . . . . . . . . . . . . . . . . . . . . . . . . . . . . . . . . . . . . 16 Hot water feature . . . . . . . . . . . . . . . . . . . . . . . . . . . . . . . . . . . . . . . . . . . . . . . . . . 17 Total coffee counter . . . . . . . . . . . . . . . . . . . . . . . . . . . . . . . . . . . . . . . . . . . . . . . . 18 Setting the standby timer. . . . . . . . . . . . . . . . . . . . . . . . . . . . . . . . . . . . . . . . . . . . 19
System lock . . . . . . . . . . . . . . . . . . . . . . . . . . . . . . . . . . . . . . . . . . . . . . . . . . . . . 20
Before using the coffee system . . . . . . . . . . . . . . . . . . . . . . . . . . . . . . . . . . . . . 21
Water tank. . . . . . . . . . . . . . . . . . . . . . . . . . . . . . . . . . . . . . . . . . . . . . . . . . . . . . . 22
Coffee bean container . . . . . . . . . . . . . . . . . . . . . . . . . . . . . . . . . . . . . . . . . . . . . 23
Setting the serving sizes. . . . . . . . . . . . . . . . . . . . . . . . . . . . . . . . . . . . . . . . . . . 24 Coffee and espresso . . . . . . . . . . . . . . . . . . . . . . . . . . . . . . . . . . . . . . . . . . . . . . . 25 Hot water . . . . . . . . . . . . . . . . . . . . . . . . . . . . . . . . . . . . . . . . . . . . . . . . . . . . . . . . 26
Making coffee . . . . . . . . . . . . . . . . . . . . . . . . . . . . . . . . . . . . . . . . . . . . . . . . . . . . 27 Pre-warming. . . . . . . . . . . . . . . . . . . . . . . . . . . . . . . . . . . . . . . . . . . . . . . . . . . . . . 27 Preparing two cups simultaneously . . . . . . . . . . . . . . . . . . . . . . . . . . . . . . . . . 28 Cappuccino . . . . . . . . . . . . . . . . . . . . . . . . . . . . . . . . . . . . . . . . . . . . . . . . . . . . . . 29
Dispensing hot water. . . . . . . . . . . . . . . . . . . . . . . . . . . . . . . . . . . . . . . . . . . . . . 31
Setting the coffee grinder . . . . . . . . . . . . . . . . . . . . . . . . . . . . . . . . . . . . . . . . . . 32 Adjusting the coffee grinder . . . . . . . . . . . . . . . . . . . . . . . . . . . . . . . . . . . . . . . . . 32 Setting the quantity . . . . . . . . . . . . . . . . . . . . . . . . . . . . . . . . . . . . . . . . . . . . . . . . 33
2

Contents
Coffee system care . . . . . . . . . . . . . . . . . . . . . . . . . . . . . . . . . . . . . . . . . . . . . . . 34 Daily care . . . . . . . . . . . . . . . . . . . . . . . . . . . . . . . . . . . . . . . . . . . . . . . . . . . . . . . . 34 Exterior. . . . . . . . . . . . . . . . . . . . . . . . . . . . . . . . . . . . . . . . . . . . . . . . . . . . . . . . . . 35 Stainless steel . . . . . . . . . . . . . . . . . . . . . . . . . . . . . . . . . . . . . . . . . . . . . . . . . . . . 35 Stainless steel colored controls . . . . . . . . . . . . . . . . . . . . . . . . . . . . . . . . . . . . . . . 35 Interior . . . . . . . . . . . . . . . . . . . . . . . . . . . . . . . . . . . . . . . . . . . . . . . . . . . . . . . . . . 35 Drip catch . . . . . . . . . . . . . . . . . . . . . . . . . . . . . . . . . . . . . . . . . . . . . . . . . . . . . . . 36 Waste unit . . . . . . . . . . . . . . . . . . . . . . . . . . . . . . . . . . . . . . . . . . . . . . . . . . . . . . . 37 Steam nozzle . . . . . . . . . . . . . . . . . . . . . . . . . . . . . . . . . . . . . . . . . . . . . . . . . . . . . 37 Brew unit . . . . . . . . . . . . . . . . . . . . . . . . . . . . . . . . . . . . . . . . . . . . . . . . . . . . . . . . 38
Rinsing cycle: Degreasing the brew unit . . . . . . . . . . . . . . . . . . . . . . . . . . . . . 39 Cleaning the brew unit filters . . . . . . . . . . . . . . . . . . . . . . . . . . . . . . . . . . . . . . 40 Lubricating the brew unit . . . . . . . . . . . . . . . . . . . . . . . . . . . . . . . . . . . . . . . . . 41 Change the gaskets. . . . . . . . . . . . . . . . . . . . . . . . . . . . . . . . . . . . . . . . . . . . . . . . 42 Changing the light bulb . . . . . . . . . . . . . . . . . . . . . . . . . . . . . . . . . . . . . . . . . . . . . 43
Descaling the appliance . . . . . . . . . . . . . . . . . . . . . . . . . . . . . . . . . . . . . . . . . . . 44 Automatic descaling . . . . . . . . . . . . . . . . . . . . . . . . . . . . . . . . . . . . . . . . . . . . . . . 44
Fault messages . . . . . . . . . . . . . . . . . . . . . . . . . . . . . . . . . . . . . . . . . . . . . . . . . . 47
Frequently asked questions . . . . . . . . . . . . . . . . . . . . . . . . . . . . . . . . . . . . . . . . 48
After sales service . . . . . . . . . . . . . . . . . . . . . . . . . . . . . . . . . . . . . . . . . . . . . . . . 51
Installation instructions . . . . . . . . . . . . . . . . . . . . . . . . . . . . . . . . . . . . . . . . . . . 53
Caring for the environment . . . . . . . . . . . . . . . . . . . . . . . . . . . . . . . . . . . . . . . . . 55 Disposal of the packing materials . . . . . . . . . . . . . . . . . . . . . . . . . . . . . . . . . . . . . 55 Disposal of an old appliance . . . . . . . . . . . . . . . . . . . . . . . . . . . . . . . . . . . . . . . . . 55
Electrical connection. . . . . . . . . . . . . . . . . . . . . . . . . . . . . . . . . . . . . . . . . . . . . . 56
Installation . . . . . . . . . . . . . . . . . . . . . . . . . . . . . . . . . . . . . . . . . . . . . . . . . . . . . . 57 Installation options . . . . . . . . . . . . . . . . . . . . . . . . . . . . . . . . . . . . . . . . . . . . . . . . . 57
Glossary . . . . . . . . . . . . . . . . . . . . . . . . . . . . . . . . . . . . . . . . . . . . . . . . . . . . . . . . 61
3

IMPORTANT SAFETY INSTRUCTIONS
When using electrical appliances, basic safety precautions should always be followed, including the following:
Read all instructions before installation or use of the coffee system.
Please read these instructions carefully to prevent accidents and machine damage.
This appliance is for household use only. Any other use is not recommended by the manufacturer and could be dangerous.
This appliance complies with current safety requirements. Improper use of the appliance can cause personal injury and material damage.
The manufacturer cannot be held responsible for damage caused by improper use of the appliance.
Electrical safety
Before connecting the appliance to the electrical supply, make sure
that the voltage and frequency listed on the data plate correspond with the household electrical supply. If in doubt, consult a qualified electrician.
Be certain your appliance is properly installed and grounded by
a qualified technician.
To guarantee the electrical safety of this appliance, continuity must exist between the appliance and an effective grounding system. It is imperative that this basic safety requirement be met. If there is any doubt, have the electrical system of the house checked by a qualified electrician. The manufacturer cannot be held responsible for damages caused by the lack, or inadequacy of, an effective grounding system.
The appliance must be built into cabinetry before operation to
ensure that no electrical components are accessible. Ensure that electrical power is not supplied to the appliance while installation work, repairs or maintenance is performed.
Do not use an extension cord to connect the appliance to electricity.
Extension cords do not guarantee the required safety of the appliance (danger of overheating).
4

IMPORTANT SAFETY INSTRUCTIONS
Never open the housing of the appliance. If electrical or mech-
anical components or electrical connections are disturbed, an electric shock could be caused damaging the machine.
Before service or maintenance, disconnect the power supply by
either removing the fuse, "tripping" the circuit breaker or unplugging the unit from the outlet.
Never use a steam cleaner to clean the appliance. Pressurized steam
could damage electrical components and cause a short circuit.
To protect against fire, electric shock and injury to persons do not
immerse cord or plugs in water or other liquid.
Do not operate any appliance with a damaged cord or plug or after
the appliance malfunctions, or has been damaged in any manner. Return appliance to the nearest authorized Miele dealer for examination, repair or adjustment.
Do not let cord hang over edge of table or counter, or touch hot
surfaces.
Installation
Installation work and repairs should only be performed by a trained
technician to ensure safety. Repairs and other work by unauthorized persons could be dangerous.
This equipment has not been designed for maritime use or for
use in mobile installations such as aircraft or recreational vehicles. However, under certain circumstances it may be possible for an installation in these applications. Please contact the nearest Miele Dealer or the Miele Technical Service Department with specific requirements.
If the coffee system is to be installed above another appliance,
there must be a full-width, closed shelf between the appliances. (The shelf is not necessary when installation is in combination with the Miele Built-in plate warmer.)
Before the appliance is connected, the steam selector must be in the
off position to prevent an uncontrolled escape of steam or hot water and possible burns.
Always attach plug to appliance first, then plug cord into the wall
outlet. To disconnect, turn program selector to "Off", then remove plug from wall outlet.
5

IMPORTANT SAFETY INSTRUCTIONS
Use
The coffee system must be cleaned daily to prevent the growth of harmful bacteria and mold. Please read the "Coffee system care" section of this booklet.
Warning: There is a danger of scalding. The nozzles and the liquids dispensed are very hot.
The hot water and steam dispensed could cause scalding.
These functions must be used carefully. Never direct the steam nozzle towards the body.
The machine must never be used to clean objects.
To prevent burns, turn the steam selector to the off position when not
needed.
The steam nozzle and hot water dispensers become very hot
during use. Always grip the steam nozzle by the insulated collar.
Do not touch hot surfaces. Use handles or knobs.
Allow the coffee system to cool before putting on or taking off
parts, and before cleaning.
Children should not use the appliance unsupervised.
Do not use outdoors.
The use of accessory attachments not recommended by the
appliance manufacturer may result in fire, electric shock or injury to persons.
In areas subject to infestation by cockroaches or other vermin, keep
the appliance and its surroundings clean at all times. Any damage caused by pests will not be covered under warranty.
The water lines must be flushed and the machine cleaned
thoroughly before the first coffee is prepared.
Only fill the water tank with cold, fresh drinking water. The water
must be changed daily to prevent bacteria or mold growth.
Disposal of an old machine
Before discarding an old machine, turn it off and unplug it. Cut off the
power cord and remove any doors to prevent hazards.
SAVE THESE
INSTRUCTIONS
6
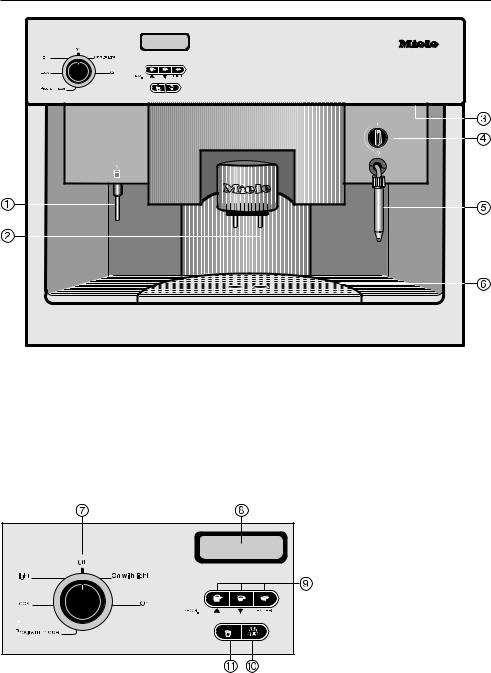
Guide to the coffee system
a Hot water dispenser
b Coffee dispensers (height-adjustable)
c Handle to open appliance front
d Steam selector
e Steam nozzle with milk frother
f Drip catch
g Program selector
h Message window
i Coffee serving buttons
j Rinse/
pre-warm button
k Hot water button
7
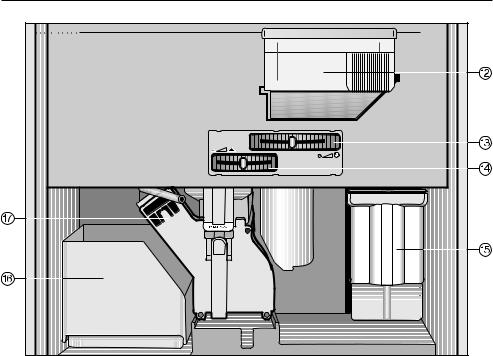
Guide to the coffee system
l Coffee bean container
m Slide control to select fineness of ground coffee
n Slide control to select quantity of ground coffee
o Water tank
p Waste unit
q Brew unit
8
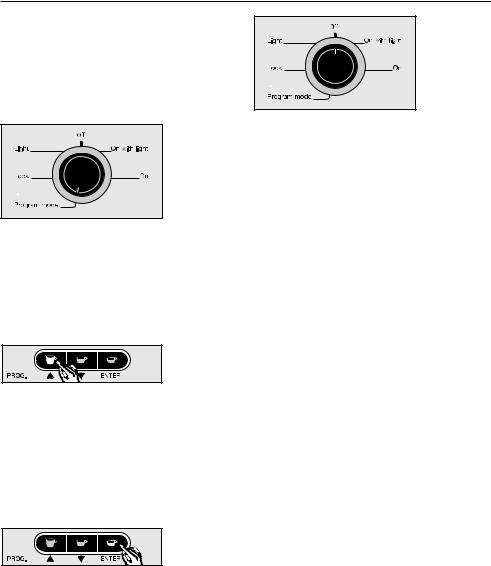
Programming
The program mode
The coffee system can be customized to each household through the "program mode."
To program the appliance:
^Turn the program selector to "Program mode".
The appliance is now in program mode and will respond according to the symbols shown under the coffee serving buttons.
^ By pressing the - or e button
–a programming option in the message window can be highlighted with an asterisk.
–the settings of the various programming options can be adjusted.
If a setting is accidentally changed, turn the program selector to "0ff". The changed setting will not be saved and the original setting will be retained.
^ By pressing ENTER
–a programming option highlighted with an asterisk can be selected.
–a change to the programmed settings can be saved.
9
Programming
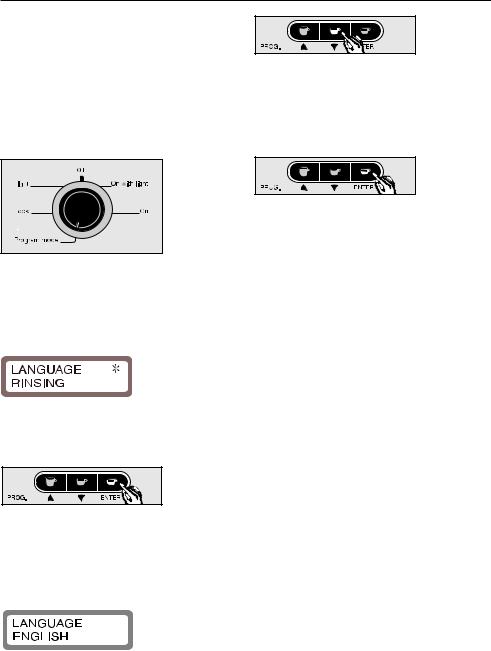
Choosing a language
The language for the commands in the message window should be selected before the machine is used.
The following languages are available: German, Dutch, Portuguese, Spanish, English, Italian, French.
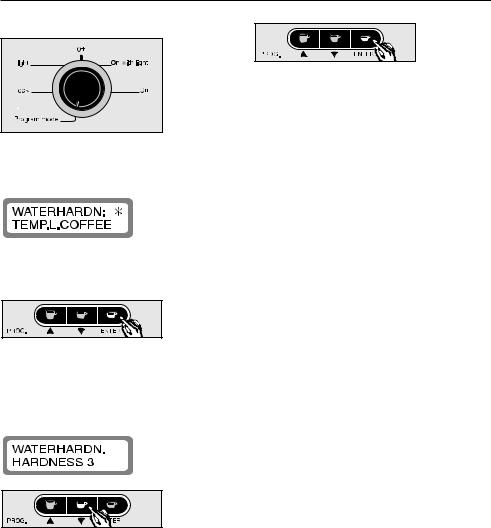
^Turn the program selector counterclockwise to "Program mode".
The following will appear in the message window:
Programming option "LANGUAGE" will be highlighted with an asterisk.
^Press ENTER to select this programming option.
The sub-menu will appear in the message window.
^Press the e button until the desired language appears (deutsch, nederlands, portugues, espanol, english, italiano or francais.)
^Press ENTER to save this setting, or turn the program selector to "0ff" to cancel if a mistake has been made.
All text in the message window will now appear in the selected language.
10
Programming
Rinsing feature
The rinsing feature flushes out coffee residue and pre-warms the coffee system. When "Rinsing - On" is selected the system will automatically be flushed and pre-warmed when the appliance is turned on. If this feature is set to "Rinsing - Off" the system will only be flushed and pre-warmed when the rinse/pre-warm button is pressed.
^Turn the program selector counterclockwise to "Program mode".
^Press the e button, to highlight "RINSING" with an asterisk.
^Press ENTER to select this programming option.
The sub-menu will appear in the message window.
^Press button e, to turn the "Rinsing" feature on or off.
^Press ENTER to save this setting, or turn the program selector to "0" to cancel if a mistake has been made.
11
Programming
Determining the water hardness
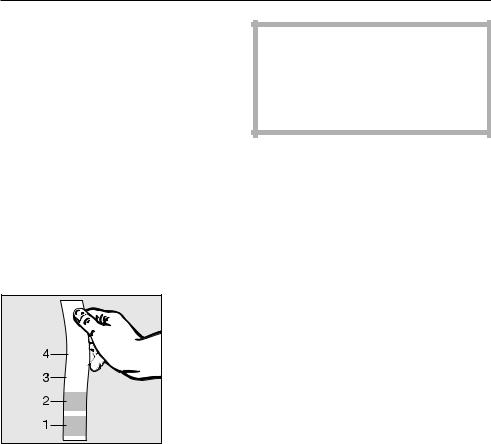
The hardness of the water (tap or bottled) used in the coffee system must be determined and programmed into the appliance. The water hardness will determine how frequently the unit must be descaled to maintain the coffee system properly. The machine monitors the volume of water passing through it in conjunction with the hardness of the water and will indicate when descaling is necessary. Your local water authority can tell you the hardness of your tap water or you can measure the hardness yourself using the enclosed test strip.
^Dip the strip in your drinking water for one second, then shake off excess water.
The result will be evident after a minute.
If the water hardness is greater than 40 gr/gal (700 ppm), the water must be mixed in equal parts with non-carbonated mineral water to prevent excessive scale build-up. Never use distilled water.
Use programming option "Water hardness" to program the water hardness.
Program |
|
Water |
gr/gal |
ppm |
|
setting |
|
Hardness |
|
|
|
|
|
|
|
|
|
Hardness 1 |
1 |
(soft) |
0 |
- 3 |
0 - 130 |
|
|
|
|
|
|
Hardness 2 |
1 |
(soft) |
4 |
- 7 |
130 - 250 |
|
|
|
|
|
|
Hardness 3 |
2 |
(medium) |
7 - 14 |
250 - 380 |
|
|
|
|
|
|
|
Hardness 4 |
3 |
(hard) |
14 |
- 21 |
over 380 |
|
4 |
(very hard) |
over 21 |
|
|
|
|
|
|
|
|
12
Programming
Setting the water hardness
^ Press ENTER to save this setting, or turn the program selector to "0ff" to cancel if a mistake has been made.
^Turn the program selector counterclockwise to "Program mode".
^Press the e button to highlight "WATER HARDN." with an asterisk.
^Press ENTER to select this programming option.
The sub-menu will appear in the message window.
^Press the e button to set the water hardness level (hardness 1 - 4).
13
Programming
Setting the drink temperatures
The appliance can be set at different temperatures to suit varying coffee drinking preferences.
Five temperature levels are available for each drink option.
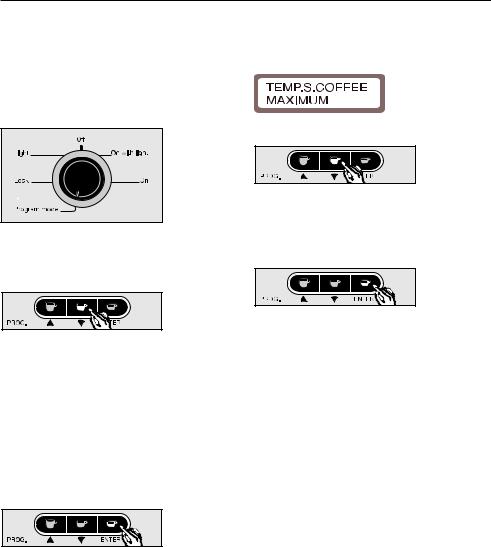
^Turn the program selector counterclockwise to "Program mode".
^Press the e button to highlight a drink option
"TEMP. L. COFFEE" (long), "TEMP COFFEE" (regular) or "TEMP. S. COFFEE" (espresso) with an asterisk.
A different temperature can be programmed for each drink.
^ Press ENTER to select the option.
Depending on the programming option selected, the sub-menu is shown in the message window as follows:
^Press the e button to set the temperature to minimum, low, medium, high or maximum.
^Press ENTER to save this setting, or turn the program selector to "0ff" to cancel if a mistake has been made.
14
Programming
Pre-brewing feature
When the pre-brewing feature is on, the freshly ground coffee is moistened with a little hot water to allow the aroma and crema of the coffee to fully develop.
When the pre-brewing feature is off, the hot water is forced through the coffee immediately.
The sub-menu will appear in the message window.
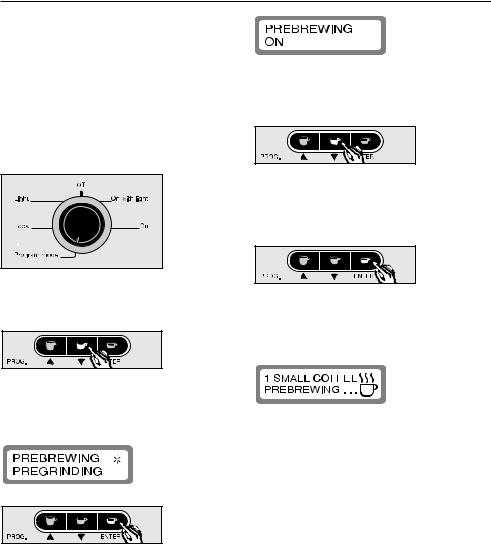
^Press the e button to set the pre-brewing process on, off or to "long" (an extra long pre-brew).
^Turn the program selector counterclockwise to "Program mode"
^Press the e button to highlight "PREBREWING" with an asterisk.
^Press ENTER to select this option.
^Press ENTER to save this setting, or turn the program selector to "0ff" to cancel if a mistake has been made.
When making coffee with the prebrewing feature on, "PREBREWING" will appear in the message window after the coffee has been ground.
15

Programming
Pre-grinding feature
The pre-grinding feature allows a new portion of beans to be ground after each coffee is dispensed, so there is always ground coffee ready. This saves time if coffee is dispensed frequently. To preserve aroma, the pre-grinding feature should be turned off when only preparing coffee occasionally.
^Turn the program selector counterclockwise to "Program mode".
^Press the e button to highlight "PREGRINDING" with an asterisk.
^ Press ENTER to select this option.
The sub-menu will appear in the message window.
^Press the e button to turn the pre-grinding feature on or off.
^Press ENTER to save this setting, or turn the program selector to "0ff" to cancel if a mistake has been made.
16
Programming
Hot water feature
When the feature "Programmed hot water" is turned on, the machine will dispense a precise, pre-programmed quantity of hot water when the hot water button dis pressed. When the feature is turned off, the machine will dispense hot water until the hot water button d is pressed again.
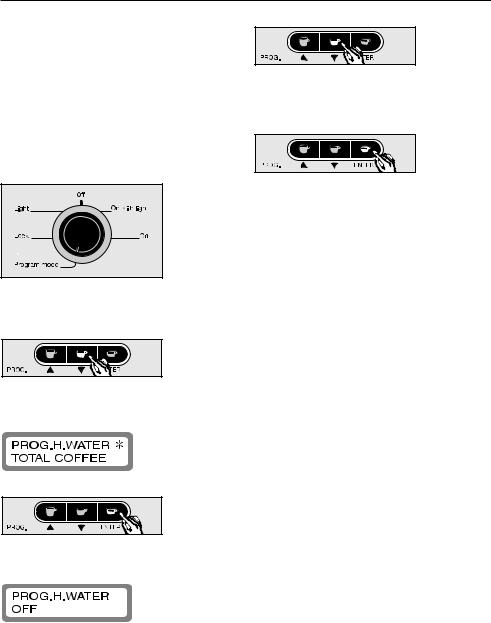
^Turn the program selector counterclockwise to "Program mode".
^Press the e button to highlight "PROG. H. WATER" with an asterisk.
^ Press ENTER to select this option.
The sub-menu will appear in the message window.
^Press the e button to set the feature on or off.
^Press ENTER to save this setting, or turn the program selector to "0ff" to cancel if a mistake has been made.
17
Programming
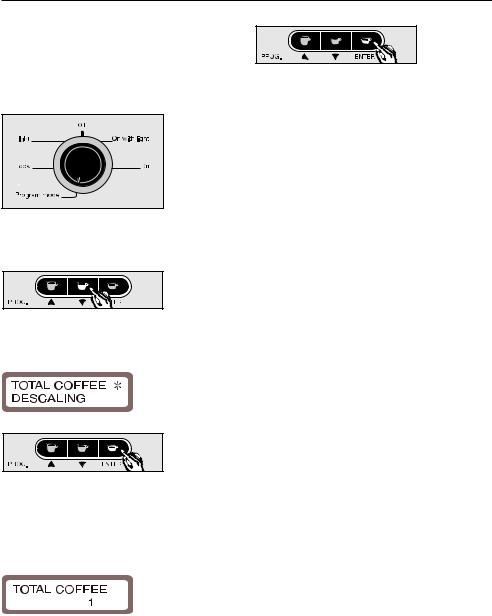
Total coffee counter
The feature "Total coffee" will display the number of cups of coffee (espresso, coffee, long coffee) that have been dispensed to date.
^Turn the program selector counterclockwise to "Program mode".
^Press the e button to highlight "TOTAL COFFEE" with an asterisk.
^ Press ENTER to select this option.
The number of coffees that have been dispensed will be displayed in the message window.
^Press ENTER to return to the main menu.
18
Programming
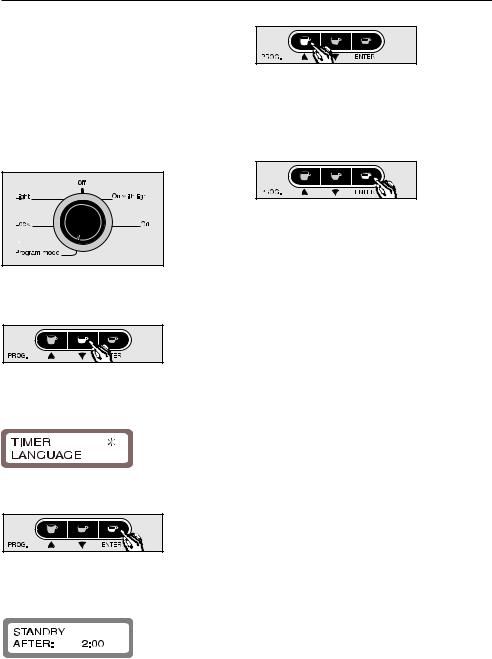
Setting the standby timer
For energy efficiency the coffee system can be set to power down after a programmed time interval.
The time is measured from the last time coffee / water was dispensed.
If the time is set at 0:00, the machine will not switch to standby.
^Turn the program selector counterclockwise to "Program mode".
^Press the e button to highlight "TIMER" with an asterisk.
^Press ENTER to select this option.
The sub-menu will appear in the message window.
^Press the e or - button to select the required length of time (e counts down, - counts up). The time can be set in 15 minute periods.
^Press ENTER to save this setting, or turn the program selector to "0ff" to cancel if a mistake has been made.
If the rinse feature is set to "On" and a drink was already dispensed, the system will be rinsed automatically before going into standby.
19
System lock
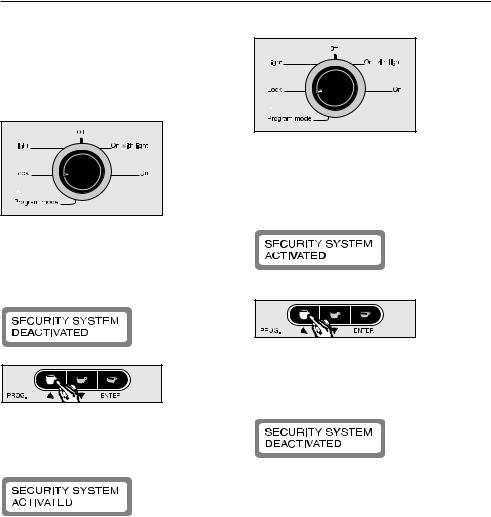
The coffee system can be locked so that it can not be used by children or those not familiar with the operating instructions.
Activating the system lock
^Turn the program selector counterclockwise to the "Lock" position.
The following will appear in the message window:
^ Press and hold the - button.
The following appears in the message window:
The appliance is now locked and will not operate. The system will remain locked and the lighting will remain turned off even if the program selector is turned to other positions.
Deactivating the system lock
^Turn the program selector counterclockwise to the "Lock" position.
The following will appear in the message window:
^ Press and hold the - button.
The following appears in the message window:
The machine is now unlocked and ready for use.
20
 Loading...