


TTUSB05XL

USB Turntable
(ION TTUSB05XL)
Quick Start Owner’s Manual (ENGLISH)
Box Contents:
Manual de inicio rápido para el usuario (ESPAÑOL)
Contenido de la caja:
Kurzbedienungsanleitung
Inhalt der Verpackung:
Guide d’utilisation rapide (FRANÇAIS)
Contenu de la boîte :
Manuale Rapido di Utilizzazione (ITALIANO)
Contenuti della confezione:
1. ION TTUSB05XL Turntable
2. Dust Cover
3. Grip Mat
4. USB Cable
5. CD
6. 45RPM Adapter
1. Giradiscos ION TTUSB05XL
2. Cubierta antipolvo
3. Alfombrilla
4. Cable USB
5. CD
6. Adaptador para 45 RPM
1. ION TTUSB05XL Turntable
2. Staubabdeckhaube
3. Matte für den Plattenteller
4. USB Kabel
5. CD
6. 45RPM Adapter
1. Tourne-disque ION TTUSB05XL
2. Couvercle anti-poussière
3. Tapis
4. Câble USB
5. Disque compact
6. Adaptateur 45 t/min
1. Giradischi ION TTUSB05XL
2. Coperchio antipolvere
3. Tappetino
4. Cavo USB
5. CD
6. Adattatore 45 giri
(DEUTSCH)
o Make sure all items listed on the front of this guide are included in the box.
(ENGLISH) QUICK START GUIDE
o READ SAFETY INSTRUCTION BOOKLET BEFORE USING THE PRODUCT
o Go to http://www.ion-audio.com for product registration.
INTRODUCTION
The USB turntable connects directly to your computer to turn your treasured vinyl recordings into digital music. We
have included two software packages to aid you in converting your vinyl recordings:
EZ Vinyl/Tape Converter (PC only) is the quickest and easiest way to turn your recordings into digital media.
EZ Vinyl/Tape Converter conveniently saves your recordings in your iTunes library. Novice users may find this
application preferable. We have included a handy Quickstart Guide with step-by-step instructions on software
installation and operation.
EZ Audio Converter (Mac only) is a basic converter application for Mac OS X and is ideal for novice users.
Please refer to the included Software Quickstart Guide for step-by-step instructions on software installation and
operation.
To install the software: simply insert the included CD into your computer and follow the on-screen instructions. After
you finish converting your vinyl, you can then burn to CD or load onto portable media devices.
* iTunes and iPod are trademarks of Apple, Inc., registered in the U.S.A. and other countries.
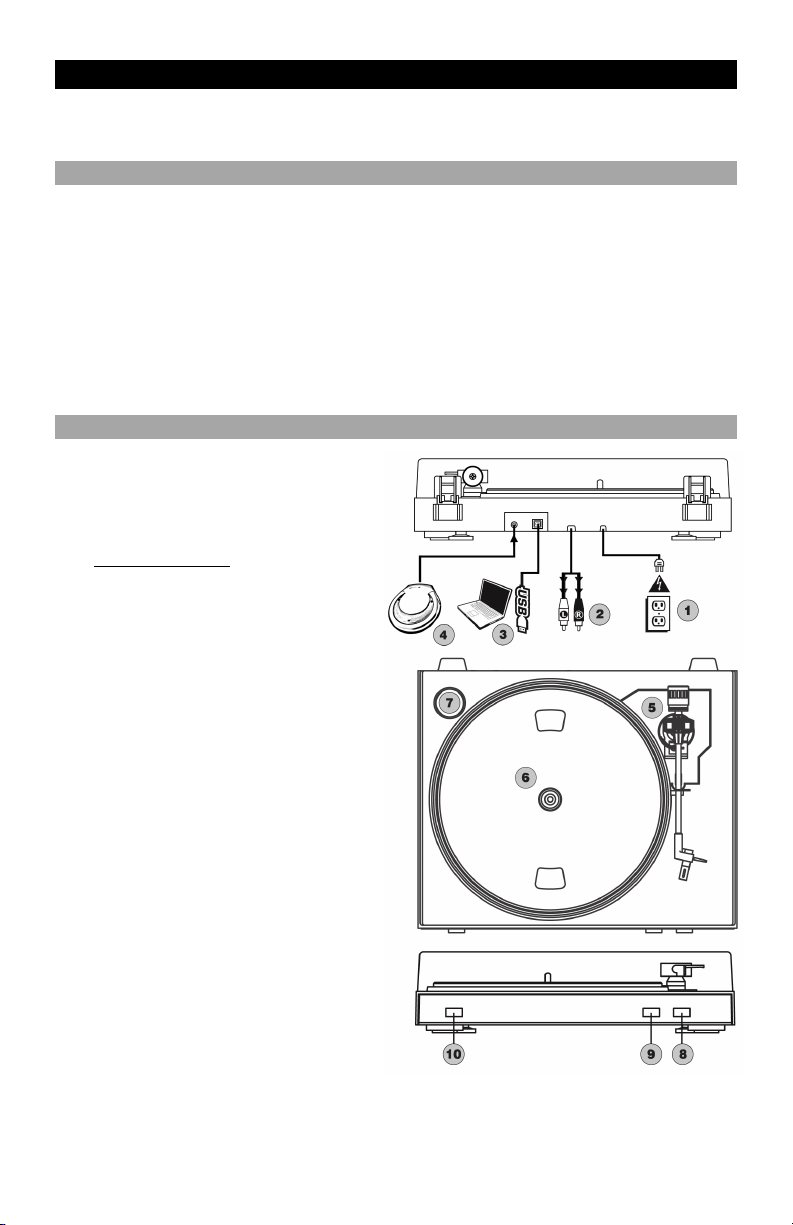
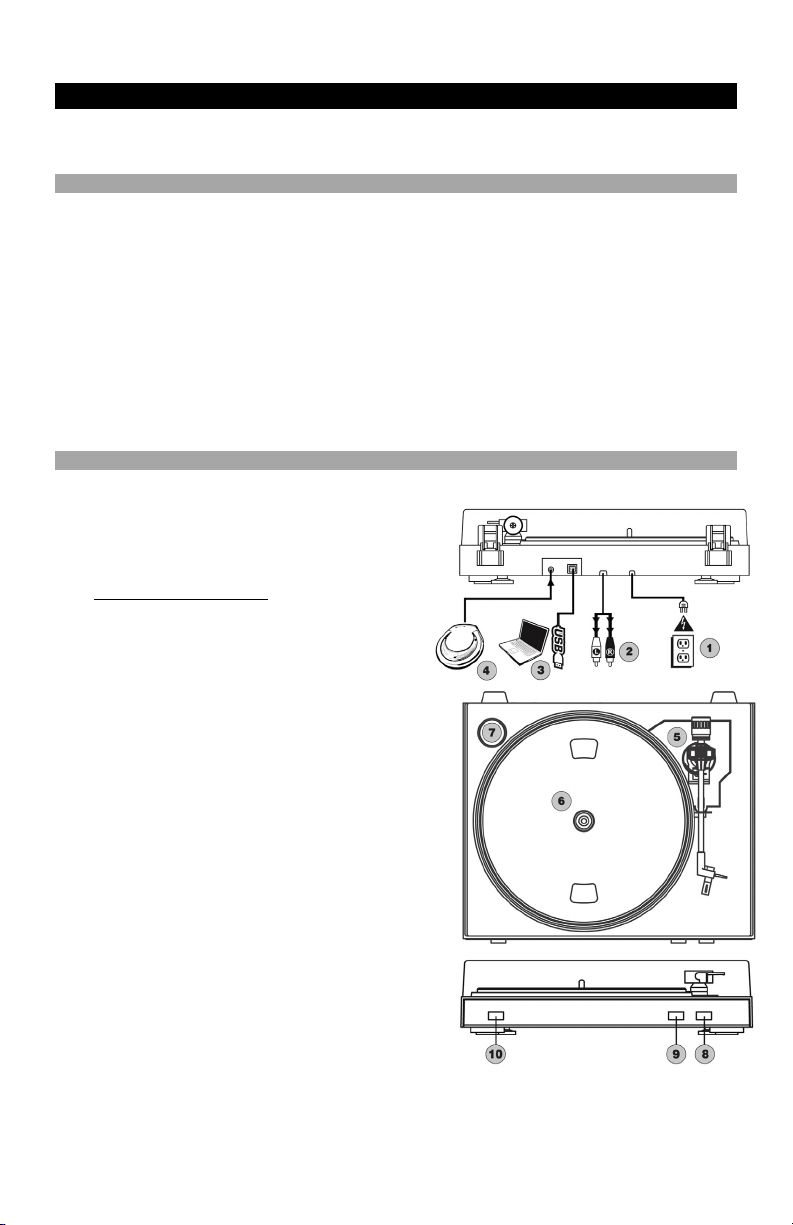
GENERAL CONTROLS
1. Power Cable: This power cable should be
plugged into a wall receptacle AFTER all audio
connections are made.
2. RCA Audio Output Cables: These cables should
be plugged into a CD or Auxiliary LINE input. This
output should be connected to your receiver, home
stereo, or other speaker system.
IMPORTANT WARNING: The RCA cables are
LINE level. Please only connect these cables
to LINE level inputs. You may damage your
receiver if you plug in a LINE level into a
PHONO input.
3. USB Audio Output: Use the included USB Cable
to connect your turntable to your computer. For
transferring your vinyl records to your computer,
we have provided two different software packages
on the included CD.
4. 1/8” Stereo Line Input: Connect Tape Players,
Reel to Reel, or any other audio source here. This
signal is sent to the computer through the USB.
Make sure that your phono cartridge is
installed while using this input for maximum
sound quality. Also make sure that your RCA
jacks are either plugged into an input device or not
in contact with metal.
Note: The 1/8" audio input is not routed to the
turntable's RCA output jacks, only to your
computer via USB.
5. Tonearm: The tonearm can be raised and lowered
by hand, or by pressing the Raise/Lower button.
6. Platter: Put the record you would like to play on
this platter.
7. 45 RPM Adapter Holder: Holds the included 45
RPM adapter. When not using the adapter, please
place it in this holder.
8. Raise/Lower Button: Press this button in to raise
the tonearm. To lower the tonearm, press this
button so it is in the out position.
9. Stop: Press this button to stop playback. When
this button is pressed, the tonearm will return back
to its original resting position.
10. Speed 33/45 RPM: This button controls the
playback speed of the record. Depending on what
kind of record you are playing, you will need to
adjust the speed to match the speed of the record (or else the music might sound too slow or too fast).
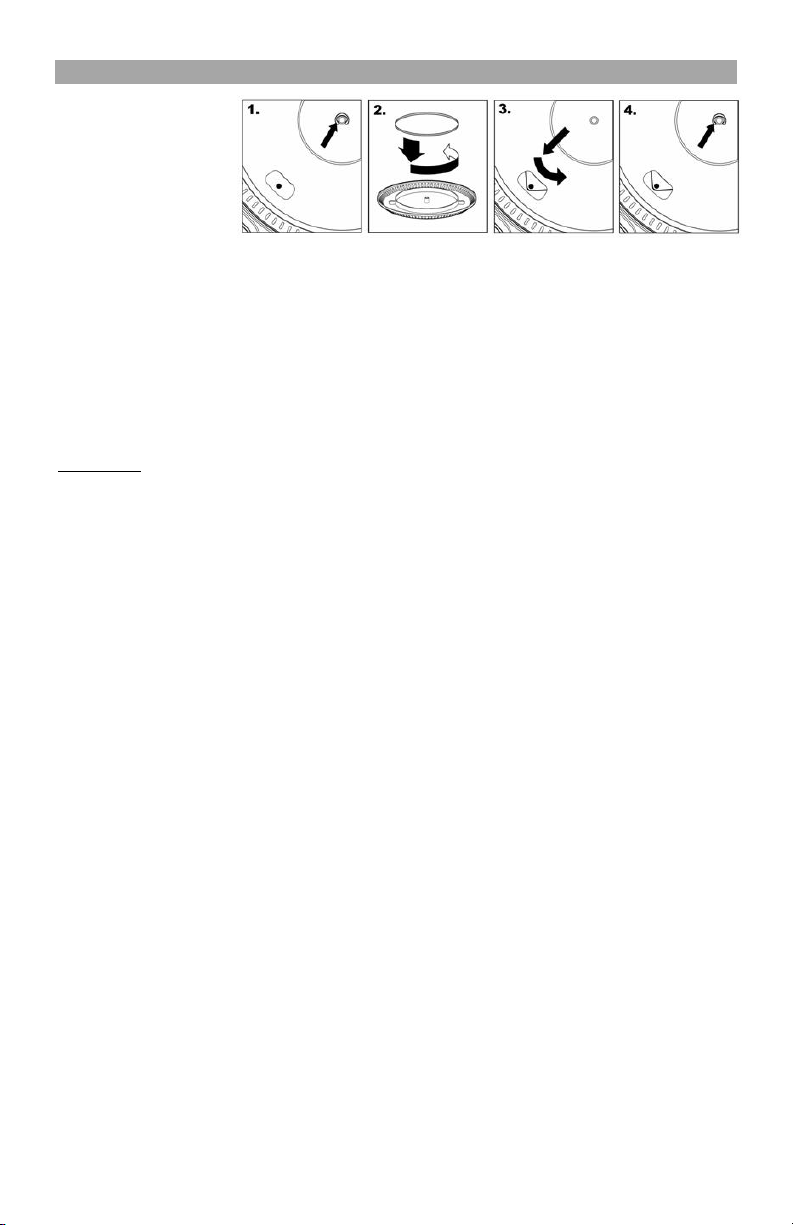
ATTACHING THE DRIVE BELT
The ION TTUSB05XL
platter is driven by a
rubber drive belt attached
to the turntable motor. In
some rare cases, this belt
may slip off, causing the
turntable platter to stop
spinning. If the turntable
does not begin spinning
when you lower the tonearm, the most likely cause is the belt. Please follow the instructions below in order
to properly re-attach the belt to the motor and the platter.
1. Begin by removing the clip which secures the platter to the center spindle. After you have removed the
clip, remove the platter.
2. Turn the platter upside down. Place the rubber drive belt around the inner bottom ring of the turntable
platter, making sure that the rubber belt is not twisted.
3. Place the platter back onto the center spindle and rotate it so that you can see the motor spindle
through the hole on the platter. Now reach into the hole, pull the rubber drive belt off the inner ring and
install it over the motor spindle, as shown in the illustration. Be careful not to twist the belt during this
step.
4. Lastly, replace the clip onto the center spindle to secure the platter
IMPORTANT
Make sure that the rubber grip mat is always placed on top of the platter while using the turntable. Failure to
use the grip mat may cause damage to your media as well as damage to the turntable.
Remove the plastic cartridge cover (needle cover) before operating the turntable.
BEFORE RETURNING THE PRODUCT, please contact ION Audio or your retailer for technical
support. Contact information can be found in the Safety Instruction Booklet included with this
product.
1
(ESPAÑOL) MANUAL DE COMIENZO RÁPIDO DEL LECTOR
1. Asegúrese de que todos los artículos incluidos al inicio de este manual están incluidos en la caja.
2. LEA LAS INSTRUCCIONES DEL FOLLETO DE SEGURIDAD ANTES DE UTILIZAR EL PRODUCTO.
3. Visite http://www.ion-audio.com para registrar el producto.
INTRODUCCIÓN
El giradiscos USB se conecta directamente a su computadora para convertir sus valiosos vinilos en música digital.
Hemos incluido dos paquetes de software para ayudarle a convertir sus grabaciones de vinilo:
EZ Vinyl/Tape Converter (PC solamente) es la forma más rápida y fácil de convertir las grabaciones en
medios digitales. Este software guarda convenientemente sus grabaciones en la biblioteca de iTunes. Es
posible que los usuarios novicios prefieran esta aplicación. Incluidos una práctica Guía de inicio rápido con
instrucciones paso a paso sobre la instalación y la operación del software.
EZ Audio Converter (Mac únicamente) es una aplicación de convertidor básica para Mac OS X, ideal para
usuarios novicios. Consulte en la Guía de inicio rápido del software incluida las instrucciones detalladas sobre
la instalación y la operación del software.
Para instalar el software: inserte simplemente el CD incluido en la computadora y siga las instrucciones de la
pantalla. Después de terminar de convertir su vinilo, puede quemarlo en CD o cargarlo en dispositivos de medios
portátiles.
* iTunes e iPod son marcas registradas de Apple, Inc., registradas en EE.UU. y otros países.
CONTROLES GENERALES
1. Cable de alimentación: Este cable de alimentación se
debe enchufar a un tomacorriente en la pared DESPUÉS
que se hagan todas las conexiones de audio.
2. Cables RCA de salida de audio: Estos cables se deben
enchufar a una entrada de CD o de LÍNEA auxiliar Esta
salida se debe conectar a su receptor, estéreo hogareño u
otro sistema de altavoces.
ADVERTENCIA IMPORTANTE: Los cables RCA son
para nivel de LÍNEA. Conecte estos cables sólo a las
entradas de nivel de línea (LINE). Puede dañar el
receptor si enchufa un nivel de línea en una entrada
fonográfica.
3. Salida de audio USB: Use el cable USB incluido para
conectar su giradiscos a su computadora. Para transferir
sus discos de vinilo a la computadora, proporcionamos dos
paquetes de software diferentes en el CD incluido.
4. Entrada de línea estéreo de 1/8”: Puede conectar aquí
reproductores de casetes y cintas o cualquier otra fuente
de audio. Esta señal se envía a la computadora por el USB.
Asegúrese de que su cápsula fonográfica esté instalada
cuando usa esta entrada, para lograr la máxima calidad del
sonido. Asegúrese también de que sus jacks RCA estén
enchufados a un dispositivo de entrada o que no estén en
contacto con partes metálicas. Nota: La entrada de audio
de 1/8" no se encamina a los conectores de salida RCA
del giradiscos, sino sólo a su computadora mediante USB
5. Brazo de lectura: El brazo de lectura se puede subir y
bajar a mano o presionando el botón Subir/Bajar.
6. Plato: Coloque en este plato la grabación que desea
reproducir.
7. Soporte del adaptador para 45 rpm: Puede colocar aquí
el adaptador para 45 cuando no lo usa.
8. Botón Subir/Bajar: Presione este botón hacia adentro
para subir el brazo de lectura. Para bajarlo, presione este
botón de modo que quede en posición hacia afuera.
9. Parar: Pulse este botón para detener la reproducción.
Cuando se pulsa este botón, el brazo de lectura vuelve a
su posición de reposo original.
10. Velocidad 33/45 RPM: Este botón controla la velocidad de
reproducción de la grabación. Según el tipo de grabación
que reproduzca, necesitará ajustar la velocidad para
hacerla coincidir con la velocidad del disco (de lo contrario,
la música puede sonar demasiado lenta o demasiado rápida).
2
 Loading...