

Page 1

NetAtlas Enterprise
Ethernet Switch Manager
Quick Start Guide
Version 1.02
1/2006
Page 2

NetAtlas Enterprise Quick Start Guide
1 Introduction
The NetAtlas Enterprise Ethernet Switch Manager is an Element
Management System (EMS) that retrieves management information
from switches using the SNMP protocol. The EMS allows you to
manage multiple switches from a central location.
This guide shows you how to install the EMS. Refer to the user’s guide
for background and configuration information. The NetAtlas Enterprise
Ethernet Switch Manager will be referred to as the EMS in this guide.
2 System Requirements
These are the system requirements for the Windows version of the
EMS.
• CPU: Intel Pentium 4, 1.6 GHz or above
• Memory (RAM): 1 GB or more
• Hard Disk free space: 20 GB or more
• Screen Resolution: 1024x768 pixels
• Ethernet Adaptor: 10/100 Mbps
• Operating System: Windows 2000 (with service pack 1), Windows XP
or Windows Server 2003 and all using NTFS file system.
• Database Program: PostgreSQL 8.0 later versions.
• Castle Rock’s SNMPc 6.
2.1 EMS Installation Overview
The following gives an overview of what you need to do to install the
EMS:
1 Install SNMPc. See the documentation that comes with your SNMPc
for information.
2 Install the EMS. The PostgreSQL database will be installed during
the EMS installation.
Note: The installation program will bypass the PostgreSQL
installation if it is already installed.
2
Page 3
NetAtlas Enterprise Quick Start Guide
3 Add custom MIB files in SNMPc.
4 Locate device(s) that you want the EMS to manage.
5 If required, configure the ODBC driver to connect to the database.
3 Installing the EMS
Follow the steps below to install the EMS server on a computer.
1 Install SNMPc if it is not already
installed. See the user’s guide for
more information.
2 Find and double-click
NetAtlasEnterprise_S102.exe on
your EMS CD.
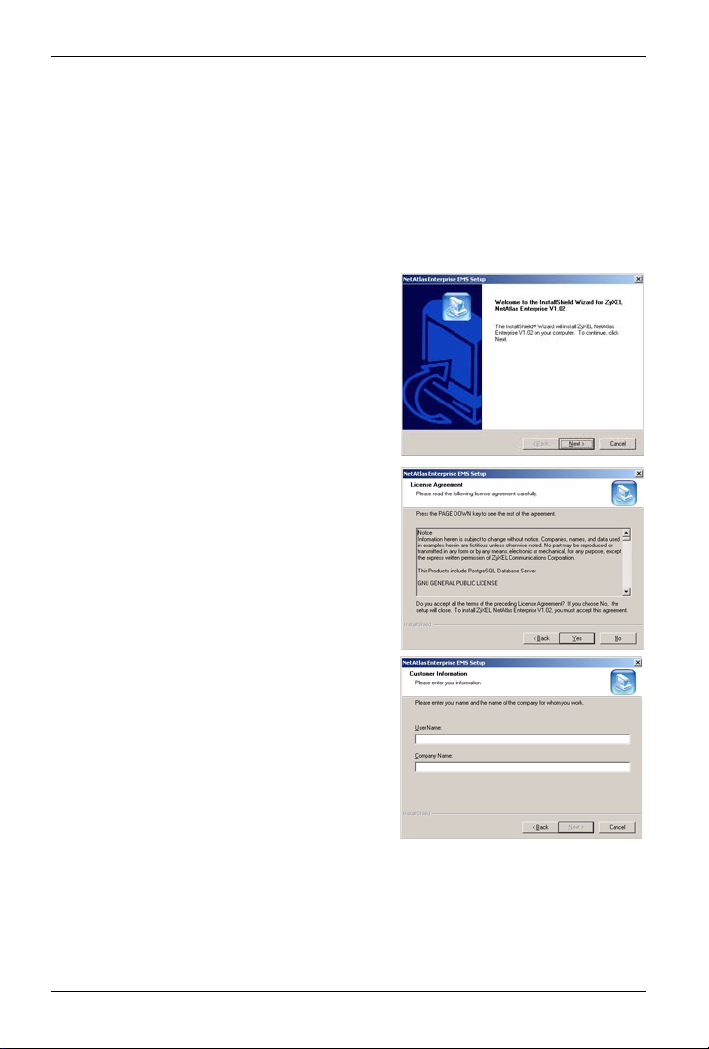
3 A Welcome screen displays. Click
Next to continue.
4 Read the license agreement. Click
Yes to accept the agreement.
5 Type your name and company name
in the following screen. Click Next to
continue.
3
Page 4

NetAtlas Enterprise Quick Start Guide
6 You must select the same directory
where you installed SNMPc. Click
Browse if it’s different from the
destination folder shown.
Click Next to continue.
7 In the next screen, click an icon to
install the EMS server or remote
client.
If this is the first time you install EMS,
install the server version.
8 The installation program will proceed
to install PostgreSQL if you have not
already installed it.
A screen displays as shown. Enter the
default account user name
(PostreSQLDB) and password
(PostreSQL1234) to run the PostgreSQL program on your computer.
Click Apply.
Note: The account user name and password are case-sensitive.
9 When the installation process is
complete, a screen displays as
shown. Click Finish.
4
Page 5

NetAtlas Enterprise Quick Start Guide
4 SNMPc Network Manager Startup
Start the SNMPc Network Manager
manually (from the Windows Start
menu) or have it start automatically
each time you turn on your computer.
To start SNMPc automatically each
time you turn on your computer, click
Config, System Startup, select
Auto Startup and then click OK.
Conversely, clear this check box if you do not wish SNMPc to
automatically start each time you turn on your computer.
5 Adding MIBs
The Management Information Base (MIB) is designed for holding
management information on systems (such as the switch that the
standard MIB does not include).
1 From the SNMPc Network Manager main screen, click Config, MIB
Database.
2 In the Compile Mibs screen that
displays, scroll down to the bottom of the
Mibs to Compile list box and click Add.
Note: If you have uninstalled an earlier
version of the EMS, you must
remove zyxel.mib first.
3 Select the following MIBs in the Add
Mibs list box:
• rfc2674.mib
• rfc2925.mib
• rfc3291.mib
• rfc3621.mib
• OSPF-MIB.mib
• zyxel-es3124.mib
• zyxel-es3124pwr.mib.
5
Page 6

NetAtlas Enterprise Quick Start Guide
• zyxel-es2024a.mib
• zyxel-gs2024.mib
• zyxel-gs4024.mib
• zyxel-gs4012f.mib
• zyxel-es2108.mib
• zyxel-es2108g.mib
Note: You MUST add the MIBs in the order listed above.
4 Click OK.
5 Click Compile in the Compile Mibs screen.
6 Click Yes when asked to confirm, then click OK.
7 Finally click Done in the Compile Mibs screen.
6 Finding your Switch
The SNMPc Network Manager can find new devices automatically using
auto-discovery (enabled by default) or you will have to add device(s)
manually.
6.1 Device Auto-Discovery
1 To enable auto-discovery and then
find your device, click Config,
Discovery/Polling.
2 Select the Enable Discovery check
box and click OK.
3 Find your device in the Device List
panel. Double-click the device icon to
access the EMS.
6
Page 7

NetAtlas Enterprise Quick Start Guide
6.2 Add Device(s) Manually
If you have disabled auto-discovery,
follow the steps below to add your
device(s) manually.
1 Click Insert, MAP Object, Device.
2 In the MAP Object Properties
screen, enter a descriptive device
name and IP address for the device
and then click OK.
7 Using SNMP
Check that you are using SNMP Version
2c (SNMPv2c). If you are not using SNMPv2c, you must uninstall any
previous versions and install SNMPv2c. Refer to RFC 1901 for more
information on SNMPv2c. Follow this procedure to use SNMPv2c.
1 Right-click the Device icon and select
Properties.
2 Click the Access tab.
3 Set the specified fields in the Map
Object Properties screen exactly as
shown in the figure.
Note: For security purposes, it is
strongly recommend to change
the Read Community and
Read/Write Community
defaults.
Write down this information in a secure place so you will not
forget it later.
7
Page 8

NetAtlas Enterprise Quick Start Guide
4 Click OK. After the device has been
found, the icon and label appear in
the network manager view window.
5 Right-click on the device icon to view
a set of SNMPc network manager
shortcuts. Click Properties to verify
the information you entered in the
previous step.
6 Make sure the PostgreSQL database
is running. PostgreSQL should start
automatically when you start
Windows. If it does not, click Start
(or start), Programs, PostgreSQL
8.0 and then click Start service.
8 Accessing the EMS
Follow the steps below to access the EMS.
1 In the SNMPc main screen, double-click
the device icon to view the Switch
Manager.
2 A screen displays. Click the Switch
Manager icon to access the main
EMS configuration screen.
9 Troubleshooting
1 SNMPc, EMS and/or PostgreSQL
will not install properly
• Make sure that the computer on which you want to install the
SNMPc, EMS and PostgreSQL meets the minimum hardware
and software requirements.
• To install PostgreSQL, make sure your computer is using NTFS
file system.
8
Page 9

NetAtlas Enterprise Quick Start Guide
• Shut down any running services or applications which may affect
the installation.
• Remove any previous versions of PostgreSQL and SNMP software from your computer.
• Re-install SNMPc and EMS in that order.
2 I cannot find my device in the SNMPc Management screen.
• Check that you have added and compiled the MIBs correctly (see
Section 5 on page 5). Make sure these instructions are followed
exactly.
• Check that you have enabled auto-discovery; see Section 4 on
page 5.
• Check that the map object properties are correct for initial installation; see Section 6.2 on page 7. Make sure the IP address
entered is the IP address of the switch you want to manage via
the EMS.
• Check that the ODBC driver is correctly configured; see Section
9.1 on page 9.
• Make sure that PostgreSQL is running.
• Make sure that the computer you have installed the EMS on, is
connected to the network where the switch is located.
• Make sure your computer’s Ethernet card is working properly.
• If the problem still persists, uninstall and re-install the EMS software.
9.1 Configuring the ODBC Driver
The ODBC driver should already be installed from the EMS installation.
You must configure the ODBC driver for the EMS to connect to the
PostgreSQL database successfully.
Follow the steps below to configure the ODBC driver in Windows 2000.
Steps are similar for other supported Windows operating systems.
1 Click Start, Settings and Control
Panel to open the Control Panel
screen. Double-click Administrative
Too ls.
9
Page 10

NetAtlas Enterprise Quick Start Guide
2 Double-click Data Source (ODBC).
3 A screen displays as shown. In the
User DNS screen, select
PostgreSQL and click Configure.
4 The PostgreSQL ODBC
Driver Setup screen displays.
Configure the Database,
Server and Port fields exactly
as shown in the figure.
5 Enter the default user name
“root” in the User Name field.
6 Enter the default password of “1234” in the Password field.
Note: The account user name and password are case-sensitive.
7 Click Save to save the changes and close this screen.
10
 Loading...