


 Loading...
Guitar Amplifier
Reference Manual
Contents |
|
Introduction ........................................................................... |
2 |
Main Features ............................................................................. |
2 |
Accessories ................................................................................ |
2 |
Names and Functions .......................................................... |
3 |
Control Panel .............................................................................. |
3 |
Rear Panel .................................................................................. |
6 |
Connection ............................................................................ |
7 |
Connection Example (on THR30II Wireless) .............................. |
7 |
Power ......................................................................................... |
8 |
Connecting to guitar by wireless (THR-II Wireless only) ............ |
9 |
Connecting to a smart device ................................................... |
10 |
Connecting to a computer ........................................................ |
12 |
Troubleshooting ................................................................. |
14 |
Specifications ..................................................................... |
16 |
Technical Specifications ........................................................... |
16 |
THR30II Wireless, THR10II Wireless* |
|
Power Button LED status list ............................................ |
17 |
Signal Flow Diagrams ............................................................... |
18 |
Amp Modeling List .................................................................... |
19 |
EN
THR30II Wireless THR10II Wireless THR10II Reference Manual 1

Introduction
Thank you for purchasing this Yamaha product.
This product is an exceptionally versatile and compact guitar amplifier designed for use in your home, rehearsal spaces, and other places—virtually anywhere you want it!
We recommend that you read this manual carefully so that you can fully take advantage of the advanced and convenient functions of the product. We also recommend that you keep this manual in a safe and handy place for future reference
Main Features
•Sophisticated guitar amplifier utilizing advanced amp modeling, made possible with Yamaha’s original VCM technology
•Advanced wireless guitar transmitter Relay G10T (made by LINE6) for wireless use (THR30II Wireless and THR10II Wireless only)
•Bluetooth® capability enables playing music and editing sound settings from a smart device and a computer.
•Built in rechargeable battery enables use without power adaptor.
•Yamaha’s original Extended Stereo technology enables an exceptionally wide stereo image, much wider than the unit’s compact size.
•The audio interface capability enables recording your guitar to computer via USB.
•Incorporates a chromatic auto tuner.
* What is VCM Technology?
An original physical modeling technology developed by Yamaha, VCM Technology reproduces the characteristics of analog circuitry at a micro level to accurately reproduce the sound of the modeled equipment.
Accessories
•Power Adaptor
•Quick Guide
•Safety Instructions Sheet
•Service Offices list
•Cubase AI Download Information
In this document, the THR30II Wireless, THR10II Wireless and THR10II are collectively called THR-II. The THR30II Wireless and THR10II Wireless are called THR-II Wireless.
THR30II Wireless THR10II Wireless THR10II Reference Manual 2

Names and Functions
Control Panel
THR30II Wireless |
|
|
|
|
!7 |
!8 |
!9 |
|
|
|
!6 |
q |
|
|
w |
|
!5 |
|
|
|
e r |
t y u i |
o !0 !1 !2 !3 !4 |
THR10II Wireless |
|
!7 |
THR10II |
|
|
|
!8 |
!6 |
q
!5
w
e r y u i o !0 !1 !2 !3 !4 * THR10II Wireless only
q [  ] (Power Button) / Power Button LED
This is the unit’s power button.
When the power is ON, the Power Button LED, the lamp corresponding to the selected amp type and the Power Lamp in the speaker cabinet light.
w LED Display
Indicates each of the THR-II’s settings and conditions.
e[TAP/TUNER] button
Tuner Function
Holding the switch for 1 second engages the tuner function and lights the 
 indicators.
The tuner is calibrated to A4=440Hz. Tune the guitar until the desired pitch appears in the LED display.
When only the circle ( ) in the center of the |
|
display is visible, tuning is accurate. |
Pitch is low |
In tune |
Pitch is high |
Press the [TAP/TUNER] button (less than one second) to turn OFF the tuner function.
*When the tuner function is set to ON, the guitar sound to the main speaker, [PHONES] jack, and [USB] jack is muted. The sounds from the [AUX] jack, [USB] jack and Bluetooth are output to the main speaker and [PHONES] jack.
THR30II Wireless THR10II Wireless THR10II Reference Manual 3
Names and Functions
Tap Tempo Function
When an ECHO or ECHO/REV effect is selected with the [ECHO/REV] knob !2control, the tempo of the delay can be set by tapping (more than twice) on the switch.
Extended Stereo Setting
Hold the switch for more than three seconds to switch the Extended Stereo* function ON/OFF. ON: “#” on LED Display w is off (default setting).
OFF: “#” on LED Display w is lit.
*Extended Stereo: The Extended Stereo function produces a much wider stereo field. Extended Stereo affects the sounds from the [AUX] jack, [USB] jack and Bluetooth as well as the guitar sounds with reverb effects applied.
*The Extended Stereo setting (ON/OFF) is saved when the power is turned OFF.
r [AMP] knob
Selects the amp type. The lamp for the corresponding amp type lights.
*When the power is turned ON, the most recent amp type is selected.
Tips on Creating Sound
Using the [GAIN] knob y and [MASTER] knob u in combination gives you broad control over the sound for each amp type, except ACO and FLAT. Setting the [GAIN] knob and [MASTER] knob properly provides the desired amount of distortion on the power amp. Once you have the desired sound, use the [GUITAR] knob !3 to set the overall volume of the guitar sound.
t [AMP] switch (THR30II Wireless only)
Selects the amp mode. Selects the amp modeling by combination of amp mode and amp type. The [AMP] knob r lamp lights for the corresponding amp mode color.
For further details of amp modeling settings that can be selected by combining the amp mode and amp type, refer to the Amp Modeling List (page 19)
y [GAIN] knob
Adjusts the amount of guitar distortion. Turn the knob to the right to increase the amount of distortion.
*When ACO is selected with the [AMP] knob r, the modeled sound is a mixture of the front-mic’d sound and pickup sound of an acoustic electric guitar. (Minimum setting produces the direct pickup sound only. Maximum setting produces the mic sound only.)
u [MASTER] knob
Adjusts the volume for the guitar sound. Turn the knob to the right to increase the volume and create power amp distortion and change in the low-range frequency.
*When BASS, ACO or FLAT is selected with the [AMP] knob r, this only adjusts the volume.
i[BASS] knob
Tone adjustment for the guitar’s sound. Turn the knob to the right to enhance the low-range frequencies.
o [MIDDLE] knob
Tone adjustment for the guitar’s sound. Turn the knob to the right to enhance the mid-range frequencies.
!0[TREBLE] knob
Tone adjustment for the guitar’s sound. Turn the knob to the right to enhance the high-range frequencies.
!1[EFFECT] knob
Selects one of four different effects: CHORUS, FLANGER, PHASER, or TREMOLO. Turn the knob to the right to increase the amount of each effect.
* Turn the knob fully to the left to set the effect OFF.
THR30II Wireless THR10II Wireless THR10II Reference Manual 4
Names and Functions
!2[ECHO /REV] knob
Selects one of four different effects: ECHO (tape echo), ECHO/REV (tape echo/reverb), SPRING (spring reverb), and HALL (hall reverb).
Turn the knob to the right to increase the amount of each effect.
*Turn the knob fully to the left to set the effect OFF.
*When ECHO or ECHO/REV is selected, the [TAP/TUNER] button e can be used to set the delay time.
!3[GUITAR] knob
Adjusts the overall volume of the guitar sound.
*This knob’s setting has no effect on the signal sent to the [USB] jack @0.
*The volume output to the [LINE OUT] [L] [R] jack (THR30II Wireless only) is constant regardless of the setting of the [GUITAR] knob.
!4[AUDIO] knob
Adjusts the audio playback volume for audio from the computer connected to the [USB] jack @0, an audio device connected to the [AUX] jack !7, or a smart device connected by Bluetooth (page 10).
!5[INPUT] jack
This is a standard phone jack used to connect a guitar to the THR-II.
*Connecting the Relay G10T to the [INPUT] jack starts charging that device automatically. (THR-II Wireless only)
*The optimal channel is set automatically by connecting the Relay G10T to the [INPUT] jack for at least 10 seconds. (THR-II Wireless only)
!6[PHONES] jack
This is a stereo mini phone jack used to connect stereo headphones to the THR-II.
* Speaker sound is muted when a plug is inserted into the [PHONES] jack.
!7[AUX] jack
This is a stereo mini phone jack used to connect an external audio device to the THR-II.
* The signal received at the [AUX] jack is not sent to the [USB] jack @0.
!8[USER MEMORY] [1] [2] [3] [4] [5] button
Saves up to five sets of amp section controller settings (GAIN, MASTER, BASS, MIDDLE, TREBLE, EFFECT, ECHO/REV).
Press and hold the number of the desired [USER MEMORY] button for saving your settings to (about 2 seconds). The save operation is complete when the memory number for the button being pushed appears in the LED Display w. Press one of the numbered buttons (less than 2 seconds) to recall the saved settings.
*On the THR10II Wireless and THR10II, enable Bluetooth by pressing the [USER MEMORY] button [4] and [5] simultaneously.(Same as [Bluetooth] button !9)
!9[Bluetooth]button (THR30II Wireless only)
Set the Bluetooth. Hold the Bluetooth button (for more than three seconds) to switch the pairing mode (the LED Display w flashes in green).
For further details of Bluetooth connecting, refer to the Connecting to a smart device. (page 10)
THR30II Wireless THR10II Wireless THR10II Reference Manual 5
Names and Functions
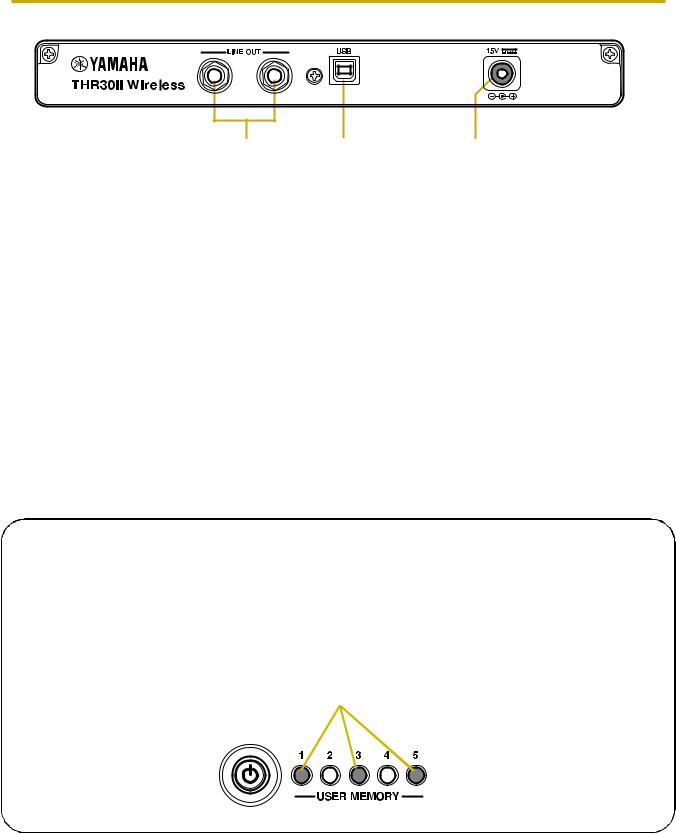
Rear Panel
L |
R |
@0 @1 @2
@0[LINE OUT] [L] [R] jack (THR30II Wireless only)
These are standard phone jacks used to output line level audio signals.
For connection to external devices with line level signals.These jacks can be connected to phone-type (balanced/unbalanced) plugs.
@1[USB] jack
This jack is used to connect THR-II to a computer via a USB cable.
@2[15V] DC IN connector
Connects the supplied power adaptor.
About the Default Settings
To reset all contents stored in the user memory, switch on the power while holding down [USER MEMORY] buttons [1], [3], and [5].
NOTICE
All contents stored in the user memory will return to factory defaults when the unit is initialized.
Hold down switches [1], [3], and [5].
Switch on the power.
THR30II Wireless THR10II Wireless THR10II Reference Manual 6
Loading...