


 Loading...
A
Tuner
OWNER’S MANUAL

CAUTION: READ THIS BEFORE OPERATING YOUR UNIT.
1To assure the finest performance, please read this manual carefully. Keep it in a safe place for future reference.
2Install this unit in a well ventilated, cool, dry, clean place – away from direct sunlight, heat sources, vibration, dust, moisture, and/or cold. For proper ventilation, allow the following minimum clearances.
Top : 10 cm (4 in) Rear: 10 cm (4 in)
3Locate this unit away from other electrical appliances, motors, or transformers to avoid humming sounds.
4Do not expose this unit to sudden temperature changes from cold to hot, and do not locate this unit in an environment with high humidity (i.e. a room with a humidifier) to prevent condensation inside this unit, which may cause an electrical shock, fire, damage to this unit, and/or personal injury.
5Avoid installing this unit where foreign objects may fall onto this unit and/or this unit may be exposed to liquid dripping or splashing. On the top of this unit, do not place:
–Other components, as they may cause damage and/or discoloration on the surface of this unit.
–Burning objects (i.e. candles), as they may cause fire, damage to this unit, and/or personal injury.
–Containers with liquid in them, as they may fall and liquid may cause electrical shock to the user and/or damage to this unit.
6Do not cover this unit with a newspaper, tablecloth, curtain, etc. in order not to obstruct heat radiation. If the temperature inside this unit rises, it may cause fire, damage to this unit, and/or personal injury.
7Do not plug in this unit to a wall outlet until all connections are complete.
8Do not operate this unit upside-down. It may overheat, possibly causing damage.
9Do not use force on switches, knobs and/or cords.
10When disconnecting the power cable from the wall outlet, grasp the plug; do not pull the cable.
11Do not clean this unit with chemical solvents; this might damage the finish. Use a clean, dry cloth.
12Only voltage specified on this unit must be used. Using this unit with a higher voltage than specified is dangerous and may cause fire, damage to this unit, and/or personal injury. Yamaha will not be held responsible for any damage resulting from use of this unit with a voltage other than specified.
13To prevent damage by lightning, keep the power cable and outdoor antennas disconnected from a wall outlet or the unit during a lightning storm.
14Do not attempt to modify or fix this unit. Contact qualified Yamaha service personnel when any service is needed. The cabinet should never be opened for any reasons.
15When not planning to use this unit for long periods of time (i.e. vacation), disconnect the AC power plug from the wall outlet.
16Install this unit near the AC outlet and where the AC power plug can be reached easily.
17Be sure to read the “TROUBLESHOOTING” section on common operating errors before concluding that this unit is faulty.
18Before moving this unit, press A to set this unit to the standby mode, and disconnect the AC power plug from the wall outlet.
19Condensation will form when the surrounding temperature changes suddenly. Disconnect the power cable from the outlet, then leave this unit alone.
20The batteries shall not be exposed to excessive heat such as sunshine, fire, or the like. When you dispose of batteries, follow your regional regulations.
WARNING
TO REDUCE THE RISK OF FIRE OR ELECTRIC SHOCK, DO NOT EXPOSE THIS UNIT TO RAIN OR MOISTURE.
As long as this unit is connected to the AC wall outlet, it is not disconnected from the AC power source even if you set this unit to standby mode by A. In this state, this unit is designed to consume a very small quantity of power.
i En

CONTENTS
PREPARATION |
|
REMOTE CONTROL AND FRONT PANEL |
.... 2 |
CONNECTIONS .................................................... |
4 |
OPERATIONS |
|
DAB TUNING......................................................... |
5 |
Preparing the DAB tuning ......................................... |
5 |
Manual tuning............................................................ |
6 |
Presetting DAB stations............................................. |
7 |
Using the DAB functions........................................... |
8 |
DAB station information ......................................... |
10 |
DAB frequency information .................................... |
10 |
FM/AM TUNING ................................................. |
11 |
Automatic and manual tuning.................................. |
11 |
Presetting stations .................................................... |
12 |
Using the FM/AM functions.................................... |
13 |
ADDITIONAL INFORMATION |
|
TROUBLESHOOTING ....................................... |
14 |
SPECIFICATIONS............................................... |
16 |
■ Features
DAB (Digital Audio Broadcasting) /DAB+ tuner |
Sophisticated FM/AM tuner |
Automatic scanning function to locate all DAB stations in your |
30-station (each band) FM/AM preset tuning |
area |
Automatic preset tuning |
DLS (Dynamic Label Segment) information display |
|
Tuning aid function to optimize DAB reception |
|
40 DAB/DAB+ station preset tuning |
|
Coaxial and optical digital audio output capability for DAB |
|
audio signals |
|
■ Supplied accessories
Please check that you have received all of the following parts.
Remote control |
Indoor FM antenna |
AM loop antenna |
PREPARATION |
|
|
|
|
|
|
|
|
OPERATIONS |
|
|
|
|
|
|
|
|
INFORMATION |
ADDITIONAL |
|
|
|
|
|
|
Battery (CR2025) |
RCA stereo cable |
Indoor DAB antenna |
■ About this manual
•y indicates a tip for your operation.
•This manual describes how to operate this unit using a remote control except when it is not available. Some of these operations are also available using the front panel.
•This manual is printed prior to production. Design and specifications are subject to change in part as a result of improvements, etc. In case of differences between the manual and the product, the product has priority.
1 En

REMOTE CONTROL AND FRONT PANEL
1 Infrared transmitter
Outputs infrared controls signals. Aim this transmitter at the component you want to operate.
2 FM MODE
Switches the FM radio wave reception mode (stereo or monaural) when this unit is in the FM tuning mode (see page 11).
3 DIMMER
Changes brightness level of the front panel display. Choose brightness from 3 levels by pressing this button repeatedly.
y
This setting is retained even if you turn off this unit.
4PRESET F / G
Switches the preset stations.
5MEMORY
Sets this unit to the preset station memory mode (see pages 7, 12).
6B / C / D / E, ENTER
Selects and confirms an item.
7INFO/TEXT
Turns on and changes the DAB station information (see page 10) on the front panel display.
8 Numeric buttons, ENTER
Selects the desired preset stations (see pages 7, 12).
y
To enter number less than 10 (i.e. 1 to 9), press the desired number and then ENTER, or press 0 and then enter the desired number.
2 En
9 BAND
Selects the reception band (DAB, FM, or AM).
0 AUTO SCAN
Starts the automatic scanning function (see pages 6, 12).
A A (standby/on)
Turns on this unit. Press this button again to set this unit to the standby mode.
y
The standby/on indicator lamp above lights up when this unit is turned on.
Note
In the standby mode, this unit consumes a small amount of power in order to receive infrared signals from the remote control.
B TUNING H / I
•Selects the desired frequency when you press this button.
•Searches the next FM or AM station when you press and hold this button for more than 2 seconds.
C FUNCTION
Activates the function set up menu (see pages 8, 13).
D CLEAR
•Clears a preset station (see pages 8, 13).
•Clears all station information and preset settings in the DAB tuning mode when you press and hold this button for more than 3 seconds (see page 9).
•Clears all preset stations in the FM or AM tuning mode when you press and hold this button for more than 3 seconds (see page 13).
E STEREO indicator
Lights up when this unit is in the stereo playback.
F TUNED indicator
Lights up when this unit is tuned into a station.
G Multi-information display
Displays tuning status messages and the DAB station information.
H SECONDARY indicator
Lights up when this unit is in the DAB tuning mode and receiving a secondary station.
I TUNING MODE
Selects the tuning mode (automatic, manual, or preset tuning).
J PRESET/TUNING
•Searches the next FM or AM station when this unit is in the automatic tuning mode.
•Selects the desired frequency when this unit is in the manual tuning mode.
•Switches the preset stations when this unit is in the preset tuning mode.
REMOTE CONTROL AND FRONT PANEL
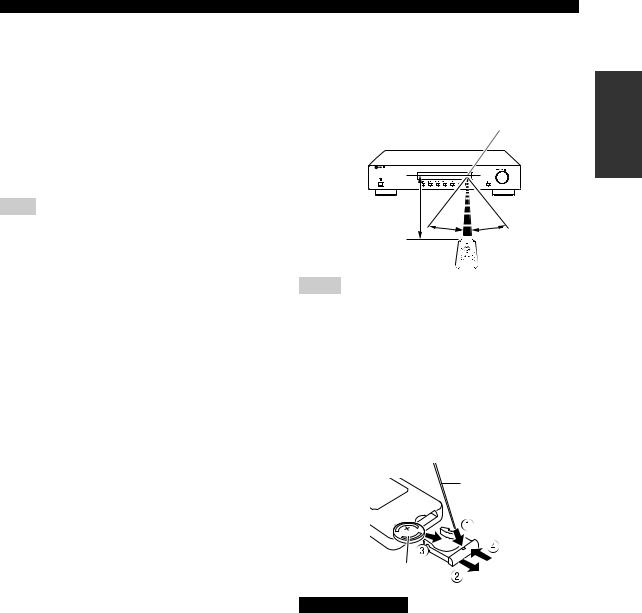
■ Using the remote control
Use the remote control within 6 m (20 ft) of this unit and point it toward the remote control sensor. It receives signals from a remote control provided with a Yamaha amplifier or AV receiver.
Remote control sensor
Approximately |
|
|
6 m (20 ft) |
30º |
30º |
Notes
•Do not spill liquid on the remote control.
•Do not drop the remote control.
•Do not leave the remote control in the following places:
–hot or humid places such as a bathroom or near heater
–extremely cold places
–dusty places
■ Installing the battery in the remote control
Change the battery when the operation range of the remote control decreases.
Straight pin
Battery (CR2025) (supplied)
CAUTION
•Keep the battery out of the reach of children, so that it is not mistakenly swallowed.
•Insert the battery according to the polarity markings.
PREPARATION
3 En
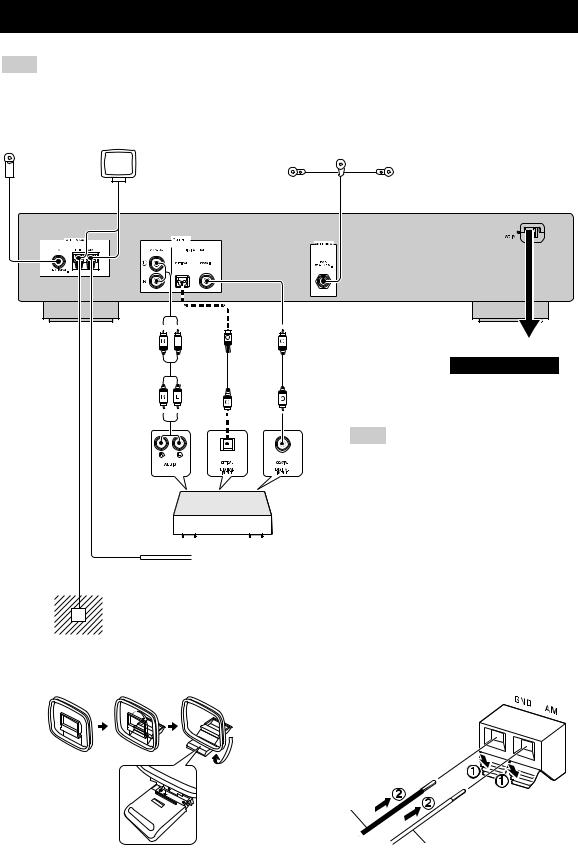
CONNECTIONS
Note
If you experience poor reception quality, install an outdoor antenna. Consult the nearest authorized Yamaha dealer or service center about outdoor antennas.
AM loop antenna (supplied)
•The AM loop antenna should always be connected, even if an outdoor AM antenna is connected to this unit.
•The AM loop antenna should be placed away from this
Indoor FM |
unit. |
antenna |
|
(supplied) |
|
RCA stereo |
Optical |
Coaxial digital |
|
cable |
|||
cable |
audio cable |
||
(supplied) |
|||
|
|
Indoor DAB antenna (supplied)
Stretch out the antenna and place it to find the best reception position then fix it.
y
It is recommended that you use the Tune Aid function in order to maximize DAB reception capability (see page 9).
To the AC wall outlet
CAUTION
Do not connect power cable until all cable connection are complete.
Analog audio |
|
Digital audio |
input |
Amplifier |
input |
|
|
Note
The DIGITAL (DAB) OUTPUT jacks (OPTICAL and COAXIAL) output the digital audio signals (PCM signals) when this unit is in the DAB tuning mode. DAB audio signals are also output the ANALOG OUTPUT jack of this unit. FM or AM audio signals are not output at the DIGITAL (DAB) OUTPUT jacks.
Outdoor AM antenna
Use a 5 to 10 m of vinyl covered wire extended outdoors from a window.
Ground
For maximum safety and minimum interference, connect the antenna GND terminal to a good earth ground.
A good earth ground is a metal stake driven into moist earth.
■Assembling the supplied AM loop antenna
■Connecting the wire of the AM loop antenna
black
white
4 En
Loading...