


|
|
|
|
|
|||||||
|
|
|
|
|
|
|
|
|
|||
|
|
|
|
|
→ |
||||||
|
|
|
|||||||||
|
|
|
|||||||||
|
|
|
|
|
|
||||||
|
|
|
|
|
→ |
||||||
|
|
|
|
||||||||
|
|
|
|
|
|||||||
|
|
|
|
|
|
|
|||||
|
|
|
|
|
|
|
|
|
|||
|
|
|
|
|
|
|
|
|
|
||
|
|
|
|
|
|
||||||
|
|
|
|
||||||||
|
|
|
|
|
|
|
|||||
|
|
|
|
||||||||
|
|
|
|||||||||
|
|
|
|
|
|
|
|||||
|
|
|
|
||||||||
|
|
|
|
|
|
|
|||||
|
|
|
|
|
|
|
|
|
|||
|
|
|
|
||||||||
|
|
||||||||||
|
|
|
|
|
|
|
|||||
|
|
|
|
||||||||
|
|
|
|
|
|
|
|||||
|
|
|
|
VOLUME 0 |
|||||||
|
|
|
|
|
|
|
|||||
|
|
|
|
||||||||
|
|
|
|
|
|
|
|||||
|
|
|
|
|
|||||||
|
|
● |
|||||||||
|
|
|
|||||||||
|
|
|
|
||||||||
|
|
|
|
|
|
|
|
||||
|
|
● |
|
|
|
|
|
|
|||
|
|
|
|
||||||||
|
|
● |
|||||||||
|
|
|
|||||||||
|
|
● |
|||||||||
|
|
|
|||||||||
|
|
● |
|||||||||
|
|
|
|
|
|
|
|||||
この機器を車内に放置しないでください。
火災、感電、故障などの原因となります。
|
|
|
|
|
|
|
|
|
|
|
|
|
|
|
|
AC100V |
|
|
|
|
|
|
|
AC200V |
|
|
|
|
|
|
|
|
|
|
|
|
|
|
|
|
|
|
|
|
|
|
|
|
|
|
|
|
|
|
|
|
|
|
|
|
|
|
|
|
|
|
|
|
|
|
|
|
|
|
|
|
|
|
|
|
|
|
|
|
|
|
|
|
|
|
|
|
|
|
|
|
|
|
|
|
|
|
|
|
|
|
|
|
|
|
|
● |
|
|
|
● |
|
|
|
● |
|
|
|
● |
|
|
|
● |
|
|
|
|
|
|
|
|
|
|
|
|
|
|
|
|
|
|
|
|
|
|
|
|
|
|
|
|
|
|
|
|
|
|
|
2
|
|
|
|
35 300 / |
TRIGGER IN |
||
BEAT 1 0 9 |
MIDI IN DIN 5 |
||
BEAT 2 9 |
AUX IN |
||
0.16% |
DC IN |
9V |
|
|
PHONE / |
||
|
|
||
LED / |
|
|
|
|
|
||
|
57mm x1 |
|
|
C2 B6 |
|
|
|
438 446Hz |
|
||
(PA-3C) 6LR61 x1 |
|||
±1Cent |
|||
|
|
||
|
/ |
|
|
|
|
||
86 |
170 x 122 x 37 mm / 395 g |
||
|
|
||
10 |
|
|
|
|
|
||
20 (1 ) |
6LR61 |
||
|
|||
|
( ) |
||
* |
|||
3

DTX
( )
CD
/


 MIDI
MIDI
どに置きながら使用することができます。
( )
( )
■ |
■ |
|
q |
!2 (PHONES) |
|
w |
!3 (POWER ON/OFF) |
|
e (VIB.) |
!4 (MIDI IN) |
|
r (VOL) |
|
|
t (VIBRATION) |
■ |
|
y |
||
!5 (AUX IN) |
||
u |
||
!6 (TRIGGER IN) |
||
i |
||
!7 |
||
o / ( ) |
||
!8 (DC IN 9V) |
||
(TAP START/STOP) |
||
|
||
!0 (TEMPO) |
|
|
!1 |
|
|
( / 9 ) |
|
|
|
4

1.(6LR61 9V, S- 006P) 1
*
2.OFF
3.(+/-)
1.OFF DCDC IN 9V
2.A C (AC100V)

電池が完全に無くなる前に、3
5
|
|
|
|
|
|
* TYPE TEMPO |
|
q CLICK |
|
|
|
|
CLICK SEARCH |
||
|
|
||
w START/STOP |
TYPE TEMPO |
||
|
|
|
|
|
* |
||
|
|
||
e 4 VOL |
|
||
|
|
c START/STOP |
|
* VOL VOL |
|
|
|
|
|
||
0 ( ) |
|
c TYPE TEMPO |
|
|
|
||
|
|
||
|
|
||
|
|
|
|
|
|
||
r VIBRATION |
|
||
|
BEAT |
||
|
|||
BEAT BEAT |
|||
|
|
||
|
0 9 |
||
VIB. |
|||
2 |
|||
|
|
||
|
|
|
|
|
* 1 ACC. |
||
q |
|||
0 ACC. |
|||
( ) |
|
|
|
|
|
2 |
|
|
|
BEAT 2 BEAT |
|
z TEMPO (35 |
COUNT BEAT |
||
9 2 |
|||
300) |
|
||
|
2 |
||
|
|
||
|
|
|
|
z TYPE TEMPO |
|
* 2 2 ( |
|
|
|
||
x |
) |
||
c START/STOP |
|
||
|
|
||
v TYPE TEMPO |
|
||
|
|
|
|
6 |
|
|
|
|
|
|
|
|
|
|
|
|||
|
|
|
|
|
|
|
|
|
|
|
|
|
|
|
|
|
|
|
|
|
|
|
|
|
|
|
|
|
|
|
|
|
|
|
|
|
|
|
|
|
|
|
|
|
|
|
|
|
|
|
|
|
|
|
|
|
|
|
|
|
|
|
|
|
|
|
4 1 |
00 |
|
|
||||||
|
|
|
||||||||
|
|
|
|
|
|
|
|
|||
86 |
|
|
|
|
|
|
|
|
||
|
|
|
|
|
100 |
|
|
|
||
1. STORE STORE |
|
|
|
|
|
|
|
|||
|
|
|
|
|
|
|
|
|||
|
|
|
|
|
|
|
|
|
||
2. SONG/STEP /
3.TEMPO
BEAT(CURSOR)
|
1. TAP TAP |
||
2. START/STOP(TAP) |
|||
4. START/STOP |
|||
|
|||
STORE 2 |
|||
|
|||
|
|||
3. |
|||
|
|
||
|
|
CLICK |
|
|
|
||
|
START/STOP(TAP) |
||
S O N G / |
|||
|
|||
STEP / |
|
||
|
|
|
|
|
TRIGGER IN DTX |
||
1. SEARCH SEARCH |
|||
|
|||
|
START/STOP(TAP) |
||
2. TEMPO |
|
||
|
* TAP |
||
|
|
||
3. START/STOP |
|
||
|
|
||
* 35 300 |
|||
START/STOP |
|||
35 Lo |
|||
|
|||
300 Hi |
|||
|
|
|
|
7
- 1 1


 01
01
120
( 0 85)
86
 20 ( )
1
10 (0 9)
1.CHAIN CHAIN
2.S T O R E C H A I N STORE
3.CHAIN NO.(BEAT) (0 9)
4.TEMPO 1 ( 0)
5.START/STOPSTORE 2 1
6.SONG/STEP
7.4 6
* 1 20( )
1.CHAIN CHAIN
2.CHAIN NO.
3.START/STOP 1
4.S T A R T / STOPSONG/STEP
* SONG/STEP
8
MIDI
|
|
|
|
|
|
|
|
|
|
|
|
|
|
|
|
|
|
|
|
|
|
|
|
|
|
|
|
|
|
|
|
|
|
|
|
|
|
|
|
|
|
|
|
|
|
|
|
|
|
|
|
|
|
|
|
|
|
|
|
|
|
|
|
|
|
|
|
|
|
|
|
|
|
|
|
|
|
|
|
|
|
|
|
|
|
|
|
|
|
|
|
|
|
|
|
|
|
|
|
|
|
120 |
|
|
|
|
|
4A |
|
||
|
|
|
|
|
|
|
|
||||||||
|
|
|
|
|
|
|
|
||||||||
|
|
|
|
|
|
|
|
|
|
|
|
|
|
||
MIDI |
|
|
|
|
|||||||||||
1. |
MIDI |
1. |
TUNE TUNE |
|
|||||||||||
|
MIDI OUT MIDI IN |
|
|
|
|
||||||||||
|
MIDI |
2. |
TEMPO 2C 6B |
|
|||||||||||
2. |
MIDI |
|
|
|
|
||||||||||
|
MIDI |
3. |
START/STOP |
|
|||||||||||
|
( STOP) |
|
|
|
|
||||||||||
3.MIDI
( START) |
1. BEAT 438Hz 446Hz |
4.START/STOP ( MIDI )
* させたい場合は、START/STOP
CONT( )
* AUX IN |
1. BACK LIGHT |
|
|
( 20 ) |
|
|
||
|
||
* START/STOP |
||
2. BACK LIGHT 1 |
||
MIDI |
||
3 |
2 |
|
STOP |
(BACK LIGHT |
|
|
||
|
) |
9

■
●
● |
|
|
|
|
||||
1 |
|
|||||||
|
|
|||||||
● |
|
|
||||||
|
|
|
|
|||||
|
Tel 053-411-4744 |
|||||||
● |
|
|||||||
|
/10:30 19:00 |
|||||||
|
||||||||
* |
||||||||
|
||||||||
|
|
|||||||
|
|
|
|
|
||||
|
|
|
|
|
|
|||
|
|
|
|
|
|
|||
|
|
|
|
|||||
|
064-8543 |
10 1 1-50 |
TEL (011) 512-6108 |
|||||
|
984-0015 |
5-7 3F |
TEL (022) 236-0249 |
|||||
|
143-0006 |
2 1 1 14 A-5F |
TEL (03) 5762-2121 |
|||||
|
435-0016 |
200 ( ) 6 2 |
TEL (053) 465-6711 |
|||||
|
454-0058 |
2-1-2 ( ) 3F |
TEL (052) 652-2230 |
|||||
|
|
565-0803 |
1-16 ( ) |
TEL (06) 6877-5262 |
||||
|
760-0029 |
8-7 ( ) |
TEL (087) 822-3045 |
|||||
|
812-8508 |
2-11-4 |
|
TEL (092) 472-2134 |
||||
|
|
|
|
|
|
|||
|
|
|
|
|
|
|||
|
|
|
|
|
||||
E M |
|
|
|
|
||||
E M |
064-8543 |
10 1 1-50 |
TEL (011) 512-6113 |
|||||
E |
M |
|
|
980-0804 |
2-2-10 |
|
TEL (022) 222-6147 |
|
E |
M |
|
|
108-8568 |
2-17-11 |
|
TEL (03) 5488-5471 |
|
E |
M |
|
|
460-8588 |
1-18-28 |
|
TEL (052) 201-5199 |
|
E |
M |
|
|
542-0081 |
3-12-9 |
TEL (06) 6252-5231 |
||
E |
M |
|
|
812-8508 |
2-11-4 |
|
TEL (092) 472-2130 |
|
E M |
108-8568 |
2-17-11 |
|
TEL (03) 5488-5445 |
||||
|
|
|
|
|
|
|
||
430-8650 10 1 TEL. 053-460-2433
|
|
|
|
|
|||||||||||||||||||||||||||||||||||||||||||||
|
|
|
|
|
|
|
|
|
|
|
|||||||||||||||||||||||||||||||||||||||
|
|
|
|
|
|
|
|
|
|
|
|||||||||||||||||||||||||||||||||||||||
|
|
1 |
|
|
|
|
|
|
|
||||||||||||||||||||||||||||||||||||||||
|
|
|
|
|
|
|
|
|
|
|
|||||||||||||||||||||||||||||||||||||||
|
|
|
|
|
|
|
|
|
|
||||||||||||||||||||||||||||||||||||||||
|
|
|
|
|
|
|
|
|
|
|
|
|
|||||||||||||||||||||||||||||||||||||
|
|
|
|
|
|
|
|
|
|
|
|
||||||||||||||||||||||||||||||||||||||
|
|
|
|
|
|
|
|
|
|
|
|
|
|
|
|
|
|
|
|
|
|
|
|
|
|
|
|
|
|
|
|
|
|
|
|
|
|
|
|
|
|
|
|
|
|
|
|
|
|
|
|
|
|
|
|
|
|
|
|
||||||||||||||||||||||||||||||||||||||||
|
|
|
|
|
|
|
|
|
|
|
|
|
|
|
|
|
|
|
|
|
|
|
|
|
|
|
|
|
|
|
|
|
|
|
|
|
|
|
|
|
|||||||||
|
|
|
|
|
|
|
|
|
|
|
|
||||||||||||||||||||||||||||||||||||||
|
|
|
|
|
|
|
|
|
|
||||||||||||||||||||||||||||||||||||||||
|
|
|
|
|
|
|
|
|
|||||||||||||||||||||||||||||||||||||||||
10
1. 売店が無料修理を致します。
This warranty is valid only in Japan.
6.
Owner’s Manual
Thank you for purchasing the Yamaha CLICKSTATION. To get the most out of this product, we ask that you read this Owner’s Manual thoroughly before using the device. Also, after reading this manual, please keep it in a safe place for future reference.
Specifications
Metronome
Tempo: 35 - 300 beats/minute
Beats: BEAT 1:0 - 9, BEAT 2 (complex beat):– - 9
Tempo Accuracy: 0.16 %
Vibration: Pulses in sync with the tempo
Tempo LED: Flashes in sync with the tempo/beat
Tuning Pitch
Range: C2 - B6
Standard Pitch: 438 - 446 Hz
Accuracy: +/– 1 Cent
Memory
Memory Allocations: 86
Total Number of Chain Programs: 10
Steps: 20 songs (per chain program)
Input/Output
TRIGGER IN: Standard Monaural Phone Jack
MIDI IN: Standard 5-Pin DIN Connector
AUX IN: Standard Stereo Phone Jack
DC IN:  9V
9V
PHONES: Standard Stereo Phone Jack x1, Mini Stereo Phone Jack x1
Speaker
57 mm x1
Power Supply
Power Adaptor (PA-3C) or 6LR61 Battery (x1)
Dimensions
170 x 122 x 37 mm (6-11/16" x 4-13/16" x 1-7/16")
Weight (including battery)
395 g (13.9 oz)
Accessories
Tilt Angle, Wing Bolt, 6LR61 Battery,
Owner’s Manual
* Specifications and/or design may change for reasons of improvement without notice.
11

Precautions
●Avoid using your CLICKSTATION in the following locations to prevent possible damage:
•In direct sunlight or next to heating equipment.
•Extremely cold or hot locations.
•Locations exposed to high humidity or excessive dust.
•Locations subject to strong shocks or vibration.
●Before making any connections, make sure that the power on the CLICKSTATION and any external devices is switched OFF.
●To protect the speaker from possible damage, always set the VOL. Slider to “0” before switching the power ON/OFF.
●Do not apply excessive force to the switches and controls.
●Your Yamaha CLICKSTATION is a precision musical instrument. Handle it with care and avoid dropping or bumping it.
●For safety, always remove the power adaptor plug from the AC wall outlet if there is any danger of lightning striking in your area.
●Keep the CLICKSTATION away from neon signs or fluorescent lighting to prevent noise pickup.
●To prevent damage and possibly electrical shock, never open the case and tamper with the internal circuitry.
●Never use benzene, thinner or other volatile liquids for cleaning, as these chemicals may cause damage or discoloration to the finish. Always use a dry, soft cloth to wipe off dust and dirt.
FCC INFORMATION (U.S.A.)
1. |
IMPORTANT NOTICE: DO NOT MODIFY THIS |
the user’s manual, may cause interference harmful to the operation of |
|
|
UNIT! |
other electronic devices. Compliance with FCC regulations does not |
|
|
guarantee that interference will not occur in all installations. If this |
||
|
This product, when installed as indicated in the instructions contained |
||
|
product is found to be the source of interference, which can be |
||
|
in this manual, meets FCC requirements. Modifications not expressly |
||
|
determined by turning the unit “OFF” and “ON”, please try to |
||
|
approved by Yamaha may void your authority, granted by the FCC, |
||
|
eliminate the problem by using one of the following measures: |
||
|
to use the product. |
||
|
|
||
2. IMPORTANT: When connecting this product to accessories and/ |
Relocate either this product or the device that is being affected by the |
||
interference. |
|||
|
or another product use only high-quality shielded cables. Cable/s |
||
|
Utilize power outlets that are on different branch (circuit breaker or |
||
|
supplied with this product MUST be used. Follow all installation |
||
|
instructions. Failure to follow instructions could void your FCC |
fuse) circuits or install AC line filter/s. |
|
|
authorization to use this product in the USA. |
In the case of radio or TV interference, relocate/reorient the antenna. |
|
3. |
NOTE: This product has been tested and found to comply with the |
||
If the antenna lead-in is 300 ohm ribbon lead, change the lead-in to |
|||
|
requirements listed in FCC Regulations, Part 15 for Class “B” digital |
co-axial type cable. |
|
|
devices. Compliance with these requirements provides a reasonable |
If these corrective measures do not produce satisfactory results, |
|
|
level of assurance that your use of this product in a residential |
||
|
please contact the local retailer authorized to distribute this type of |
||
|
environment will not result in harmful interference with other |
||
|
product. If you cannot locate the appropriate retailer, please contact |
||
|
electronic devices. This equipment generates/uses radio frequencies |
||
|
Yamaha Corporation of America, Electronic Service Division, 6600 |
||
|
and, if not installed and used according to the instructions found in |
||
|
Orangethorpe Ave, Buena Park, CA 90620 |
||
|
|
||
|
|||
• The above statements apply ONLY to those products distributed by Yamaha Corporation of America or its subsidiaries. |
|||
CANADA
THIS DIGITAL APPARATUS DOES NOT EXCEED THE “CLASS B” LIMITS FOR RADIO NOISE EMISSIONS FROM DIGITAL APPARATUS SET OUT IN THE RADIO INTERFERENCE REGULATION OF THE CANADIAN DEPARTMENT OF COMMUNICATIONS.
• This applies only to products distributed by Yamaha Canada Music Ltd.
12

Nomenclature
DTX pad, etc.
CD player, etc.
Both standard phone and mini jacks can be used simultaneously.
AC adaptor (optional)
Refer to the “Attaching the Holder” section described below.


 MIDI device
■ Attaching the Holder
Attaching the supplied tilt angle lets you set the CLICKSTATION at an angle on top of a desk, etc., for use.
Wing Bolt (supplied)
Tilt Angle (supplied)
■ Front Panel
q Display
w Beat Volume
e Vibration Volume (VIB.)
r Volume (VOL.)
tVibrator (VIBRATION)
ySpeaker
uBeat Indicators
i Control Buttons
o Start/Stop Switch (also used as Tap Switch) !0Tempo Dial (TEMPO)
!1Back Light Switch
(auto off or continuous operation available, refer to page 18)
Also, the CLICKSTATION can be attached to a mic stand, cymbal stand, cowbell holder, etc., using the optional mount adaptor or mic stand adaptor.
■ Side Panel
!2Headphones Jacks x2 (PHONES) !3Power Switch (POWER ON/OFF) !4MIDI IN jack (MIDI IN)
■ Rear Panel
!5External Device Input Jack (AUX IN)
!6Trigger Input Jack (TRIGGER IN)
!7Holder Attachment
!8Power Adaptor Jack (DC IN 9V)
13
Preparing for Use
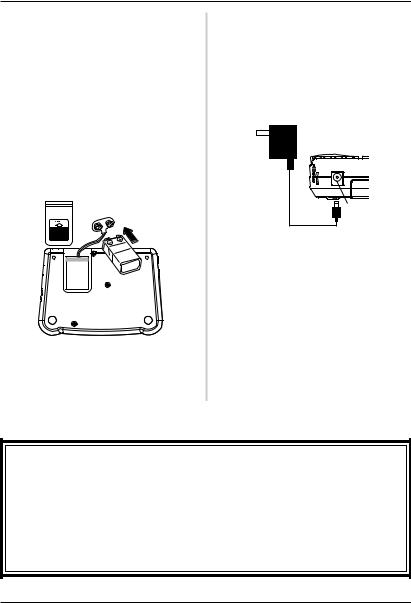
■ Using Battery Power
1.Prepare one alkaline battery (6LR61: 9V, S- 006P).
*A manganese battery can be used but battery life may be extremely short depending upon the battery type.
2.Make sure that the power switch is set to its OFF position then remove the battery cover from the rear panel.
3.Check the alignment and polarity markings (+/–) on the battery, attach the battery to the battery terminal then replace the battery cover.
*When battery power gets low, the volume output will be reduced or the display will grow dim. If this is the case, replace the battery with a new one as soon as possible.
■ Using a Power Adaptor
1.Make sure that the power switch is set to its OFF position, then connect the power adaptor’s DC plug into the device’s DC IN 9V jack.
2.Connect the power adaptor’s AC plug to an AC wall outlet.
Power adaptor
Power adaptor jack
*If the power adaptor is connected when a battery is installed in the device, power is automatically supplied from the power adaptor.
*Make sure only the specified power adaptor is used. The use of any power adaptor other than the one specified may result damage, fire, etc. Doing so may void the warranty even if the device is still within the warranty period so please use caution.
Cautions Regarding Memory Backup
•This device has no data backup capabilities to preserve data when the battery is removed or when the AC adaptor is disconnected.
•If the device is left without power supplied from a battery or AC adaptor, song and chain program data created by the user will be lost.
•To replace the battery without loosing data connect the AC power adaptor to the device while changing the battery or, change the battery before battery power is completely exhausted and complete the battery changing procedure within 3 minutes.
•The device’s vibrator grows weak as battery power depletes.
•When the display dims, the battery should be replaced as soon as possible.
14
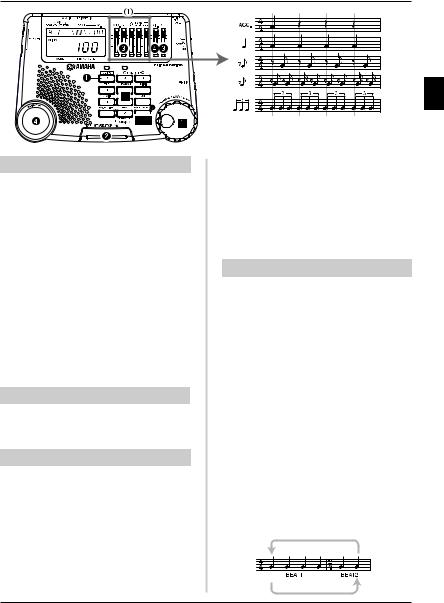
Using the Metronome
Start the Metronome’s Audio Click
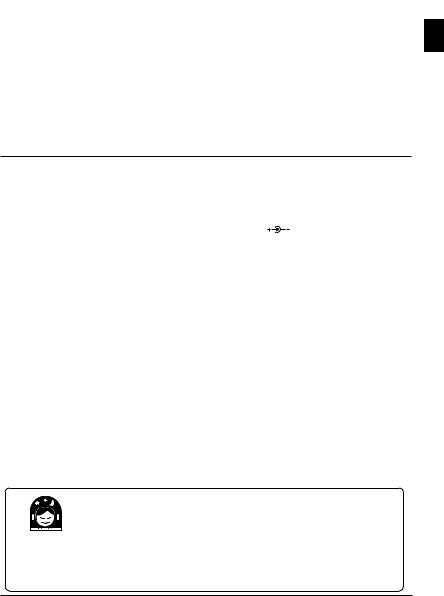
q Press the CLICK button.
wPress the START/STOP button to start the metronome.
eUse the Quarter Note and VOL volume control sliders to increase the volume level.
*The VOL slider is used to control the device’s overall volume level. When the VOL slider is set to [0] (all the way down), no sound is produced.
[Using the VIBRATION feature]
rPress and hold the VIBRATION pad and the vibrator will pulse in tempo with the metronome. When the metronome is stopped only the vibrator and flashing beat indicator will operate.
Use the VIB. slider to adjust the amount of vibration.
Adjust Beat Volumes
qUse the volume sliders q for each beat to adjust individual beat volumes. (Shown in the illustration above)
Change the Tempo
zRotate the TEMPO dial to adjust the tempo (35 - 300).
[Using the ten-key pad to set the tempo]
z Press the TYPE TEMPO button. (Lamp lights)
x Use the ten-key pad to set the tempo value.
cPress the START/STOP button and the metronome will start at the tempo you just entered.
vPress the TYPE TEMPO button to cancel the setting. (The lamp goes off.)
*When the TYPE TEMPO lamp lights, the ten-key pad is in the tempo setting mode. Turn the TYPE TEMPO lamp off when you want to use the CLICK, SEARCH, or other function buttons.
*To change the tempo when the metronome is in use:
•If the START/STOP button is pressed in step 3, the tempo will change from that instant (from beat 1).
•If the TYPE TEMPO button is pressed in step 3, the tempo will change from the next beat.
Change the Beat
Press the BEAT button and the BEAT value shown on the upper left corner of the display will flash. While the BEAT value is flashing, press the BEAT button to set the beat value between 0 and 9. After 2 seconds, if the button is not pressed, the beat setting is entered and the display will return to its original display.
*When the beat is set, the ACC. tone will sound on the first beat of every measure. If the beat is set to [0], the ACC. tone will not sound.
[Use Beat 2 to create a complex beat or subdivisions]
Press and hold the BEAT button for more than 2 seconds and the COUNT value located next to the BEAT value will flash. While the COUNT value is flashing, press the BEAT button to set Beat 2 to a value between – and 9. After 2 seconds, if the button is not pressed, the beat setting is entered and the display will return to its original display.
*The Beat 2 setting can be used to create complex beats over 2 measures (subdivisions).
15

Using the Metronome
Saving Songs
In this section, metronome settings (tempo, beat, count, etc.) can be saved as a song. With the CLICKSTATION, you can create, name, and save a maximum of 86 songs.
1.Press the STORE button to enter the Store display and the SONG name will flash.
2.Use the SONG/STEP –/+ buttons to select the song number to which you want to save your song.
3.Rotate the TEMPO dial to select a letter and then press the BEAT (CURSOR) button to enter the setting and move the cursor to the right.
4.Press the START/STOP button and STORE will flash two times in the display to indicate that the song is saved.
Recall a Song
Use the SONG/STEP –/+ buttons to select a saved song.
[Search for a song]
1.Press the SEARCH button to enter the SEARCH display. The SONG name will flash.
2.Rotate the TEMPO dial to select the first letter of the saved song name you want to find.
3.Press the START/STOP button to display the song name that begins with the letter you selected. Press the START/STOP button again to display the next song name in the list.
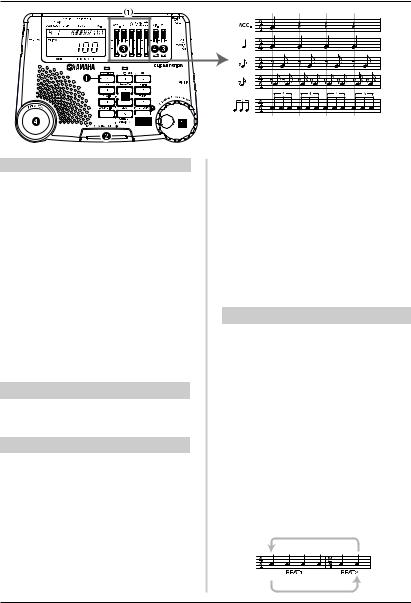
Tap Function
4 1 


 00
00

 100
100
Set the Tempo Using the TAP Function
1.Press the TAP button to enter the TAP mode.
2.Tap in tempo on the START/STOP (TAP) button. The CLICKSTATION automatically calculates the tapped tempo and displays the tempo value on the display.
3.To start the metronome at the tempo shown on the display, press the CLICK button and then press the START/STOP (TAP) button.
[Use a trigger or drum pad to set the tempo value]
Connect a drum pad or DTX Drum Trigger to the TRIGGER IN jack and the pad or trigger can be used in the same manner as the START/STOP (TAP) button.
*To name and save the tempo you calculated using the TAP function, refer to the [Saving Songs] section on this page.
*The tempo can be calculated within a range of 35 and 300 beats per minute. If the tempo is slower than 35 [Lo] will be displayed, and [Hi] will be displayed if the tempo is faster than 300.
16
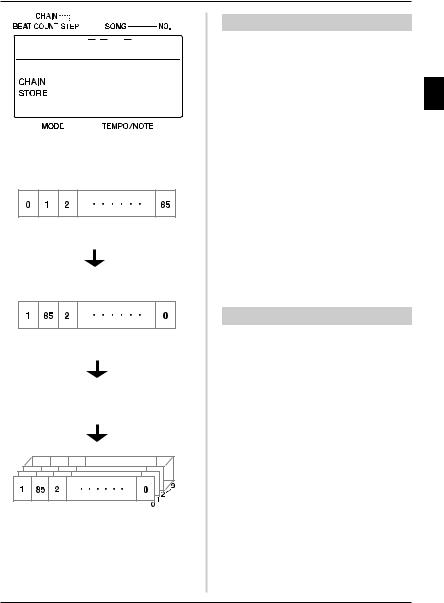
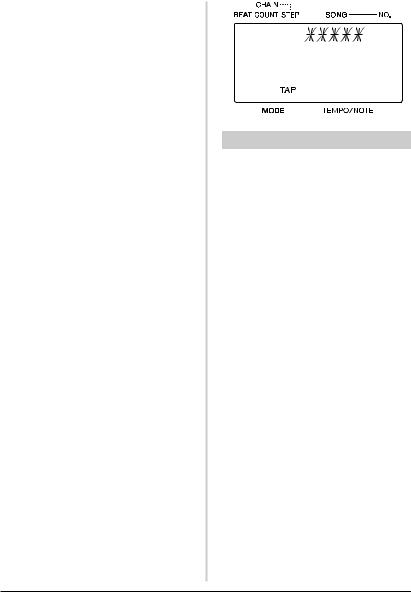
Chain Function
- 1 1


 01
01
120
Saved songs (song numbers 0-85)
 86 songs maximum
Place the songs in any order you like
 20 songs (steps) maximum
The grouping of songs saved here is a Chain Program
A maximum of 10 Chain Programs like those shown above can be created and saved.
Changing Song Order
The Chain Function lets you place saved songs in any order you like.
1.Press the CHAIN button to enter the CHAIN mode.
2.Press the STORE button so that both CHAIN and STORE are shown on the left side of the display.
3.Press the CHAIN NO. (BEAT) button to select the chain program number (0 - 9) to which you want to save the chain.
4.Rotate the TEMPO dial to select the song that will become the first step in the chain.
5.Press the START/STOP button and STORE will flash two times in the display to indicate that the first step in the chain is saved.
6.Press the SONG/STEP+ button to move to the next step and enter the setting.
7.Repeat numbers 4 through 6 above to create a chain program.
*A maximum of 20 steps (songs) can be saved in a chain program.
Play the Chain Program
1.Press the CHAIN button to enter the CHAIN mode.
2.Press the CHAIN NO. button to select the chain program number that you want to use.
3.Press the START/STOP button to start the song that is set at the top of the list.
4.Press the START/STOP button to stop the song and then press the SONG/STEP + button to start the next song in the list.
*Press the SONG/STEP – button to return to the previous song in the list.
17

MIDI |
|
Tune (Pitch) Function |
|
||
|
|
|

 120
120
Synchronize the tempo to an external MIDI device
1.After the power is switched OFF, use a MIDI cable to connect the external MIDI device’s MIDI OUT jack to the MIDI IN jack on the CLICKSTATION.
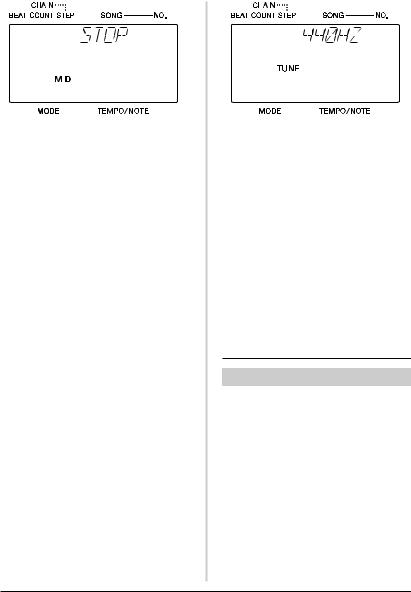
2.Turn the power switch ON and press the MIDI button to enter the MIDI mode. (Display: STOP)
3.When the external MIDI device’s sequencer starts, its tempo is automatically calculated and shown on the display. (Display: START)
4.Press the START/STOP button then start the sequencer (Display: MIDI flashes) and the metronome and beat indicator will start and play in sync with the sequencer.
*To only display the tempo without metronome playback, press the START/STOP button again.
*If the sequencer is temporarily stopped, CONT (continue) appears in the display when the sequencer starts again.
*To hear the sequencer’s song playback along with the metronome, connect the audio output from the sequencer to the CLICKSTATION’s AUX IN jack.
*If the device cannot detect the MIDI signal (due to trouble such as a disconnected MIDI cable, etc.) within 3 minutes of pressing the START/STOP button, “STOP” will appear in the display and the calculation will quit.
4A
Sound the Tuning Pitch
1.Press the TUNE button to enter the TUNE mode.
2.Rotate the TEMPO dial and select the note between 2C and 6B that you want to hear.
3.Press the START/STOP button to sound the tuning pitch that is selected.
[To change the standard pitch]
1.Press the BEAT button to adjust the standard pitch between 438Hz and 446Hz.
Other Functions
Using the Back Light
1.Press the BACK LIGHT button to light the display’s back light (it will stay on for about 20 seconds and then switch off).
2.To keep the display lit continuously, press and hold the BACK LIGHT button for more than 1 second. The back light will flash twice then stay on. (Press the BACK LIGHT button to switch off the back light.)
18
 Loading...