


ZH

|
|
............................................ |
5 |
................................................... |
7 |
........................................................ |
7 |
................................................................... |
7 |
..................................................... |
7 |
..................................................... |
7 |
.............................................. |
7 |
.............................................. |
7 |
CL ........................................ |
8 |
............................................................ |
8 |
............................................................ |
9 |
.............................. |
10 |
.......................................................... |
10 |
............................................................. |
16 |
............................................................. |
16 |
............................................. |
18 |
............................................... |
18 |
............................................ |
18 |
...................................................... |
20 |
.......................................................... |
21 |
................................................... |
22 |
...................................................... |
23 |
...................................................... |
26 |
/ ................................................ |
26 |
2 ................................................... |
27 |
CL ...................... |
28 |
SELECTED CHANNEL ...28 |
|
Centralogic ... |
28 |
................ |
29 |
................................................. |
31 |
................................................... |
31 |
I/O ............................................... |
32 |
/ ......................................... |
33 |
............................................... |
34 |
................................................. |
35 |
LED ... |
35 |
.............................. |
35 |
............................................ |
36 |
HA ................. |
37 |
STEREO ................ |
38 |
.......................................... |
40 |
.......................................................... |
40 |
................................................... |
41 |
EQ/ ........................................... |
42 |
................................................... |
42 |
GEQ......................................................... |
42 |
.......................................................... |
43 |
................................................... |
45 |
...................................................... |
46 |
............................................ |
47 |
................................................... |
47 |
........................... |
48 |
................................................... |
48 |
USB .................. |
49 |
..................................... |
50 |
.......................................... |
51 |
................................. |
51 |
.............................. |
51 |
..................................... |
52 |
.......................................... |
53 |
.......................................... |
55 |
................................................... |
55 |
/ ............................................ |
56 |
Pin Assignment ........................... |
57 |
.......................................... |
58 |
................................................. |
59 |
Block Diagram ...
Level Diagram ...
2 |
|
|
|
|
|
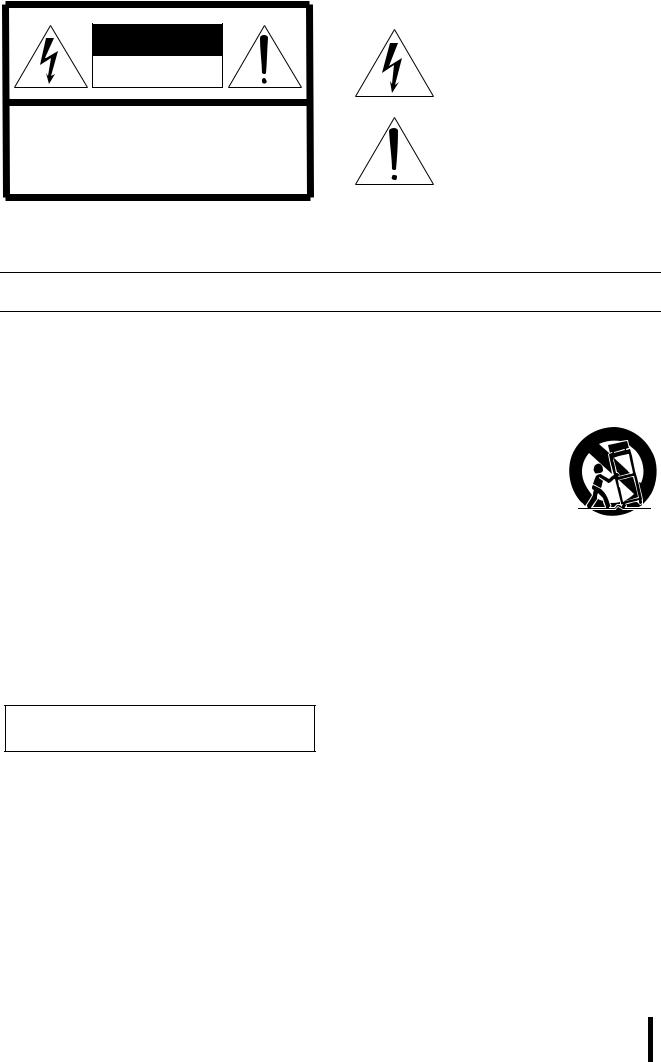
CAUTION
RISK OF ELECTRIC SHOCK
DO NOT OPEN
CAUTION: TO REDUCE THE RISK OF ELECTRIC SHOCK, DO NOT REMOVE COVER (OR BACK). NO USER-SERVICEABLE PARTS INSIDE. REFER SERVICING TO QUALIFIED SERVICE PERSONNEL.
The above warning is located on the rear of the unit.
• Explanation of Graphical Symbols
The lightning flash with arrowhead symbol within an equilateral triangle is intended to alert the user to the presence of uninsulated “dangerous voltage” within the product’s enclosure that may be of sufficient magnitude to constitute a risk of electric shock to persons.
The exclamation point within an equilateral triangle is intended to alert the user to the presence of important operating and maintenance (servicing) instructions in the literature accompanying the product.
IMPORTANT SAFETY INSTRUCTIONS
1Read these instructions.
2Keep these instructions.
3Heed all warnings.
4Follow all instructions.
5Do not use this apparatus near water.
6Clean only with dry cloth.
7Do not block any ventilation openings. Install in accordance with the manufacturer’s instructions.
8Do not install near any heat sources such as radiators, heat registers, stoves, or other apparatus (including amplifiers) that produce heat.
9Do not defeat the safety purpose of the polarized or grounding-type plug. A polarized plug has two blades with one wider than the other. A grounding type plug has two blades and a third grounding prong. The wide blade or the third prong are provided for your safety. If the provided plug does not fit into your outlet, consult an electrician for replacement of the obsolete outlet.
WARNING
TO REDUCE THE RISK OF FIRE OR ELECTRIC SHOCK,
DO NOT EXPOSE THIS APPARATUS TO RAIN OR MOISTURE.
10Protect the power cord from being walked on or pinched particularly at plugs, convenience receptacles, and the point where they exit from the apparatus.
11Only use attachments/accessories specified by the manufacturer.
12Use only with the cart, stand,
tripod, bracket, or table specified by the manufacturer, or sold with the apparatus. When a cart is used, use caution when moving the cart/ apparatus combination to avoid injury from tip-over.
13Unplug this apparatus during lightning storms or when unused for long periods of time.
14Refer all servicing to qualified service personnel. Servicing is required when the apparatus has been damaged in any way, such as powersupply cord or plug is damaged, liquid has been spilled or objects have fallen into the apparatus, the apparatus has been exposed to rain or moisture, does not operate normally, or has been dropped.


 3
3
4 |
|
|
|
|
|

*

事项。这些注意事项包括但不限于下列情况
/
• 被踩踏引起绊倒或可能被碾压的地方。
•/ Yamaha
• 试图拆卸其内部零件或进行任何方式的改造。若出现异常
Yamaha
立即切断电源并从AC Yamaha
• 插座中拔出电源线插头。然后请Yamaha

事项包括但不限于下列情况
/
• 而不是电源线。直接拽拉电源线可能会导致其损坏。
•AC
AC
•2
都调到最小。
•AC
AC
Yamaha
• 关或插口时要避免过分用力。
请寻求医治。
PA_zh_1 1/2
5

置。请在电量全部耗尽之前更换备份电池。
LCD Low Battery
Yamaha Yamaha
5 ,
,
:5°C-40°C, 41°F-104°F
USB /
* 不限于MIDI /
/
* MPEG Layer-3 Fraunhofer IIS Thomson
*Fraunhofer mp3 Steinberg
Thomson Licensing S.A. /
Internet
/ CD DVD
http://mp3licensing.com/
PA_zh_1
*LCD
*Windows Microsoft R Corporation
*Apple Mac Macintosh Apple Inc.
Yamaha
2/2
6 |
|
|
|
|
|

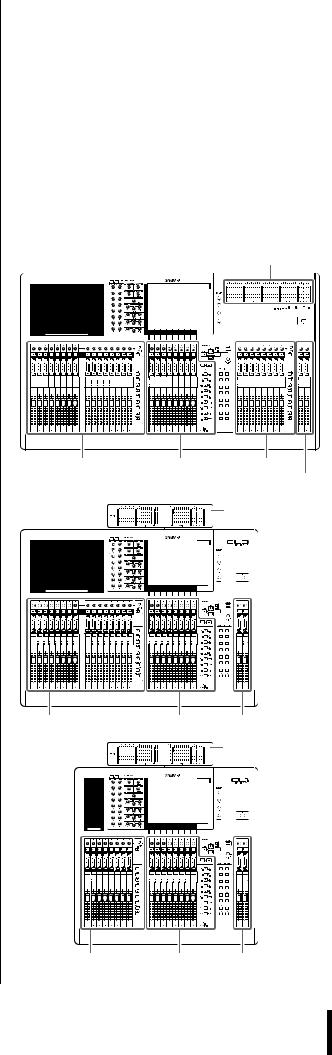
Yamaha CL CL5/CL3/CL1CL
•AC
•Dante Virtual Soundcard
CL
• CL Editor
台参数。
• Console File Converter
Yamaha PM5D M7CL LS9CL LS9
• CL StageMix
WiFi iPad/iPad 2
Yamaha pro audio :
http://www.yamahaproaudio.com/
排除可能的故障。以下两种类型的固件可供本设备 使用。
•Dante
有关固件升级的详情请参考下列网址
http://www.yamahaproaudio.com/
CL
PDF ;
MIDI
PDF Adobe Reader
Adobe Reader http://www.adobe.com/
XML ;
Help
http://www.yamahaproaudio.com/
CUE
SCENE MEMORY [STORE]


 7
7

CL
CL
CL
Yamahas —CentralogicTMI/O
单友好
按照现场环境的多种昏暗程度调整各指示灯的亮度。
SELECTED CHANNEL EQ
Centralogic 88/ DCA
即可打开/
MIX
Dante
Dante CLRio3224-D I/O ID I/O
I/O Dante CLI/O
Dante VirtualDAW
PREMIUM
RACK
CL PREMIUM RACK, VCM
忠实地还原动人的模拟音色。通过对模拟电路的建模 并忠实捕捉模拟电路精密调制的原始声音特性
PREMIUM RACK CL PREMIUM RACK Rupert Neve Design Portico 5033 EQ/Portico 5043 U76Opt-2A 6
GEQ
CL PREMIUM RACK8
CL GEQ 31 EQ
Flex15GEQ Flex15GEQ
31 15 2 GEQ 32 GEQ EQ /
CL CL EditorWindows Mac
CL StageMix iPad Wifi CLEQ
PM5D/M7CL/LS9 CLCL
8


I/O
3 YGDAIAD DA I/O DSP
Cascade
I/O
CL Yamaha M7CL PM5DLS9
MIX, MATRIX STEREOL/R MONO CUE L/R
音的录音
CL USB STEREO MIX
USBUSB
MP3 MPEG-1 Audio Layer-3MP3 WMA Windows Media Audio MPEG-4 AAC Advanced Audio Coding
:
“ ” USB
您就能在今后任意时间使用帮助功能。
CL :CL5 CL3 CL1 CL5 CL3 CL1MBCL
|
|
|
Output |
|
|
|
|||
|
|
|
||
|
|
|
|
|
|
|
A :16 |
|
|
CL5 |
72 |
B Centralogic :8 |
|
|
C :8 |
||||
|
|
|
||
|
|
:2 |
|
|
|
|
|
|
|
|
|
A :16 |
|
|
CL3 |
64 |
B Centralogic :8 |
||
MBCL |
||||
|
|
:2 |
||
|
|
|
||
|
|
|
|
|
|
|
A :8 |
|
|
CL1 |
48 |
B Centralogic :8 |
||
MBCL |
||||
|
|
:2 |
||
|
|
|
||
|
|
|
|
|
|
|
CL5 |
||
• CL5 |
|
Output |
|
|
|
A |
Centralogic B |
C |
|
|
|
• CL3 |
|
|
|
MBCL |
|
A |
Centralogic B |
• CL1 |
|
|
MBCL |
A |
Centralogic B |


 9
9

CL
2 |
3 |
6 |
j |
|
|
|
|
|
9 |
|
|
5 |
|
|
1 |
4 |
7 |
1 |
8 |
1 11 |
|
|
|
|
2SELECTED CHANNEL 12
313
4Centralogic 13
5SCENE MEMORY/MONITOR 14
6USER DEFINED KNOBS 14
7USER DEFINED KEYS 14
815
9USB 15
0 CL5 15
CL5
CL3 CL1 MBCL
10 |
|
|
|
|
|
1


2


 9
9
3

4


5

6
7

 j
j
8

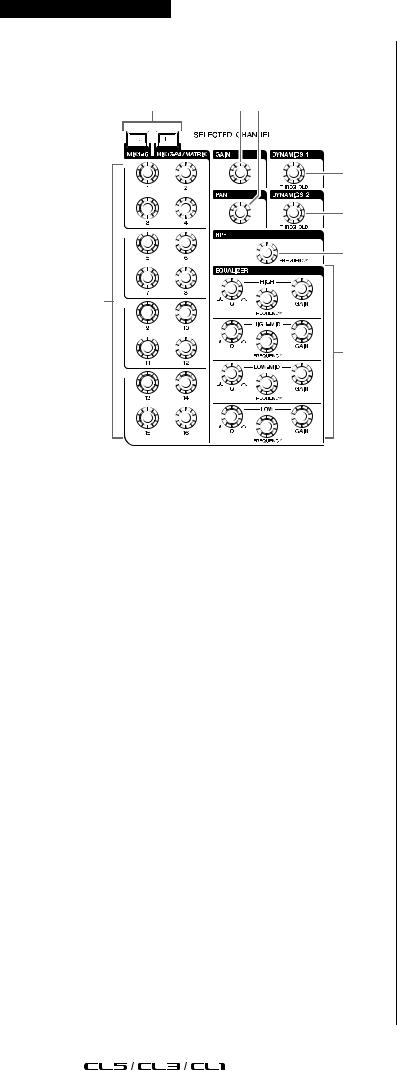
1GAIN/PAN/ASSIGN
9[GAIN/PAN/ASSIGN]
当前输入信号的放大量。输入信号灵敏度之间关 系请参考换算表。
|
|
|
|
-6dB |
+10dBu |
|
|
: |
: |
|
|
0 |
+4dBu |
|
|
: |
: |
|
|
+66dB |
-62dBu |
|
|
2[SEL]
LED
A ST IN LR
CUSTOM CL/R[SEL] L R
L R
3[CUE]
cueLED
4 LED
5[ON]
/
LED SENDS ON FADER/
MIX/MATRIX
USER SETUPPREFERENCE
PATCH/NAME8
/ SENDS ON FADER MIX/MATRIX
9[GAIN/PAN/ASSIGN]
LED ASSIGN USER SETUP USER DEFINED KNOBS
[CUSTOM] 47


 11
11
SELECTED CHANNEL
1 |
3 4 |
5
6
7
2
8
1[MIX1–16] /[MIX17–24/MATRIX]
MIX
MATRIX
2[1]–[16]
MIX MATRIX
SENDS ON FADER
SIGNAL TYPE STEREOPAN
3[GAIN]
USER SETUP
PREFERENCE GAIN KNOB FUNCTION
DIGITAL GAIN
•+17 dB +18 dB HA PAD
INPUT
•11
4[PAN]
STEREO PAN
5[DYNAMICS 1]
6[DYNAMICS 2]
THRESHOLD
MIX MATRIX STEREO MONO[DYNAMICS 2]
7[HPF]
HPF
8EQ [Q] EQ [FREQUENCY] EQ [GAIN]
4 EQ Q
EQ [Q] EQ [GAIN]GAIN 0.0 dB
12 |
|
|
|
|
|
Centralogic
8 DCA
2

3

4

5


6

7
8
1
9

Centralogic[INPUT]
Centralogic [OUTPUT]Centralogic
3[SEL]
4[CUE]
5LED
6[ON]
/
LED SENDS ON FADERMIX/MATRIX/ EQ0 dB


 13
13
EQ
/ GEQ
SCENE MEMORY/MONITOR
3 4 |
5 |
||||||||||
|
|
|
|
|
|
|
|
|
|
|
|
|
|
|
|
|
|
|
|
|
|
|
|
|
|
|
|
|
|
|
|
|
|
|
|
|
|
|
|
|
|
|
|
|
|
|
|
|
|
|
|
|
|
|
|
|
|
|
|
|
|
|
|
|
|
|
|
|
|
|
|
|
|
|
|
|
|
|
|
|
|
|
|
|
|
|
|
|
|
|
|
|
|
|
|
|
|
|
|
|
|
|
|
|
|
|
|
|
|
|
|
|
|
|
|
|
|
|
|
1 2 6
1SCENE MEMORY [STORE]
2SCENE MEMORY [RECALL]
3SCENE MEMORY [INC]/[DEC]
[INC]/[DEC]
4[UNDO]
LED
5[PREVIEW]
固件版本1.0
6[MONITOR LEVEL]
MONITOR PHONES LEVEL LINK
PHONES Out
USER DEFINED KNOBS
USER DEFINED [A]–[D]
SETUP USER SETUP
USER DEFINED KEYS
USER DEFINED [1]–[16]
景变换、打开/USER SETUP
14 |
|
|
|
|
|

STEREO/MONO
1GAIN/PAN/ASSIGN |
|
|
|
|
|
|
|
|
|
|
|
||
|
1 |
|
|
|
|
|
|
|
|
|
|
||
|
|
|
|
|
|
|
|
|
|
||||
|
|
|
|
|
|
|
|
|
|
|
|
||
|
|
|
2 |
|
|
|
|
|
|
|
|
|
|
|
|
|
|
|
|
|
|
|
|
|
|
||
|
|
|
|
|
|
|
|
|
|
|
|
||
|
|
|
|
|
|
|
|
|
|
|
|
||
|
|
|
|
|
|
|
|
|
|
|
|
||
CL5 |
|
|
|
|
|
|
|
|
|
|
|||
|
|
|
|
|
|
|
|
|
|
||||
|
|
|
|
|
|
|
|
|
|
||||
|
|
|
|
|
|
|
|
|
|
||||
|
|
|
|
|
|
|
|
|
|
||||
|
|
|
|
|
|
|
|
|
|
||||
|
|
|
|
|
|
|
|
|
|
||||
|
|
|
|
|
|
|
|
|
|
||||
|
|
|
|
|
|
|
|
|
|
|
|||
|
|
|
|
|
|
|
|
|
|
|
|||
|
|
|
3 |
|
|
|
|
|
|
|
|
|
|
|
|
|
|
|
|
|
|
|
|
|
|
||
[GAIN/PAN/ASSIGN] |
|
|
|
|
|
|
|
|
|
|
|||
|
|
CL1 |
|
|
|
|
|
|
|
|
|
|
|
|
|
|
|
|
|
|
|
|
|
|
|||
|
|
|
|
|
|
|
|
|
|
|
|||
|
|
|
|
|
|
|
|
|
|
|
|||
CL3 |
|
|
|
|
|
|
|
|
|
|
|
|
|
|
|
|
|
|
|
|
|
|
|
|
|
||
|
|
|
|
|
|
|
|
|
|
|
|||
|
|
|
|
|
|
|
|
|
|
|
|||
|
|
|
|
|
|
|
|
|
|
|
|||
A |
|
|
|
|
|
|
|
|
|
|
|
|
|
|
|
|
|
|
|
|
|
|
|
|
|
|
|
|
|
|
|
|
|
|
|
|
|
|
|
|
|
[GAIN/PAN/ASSIGN] |
4 |
|
|
|
|
|
|
|
|
|
|
||
|
|
|
|
|
|
|
|
|
|
||||
|
|
|
|
|
|
|
|
|
|
||||
|
|
|
|
|
|
|
|
|
|
|
|
|
|
|
|
|
|
|
|
|
|
|
|
|
|
||
|
|
|
|
|
|
|
|
|
|
|
|
||
2[SEL] |
|
|
|
|
|
|
|
|
|
|
|
|
|
|
|
|
|
|
|
|
|
|
|
|
|
|
|
|
5 |
|
|
|
|
|
|
|
|
|
|
||
LED |
|
|
|
|
|
|
|
|
|
|
|||
|
|
|
|
|
|
|
|
|
|
||||
SELECTED |
6 |
|
|
|
|
|
|
|
|
|
|
||
|
|
|
|
|
|
|
|
|
|
||||
CHANNEL
STEREO[SEL]L R 
 7
7

3[CUE]
LED
4[ON]
/ LED
MONITOR
/
MONITOR
USB
USB USB USB
USB
USB
■ USB
USB 32 GBUSB
FAT16 FAT32
■
USB
USB
现ACCESS USB CL CL
CL5
MIX/MATRIX STEREO/MONO CUEPRE EQ EQ PRE FADERPOST ON [ON]
MBCL CL3 CL1


 15
15
|
|
|
|
|
3TALKBACK |
|
|
XLR-3-31 |
|
|
+48V |
1 2 |
3 4 |
|
|
||
1PHONES LEVEL |
|
4TALKBACK LEVEL |
|
TALKBACK |
|
PHONES OUT |
||
|
|
|
|
|
|
2PHONES OUT |
|
|
|
|
|
|
|
|
|
|
|||||||
MONITOR OUT CUE |
|
|
|
|
|
|
|
|
|
|
|||||||
|
|
|
|
|
|
|
|
|
|
|
|
|
|
|
|
|
|
1 |
2 |
|
3 |
4 |
5 |
|
|
|
|
|
|
|
|
|
|
||
67 |
|
|
|
8 |
|
9 |
|
0 |
|
|
|
A |
|
B D C |
|
||
1LAMP |
|
|
|
5DIGITAL OUT |
|
|
|||||||||||
|
XLR |
|
|
|
|
|
|
|
|
|
|||||||
|
|
|
|
|
|
|
|
AES/EBU XLR-3-32 |
|
|
|||||||
Yamaha LA1L CL3 |
AES/EBU |
||||||||||||||||
|
|
|
STEREO/MONO |
|
|||||||||||||
|
|
|
|
|
CL1 |
|
|
|
|
|
|
|
|
||||
2MIDI IN/OUT |
|
|
|
|
|
|
|
|
|
||||||||
|
|
6OMNI IN |
|
|
|
|
|||||||||||
MIDI MIDI |
|
|
|
|
|||||||||||||
MIDI IN |
|
|
XLR-3-31 |
|
|||||||||||||
|
|
|
|
|
MIDI |
|
|
|
|
|
|
|
|||||
OUT CL |
|
||||||||||||||||
CL |
– |
62 dBu |
|
+10 dBu |
|
|
|
||||||||||
|
|
|
|
|
|||||||||||||
/ |
|
|
XLR |
|
|
1 |
|||||||||||
CL |
|
|
|
|
|
|
3 |
||||||||||
|
|
|
|
|
|
|
|
|
|
||||||||
|
|
|
|
|
|
|
|
|
|
|
|||||||
3WORD CLOCK IN/OUT |
|
|
|
|
|
|
|
|
|
|
|
|
|
|
|
|
|
|
|
|
|
|
|
|
|
|
|
|
|
|
|
|
|
|
|
|
|
|
|
|
|
||
BNC |
|
|
|
|
|
|
|
|
|
|
|
|
|
|
|
2 |
|||||
|
|
75 |
|
|
|
|
|
|
|
|
|
|
|
|
|
|
|
|
|||
WORD CLOCK IN |
|
|
|
|
|
|
|
|
|
|
|
|
|
|
|
|
|
|
|
|
|
4GPI |
|
|
|
7OMNI OUT |
|
|
|
|
|
|
|||||||||||
|
|
XLR-3-32 |
|||||||||||||||||||
1.0 |
|
|
MIX MATRIX |
||||||||||||||||||
|
|
|
|
+4 dBu |
|||||||||||||||||
|
|
|
|
|
XLR |
|
|
2 |
|||||||||||||
|
|
|
|
|
|
|
|
|
|
3 |
|||||||||||
|
|
|
|
|
|
|
|
|
|
|
|
|
|
|
|
|
|
|
|
|
|
|
|
|
|
|
|
|
|
|
|
|
|
|
|
|
|
|
|
|
|
|
|
|
|
|
|
|
|
|
|
|
|
|
|
|
|
|
|
|
|
|
|
|
|
|
|
|
|
|
|
|
|
|
|
|
|
|
|
|
|
|
|
|
|
|
|
|
|
|
|
|
|
|
|
|
|
|
|
|
|
|
|
|
|
|
1 |
||
|
|
|
|
|
|
|
|
|
|
|
|
|
|
|
|
|
|
|
|||
16 |
|
|
|
|
|
OMNI OUT / +4 dBu+24 dBu
–2 dBu +18 dBuYAMAHA
8Dante
Dante Rio3224-D I/O
Neutrik EtherCon CAT5e RJ-45
STP STP
9NETWORK
CAT5e CLCL Editor StageMix iPad
STP STP
01–3
DSP mini-YGDAI I/O/
ADC POWER INPUT
PW800W PW800W CL PW800W

PW800W CL PW800W PSL360
•PW800W CL PW800W
•CL
BAC IN
AC ACCL AC
V-LOCK

插头上的锁定装置按钮。
C
/


• 至少6
•AC
AC ACCL


 17
17

CLCL
数以及打开/
/
摸屏上移动来选择多个按钮。
/
来微调数值。
1-8
8
钮将改变相应参数的数值。
SCENE LIST
//


■ ▼
/
和旋钮也会跟着移动。当前数值会立即出现在推子或 旋钮下方。
会出现粗线组成的方框。该框表示旋钮已被选定进行 操作。
在这个窗口中您可以执行额外的详细设置。
18 |
|
|
|
|
|

USER DEFINED
列表下方的箭头 /
/
• 色方框包围的列表。您可按多功能旋钮将操作对象移动到 下一栏。
字符。
个显示详细参数或列表的窗口。此类型的窗口称为弹 出窗口。
“X”
OK CANCEL


 19
19
CL
1 |
1 |
|
|
|
|
|
|
|
|
|
||
|
|
|
|
|
|
|
|
|
||||
|
2 |
|
|
|
|
|
|
|
|
|
4 |
|
|
|
|
|
|
|
|
|
|
||||
3 |
|
|
|
|
|
|||||||
|
|
|
|
|
|
|
|
|
|
|
||
|
|
|
|
|
|
|
|
|
|
|||
|
|
|
|
|
|
|
|
|
5 |
|||
|
|
|
|
|
||||||||
|
|
|
|
|
|
|
|
|
|
|
|
6 |
|
|
|
|
|
|
|
|
|
||||
|
|
|
|
|
||||||||
|
|
|
|
|
|
|
|
|
|
|
|
|
|
7 |
|
|
|
|
|
|
|
|
|
|
8 |
2 |
|
|
|
|
|
|
|
|||||
|
|
|
|
|
|
|
|
|
|
|
|
|
|
|
|
|
|
|
|
|
|
|
|
|
|
3 |
|
|
|
|
|
|
|
|
|
|
|
|
|
|
|
|
|
|
|
|
|
|
|
|
9 |
|
|
|
|
|
|
|||||||
|
|
|
|
|
|
|
|
|
|
|
|
|
|
|
|
|
|
|
|
|
|
|
|
|
|
|
|
|
|
|
|
|
|
|
|
|
|
|
|
|
|
|
|
|
|
|
|
|
|
|
|
|
j |
|
|
|
|
|
|
|
|
|
k |
|
OSC TALKBACK |
|
|
|
|
|
|
|
|
||||
|
|
|
|
|
|
|
|
|
|
|
|
|
|
|
|
|
|
|
|
|
|
|
|
|
l |
CUE |
|
|
|
|
|
|
|
|
|
|
|
|
|
|
|
|
|
|
|
|
|
|
|
|
|
|
|
|
|
|
|
|
|
|
|
|
|
|
IN/OUT/DCA/KEY IN/EFFECTcue
USB USB ACCESS
ALTERNATE ALTPLAY USBREC
ACCESS USBUSB
4HELP
USB
5SENDS ON FADER
SENDS ON FADERMIX/MATRIXMIX/MATRIX
6CH JOB
CH JOB
7RACK
VIRTUAL RACK I/O
GEQ VIRTUAL RACK: GEQ 1–8, GEQ 9–16, EFFECT, PREMIUM, I/O RACK, EXTERNAL HA
8MONITOR
MONITOR
9METER
STEREO L/R MONO
M CUEMETER CUECUE CLEAR
0SETUP
SETUP
ARECORDER
播放音频文件。
BSCENE
和标题。“R” “E” SCENE LIST
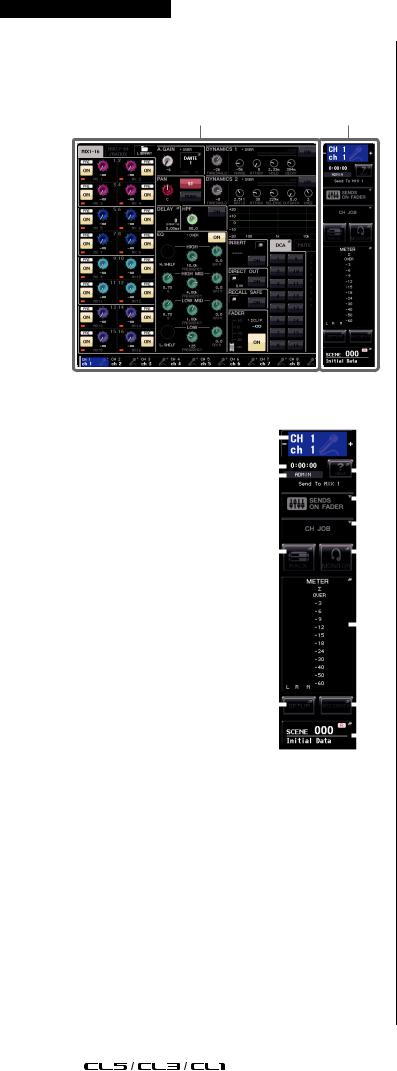
7 BSELECTED CHANNEL VIEW OVERVIEW
20 |
|
|
|
|
|
 Loading...